
PEC 9405 - Range hood Philco - Free user manual and instructions
Find the device manual for free PEC 9405 Philco in PDF.


| Product Type | Range Hood |
| Brand | Philco |
| Model | PEC 9405 |
| Power Supply | 220-240 V ~ 50 Hz |
| Air Outlet Diameter | 150 mm |
| Exhaust Power Levels | 3 speeds (I, II, III) + optional 4th/5th on some models |
| Maximum Airflow (Speed 3) | 335 m³/h |
| Noise Level (Speed 3) | 48 dB |
| Lighting | Built-in, replaceable bulb |
| Filter Type | Aluminium grease filter (washable) + optional carbon filter |
| Carbon Filter | Not included, replace every 3-5 months |
| Installation Height (Electric Cooktop) | Minimum 65 cm |
| Installation Height (Gas Cooktop) | Minimum 75 cm |
| Exhaust Connection | Aluminium pipe, diameter 150 mm or 120 mm |
| Mounting Type | Wall or ceiling mounted |
| Safety Features | Grounding required, child supervision, thermal protection |
| Maintenance | Clean aluminium filter monthly; replace carbon filter every 3-5 months |
| Spare Parts Availability | Contact authorised service centre for bulbs, filters, motor parts |
| Warranty | Covered by manufacturer warranty, void if modified by unqualified person |
Frequently Asked Questions - PEC 9405 Philco
User questions about PEC 9405 Philco
0 question about this device. Answer the ones you know or ask your own.
Ask a new question about this device
Download the instructions for your Range hood in PDF format for free! Find your manual PEC 9405 - Philco and take your electronic device back in hand. On this page are published all the documents necessary for the use of your device. PEC 9405 by Philco.
USER MANUAL PEC 9405 Philco
Famous for Quality the World Over
PEC 9405
PEC 6405
Dear customer,
Thank you for buying a PHILCO brand product. So that your appliance serves you well, please read all the instructions in this user's manual.
CONTENTS
PART 1: IMPORTANT SAFETY INSTRUCTIONS....2
PART 2: DESCRIPTION OF THE APPLIANCE .... 4
PART 3: INSTALLATION .... 5
Unpacking....5
Dimensions of the appliance ....5
Placement 6
Installation....7
Exhaust connection....8
Carbon filter....9
Ventilation....10
PART 5: MAINTENANCE AND CLEANING....12
Changing a light bulb....12
Cleaning....12
PART 6: BEFORE YOU CALL THE SERVICE CENTRE....14
PART 7: TECHNICAL SPECIFICATIONS....15
PART 1: IMPORTANT SAFETY INSTRUCTIONS
Recommendation:
Carefully read these instructions before installing and operating this range hood.
Write down the serial number found on the rating label of the range hood in the space below. It is essential that you store this user's manual in a safe place so that you can use it in the future. If you intend to sell the appliance, give it to another owner, or if you move, always make sure that the user's manual is attached to the appliance, so that the new owner can also learn about the operation of the appliance and the relevant warnings.
SERIAL NUMBER:
Important safety instructions
• This appliance is designed for household use only.
- Before connecting the power cord plug, make sure the voltage stated on the rating label of the appliance corresponds to the voltage in your wall socket. Connect the power cord plug to a power socket with a voltage of 220 – 240 V \~ 50 Hz.
- Only use a properly grounded power socket. The appliance may only be connected to a properly grounded power socket.
- All electrical connections must be performed by a qualified electrician.
- Installation performed by an unqualified person may cause incorrect operation, damage to the appliance, create a fire hazard or cause injury to persons.
- Neither the manufacturer nor the vendor take responsibility for damages cause by incorrect or unprofessional installation, connection or operation. Tampering with the appliance by an unqualified person will void the customer's right to a warranty repair.
- Do not expose the power cord to excessive pressure or loads, do not place heavy objects on it, it must not be tangled and it must not be stepped on. Do not locate the power cord in or on heat sources such as stoves, heating or other generators of heat. Otherwise this may damage the power cord or create a fire hazard.
- Only connect the power cord plug to a power socket after the entire installation is completed.
- The power plug serves as a disconnection device and for this reason the power socket must remain easily accessible for the event of a dangerous situation, unless it is connected into a terminal box.
- Do not touch the lights if the appliance has been running for some time. Lights heat up during operation and may cause burns.
- This appliance is designed for fume extraction during standard domestic use. Do not use the appliance for purposes other than those for which it was designed. Otherwise you expose yourself to the risk of a dangerous situation and voiding the warranty.
- Follow the instructions for installation and ventilation (with the exception of when a fire stove is used).
- Do not use the flambé cooking method under the range hood.
• Regularly replace the filters in the range hood. Otherwise this presents a fire hazard.
- Only use filters suitable for use with the range hood. The manufacturer or distributor will recommend the suitable fi lter type.
- Do not use the appliance without the aluminium filter inserted. Do not take out the filters while the appliance is on.
• Regularly clean the appliance to prevent a dangerous situation from occurring.
- Before cleaning, replacing filters, moving or any other maintenance, turn off the appliance and pull out the power plug from the power socket, or turn off the respective circuit breaker.
- If you are using another gas or natural gas appliance in the room at the same time, the fumes from this appliance must be spatially isolated.
- If a chimney is connected to the exhaust of the range hood, use pipes with a diameter of 150 or 120 mm. The pipe connection should be as short as possible.
- Keep packaging materials out of children's reach. They could suffer injury or suffocation.
- Children must be supervised to ensure that they do not play with the appliance. If the power cord is damaged stop using the appliance. Have the power cord replaced at an authorised service centre or by another qualified person. Under no circumstances should you replace the power cord yourself.
To ensure safety, use a fuse with a maximum rating of 6 A.

WARNING!
This appliance must not be used by persons (including children) with physical or mental impairments or by inexperienced persons, unless properly trained or schooled in the safe use of the appliance, or unless they have been properly supervised by a qualified person who will be responsible for their safety.
Attention when transporting or carrying
The packaging materials are from recyclable materials, so dispose of them in an environmentally conscientious manner according to regulations in force.
During transport adhere to the symbols of the cardboard box.
When carrying the appliance, hold it by the respective handles.
NOTE:
We recommend that you keep the original packaging at least for the duration of the warranty period for the event of repair or refund and transport to the authorised service centre. Adhere to the symbols on the cardboard box.
If you do not have the original cardboard box, adhere to the following instructions:
a) Do not place any items on the appliance that could damage the appliance during transport.
b) Protect the appliance against impacts, falls, etc.
c) Wrap the appliance, e.g. in bubble wrap which will protect the appliance from damage.
NOTE:
The carbon fi Iter is not included.
NOTE:
If the building is equipped with a heat recovery system system, it is necessary to setup the appliance for internal air circulation (without an exhaust). In that case, it is necessary to purchase the carbon filter.
PART 2: DESCRIPTION OF THE APPLIANCE
- Internal chimney
- Outer chimney
- Frame
- Front panel
- Control panel
- Aluminium filter
- Lighting

PART 3: INSTALLATION
Unpacking
• After unpacking remove all packaging and advertising labels from the appliance.
- Check that the appliance has not been damaged and that the package includes all the items described in this user's manual.
• If the appliance was damaged during transport, contact authorised service centre.
- Do not use a damaged appliance under any circumstances.
IMPORTANT:
Ensure that children do not play with the packaging material.
Dimensions of the appliance

Supplied accessories (depending on the model)
A non-return exhaust flap must be installed into the air outlet of the range hood (unless one is already factory installed).
IMPORTANT:
Before installing or using the appliance, please first read all instructions and check that the voltage and frequency values on the rating label correspond to the voltage and frequency in your electricity grid.
We recommend that the appliance be connected by a service technician or another qualified person in compliance with local codes and regulations.
Before starting the installation
- Check that the purchased appliance has the correct dimensions corresponding to the chosen installation location. Furthermore ensure that there is an electrical power socket available that will remain accessible even after the range hood is installed.
• Before installing the range hood, check that all necessary masonry work is complete.
• Have all electrical connections performed by a qualified person.
• We recommend that you remove the aluminium filters before installing the range hood. - Check that there are no packaging materials or other materials, e.g. user's manual, warranty card or bags with screws, inside the appliance. These need to be taken out and kept for possible use in the future.
• We recommend that you disconnect and move to the side freely standing or built in stoves so that you have easier access to the rear wall or ceiling. If this is not possible place protective material on to the work area, cooktop or stove. This will prevent damaging these surfaces. - Select an even surface for the necessary assembly of the range hood. Cover the surface with a protective material and place all parts of the range hood and fastening elements on to it.
- It is necessary that a qualified technician inspects the suitability of the supplied fastening material and other components for the specific wall / ceiling type. The wall / ceiling must be sufficiently strong to hold the weight of the range hood.
- Do not attach this range hood to a wall or cabinet furniture by tiling, plastering and do not glue it on using silicone glue. The appliance is designed to only be installed on a wall / ceiling.
• We recommend that always two people perform the installation of the appliance.
If your range hood is designed to be mounted to the ceiling, adhere to the following instructions.
1) The range hood must only be suspended on ceiling beams or on load bearing ceiling beam connections.
2) Do not suspend the range hood on false ceilings.
3) The ceiling must have a load bearing capacity of at least 40 kg.
4) The ceiling thickness must be at least 30 mm.
IMPORTANT: THE RANGE HOOD MAY ONLY BE CONNECTED TO THE ELECTRICAL GRID AFTER THE ENTIRE INSTALLATION IS COMPLETE.
Placement
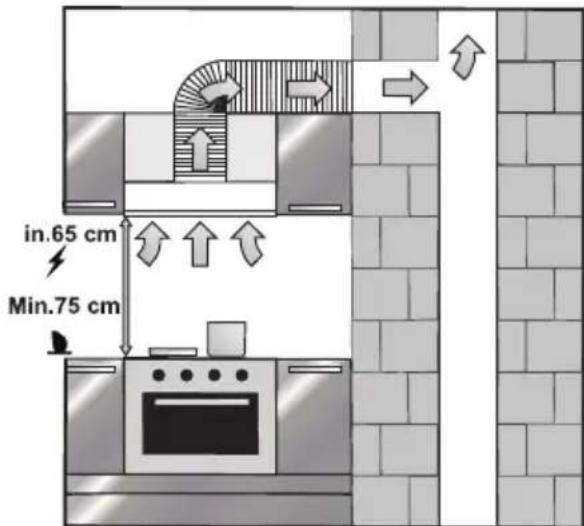
Install the range hood at a height of at least 65 cm above an electric cooktop or at a height of 75 cm above a gas cooktop.
Installation

-
According to the model, mark out the drill hole points A, B, C, D in the location where you wish to install the range hood. Use 8mm drill bits to drill holes in points A, B, C, D. Use a drill with a 4mm drill bit to mount the bottom part of the duct respecting the maximum / minimum height dimensions.
-
Insert 10 mm dowels into the drilled holes A, B, C, D and secure firmly. You can also use a hammer. Check that the dowels are inserted correctly, that they are not moving in any way and that they cannot be pulled out.

natural_image
Black and white photo of a small object on a stand, possibly a tool or device, with no visible text or symbols.Then insert 2 x 6mm ∅ 4 mm bolts into holes A, B with the installed dowels. Do not tighten fully.
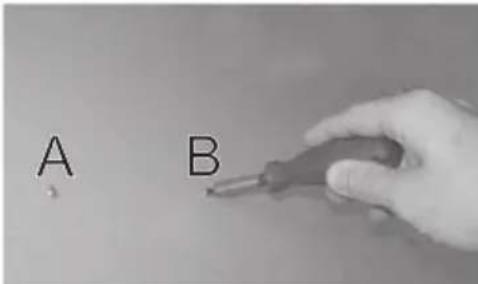
- Place the range hood frame on to bolts A and B and pull tight – see illustrations below.

natural_image
Technical line drawing of a structural support frame with an inset detail showing internal components (no text or symbols)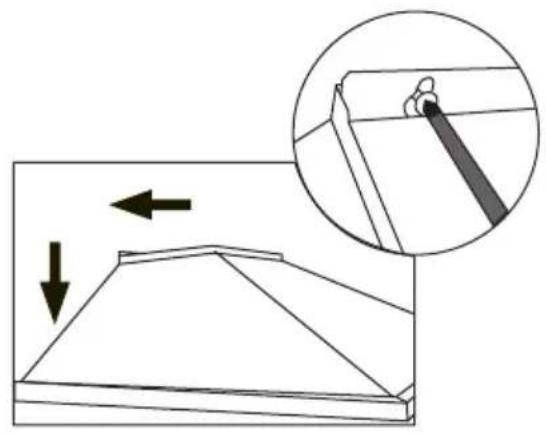
natural_image
Diagram showing a mechanical component with an inset close-up of a pin inserted into a bracket (no text or symbols)Exhaust connection
NOTE:
This range hood may be used with or without an exhaust option. Nonetheless it is recommended to install it with the exhaust option.
The carbon filter is not included.

WARNING!
The air outlet must not be connected to the chimney of a fire stove or another similar outlet used for heating.
- Attach one end of the aluminium flue pipe to the range hood flange and the other end to the air outlet. Check that both ends are firmly attached and secured in place.

- Bends and deviations in the aluminium flue pipe reduce the exhaust performance, so it is essential that the pipe is bent as little as possible.

Right
Completing the installation
- Insert 2 x 6mm ∅ 4 mm bolts into holes C, D with the installed dowels. Do not tighten fully.
- Place the internal and outer part of the chimney on the bolts in holes C, D according to the illustrations below and tighten these bolts. Then use the 3.9 x 9.5 bolts to secure the chimney to the frame of the range hood.
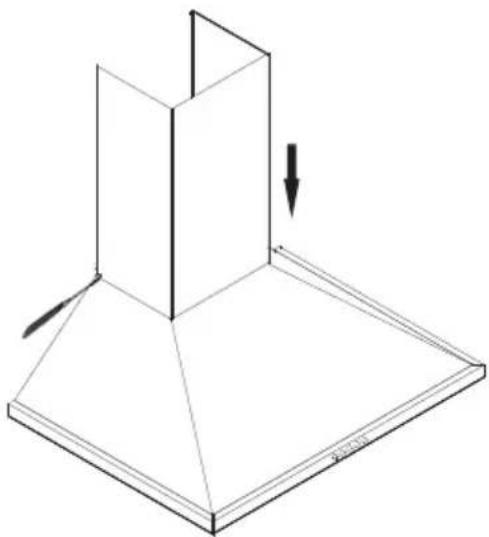
natural_image
Isometric line drawing of a 3D geometric structure with an arrow indicating direction (no text or symbols)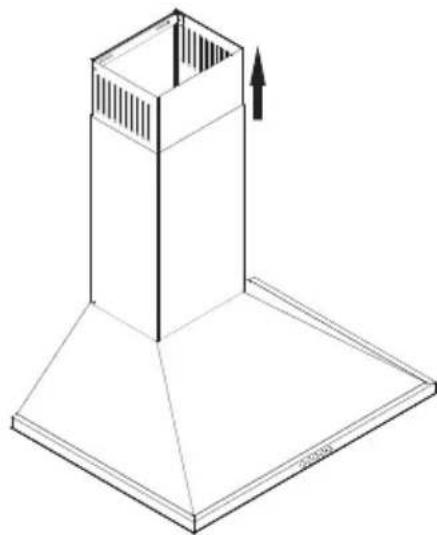
natural_image
Isometric line drawing of a chimney with an upward arrow indicating direction (no text or symbols)Carbon fi Iter
If you are using the range hood without an air exhaust, it is necessary to use a carbon filter. The carbon filter is not included. Contact your vendor or an authorised service centre to purchase this fi Iter.
- Before installing or replacing the carbon filter, check that the appliance is turned off and disconnected from the power socket or that the respective circuit breaker is turned off.
- It is necessary to replace the carbon filter regularly every 3 – 5 months depending on how much the appliance is used.
• Never wash the carbon filter in water unless the manufacturer states otherwise. - Aluminium filters must always be installed even when the carbon filter is not installed. Do not use the appliance without the aluminium filter installed.
Replacing the carbon fi Iter
- For the correct operation of the appliance it is necessary to install a carbon filter. The number and type depends on the model.
- Place the carbon filter on the motor outlets and turn it in the clockwise direction.
- To remove the carbon filter turn it in the anticlockwise direction.

natural_image
Line drawing of a kitchen air conditioner unit with ventilation grilles and mounting base (no text or symbols)
natural_image
Technical illustration of a three-blade fan assembly with internal blades and mounting holes, shown in 3D views (no text or labels)Ventilation
To ensure proper ventilation, leave windows closed while the appliance is turned on.

WARNING!
Pay increased attention if you are using the appliance together with another appliance that uses air or fuel for its operation (e.g. heating fan, fan, etc.) or that uses gas, coal or wood, as its operation may negatively affect the performance of the range hood because it expels air out of the room. This warning does not apply if you installed the appliance without an exhaust out of the room.
PART 4: OPERATION
Remove the protective foil from the control panel.
Exhaust power selection
This range hood is equipped with 3 levels of exhaust power. Select the power level based on the use of the stove and the amount steam that the pots emit.
Press the respective button on the control panel.
I – lowest exhaust power
II – medium exhaust power
III – highest exhaust power
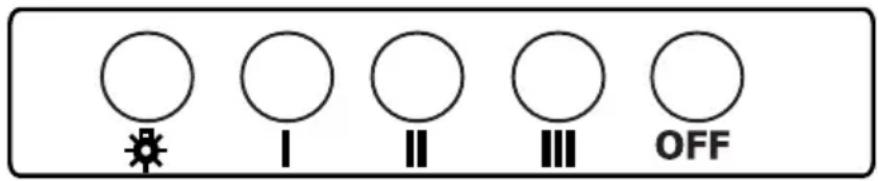
Use the range hood together with the stove. This will ensure the correct air exhaust. We recommend to leave the range hood running a few minutes longer than the stove to ensure that all odours are extracted.
Lighting
The range hood is equipped with lighting. Press the button with the light symbol to turn on the lights. Press the button again to turn the lights off.
Turning off the range hood
Press the OFF button to turn off the range hood.
Operating tips
- Regularly clean the aluminium filters and regularly replace the carbon and fat filters.
- Use the medium exhaust power level. Only use the highest power level when necessary.
- To ensure proper ventilation, leave windows closed while the appliance is turned on.
PART 5: MAINTENANCE AND CLEANING

WARNING!
Before cleaning, regular or other maintenance, installation or removal, check that the appliance is turned off and disconnected from the power socket or that the respective circuit breaker is turned off.
Changing a light bulb
• Turn off the appliance.
• Take out the aluminium fi Iter.
• If the light bulb broke during operation wait until it cools down.
- Unscrew the broken light bulb. Install a new one with the same parameters.

natural_image
Technical line drawing of a bulb and optical device (no text or symbols)Cleaning
• Aluminium filters capture dust and fat from the extracted air.
- It is necessary to regularly wash these filters, ideally once a month, depending on the level of use. Wash the filters in water with dishwashing detergent, or you may place the filters in a dishwasher and wash them using a gentle program (max. 60°C).
• Take out the aluminium filters by pressing the clip.
• After cleaning allow the aluminium fi Iters to dry thoroughly before reinstalling them.
- Wipe the outer surface of the range hood with a clean damp wiping cloth lightly dipped in water with a small amount of dishwashing detergent. Then wipe dry.
- Avoid electrical parts coming into contact with water or another liquid.
- For cleaning you can also use special agents for the maintenance and cleaning of INOX surfaces (applies only for models with an INOX surface treatment).
Cleaning the aluminium fi Iters
The aluminium filters must be cleaned regularly. Clean the filters according to the instructions above.

natural_image
Two rectangular panels with grid patterns and side cutouts, no text or symbols visible
WARNING!
For cleaning do not use petrol, benzene, thinners or any other solvents, coarse cleaning agents, steel wool or any sponges with steel wool.

WARNING!
You may put the aluminium filters in a dishwasher. The colour of the aluminium filters may change after several washes. This is a normal event.
PART 6: BEFORE YOU CALL THE SERVICE CENTRE
If the appliance is not working as it should check the following recommendations for resolving the most common problems.
If the problem persists or it is not included in the table below, turn off the appliance and disconnect it from the power socket and contact an authorised service centre.
| Problem | Solution |
| The range hood is not working. Check that the power plug is properly inserted in a properly grounded power socket with the parameters 220 – 240 V ~ 50 Hz. | |
| The lights are not working. Check that the power plug is properly inserted in a properly grounded power socket with the parameters 220 – 240 V ~ 50 Hz. | |
| Exhaust power is weak. Check whether the aluminium fi lters are dirty. | |
| The range hood does not extract the air directly out (for models without an exhaust). | Check whether the aluminium fi lters are dirty. |
| Check whether the carbon fi lter is not too dirty. | |
Attention:
Use the range hood together with the stove. This will ensure the correct air exhaust. We recommend to leave the range hood running a few minutes longer than the stove to ensure that all odours are extracted.
PART 7: TECHNICAL SPECIFICATIONS
| PEW PEI | PEC 6405 - PEC 9405 | PEC 5507 - PEC 6507 | PEB 6408 | PEC 5406 - PEC 6406 | PEB 6708 | ||||
| SPEED 1 | Voltage (A) 0,5 0,6 0 | 5 0,5 1 0,6 0,6 | 0,5 | ||||||
| Power (W) 105 90 12 | 0 70 135 80 8 | 0 110 | |||||||
| Air flow (m^3/h) 180 | 230 200 190 | 250 190 155 2 | 10 | ||||||
| Pressure (mmH20) | 30 155 170 1 | 50 160 160 18 | 0 155 | ||||||
| Noise level (dB) | 36 | 35 | 39,7 | 43 | 40 | 45 | 44 | 34,5 | |
| SPEED 2 | Voltage (A) 0,6 0,9 0 | 6 0,6 1,2 0,9 0 | 6 0,6 | ||||||
| Power (W) 125 120 1 | 30 90 170 110 | 95 125 | |||||||
| Air flow (m^3/h) 260 | 310 265 225 | 310 400 175 2 | 90 | ||||||
| Pressure (mmH20) | 200 205 230 1 | 65 180 190 20 | 5 235 | ||||||
| Noise level (dB) | 43 | 42 | 43,6 | 47,5 | 48 | 54 | 50 | 43 | |
| SPEED 3 | Voltage (A) 0,7 1,5 0 | 7 0,8 1,6 | 0,9 0,7 | ||||||
| Power (W) 145 185 1 | 50 110 220 | 110 150 | |||||||
| Air flow (m^3/h) | 335 | 500 | 360 | 400 | 500 | 400 | 375 | ||
| Pressure (mmH20) | 265 245 290 1 | 80 200 | 225 285 | ||||||
| Noise level (dB) | 48 | 52 | 49 | 51,5 | 55 | 53 | 49 | ||
| SPEED 4 | Voltage (A) 0,8 | 0,8 | 0,8 | ||||||
| Power (W) 170 | 175 | 175 | |||||||
| Air flow (m^3/h) | 450 | 455 | 470 | ||||||
| Pressure (mmH20) | 310 | 325 | 320 | ||||||
| Noise level (dB) 53 | 53,4 | 53,5 | |||||||
| SPEED 5 | Voltage (A) | 1 | 1 | 1 | |||||
| Power (W) 210 | 210 | 210 | |||||||
| Air flow (m^3/h) | 750 | 750 | 750 | ||||||
| Pressure (mmH20) | 350 | 365 | 380 | ||||||
| Noise level (dB) 61 | 60,2 | 61 | |||||||
| Input voltage | 220 - 240 V ~ 50 Hz | 220 - 240 V ~ 50 Hz | 220 - 240 V ~ 50 Hz | 220 - 240 V ~ 50 Hz | 220 - 240 V ~ 50 Hz | 220 - 240 V ~ 50 Hz | 220 - 240 V ~ 50 Hz | 220 - 240V ~ 50 Hz | |
| Air outlet diameter | 150 mm | 150 mm | 150 mm | 120 mm | 120 mm | 120 mm | 120 mm | 120 mm | |
NOTE: All the here mentioned data is subject to change.
INSTRUCTIONS AND INFORMATION REGARDING THE DISPOSAL OF USED PACKAGING MATERIALS
Dispose of packaging material at a public waste disposal site.
DISPOSAL OF USED ELECTRICAL AND ELECTRONIC APPLIANCES
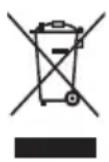
The meaning of the symbol on the product, its accessory or packaging indicates that this product shall not be treated as household waste. Please, dispose of this product at your applicable collection point for the recycling of electrical & electronic equipment waste. Alternatively in some states of the European Union or other European states you may return your products to your local retailer when buying an equivalent new product. The correct disposal of this product will help save valuable natural resources and help in preventing the potential negative impact on the environment and human health, which could be caused as a result of improper liquidation of waste. Please ask your local authorities or the nearest waste collection centre for further details. The improper disposal of this type of waste may fall subject to national regulations for fi nes.
For business entities in the European Union
If you wish to dispose of an electrical or electronic device, request the necessary information from your seller or supplier.
Disposal in other countries outside the European Union
If you wish to dispose of this product, request the necessary information about the correct disposal method from local government departments or from your seller.

This product meets all the basic EU regulation requirements that relate to it.
Changes to the text, design and technical specifications may occur without prior notice and we reserve the right to make these changes.
ODSAVAČ PAR
NÁVOD K OBSLUZE
PHILCO

Famous for Quality the World Over
PEC 9405
PEC 6405
Vážený zákazníku
natural_image
Black and white photo of a hand holding a small white object near a black mechanical component (no text or symbols visible)natural_image
Technical line drawing of a structural support frame with an inset detail showing internal components (no text or symbols)
natural_image
Diagram showing a mechanical component with an inset close-up of a pin inserted into a bracket (no text or symbols)Připojení odsávání
POZNÁMKA:
natural_image
Isometric line drawing of a 3D geometric structure with an arrow indicating direction (no text or symbols)
natural_image
Isometric line drawing of a chimney with an upward arrow indicating direction (no text or symbols)Uhlíkový fi ltr
natural_image
Line drawing of a kitchen air conditioner unit with ventilation duct and fan (no text or symbols)
natural_image
Technical illustration of three types of electric motors with fan blades and rotor, shown in side and top views (no text or symbols)Ventilace
natural_image
Technical line drawing of two mechanical components: a bulb and a cylindrical device (no text or symbols)Čištění
natural_image
Two rectangular panels with grid patterns and side clips, no text or symbols visible
VAROVÁNÍ!
Famous for Quality the World Over
PEC 9405
PEC 6405
Vážený zákazník
natural_image
Black and white photo of a hand holding a small white object near a black mechanical component (no text or symbols visible)natural_image
Technical line drawing of a structural support frame with an inset detail showing internal components (no text or symbols)
natural_image
Diagram showing a mechanical component with an inset close-up of a pin inserted into a bracket (no text or symbols)Pripojenie odsávania
POZNÁMKA:
natural_image
Isometric line drawing of a 3D geometric structure with a downward arrow indicating direction (no text or symbols)
natural_image
Isometric line drawing of a chimney with an upward arrow indicating direction (no text or symbols)Uhlíkový fi Iter
natural_image
Line drawing of a kitchen air conditioner unit with ventilation duct and fan (no text or symbols)
natural_image
Technical illustration of a three-blade fan assembly with internal blades and mounting holes (no text or symbols)Ventilácia
natural_image
Technical line drawing of a bulb and optical device (no text or symbols)Čistenie
natural_image
Two rectangular panels with grid patterns and side cutouts, no text or symbols visible
VAROVANIE!
Na čistenie nepoužívajte benzín, benzén, riedidlo ani iné rozpúšťadlá; hrubé čistiace prostriedky; drôtenky ani hubky s drôtenkami.

VAROVANIE!
- CONTENTS
- PART 1: IMPORTANT SAFETY INSTRUCTIONS
- Recommendation:
- SERIAL NUMBER:
- Important safety instructions
- WARNING!
- Attention when transporting or carrying
- NOTE:
- PART 2: DESCRIPTION OF THE APPLIANCE
- PART 3: INSTALLATION
- Unpacking
- Dimensions of the appliance
- Supplied accessories (depending on the model)
- Before starting the installation
- Placement
- Installation
- Exhaust connection
- Completing the installation
- Carbon fi Iter
- Replacing the carbon fi Iter
- Ventilation
- PART 4: OPERATION
- Exhaust power selection
- Lighting
- Turning off the range hood
- Operating tips
- PART 5: MAINTENANCE AND CLEANING
- Changing a light bulb
- Cleaning
- Cleaning the aluminium fi Iters
- PART 6: BEFORE YOU CALL THE SERVICE CENTRE
- Attention:
- PART 7: TECHNICAL SPECIFICATIONS
- INSTRUCTIONS AND INFORMATION REGARDING THE DISPOSAL OF USED PACKAGING MATERIALS
- DISPOSAL OF USED ELECTRICAL AND ELECTRONIC APPLIANCES
- For business entities in the European Union
- Disposal in other countries outside the European Union
- ODSAVAČ PAR
- NÁVOD K OBSLUZE
- PHILCO
- Připojení odsávání
- POZNÁMKA:
- Uhlíkový fi ltr
- Ventilace
- Čištění
- VAROVÁNÍ!
- Pripojenie odsávania
- Uhlíkový fi Iter
- Ventilácia
- Čistenie
- VAROVANIE!
Brand : Philco
Model : PEC 9405
Category : Range hood