
CRMD 1723 SU - Car radio HYUNDAI - Free user manual and instructions
Find the device manual for free CRMD 1723 SU HYUNDAI in PDF.


| Product Type | Car Stereo with CD/USB/AUX |
| Brand | Hyundai |
| Model | CRMD 1723 SU |
| Form Factor | Single DIN |
| Dimensions (W x H x D) | 178 x 50 x 160 mm |
| Weight | 0.5 kg |
| Power Supply | 12V DC (negative ground) |
| Maximum Power Output | 4 x 50W |
| RMS Power Output | 4 x 20W |
| Supported Media | CD, CD-R, CD-RW, MP3 via USB |
| Radio Bands | FM, AM |
| Preset Stations | 30 (FM) / 10 (AM) |
| Front Inputs | USB, AUX (3.5mm) |
| Controls | Rotary volume, buttons, remote control |
| Display | LCD with white backlight |
| Equalizer Presets | 5 (Rock, Pop, Classic, Jazz, Flat) |
| Bluetooth | No (wired connections only) |
| Cleaning Instructions | Wipe with a soft, dry cloth. Avoid solvents. |
| Safety Certification | CE, RoHS |
| Spare Parts Availability | Remote control, faceplate, wiring harness |
| Repairability | Modular design; repair by qualified technician recommended |
Frequently Asked Questions - CRMD 1723 SU HYUNDAI
User questions about CRMD 1723 SU HYUNDAI
0 question about this device. Answer the ones you know or ask your own.
Ask a new question about this device
Download the instructions for your Car radio in PDF format for free! Find your manual CRMD 1723 SU - HYUNDAI and take your electronic device back in hand. On this page are published all the documents necessary for the use of your device. CRMD 1723 SU by HYUNDAI.
USER MANUAL CRMD 1723 SU HYUNDAI

Upozornění
ZAČÍNÁME
Režim ekvalizéru EQ
MENU OTOČNÉHO KNOFLÍKU
RÁDIO
Pásmo
Výchozí hodnoty
Dynamický rozsah
Instalační otvor

DŮLEŽITÉ:
SYSTÉM OCHRANY PROTI KRÁDEŽI
Upozornenie
ZAČÍNÁME
Tlačidlom ▲tvoríte panel a tlačidlom ▼ysuniete disk.

Režim ekvalizéra EQ
MENU OTOČNÉHO GOMBÍKA
Režim nastavenia hlasitosti VOL
RÁDIO
Pásmo
Režim video výstupu
Východiskové nastavenie: INTERLACE-YUV.
Nastavenie typu TV
Dynamický rozsah
Inštalačný otvor

DÔLEŽITÉ:
Pred inštaláciou odstráňte tieto dve skrutky. Inak nebude DVD prehrávač fungovat'.

SYSTÉM OCHRANY PROTI KRÁDEŽI
Ostrzeżenie
ZACZYNAMY
MENU GALKI
RADIO
Pasmo
Tryb wyjścia video
Zakres dynamiczny


WAŻNE:
PRZED INSTALACJA USUŃ TE DWIE ŚRUBY. W INNYM PRZYPADKU ODTWARZACZ DVD NIE BĘDZIE DZIAŁAŁ.


ROZWIĄZYWANIE PROBLEMÓW
- Only connect the unit to a 12-volt power supply with negative grounding.

- Never install this unit where the operation & condition for safety driving is restrained.

- Never use the video display function in the front when driving to prevent the violation of laws & regulations and also to reduce the risk of traffic accident except using for rear view video camera.

-
To ensure safe driving, please adjust the volume to a safe & comfort level in case of emergency situations.
-
Never expose this unit, amplifier, and speakers to moisture or water for preventing electric sparks or fires.

- Please don't change the fuse on the power cord without professional guidance, using improper fuse may cause damage to this unit or even cause fire.
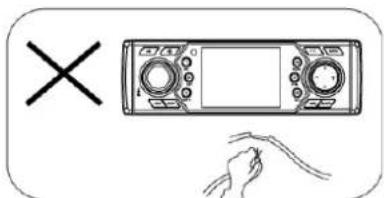
- Please power off this unit at once and send it back to the aftersales service center or the dealer /distributor you purchased from if one of the following symptoms is found::

a) No audio output;
b) No image output;
c) Water or other obstacle enters the unit;
d) Smoking;
e) Peculiar smell.
SAFETY INFORMATION
Warning
Operate the unit correctly according to the manual instruction to prevent unnecessary problem.
Caution
This product is a CLASS 1 LASER PRODUCT. Use of controls or adjustments or performance of procedures other than those specified herein may result in hazardous radiation exposure. Do not open covers and do not repair yourself. Refer servicing to qualified personnel.
Two Laser Products
Wave length: CD: 780nm DVD: 650nm
Laser power: No hazardous radiation is emitted with safety protection.
To reduce the risk of fire electric shock, and annoying interference, use only the included components.
Disc Notes
- Playing a defective or dusty disc can cause dropouts in sound.
- Hold discs as illustrated.
- Do not touch the unlabeled side.
- Do not attach any seal, label or data protection sheet to either side of a disc.
- Do not expose a disc to direct sunlight or excessive heat.
- Wipe a dirty disc from the center outward with a cleaning cloth.
- Never use solvents such as benzine or alcohol.
- This unit cannot play 3-inch (8cm) discs.
- Never insert a 3-inch disc contained in the adapter or an irregularly shaped disc. The unit may not be able to eject it.


CONTENTS
Safety Precautions 103
Safety Information 104
Panel Controls 106
Remote Controls 107
Getting Started 108
USB/SD/MMC/MP3 Playback 109
General Operation 110
Rotary Knob Menu 110-114
Radio 115
DVD & AV IN Mode 115
Radio and Clock 116
RDS (Radio Data System) 116
Disc Playback 117
Disc Playable 118
Audio/Video/Picture File Playback 118
Track Playback 119-121
DVD Playback 122
DVD Setup 123
DVD System Setup 124-125
DVD Language Setup 126
DVD Audio Setup 127
DVD Video Setup 127
DVD Digital Setup 128
Electrical Connections 129-130
Installation Guide 131
Anti-Theft System 132
Troubleshooting 133
Specifications 134
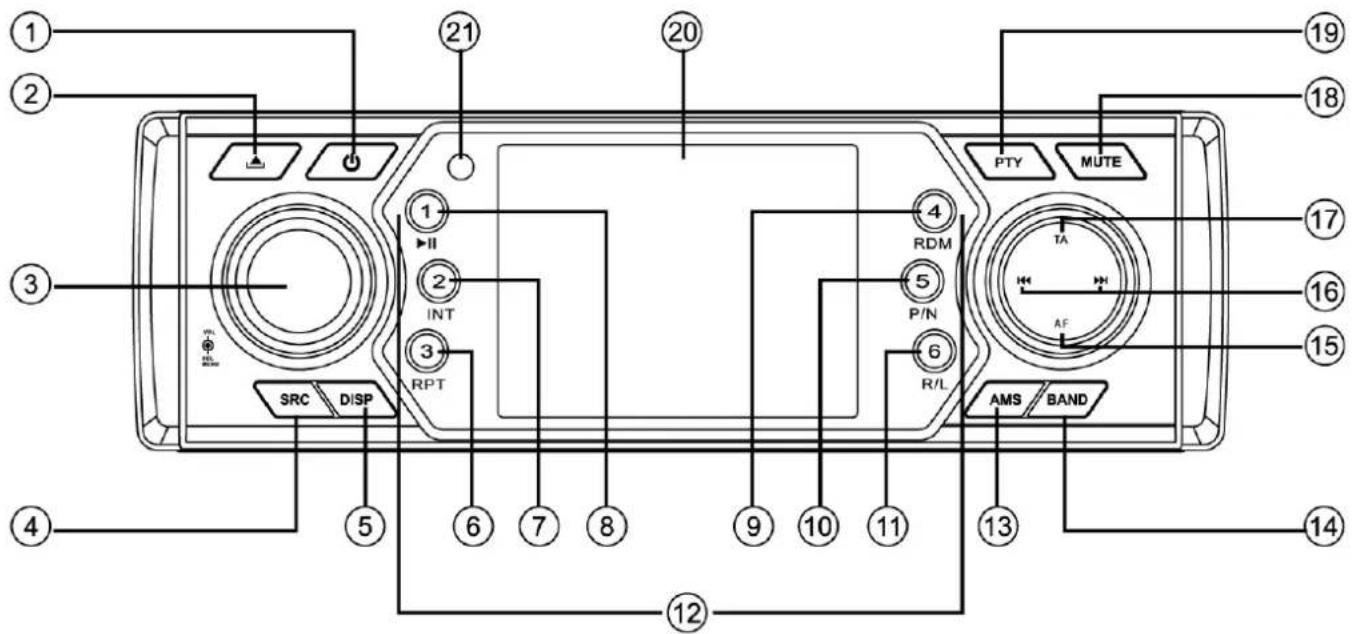
PANEL CONTROLS
Power on/off: Press ⬆to turn on/off the unit.
-
Power on/off
-
Panel open
-
- Rotate the knob to adjust volume level.
-
Push to select BAS/TRE/BAL/FAD, and rotate the knob to adjust level.
-
- Radio
- Disc (when disc inserted)
- USB (when USB inserted)
- SD Card (when SD/MMC inserted)
-
AV-in
-
Display switch/Time adjust
-
Track repeat play
-
Intro play
-
Play/Pause
-
Track random play
-
- Video system PAL/NTSC/AUTO
-
Folder up (USB/SD/MP3/Disc)
-
- DVD audio channel
- VCD audio channel L/R/ST
-
Folder down (USB/SD/MP3/Disc)
-
Radio Preset: Press to listen to a preset station, hold for more than 2 seconds to store station.
-
AMS: Radio auto preset/Radio preset scan
-
Band switch: FM1-FM2-FM3-MW1-MW2
-
Alternative frequency on/off
-
- Radio tune
-
Track skip/seek
-
Traffic announcements
-
Mute
-
Program type
-
3 inch TFT display
-
Remote sensor
REMOTE CONTROLS
Power on/off: Press ⬆to turn on/off the unit.
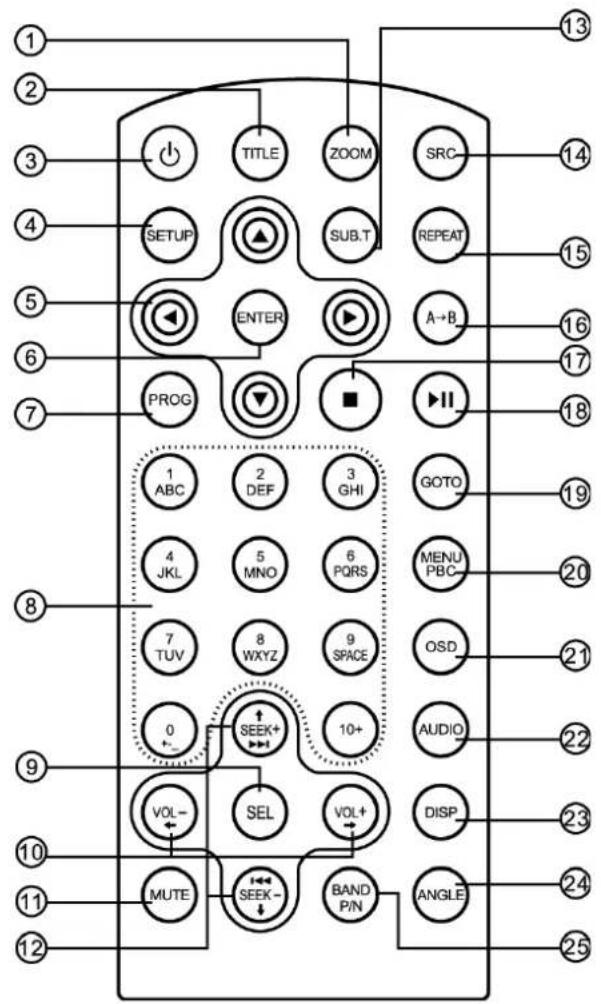
-
Zoom (DVD/VCD only)
-
Title (DVD only)
-
Power on/off
-
Setup
-
Menu cursor
-
Enter
-
Program
-
Digit area
-
- Audio mode select Bas/Tre/Bal/Fad/Bri/Con/Sat
- Push more than 2 seconds to menu mode
-
Volume
-
Mute
-
- Radio tune
- Track skip/seek
-
Subtitle (DVD only)
-
- Radio
- Disc (when disc inserted)
- USB (when USB inserted)
- SD Card (when SD/MMC inserted)
- AV-in
-
Repeat
-
Repeat A→B
-
Stop/Return
-
Play/Pause
-
Go to search
-
- DVD menu
- PBC (for VCD 2.0 or up)
-
On screen display
-
- DVD audio
- VCD audio L/R/ST
-
On panel display
-
Angle (DVD only)
-
- Video system PAL/NTSC/AUTO
- Radio band
REMOTE CONTROLS
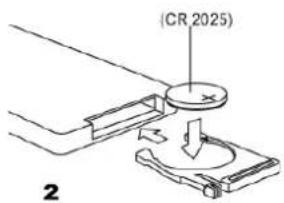
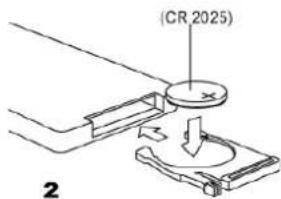
Replacing the lithium battery of remote control unit.
When the range of the operation of the card remote control becomes short or no functions while operating, replace the battery with a new lithium battery. Make sure the battery polarity replacement is correct.
- Pull out the battery holder while pressing the stopper.
- insert the button-type battery with the stamped (+) mark facing upward. Insert the battery holder into the remote control.


Warning
- Store the battery where children cannot reach. If a child accidentally swallows the battery, consult a doctor immediately.
- Do not recharge, short, disassemble or heat the battery or dispose it in a fire.
- Do not expose or bring into contact the battery with other metallic materials.
- Doing this may cause the battery to give off heat, crack or start a fire.
- When throwing away or saving the battery, wrap it in tape and insulate; otherwise, the battery may give off heat, crack or start a fire.
Remote control operating range
The remote control can operate within a distance of 3\~5m.

GETTING STARTED
Press the button to open the panel and press to eject the disc.
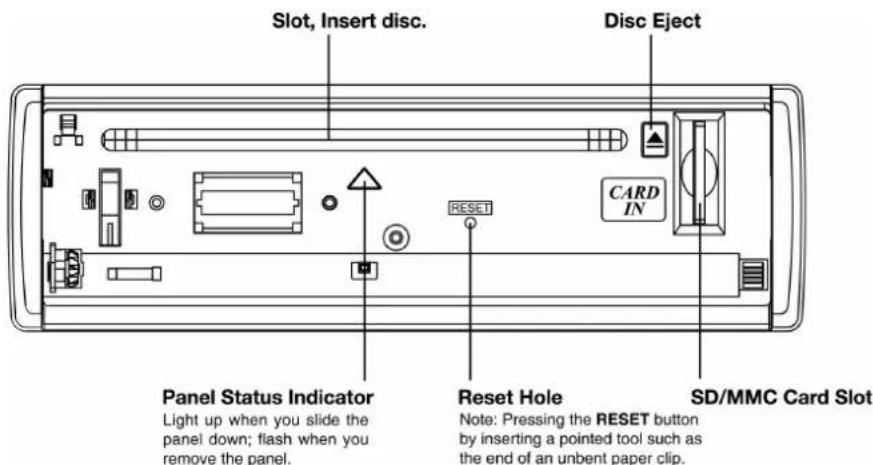
USB/SD/MMC/MP3 PLAYBACK
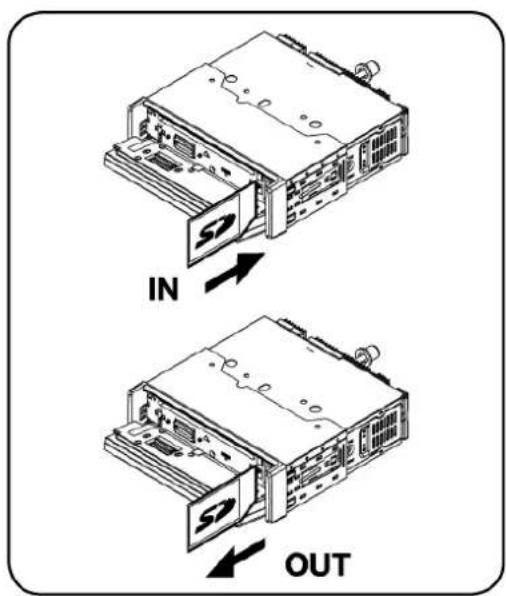
1. Load SD/MMC card
Open the panel and insert the SD/MMC card into the slot. Close the panel, the unit will read the file of the card automatically.
2. Take out SD/MMC card
Push SRC button to non-SD mode, press the SD/MMC card to pop out. Take out the card..
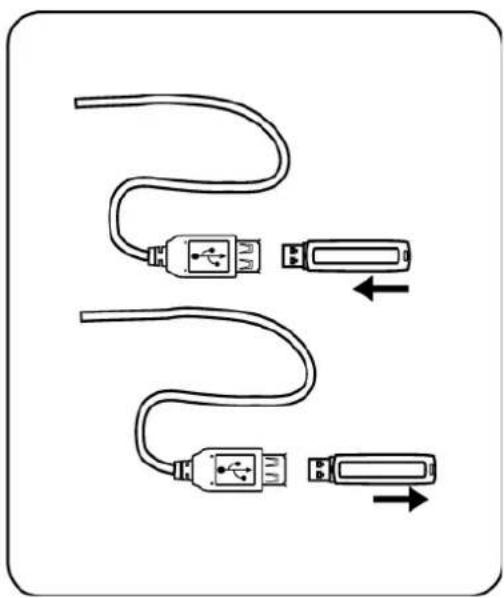
3. Load USB device
Insert USB device into the USB jack. The unit will read the file in the USB device automatically.
4. Take out USB device
Press the SRC button to non-USB mode and take out the USB device from the USB jack.
USB/SD/MMC Notes
USB functions (flash memory type) MP3 music play
- SD/MMC card support
- USB flash memory 2 in 1 (SD/MMC) support
- Support FAT 16 & FAT 32
- File name: 32 byte/dir name: 32 byte/tag name: 32 byte
- Tag (id3 tag ver 2.0)
- Title/artist/album: 32 byte support
- Multi card reader not support
- USB 1.1 support
Not all kinds of USB devices are compatible with the unit.
GENERAL OPERATION
Switching on and off
- Press ⬆ to turn on the unit.
- Press SRC once or more to select your desired function: DISC, Tuner (Radio), USB & SD/MMC, AV-in.
- Press Ⓞto power off (press more than 2 seconds).
- When you switch off the system or car ignition, the settings, tuner presets and the volume level will be retained in the unit's memory.
VOL Knob Function
Press the knob once to select BASS/TREBLE/BALANCE/FADER, and rotate the knob to adjust.

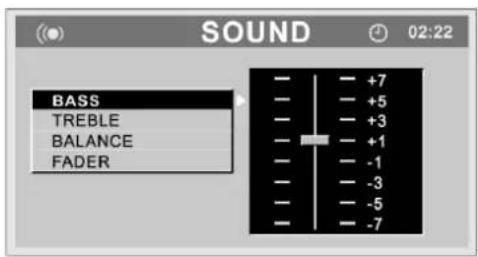
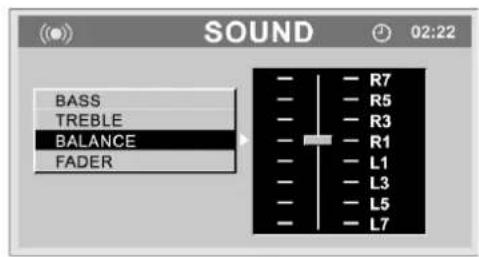


ROTARY KNOB MENU
Press the knob more than 2 seconds to enter menu mode, then each press changes the mode as follows:
EQ MODE → LOUD → BEEP CAMERA → 12 /24 MODE → TA MODE → RETUNE PARKING → MIRROR IMAGE → TAVOL → VOL-MODE → A-VOL
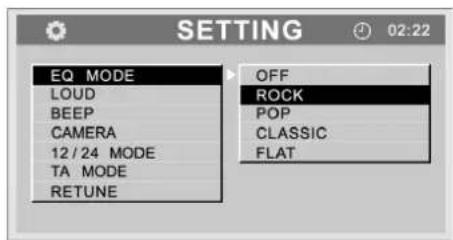


EQ mode
Rotate the knob to select EQ sound effect:
ROCK - POP - CLASSIC - FLAT - EQ OFF

LOUD mode
Rotate the knob to choose loud on or off.

ROTARY KNOB MENU
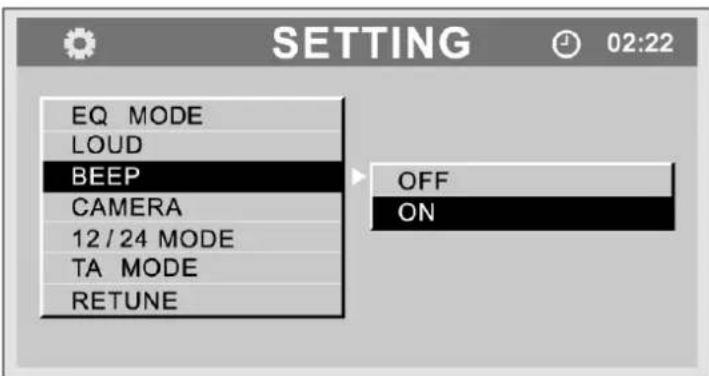
BEEP ON/OFF mode
Rotate the knob to choose button beep sound on or off.
CAMERA
Rotate the knob to turn rear camera on or off. While unit enter CAMERA ON mode, press the knob more than 2 seconds return to CAMERA OFF mode. Under camera on mode, press the SRC is invalid.

12/24 mode
Select 12 hours mode or 24 hours mode.

TA mode
Rotate the knob to choose TA ALARM or TA SEEK mode. If the TA (Traffic Announcements) is turned on and there is no traffic program identification code received in the specified time, no TA/TP will display and either TA ALARM or TA SEEK will be activated. TA ALARM mode : Alarm is turned on.
TA SEEK mode: TA SEEK is automatically activated.

ROTARY KNOB MENU
RETUNE mode
Rotate the control to choose RETUNE-S or RETUNE-L.
RETUNE-S or RETUNE-L is time length selection of TA SEEK retune interval.
RETUNE-S: Short, TA SEEK Retune interval is 45 seconds.
RETUNE-L: Long, TA SEEK Retune interval is 180 seconds.
REMARK: RETUNE mode functions for TA during TA SEEK mode only.

MIRROR IMAGE mode
Rotate the knob to choose MIRROR IMAGE mode on or off. While enter MIRROR IMAGE ON mode, the video of camera is mirror image.
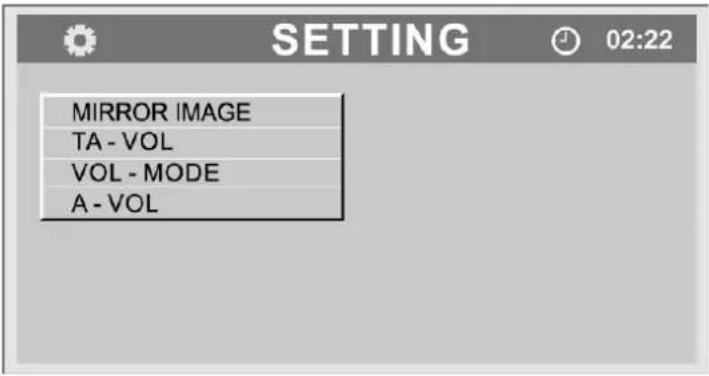
TA-VOL
Rotate the knob to choose TA-VOL level.

ROTARY KNOB MENU
VOL - MODE
Rotate knob to choose VOL LAST, the turn-on volume level is the volume level of latest power off.
Rotate knob to choose VOL ADJ, then rotate the knob to set the turn-on volume level.

A - VOL
Rotate the knob to choose A-VOL level.

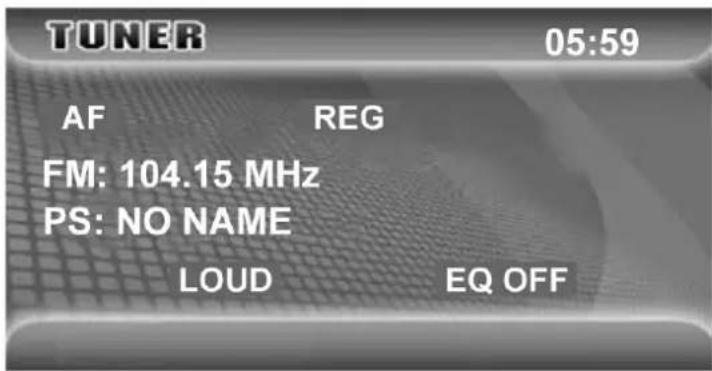
RADIO
Band
- Press Ⓞto power on, then press SRC once or more to select tuner.
- Press BAND once or more to select FM1-FM2-FM3-MW1-MW2.
Display shows wave band, frequency, and preset station number if already stored.

Tune
Radio tune by step manually: Press ▶ or ◀ less than 2 seconds.
Radio seek automatically: Press ▶ or ◀ more than 2 seconds.
Press either ① button to store the selected station.
AMS: Auto Memory Store
Press AMS briefly to scan the preset station 1 - 6 for 5 seconds each. Hold more than 2 seconds, the 6 strongest available stations will be automatically saved in the memory of preset 05:59 button 1 - 6.
DVD & AV IN MODE
DVD Mode
Press SRC button to select DVD mode (when disc is inserted, and unit is reading disc), then press the DISP button. The LCD will display:

AV IN Mode
Press SRC button to select AV IN mode (when unit is reading). The LCD will display the external video.
CLOCK SETTING
Clock Setting
- Press DISP more than 2 seconds, minute display blinks, rotate the knob to set minute.
- Press the knob once, hour display blinks, rotate the knob to set hour.
- Press DISP to confirm.

RDS (RADIO DATA SYSTEM)
RDS service availability varies with areas. Please understand if RDS service is not available in you area, the following service is not available..
RDS Basics
AF(Alternative Frequency): When the radio signal strength is poor, enabling the AF function will allow the unit to automatically search another station with the same PI (program identification) as the current station but with stronger signal strength.
PS (Program Service name): The name of station will be display instead of frequency.
AF Mode:
AF on: AF function is activated.
AF off: AF function is disabled.
Remark: AF indicator on LCD will flash until RDS information is received. If RDS service is not available in your area, turn off the AF mode.
REG Mode: Press PTY for more than 2 seconds to switch REG mode on and off.
REG on: AF function will implement the regional code (of the PI) and only stations in the current region can be tuned automatically.
REG off: AF function will ignore the regional code (of the PI) and stations in the other regions can also be tuned automatically.
Traffic Announcements
Some RDS FM stations periodically provide traffic information.
TP ( Traffic Program Identification ) Broadcasting of traffic information
TA ( Traffic Announcements Identification )Radio announcements on traffic conditions
TA Mode: When TA mode is turned on, the TA indicator will blink.
When traffic announcement is received, the TA indicator will display. The unit will temporarily switch to the tuner mode (regardless of the current mode) and begin broadcasting the announcement at TA volume level. After the traffic announcement is over, it will return to the previous mode and volume level. When TA is turned on, SEEK, SCAN, AMS function can only be received or saved when traffic program identification (TP) code is received.
EON (Enhanced Other Networks)
When EON data is received, the EON indicator lights and the TA and AF functions are enhanced.
TA: Traffic information can be received from the current station or stations in other network.
AF: The frequency list of preset RDS stations is updated by EON data. EON enables the radio to make fuller use of RDS information. It constantly updates the AF list of preset stations, including the one that currently tuned into. If you preset a station around the area at your home, you will later be able to receive the same station at an alternative frequency, or any other station serving the same program, EON also keeps
track of locally available TP stations for quick reception.
RDS (RADIO DATA SYSTEM)
PTY Reception (Program Type)
RDS FM stations provide a program type identification signal.
Example: news, rock, info, sport, etc.
PTY Mode:
Press PTY to turn on the Program Type reception, the previous
PTY type is shown. Press PTY once again to enter the MUSIC type or press twice to enter the SPEECH type, then use buttons 1 - 6 to select the desired program type. The selected PTY type is shown and searching starts if no other function is selected for 2 seconds. If there is no corresponding program type, NO PTY is shown and the unit will return to normal mode.
PTY Type Preset:
Press PTY once to enter the MUSIC type or press PTY twice to enter the SPEECH type. Then use function ① to select the desired program type.
| PRESET NO. MUSIC TYPE SPEECH TYPE | ||
| 1 POP M NEWS | ||
| AFFAIRS | ||
| ROCK M INFO | ||
| 2 EASY M SPORT | ||
| EDUCATE | ||
| LIGHT M DRAMA | ||
| 3 CLASSICS CULTURE | ||
| SCIENCE | ||
| OTHER M VARIED | ||
| 4 JAZZ M) WEATHER | ||
| FINANCE | ||
| COUNTRY | CHILDREN | |
| 5 | NATIONAL M | SOCIAL |
| RELIGION | ||
| OLDIES M PHONE IN | ||
| 6 FOLK M | TRAVEL | |
| LEISURE | ||
| DOCUMENT | ||
DISC PLAYBACK
Disc Load / Eject
Load: Press ▲ button to flip down the panel. Insert the disc into the slot.
Eject: Press ▲ button to flip down the panel. Press ▲ to eject the disc..
Disc Playback
- When disc inserted, display shows LOAD. For MP3 or disc with mixed files, reading time may exceed 1 minute.
- ERROR will be displayed if error found in disc operation.
- For VCD/CD, VCD or CD icon will appear on the display.
- While MP3/WMA files playback, MP3/WMA icon will appear on the display.
- For DVD, DVD icon will appear on the display and TITLE appears. Press ENTER or ▶ II to play.
DISC PLAYABLE
File type supported
Audio file: MP3(*.mp3), WMA(*.wma) Video file: MP4(*.avi, MPEG-43.11/4.0/5.0/6.0 /7.0), MPEG 2(*.vob), MPEG 1(*.dat) Picture file: JPEG(*.jpg) MP3 file: ISO 9660 or ISO 9660 + Joliet format - Max. 30 characters.
Max. nested directory is 8 levels.
The max. album number is 99.
The max. length of each track is 99 minutes 59 seconds.
Supported sampling frequency for MP3 disc: 8KHz to 48KHz (44.1KHz preferably).
Supported bit-rates of MP3 disc are: 32 - 320 kbps (128 kbps preferably).
Disc and file NOT supported
*.AAC, *.DLF, *.M3U, *.PLS, MP3 PRO files and files with DRM.
Open session discs.
When AUDIO/PICTURE/VIDEO file is played, Category/Folder/File list will be displayed on the screen, and file/folder name being played will be displayed on top. Current selected item will be highlighted.
Category Select
Use ◀ / ▶ to select
VIDEO
AUDIO
OBRAZ
Press ENTER to confirm.
Folder Select
Use ◀ / ▶ to enter folder list and use ▲ / ▼ to select desired folder, press ENTER to confirm.
File Select
Use ◀/▶ to enter file list and use ▲/▼ to select desired file, press ENTER to play back, press ■ to return.
For PICTURE, press ▶ II to slide show the pictures, press PROG to select picture showing style.
For MUSIC, press ■ will enter intro logo, then press ▶ II to return.
![USB [:\]:MP3 SOND: FOLDER hello sun.mp3 say hi.mp3 do you like.mp3 baby.mp3 foryou.wma nice.jpg](/content/2026/05/1003633/images/f0c8362b5a9cbd52a4b2499dad8f923b5d2e3855cd419a08204fc22b8460808a.jpg)
![graph TD A["▲"] --> B["◀"] C["▶"] --> D["▼"] E["●"] --> F["ENTER"]](/content/2026/05/1003633/images/abcdeb1e68e2dee1761fbe15da9c74cbe04e6a25e6068604036006f1a34c8942.jpg)
On the remote control
TRACK PLAYBACK
Select desired track
- Press ◀◀ or ▶▶ to skip to the next track.
- Use 1-9 and 0, 10+ buttons on the remote control to select desired track number.
Fast forward/backward during playback
- Press ◀ or ▶ for more than 2 seconds once or more to select X2, X4, X8, X20 to fast backward or forward track during playback.
- During the fast forward or backward operation, press ▶ II briefly to playback again.
- During the fast forward or backward operation, the volume will be muted.
Intro (for CD/VCD only)
You can play the beginning of every track for 15 seconds in sequence.
- During playback, press INT once.
- INT ON/OFF will appear on the display.
- Press INT again to select the current track.

Random track playback (for CD/VCD/MP3 Only)
You can play all the tracks in random order.
- During playback, press RDM once or more.
- RDM icon will appear on the display.
- Press RDM again to select normal playback.
Repeat
During playback, press RPT once or more.
- RPT icon will appear on the display.
- For VCD/CD: Display appears RPT ONE → RPT ALL → RPT OFF
- For DVD: Display appears RPT CHAPTER → RPT TITLE → RPT OFF
- For File disc: Display appears RPT ONE → RPT DIR → RPT ALL → RPT OFF
Note: If you do not select RPT on, when the entire disc or TITLE playback has finished, the system will stop. If no other control, after 5 minutes the unit will turn into standby mode.

Repeat A → B
Select desired passage to repeat playback.
- Press A → B once to select starting point. Display shows REPEAT A.
- Press A → B again to select ending point. Display shows REPEAT A B, and selected passage start to replay.
- Press A → B once again to exit. Display shows A → B CANCELLED.

TRACK PLAYBACK
Pause
- During playback, press ▶ II to pause playback.
- The sound will be muted.
- Display „PAUSE“ in the TV screen, display and blink „PAUSE“ on the panel display.
Press ▶ II again to continue playback.

PBC - Playback Control (for VCD only)
- If you insert a VCD with PBC, playback starts from the beginning of the 1st track automatically.
- Press PBC to show menu, use ◀ or ▶ or digit button to select desired track.
Press ■ to return to menu. Press PBC again to exit menu.
GO TO
Go to desired track/chapter or time point directly.
Press GO TO button on the remote control, track or DVD Title/Chapter and time display on top of the screen. Current item is highlighted. Use / to select desired item. Use digit button to select number. Press ENTER to confirm.
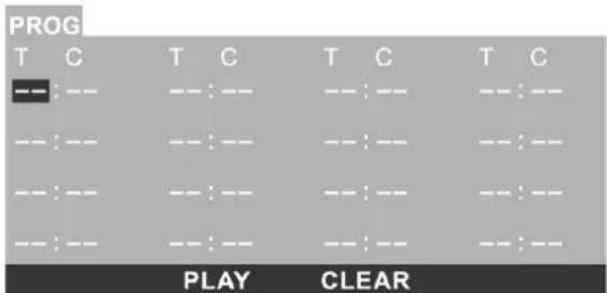
Program
- Press PROG to enter program list. Use ▲/▼ or ◀/► cursor and digit button to enter number. For DVD and File disc, select title and chapter number.
For VCD and CD, select track number.
- Press ▶ II to play, or move the cursor to select „PLAY“ and press ENTER to play.
- If you want to delete the list, move the cursor to „CLEAR“, press ENTER to delete all the list set before.
- Press PROG again to exit program play.

![graph TD A["▲"] --> B["◀"] C["▶"] --> D["▼"] E["●"] --> F["ENTER"]](/content/2026/05/1003633/images/28d3de2a8ebc6856d76eb41f1dbaf20c7ebc9093b30e249427b0e207637cf99c.jpg)
On the remote control
Press AUDIO or R/L to select audio language to listen if the DVD has multiple audio languages.


VCD Audio Select
Press R/L to select audio channel to listen.
L → R → Stereo

DVD Subtitle Select
Press SUB.T to select the subtitle language to show if the DVD has multiple language subtitles..
DVD TITLE Select
Press TITLE to display title or chapter list, use ▲/▼ or ◀/► cursor or digit number to select, press ENTER to play.

DVD Angle Select
Press ANGLE to select different angle to view if the DVD has multiple-angle views.

ZOOM
Press ZOOM button, the picture will be zoomed accordingly.

x 2 → x 3 → x 4 → x 1 / 2 → x 1 / 3 → x 1 / 4 → OFF
DVD SETUP
Press SETUP to display setup menu on the screen.
Use ◀ / ▶ to select setup items:
SYSTEM → LANGUAGE → AUDIO → VIDEO → DIGITAL
Use ▲/▼, ◀/▶ to select and ENTER to confirm.
SYSTEM LANGUAGE AUDIO VIDEO DIGITAL

DVD SYSTEM SETUP
TV System
Select the TV system in the setting menu.

Screen Saver
The screen saver appears if disc stop last more than 3 minutes. Original setting: ON.

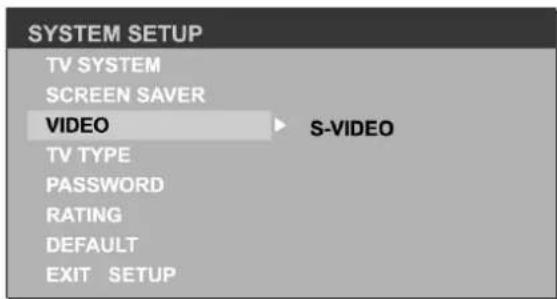
Video Output Mode
Original setting: INTERLACE-YUV.

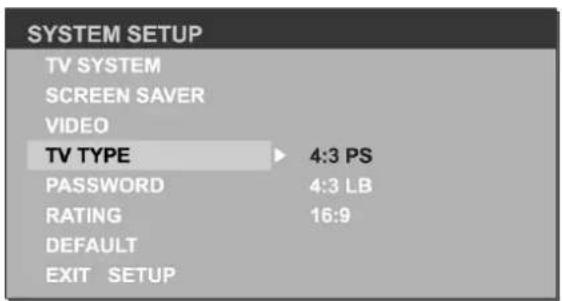
Setting TV type
Select TV type to watch wide screen movies.
4:3 Pan Scan: For 4:3 TV, left and right edges will be cut.
4:3 Letter Box: For 4:3 TV, black bars will appear on top and bottom.
16:9: For 16:9 wide screen TV.
DVD SYSTEM SETUP
Setting Password
Original password is 0000.

Setting Rating
The rating of the disc is from 1 to 8:
(1) with the most limit when playing.
(8) with the least limit when playing.
Original setting: 8
Note: The rating can be selected only under the password unlocked status, and the limit can be worked only under the password locked status.

Load Default
If this item is selected, the unit will return to original setting.

DVD LANGUAGE SETUP
OSD Language
Select on screen display language of the DVD.

Audio Language
Select audio language of the DVD from which are contained in the DVD.
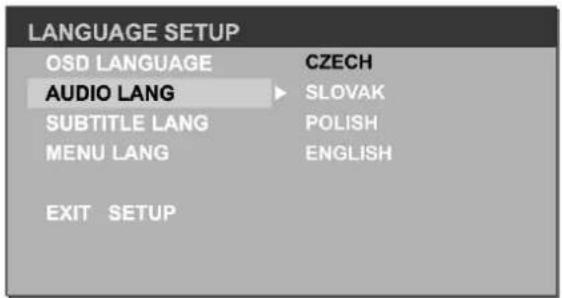
Subtitle Language
Select subtitle language of the DVD from which are contained in the DVD.
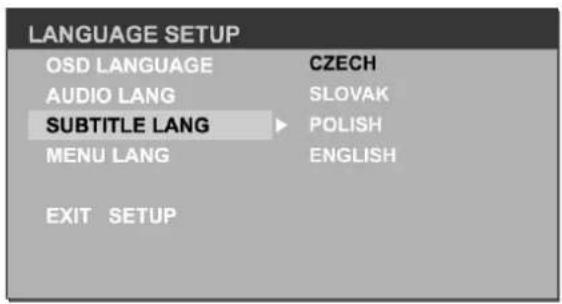
Menu Language
Select menu language of the DVD from which are contained in the DVD.

DVD AUDIO SETUP
Setting Volume
Setup the volume with the ▲/▼ buttons.

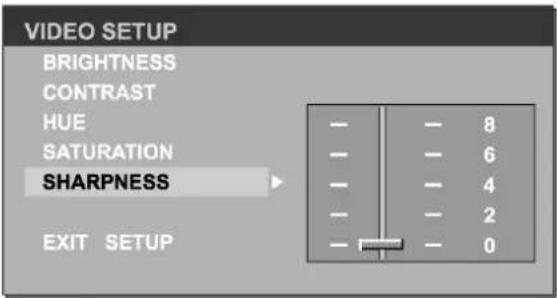
DVD VIDEO SETUP
Brightness
Set the brightness of the video output with ▲/▼.
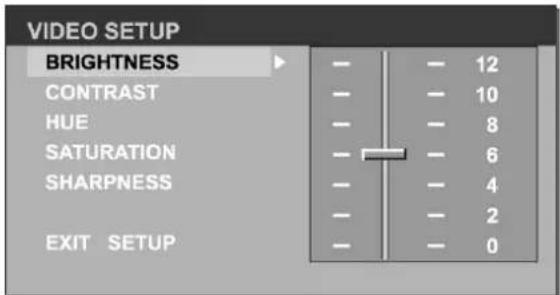
Contrast
Set the contrast of the video output with ▲/▼.

Hue
Set the hue of the video output with ▲/▼.

Saturation
Set the saturation of the video output with ▲/▼.
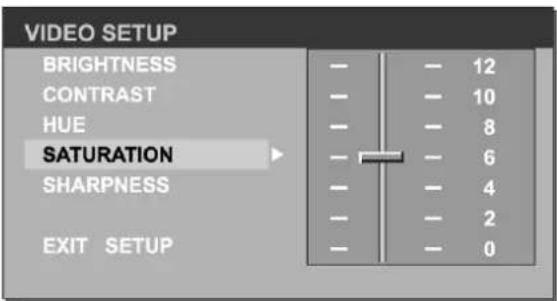
Sharpness
Set the sharpness of the video output with ▲/▼.
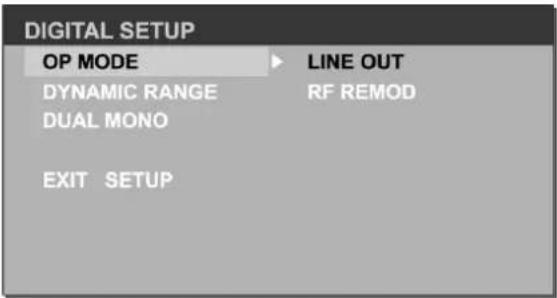
DVD DIGITAL SETUP
Output Mode
Select the output mode:
LINE OUT: Compress the input signal. The volume is small.
RF REMOD: The volume is large.
Dynamic Range
When you select the compressed mode as „line out“, select it to adjust the compression proportion and get the different compressed effect.
When select FULL, the audio signal is minimum; when select OFF, the audio signal is maximum.

Dual Mono
Select the audio channel from STEREO, MONO L, MONO R and MIX MONO.

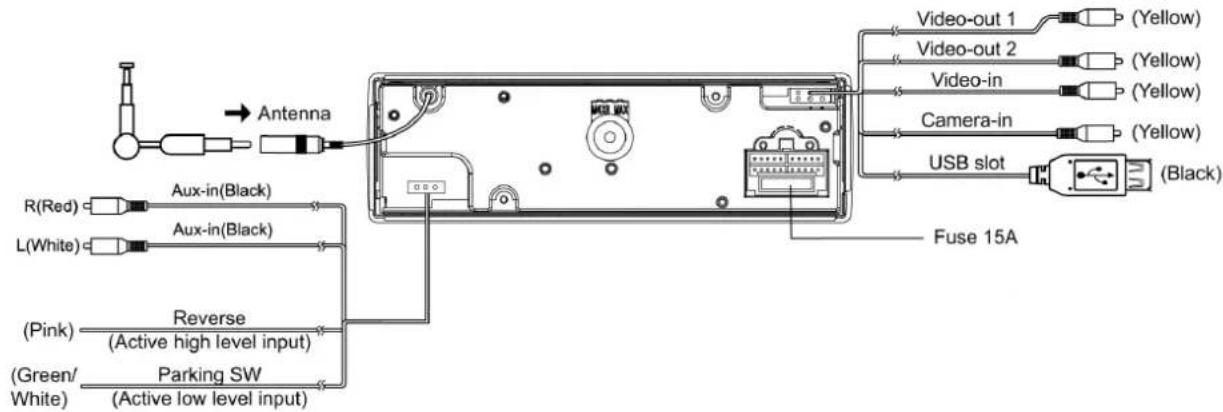
ELECTRICAL CONNECTIONS
Wiring Diagram
![graph LR A["ISO Connector"] --> B["Connector"] B --> C["Rear Line-out(Gray)"] C --> D["R(Red)"] C --> E["L(White)"] D --> F["Amplifier"] E --> F B --> G["Power Supply"] style A fill:#f9f,stroke:#333 style F fill:#ccf,stroke:#333](/content/2026/05/1003633/images/6bbf55e6895f8eb985aecb545e7227590e67899b6d15c24ee67b4f185bf230b9.jpg)
![graph TD A["Device B"] -->|Yellow| B["ISO Connector"] A -->|Black| B A -->|Blue| B A -->|Red| B B --> C["To car battery(+)"] B --> D["Continuous +12V DC"] B --> E["Ground Lead"] B --> F["Motor/Electric Antenna relay control Lead"] B --> G["Amplifier relay control Lead"] B --> H["Ignition key +12V DC…](/content/2026/05/1003633/images/68c647aa6ad29d021f6486a25e4da38fe00dc53bac0eb1bade142bdbe9c09217.jpg)
For some VW/Audi or Opel (Vauxhall) car models, you may need to modify wiring of the supplied power cord as illustrated, or else the memory of the unit may be lost after you power off. Contact your authorized car dealer before installing this unit.
Original wiring
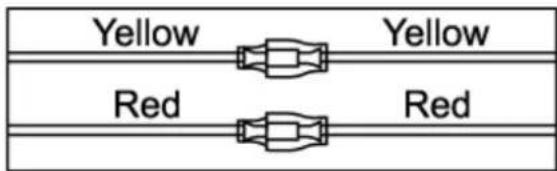
Modified wiring


Important: Parking lead at power connector MUST be connected to the switched side of the parking brake circuit (the side that becomes ground when the brake is applied), and in 'General Set Up' screen, parking mode MUST be set to 'on'. Imptoper connection, use of lead and incorrect setting may violate road traffic regulations.
ELECTRICAL CONNECTIONS
Using the ISO Connector
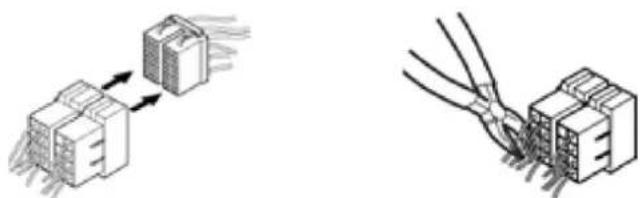
- If your car is equipped with the ISO connector, then connect the ISO connectors as illustrated.
- For connections without the ISO connectors, check the wiring in the vehicle carefully before connecting, incorrect connection may cause serious damage to this unit. Cut the connector, connect the colored leads of the power cord to the car battery, as shown in the colour code table below for speaker and power cable connections.
| Location Function | ||
| Connector A Connector B | ||
| 1 Rear | Right (+) - Purple | |
| 2 Rear | Right (-) - Purple / Black Stripe | |
| 3 Front | Right (+) - Gray | |
| 4 ACC | +/Red Front Right (-) - Gray / Black Stripe | |
| 5 ANT | Amp Control/Blue Front Left(+) - White | |
| 6 Front | Left(-) - White / Black Stripe | |
| 7 Battery | 12V(+)/Yellow Rear Left (+) - Green | |
| 8 Ground | Black Rear Left (-) - Green / Black Stripe | |
INSTALLATION GUIDE
Installation Procedures
First complete the electrical connections, and then check for correctness.
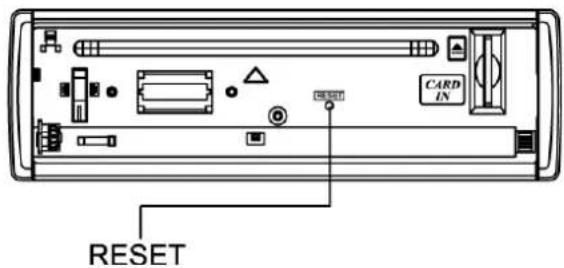
Reset
Press button to flip down the panel. Then press the RESET button with a pointed object to reset the unit to the original status.
Note: Press the RESET button will erase the clock and stored stations.
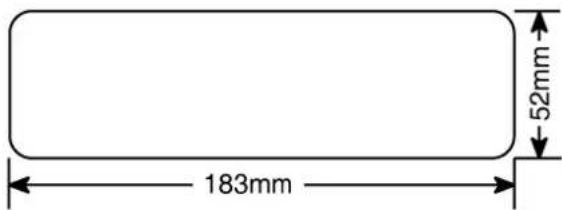
Installation Opening
This unit can be installed in any dashboard having an opening as shown below.
The dashboard should be 4.75mm - 5.56mm thick in order to be able to support the unit.

IMPORTANT:
Remove these two screws before installation. Otherwise, the DVD player will not work.

1. Inset mounting collar into the dashboard, and bend the mounting tabs out with a screwdriver.
Make sure that lock lever (※is flush with the mounting collar (not projecting outward).
2. Secure the rear of the unit.
After fixing mounting bolt and power connector, fix the rear of the unit to the car body by rubber cushion.
3. Insert trim plate.
Lock lever (※)

ANTI-THEFT SYSTEM
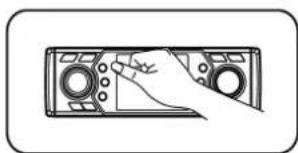
This unit is equipped with a flip-down detachable panel.
Panel can be detached and taken with you, helping to deter theft.
Remove the panel
- Press ⏻button to switch off the power of the unit..
- Press 🔊 button to flip down the panel.
- Hold the right of the panel. Take off right end, and then take off the left end.
- Place the panel into the case and take it with you when you leave the car.
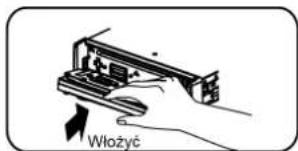
Install the panel
- Hold the panel and ensure the panel faces downwards, and set the left side of the panel in the panel bracket.
- Press the right side of the panel until it locks.
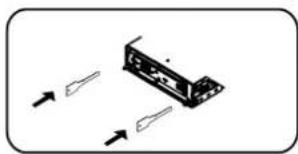
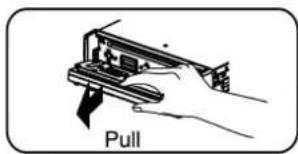
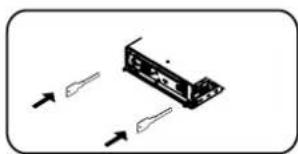
Remove the unit
- Remove the panel and the trim plate.
- Insert both T-Keys into hole on the front of the set until they lock.
- Pull out the unit.



TROUBLESHOOTING
If you suspect something is wrong, immediately switch power off. Do not use the unit in abnormal condition, for example without sound, or with smoke or foul smell, can cause fire or electric shock. Immediately stop using it and call the store where you purchased it. Never try to repair the unit yourself because it is dangerous to do so.
General
No power or no sound.
Car's engine switch is not on.
Turn your car's key to ACC or ON.
Cable is not correctly connected.
Check connection.
Fuse is blown.
Replace fuse.
Check volume or mute on / off.
If the above solutions cannot help. Press the RESET button.
Disc
Disc is inside but no sound.
Disc is upside down.
Place disc in the correct direction, and the label side up.
Disc is dirty or damaged.
Clean disc or change another disc.
Disc sound skips, tone quality is low.
Disc is dirty or damaged. Clean CD or change another CD.
Sound skips due to vibration.
Mounting angle is over 30o.
Adjust mounting angle to less than 30o.
Unstable mounting.
Mount the unit securely with the mounting parts.
Radio
Noise in broadcasts.
Station is too far, or signals are too weak.
Select other stations of higher signal level.
Preset station lost.
Battery cable is not correctly connected.
Connect the battery cable to the terminal that is always live.
Error Display Messages
Display shows ERROR.
Disc is dirty, damaged or upside down.
Press ▲to eject the disc.
When video file initializing time is too long.
File read error or file type not supported.
Press SRC to exit. Then press SRC to play disc again.
SPECIFICATIONS
Genral
| Power supply | 12VDC(11 – 16 V)Test voltage 14,4V, negative ground |
| Maximum power output | 45 W x 4 channels |
| Continuous power output | 25 W x 4 channels(4 Ω, 10% T.H.D.) |
| Suitable speaker impedance | 4 – 8 ohm |
| Pre-Amp output voltage | 2,0 V (CD play mode:1 kHz, 0 dB, 10 kΩ load) |
| Fuse | 15A |
| Dimensions(WxHxD) | 178 x 50 x 166 mm |
| (NETTO) Weight | 2,2 kg |
| Aux-in level | ≥300 mV |
3 Inch TFT LCD
| Display resolution(dot): | 960 (W) x 240 (H) |
| Active area(mm) | 60,00 x 45,00 |
| Screen size(inch) | 3,0 (Diagonal) |
| Dot pitch(mm) | 0,0625 x 0,1875 |
| Contrast ratio | 300 |
| Brightness | 350 nits |
FM Stereo Radio
| Frequency range | 87,5 – 108,0 MHz (Europe) |
| 87,5 – 107,9 MHz (America) | |
| Usable sensitivity | 8 dBμ |
| Frequency response | 30 Hz – 15 kHz |
| Stereo separation | 30 dB (1 kHz) |
| Image response ratio | 50 dB |
| IF response ratio | 70 dB |
| Signal/noise ratio | >55 dB |
Disc Player
| System: | Disc digital audio system |
| Frequency response | 20 Hz – 20 kHz |
| Signal/noise ratio | >80 dB |
| Total harmonic distortion | Less than 0,20% (1 kHz) |
| Channel separation | >60 dB |
| Video signal format system: | PAL, NTSC, AUTO |
| Video output: | 1 ± 0,2 V |
COMPONENTS
| Mounting collar | 1 |
| Machine screws M5x6 mm | 4 |
| M4x6 mm | 4 |
| Mounting bolt (50 mm) | 1 |
| Wire connector | 1 |
| Removable face plate case | 1 |
| Trim plate | 1 |
| T-key | 2 |
| Operating Instructions | 1 |
| Rubber cushion | 1 |
| Remote control | 1 |
WARNING:
Do not use this product near water, in wet areas to avoid fire or injury of electric current. Always turn off the product when you don't use it or before a revision. There aren't any parts in this appliance which are reparable by consumer. Always appeal to a qualified authorized service. The product is under a dangerous tension.
Disposal of used electrical & electronic equipment
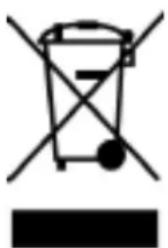
The meaning of the symbol on the product, its accesory or packaging indicates that this product shall not be treated as household waste. Please, dispose of this equipment at your applicable collection point for the recycling of electrical & electronic equipments waste. In the European Union and Other European countries which there are separate collection systems for used electrical and electronic product. By ensuring the correct disposal of this product, you will help prevent potentially hazardous to the environment and to human health, which could otherwise be caused by unsuitable waste
handling of this product. The recycling of materials will help conserve natural resources. Please do not therefore dispose of your old electrical and electronic equipment with your household waste. For more detailed information about recycling of this product, please contact your local city office, your household waste disposal service or the shop where you purchased the product.
HYUNDAI
CORPORATION
Seoul, Korea
- Upozornění
- Začínáme
- Režim ekvalizéru eq
- Menu otočného knoflíku
- Rádio
- Pásmo
- Výchozí hodnoty
- Dynamický rozsah
- Instalační otvor
- Důležité
- Systém ochrany proti krádeži
- Upozornenie
- Režim ekvalizéra eq
- Menu otočného gombíka
- Režim nastavenia hlasitosti vol
- Režim video výstupu
- Nastavenie typu tv
- Inštalačný otvor
- Dôležité
- Ostrzeżenie
- Zaczynamy
- Menu galki
- Radio
- Pasmo
- Tryb wyjścia video
- Zakres dynamiczny
- Ważne
- Rozwiązywanie problemów
- Safety information
- Warning
- Caution
- Two laser products
- Disc notes
- Contents
- Panel controls
- Remote controls
- Replacing the lithium battery of remote control unit
- Remote control operating range
- Getting started
- USB/SD/MMC/MP3 playback
- Load sd/mmc card
- Take out sd/mmc card
- Load usb device
- Take out usb device
- Usb/sd/mmc notes
- General operation
- Switching on and off
- Vol knob function
- Rotary knob menu
- Eq mode
- Loud mode
- Beep on/off mode
- Camera
- 12/24 Mode
- Ta mode
- Retune mode
- Mirror image mode
- Ta-vol
- Vol - mode
- A - vol
- Band
- Tune
- Ams: auto memory store
- Dvd & av in mode
- Dvd mode
- Av in mode
- Clock setting
- Rds (radio data system)
- Rds basics
- Traffic announcements
- Eon (enhanced other networks)
- Pty reception (program type)
- Pty mode
- Pty type preset
- Disc playback
- Disc load / eject
- Disc playable
- File type supported
- Disc and file not supported
- Category select
- Folder select
- File select
- Track playback
- Select desired track
- Fast forward/backward during playback
- Intro (for cd/vcd only)
- Random track playback (for CD/VCD/MP3 only)
- Repeat
- Repeat a → b
- Pause
- Pbc - playback control (for vcd only)
- Go to
- Program
- Vcd audio select
- Dvd subtitle select
- Dvd title select
- Dvd angle select
- Zoom
- Dvd setup
- Dvd system setup
- Tv system
- Screen saver
- Video output mode
- Setting tv type
- Setting password
- Setting rating
- Load default
- Dvd language setup
- Osd language
- Audio language
- Subtitle language
- Menu language
- Dvd audio setup
- Setting volume
- Dvd video setup
- Brightness
- Contrast
- Hue
- Saturation
- Sharpness
- Dvd digital setup
- Output mode
- Dynamic range
- Dual mono
- Electrical connections
- Using the iso connector
- Installation guide
- Installation procedures
- Reset
- Installation opening
- Important
- Inset mounting collar into the dashboard, and bend the mounting tabs out with a screwdriver
- Secure the rear of the unit
- Insert trim plate
- Anti-theft system
- Remove the panel
- Install the panel
- Remove the unit
- Troubleshooting
- General
- Disc
- Specifications
- Components
- Warning
- Disposal of used electrical & electronic equipment
- Hyundai
Brand : HYUNDAI
Model : CRMD 1723 SU
Category : Car radio