
CRMD 7222 SU - Car radio HYUNDAI - Free user manual and instructions
Find the device manual for free CRMD 7222 SU HYUNDAI in PDF.


| Product Type | Car Stereo |
| Brand | Hyundai |
| Model | CRMD 7222 SU |
| Dimensions (W x H x D) | 178 x 50 x 166 mm |
| Weight | 1.7 kg |
| Power Supply | 12V DC (11V-16V), negative ground |
| Maximum Power Output | 45 W x 4 channels |
| Continuous Power Output | 20 W x 4 channels (4 Ω, 10% THD) |
| Speaker Impedance | 4-8 Ω |
| Pre-Amp Output Voltage | 2.0 V (1 kHz, 0 dB, 10 kΩ load) |
| Display | 3-inch (16:9) TFT LCD, 960 x 240 pixels |
| FM Frequency Range | 87.5-108.0 MHz (Europe) / 87.5-107.9 MHz (America) |
| AM Frequency Range | 522-1620 kHz (Europe) / 530-1710 kHz (America) |
| Disc Playback | DVD, CD, MP3, WMA |
| File Formats Supported | MP3, WMA, MP4, AVI, VOB, DAT, JPEG |
| USB/SD/MMC Support | Yes (FAT12/16/32, up to 200 dirs, 500 files) |
| RDS Functions | AF, TA, PTY, EON, CT, REG |
| Anti-Theft System | Detachable faceplate with carrying case |
| Remote Control | Card-type remote with lithium battery |
| Fuse | 15 A (blade type) |
| Included Accessories | Mounting sleeve, trim plate, removal keys, remote control, faceplate case, wiring harness |
| Safety Features | Parking brake interlock, reverse camera input, mute function |
Frequently Asked Questions - CRMD 7222 SU HYUNDAI
User questions about CRMD 7222 SU HYUNDAI
0 question about this device. Answer the ones you know or ask your own.
Ask a new question about this device
Download the instructions for your Car radio in PDF format for free! Find your manual CRMD 7222 SU - HYUNDAI and take your electronic device back in hand. On this page are published all the documents necessary for the use of your device. CRMD 7222 SU by HYUNDAI.
USER MANUAL CRMD 7222 SU HYUNDAI
VÝCHOZÍ STAV: OBNOVIT
STEREO\_MONO: STEREO/MONO
Volba mezi FM MONO a FM STEREO.
AF: ZAP./VYP.
- MANUÁLNÍ VYHLEDÁVÁNÍ
natural_image
Illustration of hands operating a device with a screen and a handheld device (no text or symbols visible)natural_image
Illustration of hands operating a device with a scroll wheel (no text or symbols visible)Vytažení přístroje
natural_image
Symbol of a trash bin crossed with a diagonal line and a horizontal bar below (no text or labels)STEREO\_MONO: STEREO/MONO
Vol'ba medzi FM MONO a FM STEREO.
AF: ZAP./VYP.
- MANUÁLNE VYHL'ADÁVANIE
natural_image
Illustration of hands operating a device with a screen and a handheld device (no text or symbols visible)natural_image
Illustration of hands operating a device with a scroll wheel (no text or symbols visible)natural_image
Symbol of a trash bin crossed with a diagonal line and a horizontal bar below (no text or labels)STEREO\_MONO: STEREO/MONO
natural_image
Illustration of hands operating a device with a screen and a cable connector (no text or symbols)natural_image
Illustration of hands operating a device with a control panel (no text or symbols visible)natural_image
Symbol of a trash bin with crossed lines indicating no waste or restriction, and a solid black rectangle below (no text or labels)Thank you for purchasing this product. Please read through these operat ing instructions so you will know how to operate your model properly. After you have finished reading the instructions, keep this manual in a safe place for future reference.
Only connect the unit to a 12-volt power supply with negative grounding.

Never install this unit where the operation & condition for safety driving is restrained.
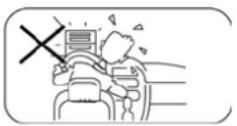
NEVER USE THE VIDEO DISPLAY FUNCTION IN THE FRONT WHEN DRIVING TO PREVENT THE VIOLATION OF LAWS & REGULATIONS AND ALSO TO REDUCE THE RISK OF TRAFFIC ACCIDENT EXCEPT USING FOR REAR VIEW VIDEO CAMERA.

To ensure safe driving, please adjust the volume to a safe & comfort level in case of emergency situations. Never expose this unit, amplifier, and speakers to moisture or water for preventing electric sparks or fires.
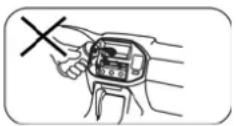
Please don't change the fuse on the power cord without professional guidance, using improper fuse may cause damage to this unit or even cause fire.

Please power off this unit at once and send it back to the after-sales service center or the dealer/distributor you purchased from if one of the following symptoms is found:

1) No audio output;
2) No image output;
3) Water or other obstacle enters the unit;
4) Smoking;
5) Peculiar smell.
To provide a clear demonstration and an alternative for easy understanding of the operation of this unit, graphic illustration was used. However, this illustration is not necessary printed as the actual image found on the unit.
SAFETY INFORMATION
Caution
This product is a CLASS 1 LASER PRODUCT. Use of controls or adjustments or performance of procedures other than those specified herein may result in hazardous radiation exposure. Do not open covers and do not repair yourself. Refer servicing to qualified personnel.
Two Laser Products
Wave length: CD: 780nm DVD: 650nm
Laser power: No hazardous radiation is emitted with safety protection. To reduce the risk of fire electric shock, and annoying interference, use only the included components.
Caution of Disc Using
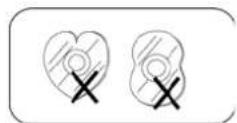
1) Never insert a 3-inch (8cm) CD contained in the adapter or an irregularly shaped CD. The unit may not be able to eject it, resulting in a malfunction.
2) Disc Cleaning. Use a dry, soft cloth to wipe the disc from center to edge, only neutral detergent can be used.

3) When playing a new disc. New disc may have some rough spots around the inner and outer edges. If such a disc is used, remove these rough spots with a pencil or ball-point pen, etc.

Contents
Safety Precautions.... 101
Safety Information....102
Features....104
Panel Controls....105
Remote Controls....107
USB/SD/MMC/MP3 Playback....108
Basic Operation.... 109
Rotary Knob Menu....110
Radio Mode....114
RDS (Radio Data System)....116
Disc Mode....117
Device Connections....124
Installation Guide.... 126
Anti-Theft System....129
Troubleshooting....130
Care and Maintenance.... 131
Specifications.... 132
FEATURES
DVD-R/RW Compatibility
It is possible to playback DVD-R/RW discs recorded with the video format and Video Recording format.
Video CDs Featuring PBC
Compatibility
It is possible to playback Video CDs featuring PBC (playback control).
WMA and MP3 Compatibility
It is possible to playback WMA and MP3 files.
About WMA
The unit can playback WMA data.
Windows Media and the Windows logo are trade marks or registered trademarks of Microsoft Corporation in the United States and/or other countries.
This unit may not operate correctly depending on the application used to encode WMA files.
About MP3
Supply of this product only conveys a license for private, non-commercial use and does not convey a license nor imply any right to use this product in any commercial (i.e.revenuegenerating) realtime broadcasting
(terrestrial, satellite, cable and/or any other media), broad-casting/streaming via internet, intranets and/or other networks or in other electronic content distribution systems, such as payaudio or audio-on-dem and applications. An independent license for such use is required. For details, please visit http://www.mp3licensing.com.
Button Operation Explanations
Some frequent operations
1) Move cursor

flowchart
graph TD
    A["Circle Flow"] --> B{Decision}
    B -->|OK| C["Down Arrow"]
    B -->|OR| D["Right Arrow"]
    B -->|Down Arrow| E["Up Arrow"]
Note:
In Setting mode, the VOL knob has the same function as the ▲/▼ button to select setting items.
2) Confirm

Press the ▲button to open the panel.

PANEL CONTROLS
Power on/off: Press ⏻ to turn on/off the unit.

1) Panel open
2) Play/Pause (in DVD, CD and MP3/WMA modes
Band switch: FM1-FM2-FM3-FM (OIRT)-MW1-MW2 (in Radio mode)
RDS program type (press and hold more-than 2 seconds, in Radio mode)
3) Press to navigate up among option items (in DVD, CD and MP3/WMA modes)
Play the previous preset radio station (in Radio mode)
4) Mute
5) 3 inch TFT display
6) Power on/off
7) Short press to select playing mode:
- Radio
- Disc (when disc inserted)
- USB (when USB inserted)
- SD (when SD/MMC inserted)
- AV (front audio & video input. External-peripheral devices with RCA audio and video outputs can be connected with the unit.)
- Long press to return to main source menu when in any mode, then use navigate button to select the desired mode, and press OK button to confirm.
8) Preset scan (press briefly, in Radio mode)
- Auto preset (press more than 2 seconds, in Radio mode)
Stop (in CD, MP3/WMA, and DVD video-mode)
9) Search the previous station manually, and each press to seek step by step (press briefly, in Radio mode).
- Search the previous station automatically (press more than 2 seconds, in Radio mode).
- Press to search the previous track or chapter (in CD, MP3/WMA, and DVD video mode).
- Fast backward by 2, 4, 8, 20 step (press more than 2 seconds, in CD, MP3/WMA and DVD video mode).
Press to navigate left among option items
10) Rotate the knob to adjust volume level Press to select Audio/video Setting, and rotate the knob to adjust level.
- Press more than 2 seconds to Setting menu.
11) Press to navigate down among option items (in DVD, CD and MP3/WMA modes)
- Play the next preset radio station (in Radio mode)
12) Search the next station manually, and each press to seek step by step (press briefly, in Radio mode).
- Search the next station automatically (press more than 2 seconds, in Radio mode).
Search the next track or chapter (in CD, MP3/WMA, and DVD video mode).
- Fast forward by 2, 4, 8, 20 step (press more than 2 seconds, in CD, MP3/WMA and DVD video mode).
Press to navigate right among option items
13) Cancel source select menu and return to previous menu
14) Confirm operation
- Stop auto seeking (in Radio mode)
15) Remote sensor
16) USB port
17) AV in
REMOTE CONTROLS
Press to turn on/off the unit.

1) Zoom (DVD/VCD only)
2) Title (DVD only)
3) Power on/off
4) Setup
5) Menu cursor
6) Enter
7) Program
8) Digit area
9) Select Audio/Video Setting, then rotate the knob to adjust level.
10) Volume
11) Mute
12) - Radio tune
- Track skip/seek
13) Subtitle (DVD only)
14) Source switch
15) Repeat
16) Repeat A-B
17) Stop/Return
18) Play/Pause
19) Goto search
20) DVD menu PBC (for VCD 2.0 or up)
21) OSD: On screen display AMS: Search and store stations automatically
25) Video system PAL/NTSC/AUTO - Radio band (in Radio mode)
Remote Control Operating Range
The remote control can operate within a distance of 3\~5m.

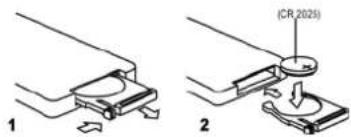
Replacing the lithium battery
When the range of operation of the card remote control becomes short or no function, replace the lithium battery with a new one. Make sure the battery polarity replacement is correct.
1) Pull out the battery holder while pressing the stopper.
2) Insert the button-type lithium battery with the (+) mark facing upward. Insert the battery holder into the remote control.
Warning
- Store the battery where children cannot reach. If a child accidentally swallows the battery, consult a doctor immediately.
- Do not recharge, short, disassemble or heat the battery or dispose it in a fire.
- Do not leave the battery with other metallic materials. Otherwise, the battery may start to give off heat, crack or catch fire.
- When throwing away or saving the battery, wrap it in tape and insulate.
USB/SD/MMC/MP3 PLAYBACK
1) Load SD/MMC Card
Insert the SD/MMC card into the slot, with the front side at right. The unit will play the music automatically and the LCD will show CARD.
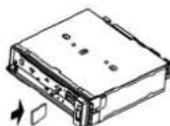
2) Take out SD/MMC Card
Press SRC button and switch to non CARD mode, slightly press SD/MMC card, take out the card when it pops out.

3) Load USB Equipment
Open the rubber cap, insert the USB into the connector and the unit will play the music in the USB storer automatically, and the LCD will show USB.

4) Take out USB Equipment
Press SRC button and switch to non USB mode, then take off the USB stick, close the rubber cap.

USB/SD/MMC Notes
USB functions (flash memory type) MP3 music play
- SD/MMC card support
- USB flash memory 2 in 1 (SD/MMC) support
- FAT 12/FAT 16FAT 32 is possible
- FAT 12/16 (dir: 200 support, file: 500 support)
-
FAT 32 (dir: 200 support, file: 500 support)
-
File name: 32 byte/dir name: 32 byte /tag, name: 32 byte
-
Tag (tag ID3 ver 2.0)
- Title/artist/album: 32 byte support
-
Multi card reader not support
-
USB 1.1 support
USB 2.0 support
(it can not support USB 2.0 speed. Just, get the same speed with USB 1.1)
Note:
Not all kinds of USB devices are compatible with the unit.
BASIC OPERATIONS
Turn on/off the Power
1) Press ⚡ to turn on the unit.
The unit goes back to the last status after power on.
2) Press ⏻ again to power off.
Mute
Press the MUTE button to cut the sound.
Note:
- Doing the operation above again or adjusting volume will release muting.
- Mute icon appears on the TFT during muting.
Adjust the Volume
Rotate the knob on the panel or press VOL +/- on the remote control to increase or decrease the volume. The adjustable range of volume is 0 to 39.

flowchart
graph TD
    A["UP"] --> B["DN"]
    B --> C["SBEK*"]
    C --> D["BGL"]
    D --> E["VOL*"]
    E --> F["BECK*"]
    F --> G["Circle with Beck*"]
Playing Source Selection
Method 1
Short press the SRC button on the panel or remote control to cycle through all the available sources.
Method 2
In any mode, long press the SRC button on the panel or remote control to enter main source menu, then use navigate button to select the desired mode, and press OK to confirm.

Note:
- When some devices are not ready, they cannot be selected.
- You should stop switching when the playing source you desired has been selected and wait for some seconds, the unit will auto enter the playing source mode you have selected.
When Parking Brake Applied
1) If ,PRK SW' cable is connected to hand brake switch, the video display of the TFT monitor will be controlled by driving status, system setup and input video sources.
2) When the car is moving ahead, if the video disc is played, the screen appears "WARNING: Engage Parking Brake to View Video". The above warning screen will prevent the driver watching images. The passengers at the rear seats can watch normally.
When Reverse Driving
If the rear view video camera is connected, the unit automatically switches to CAMERA source during reverse driving. The unit returns to the original work mode after the reverse driving is done.
ROTARY KNOB MENU
- Rotate the knob to adjust volume level.
- Short press to access the Audio&VIDEO Setting menu.


bar
| Video Setting | Value | | :--- | :--- | | BRI | 7 | | CON | 7 | | SAT | 7 |Each press the knob to change the AUDIO mode: EQ/Bass/Middle/Treble/Balance/Fader, and rotate the knob to adjust level. Each press the knob to change the VIDEO mode: Bright/
Contrast/Saturation, and rotate the knob to adjust level.
EQ: USER/FLAT/POP/ROCK/CLASSIC/JAZZ
The Equalizer function applies preset sound effects to the unit's audio output signal. Turn the rotary encoder to select from the following equalizer options: USER, FLAT, POPULAR, ROCK, CLASSIC, JAZZ. With the equalizer function activated, if bass or treble is adjusted, the EQ Mode will revert to "USER". When the equalizer function is activated, the most recently selected bass/treble levels cannot be adjusted. When the equalizer function is not active, the unit will return to the most recently selected bass and treble levels.
- Press the knob more than 2 seconds to enter Setting mode, then Use ◀/▶, ▲/▼ and OK key to select setting items.
GENERAL SETTING

BEEP: ON/ OFF
The beep tone feature allows the selection of an audible beep tone to be heard each time the menu is accessed.
LOUDNESS: ON/OFF
When listening to music at low volumes, this feature will selectively boost certain bass and treble frequencies.
TIME MODE
12 HOURS MODE: the clock displays in the type of 12 hours such as 11:18 AM.
24 HOURS MODE: the clock displays in the type of 24 hours such as 20:18.
TIME ADJUST
Press ◀ / ▶ or ▲/▼ key to set hour and minute.
Each time you press ◀ / ▶ to select one segment of the clock display:
Hour-Minute
As you select segments of the clock display the segment selected will be highlighted. Then you can press ▲/▼ to put a clock right.
MIRROR: ON/OFF
This option allows for selection of a mirror image view when a rear view backup camera (sold separately) is connected to the CAMERA IN input on the back of the radio. Turn the rotary encoder to select "On" or "Off".
DVD Setting

TV SYSTEM: NTSC/PAL/AUTO
Select the TV system in the setting menu.
TV TYPE: 4:3PS/4:3LB/16:9
Select TV type to watch wide screen movies.
4:3 Pan Scan: For 4:3 TV, left and right edges will be cut.
4:3 Letter Box: For 4:3 TV, black bars will appear on top and bottom.
16:9: For 16:9 wide screen TV.
PASSWORD
1) Press number button,,0000,,on the remote control, then press the ENTER button to confirm.
2) Press the desired 4-digit password, and then press ENTER button to confirm.
3) Record the password and keep it in a safe place for future reference.
If you forget the password, please enter 0000 to reset a new password.
The password : 0000
RATING: 1 KID SAFE/2 G/3 PG/4 PG13/5 PG-R/6 R/7 NC-17/8 ADULT
The rating of the disc is from 1 to 8:
(1) with the most limits when playing.
(8) with the least limits when playing.
Original setting: 8
Note:
The rating can be selected only under the password unlocked status, and the limits can be worked only under the password locked status.
DEFAULT: RESTORE
If this item is selected, the unit will return to original setting.
BRIGHTNESS
Set the brightness of the video output with ▲/▼ from 00 to 12.
CONTRAST
Set the contrast of the video output with ▲/▼ from 00 to 12.
HUE
Set the hue of the video output wit ▲/▼ from 00 do 12.
SATURATION
Set the saturation of the video output with ▲/▼ from 00 to 12.
Language Setting
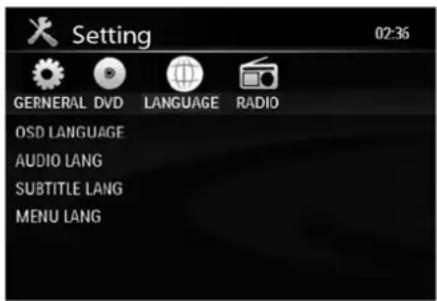
OSD LANGUAGE:
Select one language that you are familiar with to display system menu.
AUDIO LANG:
Select one dialogue language that you are familiar with when playing back DVD discs.
Note:
If the DVD disc has the audio file in the selected language, the dialogues you listened to will be in the selected language. If the DVD disc does not contain the audio file in the selected language, the dialogues you listened to will be in the default language. You can change the language by pressing [AUDIO] key of the remote controller.
SUBTITLE LANGEnglish
Select one language that you are familiar with to display DVD subtitles.
If the DVD disc has the subtitle file in the selected language, the subtitle will be displayed in the selected language. If the DVD disc does not contain the subtitle file in the selected language, the subtitle will be displayed in the default language.
MENU LANG
Select one language that you are familiar with to display DVD menu.
Note:
If the DVD disc has the selected language, the DVD MENU/TITLE will be displayed in the selected language. If the DVD disc does not contain the selected language, the DVD MENU/TITLE will be displayed in the default language.
RADIO SETTING

LOC\_DX: LOC/DX
Choose radio distant or local.
Local: Only station with strong signal can be broadcast.
Distant: Stations with strong and weak signals can be broadcast.
STEREO\_MONO: STEREO/MONO
Choose FM mono/stereo.
AF: ON/OFF
Choose AF (Alternative Frequency) on or off.
AF ON: AF function is activated.
AF OFF: AF function is disabled.
Remark: AF indicator on LCD will flash until RDS information is received. If RDS service is not available in your area, turn off the AF mode.
TA: ON/OFF
Choose TA (Traffic Announcements
Identification) on or off.
When TA mode is turned on, the TA indicator will blink.
When traffic announcement is received, the TA indicator will display. The unit will temporarily switch to the tuner mode (regardless of the current mode) and begin broadcasting the announcement at TA volume level. After the traffic announcement is over, it will return to the previous mode and volume level. When TA is turned on, SEEK, SCAN, AMS function can only be received or saved when traffic program identification (TP) code is received.
TA VOLUME: 00-63
Choose TA-VOL level.
REGIONAL: ON/OFF
Choose AF function to implement or ignore the regional code (of the PI) and only stations in the current region can be tuned automatically.
REG ON: AF function will implement the regional code (of the PI) and only stations in the current region can be tuned automatically.
REG OFF: AF function will ignore the regional code (of the PI) and stations in the other regions can also be tuned automatically.
CT: ON/OFF
Some stations broadcast the time and date within the encoded RDS signal. The clock time is automatically adjusted when "CT" is set to "ON".
Accessing Radio Mode
Press the SRC button on the front panel or remote control to switch to the Radio source.

Selecting a Band
Press BAND once or more to select FM1- FM2 - FM3 - MW1 - MW2.
Display shows wave band, frequency, and preset station number if already stored.
Selecting a Station
Press the ▶ or ◀ tuning button to tune to another station.
Tuning
- AUTO SEEK
Press the ▶ or ◀ buttons to seek the next/ previous station automatically.
- MANUAL SEEK
Press and hold the ▶ or ◀ buttons to enter manual tuning mode. Press the buttons again to move the radio frequency number up or down one step.
Note:
During manual seeking, if the pause between two operating steps is longer than 5 seconds, press the ▶ or ◀ buttons, the unit will enter auto seeking.
Preset Mode
Six numbered preset buttons store and recall stations for each band. The stored stations (P1-P6) for the current band can be viewed on the screen.
1) Source Indicator
2) Current Preset Channels
3) Time/Clock
4) AM/FM Band
5) RDS Information
6) Radio Station Frequency
7) EQ Indicator
8) AF Indicator
STORING STATIONS
- Auto storing
1) Select a band (if needed).
2) Press AMS briefly to scan the preset station P1 - P6 for 5 seconds each.
3) Hold AMS more than 2 seconds, the 6 strongest available stations will be automatically saved in the preset button (numbers 1-6).
- Manual Storing
1) Select a band (if needed), then select a station.
2) Press and hold a preset button (numbers 1-6) on the front panel or remote control.
3) The preset number and station is displayed and highlighted.
Recalling a Station
1) Select a band (if needed).
2) Press a front panel or remote control preset button (numbers 1-6) to select the corresponding stored station.
RDS (RADIO DATA SYSTEM, OPTIONAL)
RDS service availability varies with areas.
Please understand if RDS service is not available in you area, the following service is not available.
RDS Basics
AF (Alternative Frequency): When the radio signal strength is poor, enabling the AF function will allow the unit to automatically search another station with the same PI (program identification) as the current station but with stronger signal strength. PS (Program Service name): The name of station will be displayed instead of frequency.
Traffic Announcements
Some RDS FM stations periodically provide traffic information.
TP (Traffic Program Identification) Broadcasting of traffic information
TA (Traffic Announcements Identification) Radio announcements on traffic conditions
EON (Enhanced Other Networks)
When EON data is received, the EON indicator lights and the TA and AF functions are enhanced.
TA: Traffic information can be received from the current station or stations in other network.
AF: The frequency list of preset RDS stations is updated by EON data. EON enables the radio to make fuller use of RDS information. It constantly updates the AF list of preset stations, including the one that currently tuned into. If you preset a station around the area at your home, you will later be able to receive the same station at an alternative frequency, or any other station serving the same program, EON also keeps track of locally available TP stations for quick reception.
PTY Reception (Program Type)
RDS FM stations provide a program type identification signal.
Example: news, rock, info, sport, etc.
PTY Mode:
Press BAND more than 2 seconds to turn on the Program Type reception, the previous PTY type is shown, then use ▲/▼ to select the desired program type. The selected PTY type is shown and searching starts if no other function is selected for 2 seconds. If there is no corresponding program type, NO PTY is shown and the unit will return to normal mode.
| MUSIC TYPE SPEECH TYPE | |
| POP M NEWS | |
| AFFAIRS | |
| ROCK M INFO | |
| EASY M SPORT | |
| EDUCATE | |
| LIGHT M DRAMA | |
| CLASSICS CULTURE | |
| SCIENCE | |
| OTHER M VARIED | |
| JAZZ M WEATHER | |
| FINANCE | |
| COUNTRY CHILDREN | |
| NATIONAL M SOCIAL | |
| RELIGION | |
| OLDIES M PHONE IN | |
| FOLK M TRAVEL | |
| LEISURE | |
| DOCUMENT | |
| TEST | |
| ALARM |
DISC MODE
Accessing Disc Mode
If a disc is already in the disc slot but is not playing, press the SRC button on the front panel or on the remote control to switch to the DISC source. To play files from an SD or USB that is already inserted, choose the CARD or USB source. The disc playback screen is indicated below:
Insert a Disc
Press ▲ to flip down the panel. Insert the disc into the slot, and the unit will change to disc mode automatically.
Note:
- Please confirm whether there is a disc in the unit before you insert another one.
- The unit will exit current playing source and enter DVD mode when one disc is inserted.
Eject the Disc
Press ▲ to flip down the panel. Press ▲ to eject the disc.
Note:
• After ejecting the disc, the unit reverts to radio mode.
- You can eject a disc with the unit powered off. The unit remains off after the disc is ejected.
Disc Playback
- When disc inserted, display shows LOAD. For MP3 or disc with mixed files, reading time may exceed 1 minute.
- ERROR will be displayed if error found in disc operation.

- Source Indicator
- Current Track/Total Track
- Name of the Song Display
- Audio Folder
- Picture Folder
-
Video Folder
-
For VCD/CD, VCD or CD icon will appear on the display.
- While MP3/WMA files playback, MP3/WMA icon will appear on the display.
- For DVD, DVD icon will appear on the display and TITLE appears. Press ENTER or ▶ II to play.
FILE TYPE SUPPORTED
Audio file: MP3(*.mp3), WMA(*.wma)
Video file:
MP4 (*.avi)
MPEG 2 (*.vob)
MPEG 1 (*.dat)
Picture file: JPEG (*.jpg)
MP3 file:
ISO 9660 or ISO 9660 + Joliet format - Max.
30 characters.
Max. nested directory is 8 levels.
The max. album number is 99.
The max. length of each track is 99 minutes 59 seconds.
Supported sampling frequency for MP3 disc:
8KHz to 48KHz (44.1KHz preferably).
Supported bit-rates of MP3 disc are: 32 - 320 kbps (128 kbps preferably).
Disc and File NOT Supported
*.AAC, *.DLF, *.M3U, *.PLS, MP3 PRO files and files with DRM.
Open session discs.
Audio/Picture/Video File Playback
When AUDIO/PICTURE/VIDEO file is played, Category/Folder/File list will be displayed on the screen, and file/folder name being played will be displayed on top. Current selected item will be highlighted. The list lets you see the list of track titles or folder names on a disc. If you select a folder on the list, you can view its contents.
For Audio Files
1) Press ESC to return to playlist menu.
2) Use ▲/▼ to select AUDIO folders.
3) Press OK, ▶ II on the front panel or ENTER on the remote control to display all available audio file folders.
4) Use ◀ / ▶ to enter file list and use ▲ / ▼ to select desired file, press OK, ▶ II on the front panel or ENTER on the remote control to start play.
5) During the file playing, press ■ will enter
6) power on logo, then press ▶ II to return.
For Picture Files
1) Press ESC to return to playlist menu.
2) Use ▲/▼ to select ■PICTURE folders.
3) Press OK, ▶ II on the front panel or ENTER on the remote control to display all available picture file folders.
4) Use ◀ / ▶ to enter file list and use ▲ / ▼ to select desired file, press OK, ▶ II on the front panel or ENTER on the remote control to slide show the pictures, and press PROG to select picture showing style.
5) During the file playing, press ■ to stop and return to the sub-root.
For Video Files
1) Press ESC to return to playlist menu.
2) Use ▲/▼ to select 📄VIDEO folders.
3) Press OK, ▶ II on the front panel or ENTER on the remote control to display all available video file folders.
4) Use ◀ / ▶ to enter file list and use ▲ / ▼ to select desired file, press OK, ▶ II on the front panel or ENTER on the remote control to start play.
5) During the file playing, press ■ to stop and return to the sub-root.
Note:
1) If the selected folder does not contain any playable track, the track list is not displayed.
2) During the folder selecting, press ESC to the upper folder (parent folder). If the uppermost folder is listed, ESC cannot be used.
MP3/WMA Notes
MP3 and WMA (Windows Media Audio) music files are digital audio files that are compressed to allow more files to be stored. This unit can play MP3/WMA and video directly from files contained on a CD-R/RW, DVDROM, DVD+RW, DVD-RW, DVD+R, DVD-R and DVD-VIDEO, or an SD card or USB Device. Many types of software are available for converting audio files into MP3/WMA formats. Nero or Roxio Easy CD Creator are recommended. This unit can play MP3 (MPEG1, 2, 2.5 Audio Layer 3). However, the MP3 recording media and accepted formats are limited.
Entering ID3 Tag
This unit supports ID3 tag version 2.0.
For character codes, refer to the table to the below.
| 0 | 1 | 2 | 3 | 4 | 5 | 6 | 7 | 8 | 9 | A | B | C | D | E | F | |
| 0 | 0 | @ | P | · | p | ■ | ° | À | Đ | à | đ | |||||
| 1 | ! | 1 | A | Q | a | q | i | ± | Á | Ñ | á | ñ | ||||
| 2 | " | 2 | B | R | b | r | € | 2 | À | Ò | á | ò | ||||
| 3 | # | 3 | C | S | c | s | £ | 3 | À | Ó | ā | ó | ||||
| 4 | $ | 4 | D | T | d | t | ☐ | · | À | Ó | ā | ö | ||||
| 5 | % | 5 | E | U | e | u | ¥ | μ | À | Ö | à | ö | ||||
| 6 | & | 6 | F | V | f | v | ! | ¶ | Æ | Ó | æ | ö | ||||
| 7 | ' | 7 | G | W | g | w | § | · | Ç | × | ç | ÷ | ||||
| 8 | ( 8 H X h x | |||||||||||||||
| 9 | ) 9 I Y i y | |||||||||||||||
| A | · : J Z j z | |||||||||||||||
| B | + ; K [ k { « » Ê Û ë û û | |||||||||||||||
| C | . < L \ l l → 1/4 i û i û | |||||||||||||||
| D | - = M ] m } | |||||||||||||||
| E | . > N ^ n ~ ® 3/4 i P i p | |||||||||||||||
| F | / ? O _ o ■ - ¿ i B i ŷ | |||||||||||||||
Entering File and Folder Names
Names using the code list characters are the only file names and folder names that can be entered and displayed. Using any other character will cause the file and folder names to be displayed incorrectly. The unit recognizes and plays only files with the MP3/ WMA extension.
Note:
A file name entered with characters not on the code list may not play correctly.
MP3 Playing Order
When selected for play, files and folders (Folder Search, File Search or Folder Select) are accessed in the order in which they were written to the media. As a result, the order in which they are expected to be played may not match the order in which they are actually played. You may be able to set the order in which MP3/WMA files are to be played by assigning file names beginning with play sequence numbers such as „01“ to „99“. For example, a medium with the following folder/ file hierarchy is subject to Folder Search, File Search or Folder Select as shown below.

flowchart
graph TD
    A[" "] --> B["Layer 1"]
    A --> C["Layer 2"]
    A --> D["Layer 3"]
    A --> E["Layer 4"]
    A --> F["Layer 5"]
    B --> G["√"]
    C --> H["√"]
    D --> I["√"]
    E --> J["√"]
    F --> K["√"]
    G --> L["√"]
    H --> M["√"]
    I --> N["√"]
    J --> O["√"]
    K --> P["√"]
    style A fill:#fff,stroke:#000
    style B fill:#fff,stroke:#000
    style C fill:#fff,stroke:#000
    style D fill:#fff,stroke:#000
    style E fill:#fff,stroke:#000
    style F fill:#fff,stroke:#000
    style G fill:#fff,stroke:#000
    style H fill:#fff,stroke:#000
    style I fill:#fff,stroke:#000
    style J fill:#fff,stroke:#000
    style K fill:#fff,stroke:#000
    style L fill:#fff,stroke:#000
    style M fill:#fff,stroke:#000
    style N fill:#fff,stroke:#000
    style O fill:#fff,stroke:#000
    style P fill:#fff,stroke:#000
The player will only recognize three folder levels and does not display folders containing only other folders. In the example above, the unit will display folders 3, 4, 6, and 8, but not 2 and 7 since they do not contain since they do not contain any tracks directly. Folder 5 is not recognized at all since it is at the fourth level.
Electronic Shock Protection
• 10 seconds for CD-DA (CDA)
• >45 seconds for MP3 recorded at 44.1kHz, 128kbps
• >90 seconds for WMA recorded at 44.1kHz, 128kbps
Stop Playback Temporarily
- During playback, press ▶ II to pause playback.
• The sound will be muted. - Display „PAUSE“ in the TV screen.
- Press ▶ II again to continue playback.
To resume normal play, repeat the operation.
Stop Playback Entirely
During DVD, VCD, CD, MP3 playback:
1) Press ■ key once stopping the playback and the relevant location on the disc is saved, press ▶ II to resume the playback from the saved disc location.
2) Press ■ twice to cease the playback. Press ▶ II to start the playback from the very beginning the Title page of the DVD or the first track of VCD / CD.
Select Desired Track
- Press ◀ or ▶ to skip to the next track.
- Use 1-9 and 0, 10+ buttons on the remote control to select desired track number.
Fast Forward/Backward During Playback
Press ◀ or ▶ for more than 2 seconds once or more to select X2, X4, X8, X20, to fast backward or forward track during playback.
- During the fast forward or backward operation, press ▶ II briefly to playback again.
- During the fast forward or backward operation, the volume will be muted.
Repeat
During playback, press REPEAT once or more.
• RPT icon will appear on the display.
- For VCD/CD: Display appears RPT ONE → RPT ALL → RPT OFF.
- For DVD: Display appears RPT CHAPTER → RPT TITLE → RPT OFF.
- For File disc: Display appears RPT ONE → RPT DIR → RPT ALL → RPT OFF.
Note:
If you do not select RPT on, when the entire disc or TITLE playback has finished, the system will stop. If no other control, after 5 minutes the unit will turn into standby mode.
Repeat A → B
Select desired passage to repeat playback.
- Press A → B once to select starting point. Display shows REPEAT A.
- Press A → B again to select ending point. Display shows REPEAT A → B and selected passage start to replay.
- Press A → B once again to exit. Display shows A → B CANCEL.
PBC - Playback Control (for VCD only)
1) If you insert a VCD with PBC, playback starts from the beginning of the 1st track automatically.
2) Press PBC to show menu, use ◀◀ / ▶ or digit button to select desired track. Press ■ to stop. Press PBC again to exit menu.
GOTO
Goto desired track/chapter or time point directly.
Press GOTO button on the remote control, track or DVD Title/Chapter and time display on top of the screen. Current i tem is highlighted. Use ◀ / ▶ to select desired item. Use digit button to select number. Press ENTER to confirm.
Program
- Press PROG to enter program list. Use ▲/▼ or ◀ / ▶ cursor and digit button to enter number.
For DVD and File disc, select title and chapter number.
For VCD and CD, select track number.
- Press ▶ II to play, or move the cursor to select „PLAY“ and press ENTER to play.
- If you want to delete the list, move the cursor to „CLEAR“, press ENTER to delete all the list set before.
- Press PROG again to exit program play.
DVD Audio Select
Press AUDIO or R/L to select audio language to listen if the DVD has multiple audio languages.
VCD Audio Select
Press R/L to select audio channel to listen.

DVD Subtitle Select
Press SUB.T to select the subtitle language to show if the DVD has multiple language subtitles.
DVD Title Select
Press TITLE to display title or chapter list, use cursor or digit number to select, press ENTER to play.
DVD Angle Select
Press ANGLE to select different angle to view if the DVD has multiple-angle views.
Picture Mirror
When you view a picture, press ▲ repeatedly to mirror the picture vertically, and press ▼ repeatedly to mirror the picture horizontally.
ZOOM
Press ZOOM button, the picture will be zoomed accordingly.

flowchart
graph TD
    A["X2"] --> B["X3"]
    B --> C["X4"]
    C --> D["X1/2"]
    D --> E["X1/3"]
    E --> F["X1/4"]
    F --> G["OFF"]
    G --> H["↑"]
DEVICE CONNECTIONS
Notes of connection
- To avoid short circuit in the electrical system, ensure that the negative battery cable is disconnected before installation.
- To prevent short circuit in the wiring and damaging to this unit, secure all wirings with cable clamp or adhesive tape. Route the wirings in a secured, out of heating place without touching any moving parts such as gear shift, handbrake, and seat rails to prevent the wiring insulation being melted / wore off.
- Never pass the yellow power cord through the installation hole into the engine compartment and connect to the car battery. Otherwise, a high possibility of serious short circuit to the electrical system may be occurred.
- Replacing a new fuse with 15A rating when the old one is broken, using no fuse or fuse with improper rating may cause damage to this unit or even fires. If a proper fuse is installed and electrical problems still occur, please contact with any professional car shops for inquiry.
• DO NOT connect other equipments with the car battery to avoid battery overheating.
- Please make sure all the wiring connections & the cables of the Speakers are wellinsulated. Otherwise, this unit may be damaged by short circuit.
- If there is no ACC available, please connect ACC lead to the power supply with a switch.
- If an external power amplifier is connected, please don't connect P.CONT lead to the power lead of the external power amplifier, otherwise, electric spark or other damage may be resulted.
- Never ground the speaker output to prevent the damage to the built-in power amplifier.
- The minimum rating of the speakers connected to this unit is 50W with 4 to 8Ω impedance.
Parking Brake Cable Connections

Reverse Driving Cable Connections

flowchart
graph LR
    A["Car frame"] --> B["Reverse driving light"]
    B --> C["Pink wire"]
    C --> D["Rear view video camera lead"]
    D --> E["Battery"]
    E --> F["Car frame"]
    G["Eng - 124"] --> H["Gearbox"]
    style A fill:#f9f,stroke:#333
    style F fill:#f9f,stroke:#333
    style G fill:#ccf,stroke:#333
    style H fill:#cfc,stroke:#333

flowchart
graph TD
    A["Radio Antenna"] --> B["(Pink)"]
    B --> C["(Green/White)"]
    C --> D["Parking SW"]
    D --> E["(Active low level input)"]
    E --> F["Reverse"]
    F --> G["(Active high level input)"]
    G --> H["MAYS-MAX"]
    H --> I["Fuse 15A"]
    I --> J["Connector"]
    J --> K["Rear Line-out(Gray)"]
    K --> L["Amplifier"]
    L --> M["Modified wiring"]

    N["Original wiring"] --> O["Yellow"]
    N --> P["Red"]
    N --> Q["Yellow"]
    N --> R["Red"]

    S["ISO Connector"] --> T["Red"]
    S --> U["Black"]
    S --> V["Blue"]
    S --> W["Yellow"]
    S --> X["Ground Lead"]
    S --> Y["Motor/Electric Antenna relay control Lead"]
    S --> Z["Amplifier relay control Lead"]
    S --> AA["To car battery(+)"]
    S --> AB["Continuous +12V DC"]

    AC["Power Bracket"] --> AD["Red"]
    AE["Motor"] --> AF["Blue"]
    AG["Speaker"] --> AH["Left Speaker (Front)"]
    AI["Speaker"] --> AJ["Left Speaker (Rear)"]

    AK["Original Wiring"] --> AL["Yellow"]
    AK --> AM["Red"]

    AN["Original Wiring"] --> AO["Yellow"]
    AN --> AP["Red"]

    AQ["Original Wiring"] --> AR["Yellow"]
    AQ --> AS["Red"]

    AT["Original Wiring"] --> AU["Yellow"]
    AT --> AV["Red"]

    AW["Original Wiring"] --> AX["Yellow"]
    AW --> AY["Red"]

    AZ["Original Wiring"] --> BA["Yellow"]
    AZ --> BB["Red"]

    BC["Original Wiring"] --> BD["Yellow"]
    BC --> BE["Red"]

    BF["Original Wiring"] --> BG["Yellow"]
    BF --> BH["Red"]

    BI["Original Wiring"] --> BJ["Yellow"]
    BI --> BK["Red"]

    BL["Original Wiring"] --> BM["Yellow"]
    BL --> BN["Red"]

    BO["Original Wiring"] --> BP["Yellow"]
    BO --> BQ["Red"]

    BR["Original Wiring"] --> BS["Yellow"]
    BR --> BT["Red"]

    BU["Original Wiring"] --> BV["Yellow"]
    BU --> BW["Red"]

    BX["Original Wiring"] --> BY["Yellow"]
    BX --> BZ["Red"]

    CA["Original Wiring"] --> CB["Yellow"]
    CA --> CC["Red"]

    CD["Ambulator"] --> CE["Rear Line-out(Gray)"]
    CE --> CF["L(White)"]

    CG["Ambulator"] --> CH["Rear Line-out(Gray)"]
    CH --> CI["L(White)"]

    CJ["Ambulator"] --> CK["Rear Line-out(Gray)"]
    CK --> CL["L(White)"]

    CM["Ambulator"] --> CN["Rear Line-out(Gray)"]
    CN --> CO["L(White)"]

    CP["Ambulator"] --> CQ["Rear Line-out(Gray)"]
    CQ --> CR["L(White)"]

    CS["Ambulator"] --> CY["Rear Line-out(Gray)"]
    CY --> CZ["L(White)"]

    DA["Ambulator"] --> DA["Lear Line-out(Gray)"]
    DA --> DB["L(White)"]

    DC["Ambulator"] --> DC["Lear Line-out(Gray)"]
    DC --> DD["L(White)"]

    DE["Ambulator"] --> DE["Lear Line-out(Gray)"]
    DE --> DF["L(White)"]

    DG["Ambulator"] --> DG["Lear Line-out(Gray)"]
    DG --> DH["L(White)"]

    DI["Ambulator"] --> DI["Lear Line-out(Gray)"]
    DI --> DJ["L(White)"]

    DK["Ambulator"] --> DK["Lear Line-out(Gray)"]
    DK --> DL["L(White)"]

    DV["Ambulator"] --> DV["Lear Line-out(Gray)"]
    DV --> DW["L(White)"]

    DX["Ambulator"] --> DX["Lear Line-out(Gray)"]
    DX --> DXF["L(White)"]

    DXG["Ambulator"] --> DXL["Lear Line-out(Gray)"]
    DXG --> DXM["L(White)"]

    DY["Ambulator"] --> DY["Lear Line-out(Gray)"]
    DY --> DYF["L(White)"]

    DYH["Ambulator"] --> DYL["Lear Line-out(Gray)"]
    DYH --> DYM["L(White)"]

    DYI["Ambulator"] --> DYJ["Lear Line-out(Gray)"]
    DYI --> DYK["L(White)"]

    DYL["Ambulator"] --> DYM["Lear Line-out(Gray)"]
    DYL --> DYN["L(White)"]

    DYO["Ambulator"] --> DYP["Lear Line-out(Gray)"]
    DYO --> DYQ["L(White)"]

    DYR["Ambulator"] --> DYS["Lear Line-out(Gray)"]
    DYR --> DYT["L(White)"]

    DYU["Ambulator"] --> DYV["Lear Line-out(Gray)"]
    DYU --> DYW["L(White)"]

    DYX["Ambulator"] --> DYX["Lear Line-out(Gray)"]
    DYX --> DYXL["L(White)"]

    DYY["Ambulator"] --> DYZ["Lear Line-out(Gray)"]
    DYZ --> DYXL["L(White)"]

    DYXL --> DYXL1["Lear Line-out(Gray)"]
    DYXL1 --> DYXL2["L(White)"]

    DYXL2 --> DYXL3["Lear Line-out(Gray)"]
    DYXL3 --> DYXL4["L(White)"]

    DYXL4 --> DYXL5["Lear Line-out(Gray)"]
    DYXL5 --> DYXL6["L(White)"]
DEVICE CONNECTIONS
Using the ISO Connector
1) If your car is equipped with the ISO connector, then connect the ISO connectors as illustrated.
2) For connections without the ISO connectors, check the wiring in the vehicle carefully before connecting, incorrect connection may cause serious damage to this unit.
Cut the connector, connect the colored leads of the power cord to the car battery, as shown in the colour code table below for speaker and power cable connections.


| Location Function | ||
| Connector A Konektor B | ||
| 1 Rear Right (+) | - Purple | |
| 2 Rear Right (-) | - Purple / Black Stripe | |
| 3 Front Right (+) | - Gray | |
| 4 Battery 12V(+) | /Yellow Front Right (-) - Gray / Black Stripe | |
| 5 ANT/Amp control | /Blue Front Left(+) - White | |
| 6 Front Left(-) - | White / Black Stripe | |
| 7 ACC+/Red Rear Left (+) - Green | ||
| 8 Ground/Black Rear Left (-) - Green/ Black Stripe | ||
PREPARATION
1. Disconnect battery
Before you begin, always disconnect the battery negative terminal.
Note:
If the unit is to be installed in a car equipped with an on-board drive or navigation computer, do not disconnect the battery cable. If the cable is disconnected, the computer memory may be lost. Under these conditions, use extra caution during installation to avoid causing a short circuit.
2. Remove transport screws
IMPORTANT:
Remove these two transport screws before installation. Otherwise, the DVD player will not work.
3. Remove unit from sleeve
Lift latches on both sides of sleeve to remove half-sleeve from the unit.
Mounting Sleeve Installation
1) Slide the mounting sleeve off the chassis. If it is locked into position, use the removal tools (supplied) to disengage it.
2) Check the dashboard opening size by sliding the mounting sleeve into it.

If the opening is too small, carefully cut or file as necessary until the sleeve easily slides into the opening. Do not force the sleeve into the opening or cause it to bend or bow. Check for sufficient space behind the dashboard for the unit chassis. This unit can be installed in any dashboard with a suitable 183 mm (W) x 52 mm (H) opening as shown above. The dashboard should be 4.75 mm - 5.56 mm thick in order to be able to support the unit.
3) Locate the series of bend tabs along the top, bottom, and sides of the mounting sleeve. With the sleeve fully inserted into the dashboard opening, bend as many of the tabs outward as necessary to firmly secure the sleeve to the dashboard..
CAUTION:
For proper operation of the DVD player, the chassis must be mounted within 20 of horizontal. Make sure the unit is mounted within this limitation..
4) Place the unit in front of the dashboard opening so the wiring can be brought through the mounting sleeve. Follow the wiring diagram carefully and make certain all connections are secure and insulated with wire nuts or electrical tape. After completing the wiring connections, turn the unit on to confirm operation (vehicle ignition must be on). If the unit does not operate, re-check all wiring until the problem is corrected.
5) Make sure the radio is right-side up, then carefully slide the radio into the mounting sleeve until it is fully seated and the spring clips lock it into place.
6) Secure the rear of the unit to the car body using the mounting bolt and rubber cushion.
7) Test the unit using the "Operation" instructions that follow..
Kit Installation
If your vehicle requires the use of an installation kit to mount this unit, follow the instructions included with the installation kit to attach the unit to the mounting plate supplied with the kit.
1) Wire and test the unit as outlined in the Mounting Sleeve Installation instructions.
2) Install the radio/mounting plate assembly to the sub-dashboard according to the instructions in the installation kit.
3) Replace the dashboard trim panel.
ISO Installation
This unit has threaded holes in the chassis side panels which may be used with the original factory mounting brackets of some vehicles to mount the radio to the dashboard.
Please consult with your local car stereo shop for assistance on this type of installation.
1) Remove the existing factory radio from the dashboard or center console mounting. Save all hardware and brackets as they will be used to mount the new radio.
2) Carefully unsnap the plastic frame from the front of the new unit chassis. Remove and discard the frame..
3) Remove the factory mounting brackets and hardware from the existing unit and attach them to the new unit. Do not exceed M5 x 9mm maximum screw size. Longer screws may damage components inside the chassis.

4) Wire the new unit as outlined in the Mounting Sleeve Installation instructions.
5) Mount the new unit assembly to the dashboard or center console using the reverse procedure of step 1.
RESET

The RESET button is located behind the front panel and can only be accessed with the front panel opened. Resetting the unit will erase the time and preset memories. It should only be activated upon initial installation after all wiring is complete, or if there is a malfunction of any of the switches on the unit. In these circumstances, pressing the RESET button will clear the system and return the unit to default operation.
Fuse
When replacing a fuse, make sure the new fuse is the correct type and amperage. Using an incorrect fuse could damage the radio.
Reconnect Battery
When wiring is complete, reconnect the battery negative terminal.
ANTI-THEFT SYSTEM
This uni t is designed with a f l ip-down detachable panel.
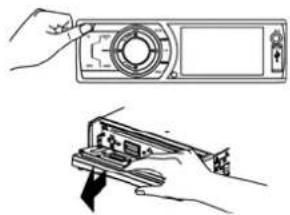
The panel can be detached and taken with you, helping to deter theft. To detach the front panel, perform the following steps:
Remove the Panel
1) Press Ⓛ to switch off the power of the unit.
2) Press ▲ to flip down the panel.
3) Grasp the right side to release the front panel and then pull it at an angle to remove the right side from the chassis.
4) Store the front panel in the supplied carrying case to protect it from dirt and damage, and take it with you to prevent theft.
natural_image
Illustration of hands operating a device with a screen and a handheld device (no text or symbols visible)Re-attach the Font Panel
1) With the panel laying flat (in the "open" position), insert the left side of the panel in place until correctly engaged.
2) Gently press the right side of the panel until the mechanism locks it into place.
3) Lift upward to close the panel.

natural_image
Illustration of a hand holding a device with an arrow pointing to it, next to a close-up of the device (no text or symbols visible)Remove the Unit
1) Remove the panel and the trim plate.
2) Remove the trim ring by firmly grasping one side and pulling.
3) Insert the removal keys straight back until they lock, then pull the radio out. If the removal keys are inserted at an angle, they will not lock properly and will not release the unit.

TROUBLESHOOTING
If you suspect something is wrong, immediately switch power off. Immediately stop using it and call the store where you purchased it. Never try to repair the unit yourself because it is dangerous to do so.
| Problém Possible cause Solution | ||
| Obecné | ||
| The unit will not switch on. Car | gnition is not on.Cable is not properly connected.Fuse is burnt. | Otočte klíčem zapalování.Zkontrolujte propojení kabelů.Vyměňte pojistku za novou o stejné kapacitě. |
| No sound Volume is set at mini | num orthe mute function is on. | Volume is set at minimum or the mute function is on. |
| The unit or screen does not function normally. | The unit system is unstable. Press the RESET button. | |
| DVD mode | ||
| The appliance will not play discs. | The discisinserted incorrectly.The disc is dirty or damaged. | Disc must be inserted with the label side facing up.Clean the disc and check for damage. Try another disc. |
| Sound skips due to vibration. | Mounting angle is over 30°.Mounting is unstable. | Adjust mounting angle to less than 30°. Mount the unit securely with the supplied parts. |
| TUNER mode | ||
| Unabletoreceive stations. The a | antenna is not connected properly. | Connect the antenna prope-ry. |
| Poor quality reception of radio station. | The antenna is not fully exten- ded or it is broken. | Fully extend the antenna and if broken, replace it with a new one. |
| Preset stations are lost. The ba | tery cable is not properly connected. | Connect the permanent live on the unit to the permanent live on the vehicle. |
| USB/SD/MMC mode | ||
| Unable to insert USB device or SD/MMC card. | The memory card or USB device has been inserted the wrong way round. | Insert it the other way around. |
| The USB device or SD/ MMC card cannot be read. | NTFS format is not supported. | Check that the USB/SD/MMC file system is in FAT or FAT32 format. Due to diffe- rent formats, some models of USB storage devices or MP3 players may not be read. |
| Remote control | ||
| The remote control is not wor- king or does not work properly | The bat ter ies are low or empty. | Change the batteries. |
CARE AND MAINTENANCE
DVD Player
The following guidelines will help you extend the life of your DVD player:
1) When cleaning the vehicle interior, do not get water or cleaning fluids on the unit.
2) The DVD player will not operate properly in extreme hot/cold or under damp conditions. In case of such conditions, wait until the vehicle interior reaches a normal temperature or any condensation on the disc player lens has evaporated before using the player.
3) Always remove the disc when the player is not in use.
4) The unit is designed with a vibration dampening disc mechanism to minimize interruption of disc play due to normal vibration in a moving vehicle. However, occasional sound skips may occur when driving on very rough roads. This will not scratch or damage the disc, and normal play will resume when the rough conditions cease.
CD-R and CD-RW Capability
Depending on media type and method of „recording/burning“, some CD-R/RWs may be incompatible with this unit. After „recording/burning“, the session must be closed. Please refer to your software's recommended procedures for closing a disc/session. Review your recording software to familiarize yourself with the correct „recording/burning“ procedures. We recommend using the latest versions of ROXIOTM or NEROTM burning software.
In addition, this unit will only recognize the CDDA (Compact Disc Digital Audio), .MP3 and .WMA formats „recorded / burned“ onto a CD-R/RW. This unit does not support .WAV, .OGG or other formats.
Disc Care and Handling
Dirt, dust, scratches and warpage can cause skips in the playback and deterioration of sound quality. Please follow these guidelines to take care of your compact discs.

1) Do not touch the disc surface.
2) Never use chemicals such as record sprays or household cleaners to clean discs, as they can irreparably damage the disc's surface.
3) Discs should be kept in their storage cases when not in use.
4) Do not expose discs to direct sunlight, high temperatures or high humidity for long periods.
5) Carefully wipe fingerprints, dust and dirt from the disc's playing surface with a soft cloth. Wipe in a straight motion from the inside to the outside of the disc.
6) Do not stick paper, tape or disc labels on disc surfaces, as internal damage may occur.
SPECIFICATIONS
General
Power supply: 12VDC (11V-16V), Test voltage 14.4V, negative ground
Maximum power output: 45W x 4 channels
Continuous power output: 20W x 4 channels (4Ω 10% T.H.D.)
Suitable speaker impedance: 4-8 ohm
Pre-Amp output voltage: 2.0V (CD play mode: 1KHz, 0dB, 10KΩ load)
Fuse: 15A
Dimensions (WxHxD): 178 x 50 x 166 mm
Weight (NETTO): 1,7 kg
Aux-in level: ≥500 mV
3 Inch (16:9) TFT LCD
Display resolution (dot): 960(W)×240(H)
Active area (mm): 65.52×36.84
Screen size (inch): 2.96 (Diagonal)
Dot pitch (mm): 0.06825 x 0.1535
Contrast ratio: 300
Brightness: 350 nits
FM Stereo Radio
Frequency range: 87,5 – 108,0 MHz (Europe) 87,5 – 107,9 MHz (America)
Usable sensitivity: 8 dBμ
Frequency response: 30 Hz – 15 kHz
Stereo separation: 30 dB (1 kHz)
Image response ratio: 50 dB
IF response ratio: 70 dB
Signal/noise ratio: >55 dB
AM(MW) Radio
Frequency range: 522 – 1620 kHz (Europe) 530 – 1710 kHz (America)
Usable sensitivity (S/N=20dB): 30 dB
Disc Player
System: Disc digital audio system
Frequency response: 20 Hz – 20 kHz
Signal/noise ratio: >80 dB
Total harmonic distortion: Less than 0,20% (1 kHz)
Channel separation: >60 dB
Video signal format system: NTSC/PAL 60/PAL/AUTO
Video output: 1 ± 0.2 V
Components
Mounting sleeve 1
Machine screws M5x6 mm 4
Mounting bolt (50 mm) 1
Wire connector 1
Removable face plate case 1
Trim plate 1
Removal key 2
Operating Instructions 1
Rubber cushion 1
Remote control 1

WARNING: Do not use this product near water, in wet areas to avoid fire or injury of electric current. Always turn off the product when you don't use it or before a revision. There aren't any parts in this appliance which are reparable by consumer. Always appeal to a qualified authorized service. The product is under a dangerous tension.
Old electrical appliances, used batteries and accumulators disposal
natural_image
Symbol of a trash bin crossed with a diagonal line and a horizontal bar below (no text or labels)This symbol appearing on the product, on the product accessories or on the product packing means that the product must not be disposed as household waste. When the product/ battery durability is over, please, deliver the product or battery (if it is enclosed) to the respective collection point, where the electrical appliances or batteries will be recycled. The places, where the used electrical appliances are collected, exist in the European Union and in other European countries as well. By proper disposal of the product you can prevent possible negative impact on environment and human health, which might otherwise occur as a consequence of improper manipulation with the product or battery/ accumulator. Recycling of materials contributes to protection of natural resources. Therefore, please, do not throw the old electrical appliances and batteries/ accumulators in the household waste. Information, where it is possible to leave the old electrical appliances for free, is provided at your local authority, at the store where you have bought the product. Information, where you can leave the batteries and accumulators for free, is provided to you at the store, at your local authority.
Poznámky / Notatka / Notes:
ZARUČNÍ LIST
ZÁRUČNÍ PODMÍNKY

- VÝCHOZÍ STAV: OBNOVIT
- STEREO\_MONO: STEREO/MONO
- AF: ZAP./VYP.
- Vytažení přístroje
- SAFETY INFORMATION
- Caution
- Two Laser Products
- Caution of Disc Using
- Contents
- FEATURES
- DVD-R/RW Compatibility
- Video CDs Featuring PBC
- Compatibility
- WMA and MP3 Compatibility
- About WMA
- About MP3
- Button Operation Explanations
- Some frequent operations
- Note:
- Press the ▲button to open the panel.
- PANEL CONTROLS
- REMOTE CONTROLS
- Press to turn on/off the unit.
- Remote Control Operating Range
- Replacing the lithium battery
- Warning
- USB/SD/MMC/MP3 PLAYBACK
- 1) Load SD/MMC Card
- 2) Take out SD/MMC Card
- 3) Load USB Equipment
- 4) Take out USB Equipment
- USB/SD/MMC Notes
- BASIC OPERATIONS
- Turn on/off the Power
- Mute
- Adjust the Volume
- Playing Source Selection
- Method 1
- Method 2
- When Parking Brake Applied
- When Reverse Driving
- ROTARY KNOB MENU
- EQ: USER/FLAT/POP/ROCK/CLASSIC/JAZZ
- GENERAL SETTING
- BEEP: ON/ OFF
- LOUDNESS: ON/OFF
- TIME MODE
- TIME ADJUST
- MIRROR: ON/OFF
- DVD Setting
- TV SYSTEM: NTSC/PAL/AUTO
- TV TYPE: 4:3PS/4:3LB/16:9
- PASSWORD
- RATING: 1 KID SAFE/2 G/3 PG/4 PG13/5 PG-R/6 R/7 NC-17/8 ADULT
- DEFAULT: RESTORE
- BRIGHTNESS
- CONTRAST
- HUE
- SATURATION
- Language Setting
- OSD LANGUAGE:
- AUDIO LANG:
- SUBTITLE LANGEnglish
- MENU LANG
- RADIO SETTING
- LOC\_DX: LOC/DX
- AF: ON/OFF
- TA: ON/OFF
- TA VOLUME: 00-63
- REGIONAL: ON/OFF
- CT: ON/OFF
- Accessing Radio Mode
- Selecting a Band
- Selecting a Station
- Tuning
- Preset Mode
- STORING STATIONS
- - Auto storing
- - Manual Storing
- Recalling a Station
- RDS (RADIO DATA SYSTEM, OPTIONAL)
- RDS Basics
- Traffic Announcements
- EON (Enhanced Other Networks)
- PTY Reception (Program Type)
- PTY Mode:
- DISC MODE
- Accessing Disc Mode
- Insert a Disc
- Eject the Disc
- Disc Playback
- FILE TYPE SUPPORTED
- Video file:
- MP3 file:
- Disc and File NOT Supported
- Audio/Picture/Video File Playback
- For Audio Files
- For Picture Files
- For Video Files
- MP3/WMA Notes
- Entering ID3 Tag
- Entering File and Folder Names
- MP3 Playing Order
- Electronic Shock Protection
- Stop Playback Temporarily
- Stop Playback Entirely
- Select Desired Track
- Fast Forward/Backward During Playback
- Repeat
- Repeat A → B
- PBC - Playback Control (for VCD only)
- GOTO
- Program
- DVD Audio Select
- VCD Audio Select
- DVD Subtitle Select
- DVD Title Select
- DVD Angle Select
- Picture Mirror
- ZOOM
- DEVICE CONNECTIONS
- Notes of connection
- Using the ISO Connector
- PREPARATION
- Disconnect battery
- Remove transport screws
- IMPORTANT:
- Remove unit from sleeve
- Mounting Sleeve Installation
- CAUTION:
- Kit Installation
- ISO Installation
- RESET
- Fuse
- Reconnect Battery
- ANTI-THEFT SYSTEM
- Remove the Panel
- Re-attach the Font Panel
- Remove the Unit
- TROUBLESHOOTING
- CARE AND MAINTENANCE
- DVD Player
- CD-R and CD-RW Capability
- Disc Care and Handling
- SPECIFICATIONS
- General
- Inch (16:9) TFT LCD
- FM Stereo Radio
- AM(MW) Radio
- Disc Player
- Components
- Old electrical appliances, used batteries and accumulators disposal
- ZARUČNÍ LIST
- ZÁRUČNÍ PODMÍNKY
Brand : HYUNDAI
Model : CRMD 7222 SU
Category : Car radio