
CRMD 7750 SU - Car radio HYUNDAI - Free user manual and instructions
Find the device manual for free CRMD 7750 SU HYUNDAI in PDF.


| Type of product | Car stereo with DVD/Radio/USB/SD/AUX |
| Dimensions (W x H x D) | 178 mm x 50 mm x (165 + 25) mm |
| Net weight | 2.3 kg |
| Power supply voltage | 12 V DC (operating range: 10.5 - 15.8 V DC) |
| Maximum operating current | 10 A |
| Fuse rating | 10 A |
| Audio output power (max) | 4 x 45 W |
| Speaker impedance | 4 - 8 Ω |
| Radio frequency bands | FM (FM1/FM2/FM3) and AM (AM1/AM2) |
| RDS functions | AF, TA, PTY, PS, CT, RT |
| Disc playback | DVD, VCD, CD, MP3, WMA, MPEG, JPEG |
| Removable media | SD card, USB device |
| Display type | 7-inch TFT LCD, resolution 1440 x 234 |
| Video inputs | AUX IN (RCA), rear camera input |
| Audio inputs | AUX IN (RCA left/right) |
| Audio outputs | Front/rear speaker outputs, subwoofer pre-out |
| Equalizer settings | Preset modes (Rock, Hip Hop, etc.) and user adjustable |
| Touch screen calibration | Yes, via TS CAL menu |
| Parental control | Rating levels (Kid safe to Adult) with password |
| Cleaning instructions | Use soft cloth with neutral detergent; avoid alcohol |
| Safety precautions | Only 12V negative ground; do not disassemble; use correct fuse |
| Spare parts / reparability | No user-serviceable parts; contact after-sales service |
Frequently Asked Questions - CRMD 7750 SU HYUNDAI
User questions about CRMD 7750 SU HYUNDAI
0 question about this device. Answer the ones you know or ask your own.
Ask a new question about this device
Download the instructions for your Car radio in PDF format for free! Find your manual CRMD 7750 SU - HYUNDAI and take your electronic device back in hand. On this page are published all the documents necessary for the use of your device. CRMD 7750 SU by HYUNDAI.
USER MANUAL CRMD 7750 SU HYUNDAI
INSTALACE A DEMONTÁŽ
Poznámky k instalaci 27

VYSUNOUT
Vložení baterie
ZASUNOUT

ZÁKLADNÍ PROVOZ
ZAPNUTÍ/VYPNUTÍ
INSTALACE A DEMONTÁŽ
POZNÁMKY K INSTALACI
DEMONTÁŽ
Demontáž rámečku
DEMONTÁŽ PŘÍSTROJE

VYSUNÚŤ
Vloženie batérie
ZASUNÚŤ

ZÁKLADNÁ PREVÁDZKA
ZAPNUTIE/VYPNUTIE
DEMONTÁŽ
Demontáž rámiku
DEMONTÁŽ PRÍSTROJA
INSTALACJA I DEMONTAŻ

WYSUNAĆ
Wkładanie baterii
ZASUNUĆ

DZIAŁANIA PODSTAWOWE
WŁĄCZANIE/WYŁĄCZANIE
WYBÓR JEZYKA NAPISÓW
Metoda 2:
INSTALACJA I DEMONTAŻ
UWAGI DOTYCZĄCE INSTALACJI

DEMONTAŻ
Demontaż ramki
DEMONTAŻ URZĄDZENIA
1) Only connect this unit to a 12 V DC power supply with negative grounding.
2) Never install this unit where the operation for safety driving is restrained.
3) NEVER USE THE VIDEO DISPLAY FUNCTION IN THE FRONT WHEN DRIVING TO PREVENT THE VIOLATION OF LAWS & REGULATIONS AND ALSO TO REDUCE THE RISK OF TRAFFIC ACCIDENT EXCEPT USING THE REAR VIEW VIDEO CAMERA.
4) Never expose this unit, amplifier, speakers to moisture or water to prevent electronic sparks or fires.
5) Please don't change the fuse in the power cord without professional guidance, improper fuse may cause damage to this using unit or even cause fire.
6) Please power off this unit at once and send it back to the after-sales service center or the dealer/distributor you purchased from if one of the following symptoms is found: (a) No audio output; (b) No image output; (c) Water or other obstacle enters the unit; (d) Smoking; (e) Peculiar smell.
7) To ensure safe driving, please adjust the volume to a safe and comfort level in case of emergency situations.
PRECAUTIONS
1) Never disassemble or adjust the unit without any professional guide.
For details, please consult any professional car shop / dealer for inquiry.
2) If the front panel or TFT monitor is squalid, please use a clean silicone cloth and neutral detergent to wipe off the spot. Using a rough cloth and non-neutral detergent such as alcohol for cleaning may result in scratching or decoloration to the applicant.
3) If any abnormal behavior of the unit is found, please refer to trouble shooting guide of this manual. If no relevant information is found, please press the [RESET] key on the front panel to resume factory default.
4) If you have parked the car in hot or cold weather for a long time, please wait until the temperature in the car becomes normal before operating the unit.
5) Using in-car heater in low temperature environment may result in beads coagulate inside the unit, DO NOT use the unit in this situation, eject the disc and wipe off the bead on the disc. If the unit still doesn't work after a few hours, please contact with after-sales service center.
6) No fierce impact to the LCD monitor when it is in open position for preventing the damage to any mechanisms inside.
7) To prevent the damage to the screen, avoid touching it with sharp objects.
8) The monitor employs auto motorizing mechanism, please don't push, pull, or swivel the monitor manually to prevent damage to the core mechanism.
9) To provide a clear demonstration and an alternative for easy understanding to the operation of this unit, graphic illustrations are used. However, these illustrations are some different from the actual images displayed on the screen.
10) During operating the unit, “ Ⓧ ” will display if the current operation is not available or illegal.
11) Operate the unit correctly according to this manual to prevent unnecessary problem. The guarantee won't be valid if the problem is caused by inappropriate operation.
DECLARATION
This product incorporates copyright protection technology that is protected by U.S. patents and other intellectual property rights. Use of this copyright protection technology must be authorized by Macrovision, and is intended for home and other limited viewing uses only unless otherwise authorized by Macrovision.
Reverse engineering or disassembly is prohibited.
CONTENTS
BEFORE USING
Front Panel 101
Remote Control 102
BASIC OPERATIONS
Power on/off 104
Mute 104
Volume adjustment 104
Open SOURCE MENU 104
Playing source selection 104
Display system time 104
Using the TFT monitor 105
Reset the unit 105
RADIO MODE
Select radio as playing source 105
Select one radio band 105
Auto tuning 105
Manual tuning 106
Auto save 106
Manual save 106
Preview scan 106
Recall the stored stations 106
Local seeking 106
RDS OPERATIONS
AF function 107
TA function 107
PTY function 107
Program Service (PS) 107
CT (Clock Time) 107
RT (Radio Text) 107
DISC MODE
Insert a disc 108
Eject the disc 108
Touch screen controls 108
Onscreen control buttons 108
Suspend playback 109
Stop playback 109
Display file list 109
Fast playback 109
Previous/Next 109
Change folder 109
Repeat playback 109
Repeat A-B 110
Random playback 110
Intro playback 110
Direct search 110
GOTO search 110
DVD MENU and TITLE 111
Select subtitle language 111
Select multi-angle views 111
Select audio channel 111
PBC function 111
Zoom in/out 111
Rotate picture 111
Playback information 112
SD/USB MODE
Select SD/USB as playing source 112
Using the touch screen controls 113
Onscreen control menus 113
Stop playback temporarily 113
Stop playback entirely 113
Display file list 113
Fast forward/reverse 113
Play the next or previous file 113
Repeat playback 113
Random playback 113
Intro playback 113
Search for a particular file 113
GOTO search 113
Zoom in/out 113
Rotate picture 113
Select picture slide mode 113
Playback informationdisplay 113
OTHER MODES
AUX 114
Camera 114
SETUP
Setup procedures 114
General 115
Language 115
Audio 115
Rating 116
Hardware 117
P.VOL 117
TS CAL 117
EQ 117
Troubleshooting 119
DEVICE CONNECTION
Notes of connection 121
Control Cables 121
Parking Brake Cable Connections ..... 122
Reverse Drive Cable Connections ..... 122
INSTALLATION AND UNINSTALL
Notes of installation 123
Unit installation 124
Trim Ring installation 125
Uninstall 125
Specifications 126
APPENDIX
Region Code 127
Cautions of disc using 127
Wiring Diagram 128
BEFORE USING
Front Panel
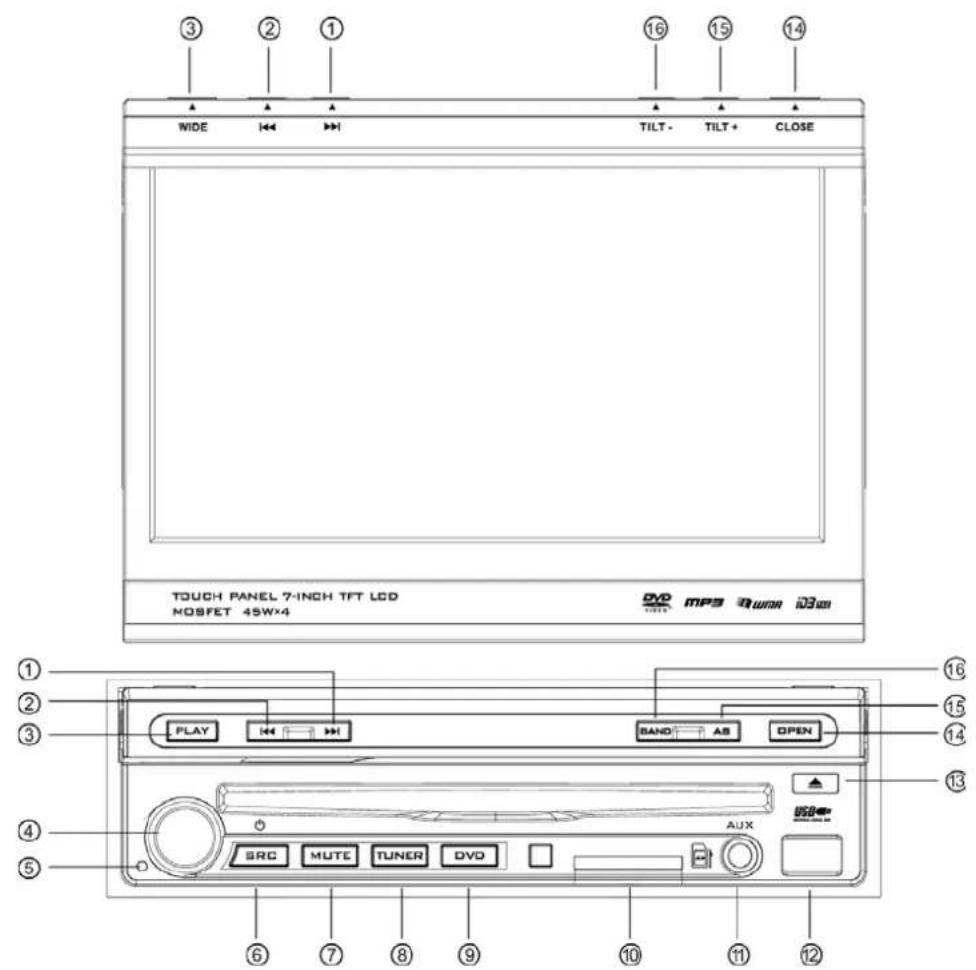
1) [▶] Key: Next/Move cursor to the right
2) [ ◀◀ ] Key: Previous/Move cursor to the left
3) [PLAY/WIDE] Key: Play - Pause/Change play mode
4) [VOL] Knob Key: Adjust volume/Pop-up EQ menu
5) [Reset] button: Reset the unit
6) [VSRC] Key: Unit power/Change work mode/Open Source Menu
7) [MUTE] Key: Mute audio outputs
8) [TUNER] Key: Switch to RADIO mode from other source
9) [DVD] Key: Switch to DVD mode from other source
10) SD CAD Slot
11) AUX IN jack
12) USB Slot
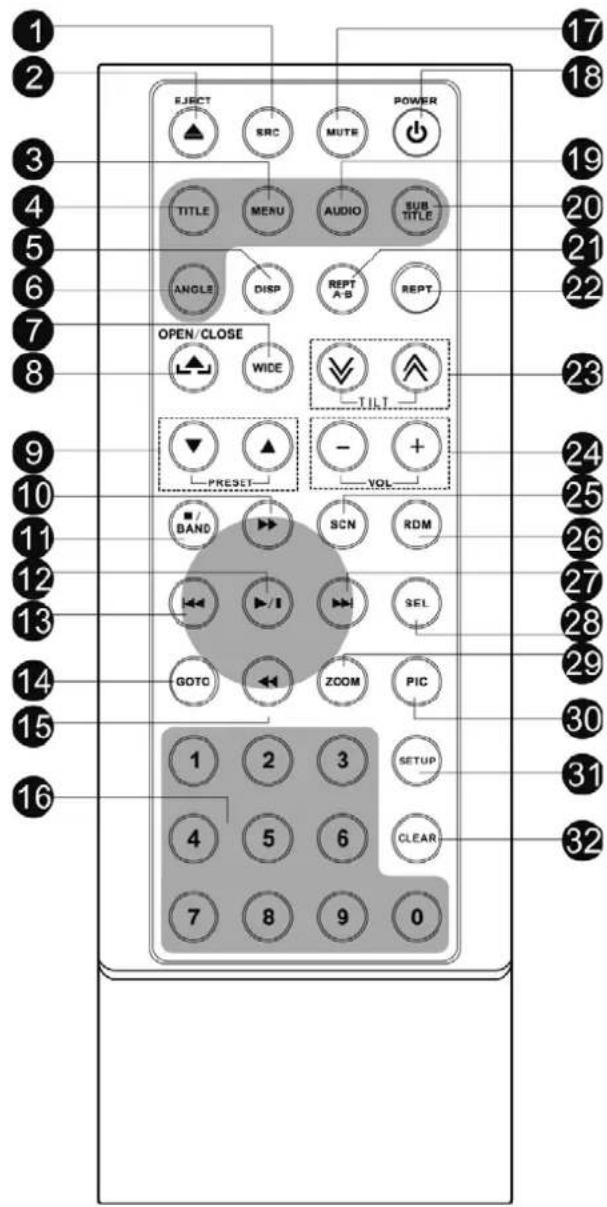
Introduce of key functions
Note:
Your remote control may differ slightly from the one pictured here. The above diagram is for illustrative purpose only.
1) [SRC] Key:select playing source
2) [EJECT] Key: Eject disc
3) [MENU] Key: DVD MENU/PBC
4) [TITLE] Key: DVD TITLE
5) [DISP] Key: Display information
6) [ANGLE] Key: Select view angle
7) [WIDE] Key: Change display mode
8) [OPEN/CLOSE] Key: Open/Close the TFT monitor
9) [PRESET/ ▲/▼ ] Key: Select preset radio station
10) [▶] Key: Fast Forward/Move cursor up
11) [ ■/BAND ] Key: Select radio band/Stop Playback
12) [ ▶ / II ] Key: Play/Pause/Enter
13) [◀] Key: Auto search/Previous/Move cursor to the left
14) [GOTO] Key: GOTO search
15) [◀] Key: Fast Reverse/Move cursor down
16) [0 \~ 9] Key: Numeric keys
17) [MUTE] Key: Mute audio outputs
18) [POWER] Key: Unit power
19) [AUDIO] Key: Select DVD dialogue language
20) [SUBTITLE] Key: Select DVD subtitle language
21) [REPT A-B] Key: A-B repeat
22) [REPT] Key: Repeat playback
23) [TILT ∨ ] Key: Adjusting display tilting angle
24) [VOL+/-] Key: Adjust volume
25) [SCN] Key: Scan playback
26) [RDM] Key: Random playback
27) [▶] Key: Auto search/Next/Move cursor to the right
28) [SEL] Key: EQ
29) [ZOOM] Key: Image zoom in/out
30) [PIC] Key: Image setting
31) [SETUP] Key: Setup menu
32) [CLEAR] Key: Clear information
Notes of remote control using:
1) Aim the remote control at the remote sensor on the unit.
2) Remove the battery from the remote control or insert a battery insulator if the battery has not been used for a month or longer.
3) DO NOT store the remote control under direct sunlight or in high temperature environment, or it may not function properly.
4) The battery can work for 6 months under normal condition. If the remote control can't work, please change the battery.
5) Use"button shaped" lithium battery"CR2025"(3V) only.
6) DO NOT recharge, disassemble, heat or expose the battery in fire.
7) Insert the battery in proper direction according to the (+) and (-) poles.
8) Store the battery in a place where children cannot reach to avoid the risk of accident.
Uninstall Battery
Slide out the battery compartment tray at the bottom on the back of the remote control.


PULL OUT
Install Battery
Use button-shaped lithium battery "CR2025 (3V)" only. Insert the battery to the battery tray with proper direction according to the (+) and (-) poles.

PUSH IN

BASIC OPERATIONS
POWER ON/OFF
Press any key on the front panel or the [POWER] key on the remote control to turn on the power under standby mode. The unit goes back to the last status after power on. Press and hold the [SRC] key on the front panel or press the [POWER] key on the remote control to turn off the power under work mode.
MUTE
Press the [MUTE] key on the front panel or remote control to mute the volume from the unit.
Notes:
1) Doing the operation above again or adjusting volume will release muting.
2) Mute icon winks on the TFT during muting.
VOLUME ADJUSTMENT
Turn the volume knob on the front panel or press the [VOL] key on the remote control. The adjustable range of volume is 0 to 40.
OPEN SOURCE MENU
Press the [SRC] key on the front panel or remote control or touch the top left corner of the screen to open the SOURCE MENU.
Do the above operation again to return to the original source.
PLAYING SOURCE SELECTION
Open the SOURCE MENU, and then touch the source you desired or select one source by moving the cursor and then confirm.
Notes:
1) Playing source selection means selecting work mode, such as DVD mode, Radio mode, Camera mode, etc.
2) When some devices are not ready, they cannot be selected.
DISPLAY SYSTEM TIME
Press and hold the [DISP] key on the front panel to switch the display information between system time and playing source when the TFT monitor is closed.
USING THE TFT MONITOR
Open/Close monitor
Press the [OPEN/CLOSE] key on the front panel or remote control to push the display panel out or in.
Change the monitor tilt angle
Due to the inherent character of LCD, you will get different vision impression s when you watch it from different angles. The display angle of this unit can be changed; hence you can select the best angle where you can get the best vision impression. Press the [TILT] key on the display panel or the remote control to adjust the tilt angle one step at a time. Press and hold the [TILT] key on the display panel or the remote control to adjust the tilt angle continuously.
Change aspect ratio
Press the [WIDE] key on the display panel or remote control to adjust the aspect ratio.
Image setting
1) Enter image setting mode
Press the [PIC] key on the remote control.
2) Select one item to adjust
Press the [▶]/[◀] keys on the remote control.
3) Adjust the value
Press the [▶]/[◀◀] keys on the remote control.
4) Exit image setting mode To exit image setting mode, repeat the first step or stop operation for some seconds.
Reset the unit
If the unit can not work correctly, you should reset the unit by pressing the [RESET] button on the front panel.
RADIO MODE
SELECT RADIO AS PLAYING SOURCE
Open the SOURCE MENU and then touch RADIO.
Press the [BAND] key on the display panel or remote control or touch the [BAND] icon on the user interface to select one radio band among FM1, FM2, FM3, AM1 and AM2.
AUTO TUNING
Press the [▶]/[◀] key on the display panel or remote control ortouch the [▶]/[◀] icon on the user interface to seek a higher/lower station. To stop searching, repeat the operation above or press other keys having radio functions.
Note:
When a station is received, searching stops and the station is played. If the unit receives a stereo broadcasting, the indicator light of stereo ,ST' on the TFT or LCD display will be lighted.
MANUAL TUNING
During manual tuning, the frequency will be changed in steps.
Press the [▶]/[◀] key on remote control or touch the [▶]/[◀] icon on the user interface to tune in a higher/lower station.
Touch the numeric keypad icon (图标) and then touch the numeric buttons to input the radio station frequency numbers.
AUTO SAVE
Only stations with sufficient signal strength will be detected and stored in the memory.
When the monitor is closed, press and hold the [AS/PS] key on the display panel.
When the monitor is opened, touch the [AS] icon on the user interface. To stop auto save, press other keys having radio functions.
Notes:
1) After auto save, the previous saved stations will be overwritten.
2) The unit has 5 bands, such as FM1, FM2, FM3, AM1, AM2, and Each band can store 6 stations; hence the unit can store 30 stations in all.
MANUAL SAVE
When one expected radio station has been detected
1) Press the [MEM] icon on the user interface and the preset menu will be opened.
2) Press one preset button among P1 \~ P6.
3) If you want to abort, press the [Exit] button.
PREVIEW SCAN
Preview scan searching is such a process that the searching pauses when a station is received and then played for 5 \~ 10 seconds. After being played, the unit continues the process until the whole band is detected.
When the monitor is closed, press the [AS/PS] key on the display panel.
When the monitor is opened, touch the [PS] icon on the user interface.
To stop the process, press other keys having radio functions.
RECALL THE STORED STATIONS
Press one numeric key among 1 to 6 on the remote control or touch an onscreen station button to select the corresponding stored station.
LOCAL SEEKING
When LOCAL seeking is on, only those radio stations with strong radio signal could be received.
To open or close LOCAL function, press and hold the volume knob on the front panel.
Notes:
1) When the local radio station searching is on, the indicator light ,LOC' lights up; whereas the light goes off.
2) The number of radio stations that can be received will decrease after the local seeking mode is on.
RDS OPERATIONS
The unit provides basic functions of RDS, including PI (Program Identification), radio station name, RT (Radio Text), CT (Clock Time), AF (Alternative Frequency), TA (Traffic Announcement) and PTY (Program Type) Selection.
AF FUNCTION
Alternative Frequencies Lists are used for the same program service and used in conjunction with the PI code (Program Identification code) to assist automatic tuning. Using this information, a radio can automatically search out another station that is playing the same material. This is useful when the station you are listening to is fading out.
To activate AF function, touch the [AF] button on the user interface.
To cancel this function, do the operation above again.
Note:
During auto switching radio frequency, some interference could be heard.
Turning off AF function can settle this problem.
TA FUNCTION
The TA (Traffic Announcement flag) function lets the unit receive traffic announcements automatically no matter what media source is playing back. The TA function can be activated by a TP (Traffic Program) station broadcasting traffic information.
When TA is activated and a traffic announcement is received, the current playing source will be overridden by the traffic announcement if the current radio band is FM and the 'TA' indicator lights up, indicating that the unit is waiting for traffic announcements.
The unit returns to the original source after the traffic announcement has been received.
To activate TA function, touch the [TA] button on the user interface.
To cancel this function, do the operation above again.
PTY FUNCTION
PTY is the abbreviation for Program Type which is a code defining the type of program being broadcast (e.g. News or Rock).
Six PTY options will display on the screen. To view more PTY options, touch the scroll bar and arrows on the screen. When one PTY option is touched (e.g. News), auto search for next available PTY by increasing tuning frequency until the PTY of the next station matches the current. If no matched PTY has been found, the unit will return to the original radio frequency.
PROGRAM SERVICE (PS)
Used for receiver displays of an 8 character alpha numeric Program Service name which may use Upper or Lower case characters, e.g. {BBC_4_FM}, {Classic_}.
CT (CLOCK TIME)
Some stations broadcast the time and date within the encoded RDS signal. The clock time is automatically adjusted when ,CT' is set to ,On'.
RT (RADIO TEXT)
When this function is activated, the unit will display short message data transmitted from the provider, such as station information, the name of the current broadcasting song and the artist name.
DISC MODE
INSERT A DISC
Upon inserting a disc, the unit will switch to disc mode automatically.
Notes:
1) Please confirm whether there is a disc in the unit before you insert another one.
2) Some recorded discs, such as CD-R, CD-RW, DVD-R, DVD+R, DVD-RW, DVD+RW cannot be played back because of different recording status. Otherwise, the discs without being closed could not be played back.
3) About the cautions of disc using, please refer to the appendix.
EJECT THE DISC
Press the [EJECT] key on the front panel or remote control to eject the disc. You can eject a disc after the unit has been powered off. The unit remains off after the disc is ejected.
The touch key areas for DVD playback are outlined below:

A) Open SOURCE MENU
B) Display playback information
C) Display onscreen control menu
ONSCREEN CONTROL BUTTONS
| Disc type | MP3/WMA | CD | VCD | DVD | MPEG | Picture |
| Icon | ||||||
| Numeric keypad | Numeric keypad | Numeric keypad | Numeric keypad | Numeric keypad | Numeric keypad | |
| Setup menu | Setup menu | Setup menu | Setup menu | Setup menu | Setup menu | |
| / | Fast forward | Fast forward | Fast forward | Fast forward | / | |
| / | Fast rewind | Fast rewind | Fast rewind | Fast rewind | / | |
| Previous | Previous | Previous | Previous | Previous | Previous | |
| Next | Next | Next | Next | Next | Next | |
| > / || | Play/Pause | Play/Pause | Play/Pause | Play/Pause | Play/Pause | Play/Pause |
| Stop | Stop | Stop | Stop | Stop | Stop | |
| □ 1/2 □ 2/2 | / | / | A second menu | A second menu | A second menu | / |
| Repeat | Repeat | Repeat | Repeat | Repeat | Repeat | |
| Random | Random | Random | Random | Random | / | |
| / | / | / | / | / | Rotate | |
| / | / | Zoom | / | / | Zoom | |
| EQ | EQ setup | EQ setup | EQ setup | EQ setup | EQ setup | EQ setup |
| PBC | / | / | PBC | / | / | / |
| A - B | / | / | A - B repeat | A - B repeat | / | / |
| Back | / | / | Exit menu | Exit menu | Exit menu | Exit menu |
| AUDIO | / | / | Channel switching | Dialog Language | Dialog Language | / |
| SUBTITLE | / | / | / | Subtitle Language | Subtitle Language | / |
| DISP | / | / | Display information | Display information | Display information | Display information |
| MENU | / | / | / | DVD MENU | / | / |
| TITLE | / | / | / | DVD TITUL | / | / |
| DIR + | Next folder | / | / | / | / | Next folder |
| DIR - | Previous folder | / | / | / | / | Previous folder |
SUSPEND PLAYBACK
Press the [▶ II ] key on the front panel or remote control or open the onscreen control buttons menu and then touch the [▶ II ] button.
To resume normal play, repeat the above operation.
STOP PLAYBACK
To stop playback, press the [■] key on the remote control or open the onscreen control buttons menu and then touch the [■] button.
When the above operation is executed for the first time, the current playback is paused and the break point is memorized and the playback will resume when you start playback again or switch back from other playing sources. The current playback will cancel if the above operation is executed twice and the playback will start over when you start playback again.
DISPLAY FILE LIST
To display the file list of one recorded disc, stop current playback.
FAST PLAYBACK
Press the [▶]/[◀] key on the remote control repeatedly or open the onscreen control buttons menu and then touch the [▶]/[◀] button repeatedly to change the rate of fast forward/fast reverse.
PREVIOUS/NEXT
Press the [ ▶ ]/[ ◀ ] key on the display panel or remote control or open the onscreen control buttons menu and then touch the [ ▶ ]/[ ◀ ] button to play the next or previous file.
CHANGE FOLDER
Press the [DIR+]/[DIR-] icon on the user interface (you should stop playback first if a video or picture file is played back) to change folder during the playback of one recorded disc containing more than one folder.
REPEAT PLAYBACK
Press the [RPT] key on the remote control repeatedly or open the onscreen control buttons menu and then touch the [→button repeatedly to alter repeat mode according to the following table.
| Disc type Repeat mode | |
| DVD Repeat | Chapter → Repeat Title → Repeat Off |
| VCD (PBC vyp.) | Repeat Single → Repeat All → Repeat Off |
| CD Repeat | Single → Repeat Off |
| MP3/WMA Repeat | Repeat Single → Repeat Folder → Repeat Off |
| MPEG Repeat | Repeat Single → Repeat Folder → Repeat Off |
| Obrazek Repeat | Repeat Single → Repeat Folder → Repeat Off |
Notes:
1) When a VCD is played back, this function is prohibited if the PBC is on.
2) Turning off the power or switching playing source to other modes and back will cancel this function
REPEAT A-B
When a DVD, VCD or CD disc is played back, you can play back the contents between the time points from A to B repeatedly.
Press the [RPT A-B] key on the remote control or open the onscreen control buttons menu and then touch the [A-B] button to set the start point (A) of the repeated section.
Do the above operation again to set the end point of the repeated section.
The selected portion will repeat continuously.
Do the above operation for the third time to cancel this function.
RANDOM PLAYBACK
When this function is on, the contents in the disc will be played back randomly. Press the [RDM] key on the remote control repeatedly or open the onscreen control buttons menu and then touch the [×button repeatedly to alter random playback mode among ,Random', ,Random repeat', Repeat Off'.
INTRO PLAYBACK
When this function is on, the unit will play back the first 10 seconds of each track of a VCD or CD disc. You can search the file you desired using this function.
Press the [SCN] key on the remote control to activate this function. Do the above operation again to cancel this function.
DIRECT SEARCH
When a DVD, VCD or CD disc is played back, you can search for a particular chapter/track by pressing the numeric keys of the remote control. For example, if you want to select the 15th track, you should press numerical key [1] and [5].
GOTO SEARCH
1) Enter GOTO search mode
Press the [GOTO] key on the remote control to open search menu.
For DVD, you can search according to title, chapter and time.
For VCD, if PBC function is off, you can search according to time; if
PBC function is on, you can search according to track, time and Disc time.
For CD, you can search according to track.
For MPEG files, you can search according to track and time.
For record discs containing MP3 and/or JPG files, you can search according to track (file number).
2) Enter search information
Select items by pressing the direction keys on the remote control and enter search information by pressing the numeric keys, such as title, chapter and time.
3) Confirm
Press the [Enter] key on the remote control to confirm.
4) Exit GOTO search mode
Repeat the above operation until the search menu disappeared or touch the [Exit] button on the menu.
DVD MENU AND TITLE
This function is only available for the DVD discs having "MENU/TITLE". Press the [MENU] key on the remote control or open the onscreen control buttons menu and then touch the [MENU] button to open DVD MENU. You can select audio language, subtitle language and so on for playback. Press the [TITLE] key on the remote control or open the onscreen control buttons menu and then touch the [TITLE] button to open DVD TITLE.
You can select a different title for playback.
SELECT SUBTITLE LANGUAGE
Press the [SUBTITLE] key on the remote control repeatedly or open the onscreen control buttons menu and then touch the [SUBTITLE] button repeatedly to choose a subtitle language.
SELECT MULTI-ANGLE VIEWS
Press the [ANGLE] key on the remote control repeatedly to choose
a shooting angle during the playback of a DVD disc or video file containing multi-angle views.
SELECT AUDIO CHANNEL
For DVD containing multi-language audio files, press the [AUDIO] key on the remote control repeatedly or open the onscreen control buttons menu and then touch the [AUDIO] button repeatedly to change dialogue language.
For VCD and CD, press the [AUDIO] key on the remote control repeatedly or open the onscreen control buttons menu and then touch the [AUDIO] button repeatedly to alter audio channel modes among Left vocal, Right vocal, Mono left, Mono right, Stereo.
Note:
Left channel and right channel cannot work properly if the audio files are not recorded correctly.
PBC FUNCTION
This function is available for the VCD discs with PBC function (Ver 2.0 or higher).
Press the [MENU] key on the remote control to activate this function. Press again to cancel.
Notes:
1) When PBC is on, playback goes back to the track list and starts from the first track.
2) When PBC is on, fast motion playback, slow motion playback or skip search is available but repeat playback and searching for a particular chapter or track is prohibited.
3) If you do the operation of random playback, scan playback or searching playback when PBC is on, PBC will be off automatically.
ZOOM IN/OUT
To zoom in/out the image being played, press the [ZOOM] key on the remote control or open the onscreen control buttons and then touch the [Q] icon.
ROTATE PICTURE
When one picture file is played back, you can rotate the picture to get proper view angle by pressing the [icon on the onscreen control buttons.
PLAYBACK INFORMATION
Touch the top center area of TFT LCD when playing back DVD and VCD discs and the playback information will be displayed on the top area of the TFT.
For DVD

1) Disc type.
2) DVD Title information. "5/8" indicates that this DVD has 8 titles and the title playing back now is the fifth title.
3) DVD Chapter information. "2/16" indicates that current title has 16 chapters and the chapter playing back now is the second chapter.
4) Elapsed time of the current title.
5) „.2/6 Eng“ indicates that the subtitle of this DVD has been recorded in 6 languages and the language displayed now is the second, that is English.
For VCD

1) Disc type.
2) PBC function indicator. „PBC On“ indicates that PBC function has been activated.
3) VCD Track information. "6/18" indicates that this VCD has 18 tracks and the track playing back now is the sixth title.
4) Elapsed time of the current track.
SD/USB MODE
SELECT SD/USB AS PLAYING SOURCE
Method 1:
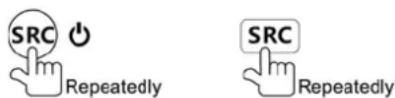
Method 2:
Open the ,SOURCE MENU' and then select ,SD'.
Notes:
1) The unit will switch to SD card mode or USB mode after a SD card or USB device has been inserted
2) The unit supports hot swap.
The operation is the same as DVD mode.
ONSCREEN CONTROL BUTTONS
Onscreen control buttons under SD/USB mode are the same as disc mode.
STOP PLAYBACK TEMPORARILY
The operation is the same as disc mode.
STOP PLAYBACK ENTIRELY
The operation is the same as disc mode.
DISPLAY FILE LIST
The operation is the same as disc mode.
FAST FORWARD/FAST REVERSE
The operation is the same as disc mode.
PLAY THE NEXT OR PREVIOUS FILE
The operation is the same as disc mode.
REPEAT PLAYBACK
The operation is the same as disc mode.
RANDOM PLAYBACK
The operation is the same as disc mode.
INTRO PLAYBACK
The operation is the same as disc mode.
SEARCH FOR A PARTICULAR FILE
The operation is the same as disc mode.
GOTO SEARCH
The operation is the same as disc mode.
ZOOM IN/OUT
The operation is the same as disc mode.
ROTATE PICTURE
The operation is the same as disc mode.
SELECT PICTURE SLIDE MODE
The operation is the same as disc mode.
PLAYBACK INFORMATION DISPLAY
The operation is the same as disc mode.
OTHER MODES
AUX
External peripheral devices with RCA audio and video outputs can be connected with the unit. To enter AUX IN mode, open the SOURCE MENU and then touch AUX IN.
CAMERA
This player is “camera ready”. Before accessing any camera features, you must purchase and install a rear video camera. Once the rear camera is connected and operating properly, the CAMERA source mode will become active. While the camera is not installed, the CAMERA option appears gray, indicating the function is not available. The playing source will change to ,CAMERA' mode automatically when you reverse your car.
SETUP
SETUP PROCEDURES
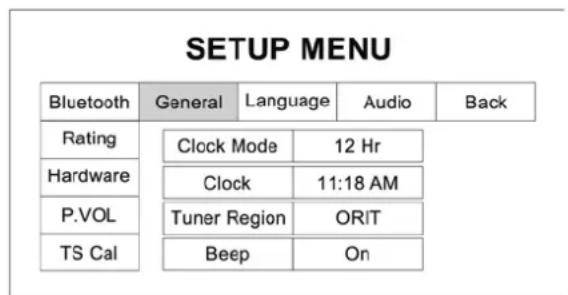
1) Enter setup mode
Press the [SETUP] key on the remote control or touch the setup icon [ ✗ on the user interface. The following menu appears after entering the setup mode. The GENERAL sub-menu is highlighted by default.
2) Select one sub-menu
Press the direction keys on the remote control.
3) Select one item
Press the [▶] / [▶] key on the remote control to select one item and then press the [▶ II] key to confirm.
4) Select one value
Press the [▶] / [◀] key on the remote control to select one suitable value and then press the [▶ II] key to confirm.
Note: All following settings can be done by touching the option directly.
GENERAL
- Clock mode
12Hr: the clock displays in the type of 12 hours such as 11:18 AM.
24Hr: the clock displays in the type of 24 hours such as 20:18.
- Clock
Adjust the clock displayed on the top right corner of the TFT screen.
- Tuner Region
The unit provides several radio systems and you can select a correct radio system according to your country.
- Beep
On: Background sound of key-press is on.
Off: Background sound of key-press is off.
LANGUAGE
- OSD
Select one language of system menu display.
- DVD Audio
Select one dialogue language of DVD disc.
Note:
If the DVD disc does not contain the selected language, the dialogues you listening to will be in default language.
- DVD Subtitle
Select one subtitle language of DVD disc.
Note:
If the DVD disc does not contain the selected language, the subtitle will be displayed in default language.
- Disc Menu
Select one language of DVD MENU display.
Note:
If the DVD disc does not contain the selected language, the DVD MENU will be displayed in default language.
AUDIO
• DRC
Set the dynamic range of Dolby digital DVD discs.
On: Playback more dynamic audio with Bass.
Off: Normal output.
- Loudness
On: Loud mode is on.
Off: Loud mode is off.
RATING
Some DVD discs have built-in parental lock which prevents children to watch some scenes as force or eroticism especially.
- Set Password
The original password of the unit is null
You should set a new password ASAP.
Method of changing password:
1) Open the parental lock
Touch the ,Password' option directly to open the keypad, touch the numeric buttons to enter your old password (initial password for the first time) and then confirm by touching the [ENT] button.
2) Change the password
Repeat the operation above to enter a 6-digit password (old or new) and then confirm. The new password becomes effective and the parental lock is closed.
- Rating
The unit has some watching level as followings:
(1) Kid safe: A movie rating that is condign to children.
(2) G: A movie rating that allows admission to persons of all ages.
(3) PG: A movie rating that allows admission of persons of all ages but suggests parental guidance in the case of children.
(4) PG-13: A movie rating that allows admission of persons of all ages but suggests parental guidance in the case of children under the age of 13.
(5) PG-R: PG-related
(6) R: A movie rating that allows admission only to persons of a certain age, usually 17, unless accompanied by a parent or guardian.
(7) NC-17: A movie rating that allows admission to no one under the age of 17.
(8) Adult: A movie rating that is consign to the adult only.
Procedures of changing the rating:
(1) Open the parental lock
According to the same method mentioned in the first step of changing password.
(2) Change the rating
Select an appropriate rating from the ,rating' list.
(3) Close the parental lock
Repeat the operation of the first step to enter a 6-digit password (old or new) and then confirm. The parental lock is closed.
- Load Factory
To restore the default settings relating with DVD playback (e.g.: DVD Audio, DVD Subtitle), press the [RESET] option only.
HARDWARE
- Camera In
Normal: Actual scenes shot by the camera display on the TFT monitor while reverse driving (just like what you are looking).
Mirror: The mirror images of actual scenes display on the TFT monitor while reverse driving (just like looking from the rearview mirror).
- TFT Auto Open
Auto: The TFT panel automatically opens when the unit is turned on. Manual: When the ignition is turned off, the TFT panel remains open if it was opened previously.
Off: The TFT panel opens only by pressing OPEN button when the unit is turned on.
- Video input
NTSC: Set the color system of the TFT screen to NTSC.
PAL: Set the color system of the TFT screen to PAL.
AUTO: Set the color system of the TFT screen automatically by the unit according to the input video formats.
- Parking
On: Image displays only after your car has been parked. Off: Image displays at all times.
P.VOL
P.VOL means Programmable Volume.
You can balance the volume among different audio sources using this function.
- Source
Select one playing source that you want to set relative volume.
- Level
You can set relative volume level from -6 to 6.
TS CAL
When the touch function is not sensitive or valid, you should calibrate the touch screen by this function. Calibrate the touch screen just following the screen introductions after entering the TS CAL mode.
EQ
Audio control allows you to easily adjust the audio system to get the best possible sound effect
Press the [SEL] key on the remote control or touch the EQ icon in the user interface and the following interface will display on the screen

2) Select EQ mode
Touch the EQ selection bar repeatedly and the EQ mode will change.
3) Adjust EQ parameters
To adjust EQ parameters, touch and drag the EQ parameters adjustment bar.
4) Adjust Front/Rear/Left/Right fader and balance
You can adjust front/back/left/right balance of the speaker to get larruping listening effect according to the surroundings and your interest.
To adjust Front/Rear/Left/Right fader and balance, touch and drag the small white point in the Fader/Balance adjustment area.
Notes:
1) The unit has provided some EQ modes: User, Rock, Hip Hop, Dance, Latin, Rave, Urban, Acoustic.
2) Different EQ reflects in different Bass, Treble and Middle level.
3) The parameters of the EQ modes has been preset and you can not change them besides 'User'.
4) The EQ mode will change to ,User' automatically when you adjust the value of BASS, TREB or MID under the modes besides ,User'.
5) The value of SUB is independent of EQ mode and can be adjusted solely.
TROUBLESHOOTING
What appears to be trouble is not always serious.
Please check the following points before calling a service center.
| Problem Cause Cause | ||
| General | ||
| Unit can not power on | Unit fuse blown. | Install new fuse with correct rating. |
| Car battery fuse blown. | Install new fuse with correct rating. | |
| Illegal operation Reset the unit. | ||
| Remote control does not work | Battery depleted. Change the battery. | |
| Battery installed incorrectly. Install the battery correctly. | ||
| No/low audio output | Improper audio output connection. | Check wiring and correct. |
| Volume set too low. Increase volume level. | ||
| Speakers damaged. Replace speakers. | ||
| Heavily biased volume balance. | Adjust the channel balance to center position. | |
| Speaker wiring is in contact with metal part of car. | Insulate all speaker wiring connections. | |
| Poor sound quality or distortion | Piratic disc is in use. Use original disc. | |
| Speaker power rating does not match unit. | Replace speakers. | |
| Wrong connections. Check wiring and correct. | ||
| Speaker is shorted. Check wiring and correct. | ||
| Tel-Mute malfunction MUTE wire is grounded. | Check the ,MUTE' wiring and correct. | |
| Unit resets itself when engine is off | Incorrect connection between ACC and BATT. | Check wiring and correct. |
| TFT monitor | ||
| Monitor does not open automatically | TFT Auto Open is turned off. Turn TFT Auto Open on. | |
| Warning information is shown at all times | Parking break wiring is not correct. | Check wiring and correct. |
| Flashing image or interference appears on screen | The color system of DVD disc does not match the monitor. | Adjust the color system of the DVD disc playing back or the monitor in use. |
| Piratic disc is in use. Use original disc. | ||
| Video cable damaged. Replace cables. | ||
| Improper video signal connections. | Check wiring and correct. | |
| Problem Cause Corrective action | ||
| Disc playback | ||
| Cannot insert disc A disc inside | the unit already. | Eject current disc and insert new one. |
| Disc does not play back | Disc is warped or scratched. Use disc in good condition. | |
| Disc is dirty or wet. Clean disc with soft cloth. | ||
| Incompatible disc is used. Use compatible disc. | ||
| Disc is inserted upside down. Insert disc with label side up. | ||
| Disc region code is not compatible with unit. | Use disc with proper region code. | |
| PBC cannot be used during VCD playback. | PBC is not available on the disc | Use disc with PBC available. |
| Repeat or search function is invalid during VCD playback | PBC is on. Turn PBC off. | |
| Error messages | ||
| No disc | Disc is dirty. Clean disc with soft cloth. | |
| Disc is upside down. Insert disc with label side up. | ||
| No disc inside. Insert disc. | ||
| Bad disc | Disc is dirty. Clean disc with soft cloth. | |
| Disc is upside down Insert disc with label side up. | ||
| Unknown disc | Disc format is not compatible with this unit. | Use disc with compatible format. |
| Region error | DVD region code is not compatible with this unit. | Use disc with compatible region code. |
DEVICE CONNECTIONS
NOTES OF CONNECTION
- This unit is designed to be used in a vehicle with a 12-volt battery and negative grounding. Before installing this unit to a recreational vehicle, a bus, or a truck, make sure the battery voltage is appropriate for this unit to be used, otherwise, install a transformer by professional to convert the output voltage to 12V.
- To avoid short circuit in the electrical system, ensure that the negative battery cable is disconnected before installation.
- To prevent short circuit in the wiring and damaging to this unit, secure all wirings with cable clamp or adhesive tape. Route the wirings in a secured, out of heating place without touching any moving parts such as gear shift, handbrake, and seat rails to prevent the wiring insulation being melted / wore off.
- Never pass the yellow power cord through the installation hole into the engine compartment and connect to the car battery. Otherwise, a high possibility of serious short circuit to the electrical system may be occurred.
- Replacing a new fuse with 10A rating when the old one is broken, using no fuse or fuse with improper rating may cause damage to this unit or even fires. If a proper fuse is installed and electrical problems still occur, please contact with any professional car shops for inquiry.
- DO NOT connect other equipments with the car battery to avoid battery overheating.
- Please make sure all the wiring connections & the cables of the speakers are well-insulated. Otherwise, this unit may be damaged by short circuit.
- If there is no ACC available, please connect ACC lead to the power supply with a switch.
- If an external power amplifier is connected, please don't connect P.CONT lead to the power lead of the external power amplifier, otherwise, electric spark or other damage may be resulted.
- Never ground the speaker output to prevent the damage to the built-in power amplifier.
- The minimum rating of the speakers connected to this unit is 50W with 4 to 8Ω impedance.
CONTROL CABLES
Auto Brightness Control
To avoid the display being too bright at night time, if the headlight cable is connected to ILLUMI, turning on the headlight will dim the backlight of the TFT LCD and vice versa.
Telephone Mute
If the MUTE cable is connected to a car phone, other audio outputs mute when one call is received by the car phone.
Reverse Driving
If a rear view camera is connected with the unit, the playing source switches to CAMERA automatically when you start reverse driving. As the reverse driving is done, the playing source switches to the previous.
Parking Brake
1) If „PRK SW“ cable is connected to hand brake switch, video display on the TFT monitor will be controlled by this function. Parking cable function ceases when the playing source is CAMERA.
2) The monitor displays the blue screen with warning information to prevent the driver watching video contents during driving, but the passengers at the rear seat can watch video contents normally.
PARKING BRAKE CABLE CONNECTIONS
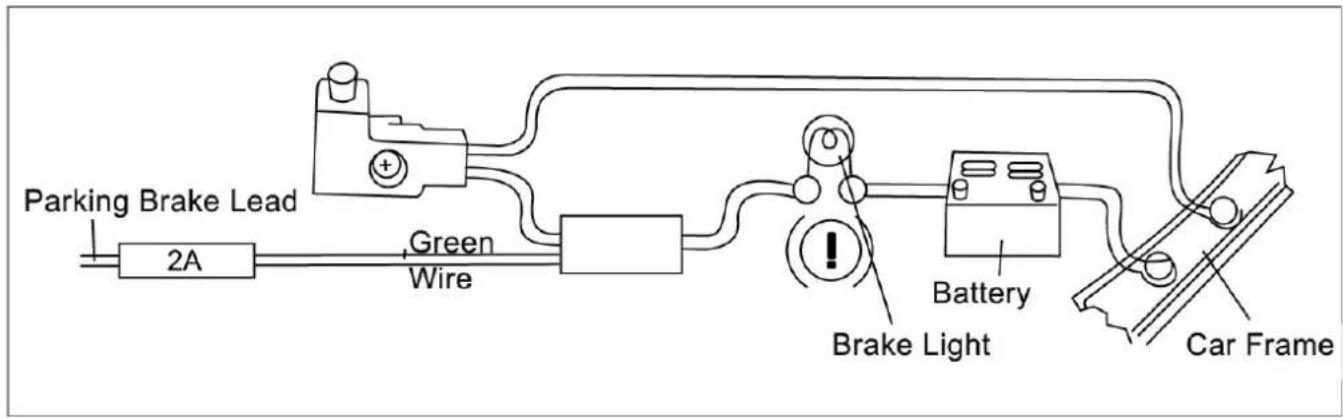

PARKING BRAKE CABLE CONNECTIONS

1) Before installation, please make sure proper connections are conducted and the unit operates normally. Improper connection may result in damage to the unit.
2) Use only accessories designed and manufactured for this unit and other unauthorized accessories may result in damage to the unit.
3) Before installation, please fasten all power cables.
4) DO NOT install the unit in the place where close to hot area to prevent damage to electrical components such as the laser head.
5) Install the unit horizontally. Installing the unit more than 30 degree vertically may result in worse performance.
6) To prevent electric spark, connect the positive pole first and then the negative pole.
7) DO NOT block the cooling fan exit to ensure sufficient heating dissipation of this unit, or it may result in damage to this unit.
UNIT INSTALLATION
Metoda A
1) Insert mounting bracket into dash board, choose appropriate mounting tab according to the gap width, bending the mounting tab outwards with a screwdriver to fix the mounting bracket in place.
2) Use 2 pieces of M5 x 5 cone shaped screw to fix two assemble bars on both sides of the unit(see picture 1)

(picture 1)
3) Screw in 1 piece of M5×24 to the hole of the unit back and put on a rubber sheath over the screw.(see picture 2)

(picture 2)
4) Insert the unit into the bracket, fasten the M4×6 screw to the fireproofing board available at the back of the dashboard, and use 4 pieces of M2 x 2 screw to lock the assemble bars and the mounting bracket in position.
Note:
According to the depth of the opening, use different length of assemble bar accordingly. If the opening is too shallow, the monitor may be extended out 10mm from the dashboard.
Metoda B:

1) Insert this unit directly to the opening of the dashboard.
2) Place M4 x 3, M5 x 5 cylindrical screw or M5 x 5 cone shaped screw through the holes of the mounting frame located inside the opening to holes of the unit and fasten the screws to left & right..
TRIM RING INSTALLATION
Attach the trim ring around the front panel with two indentions on one side facing upwards

UNINSTALL
Disassemble trim ring
1) Push the trim ring upward and pull out the upper part.

2) Push the trim ring downward and pull out the lower part.

DISASSEMBLE THE UNIT
1) Unscrew the 4 pieces M2 x 2 screws.
2) Use a screwdriver to bend straight the bended mounting tab and tip out the unit from the mounting bracket.
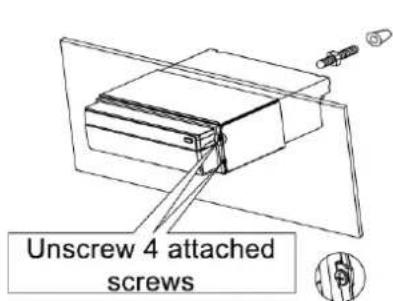
Remove the rubber sheath
3) Pull out the unit from the mounting bracket with both hands.
SPECIFICATIONS
General
Reference Supply Voltage 12 V (DC)
Operating Voltage Range 10.5 \~ 15.8 V (DC)
Max Operating Current 10 A
Grounding System Car Battery Negative Pole
Installation Dimension(W×H×D) 178 mm × 50 mm × (165+25) mm
Installation Angle 0° \~ 30°
Net Weight (NETTO) 2,3 kg
FM
Signal Noise Ratio 55 dB
Residual Noise Sensitivity (S/N=30dB) 20 dBμV
Frequency Response (± 3dB) 40 Hz \~ 12.5 KHz
Station Seeking Level 20 \~ 30 dBμV
Distortion 1.5%
Stereo Separation (1 KHz) 20 dB
Antenna Impedance 75 Ω
AM
Residual Noise Sensitivity (S/N=20dB) 40 dBμV
Selectivity (±9KHz) 50 dB
DVD Player
Signal/Noise Ratio 90 dB
Dynamic Range 90 dB
Distortion (line out) 0.1%
Frequency Response (±3dB) 20 Hz \~ 20 KHz
Max Output Power 4 x 45 W
Load Impedance 4 Ω
AUX IN
Distortion 0.5%
Frequency Response (±3dB) 20 Hz \~ 20 KHz
Audio Input Level 0.4 Vrms
Audio
Audio Output Impedance 200 Ω
Audio Output Level 2 Vrms (Max)
(Under normal audio input level and maximum volume)
Video
Normal Video Input Level (CVBS) 1.0±0.2V
Video Input Impedance 75 Ω
Video Output Impedance 75 Ω
Video Output Level 1.0 ± 0.2 V
(Under normal video input level)
TFT Monitor
Screen Diagonal 7 inches
Usable Display Area 154.1 (W) x 87.0 (H)
Resolution 1440 (W) x 234 (H)
Brightness 400 cd/m²
(Measure the center brightness after 30 minutes)
Contrast 300 (TYP.)
Response Time
Rise 12 ms
Fall 18 ms
Viewing Angle
From Top 40°
From bottom 65°
Horizontally ±65°
LCD Life Cycle 10000 hours (at 25°C)
Environment
Operating Temperature -10°C \~ +60°C
Storing Temperature ---- - 20°C +70°C
Operating Humidity 45% \~ 80% RH
Storing Humidity 30%\~90% RH
※ We reserve the right to change technical specifications.
※ WARNING: If the car is not used for a long time, the accumulator battery may discharge, resulting into impossibility to start the car.
APPENDIX
Region Code
According to DVD sale region, the whole world is divided into six regions. A DVD disc can be played back only when its region code is compatible with that of the player in use.
Region 1: USA, Canada, East Pacific Ocean Islands;
Region 2: Japan, West Europe, North Europe, Egypt, South Africa, Middle East;
Region 3: Taiwan of China, Hong Kong of China, South Korea, Thailand, Indonesia,
South East Asia;
Region 4: Australia, New Zealand, Mid & south America, South Pacific Ocean Islands/Oceania;
Region 5: Russia, Mongolia, India, Middle Asia, East Europe, North Korea, North Africa, North West Asia;
Region 6: Chinese Mainland.
CAUTIONS OF DISC USING
1) DO NOT use irregular shaped disc
2) Disc Cleaning
Use a dry, soft cloth to wipe the disc from center to edge, only neutral detergent can be used.
3) When playing a new disc
New disc may have some rough spots around the inner and outer edges. If such a disc is used, remove these rough spots with a pencil or ball-point pen, etc.
WIRING DIAGRAM
![graph TD A["AV SYSTEM"] --> B["POWER AMPLIFIER"] B --> C["AUX IN R"] B --> D["AUX IN L"] B --> E["AUX IN VIDEO"] C --> F["SUBWOOFER"] D --> G["RED"] E --> H["WHITE"] F --> I["REAR R"] F --> J["REAR L"] F --> K["FRONT R"] F --> L["FRONT L"] G --> M["RED"] H --> N["WHITE"] I --> O["SUBWOOFER"] J --> P…](/content/2026/05/1003626/images/3b072fbdd6f7a38b9eb8c7354c7cb1f7f36b1cc8e25ae14813ddab21001fb6cc.jpg)

WARNING: Do not use this product near water, in wet areas to avoid fire or injury of electric current. Always turn off the product when you don't use it or before a revision. There aren't any parts in this appliance which are repairable by consumer. Always appeal to a qualified authorized service. The product is under a dangerous tension.
Old electrical appliances, used batteries and accumulators disposal
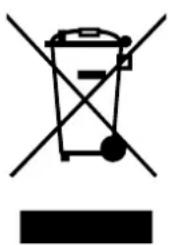
This symbol appearing on the product, on the product accessories or on the product packing means that the product must not be disposed as household waste. When the product/ battery durability is over, please, deliver the product or battery (if it is enclosed) to the respective collection point, where the electrical appliances or batteries will be recycled. The places, where the used electrical appliances are collected, exist in the European Union and in other European countries as well. By proper disposal of the product you can prevent possible negative impact on environment and human health, which might otherwise occur as a consequence of improper manipulation with the product or battery/ accumulator. Recycling of materials contributes to protection of natural resources. Therefore, please, do not throw the old electrical appliances and batteries/ accumulators in the household waste. Information, where it is possible to leave the old electrical appliances for free, is provided at your local authority, at the store where you have bought the product. Information, where you can leave the batteries and accumulators for free, is provided to you at the store, at your local authority.
Poznámky / Notatka / Notes:
ZÁRUČNÍ LIST
ZÁRUČNÍ PODMÍNKY
- INSTALACE A DEMONTÁŽ
- VLOŽENÍ BATERIE
- ZÁKLADNÍ PROVOZ
- ZAPNUTÍ/VYPNUTÍ
- POZNÁMKY K INSTALACI
- DEMONTÁŽ
- DEMONTÁŽ RÁMEČKU
- DEMONTÁŽ PŘÍSTROJE
- VLOŽENIE BATÉRIE
- ZÁKLADNÁ PREVÁDZKA
- ZAPNUTIE/VYPNUTIE
- DEMONTÁŽ RÁMIKU
- DEMONTÁŽ PRÍSTROJA
- INSTALACJA I DEMONTAŻ
- WKŁADANIE BATERII
- DZIAŁANIA PODSTAWOWE
- WŁĄCZANIE/WYŁĄCZANIE
- WYBÓR JEZYKA NAPISÓW
- UWAGI DOTYCZĄCE INSTALACJI
- DEMONTAŻ
- DEMONTAŻ RAMKI
- DEMONTAŻ URZĄDZENIA
- PRECAUTIONS
- DECLARATION
- CONTENTS
- BEFORE USING
- BASIC OPERATIONS
- RADIO MODE
- RDS OPERATIONS
- DISC MODE
- SD/USB MODE
- OTHER MODES
- SETUP
- DEVICE CONNECTION
- INSTALLATION AND UNINSTALL
- APPENDIX
- INTRODUCE OF KEY FUNCTIONS
- NOTE
- NOTES OF REMOTE CONTROL USING
- UNINSTALL BATTERY
- INSTALL BATTERY
- POWER ON/OFF
- MUTE
- NOTES
- VOLUME ADJUSTMENT
- OPEN SOURCE MENU
- PLAYING SOURCE SELECTION
- DISPLAY SYSTEM TIME
- USING THE TFT MONITOR
- OPEN/CLOSE MONITOR
- CHANGE THE MONITOR TILT ANGLE
- CHANGE ASPECT RATIO
- IMAGE SETTING
- RESET THE UNIT
- SELECT RADIO AS PLAYING SOURCE
- AUTO TUNING
- MANUAL TUNING
- AUTO SAVE
- MANUAL SAVE
- PREVIEW SCAN
- RECALL THE STORED STATIONS
- LOCAL SEEKING
- AF FUNCTION
- TA FUNCTION
- PTY FUNCTION
- PROGRAM SERVICE (PS)
- CT (CLOCK TIME)
- RT (RADIO TEXT)
- INSERT A DISC
- EJECT THE DISC
- SUSPEND PLAYBACK
- STOP PLAYBACK
- DISPLAY FILE LIST
- FAST PLAYBACK
- PREVIOUS/NEXT
- CHANGE FOLDER
- REPEAT PLAYBACK
- REPEAT A-B
- RANDOM PLAYBACK
- INTRO PLAYBACK
- DIRECT SEARCH
- GOTO SEARCH
- ENTER GOTO SEARCH MODE
- ENTER SEARCH INFORMATION
- CONFIRM
- EXIT GOTO SEARCH MODE
- DVD MENU AND TITLE
- SELECT SUBTITLE LANGUAGE
- SELECT MULTI-ANGLE VIEWS
- SELECT AUDIO CHANNEL
- PBC FUNCTION
- ZOOM IN/OUT
- ROTATE PICTURE
- PLAYBACK INFORMATION
- FOR DVD
- FOR VCD
- SELECT SD/USB AS PLAYING SOURCE
- ONSCREEN CONTROL BUTTONS
- STOP PLAYBACK TEMPORARILY
- STOP PLAYBACK ENTIRELY
- FAST FORWARD/FAST REVERSE
- PLAY THE NEXT OR PREVIOUS FILE
- SEARCH FOR A PARTICULAR FILE
- SELECT PICTURE SLIDE MODE
- PLAYBACK INFORMATION DISPLAY
- AUX
- CAMERA
- SETUP PROCEDURES
- ENTER SETUP MODE
- SELECT ONE SUB-MENU
- SELECT ONE ITEM
- SELECT ONE VALUE
- GENERAL
- LANGUAGE
- AUDIO
- RATING
- METHOD OF CHANGING PASSWORD
- PROCEDURES OF CHANGING THE RATING
- HARDWARE
- CAMERA IN
- TFT AUTO OPEN
- VIDEO INPUT
- PARKING
- P.VOL
- SOURCE
- LEVEL
- TS CAL
- EQ
- SELECT EQ MODE
- ADJUST EQ PARAMETERS
- ADJUST FRONT/REAR/LEFT/RIGHT FADER AND BALANCE
- TROUBLESHOOTING
- DEVICE CONNECTIONS
- NOTES OF CONNECTION
- CONTROL CABLES
- AUTO BRIGHTNESS CONTROL
- TELEPHONE MUTE
- REVERSE DRIVING
- PARKING BRAKE
- UNIT INSTALLATION
- METODA A
- METODA B
- TRIM RING INSTALLATION
- UNINSTALL
- DISASSEMBLE TRIM RING
- DISASSEMBLE THE UNIT
- SPECIFICATIONS
- FM
- AM
- DVD PLAYER
- AUX IN
- VIDEO
- TFT MONITOR
- RESPONSE TIME
- VIEWING ANGLE
- ENVIRONMENT
- REGION CODE
- CAUTIONS OF DISC USING
- OLD ELECTRICAL APPLIANCES, USED BATTERIES AND ACCUMULATORS DISPOSAL
- ZÁRUČNÍ LIST
- ZÁRUČNÍ PODMÍNKY
Brand : HYUNDAI
Model : CRMD 7750 SU
Category : Car radio