
AR380 F2 - Server ACER - Free user manual and instructions
Find the device manual for free AR380 F2 ACER in PDF.
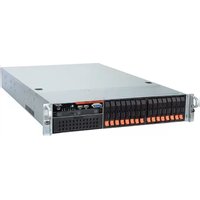


| Product Type | Server |
| Model | AR380 F2 |
| Brand | Acer |
| Form Factor | 2U Rackmount |
| Processor | Dual Intel Xeon Scalable (up to 28 cores each) |
| Memory | DDR4, up to 2TB, 24 slots |
| Storage | Hot-swappable SAS/SATA/SSD, up to 12x 3.5" or 24x 2.5" |
| Power Supply | Dual redundant 1600W 80+ Platinum |
| Dimensions (HxWxD) | 3.5 x 17.2 x 30.5 inches (approx) |
| Weight | ~60 lbs (max config) |
| Cooling | 6 hot-swap fans |
| Expansion Slots | 8 PCIe 3.0 |
| Management | IPMI 2.0 |
| Operating Systems Supported | Windows Server, Linux, VMware |
| Warranty | 3-year limited (parts, labor, on-site) |
| Certifications | FCC, CE, RoHS |
| Operating Temperature | 10°C to 35°C |
| Operating Humidity | 20% to 80% non-condensing |
| Power Consumption | Idle ~200W, load ~800W (depending on config) |
| Noise Level | <65 dBA |
| Safety Features | Over-current, over-voltage, over-temperature protection |
| Maintenance | Hot-swappable fans and power supplies, tool-less drive bays |
| Spare Parts Availability | Direct from Acer or authorized resellers |
Frequently Asked Questions - AR380 F2 ACER
User questions about AR380 F2 ACER
0 question about this device. Answer the ones you know or ask your own.
Ask a new question about this device
Download the instructions for your Server in PDF format for free! Find your manual AR380 F2 - ACER and take your electronic device back in hand. On this page are published all the documents necessary for the use of your device. AR380 F2 by ACER.
USER MANUAL AR380 F2 ACER
Smart Server Manager v1.2 Best Practices Guide
Acer EPBU, July 2012
Contents
About this guide 3
Smart Server Manager overview 4
What's new to Smart Server Manager 5
Required hardware and software 6
Network setup: suggestions, tips; requirements 6
Tips when configuring on Windows Server OS 9
Tips when configuring on Linux Server OS 10
Suggested configuration for setting hardware, software and performance alerts 12
Setting email alerts
Setting out-of-band (hardware) email alerts
Setting in-band (software/OS) email alerts
Setting VM performance alerts
Setting up RAID monitoring with LSI MegaRAID Storage Manager 21
Smart Server Manager v1.2 Report manager overview 27
Installing additional extensions 27
Running a networked firmware update 28
Additional power capping enablement and use 33
About this guide
This guide is intended to be a quick reference for successfully configuring a working Smart Server Management environment across a network of Acer servers. Though it does not go into detail for all of the available features in Smart Server Manager (SSM) v1.2, it offers tips and a brief how-to for getting the monitoring software working and setting up email alerts.

Smart Server Manager overview
Smart Server Manager is a free server system management solution for IT professionals to monitor and receive proactive email alerts in the event of any system failure – be it hardware or software. This powerful solution connects seamlessly to Acer servers via the onboard BMC chip available in most Acer server systems. 1 The BMC allows for hardware management of all onboard components, including temperature, memory, CPU, power voltage, and more. Smart Server Manager can also be set to send email alerts to IT administrators in the event any of these monitored components experience a technical issue.
In addition, Smart Server Manager includes operating system (OS) monitoring for Windows and/or Linux platforms, and virtual machine performance monitoring. Within the OS monitoring users can view the status and remotely troubleshoot running processes and applications, as well as view the system resource status of the hardware being used by the given OS. In addition, users may set specific processes to be monitored and send out an email alert in the event that an application is interrupted for any reason.
Smart Server Manager monitors Virtual Machines (VMs) via its VM management function and supports VMs from both VMware and Microsoft Hyper-V. The management tool allows for the performance of the VM hosts and guest OS to be monitored to the component level (CPU, memory, disks, system, and network). Smart Server Manager can also be set to record the performance history and proactively send alerts in the event that any component is becoming a bottleneck, thereby allowing IT administrators to determine whether to allocate more hardware resources to the VM.
Smart Server Manager is 100% agentless, meaning that it only needs to be installed once on a core system, and then all other Acer servers on the network can be monitored – no additional installation required. The system can support up to 250 devices (including physical hardware, OS, and VMs) and is perfect for small to medium-sized IT network management.
Acer Smart Server Manager UI

What's new to Smart Server Manager v1.2?
Smart Server Manager v1.2 includes both a more robust set of functions compared to previous versions, as well as a more intuitive interface which streamlines important functions, such as email alert creation. The complete feature comparison is included below.
| Features v1.0 v1.1 v1.2 | ||||
| Administration Console | Web based management console Y Y Y | |||
| Role based user administration Y Y Y | ||||
| LDAP integration Y Y Y | ||||
| Communication security with SSL Y Y Y | ||||
| Task-automation by Script Manager Y Y Y | ||||
| Dashboard Y Y Y | ||||
| Network Management Server (NMS) to receive traps Y Y Y | ||||
| User defined server group support N Y Y | ||||
| Auto discovery Y Y Y | ||||
| Agentless management Y Y Y | ||||
| Multilingual UI support | N N Y | |||
| Mail notification testing | N N Y | |||
| Mail group notification | N N Y | |||
| Report Manager | N N Y | |||
| Configurable SSM console port (HTTP & HTTPS) | N N Y | |||
| System Health Management (OOB Management) | System health monitoring | Y Y Y | ||
| Event handling (alerting and actions) | Y Y Y | |||
| System diagnostic with System Event Log (SEL) | Y Y Y | |||
| Remote power control (on/off/reset) | Y Y Y | |||
| Remote ID LED control (on/off/blink) | Y Y Y | |||
| Acer Smart Console integration | Y Y Y | |||
| Network Management Server (NMS) for trap receiving (PET & LSI RAID) | Y Y Y | |||
| Sensor/SEL/FRU history reporting | Y Y Y | |||
| BMC configuration | Y Y Y | |||
| Event log export to file | N Y Y | |||
| OS Host Management (In-band management) | OS and BIOS information | N Y Y | ||
| Software inventory | N Y Y | |||
| Hardware Inventory | N Y Y | |||
| Resource threshold setting and monitoring (CPU, memory, network, storage) | N Y Y | |||
| Processes control and monitoring | N Y Y | |||
| System services control and monitoring | N Y Y | |||
| Remote OS shutdown and reboot | N Y Y | |||
| Process owner information | N N Y | |||
| Virtual Machine Management | VM and VM host auto-grouping | N Y Y | ||
| VM and VM host resource and performance monitoring and alerting | N Y Y | |||
| Remote power on/off VM | N Y Y | |||
| Remote desktop connection to VM | N Y Y | |||
| VM and VM host performance and resource reporting | N Y Y | |||
| Windows Hyper-V 2008 R2 support | N Y Y | |||
| Windows Hyper-V 2008 R2 SP1 support | N N Y | |||
| VMware ESXi 4.0 support | N Y Y | |||
| VMware ESXi 4.1 support | N Y Y | |||
| VMware ESXi 5.0 support | N N Y | |||
| Extension support | ASSM Power Efficiency Management Extension v1.0 | N N Y | ||
| ASSM Firmware Update Extension v1.0 | N N Y | |||
| Acer Smart Client Manager Extension | N N Y | |||
Hardware and software dependencies
Minimum hardware requirements for SSM installation are as follows:
• System processor: 2 GHz • System memory: 2 GB RAM • Free disk space: 4 GB (May need more disk space depending on the nodes managed and the amount of history information needed.) • BMC chip for remote manageability
Minimum software requirements for SSM installation are as follows:
• Windows Server 2003 R2 SP2 x86 and x64 • Windows Server 2008 x86 and x64 • Windows Server 2008 R2 • Red Hat Enterprise Linux (RHEL) 5.4/6.0/6.1 x86 and x64 • SLES 11/11 SP1 x86 and x64
Prerequisites:
- Install Microsoft Visual C++ 2008 SP1 Redistributable Package x86 before starting to install SSM. Only support following 3 versions of vcredist from the download link.
Microsoft Visual C++ 2008 Redistributable - x86 9.0.30729.17
- http://www.microsoft.com/download/en/details.aspx?id=5582
Microsoft Visual C++ 2008 Redistributable - x86 9.0.21022
- http://www.microsoft.com/download/en/confirmation.aspx?id=29
Microsoft Visual C++ 2008 Redistributable - x86 9.0.30729.6161
- http://www.microsoft.com/download/en/details.aspx?id=26368
Browsers*:
- Internet Explorer 7 and above
- Mozilla Firefox 3.5 and above
*Adobe Flash Player 10.1 and above
Networking tips and suggestions
Smart Server Manager should be run across a gigabit Ethernet network dedicated to system management and the first Ethernet port used by the operating systems deployed.
When wiring the systems it is recommended to route the OS connection from NIC 1 along with the BMC port to ensure maximum bandwidth and functionality. Alternatively, the BIOS of Acer servers can be set to
route both BMC and OS networking traffic through NIC 1. This method cuts down on the total number of cables, but can impact the networking performance of the first NIC.

BMC Ethernet jack NIC 1
Switch from dedicated to either onboard or failover to use NIC1 as both the management and LAN network jack.
Note: The core server with SSM installed must be connected to both the dedicated management port and its NIC1 to monitor itself.
![Java iKVM Viewer VLS8 r2 [192.168.100.111] - Resolution 640 X 480 - HPS 19. Virtual Media Record Macro Options User List Capture Exit. BIOS SETUP UTILITY. Server Management. System Product Name GW175h F1. System Serial Number. Base Board Product Name GW175h F1. Base Board Serial Number. UUID:534D434…](/content/2026/05/1001830/images/f683bcc5be39fd339d7c367d08fe60a5858ee442a9fa9217830b3f6c81e6abbf.jpg)
In the BIOS it is important to also watch for the message 'Update IPMI LAN configuration'. When setting the IP of the BMC to the desired static IP, the user must change to 'Yes' to ensure the IP is changed as desired when exiting the BIOS.
This item is only available on some of the newer servers beginning with the 2 socket F2 family (i.e. AT350 F2, AR380 F2 and AR360 F2).

When setting up an SSM network, only a single machine needs to be dedicated as the core machine for installing the software. This machine will then act as a central hub for receiving information on the status of all the monitored server systems, VMs and operating systems, and can then forward alerts to IT administration based on the pooled data.
The SSM network is detailed in the below diagram.
![graph TD A["Administrator Web Console"] --> B["Acer Smart Server Manager"] B --> C["VPN Server"] C --> D["Managed Nodes/Servers"] D --> E["House with Home"] style A fill:#f9f,stroke:#333 style B fill:#ccf,stroke:#333 style C fill:#cfc,stroke:#333 style D fill:#fcc,stroke:#333](/content/2026/05/1001830/images/f9b1e96aedc48a4848e64c966d986e3d59307f3530d0195bcec25a86ed1b95b0.jpg)
For remote management, a VPN server is recommended to ensure better security to the internet and ensure no non-administrators have access to the IT infrastructure.
TIP: Ensure that the management IPs are set to static for all monitored servers to ensure that IPs do not change and need to be re-authenticated.
Tips for setting Windows Server OS
Windows Server OS is a supported OS in Smart Server Manager v1.2. However, though SSM does its best to provide near seamless integration, some default settings of Windows Server should be modified to ensure ideal monitoring.
Open Firewall connection
In Windows, the default firewall configuration blocks SSM from receiving information about the OS and its behavior. When setting up Windows, please ensure to unblock the firewall ports for 443, 80, and 162 as listed in the below image. The window can be navigated to via Windows 'Server Manager -> Windows Firewall with Advanced security -> Inbound Rules'.

Tips for setting Linux Server OS
Acer servers certify major enterprise Linux OS SUSE and RedHat. Smart Server Manager is guaranteed to support either, and is programmed to support other Linux solutions, but not certified to do so.
When setting up a Linux OS, some good tips to follow are listed below.
For Linux there are some dependencies which need to be installed. The process is detailed in greater detail in the User Guide, and the related dependencies for Windows and Linux are listed below.
| Installation File | Supported OS for Installation |
| acer.ssm-1.2.91346-win32-x86.msi | Windows Server 2008 SP1/SP2 32-bit/64-bit, |
| Windows Server 2008 R2/R2 SP1 64-bit | |
| acer.ssm.hx-1.2-91347.rhel5.i386.rpmacer.ssm.sx-1.2-91347.rhel5.i386.rpmacer.ssm.vxhlite-1.2-91347.rhel5.i386.rpmacer.ssm.vxlite-1.2-91347.rhel5.i386.rpmacer.ssm-1.2-91347.rhel5.i386.rpm | Red Hat Enterprise Linux 5.4/5.6 32-bit |
| acer.ssm.hx-1.2-91347.rhel5.x86_64.rpmacer.ssm.sx-1.2-91347.rhel5.x86_64.rpmacer.ssm.vxhlite-1.2-91347.rhel5.x86_64.rpmacer.ssm.vxlite-1.2-91347.rhel5.x86_64.rpmacer.ssm-1.2-91347.rhel5.x86_64.rpm | Red Hat Enterprise Linux 5.4/5.6 64-bit |
| acer.ssm.hx-1.2-91347.rhel6.i686.rpmacer.ssm.sx-1.2-91347.rhel6.i686.rpmacer.ssm.vxhlite-1.2-91347.rhel6.i686.rpmacer.ssm.vxlite-1.2-91347.rhel6.i686.rpmacer.ssm-1.2-91347.rhel6.i686.rpm | Red Hat Enterprise Linux 6/6.1 32-bit |
| acer.ssm.hx-1.2-91347.rhel6.x68_64.rpmacer.ssm.sx-1.2-91347.rhel6.x68_64.rpmacer.ssm.vxhlite-1.2-91347.rhel6.x68_64.rpmacer.ssm.vxlite-1.2-91347.rhel6.x68_64.rpmacer.ssm-1.2-91347.rhel6.x68_64.rpm | Red Hat Enterprise Linux 6/6.1 64-bit |
| acer.ssm.hx-1.2-91347.sles11.i586.rpmacer.ssm.sx-1.2-91347.sles11.i586.rpmacer.ssm.vxhlite-1.2-91347.sles11.i586.rpmacer.ssm.vxlite-1.2-91347.sles11.i586.rpmacer.ssm-1.2-91347.sles11.i586.rpm | SUSE Enterprise Linux Server 11/11.1 32-bit |
| acer.ssm.hx-1.2-91347.sles11.x86_64.rpmacer.ssm.sx-1.2-91347.sles11.x86_64.rpmacer.ssm.vxhlite-1.2-91347.sles11.x86_64.rpmacer.ssm.vxlite-1.2-91347.sles11.x86_64.rpmacer.ssm-1.2-91347.sles11.x86_64.rpm | SUSE Enterprise Linux Server 11/11.1 64-bit |
Open Linux firewall settings
Like Windows, Linux systems also need to open their default firewall settings. The same as Windows, be sure to add 'TCP 443', 'TCP 80', 'UDP 162', and 'ICMPv4 echo request for SSM discovery'.

Suggested configuration for setting hardware, software and VM performance alerts
Smart Server Manager's email alert system is a powerful tool for IT administrators to ensure they have up-to-the-minute status updates about their hardware and software across their network. This free management tool can also be easily set for an entire network within about an hour across existing Acer hardware, and roughly an afternoon for a new setup.
Once Smart Server Manager is installed on a host machine, and the networks for both the operating systems (connected via NIC 1 or others) and the server hardware (dedicated BMC management port), IT administration may begin monitoring the devices.
To enter SSM v1.2, simply enter the IP address of the core server into the browser followed by "/XMS.html" as shown below. /XMS.html is not necessary as the system should add it automatically.

The default user name and password are "admin" and "password", respectively.
Once logged in, the user will see the "Open Discovery Range" button. Click it to set a series of IP ranges for which SSM v1.2 can detect available OS, server hardware, and/or virtual machines.
Welcome to Smart Server Manager!
In order for Smart Server Manager to retrieve devices for management, you must first set the discovery ranges for the server to begin adding them to the database.
Once the ranges have been configured, it may take a few moments for devices to begin appearing in the list. When devices appear in the list, simply click one to
Click the button below to open the Discovery range configuration page. NOTE: You will need Administrator privilege to save discovery range settings.

Open Discovery Configuration
Alternatively, the user can access the same discovery configuration window via the "Discovery" hotkey located at the bottom of the left-hand side task bar.

In the discovery range menu, the user may set multiple IP ranges from which SSM v1.2 will search. This is particularly useful in case the BMC management network (out-of-band) and OS network (in-band) are separate.

Once set and the OS, servers are detected they must be authenticated in order for SSM v1.2 to provide status updates and forward email alerts.
Single devices may be authenticated one at a time by entering in the user name and password for each system. For Acer server hardware, the default user name and password is "root" and "superuser".

For multiple systems with identical user name and password, the user may select a group of machines by holding down "ctrl" or "shift" when selecting from the left menu, and then performing the same function as above. Alternatively, the administrator can use 'global user account' function for each extension if all systems are configured alike.

Virtual machines can be automatically detected and authenticated for user defined IPs and authentication information. To do so, the user should go to "Extensions" in the upper right-hand corner, and select either the Hyper-V or ESX extension configuration tab (currently SSM v1.2 can only read information from these two hypervisors).
Note: users must set "global user account" for auto authentication.

Once complete, a full list of available Acer servers, monitored OS (both Linux and Windows) and the monitored VMs should be shown in the left-hand menu, as below.

Should there be any difficulties in finding any of the OS, servers or VMs, try checking that the appropriate IPs for all networks are linked and read into the system and that the authentication information is correct.
Once authenticated, the IT administrator can view the status of the server hardware, read sensor reports, view and download event logs, see processes and services running on all available OS, and view the performance history for any VM. A more detailed overview of all the functions available can be found in the Smart Server Manager v1.2 User guide.
Setting email alerts
The process for setting up email alerts varies slightly depending on the email alert type which the user wishes to create.
Regardless of the alert type, the system must have access to an email server in order to relay any alert to an email target. To set the email server, simply click under "SSM tools" -> "SSM alerting".

Once selected, the below window will pop up. Click on the "Email server" tab and enter the IP address for the email server on the network. If the email server is password protected, also enter the user name and password to ensure the email alerts can be relayed out.
*Note: Companies who do not have their own email server will have to create one in either a Windows or Linux environment for the alert functions. Once created, the server will be able to send emails to external email accounts, such as Gmail, Hotmail or Yahoo. Some suggested mail servers include Postfix (http://www.postfix.org/), and Microsoft embedded email functions.

Should there be any issues receiving the alerts and all the settings appear correct in SSM v1.2, also ensure that the email server is not being blocked by any firewall settings in the network.
To set an out-of-bound email alert, the best practice is to use the default "Health Alert" settings which will send a notification in the event of any sensor warning. PEF traps are more appropriate for remote troubleshooting, but also much more difficult and time consuming to configure. Both methods are detailed in the SSM v1.2 user guide.
To set an alert for one or multiple servers, simply select the "Out-of-band management alert" tab from the "SSM Alerting" window, select the desired machines to be monitored, and enter the destination email and severity.
TIP: Set both "Non-recoverable" and "Good" alerts to ensure IT administration has up-to-the-minute information about any status change.

When setting an in-bound alert, it is important to first set specific processes to be monitored. The default health alerts are based on the process for which the admin defines to be monitored. If no processes are selected to be monitored, any failed or interrupted process will not send out an email alert.
First select a monitored OS and go to "information" -> "software inventory" -> "process list" to view the available processes running on the system.

In the process information page, the user can set view all available process, kill/stop certain processes and select which process(es) he/she would like to monitor. Again, holding "ctrl" or "shift" will allow the user to select multiple processes at once.

Once added, should any process be interrupted, the default health settings will trigger an email alert to the destination mail(s) of the user's choice. The user can again go to "Tools" -> "SSM Alerting", click on the "In-band management" tab, select which OS to monitor, and enter the destination email and alert severity.

TIP: It is a good idea to select both critical and good when creating the alerts so that if any processes automatically restart themselves, the IT administration will also know if the restart happened or not.
Setting performance alerts for monitored virtual machines
Setting performance alerts for virtual machines is a powerful tool that enables active monitoring of the loading on the components assigned to any virtual device. Once established, these alert rules enable IT administration to receive email alerts in the event any virtual machine begins to reach performance bottlenecks, so the administration may take immediate corrective action.
Before an email alert can be set for a virtual machine performance alert (regardless of whether the VM hypervisor is VMware ESX or Windows Hyper-V), the performance rules must be set.
Click under the monitored VM – Information – Performance. To begin monitoring a specific component's performance, click on the 'historical data' check box next to the desired component.

After selecting all of the desired components to be monitored, an alert can be set for the desired VM and component type. To set the alert, again go to 'SSM Tools – SSM alerting' and select the appropriate virtual machine tab (either VMware ESX or Windows Hyper-V).

After selecting the appropriate tab, a performance alert can be set by clicking on 'Performance Alerts – Add'. The below screen will appear, and the user can select for which VM host or VM the alert should monitor, and which counter (monitored component) to monitor. The percentage used can also be set by the user, allowing for complete control of the severity.

Setting RAID SNMP traps with LSI add-on RAID cards
For server models with add-on RAID cards, or onboard Adaptec or LSI software RAID, users can enable the RAID software to send Smart Server Manager SNMP traps to alert the utility in the event a RAID volume experiences any problem – including hard drive failure. SSM can then relay this alert as an email to the IT administrator for up-to-the-minute hardware monitoring.
For the purposes of this guide, it will cover the settings for LSI MegaRAID Storage Manager (LSI MSM) which can be used for all Acer Servers equipped with add-on RAID cards.
In either the Linux or Windows environment, this software must be first installed on the client (being monitored) server.

After installation, the user will have access to the LSI MSM control panel and be able to configure it to send SNMP traps to the appropriate destination. This interface can allow for users to configure and change RAID configurations, create alerts, and get status updates on available RAID volumes. For more information, please see http://www.lsi.com/lookup/Downloads.aspx

To set an SNMP trap alert, go to 'Tools – Configure – Configure Alerts'.
![MegaRAID Storage Manager - [SLI] File Operations Group Operations Log Tools Help Configure Configure Alerts LSI Physical Logical localhost MegaRAID SAS BBBOEM2 (Bus 4, Dev 0) Slot: 65 45 5, SAS, 34.18 GB, Unconfigured Slot: 65 45 6, SAS, 68.36 GB, Unconfigured Backplane (252) MD1000 (15.1), Connecto…](/content/2026/05/1001830/images/4180fa5b68d789e2d62c1dce1de0681dec8b772c5d4f1a8da1ff00a35feb6ac1.jpg)
Under the alerts screen, users can set their own email alerts via the LSI software, and can have SNMP traps be sent to the SSM core server.
To send SNMP trap alerts to SSM v1.2, the user must first enable SNMP traps in their operating system, whether it be Windows or Linux.
In Windows Server 2008 R2, first go to 'Start -> All Programs -> Administrative Tools -> Services -> SNMP Service.' (If you don't see the "SNMP service" in the service list, please refer to Microsoft documentation to enable the SNMP service feature.)

Step 2: Configure the SNMP service to make the OS forward the RAID SNMP trap to SSM.

In Linux, the idea is very much the same, but the SNMP trap function must be enabled in the terminal. The below script is outputted on Red Hat 5.3; for more detailed information, please refer to the LSI MSM user guide.
The LSI MSM rpm will take care of the necessary modifications needed in the snmpd.conf file for running the agent. Please refer to LSI documents. Or, you can refer to the following steps to configure it yourself.
[SNMP service configuration example on RHEL6.0/5.6]
- Check if net-snmp is installed (RHEL6.0/RHEL5.6 default setting contains net-snmp).
1.1) xxxx> rpm -qa | grep net-snmp 1.2) Make sure the following net-snmp packages are installed.
![[root@localhost ~]# rpm -qa | grep net-snmp net-snmp-perl-5.3.2.2-9.0.1.el5_5.1 net-snmp-lbs-5.3.2.2-9.0.1.el5_5.1 net-snmp-utils-5.3.2.2-9.0.1.el5_5.1 net-snmp-5.3.2.2-9.0.1.el5_5.1 [root@localhost ~]#](/content/2026/05/1001830/images/5b07bd421ca89f26942728de7bf9be6667d0bc68bf3be6aaefd97200d9aa6868.jpg)
- Install LSI MSM rpm.
- Check if LSI snmp is installed.
3.1) xxxx> rpm -qa | grep sas_
3.2) Make sure the following packages are installed.
[root@localhost ~]#
[root@localhost ~]# rpm qa | grep sas_
sas snmp-3.17-1102
sas_ir_snmp-3.17-1100
[root@localhost ~]#
- Edit "/etc/lsi_mrdsnmp/sas/sas_trapdestination.conf" and mark the original TrapDestInd 1 and IP address.
Add TrapDestInd 3 and the new SSM's IP address.

- Restart the lsi_mrdsnmpd service.
[root@localhost ~]#
[root@localhost ~]# service lsi_mrdsnmpd restart
Stopping LSI SNMP Agent:    [ OK ]
Starting LSI SNMP Agent:LSI MegaRAID SNMP Agent Ver 3.17.0.1 (Sep 04th, 2008) Started
    [ OK ]
[root@localhost ~]#
- Restart the snmpd service.
[root@localhost ~]#
[root@localhost ~]#
[root@localhost ~]# service snmpd restart
Stopping snmpd:    [ OK ]
Starting snmpd:    [ OK ]
[root@localhost ~]#
Finally, the user should configure the email server (refer to the SSM User Guide) and set the email rule on SSM so that SSM can send a RAID mail notification out. Go to SSM Tools > SSM Alerting > Alerts > In-Band Mgmt Extension > SNMP Trap Alerts to add a new Email rule (see the following example).


Setting an Email group alert
In addition to sending email reports for sensor alerts, performance alerts, SNMP traps, and software process status, Smart Server Manager v1.2 also supports email grouping whereby admin-defined groups can be established and managed in a consolidated format.
To enable email group management, the user must first click on the 'SSM Options' tab located on the upper right-hand side of the menu. Then click on 'Alert Destinations'.
The user will then see the window below.

Clicking on the 'Email Groups' allows for a new group to be established, and relevant emails to be added to the group. Click on 'Edit Group Members' to add more individuals to the group.

Once complete, click 'Save Changes' and the group will be available to receive any defined alerts desired.
Report Manager
Report Manager allows users to generate reports based on SSM's own database which they want to export into another file format. The function is ideal for users who need to report a problem or pass vital information, such as CPU usage or device reliability, to outside offices or managers. The function can also be used to better troubleshoot issues remotely.
System Model
Provides System Model information about the device(s).
2012/03/12 22:12:46
| BMC IPADDRESS | System Model |
| 192.168.1.14 | IPMI 2.0 |
| 192.168.1.15 | IPMI 2.0 |
| 192.168.1.22 | Not Available |
| 192.168.1.23 | AR160 F1 |
| 192.168.1.25 | AT310 F2 |
| 192.168.1.27 | AR360 F2 |
| 192.168.1.41 | AW175h F1 |
| 192.168.1.42 | AT350 F2 |
| 192.168.1.50 | AR385 F1 |
| 192.168.2.170 | AT310 F2 |
| 192.168.2.196 | GA-6FXSV4 |

Installing additional extensions – power management and remote firmware updates
After setting up a management core server with Acer Smart Server Manager v1.2 installed, users can then install the extension from the support and downloads section within Smart Server Manager. Click on the SSM Tools tab 'Manage Licenses' and follow the links to the online website for download.
Note: Power Management Extension does require a fee, so users should understand their need before installing the software. The remote firmware


Running a networked firmware update to multiple machines
First, the user will need to ensure a DHCP server is set up.
The firmware is updated via the IPMI management network connected to the BMC – the dedicated management port must be connected, or NIC 1 set to failover in the BIOS as detailed below.
1) Failover mode (one line for dedicated BMC NIC, one line for NIC#1) or 2) Onboard mode (only one line for NIC#1) or 3) Dedicated mode (one line for dedicated BMC NIC, one line for NIC#1)

Once downloaded, install the package by following the simple installation instructions in the read me file of download. Be sure to download and install the correct package for your OS environment – i.e. Windows Server, Red Hat Enterprise Linux or SUSE Enterprise Linux.
Once installed the extension will be accessible in the 'extensions' section on in the SSM interface.

Once open, the user can enter the account details for the management ports on the network via the 'Configuration' tab. In a standard Acer server environment, the management account details for Acer Smart Console are ID: 'root', PWD: 'superuser', but this can be changed by the local admin via Acer Smart Console itself.

Another feature to note is the settings tab which allows Smart Server Manager to search for firmware updates on select websites – such as the Acer Support and Downloads website. However, this step is not necessary as users may prepare the firmware file themselves if desired.
Open the ‘Firmware Update Management’ to scan for available devices on the network which can be monitored and selected to update the BIOS or IPMI firmware on the device. Afterwards the user can upload the firmware and create a task to complete a firmware update is to tab and set a task which can run at the desired time.

Before a new task can be created, the admin should upload the desired BIOS package they wish to update. This package can be one of three options: an Acer update to a standard BIOS or BMC firmware, or a user defined template created with the Acer SCE tool. The SCE tool allows administrators to change BIOS settings as needed – for example disabling Intel Hyper Threading or power saving functionality, and than save the changes as a new '.txt' file which can be updated across the network. Important for certain environments, such as high-performance computing, this tool may not be crucial for everyone and Acer recommends using the standard, most updated BIOS firmware wherever possible.

When selecting the new package to upload, be sure to select the BIOS file of the firmware updates. The .zip file can be uploaded in total. Smart Server Manager will detect the appropriate DOS-based .bat file to flash.

Next, create a task which determines which models will be flashed, what firmware will flash, and when the action will take place.
NOTE: Because IPs can change, it is important for users to 'Scan Devices' every time before scheduling a task to avoid the firmware from accidentally being flashed to the wrong device SSM v1.2 does not automatically refresh the data across the network in its database.

Once complete the Firmware Update management page should look like the below screenshot with queried systems shown, and a Firmware Update Task ready to run.

Firmware update supported systems
| ASSM FW Update Manager v1.0 | ||||
| Server model BIOS Update IPMI FW Update | BIOS Setting Deployment | |||
| AT110 F2 *N *N *N | ||||
| AT310 F2 Y Y Y | ||||
| AR320 F2 Y Y Y | ||||
| AT150 F2 In Planning In Planning In Planning | ||||
| AR160 F2 In Planning In Planning In Planning | ||||
| AR180 F2 In Planning In Planning In Planning | ||||
| AT350 F2 Y Y Y | ||||
| AR360 F2 Y Y Y | ||||
| AR380 F2 Y Y Y | ||||
| AT115 F1 N N N | ||||
| AT310 F1 N N N | ||||
| AR320 F1 N N N | ||||
| AT150 F1 In Planning In Planning In Planning | In Planning | N | ||
| AR160 F1 In Planning In Planning In Planning | N | |||
| AR180 F1 In Planning In Planning In Planning | N | |||
| AR350 F1 In Planning In Planning In Planning | N | |||
| AR360 F1 In Planning In Planning In Planning | N | |||
| AR380 F1 In Planning In Planning In Planning | N | |||
| AR385 F1 In Planning In Planning In Planning | N | |||
| AR585 F1 In Planning In Planning In Planning | N | |||
| AW170h/ht F1 N N N | ||||
| AW175h F1 In Planning In Planning | N | |||
| AB2x280 F1 N N N | ||||
| AB460 F1 N N N | ||||
Additional power capping enablement and use
Acer Smart Server Manager v1.2 extensions also include the optional power management extension for data centers and enterprise users seeking to reap cost savings possible from power capping. Power capping allows users to fix a maximum power usage for a given group of servers to ensure they throttle themselves so as not to exceed the set power limit. This can be useful for virtualized environments or for server farms that are running 24/7 but only require basic functionality – i.e. web servers, file and print, storage and/or email servers. In such a case the admin can save the company money by preventing the rare power spike to waste energy resources fulfilling unnecessary tasks.
To enable this feature in SSM v1.2 the admin will need to purchase additional licenses via the online website reached via the add extension tab.
Once purchased and installed the admin can begin to set up the power management extension. First ensure that the necessary accounts are granted access and use IPMI 2.0 for control.

Once set the admin may then begin to create one of three power zones – Critical, High Availability and Low Priority. The power zones will act as groups of which servers should impose power capping when the rack limit begins to be reached. For example, if the set rack begins to peak, the low priority servers will be under clocked first, before the high availability and critical server groups. Each group can be configured to throttle the servers to any percentage desired – this mostly relates to the CPU usage.

After setting the management groups the admin will have to set up a rack of devices for which the groups will apply to. The first step the admin can right click in the device tree to the left-hand side to add a power management device.

After which, the user will be prompted to configure the rack they wish to setup. This step includes selecting which machines will be managed, the desired power limit of the rack and each managed device's power grouping priority.
Establish a rack and set its maximum power.

Add devices to be managed and their grouping priority.


Once set the admin will be able to view the power management dashboard and see both the system temperature and power usage.


Reports may also be generated by clicking on Information -> reports.




- SMART SERVER MANAGER V1.2 BEST PRACTICES GUIDE
- CONTENTS
- ABOUT THIS GUIDE
- SMART SERVER MANAGER OVERVIEW
- ACER SMART SERVER MANAGER UI
- WHAT'S NEW TO SMART SERVER MANAGER V
- HARDWARE AND SOFTWARE DEPENDENCIES
- PREREQUISITES
- BROWSERS
- NETWORKING TIPS AND SUGGESTIONS
- TIPS FOR SETTING WINDOWS SERVER OS
- TIPS FOR SETTING LINUX SERVER OS
- OPEN LINUX FIREWALL SETTINGS
- SUGGESTED CONFIGURATION FOR SETTING HARDWARE, SOFTWARE AND VM PERFORMANCE ALERTS
- WELCOME TO SMART SERVER MANAGER
- SETTING EMAIL ALERTS
- SETTING PERFORMANCE ALERTS FOR MONITORED VIRTUAL MACHINES
- SETTING RAID SNMP TRAPS WITH LSI ADD-ON RAID CARDS
- SETTING AN EMAIL GROUP ALERT
- REPORT MANAGER
- SYSTEM MODEL
- INSTALLING ADDITIONAL EXTENSIONS – POWER MANAGEMENT AND REMOTE FIRMWARE UPDATES
- RUNNING A NETWORKED FIRMWARE UPDATE TO MULTIPLE MACHINES
- ADDITIONAL POWER CAPPING ENABLEMENT AND USE
Brand : ACER
Model : AR380 F2
Category : Server