
TV-LED1311 - Television QFX - Free user manual and instructions
Find the device manual for free TV-LED1311 QFX in PDF.


| Product Type | 13-inch LED TV |
| Model Number | TV-LED1311 |
| Brand | QFX |
| Display Diagonal | 13 inches |
| Display Resolution | 1366 × 768 pixels |
| Aspect Ratio | 16:9 |
| Contrast Ratio | 500:1 |
| Brightness | 200 cd/m² |
| Response Time | 16 ms |
| Viewing Angle | 90° horizontal / 50° vertical |
| Power Consumption | ≤24W |
| Power Source | DC 12V, 2A (AC adapter included) |
| Dimensions (with stand) | 348 × 160 × 301 mm |
| Weight (with stand) | Approx. 1.3 kg |
| Tuner Type | Digital TV (ATSC) with auto scan |
| Inputs | HDMI (x2), VGA, Composite AV, Component (YPbPr), USB, PC Audio, Antenna |
| Outputs | Headphone, Coaxial (SPDIF) |
| Audio | Built-in speakers, stereo, MTS/Audio select, surround, AVL |
| USB Playback | Music (MP3) and Photo (JPG) |
| Remote Control | Full function with AAA batteries (x2) |
| Accessories | AC adapter, remote control, car cord, instruction manual |
| Features | EPG, Closed Caption, Sleep Timer, Favorite List, Picture/Sound modes, Noise Reduction, DLC |
| Safety | Keep away from heat and liquids; no user serviceable parts |
| Maintenance | Clean with dry soft cloth; avoid solvents |
Frequently Asked Questions - TV-LED1311 QFX
User questions about TV-LED1311 QFX
0 question about this device. Answer the ones you know or ask your own.
Ask a new question about this device
Download the instructions for your Television in PDF format for free! Find your manual TV-LED1311 - QFX and take your electronic device back in hand. On this page are published all the documents necessary for the use of your device. TV-LED1311 by QFX.
USER MANUAL TV-LED1311 QFX
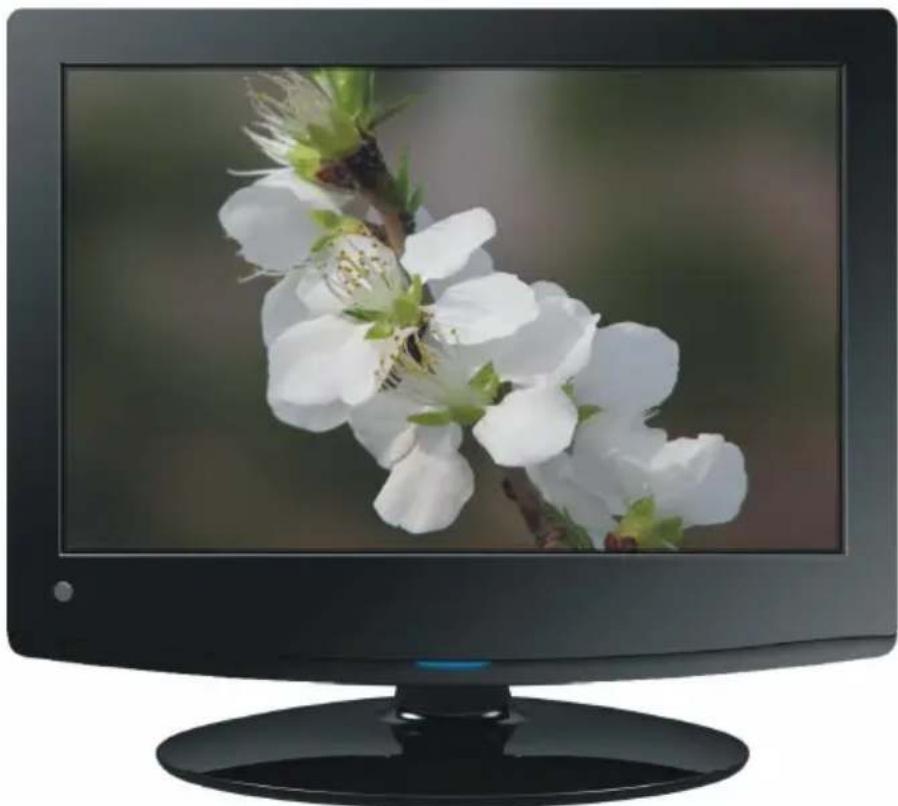
13" Full Color LED TV
MODEL NO.: TV-LED1311
natural_image
Computer monitor displaying a blooming white orchid flower on its screen (no text or symbols visible)INSTRUCTION MANUAL
IMPORTANT INSTRUCTIONS
SAFETY INSTRUCTIONS

WARNING – TO REDUCE THE RISK OF FIRE, ELECTRIC SHOCK, OR SERIOUS PERSONAL INJURY:
● This product shall not be exposed to dripping or splashing and that no objects filled with liquids, such as vases, shall be placed on the apparatus.
- Situate this product away from heat sources such as radiators, heat registers, stoves, or other appliances (including amplifiers) that produce heat.
- Clean the product only as recommended by the manufacturer (see “Maintenance”) section for details). Unplug the power cord from the wall outlet before cleaning,
● Unplug the power cord from the wall outlet when left unused for an extended period.
● Prevent objects/liquids from falling or spilled on the product.
- Operate the product only with the supplied power adapter. Route power cords so they are not likely to be walked on or pinched by items placed upon or against them, paying particular attention to plugs, convenience receptacles, and the point where they exit from the product.
- Where the MAINS plug or an appliance coupler is used as the disconnect device, the disconnect device shall remain readily operable.
- Do not operate this product under the following conditions.
- When the power-supply cord or plug is damaged.
- If liquid has been spilled into or objects have fallen into the product.
- If the product has been exposed to rain or water.
- If the product does not operate when used according to the operating instructions.
- If the product has been dropped or damaged in any way.
- Do not attempt to service the product; take it to the electronics repair shop of your choice for any servicing or repair.
- Do not overload wall outlets, extension cords, or integral convenience receptacles.

CAUTION- TO REDUCE THE RISK OR PERSONAL INJURY OR PRODUCT/PROPERTY DAMAGE:
● This product is intended solely for non-commercial, non-industrial, personal use as a television. Do not use this product for any other purpose.
- Do not subject the product to violent shocks, extreme temperatures, or lengthy periods or direct sunlight.
- Keep the product away from magnetic objects, motors, and transformers.
- Do not use outdoors in inclement weather.
- Do not use the TV while driving; this is dangerous and is illegal in some areas.
BATTERY HANDLING AND USAGE:
- KEEP BATTERIES AWAY FROM CHILDREN AND PENTS. ONLY ADULTS SHOULD HANDLE BATTERIES.
- NEVER THROW BATTERIES INTO A FIRE OR EXPOSE THEM TO FIRE OR OTHER HEAT SOURCES.
- FOLLOW THE BATTERY MANUFATURES'S SAFETY AND USAGE INSTRUCTIONS
ACCESSORIES
natural_image
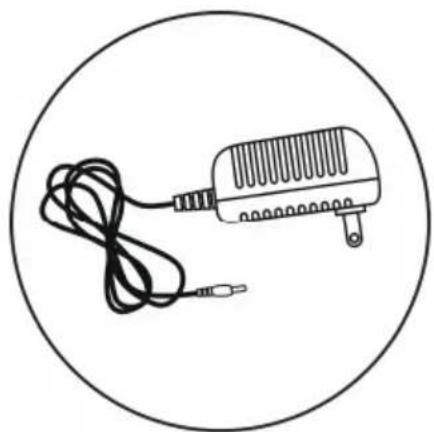
Line drawing of a vintage electric shaver with cord and plug, enclosed in a circle (no text or symbols)AC adaptor ....1

Instruction manual ....1

natural_image
Front view of a black remote control with control buttons and a circular border (no text or symbols visible)Remote control with battery ....1

natural_image
Simple line drawing of a handheld device with a coiled cable, enclosed in a circle (no text or symbols)Car cord ....1
All the pictures in this instruction manual are just for your reference, specification should refer to actual accessories.
TABLE OF CONTENTS
GETTING STARTED
IMPORTANT INSTRUCTIONS....1-2
ACCESSORIES....3
FEATURES....5
GENERAL PARTS....6
REMOTE CONTROL....7-8
REMOTE CONTROL PREPARATION....9
BASIC CONNECTION....10-13
OPERATIONS
BASIC OPERATIONS....14-18
MAIN MENU....19-27
TV MODE....19-26
AV/COMPONENT/HDMI1/HDMI2/USB MODE....26
PC/VGA MODE....27
FOR REFERENCE
MAINTENANCE....28
SPECIFICATIONS....28
TROUBLESHOOTING....29
FEATURES
13" TFT DISPLAY
This player has a built-in 13" TFT display window to provide clear vision and low radiation.
SUPPORT AUTO TV SCANNING
SUPPORT DIGITAL BROADCASTING RECEPTION
SUPPORT ELECTRONIC PROGRAM GUIDE
SUPPORT USB MULTIMEDIA PLAYBACK
SUPPORT MULTI-LANGUAGE ON SCREEN DISPLAY
SUPPORT FULL FUNCTION REMOTE CONTROL
SUPPORT PC AUDIO, ANT, VGA, VIDEO, AUDIO R/L, HDMI1/HDMI2 AND YPBPR INPUT
WITH HEADPHONES AND COAXIAL OUTPUT JACK
WITH EXTERNAL ANTENNA JACK
WITH BUILT-IN SPEAKERS
WITH WEAK SIGNAL ENHANCEMENT FUNCTION
WITH NOISE REDUCTION FUNCTION
GENERAL PARTS
MAIN UNIT


natural_image
Diagram of a computer monitor with internal components and directional arrows indicating movement or flow (no text or symbols present)
| POWER INPUT ©©DC 12V | USB | HDMI 1 | VGA | PC AUDIO | Y | Pb IN | Pr | ANT HEADPHONES Ω |
| | | | | | | | | | | | | |||
| 13 | 14 | 15 | 16 | 17 | 18 | 19 | ||
- TFT display screen
- Remote control sensor
- Power indicator- In standby mode the indicator light will display red color; when switching on the unit the indicator light will display blue color.
- Stand holder
- SOURCE button- To select the input source.
- MENU button- To enter menu setting page.
- CH+/CH- button- To select next/previous channel or move up/down.
-
VOL+/VOL- button- To increase/decrease the volume level or move left/right.
-
POWER button- To switch ON/OFF the TV.
- COAX OUT terminal
- VIDEO and AUDIO R/L input terminals
- HDMI2 input terminal
- POWER input
- USB slot- For music/photo playback.
- HDMI1 input terminal
- VGA input terminal
- PC AUDIO input terminal
- YPBPR input terminals
- ANT input terminal
- HEADPHONES output terminal
REMOTE CONTROL
- POWER: To set the unit in standby mode; press it again to switch it on.
- NUMBERIC BUTTONS (0-9): To input the number information, such as channel number and so on.
-
-/--: To select additional channels (digital) being broadcast by the same station. For example, to select channel "15-3", press "1" and "5", then press "-/--" and "3".
-
GREEN button
-
RED button
-
VOL +/-: Press VOL+ button to increase the volume, or press VOL- button to decrease the volume.
-
EPG: To display electronic program guide information.
-
PICTURE: To switch the picture mode.
-
CC: To set CC function On or Off in TV mode.
-
Navigation buttons: Press ▲/▼/◄/►
buttons to move up/down/left/right.
-
MENU: To display the main menu. Press it again to return to previous menu page.
-
SLEEP: To select desired Sleep Timer.
-
MTS/AUDIO: To select desired soundtrack in TV mode.
-
F.LIST: To display the favorite channels list page in TV mode.
-
C.LIST: To display available channels list page in TV mode.

- MUTE: To mute the sound.
- CDo return to previous channel or input source.
- YELLOW button
- BLUE button
- CH+/-: Press CH+ button to play next channel, or press CH- button to play previous channel.
- INFO: To display current program information.
- SOURCE: To switch the input source.
- SOUND: To switch the sound mode in TV mode.
- ENTER: To confirm a selection.
- EXIT: To exit menu page.
- AUTO: To adjust the screen automatically (in PC mode).
- ASPECT: To select desired displaying mode.
- FREEZE: To hold the picture during normal playing.
- FAV: To label current program as a favorite one or not.

REMOTE CONTROL PREPARATION
BATTERY INSTALLATION
Install the batteries as the following pictures. Be sure + and – terminals are positioned as indicated in the battery compartment (Fig1).
SERVICE LIFE OF BATTERIES
- The batteries normally last for one year although this depends on how often the remote control is used.
- If the remote control fails to work even when it is operated near the player, replace the batteries.
- Use two size AAA dry batteries.
NOTE:
- Do not drop, step on or otherwise impact the remote control. This may damage the parts or lead to malfunction.
- If the remote control is not going to be used for a long time, remove the batteries.
Point the remote control from no more than about 6m from the remote control sensor and within about 60irc of the front of the player(Fig2).
NOTES:
- The operating distance may vary according to the brightness of the room.
- Do not point bright light at remote control sensor.
- Do not place objects between the Remote control and the remote control sensor.
- Do not use this remote control while simultaneously operating the remote control of any other equipments.
Fig1

Fig

BASIC CONNECTION
- Ensure all the cables are disconnected from the main unit before connecting to AC power source by AC power adaptor.
● Read through the instructions before connecting other equipments.
CONNECTING TO AC POWER SOURCE

CONNECT EXTERNAL ANTENNA TO UNIT
Install external antenna into antenna jack for best picture.

COMPOSITE AV CONNECTION

YPbPr CONNECTION

HDMI CONNECTION

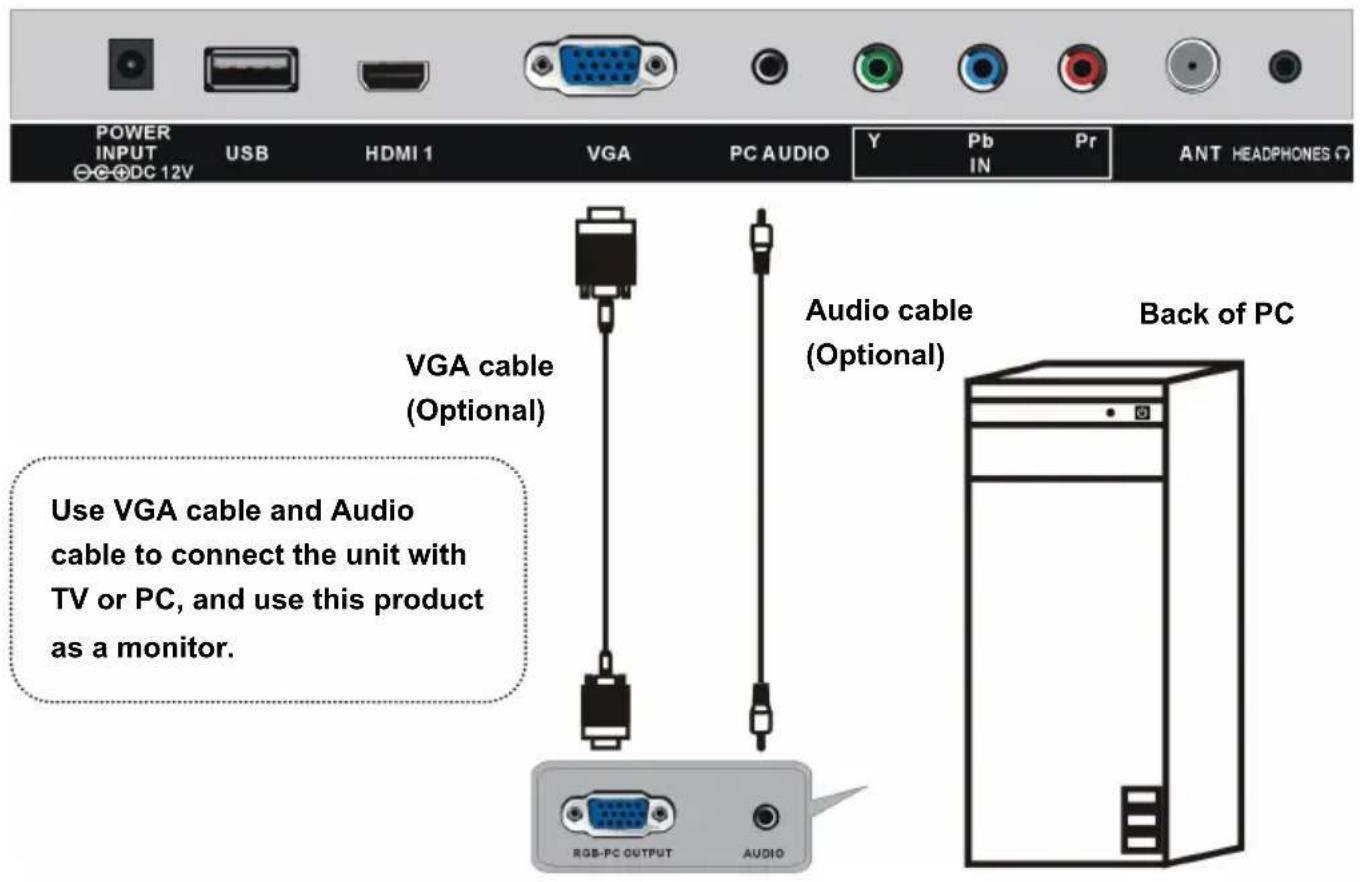
PC/VGA CONNECTION
COAXIAL CONNECTION

CONNECT EARPHONE TO THE UNIT

USB CONNECTION
Insert a USB memory device into USB slot for MUSIC/PHOTO multimedia files playback.

MAKE SURE ALL THE EQUIPMENTS AND AC ADAPTOR ARE CONNECTED PROPERLY AND THE UNIT IS SET IN CORRECT MODE BEFORE KINDS OF OPERATIONS.
BASIC OPERATIONS
- Press POWER button on the top of this unit to POWER ON the unit (indicator light displays in blue), press it again to POWER OFF the unit (indicator light displays in red). Or press POWER button on remote control to POWER ON the unit (indicator light displays in blue), press it again to STANDBY mode (indicator light displays in red).
- Press SOURCE button on unit top or remote control to set the unit in TV mode.
SELECT DESIRED PROGRAM
- Press CH+ button to play next channel.
- Press CH- button to play previous channel.
- Press numeric buttons on the remote control directly to select desired program.
Example : Track 9, press "9", three seconds later it will turn to track 9 automatically, or press ENTER button to confirm directly.
Track 12, press "1" and "2", three seconds later it will turn to track 12 automatically, or press ENTER button to confirm directly.
NOTE : If one frequency dot has more than one channel, for example, track 15-3, press "1" and "5", then press "-/--" and "3", three seconds later it will turn to track 15-3 automatically, or press ENTER button to confirm directly.
VOLUME CONTROL
- Press VOL+ or VOL- to adjust the level of current volume.
Available range: 0-100.
MUTE CONTROL
- Press MUTE button to mute the sound, press it again to turn on the sound.
SOURCE SETTING
- Press SOURCE button on unit top or remote control to display the input source list.
- Press UP or DOWN navigation button to select desired input source, and then press OK button to confirm selection.
Available options: TV, AV, Component, HDMI1, HDMI2, VGA, USB.
PICTURE MODE
- When watching an available program, press PICTURE button on remote control repeatedly to select desired PICTURE mode directly.
Available options: Standard, Dynamic, Mild, User.
SOUND MODE
- When watching an available program, press SOUND button on remote control repeatedly to select SOUND mode directly.
Available options: Standard, Music, Movie, User.
SLEEP TIMER SETTING
- Press SLEEP button on remote control repeatedly to select SLEEP TIMER directly.
Available options: Off, 5 min, 10 min, 15 min, 30 min, 45 min, 60 min, 90 min, 120 min, 180 min, 240 min.
VIDEO SIZE SETTING
- When watching an available program, press ASPECT button on remote control repeatedly to select VIDEO SIZE directly.
Available options: Normal, Wide, Zoom, Cinema.
NOTE: The available video size may be different in different input source.
MTS/AUDIO SETTING
- When watching an available program, press MTS/AUDIO button on remote control to enter Sound menu page, then use UP or DOWN navigation button to select desired option.
Options: Mono, Stereo, SAP.
(Not available for all channels)
- Or press MTS/AUDIO button on remote control to display Digital Sound language.
(Not available in for channels)
INFORMATION DISPLAY
- When watching an available program, press INFO button on remote control to display information of current program.
TV GUIDE (FOR TV MODE ONLY)
- When watching an available program, press EPG button on remote control to enter below menu page:

- Press LEFT or RIGHT navigation button to view previous or next page.
CLOSED CAPTION
- When watching an available program, press CC button on remote control repeatedly to turn it ON/OFF.
FAVOURITE LIST

- When watching an available program, press F.LIST button on remote control to enter FAVORITE LIST menu page.
- Press navigation buttons to select desired channel.
- Press ENTER button to confirm selection.
NOTE: During normal playing, press FAV button on remote control to label current program as a favorite one or not.
CHANNEL LIST
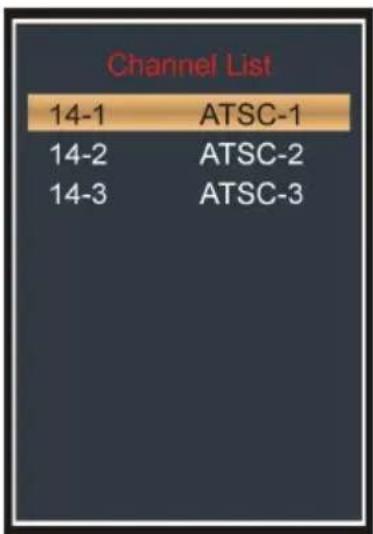
- When watching an available program, press C.LIST button on remote control to enter CHANNEL LIST menu page.
- Press navigation buttons to select desired channel.
- Press ENTER button to confirm selection.
FREEZE FUNCTION
- When watching an available program, press FREEZE button on remote control to hold the picture, and press it again to resume normal playing.
USB MULTIMEDIA PLAYBACK
- Before following operations, insert a USB memory device first, which contains Photo and Music files.
- Press SOURCE button on unit top or remote control to set the unit in USB mode.
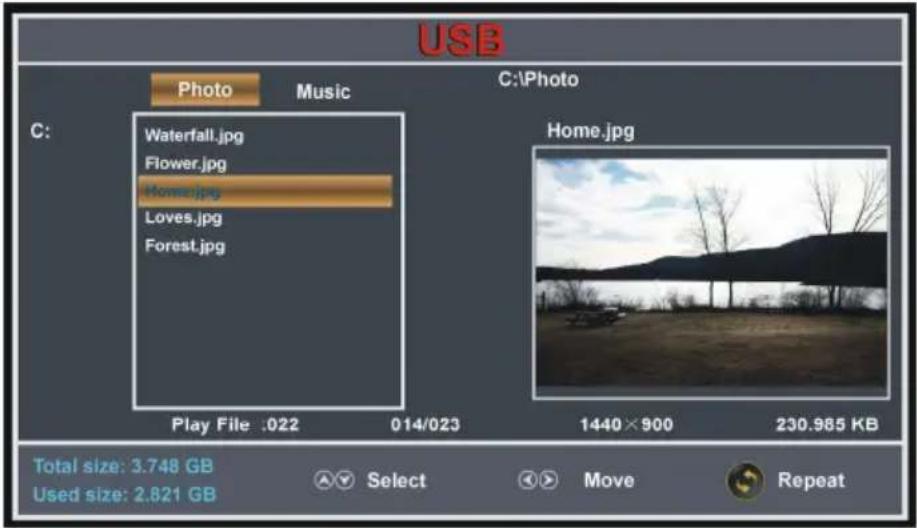
- Press LEFT/RIGHT navigation button to select Photo/Music in the main menu.
- Press UP/DOWN navigation button to select preferred file.
Photo Playback
- Select Photo item in the main menu.
- Press UP/DOWN navigation button to select preferred folder/file and press ENTER button to enter a folder or play selected file.

During normal playing:
- Press UP/DOWN navigation button to play previous/next photo.
- Press LEFT/RIGHT navigation button to rotate a photo counterclockwise/clockwise.
- Press EXIT button to return to file selecting page.
Music Playback
- Select Music item in the main menu.
- Press UP/DOWN navigation button to select preferred folder/file and press ENTER button to enter a folder or play selected file.

During normal playing:
- Press INFO button to display/hide the tool bar.

- Press LEFT/RIGHT navigation button to select preferred option and press ENTER button to confirm it.
MAIN MENU
- The unit contains different setting menus. Once the initial programming is entered, it will be remained in the memory until it's changed, and the unit can always be operated under the same conditions.
● This settings will be remained in the memory until the settings are changed even after setting the player to standby mode.
Common procedure for initial settings
- Press MENU button on unit top or remote control to display the main menu.
- Press LEFT or RIGHT navigation button to select Picture/Audio/Time/Setup/Lock/Channel.
- Press DOWN navigation button to enter submenu page.
- Press UP or DOWN navigation button to select the option that want to adjust.
- Press LEFT or RIGHT navigation button to adjust selected option to desired value.
- Press RIGHT navigation button or ENTER button to enter next menu page.
- Press MENU button to return to previous menu page.
- Press EXIT button to exit menu page.
DTV MODE
- Press SOURCE button on unit top or remote control to set the unit in DTV mode.
First Time Installation
If this is your first time turning on this TV, Setup Wizard will appear on the screen.
- Press UP or DOWN navigation button to select preferred item.
- Press LEFT or RIGHT navigation button to adjust the value.
Menu Language
To choose your menu language.
Air/Cable
To choose your signal type: Air, Cable.
Cable System
To choose desired Cable System: AUTO, STD, IRC, HRC.
NOTE: Cable System is adjustable only when your signal type is set to Cable.


Auto Scan
Highlight Auto Scan, press ENTER to search and store all available channels.
1. PICTURE
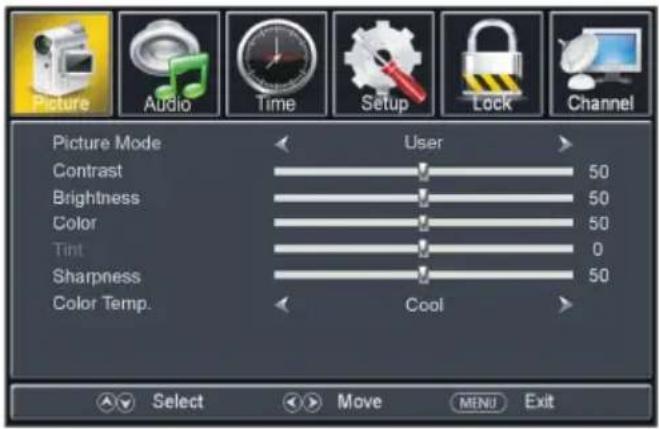
1.1 Picture Mode
Available options: Standard, Dynamic, Mild, User.
1.2 Contrast
The value of Contrast can be adjusted from 0-100.
1.3 Brightness
The value of Brightness can be adjusted from 0-100.
1.4 Color
The value of Color can be adjusted from 0-100.
1.5 Tint
The value of Tint can be adjusted from -50 to 50.
NOTE: Tint is adjustable only in certain TV system.
1.6 Sharpness
The value of Sharpness can be adjusted from 0-100.
NOTE: If the value of Contrast, Brightness, Color, Tint or Sharpness has been changed, the picture mode will turn to User automatically.
1.7 Color Temp. (Color Temperature)
Available options: Normal, Warm, Cool.
2. AUDIO

2.1 Sound Mode
Available options: Standard, Music, Movie, User.
2.2 Bass
The value of Bass can be adjusted from 0-100.
2.3 Treble
The value of Treble can be adjusted from 0-100.
2.4 Balance
The value of Balance can be adjusted from -50 to 50.
NOTE: If the value of Bass, Treble, or Balance has been changed, the sound mode will turn to User automatically.
2.5 Surround
This item is used to turn on/off Sound Surround function.
2.6 AVL (Auto Volume Level)
Available options: On, Off.
2.7 SPDIF Type
This item is used to select preferred SPDIF audio output type.
Available options: RAW, PCM.
2.8 Audio Language
This item is used to select preferred audio language.
NOTE: This item is adjustable only for digital programs.
3. TIME
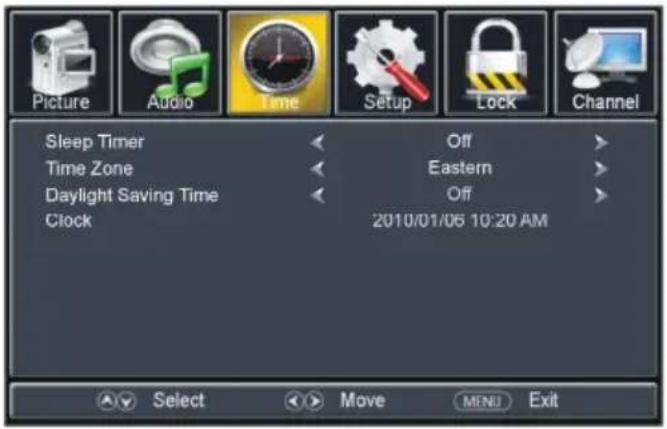
3.1 Sleep Timer
Available options: Off, 5 min, 10 min, 15 min, 30 min, 45 min, 60 min, 90 min, 120 min, 180 min, 240 min.
3.2 Time Zone
Available options: Eastern, Central, Mountain, Pacific, Alaska, Hawaii, Atlantic.
3.3 Daylight Saving Time
Available options: On, Off.
NOTE: This item is adjustable only for digital programs.
3.4 Clock
When an available digital program is present, this unit will get Date and Time information automatically from current program. And it's not user adjustable.
4. SETUP

4.1 Menu Language
This item is used to select preferred OSD menu language.
4.2 Transparent
This item is used to turn on/off Transparent OSD menu.
4.3 Zoom Mode
This item is used to select preferred zoom mode of display screen.
Available options: Normal, Wide, Zoom, Cinema.
NOTE: The available zoom mode may be different for different input source.
4.4 Noise Reduction
Available options: Off, Weak, Middle, Strong.
4.5 Advanced
This item is adjustable only for PC/VGA input signal.
4.6 Closed Caption
CC Mode
Available options: CC on Mute, Off, On.
Basic Selection
Available options: CC1, CC2, CC3, CC4, Text1, Text2, Text3, Text4.
Advanced Selection
Available options: Service1, Service2, Service3, Service4, Service5, Service6.
Option
Mode
Available options: Default, Custom.
Font Style
Available options: Default, Font 0, Font 1, Font 2, Font 3, Font 4, Font 5, Font 6, Font 7.
Font Size
Available options: Default, Normal, Large, Small.
Font Edge Style
Available options: Default, None, Raised, Depressed, Uniform, Left Shadow, Right Shadow.
Font Edge Color
Available options: Default, Black, White, Red, Green, Blue, Yellow, Magenta, Cyan.
FG Color
Available options: Default, White, Red, Green, Blue, Yellow, Magenta, Cyan.
BG Color
Available options: Default, Black, Red, Green, Blue, Yellow, Magenta, Cyan.
FG Opacity
Available options: Default, Solid, Flashing, Translucent, Transparent.
BG Opacity
Available options: Default, Solid, Flashing, Translucent, Transparent.
NOTE: Advanced Selection and Option are adjustable only for digital programs.
4.7 DLC
This item is used to turn on/off Dynamic Luminance Control.
4.8 Restore Default
This item is used to reset to factory default settings.
5. LOCK
- Input the password by pressing number buttons on remote control.
NOTE: The factory default password is 0000.
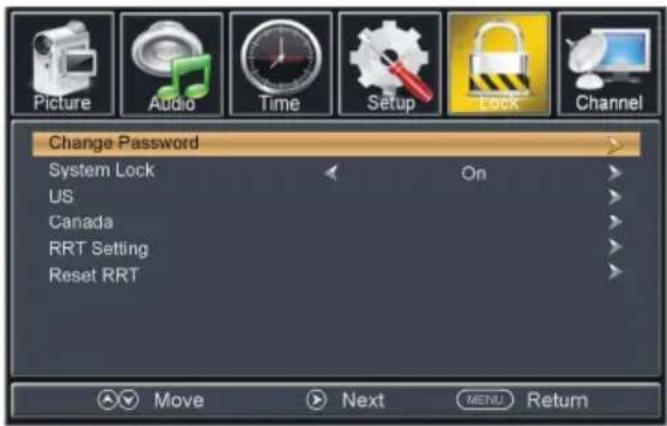
5.1 Change Password
- Press RIGHT navigation button or ENTER button to enter it.
- Press number buttons to input the new password and input it again to finish password changing.
5.2 System Lock
This item is used to turn on/off system lock.
5.3 US
TV
- Press RIGHT navigation button or ENTER button to enter it.
- Press navigation buttons to move the cursor.
- Press ENTER button to block or unblock it.
MPAA
Available options: N/A, G, PG, PG-13, R, NC-17, X.
5.4 Canada
Canada English
Available options: E, C, C8+, G, PG, 14+, 18+.
Canada French
Available options: E, G, 8 ans+, 13 ans+, 16 ans+, 18 ans+.
NOTE: US, Canada, RRT Setting and Reset RRT items are adjustable only when System Lock is On.
5.5 RRT Rating
This item is available only when viewing programs which contain related Advance Rating information.
5.6 Reset RRT
This item is used to reset RRT Rating.
6. CHANNEL

6.1 Air/Cable
This item is used to select preferred signal receiving type.
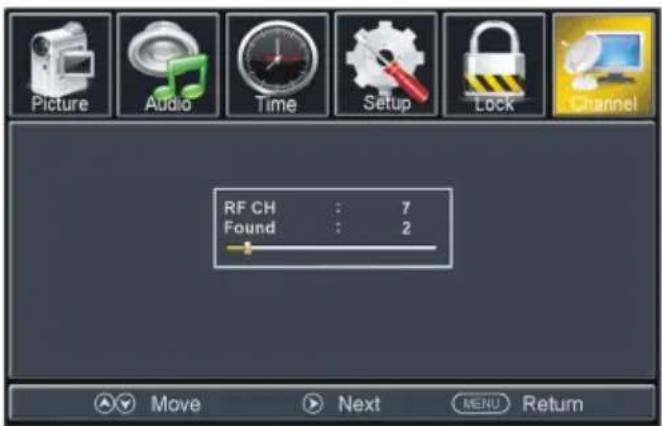
6.2 Auto Scan
-Press RIGHT or ENTER button to enter it.
6.21 Cable System
This item is used to select preferred cable system.
Available options: AUTO, STD, IRC, HRC.
NOTE: This item is adjustable only when your signal type is set to Cable.
6.22 Start to Scan
- Press RIGHT or ENTER button to start auto scanning.
- Press MENU or EXIT button to exit auto channel searching.
6.3 Favorite
- Press RIGHT or ENTER button to enter it.
- Press UP or DOWN navigation button to select preferred channel.
- Press ENTER button to label the selected channel as a favorite one or not.
6.4 Show/Hide
- Press RIGHT or ENTER button to enter it.
- Press UP or DOWN navigation button to select preferred channel.
- Press ENTER button to show or hide the selected channel.
6.5 Channel No.
- Press LEFT or RIGHT navigation button to select preferred channel number.
6.6 Channel Label
- Press RIGHT or ENTER button to enter it.
- Press LEFT or RIGHT navigation button to move the cursor.
- Press UP or DOWN navigation button to adjust the value.
NOTE: If no available channel is present, Favorite, Show/Hide, Channel No., and Channel Label will not be adjustable.
6.7 DTV Signal
This item is not user adjustable.
AV/COMPONENT/HDMI1/HDMI2/USB
- Press SOURCE button on unit top or remote control to select preferred input source.
- For menu operations in above modes, please refer to the menu operations in TV mode.
PC/VGA MODE
- Connect your computer to this unit using a VGA cable.
- Power on this unit and your computer.
- Press SOURCE button on unit top or remote control to set the unit in VGA mode.
- Press MENU button to display the main menu and select Setup item. Then press DOWN navigation button to enter Setup menu page.
- Press UP or DOWN navigation button to select Advanced and press RIGHT navigation button or ENTER button to enter it.

1. H-POS (Horizontal Position)
Available range: 0-100.
2. V-POS (Vertical Position)
Available range: 0-100.
3. Clock
Available range: 0-100.
4. Phase
Available range: 0-100.
5. Auto
If this item is entered, it will adjust the PC screen automatically.
- For the PICTURE, AUDIO, TIME, SETUP and LOCK menus, please refer to the menu operations in TV mode.
MAINTENACE
- Be sure to press POWER button to set the player to the standby mode and disconnect the AC adaptor before maintaining the player.
● Wipe the player with a dry, soft cloth. - If the surface is extremely dirty, wipe clean with a cloth which has been dipped in a weak soap-water solution and wrung out thoroughly, and then wipe again with a dry cloth.
● Never use alcohol, benzene, thinner, cleaning fluid or other chemicals. And do not use compressed air to remove dust.
SPECIFICATIONS
| Display Device | 13 inch LED TV |
| Resolution 1366×768 | |
| Pixel Pitch 0.2148(H)×0.2148(V)mm | |
| Luminance 200 cd/m2 | |
| Contrast Ratio 500:1 | |
| Aspect Ratio 16:9 | |
| Response Time 16 ms | |
| Viewing Angle 90(H)/50(V) | |
| Visible Range | 293.42(H)×164.97(V)mm |
| Life Time | 10,000 Hrs |
| FORMAT (TV MODE) | Music: MP3 compatible MULTIMEDIA PLAYBACK |
| Photo: JPG compatible | |
| POWER SOURCE AC adaptor (normal DC 12 V 2A) --- | |
| POWER CONSUMPTION | ≤24W |
| OPERATION TEMPERATURE | -5°C to 45°C |
| MEASUREMENT | 348(L)×160(W)×301(H)mm –「With stand holder」 |
| WEIGHT | Appox. 1.3 Kg –「With stand holder」 |
Specifications are subject change without notice.
GENERAL TROUBLESHOOTING
Check the following points before assuming malfunctions of this unit:
| Symptom | Remedy |
| No picture & sound. Improper connection of AC adaptor. | |
| No or poor picture. | Adjust antenna or use an external antenna.Relocate the unit near a window (if inside a building).Move units away from this product that causes interferenceDo Auto Tuning again.Try another channel. |
| No sound. Volume is too low; Mute function is switched on.The headphone has been plugged in or the signal is too weak. | |
| Poor reception. TV antenna is not correctly adjusted or TV channel is not right. | |
| Dark or blurred picture. The bright & contrast is too low. | |
| Unclear or unstable Picture. | TV antenna is not properly adjusted or in too weak signal reception area. |
| Picture moves up & down, blurs or folds over. | TV antenna is not rightly adjusted.The signal reception is too weak or caused by signal reflection from the buildings nearby or mountains. |
| Interfered snow picture. | The signal is interfered by car's engine, railway, high tension wires, neon signs or radio frequency. |
| No color. Color or color system is not set properly. | |
QFX
13" Televisión LED
Completamente a Color
Modelo: TV-LED1311

natural_image
Black CRT monitor displaying a blooming white orchid flower on its screen (no text or symbols visible)natural_image
Line drawing of a portable electric guitar with cord and plug, enclosed in a circle (no text or symbols)natural_image
Black remote control device with circular frame, no visible text or symbols on the device itselfnatural_image
Line drawing of a handheld electronic device with a coiled cable and connector (no text or symbols)Cable para Auto .....1
Control Remoto....7-8
natural_image
Diagram of a computer monitor with internal components and directional arrows indicating movement or flow (no text or symbols present)
| POWER INPUT ©©©DC 12V | USB | HDMI 1 | VGA | PC AUDIO | Y Pb Pr IN | ANT HEADPHONES Φ | |||
| | | | | | | | | | | | | | | |||
| 13 | 14 | 15 | 16 | 17 | 18 | 19 | 20 | ||
natural_image
Technical line drawing of a computer monitor with internal components and mounting holes (no text or symbols)
Sistema de Cable
2.1 Modo de Sonido
4.1 Idioma del Menú
6.1 Aire/Cable
AV/COMPONENTES/HDMI1/HDMI2/USB

- 13" Full Color LED TV
- INSTRUCTION MANUAL
- IMPORTANT INSTRUCTIONS
- SAFETY INSTRUCTIONS
- WARNING – TO REDUCE THE RISK OF FIRE, ELECTRIC SHOCK, OR SERIOUS PERSONAL INJURY:
- CAUTION- TO REDUCE THE RISK OR PERSONAL INJURY OR PRODUCT/PROPERTY DAMAGE:
- BATTERY HANDLING AND USAGE:
- ACCESSORIES
- TABLE OF CONTENTS
- GETTING STARTED
- OPERATIONS
- FOR REFERENCE
- FEATURES
- 13" TFT DISPLAY
- GENERAL PARTS
- REMOTE CONTROL
- REMOTE CONTROL PREPARATION
- BATTERY INSTALLATION
- SERVICE LIFE OF BATTERIES
- NOTE:
- NOTES:
- BASIC CONNECTION
- CONNECTING TO AC POWER SOURCE
- CONNECT EXTERNAL ANTENNA TO UNIT
- USB CONNECTION
- MAKE SURE ALL THE EQUIPMENTS AND AC ADAPTOR ARE CONNECTED PROPERLY AND THE UNIT IS SET IN CORRECT MODE BEFORE KINDS OF OPERATIONS.
- BASIC OPERATIONS
- SELECT DESIRED PROGRAM
- VOLUME CONTROL
- MUTE CONTROL
- SOURCE SETTING
- PICTURE MODE
- SOUND MODE
- SLEEP TIMER SETTING
- VIDEO SIZE SETTING
- MTS/AUDIO SETTING
- INFORMATION DISPLAY
- TV GUIDE (FOR TV MODE ONLY)
- CLOSED CAPTION
- FAVOURITE LIST
- CHANNEL LIST
- FREEZE FUNCTION
- USB MULTIMEDIA PLAYBACK
- Photo Playback
- During normal playing:
- Music Playback
- MAIN MENU
- Common procedure for initial settings
- DTV MODE
- First Time Installation
- Menu Language
- Air/Cable
- Cable System
- Auto Scan
- PICTURE
- Picture Mode
- Contrast
- Brightness
- Color
- Tint
- Sharpness
- Color Temp. (Color Temperature)
- AUDIO
- Sound Mode
- Bass
- Treble
- Balance
- Surround
- AVL (Auto Volume Level)
- SPDIF Type
- Audio Language
- TIME
- Sleep Timer
- Time Zone
- Daylight Saving Time
- Clock
- SETUP
- Menu Language
- Transparent
- Zoom Mode
- Noise Reduction
- Advanced
- Closed Caption
- CC Mode
- Basic Selection
- Advanced Selection
- Option
- DLC
- Restore Default
- LOCK
- Change Password
- System Lock
- US
- TV
- MPAA
- Canada
- Canada English
- Canada French
- RRT Rating
- Reset RRT
- CHANNEL
- Air/Cable
- Auto Scan
- Cable System
- Start to Scan
- Favorite
- Show/Hide
- Channel No.
- Channel Label
- DTV Signal
- AV/COMPONENT/HDMI1/HDMI2/USB
- PC/VGA MODE
- H-POS (Horizontal Position)
- V-POS (Vertical Position)
- Clock
- Phase
- Auto
- MAINTENACE
- GENERAL TROUBLESHOOTING
- QFX
- 13" Televisión LED
- Completamente a Color
- Sistema de Cable
- Modo de Sonido
- Idioma del Menú
- Aire/Cable
- AV/COMPONENTES/HDMI1/HDMI2/USB
Brand : QFX
Model : TV-LED1311
Category : Television