
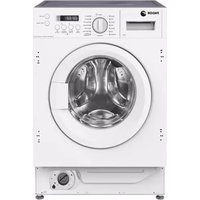
FDD-59 - Washing machine FAGOR - Free user manual and instructions
Find the device manual for free FDD-59 FAGOR in PDF.


| Product Type | Washing machine |
| Brand | Fagor |
| Model | FDD-59 |
| Loading Type | Front-loading |
| Capacity | 7 kg |
| Maximum Spin Speed | 1200 rpm |
| Dimensions (H x W x D) | 85 x 60 x 60 cm |
| Weight | 70 kg |
| Power Supply | 220-240 V, 50 Hz |
| Energy Class | A+ |
| Washing Programs | Cotton, Synthetics, Delicates, Wool, Quick 30', Hand Wash, Rinse, Spin, Drain |
| Temperature Range | Cold to 90°C |
| Drum Material | Stainless steel |
| Control Type | Electronic with LED display |
| Child Lock | Yes |
| Delay Start | Up to 24 hours |
| Noise Level (Wash/Spin) | 58 / 76 dB |
| Water Consumption per Cycle | Approx. 45 L |
| Annual Energy Consumption | Approx. 220 kWh |
| Features | AquaStop, Foam control, Unbalance detection, Variable spin speed |
Frequently Asked Questions - FDD-59 FAGOR
User questions about FDD-59 FAGOR
0 question about this device. Answer the ones you know or ask your own.
Ask a new question about this device
Download the instructions for your Washing machine in PDF format for free! Find your manual FDD-59 - FAGOR and take your electronic device back in hand. On this page are published all the documents necessary for the use of your device. FDD-59 by FAGOR.
USER MANUAL FDD-59 FAGOR
natural_image
Red circular logo with three horizontal white lines, resembling a stylized number 3 or speedometer (no text or symbols)
natural_image
Black and silver industrial water dispenser with a vertical handle (no visible text or symbols)
natural_image
Exterior view of a black rectangular industrial enclosure with two metallic fixtures on top (no text or symbols visible)
natural_image
Exterior view of a modern black and white beverage refrigerator with two side doors showing glass shelves filled with various beverages (no visible text or labels)FAGOR BAR EQUIPMENT
Manual for installation, use and maintenance.
TABLE OF CONTENTS
1 RECEIVING AND INSPECTING THE EQUIPMENT ____ 3
2 SPECIFICATIONS 4
3 INSTALLATION 5
3.1 UNCRATING 5
3.2 SEALING 5
3.3 CLEANING OF CABINET 5
3.4 PREPARATION, OPERATION, AND MAINTANANCE ____ 5
3.5 LOCATION 7
3.6 DATA PLATE 8
3.7 ELECTRICAL CONNECTIONS 8
3.8 SHELVING INSTALLATION 9
4 OPERATION 9
4.1 DEFROST 9
4.2 TROUBLESHOOTING 9
5 MAINTENANCE 10
6 PROCEDURE TO INSTALL AIR CHANNEL & DRAFT TOWERS 12
6.1 TECHNICAL INFORMATION 14
1 RECEIVING AND INSPECTING THE EQUIPMENT
Upon receiving your new FAGOR BAR EQUIPMENT, check the package and the machine for any damages that may have occurred during transportation. Visually inspect the exterior of the package, if damaged, open and inspect the contents with the carrier. Any damage should be noted and reported on the delivering carrier's receipt.
In the event that the exterior is not damaged, yet upon opening, there is concealed damage to the equipment notify the carrier immediately. Notification should be made verbally as well as in written form. Request an inspection by the shipping company of the damaged equipment. Retain all crating material until inspection has been made. Contact the dealer through which you purchased the unit.
Check the compressor compartment housing and visually inspect the refrigeration package. Be sure lines are secure and base is still intact.
A NOTE FROM OUR QUALITY CONTROL MANAGER
CONGRATULATIONS ON YOUR NEW PURCHASE. WE WOULD LIKE TO WELCOME YOU TO THE FAGOR TEAM. THE UNIT IN FRONT OF YOU IS A GREAT PIECE OF EQUIPMENT THAT WILL BECOME ONE OF YOUR MOST RELAIBLE TOOLS IN YOUR DAILY OPERATIONS FOR YEARS TO COME!
PRIOR TO SHIPPING YOUR UNIT, OUR TRAINED SERVICE TECHNICIANS TESTED YOUR UNIT FOR A PERIOD OF 12 HOURS. THIS PERFORMANCE TEST WAS RECORDED AND A COPY OF THE RESULTS IS INCLUDED WITH THIS SERVICE MANUAL. DURING THIS TEST, OUR HIGHLY QUALIFIED PERSONNEL INSPECTED YOUR MACHINE FOR LEAKS, LOSE COMPONENTS, AND IMPROPER NOISE LEVELS. WE ALSO TESTED THE COOLING PERFORMANCE IN AN EFFORT TO GIVE YOU THE BEST AND MOST RELAIBLE UNIT POSSIBLE.
2 SPECIFICATIONS
| MODEL | Doors | Tower | Taps | Kegs | HP | AMPS | Crated Weight (LBS.) | Length | Width | Height | Refrigerant charge. oz R134 A |
| FBB/DD-23 | 1 | 1 | 1 | 1 | 1/6 | 2.5 | 165 | 24.5" | 30.5" | 40" | 6.3 |
| FBB/DD-58 | 2 | 2 | 2 | 3 | 1/3 | 6.6 | 343 | 59.5" | 28" | 37" | 9.8 |
| FBB/DD-68 | 2 | 2 | 2 | 3 | 1/3 | 6.6 | 370 | 69.5" | 28" | 37" | 9.8 |
| FBB/DD-78 | 3 | 2 | 2 | 4 | 1/3 | 6.9 | 396 | 80" | 28" | 37" | 9.8 |
| FBB/DD-94 | 3 | 2 | 2 | 5 | 1/3 | 7.2 | 429 | 95.5" | 28" | 37" | 9.8 |
| MODEL | Doors | Shelves | Kegs | 12oz. Cans | HP | AMPS | Crated Weight (LBS.) | Length | Width | Height | Refrigerant charge. oz R134 A |
| FBB/DD-24 (G) | 1 | 2 | 1 | 415 | 1/6 | 2.5 | 165 | 24.5" | 30.5" | 40" | 6.3 |
| FBB/DD-58 (G) | 2 | 4 | 3 | 852 | 1/3 | 6.6 | 343 | 59.5" | 28" | 37" | 9.8 |
| FBB/DD-68 (G) | 2 | 4 | 3 | 1014 | 1/3 | 6.6 | 370 | 69.5" | 28" | 37" | 9.8 |
| FBB/DD-78 (G) | 3 | 6 | 4 | 1092 | 1/3 | 6.9 | 396 | 80" | 28" | 37" | 9.8 |
| FBB/DD-94 (G) | 3 | 6 | 5 | 1202 | 1/3 | 7.2 | 429 | 95.5" | 28" | 37" | 9.8 |
AMBIENT TEMPERATURE: The above equipment mentioned are tested in the ambient temperature between 60^ F to 90^ F. If the equipment is installed in an ambient higher than 90^ F it will reduce the equipment efficiency and consume more energy.
3 INSTALLATION
3.1 UNCRATING
Cut and remove the outer packaging. Cut the (4) clamps that hold the refrigerator to the skid. Lift the unit off the skid. If machine was laid down during this operation leave the cabinet upright for 24 hours before plugging into power source. To install draft arm, first place rubber washer over draft arm mounting holes in cabinet top and put beer line connector down through hole. Next secure draft arm with four bolts provided. To retain complete mobility of the cooler, the accessory CO2 tank (up to five pounds in size) must be placed inside the cabinet.
3.2 SEALING
WHEN SANITATION CODES REQUIRE SEALING TO FLOOR THIS METHOD MAY BE USED
- Tip cabinet and apply a bead of silicone seal on bottom edge of the base.
- Return cabinet to upright position and using proper equipment, lift cabinet into location.
Heavy appliances should not be used on the same circuit with the cooler.
CAUTION: If an extension cord is necessary, use only a three wire grounding type of wire, size 16 AWG or heavier; do not exceed 20 feet in length. The use of ungrounded cords or overloaded circuit voids compressor warranty.
3.3 CLEANING OF CABINET
The exterior of the cabinet is painted and should be cleaned only with lukewarm water, taking care not to scratch the paint. Mild detergents are also recommended. The interior can be cleaned in a similar manner. THE CONDENSER MUST BE CLEANED AT REGULAR INTERVALS. FAILURE TO DO SO CAN CAUSE COMPRESSOR MALFUNCTION AND WILL VOID WARRANTY. Clean approximately every six months, depending upon usage, dust, etc. Pull cabinet away from wall and thoroughly vacuum the condenser and surrounding surfaces.
3.4 PREPARATION, OPERATION AND MAINTENANCE OF BEER DISPENSING SYSTEM
The pressure source in direct draw dispenser is bottled CO2 gas.
This gas is reduced to the proper dispensing pressure by a regulator and then delivered to the barrel through a flexible hose and tap (or vent). This tap has a check valve in it to prevent beer from backing up into the hose and regulator. Before a new barrel is tapped, this line should be purged by quickly opening and closing the regulator outlet valve, allowing a surge of gas to travel through the line and tap.
Always keep the CO2 cylinder in vertical position. The recommended pressure for the CO2 system is 8-10 psi.
CAUTION: Handle all pressure system components with care. Do not use excessive pressures. Be sure instructions are understood thoroughly, If in doubt, contact your dealer/distributor for explanation.
TAPPING INSTRUCTIONS
This cooler will accept only the quarter-size keg. The Sankey type is the most modern and easiest of all to tap with the available taps. The type of keg and tap you use will depend on the brand of beer your purchase. Your beer distributor can provide additional instructions and tips on how to maintain the beer to your satisfaction.
Following these tapping instructions, place the keg in front of cabinet for tapping. After all connections are complete and checked for leaks, place the CO2 bottle in the rear (inside) of cabinet with the pressure gage visible for reading, then place the keg in position, allowing the door to be closed completely without interference. Make certain that beer line and keg are not touching the evaporator.
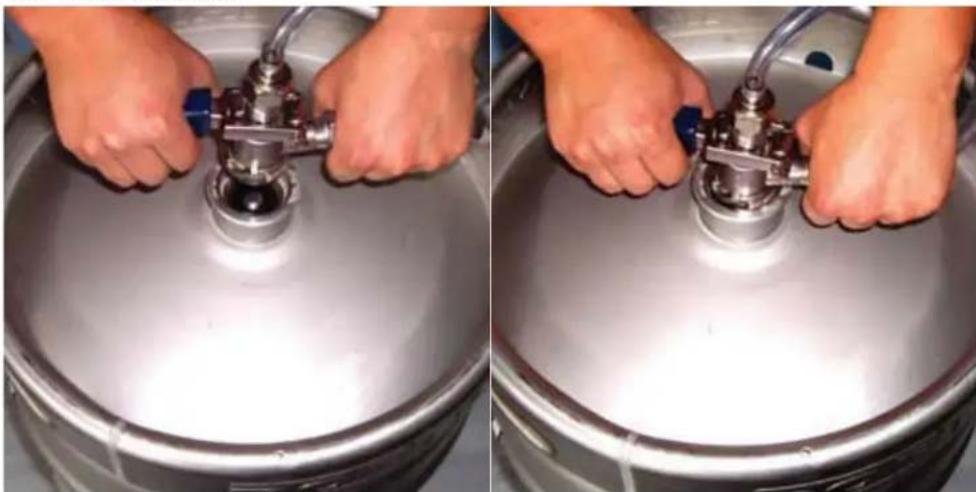
How to Tap a Keg of Beer / Sankey Type Barrel
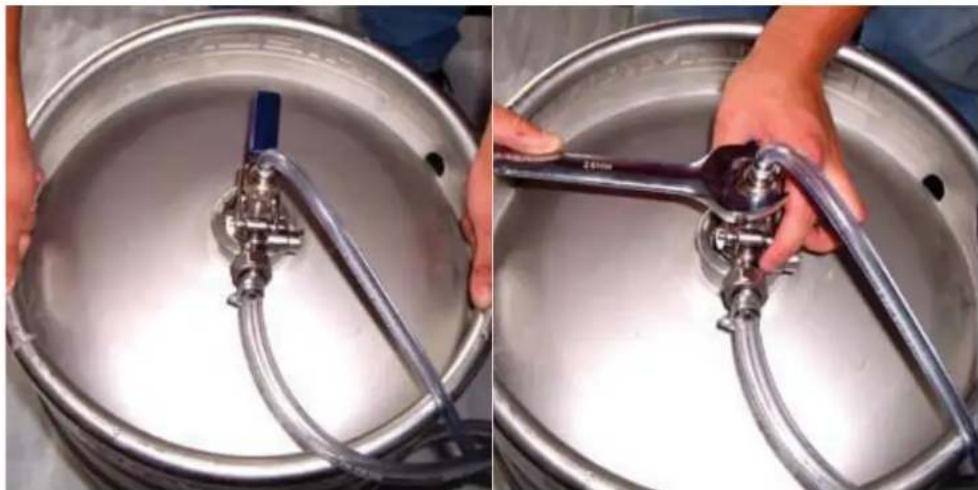
- Connect line from pressure source to tap nipple (use clamp).
Using coupling washer connect beer line to thread on probe. Holding flats on probe with wrench, tighten wing nut or hex nut on beer hose. - Align tap with lugs in barrel, insert tap.
- Turn tap body handle 14 turn clockwise until tight to secure tap to barrel. Turn on pressure regulator.
- Rotate wheel handle 14 turn clockwise. Be certain handle is turned as far as it will go to stop. This will assure that the beer and gas pots in the keg down tube will be fully opened.
To Beer Faucet
BARREL IS TAPPED
To Pressure Source
natural_image
Close-up of hands adjusting a metallic valve on a cylindrical tank (no text or symbols visible)Page 6 For Customer Service: Call 1-866-GO FAGOR
natural_image
Two-panel photo showing hands holding a metal pipe fitting inside a large metallic container (no text or symbols visible)CLEANING INSTRUCTIONS FOR THE FAUCET
Proper cleaning is important for the beer faucet, drain pan or any item coming in contact with food or beverages to prevent odors and tastes
from bacteria. Prior to removing the faucet for cleaning, close the tap valve at the keg.
The faucet should be cleaned every week. Using the spanner wrench provided, remove the faucet from the shank and thoroughly clean with hotwater and detergent. Rinse completely and reinstall the faucet. (Note: The faucet may be taken apart for more thorough cleaning.)
NOTICE
This cooler is designed to maintain your beer keg temperature within the most desirable range of 35^ to 40^ F. You can expect this temperature with the proper temperature control setting and in a normal environment. It is important to understand that when the keg of beer is purchased, it must be installed inside the cooler as soon as possible to avoid excessive warm-up of the beer. If this happens, it may take many hours for the temperature to be reduced to the desirable range. No provision is made for rapid cooling of a keg which has become too warm.
When purchasing your keg of beer, you can wrap the keg in a blanket or other insulation to help it cool prior to installing in the cooler.
3.5 LOCATION
Units represented in this manual are intended for indoor use only. Be sure the location chosen has a floor strong enough to support the total weight of the unit and contents. For the most efficient operation, be sure to provide good air circulation inside and outside of the unit.
Inside cabinet:
The first cleaning must be made when you unpack the unit and before switching it on. Clean it with water and a mild detergent. When it is clean and dry, insert the accessories in the appropriate places, for the best use of the user.
Outside cabinet:
Be sure the unit has good air circulation around it. Avoid hot corners and locations near stoves and ovens. It is recommended the unit be installed no closer than 2" from any wall. The place
where the refrigerator is placed must be open and clean, avoiding that de fan of the condensing unit absorbs materials which are deposited then into the condenser blades and coil, which can produce failures.
3.6 DATA PLATE
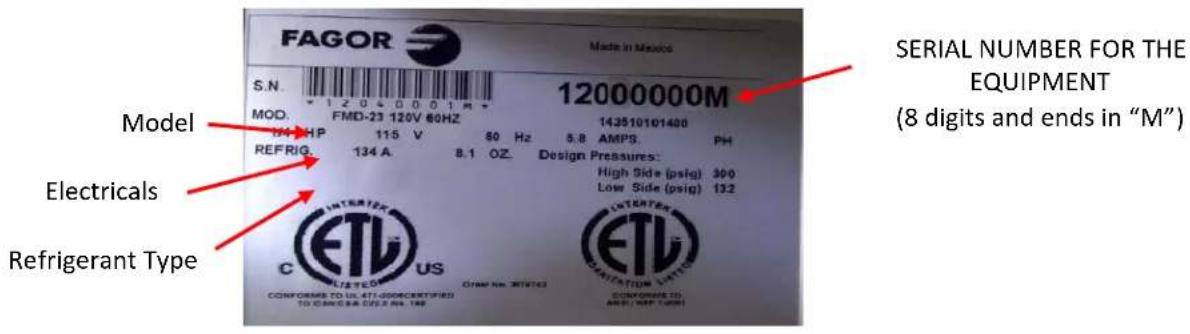
The data plate in located inside the unit, near the top front left corner. Under no circumstances should the data plate be removed from the unit. The data plate is essential to identify the particular features of your unit and is of great benefit to installers, operators and maintenance personnel. It is recommended that, in the event the data plate is removed, you copy down the essential information in this manual for reference before installation.
3.7 ELECTRICAL CONNECTIONS
Refer to the amperage data in this manual or on data plate and your local code or the National Electrical Code to be sure unit is connected to the proper power source. Verify correct incoming voltage according to the Data Plate information.
HEAVY APPLIANCES
A protected circuit of the correct voltage and amperage must be run for connection of the supply cord. Unit must be grounded and connected in accordance with NEC Article 422 Appliances.

DANGER: Power must be turned off and disconnected from the power source whenever performing maintenance, repair or cleaning the condensing unit. If machine still running when power is off, disconnect power at the circuit breaker before unplugging the machine.

WARNING: Machine and compressor warranties are void if failure is due to improper electrical installation.
3.8 SHELVING INSTALLATION
1) Hook shelf rails onto shelf pilasters
2) Position all two shelf rails equal in distance from the floor for level shelves.
3) Wire shelves are oriented so that cross support bars are facing down.
4) Place shelves on shelf clips making sure all corners are seated properly.
3 OPERATION
Verify thermostat is in the OFF position prior to connecting the unit to its power source. Failure to do so could lead to electrical failures. Keep in mind the evaporator fans and lights will still have power while the thermostat in the OFF position. Connect unit to power supply.
Temperature controller (inside the cabinet) goes from 0 (OFF Position) to 7 (Coolest Position). Set control at position 3 for temperature average of 35^ F.
For 23 models set control at position 3, for temperature average of 35^ F.
4.1 DEFROST
The unit will not require defrosting if the door is only opened for a minimum time. Defrosting should be done when the keg is changed. To do this unplug the unit and leave the door open for fifteen minutes. Defrost water will accumulate in a pan under the evaporator and will drain to a plastic container in the storage area under the beer keg shelf. Do not use a pick, knife, etc., to pry ice from evaporator as this could puncture evaporator or damage the finish.
4.2 TROUBLESHOOTING
Sometimes, working failures are due to simple causes which can be solved by the user. Before asking for the help of a qualified technician, you have to do some verification. These failures are not covered by the warranty:
- Refrigeration doesn't work.
a. Check the unit is still connected to power supply. -
Refrigerator doesn't reach temperature.
a. Check the thermostat is not in OFF position. b. Check the thermostat is at position 5 or higher.
c. Check the unit is not on defrost cycle.
d. Check gasket is in good condition and door is sealed.
e. Check fan is moving. Open the door press and hold door switch for verification.
f. Don't put any food inside until unit is at temperature.
g. Be sure castors or legs were installed. -
There is water under the refrigerator.
a. Check the drain pipe is over the pan.
b. Check cabinet is level.
4 MAINTENANCE
Stainless Steel Care and Cleaning:
Proper cleaning of stainless steel requires soft cloths or plastic souring pads. Never use steel pads, wire brushes or scrapers!
Cleaning solutions need to be alkaline or non-chloride cleaners. Any cleaner containing chlorides will damage the protective film of the stainless steel. Chlorides are also commonly found in hard water, salts, and household and industrial cleaners. If cleaner containing chlorides are used be sure to rinse repeatedly and dry thoroughly upon completion.
Routine cleaning of stainless steel can be done with soap and water. Extreme stains or grease should be cleaned with a non-abrasive cleaner and plastic scrub pad. There are also stainless steel cleaners available which can restore and preserve the finish of the steels protective layer.
Never use and acid based cleaning solution! Many food products have an acidic content which can deteriorate the finish. Be sure to clean the ALL food products from any stainless steel surface. Common items include peppers, tomatoes and other vegetables.
Cleaning the Condenser Coil

DANGER: Power must be turned off and disconnected from the power source whenever performing maintenance, repair or cleaning the condensing unit.
Disconnect machine. Remove front bottom panel and carefully slide out the condensing unit. The condenser coil requires regular cleaning; recommended every 30-60 days, depending of the accumulation of dust and grease. If the buildup on the coil consists of only light dust and debris the condenser coil can be cleaned with a simple brush. Heavier dust build up may require a vacuum or even compressed air to blow though the condenser coil. If heavy grease is present there are de-greasing agents available for refrigeration use and specifically for the condenser coils. The condenser coil may require a spray with the de-greasing agent and then blown through with compressed air.
Be sure all electrical and mechanical parts are dry before turning on the power.
Never use a high pressure water wash for this cleaning procedure as water can damage the electrical components located near or at the condenser coil. Do not place filter material in front of condenser coil. This material blocks air-flow to the coil similar to having a dirty coil!
If you keep the Condenser clean you will minimize your service expense and lower your electrical costs. Failure to maintain a clean condenser coil can initially cause high temperatures and excessive run times. Continuous operation with dirty or clogged condenser coils can result in compressor failures.
Neglecting the condenser coil cleaning procedures WILL VOID YOUR WARRANTY associated with the compressor or cost to replace the compressor!
To put back the condensing unit in its place, slide in the unit carefully. BE SURE DRAIN PIPE IS LOCATED OVER THE PAN. Replace front bottom panel.
Gasket Maintenance
Gaskets require regular cleaning to prevent mold and mildew build up and also to keep the elasticity of the gasket. Gasket cleaning can be done with the use of warm soapy water. Avoid full strength cleaning products on gaskets as this can cause them to become brittle and prevent proper seals. Also, never use sharp tools or knives to scrape or clean the gasket which could possibly tear the gasket and rip the bellows.
Gaskets can easily be replaced and do not require the use of tools or authorized service persons. The gaskets can be pulled out of the grove in the door and new gaskets can be “pressed” back into place.
Doors/Hinges
Over time and with heavy use doors the hinges may become loose. If it is noticed that the door is beginning to sag, it may become necessary to tighten the screws that mount the hinge brackets to the frame of the unit. If the doors are loose or sagging this can cause the hinge to pull out of the frame which may damage both the doors and the door hinges. In some cases this can require qualified service agents or maintenance personnel.
Drain Maintenance
Each unit has a drain located inside the unit which removes the condensation from the evaporator coil and evaporates it at an external condensate evaporator pan. Each drain can become loose or disconnected from moving or bumping the drain. IF YOU NOTICE EXCESSIVE WATER ACCUMULATION ON THE INSIDE OF THE UNIT be sure the drain tube is connected from the evaporator housing to the condensate evaporator drain pan. IF WATER IS COLLECTED UNDERNEATH THE UNIT you may want to check the condensate evaporator drain tube to be sure it is still located inside the drain pan. The leveling of the unit is important as the units are designed to drain properly when on a level surface, if your floor is not level this can also cause drain problems. Be sure all drain lines are free of obstructions; typically food product is found blocking drain lines causing water to back up and overflow the drain pans.
6 PROCEDURE TO INSTALL THE AIR CHANNELS AND DRAFT TOWERS
Models: FDD-58, FDD-68, FDD-78 & FDD-95
This procedure describes how to install the air channel needed to provide cold air directly into the beer towers.
Tools needed: Philips Screwdriver.
Step 1
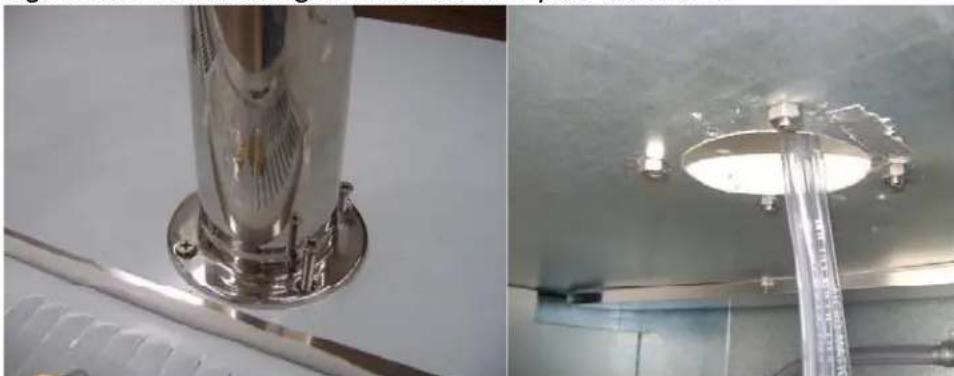
Locate the gaskets and bolts included in with your Tower. Place gasket over the pre-drilled holes and place the 4 screws thru the tower base. Align the tower with screws and gasket to the cabinet top as shown below while dropping the beer line(s) thru the top of the unit. (Fig. 1)
Figure 1

natural_image
Close-up of a metallic mechanical component with a black arrow pointing to a circular opening, no visible text or symbols.Gasket, Tower and Beer line(s)
Step 2
Tighten the screws using the nuts found in your tower box.
natural_image
Two-panel image showing a metallic cylindrical component mounted on a base and a close-up of a circular metallic fixture with a tube inserted (no visible text or symbols)Figure 2
Figure 3
Step 3
Identify the "L" deflector channel shown below (Fig. 4) which is found inside of the plastic bag located in the inside of your cabinet. Insert the "L" deflector into the center channel as shown in the picture below. (Fig. 5)
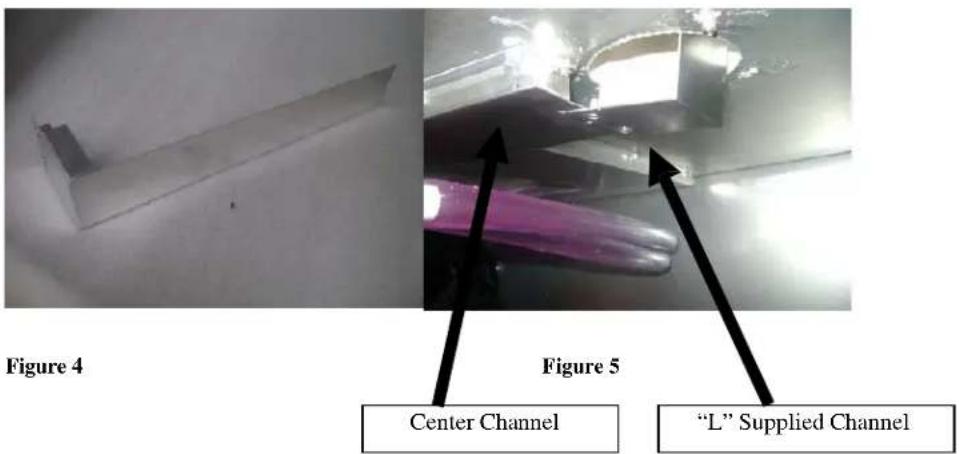
Note: Beer Tubes are to be placed on the outside of the "L" Deflector channel
Step 4
Insert and manually tighten the plastics screws to the "L" deflector and the center channel from the inside the box. (Fig. 6).

natural_image
Interior view of an industrial facility with purple ductwork and overhead lighting (no visible text or symbols)Figure 6
7 WIRING DIAGRAMS
| Color Estándar / Standard Color | Calibre AWG (AWG Size) | Ref. | Símbolo /Symbol | Descripción/Description | Símbolo /Symbol | Descripción/Description |
| Verde/Green | 18 AWG | A | VE | Ventilador de Evaporador/Evaporator's Fan | RDE | Resistencia de Descarche/Defrost Resistance |
| Azul Obscuro/Dark Blue | 16 AWG | B | COM | Compresor/Compressor | RG | Resistencia de Desague/Drain Resistance |
| Marrón/Brown | 16 AWG | C | VC | Ventilador de Condensador/Condenser Fan | CONT | Contactor/Auxiliar Contactor |
| Azul Claro/Light Blue | 18 AWG | D | LAM | Lampara/Light | JB | Araña de Conexiones/Juction Box |
| Marrón/Brown | 18 AWG | E | CE | Controlador Eléctronic/Electronic Controller | TA | Termostato Mécanico/Thermostat |
| Azul Obscuro/Dark Blue | 18 AWG | F | MP | Micro-interruptor Puerta/Door Micro-Switch | T1 | Sensor de Ambiente/ Environment Sensor |
| Amarillo/Yellow | 18 AWG | G | INT | Interruptor Principal/Main Switch | T2 | Sensor Deshielo/ Defrost Sensor |
| Rojo/Red | 18 AWG | H | RM | Resistencia de Marco/Frame Resistance | INT-L | Interruptor Lámpara/Ligth Switch |
| Color Estándar / Standard Color | Calibre AWG (AWG Size) | Ref. | Símbolo /Symbol | Descripción/Description | Símbolo /Symbol | Descripción/Description |
| Verde/Green | 18 AWG | A | VE | Ventilador de Evaporador/Evaporator's Fan | RDE | Resistencia de Descarche/Defrost Resistance |
| Azul Obscuro/Dark Blue | 16 AWG | B | COM | Compresor/Compressor | RG | Resistencia de Desague/Drain Resistance |
| Marrón/Brown | 16 AWG | C | VC | Ventilador de Condensador/Condenser Fan | CONT | Contactor/Auxiliar Contactor |
| Azul Claro/Light Blue | 18 AWG | D | LAM | Lampara/Light | JB | Araña de Conexiones/Juction Box |
| Marrón/Brown | 18 AWG | E | CE | Controlador Eléctronico/Electronic Controller | TA | Termostato Mécanico/Thermostat |
| Azul Obscuro/Dark Blue | 18 AWG | F | MP | Micro-interruptor Puerta/Door Micro-Switch | T1 | Sensor de Ambiente/ Environment Sensor |
| Amarillo/Yellow | 18 AWG | G | INT | Interruptor Principal/Main Switch | T2 | Sensor Deshielo/ Defrost Sensor |
| Rojo/Red | 18 AWG | H | RM | Resistencia de Marco/Frame Resistance | INT-L | Interruptor Lámpara/Ligth Switch |
| Negro/Black | 16 AWG | I |
| Blanco/White | 18 AWG | J |
| Blanco/White | 14 AWG | K |
| Negro/Black | 14 AWG | L |
| Negro Rayado/Black Striped | 14 AWG | M |
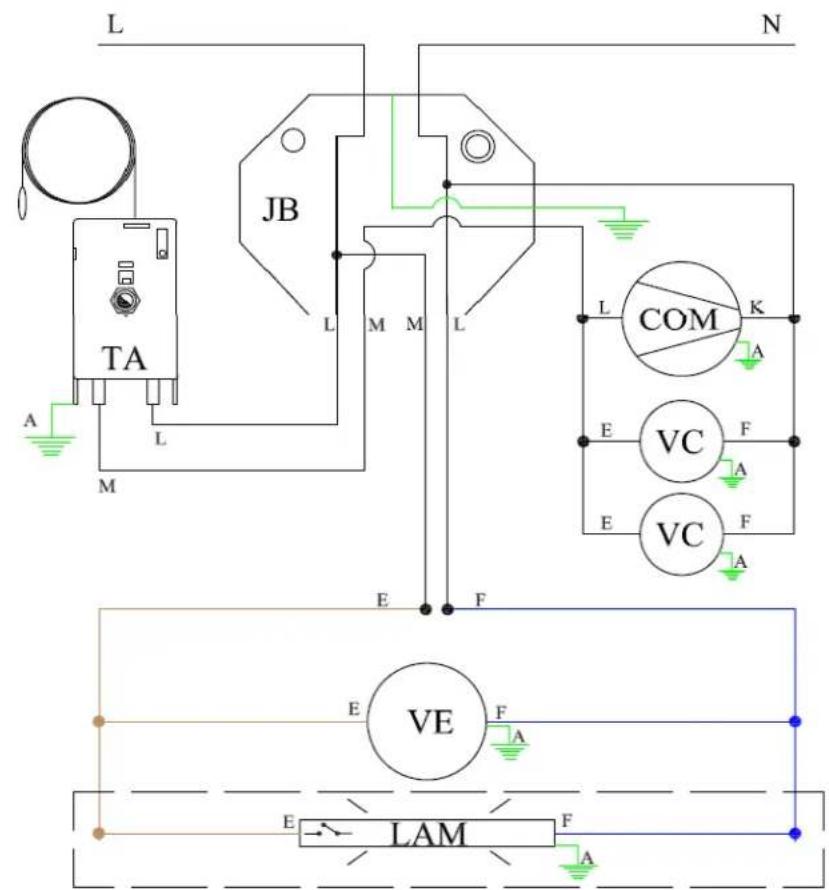
Note: Some models doesn't include the lamp installed from factory, check your sales representative / Nota: Algunos modelos no incluyen la lámapra instalada de fabrica, revise con su representate de ventas.
WARRANTY
Limited Warranty
One Year Parts & Labor Warranty: Fagor Commercial, Inc. ("Fagor") Warrants to the fist-end-user purchaser (the "User") that the Fagor brand equipment sold hereunder, except for parts and accessories which carry the warranty of a supplier (the "Equipment") will be free from defects in material and factory workmanship under normal conditions of use and maintenance for a period of one (1) years from the date of installation (Warranty commencement date), but in no event to exceed eighteen (18) months from the date of shipment from the factory. Warranty is Not Transferable.
Warranty Coverage: If there is a defect in material or factory workmanship covered by this Warranty reported to Fagor during the period the applicable Warranty is in force and effect, Fagor will repair or replace, at Fagor's option, that part (ground shipping only) of the Equipment that has become defective and will cover labor cost (straight time only) within the corresponding warranty period of time Fagor shall bear all labor costs (straight time only) in connection with the installation of these replacement parts, provided that, the installation is conducted by Fagor or its authorized representative. Charges for warranty travel time round trip, total two (2) hours or up to 100 miles total. Any charges exceeding those stated herein must have prior authorization by Fagor. Travel outside of the two (2) hours or 100 miles, and any work performed at overtime or weekend rates, would be the responsibility of the owner/user. In the case Fagor deems the equipment non-repairable, said equipment will be replaced and the replacement unit(s) will carry the same warranty period from the original unit's installation date (original Warranty Commencement Date).
Additional Three Year Compressor Part Warranty: In addition to the warranty set above, Fagor warrants the sealed compressor (part only) for an additional four (4) years based on the installation date. This warranty is for defects, both in workmanship and material, under the normal and proper use and maintenance service. The four (4) year extended warranty only applies to sealed parts of the compressor and does not apply to any other part or component, including, but not limited to cabinet, temperature control, refrigerant, motor starting equipment, fan assembly, or any other electrical or mechanical component.
Exclusions from and Conditions to Warranty Coverage: This Warranty does not cover parts or accessories, which (a) carry the warranty of a supplier or (b) are abused. Application of this Warranty is further conditioned upon the following:
Installation: The Equipment must be properly installed in accordance with Fagor's installation procedures and by a professional technician.
No Alteration: The Equipment must not have been modified or altered from its condition at the date of original installation.
Use: FAGOR EQUIPMENT IS NOT DESIGNED FOR PERSONAL, FAMILY, OR HOUSEHOLD PURPOSES, AND ITS SALE FOR SUCH PURPOSES IS NOT INTENDED. IN THE EVENT THE EQUIPMENT IS SO USED, THIS WARRANTY SHALL BE NULL AND VOID, AND THE EQUIPMENT SHALL BE DEEMED TO HAVE BEEN SOLD "AS IS-WHERE IS" WITHOUT ANY WARRANTY OF ANY KIND, INCLUDING WITHOUT LIMITATION ANY WARRANTY OF TITLE, NON-INFRINGEMENT, MERCHANT-ABILITY OR FITNESS FOR A PARTICULAR PURPOSE.
Proper Maintenance and Operation: The Equipment must be properly maintained and operated in accordance with Fagor's maintenance and operating procedures. All service, labor and parts must be acquired from Fagor or its authorized service representative for the User's area.
This warranty is void if failure is a direct result of handling and/or transportation, fire, water, accident, misuse, acts of god(s), attempted repair by unauthorized persons, improper installation, if serial number has been removed or altered, or if unit is used for purpose other than it was originally intended.
Failure to comply with any of these conditions will void this Warranty. In addition, this Warranty does not cover defects due to apparent abuse, misuse or accident.
Parts Warranty Coverage: Fagor warrants all new machine parts produced or authorized by Fagor to be free from defects in material and workmanship for a period of 90 days from the Warranty Commencement Date. If any defect in material and workmanship is found to exist within the warranty period, Fagor will replace the defective part without charge. Defective parts become the property of Fagor.
Fagor will have no responsibility to honor claims received after the date the applicable Warranty expires. Notwithstanding the foregoing, any claim with reference to the Equipment or any parts therefore for any cause shall be deemed waived unless submitted by the User to Fagor within (30) days after the date the User discovered, or should have discovered, the claim. In connection with all claims under this Warranty, Fagor will have the right, at its own expense, to have its representatives inspect the Equipment at the User's premises and to request all of the User's records pertaining to the Equipment to determine whether a defect exists, whether the conditions set forth in this Warranty have been satisfied, and whether or not the applicable Warranty is in effect.
THE FOREGOING WARRANTY IS IN LIEU OF AND EXCLUDES ALL OTHER WARRANTIES NOT EXPRESSLY SET FORTH HEREIN, WHETHER EXPRESS OR IMPLIED BY OPERATION OF LAW OR OTHERWISE, INCLUDING BUT NOT LIMITED TO ANY REPRESENTATION OF PERFORMANCE AND ANY IMPLED WARRANTIES OF TITLE, NON-INFRINGEMENT, MERCHANTABILITY OR FITNESS FOR A PARTICULAR PURPOSE. NO OTHER WARRANTIES ARE AUTHORIZED ON BEHALF OF FAGOR UNLESS SPECIFICALLY ISSUED BY FAGOR.
Fagor shall have no liability for incidental or consequential losses, damages including without limitation or expenses, loss of sales, spoiled food, profits or goodwill, claims whether or not on account of refrigeration failure or punitive or exemplary damages directly or indirectly arising from the sale, handling or use of the Equipment or from any other cause relating thereto, whether arising in contract, tort, warranty, strict liability or otherwise. Fagor's liability hereunder in any case is expressly limited, at Fagor's election, to repair or replacement of Equipment or parts therefore or to the repayment of, or crediting the user with, an amount equal to the purchase price of such goods.
Prices & Specifications: Fagor reserves the right to change the prices and specifications of the equipment and/or material without notice. Prices are FOB Fagor warehouses. All orders are subject to acceptance by Fagor Commercial, Inc.
Terms: All orders are subject to credit approval. All Invoices not paid within the specified terms will be subject to a 1.5% per month delinquency charge. Buyer agrees to pay all costs of collection including such attorney's fees as may be allowed by law.
Taxes: This price list does not include any Federal, State, City or Local taxes, which may apply and are subject thereto.
Shipment: Requested carrier will be used upon request. Fagor has the right to ship via any responsible carrier if requested carrier is unavailable. Shipping charges are payable by consignee and any claims arising as such charges shall be resolved between the carrier and the consignee. Shipping dates are approximates. Fagor is not responsible for any delays in deliveries that are beyond our control.
Damaged Merchandise: Inspect shipment for any damage, before accepting it. If damaged, open and inspect the contents with the carrier. Any damage should be noted and reported on the delivering carrier's receipts. Fagor assumes nor responsibility for damages while in transit.
Concealed Damage: If there is concealed damage to the equipment, notify the carrier immediately. Notification should be made verbally as well as in written form. Request an inspection by the shipping company of the damaged equipment. Retain all crating material until inspection has been made.
Cancellations & Returns: Cancelled orders and returned merchandise are subject to a 25% restocking and handling charge. Written authorization is required for a return of any equipment. All equipment returned must be in its original factory crate; freight prepaid and must be in the same condition as originally shipped by Fagor. Returns will only be authorized within 30 days of invoice date.
Warranty: Register your product with Fagor Commercial to validate you warranty. Service calls must be made directly through Fagor service department. 1-(866)-463-2467 or e-mail servicerequest@Fagorcommercial.com.
*You may register your product online at http://www.Fagorcommercial.com
6.2 TECHINICAL INFORMATION
If further technical information is needed, please contact the Service Department directly.
Toll Free: (866) 463-2467
Phone: (305) 779-0170
FAGOR
13105 NW 47th Ave
Miami, Fl. 33054
Phone: (866) 463-2467
www.fagorcommercial.com


- FAGOR BAR EQUIPMENT
- TABLE OF CONTENTS
- RECEIVING AND INSPECTING THE EQUIPMENT
- A NOTE FROM OUR QUALITY CONTROL MANAGER
- INSTALLATION
- UNCRATING
- SEALING
- CLEANING OF CABINET
- PREPARATION, OPERATION AND MAINTENANCE OF BEER DISPENSING SYSTEM
- TAPPING INSTRUCTIONS
- CLEANING INSTRUCTIONS FOR THE FAUCET
- NOTICE
- LOCATION
- DATA PLATE
- ELECTRICAL CONNECTIONS
- HEAVY APPLIANCES
- SHELVING INSTALLATION
- OPERATION
- DEFROST
- TROUBLESHOOTING
- MAINTENANCE
- Stainless Steel Care and Cleaning:
- Cleaning the Condenser Coil
- Neglecting the condenser coil cleaning procedures WILL VOID YOUR WARRANTY associated with the compressor or cost to replace the compressor!
- Gasket Maintenance
- Doors/Hinges
- Drain Maintenance
- PROCEDURE TO INSTALL THE AIR CHANNELS AND DRAFT TOWERS
- Step 1
- Step 2
- Step 3
- Step 4
- WIRING DIAGRAMS
- WARRANTY
- TECHINICAL INFORMATION
Brand : FAGOR
Model : FDD-59
Category : Washing machine