
Miniblue H9 - Headphones MOTOROLA - Free user manual and instructions
Find the device manual for free Miniblue H9 MOTOROLA in PDF.


| Product Type | Bluetooth Handsfree Headset |
| Brand | Motorola |
| Model | Miniblue H9 |
| Bluetooth Profiles | Handsfree Profile (HFP), Headset Profile (HSP) |
| Battery Type | Rechargeable (internal) |
| Headset Charging Time | Approximately 3 hours |
| Charger Base Charging Time | Approximately 6.5 hours |
| Power Supply | Motorola power supply (included) |
| Ear Tips | Multiple sizes (flanged tips included) |
| Volume Control | Dual volume buttons (orientation can be changed) |
| Call Functions | Voice dial, redial, answer, reject, call hold, 3-way calling, mute |
| Audio Tones | Battery low, out of range, incoming call, mute status, power on/off |
| Indicator Lights | Charger base: charger battery, headset battery. Headset: pairing, connected, standby |
| Pairing Passkey | 0000 |
| Portable Charger Base | Included for on-the-go charging |
| Compliance | EU Directive 1999/5/EC (R&TTE) |
| Manufacturer | Motorola, Inc., Schaumburg, IL, USA |
| Support | 1-877-MOTOBLU, www.hellomoto.com/Bluetoothsupport |
| Export Regulations | Controlled under US and Canada export regulations |
| User Manual Pages | 84 pages (EN) |
Frequently Asked Questions - Miniblue H9 MOTOROLA
User questions about Miniblue H9 MOTOROLA
0 question about this device. Answer the ones you know or ask your own.
Ask a new question about this device
Download the instructions for your Headphones in PDF format for free! Find your manual Miniblue H9 - MOTOROLA and take your electronic device back in hand. On this page are published all the documents necessary for the use of your device. Miniblue H9 by MOTOROLA.
USER MANUAL Miniblue H9 MOTOROLA
Miniblue H迷你型蓝牙耳机用户手册
Miniblue H9 Universal Bluetooth™ Headset User's Guide
Welcome
Please read carefully before use.
The Motorola Miniblue H9 Bluetooth TM Headset makes connectivity invisible and reliable. It is astonishingly advanced and simple to use.
Motorola is actively creating Bluetooth ™ solutions for work, play, home, and life everywhere around the globe.
Thank you for choosing the Motorola Miniblue H9 Bluetooth™ Headset with Bluetooth™ technology!
Export Law Assurances
This product is controlled under the export regulations of the United States of America and Canada. The Governments of the United States of America and Canada may restrict the exportation or re-exportation of this product to certain destinations. For further information contact the U.S. Department of Commerce or the Canadian Department of Foreign Affairs and International Trade.
The use of wireless devices and their accessories may be prohibited or restricted in certain areas. Always obey the laws and regulations on the use of these products.
MOTOROLA and the Stylized M Logo are registered in the US Patent & Trademark Office. The Bluetooth trademarks are owned by their proprietor and used by Motorola, Inc. under license.
All other product or service names are the property of their respective owners. © Motorola, Inc., 2007.
欢迎使用
使用前请仔细阅读本手册。
① CHARGE Your Headset's Battery 3......
② START BLUETOOTH FEATURE Your Phone 5
③ PAIR Your Headset 6.
③ PAIR Continued Your Phone 7
④TEST AND USE 8
USING YOUR PORTABLE CHARGER BASE 9....
USING HEADSET 10
TURNING ON AND OFF 11
EARTIPS AND YOUR HEADSET 12
INSTALLING EARTIP 13
WEARING HEADSET 14
CHANGING VOLUME BUTTON ORIENTATION 15
MAKING CALLS 16
MAKING CALLS CONTINUED 17
AUDIO TONES 18
AUDIO TONES CONTINUED 19
INDICATOR LIGHTS 20
TROUBLESHOOTING 21
目录
4步快速连接 25
GET CONNECTED IN 4 QUICK STEPS
BEFORE YOU BEGIN
Before using this product, read the Important Safety and Legal Information pamphlet and follow its instructions.
Take a moment before you get started to familiarize yourself with your new H9 Bluetooth Handsfree Headset. Along with your headset, a portable charger base is provided for both storage and on-the-go remote charging.


① CHARGE Your Headset's Battery

1 Plug the Motorola power supply into charger port on portable charger base. The charger battery indicator light( [⚡]) turns on.
Note: if using a Dual Charging Adapter (sold separately), plug the "Phone side" of cable into the charger base.
2 Insert headset snugly into portable charger base. The Headset Battery indicator light( 🔒 ) turns on.
When headset's battery is fully charged (about 3 hours), the headset battery indicator light turns off.
3 When headset is fully charged, proceed to step 2. Do not remove the headset from the charger base until step 3.
Note: Once the headset is fully charged, the charger base will continue to charge. When fully charged (about 6.5 hours), the charging battery indicator light turn off.
② START BLUETOOTH FEATURE Your Phone
Your phone's Bluetooth feature is off by default. To use your headset, you must turn on the Bluetooth feature in your phone.
For most Motorola phones (at the main menu):
1 Press ☐ (Menu) > Settings > Connection >Bluetooth Link > Setup.
2 Scroll to Power.
3 Select Change.
4 Scroll to On.
5 Press Select to turn on the Bluetooth feature. The Bluetooth feature remains on until you turn the feature off.
Note: These steps are for most Motorola phones. For other phones, see your phone's user's guide.
③ PAIR Your Headset
Before you can use your Headset, you must pair (link) it with your phone.
Step A - ENSURE HEADSET IS IN PAIRING MODE
Power on headset by removing from charger base. The indicator light flashes to initiate easy pairing. After a few moments, the indicator light will be steadily lit in blue to indicate headset is in pairing mode.

If the headset does not enter pairing mode, see TROUBLESHOOTING for help.
③ PAIR Continued Your Phone
Step B - SET YOUR PHONE TO LOOK FOR YOUR HEADSET
For most Motorola phones:
1 On your Motorola phone, press 📄 (Menu) >Settings >Connection >Bluetooth Link >Handsfree >Look for Devices.
The phone lists Bluetooth devices it finds.
2 Select Motorola Miniblue.
3 Select OK or Yes to pair your headset with your phone.
4 Enter the passkey: 0000
5 Select OK.
When your headset successfully pairs and connects with your phone, the indicator light changes from steadily lit to flashing blue.
Note: These steps are for most Motorola phones. For other phones, see your phone's user's guide.
④TEST AND USE
Your phone and headset are now paired and ready to make and receive calls.
To make a call:
1 Place the headset in your ear. The eartip should be inserted so that the headset feels comfortable and forms a seal in the ear.
Note: See “Eartips and Your Headset” on the reverse side of this guide for more information on using eartips with your headset.
2 On the phone, dial the number you want to call and press Send key on your phone.
3 If your phone and headset are successfully paired, you will hear ringing on the headset.
After you have successfully paired your phone and headset, you don't need to repeat these steps. For daily use, ensure that your headset is turned ON and that your phone's Bluetooth feature is ON.
USING YOUR PORTABLE CHARGER BASE
The portable charger base provided with your headset can be used to cordlessly recharge your headset anywhere. Once charged, the portable charger base provides power on-the-go, extending your talk time by constantly “topping off” your headset’s battery.
Using the included Motorola power supply, you can charge both the portable charger base and headset at the same time. The portable base charger provides two indicator lights for charging status. See “Indicator Lights” in the reverse side of this guide for information on these indicator lights.
Note: Using your PC's USB port as a power source for charging is not recommended.
USING HEADSET
Features and Functions Guide
See Features and Functions Guide on using your H9.
IMPORTANT:
Be sure to first follow the
MOTOSTART User Manual to complete
initial setup of your H9
TURNING ON AND OFF
To turn your headset on, press and hold the Call button until the indicator light flashes.
To turn you headset off, press and hold the Call button until the indicator light flashes rapidly and then turns off.
To conserve battery power, store your headset in the included charger base.

EARTIPS AND YOUR HEADSET
Your H9 headset is supplied with multiple eartips. The eartip is fitted onto the end of your headset's earpiece speaker, and placed into your ear when using your headset.
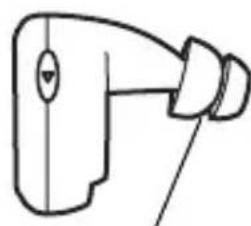
Flanged Tip
Your headset's performance is greatly dependent upon achieving a good seal in your ear. Therefore, we recommend trying all the supplied eartips with your headset.
To verify you are using the proper eartip, you can leave yourself a voicemail and check for optimal ear seal to ensure good performance.
INSTALLING EARTIP
When installing an eartip, carefully place it onto the tip of the earpiece speaker.
1 Pull back largest flange on eartip.

2 Twist eartip onto earpiece starting at an angle and pushing onto headset.

3 Pull flange back to wearing position.
WEARING HEADSET
To wear your headset, insert the headset's earpiece speaker with installed eartip into your ear. The eartip should form a comfortable seal.

CHANGING VOLUME BUTTON ORIENTATION
You can also change the orientation of the volume buttons on your headset.
1 Turn the headset power off.
2 Press both the Call button and Volume button you want to assign as the "volume up" button until the indicator light flashes twice.

MAKING CALLS
| Function | Action |
| Make a voice dial call | Tap the Call button and speak the name after the tone |
| End a call | Tap the Call button |
| Receive a call | Tap the Call button |
| Reject a call | Press and hold the Call button until you hear a medium beep |
| Redial last call | Press and hold the Call button until you hear a medium beep |
| Answer a second incoming call | Press and hold the Call button until you hear a medium beep (places first call on hold). |
Note: Your H9 supports both Handsfree and Headset Profiles. Accessing call functions depends upon which profile your phone supports. See your phone's user's guide for more information.
MAKING CALLS CONTINUED
| Function | Action |
| Toggle between two active calls | Press and hold the Call button until you hear a medium beep |
| Join a 3-way call | Press and hold both volume buttons until you hear a medium beep |
| Put an active call on hold or resume a call on hold | Press and hold the Call button until you hear a medium beep. |
| Transfer a call from the phone to the headset | Tap the Call button |
| Transfer a call from the headset to the phone | Press and hold the Call button until you hear a low beep |
| Mute or unmute a call | Tap both Volume buttons |
| Disable or enable the indicator light | Press and hold both Volume buttons until you hear a low beep |
Note: Some features are phone/network dependent.
AUDIO TONES
The audio tones provide information about your headset status.
| Audio Tone | Headset Status |
| Single high tone when pressing volume button | Volume at minimum or maximum |
| Five rapid high tones repeated every 20 sec. | Low battery |
| No audio indications; deteriorating quality | Out of range |
| Ring tone | Incoming call |
| Single very high tone | All calls ended |
| Single high tone | Tapping Call button or both volume buttons |
AUDIO TONES CONTINUED
| Audio Tone | Headset Status |
| Single medium tone | Pressing Call button or both Volume buttons for 1-2 sec |
| Single low tone | Pressing and holding Call button or both Volume buttons for greater than 2 secs. |
| Single high tone repeated every 5 sec | Phone network not available |
| Two ascending tones | Mute enabled |
| Two descending tones | Mute disabled |
| Four ascending tones | Headset powering on |
| Four descending tones | Headset powering off |
INDICATOR LIGHTS
Indicator lights provides information about your headset and charger base status.
Charger Base
| Indicator | Status |
| Charger Battery( [⚡]) | (On) Charging |
| (Flashing) Battery low | |
| (Off) charging complete | |
| Headset Battery( [💡]) | (On) Charging |
| (Off) charging complete |
Headset
| Indicator | Status |
| Off | Power off |
| On (steady) | Pairing mode |
| 10 rapid flashes | Pairing successful |
| Slow pulse | Connected (on a call) |
| Quick flash | Standby ( not on call) |
Note: After 5 minutes of inactivity, the light stops flashing to conserve power, but the headset remains in standby mode.
TROUBLESHOOTING
My headset will not enter pairing mode.
Make sure that any devices previously paired with the headset are turned off. If the indicator light is not steadily lit in blue, turn off both the other device and headset, wait 10 seconds, then turn headset back on. Wait for the indicator light to become steadily lit in blue, indicating the headset is now in pairing mode.
My phone doesn't find my headset.
Make sure the indicator light on your headset is on (lit in blue) and steady when your phone is searching for devices (see step 3).
My headset worked before but now it's not working.
Make sure your phone is on and the Bluetooth feature is turned on in your phone (see step 2). If the Bluetooth feature was turned off or was turned on only temporarily, you may need to restart the Bluetooth feature (see step 2) and pair your phone and headset again (see step 3).
SUPPORT
If you need more help, contact us at 1-877-MOTOBLU or visit us at www.hellomoto.com/Bluetoothsupport
Motorola, Inc.
Consumer Advocacy Office
1307 East Algonquin Road
Schaumburg, IL 60196
www.hellomoto.com
1-877-MOTOBLU
1-888-390-6456 (TTY/TDD United States for hearing impaired)
MOTOROLA and the Stylized M Logo are registered in the US Patent & Trademark Office. The use of wireless devices and their accessories may be prohibited or restricted in certain areas. Always obey the laws and regulations on the use of these products. The Bluetooth trademarks are owned by their proprietor and used by Motorola, Inc. under license. All other product or service names are the property of their respective owners.
© Motorola, Inc. 2007.
European Union Directives Conformance Statement
Hereby, Motorola declares that this product is in compliance with:

• The essential requirements and other relevant provisions of Directive 1999/5/EC
• All other relevant EU Directives

The above gives an example of a typical Product Approval Number.
You can view your product's Declaration of Conformity (DoC) to Directive 1999/5/EC (to R&TTE Directive) at www.motorola.com/rtte. To find your DoC, enter the product Approval Number from your product's label in the "Search" bar on the Web site.

4步快速连接
准备工作
凸缘耳塞头
3 将凸缘拉回佩戴位置。
佩戴耳机
改变音量按钮方向
您还可以改变耳机音量按钮的方向。
1 关闭耳机。
www.hellomoto.com/Bluetoothsupport
Motorola, Inc.
消费者权益办公室
1307 East Algonquin Road
Schaumburg, IL 60196
www.hellomoto.com
1-877-MOTOBLU
4步快速連接
準備工作
凸緣耳塞頭
3 將凸緣拉回佩戴位置。
佩戴耳機
改变音量按钮方向
您還可以改變耳機音量按鈕的方向。
www.hellomoto.com/Bluetoothsupport
Motorola, Inc.
消費者權益辦公室
1307 East Algonquin Road
Schaumburg, IL 60196
www.hellomoto.com
1-877-MOTOBLU

- WELCOME
- PLEASE READ CAREFULLY BEFORE USE
- EXPORT LAW ASSURANCES
- 欢迎使用
- 使用前请仔细阅读本手册。
- USING HEADSET 10
- 目录
- 4步快速连接 25
- BEFORE YOU BEGIN
- ① CHARGE YOUR HEADSET'S BATTERY
- ② START BLUETOOTH FEATURE YOUR PHONE
- ③ PAIR YOUR HEADSET
- STEP A - ENSURE HEADSET IS IN PAIRING MODE
- ③ PAIR CONTINUED YOUR PHONE
- STEP B - SET YOUR PHONE TO LOOK FOR YOUR HEADSET
- ④TEST AND USE
- TO MAKE A CALL
- USING YOUR PORTABLE CHARGER BASE
- USING HEADSET
- FEATURES AND FUNCTIONS GUIDE
- IMPORTANT
- TURNING ON AND OFF
- EARTIPS AND YOUR HEADSET
- INSTALLING EARTIP
- WEARING HEADSET
- CHANGING VOLUME BUTTON ORIENTATION
- MAKING CALLS
- MAKING CALLS CONTINUED
- AUDIO TONES
- AUDIO TONES CONTINUED
- INDICATOR LIGHTS
- TROUBLESHOOTING
- MY HEADSET WILL NOT ENTER PAIRING MODE
- MY PHONE DOESN'T FIND MY HEADSET
- MY HEADSET WORKED BEFORE BUT NOW IT'S NOT WORKING
- SUPPORT
- EUROPEAN UNION DIRECTIVES CONFORMANCE STATEMENT
- 准备工作
- 佩戴耳机
- 改变音量按钮方向
- 準備工作
- 佩戴耳機
Brand : MOTOROLA
Model : Miniblue H9
Category : Headphones