
SF-B240 - Receiver Epcom - Free user manual and instructions
Find the device manual for free SF-B240 Epcom in PDF.


| Product Type | Constant pressure amplifier (receiver) |
| Model | SF-B240 |
| Rated Power Output | 240 W |
| Speaker Output | 70 V / 100 V selectable |
| Input Sensitivity | MIC: +5 mV (unbalanced 6.3 mm), AUX: 350 mV (unbalanced RCA) |
| Frequency Response | 80 Hz – 16 kHz (-3 dB) |
| Signal-to-Noise Ratio | ≥ 75 dB |
| Total Harmonic Distortion | ≤ 1% at rated power |
| Tone Controls | Bass: ±10 dB at 100 Hz, Treble: ±10 dB at 10 kHz |
| Priority Function | MIC 1 has priority over other inputs |
| Protection | Short circuit, overload, and over-temperature protection |
| Audio Sources | 1 MIC input (6.3 mm), 2 AUX inputs (RCA), EMC input, MP3 player (USB/SD), Bluetooth, FM radio |
| MP3 Player Features | USB and SD card playback, Bluetooth (label: PA-02086), FM tuner (auto/manual search), recording function |
| Remote Control | IR remote with range up to 8 m (±35° horizontal, ±15° vertical) |
| Power Supply | AC ~110 V, 60 Hz |
| Power Consumption | 400 W |
| Dimensions (W × H × D) | 300 × 88 × 280 mm |
| Weight | 4.1 kg |
| Cooling | Built-in cooling fan |
| Display | LED indicators (Power, Signal, Overload, Protection, 70V/100V) + LCD for MP3 player status |
| Maintenance | Clean dust periodically; unplug when not in use for 10+ days |
| Safety | Do not expose to moisture; use specified voltage; ground to earth terminal |
Frequently Asked Questions - SF-B240 Epcom
User questions about SF-B240 Epcom
0 question about this device. Answer the ones you know or ask your own.
Ask a new question about this device
Download the instructions for your Receiver in PDF format for free! Find your manual SF-B240 - Epcom and take your electronic device back in hand. On this page are published all the documents necessary for the use of your device. SF-B240 by Epcom.
USER MANUAL SF-B240 Epcom
Please follow the instructions in this manual to obtain the optimum results from this unit. We also recommend that you keep this manual handy for future reference.
TABLE OF CONTENTS
- SAFETY PRECAUTIONS ....3
- GENERAL DESCRIPTION ....5
- FEATURES ....5
- NOMENCLATURE AND FUNCTIONS
4.1 Front Panel 6
4.2 Remote control....6
4.3 Rear Panel....7
- OPERATION ILLUSTRATION ....8
- TROUBLESHOOTING ....11
- APPLICATIONS ...... 12
8.BLOCK DIAGRAM 13
9.SPECIFICATIONS 14
1. SAFETY PRECAUTIONS
- Be sure to read the instructions in this section carefully before use.
- Make sure to observe the instructions in this manual as the conventions of safety symbols and messages regarded as very important precautions are included.
• We also recommend you keep this instruction manual handy for future reference.
Safety Symbol and Message Conventions
Safety symbols and messages described below are used in this manual to prevent bodily injury and property damage which could result from mishandling. Before operating your product, read this manual first and understand the safety symbols and messages so you are thoroughly aware of the potential safety

WARNING
Indicates a potentially hazardous situation which, if mishandled, could result in death or serious personal injury.

CAUTION
Indicates a potentially hazardous situation which, if mishandled, could result in moderate or minor personal injury, and/or property damage.

WARNING
When Installing the Unit
- Do not expose the unit to rain or an environment where it may be splashed by water or other liquids, as doing so may result in fire or electric shock.
- Use the unit only with the voltage specified on the unit. Using a voltage higher than that which is specified may result in fire or electric shock.
- Do not cut, kink, otherwise damage nor modify the power supply cord. In addition, avoid using the power cord in close proximity to heaters, and never place heavy objects -- including the unit itself -- on the power cord, as doing so may result in fire or electric shock.
- Be sure to replace the unit's terminal cover after connection completion. Because high voltage is applied to the speaker terminals, never touch these terminals to avoid electric shock.
- Be sure to ground to the safety ground (earth) terminal to avoid electric shock. Never ground to a gas pipe as a catastrophic disaster may result.
- Avoid installing or mounting the unit in unstable locations, such as on a rickety table or a slanted surface. Doing so may result in the unit falling down, causing personal injury and/or property damage.
When the Unit is in Use
- Should the following irregularity be found during use, immediately switch off the power, disconnect the power supply plug from the AC outlet and contact your nearest EEM. Make no further attempt to operate the unit in this condition as this may cause fire or electric shock.
- If you detect smoke or a strange smell coming from the unit.
- If water or any metallic object gets into the unit
- If the unit falls, or the unit case breaks
- If the power supply cord is damaged (exposure of the core, disconnection, etc.)
. If it is malfunctioning (no tone sounds.)
• To prevent a fire or electric shock, never open nor remove the unit case as there are high voltage components inside the unit. Refer all servicing to your nearest dealer. EPCOM
- Do not place cups, bowls, or other containers of liquid or metallic objects on top of the unit. If they accidentally spill into the unit, this may cause a fire or electric shock.
- Do not insert nor drop metallic objects or flammable materials in the ventilation slots of the unit's cover, as this may result in fire or electric shock.

CAUTION
When Installing the Unit
- Never plug in nor remove the power supply plug with wet hands, as doing so may cause electric shock.
- When unplugging the power supply cord, be sure to grasp the power supply plug; never pull on the cord itself. Operating the unit with a damaged power supply cord may cause a fire or electric shock.
- When moving the unit, be sure to remove its power supply cord from the wall outlet. Moving the unit with the power cord connected to the outlet may cause damage to the power cord, resulting in fire or electric shock. When removing the power cord, be sure to hold its plug to pull.
- Do not block the ventilation slots in the unit's cover. Doing so may cause heat to build up inside the unit and result in fire.
- Avoid installing the unit in humid or dusty locations, in locations exposed to the direct sunlight, near the heaters, or in locations generating sooty smoke or steam as doing otherwise may result in fire or electric shock.
When the Unit is in Use
- Do not place heavy objects on the unit as this may cause it to fall or break which may result in personal injury and/or property damage. In addition, the object itself may fall off and cause injury and/or damage.
- Make sure that the volume control is set to minimum position before power is switched on. Loud noise produced at high volume when power is switched on can impair hearing.
- Do not operate the unit for an extended period of time with the sound distorting. This is an indication of a malfunction, which in turn can cause heat to generate and result in a fire.
- Contact your E### as to the cleaning. If dust is allowed to accumulate in the unit over a long period of time, a fire or damage to the unit may result.
- If dust accumulates on the power supply plug or in the wall AC outlet, a fire may result. Clean it periodically. In addition, insert the plug in the wall outlet securely.
- Switch off the power, and unplug the power supply plug from the AC outlet for safety purposes when cleaning or leaving the unit unused for 10 days or more. Doing otherwise may cause a fire or electric shock.
An all-pole mains switch with a contact separation of at least 3 mm in each pole shall be incorporated in the electrical installation of the building.
Due to product upgrades, while some of the features and specification in the user manual does not match the actual functions, sorry for any inconvenience and thanks for your kind understanding!
2. GENERAL DESCRIPTION
This is a mini desktop constant pressure amplifier, with beautiful appearance, light weight, easy to carry, and it can be used for background music and radio in family, leisure cafes, classrooms, and other small indoor venues.
3. FEATURES
- With desktop design, beautiful appearance, light weight, and easy to carry.
- It can be used for different sound effect places. This series including 120W and 240W.
- Super sound quality and high definition, switching options can be connected to 70V or 100V output, and to provide beautiful sound for long distance broadcast.
- The output terminal uses standard 6.3 audio microphone jack and line input use RCA jack, to provide users with different audio input interface options.
- 1 channel microphone input with independent volume control.
- 2 channel line inputs with independent volume control. And also with EMC input.
- With function of auto play MP3 and power off memory.
- With priority function, when MIC 1 input, the other audio signal can be disconnected.
- With power indicator, the machine has a signal indicator, overload, protection indicator, and 70V, 100V output switch indicator.
- With function of short circuit, overload and over temperature protection.
- With function of MP3 module, can read MP3 files in USB flash disk, SD card, support for Bluetooth of mobile phones and FM radio.
4. NOMENCLATURE AND FUNCTIONS
4.1 FRONT PANEL

- MIC1 input
- SD/MMC card port
- Previous track/volume down
- Play/Pause
- Next one/volume up
- Mode selection
- BASS adjustment potentiometer
- TREBLE adjustment potentiometer
-
Master volume control
-
The Power switch
- Power indicator light
- PROT/100V/70V/OL/CLIP/SIG status indicators
- AUX2 volume control knob
- AUX1 volume control knob
- MIC1 volume control knob
- LED display
- USB interface
4.2 Remote control

- Power switch
- Mode
- Previous/next
- Volume increase/decrease
- 0\~9 number button
- Play/pause
- Sound effect control
- Mute
- Cycle play button
- Pause
Normal usage distance of remote control:
Remote control distance: 8 meter, angle: level ±35, vertical 15.±
Remote control usage attention:
- When install battery, please mind electrode.
- Please let remote control aim right with window of host machine.
- When found remote distance get short and insensitive, please change battery.
- Please take out battery when don't use it for a long time.
- Take it easy in case of falling.
4. NOMENCLATURE AND FUNCTIONS
4.3 REAR PANEL

- AC power input socket
- Cooling fan
- 100V / 70V speaker output switch
- MUTE mute control
- FM radio antenna interface
- AUX1 input interface, used to connect AUX output interface
- AUX2 input interface
- Line output interface, used to connect the line input interface
- EMC input interface
- 100V/70V output interface
1. Connect the speakers:
①When the 100V and 70V selector switch to 70V position, as shown below:
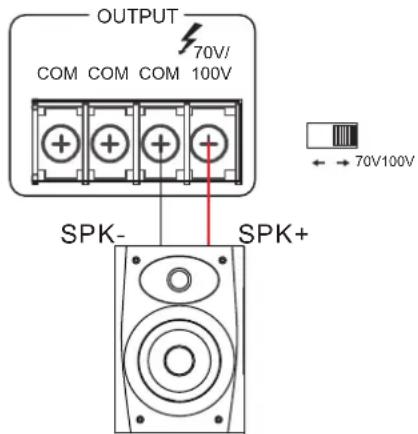
Maximum output voltage: 70V
②When the 100V and 70V selector switch to 100V position, as shown below:

Maximum output voltage: 100V

Note:
- Before connecting the speakers, please make sure that the equipment is powered off. In the case of power on, may have the risk of electric shock.
- Please make sure there are no applied load to the speaker cables.
-
During the installation of speakers, please make sure that the sum of the rated input power of the speakers to be connected is less than rated power of equipment.
-
Connect external devices :
①Please make sure this amplifier and other equipment to be connected are turn off.
②Please use the correct cable to connect with external equipment.
- Connect the power cord and turn on:
① Please make sure the power switch is off when connect the equipment.
② Turn the volume knob to the counterclockwise.
③ Connect the power cord with AC IN interface, turn on the power switch.
④ Turn on the other equipment firstly (CD player, etc), then turn on this amplifier.

Note:
- Please check carefully to make sure the correct connection before turning on power.
- Please turn off this amplifier firstly, and then turn off other equipment.
①Turning the volume knob to the left for minimum volume. Plug the microphone into the microphone connector of the pre-amplifier, and then connect the OUTPUT of the pre-amplifier into the INPUT connector on the rear panel of the amplifier.
②Turning the volume knob in the right position.
③Speak loudly into the microphone and turn the volume knob counterclockwise (to the left), until the output signal no longer distorting. If input is high but output is low, then increase the volume by turning the volume knob on the amplifier counterclockwise (to the right). If the speaker volume is very high, then reduce the volume by turning the knob to the left.
5.Shut down the system:
①Turn the amplifier volume knob counterclockwise until in the minimum position.
②Press the amplifier panel power switch to the off position. Then switch off the connected processor equipment and audio source equipment.

Note:
- After turning off the power switch, please wait about 5 seconds before turning it on again. Repeated and frequent turning the power switch on and off may result in equipment failure.
- When the power switch is off, a little current will remain in the equipment.
- If the amplifier is not going to be used for an extended period, please unplug the power cord from the wall AC mains socket.
6. Built-in MP3 player operation method:

①USB and SD Card interface will automatically give playback priority to inserted media. When media is inserted, LCD displays "USB" or "SD" on screen for a few seconds, and then shows the track ID and playback time.
②"MODE" button: press the "MODE": choose radio, Bluetooth or audio playback.
③" I◀ "button: If press quickly, it is last song; Long press is the volume decrease.
④" ▶II "button: When playing music, press one time quickly is pause, press again is play.
⑤" ▶I "button: If press quickly, it is next song; Long press is the volume increase.

Note:
- When using the built-in MP3 player, please avoid pressing the control buttons too firmly. Pressing buttons with excessive force might damage them.
- When inserting an SD card or USB memory stick, please insert them with minimal force and oriented the right way. This will prevent damage to the interface sockets.
- Mobile phone Bluetooth connection method:
①Press the MODE button on the MP3 player to set the module to Bluetooth mode. The LCD will display "bt" on screen, and while in Bluetooth mode, this mark will always be present. As soon as you enter "bt" mode the device is ready to pair and sync with another Bluetooth device in the vicinity.
②Activate Bluetooth on your mobile device (phone or tablet or laptop). Check the mobile device for any newly scanned devices. The Bluetooth label for the SFB120/SFB240 is "PA-02086".
③If that device shows up on your mobile devices list, then select it and begin the pairing process.
④Once the new "bt" playback device is connected, you can commence playing songs and audio podcasts from your phone through the amplifier module.
⑤Transport controls on the MP3 player are in sync with the phone. Press "Play/Pause" on the module and the mobile device will play or pause. Press "Next" or "Previous" and the current track will restart. You can also change the audio playlist from the phone, as well as pause, skip etc.
- MP3 module recording function description:
①Insert SD card or USB device into the corresponding interface of MP3 module.
②Press the "Play/Pause" ( ▶) button on the MP3 module for 3 seconds to enter the recording mode, as shown by "REC" on the LCD screen. The recording onto whichever media is available begins immediately the timer starts to count up. Only the connected audio sources (Mic 1-4, Aux 1-2) that have volume up will be recorded in the Master mix recording.
③After recording ends, press "MODE" button to save and start to play the recording file.
④User can press the last song and the next song button to play the required recording file.
- FM Playback mode :
①Connect the FM antenna wires to the "FM ANT" sockets on the rear of the unit. Place the antenna wire close to a nearby window to optimise signal reception.
②FM mode is the default mode when the amplifier is first switched on, unless a USB or SD card is inserted. If either of these media is inserted during FM playback, the mode will switch to that media and commence playback automatically. Press the mode button repeatedly to return to FM Tuner mode, which is indicated by the appearance of an FM frequency on the LCD screen.
③Press "Play/Pause" (▶) on the MP3 player to start the automatic search for FM Frequencies. The search will stop on any strong signal that it can pick up and commence playback. Press "Play/Pause" again to restart the search, which proceeds in one direction from lower to higher FM frequencies.
④To tune to an FM station manually in 1MHz steps, use the "NEXT" or "PREVIOUS" arrow button on the MP3 player until you find the desired frequency.
6. TROUBLESHOOTING
| Failure phenomena | Failure cause |
| 1. Power switch is not opened | 1. Power line is cut off2. The protection function of the equipment is not activated |
| 2. All lines are connected, but there is no sound. | 1. The power switch is not opened or the power plug is bad contacted.2. The fuse is burnt3. The volume knob is not opened or turned down to a extra low level4. There is no audio signal input5. There is short-circuit in the speaker line. |
| 3. The sound suddenly disappears in normal status. | 1. The equipment is in very high temperature to make it into protection status.2. The connection wire is bad contact. |
| 4. Low sound | The equipment is set to be low impedance connection, but the speakers connected is with high impedance. |
| 5. Sound is distorted | The input level of Mic or external equipment is too high |
7. APPLICATIONS
REAR PANEL CONNECTIONS


flowchart
graph TD
    A["ENC IN"] --> B["LEVEL"]
    C["MIC1"] --> D["LEVEL"]
    B --> E["MUTE_MIC1"]
    D --> F["MUTE_ALL"]
    E --> G["AUX2AUX1"]
    F --> H["GND"]
    I["MP3/BT MODULE"] --> J["LEVEL"]
    K["D isplay Remote control Button"] --> L["Ground"]
    M["BASS TREBLE"] --> N["2-STAGE EQ"]
    O["Switchover between 70V and 100V"] --> P["120W/240W Amplifier module"]
    Q["DC 24V inverter power supply"] --> R["switching power supply"]
    S["Audio OUT"] --> T["Amplifier output"]
    U["Protection circuit"] --> V["Amplifier output"]
    W["LED display"] --> X["Amplifier output"]
    Y["Fun control"] --> Z["Amplifier output"]
9. SPECIFICATIONS
| Model | SFB120 | SFB240 |
| Rated Power Output | 120W | 240W |
| Speaker Output | 70V/100V | |
| Input Sensitivity& Source Impedance | MIC input: + 5mV, unbalanced 6.3 connector AUX input: 350mV, unbalanced RCA connector | |
| Tone | Bass: 100Hz±10dB, Treble: 10KHz±10dB | |
| Frequency Response | 80Hz~16KHz(-3dB) | |
| S/N Ratio | ≥75dB | |
| T.H.D | Rated power output, distortion ≤ 1% | |
| Priority function | MIC 1 has the priority than other input | |
| Protection | Short circuit, overload and overheating protection. | |
| Input power | ~110V 60Hz | |
| Power Consumption | 200W | 400W |
| Dimension | 300×88×280mm | |
| Weight | 3.9Kg | 4.1Kg |
PUBLIC ADDRESS SYSTEM

- TABLE OF CONTENTS
- SAFETY PRECAUTIONS
- Safety Symbol and Message Conventions
- WARNING
- CAUTION
- When Installing the Unit
- When the Unit is in Use
- GENERAL DESCRIPTION
- FEATURES
- NOMENCLATURE AND FUNCTIONS
- FRONT PANEL
- Remote control
- Normal usage distance of remote control:
- Remote control usage attention:
- REAR PANEL
- Connect the speakers:
- Note:
- 5.Shut down the system:
- Built-in MP3 player operation method:
- TROUBLESHOOTING
- APPLICATIONS
- SPECIFICATIONS
- PUBLIC ADDRESS SYSTEM
Brand : Epcom
Model : SF-B240
Category : Receiver