
Classic-V9 - Effektpedal für E-Gitarre Radial Engineering - Kostenlose Bedienungsanleitung
Finden Sie kostenlos die Bedienungsanleitung des Geräts Classic-V9 Radial Engineering als PDF.


| Produkttyp | Verzerrungspedal (Distortion Pedal) |
| Stromversorgung | 9V DC, Mittelpol negativ (Netzteil nicht im Lieferumfang) |
| Eingang | 1/4" Klinke (High-Z) |
| Ausgang | 1/4" Klinke (High-Z) |
| Gehäuse | Stahl, 14 Gauge (schwere Ausführung) |
| Schaltkreis | Classic Class FET Puffer und Audio-ICs |
| Regler: Drive | Feineinstellung der Verzerrungsintensität |
| Regler: Level | Einstellung der Gesamtlautstärke (Unity bis +48 dB bei 1 kHz) |
| EQ: Höhen (High) | Variabel von -10 dB bis +10 dB (Post-Distortion) |
| EQ: Tiefen (Low) | Variabel von -10 dB bis +10 dB (Post-Distortion) |
| Mitten-Boost | Schaltbar: 0 dB, +7 dB, +12 dB bei 500 Hz |
| Höhenfilter (High Shelf) | Schaltbar: Anhebung/Absenkung der Höhen |
| Gain-Schalter (Range) | 3-stufig: Low (leichte Übersteuerung), Med (Crunch), High (Vollsättigung) |
| Fußschalter | Bypass (True Bypass) mit LED-Anzeige |
| Garantie | 3 Jahre, übertragbar (eingeschränkt) |
| Zubehör | Kabelklemme zur Sicherung des Netzteils |
Häufig gestellte Fragen - Classic-V9 Radial Engineering
Benutzerfragen zu Classic-V9 Radial Engineering
0 Frage zu diesem Gerät. Beantworten Sie die, die Sie kennen, oder stellen Sie Ihre eigene.
Eine neue Frage zu diesem Gerät stellen
Laden Sie die Anleitung für Ihr Effektpedal für E-Gitarre kostenlos im PDF-Format! Finden Sie Ihr Handbuch Classic-V9 - Radial Engineering und nehmen Sie Ihr elektronisches Gerät wieder in die Hand. Auf dieser Seite sind alle Dokumente veröffentlicht, die für die Verwendung Ihres Geräts notwendig sind. Classic-V9 von der Marke Radial Engineering.
BEDIENUNGSANLEITUNG Classic-V9 Radial Engineering
FEATURES

- 9VDC POWER: Connection for 9 volt (center negative) power adapter. Includes a cable clamp to prevent accidental power disconnection.
- OUTPUT: High-Z 1/4 " connection to your amplifier.
- INPUT: High-Z 1/4" connection from your instrument.
- EQ: Powerful dual band post-distortion EQ.
- DRIVE: Used to fine tune the drive to suit your playing style.
-
RANGE: 3-position switch used to set the gain stage:
-
Low – for slight signal breakup
- Med – for crunch
• High – for full on saturation - LEVEL: Used to set the overall output level.
- HIGH: Used to compensate the top end for overly bright amps or amps that may sound too dark.
- MID: 3-position mid-boost with flat, +7dB and +12dB to accentuate signal for solos or to fatten up the tone of a single-coil pickup.
- FOOTSWITCH: Activates the Classic V9 with LED indicator.
- STEEL ENCLOSURE: Heavy-duty 14-gauge steel enclosure for long life.

True to the Music
Radial Classic Specifications
Circuit Type .... Classic Class FET buffer and classic audio grade ICs Post-Distortion High & Low EQ .... Variable from -10dB to +10dB
High Shelf .... Switchable high frequency boost/cut Mid Boost .... Switchable 0dB, +7dB, +12dB @ 500Hz
Gain Switch....Increases saturation of the drive circuit Output Gain.....Variable from unity to +48dB @ 1kHz
Footswitch .... Latching bypass switch Power .... 9VDC, adapter not included
RADIAL ENGINEERING 3 YEAR TRANSFERABLE LIMITED WARRANTY
RADIAL ENGINEERING LTD. ("Radial") warrants this product to be free from defects in material and workmanship and will remedy any such defects free of charge according to the terms of this warranty. Radial will repair or replace (at its option) any defective component(s) of this product (excluding finish and wear and tear on components under normal use) for a period of three (3) years from the original date of purchase. In the event that a particular product is no longer available. Radial reserves the right to replace the product with a similar product of equal or greater value. In the unlikely event that a defect is uncovered, please call 800-939-1001 or email service@radialeng.com to obtain an RA number (Return Authorization number) before the 3 year warranty period expires. The product must be returned prepaid in the original shipping container (or equivalent) to Radial or to an authorized Radial repair center and you must assume the risk of loss or damage. A copy of the original invoice showing date of purchase and the dealer name must accompany any request for work to be performed under this limited and transferable warranty. This warranty shall not apply if the product has been damaged due to abuse, misuse, misapplication, accident or as a result of service or modification by any other than an authorized Radial repair center.
THERE ARE NO EXPRESSED WARRANTIES OTHER THAN THOSE ON THE FACE HEREOF AND DESCRIBED ABOVE. NO WARRANTIES WHETHER EXPRESSED OR IMPLIED, INCLUDING BUT NOT LIMITED TO, ANY IMPLIED WARRANTIES OF MERCHANTABILITY OR FITNESS FOR A PARTICULAR PURPOSE SHALL EXTEND BEYOND THE RESPECTIVE WARRANTY PERIOD DESCRIBED ABOVE OF THREE YEARS. RADIAL SHALL NOT BE RESPONSIBLE OR LIABLE FOR ANY SPECIAL, INCIDENTAL OR CONSEQUENTIAL DAMAGES OR LOSS ARISING FROM THE USE OF THIS PRODUCT. THIS WARRANTY GIVES YOU SPECIFIC LEGAL RIGHTS, AND YOU MAY ALSO HAVE OTHER RIGHTS, WHICH MAY VARY DEPENDING ON WHERE YOU LIVE AND WHERE THE PRODUCT WAS PURCHASED.
Radial® engineering
True to the Music

USER GUIDE
Radial Engineering Ltd.
1588 Kebet Way, Port Coquitlam BC V3C 5M5
tel: 800-939-1001 • fax: 604-942-1010
info@radialeng.com • www.radialeng.com Made in Canada
Classic V9™ User Guide - Part# R870 1018 00 / 09-2016 All rights reserved. Specifications and appearance are subject to change without notice.
OVERVIEW
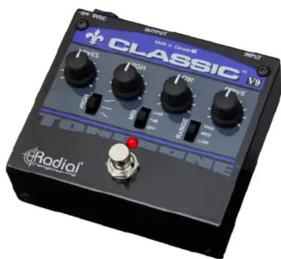
Thank you for purchasing the Tonebone Classic V9... what will likely be the most inspiring distortion pedal you have ever played. It is not only quiet, it is dynamic. This means that each note responds to your playing just like a real guitar amp.
Before you start playing, please take a moment to read through this short manual. This will not only guide you through the functions, but also give you some hints on how to best approach your tone. After you have done your homework, if you find yourself asking questions that you feel are unanswered, please visit the Classic V9 FAQ page on the Tonebone site. This is where we post updates and questions from users like yourself. If you still feel the need to communicate, feel free to drop us an email at info@radialeng.com and we will do our best to reply in short order.
Now get ready to grind, spit and slug like a winning prize fighter!
MAKING CONNECTIONS
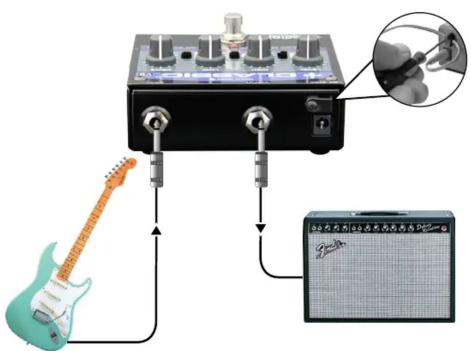
Like most other pedals, the Classic V9 employs a standard 9 volt Boss ® style power supply (not included). You can also use your power brick to deliver power. Make sure the polarity is correct with center pin negative. Connecting to and from the Classic V9 is done using standard 1/4 " coaxial guitar cables. Using high quality cables will help reduce susceptibility to noise. Before making any connections, make sure your amp is turned down or off. This will eliminate turn-on transients that can cause damage to your loudspeakers. Connect your guitar to the Classic V9's input and your amp from the V9's output.
GETTING STARTED
To start, set all of the rotary control knobs to the 12 o'clock position and the three 3-position switches to the middle [start position]. This will let you better explore each function as we go through them. Turn on your amp and then bring up the volume slowly. You should always test at a low volume as this prevents loud pops from occurring should a cable or power supply not be properly seated. Set your amp to a clean tone. When ready, activate the Classic V9 by depressing the footswitch. The LED will illuminate to let you know power is present.

start position
SETTING THE DISTORTION
There are two controls used to set the desired level of distortion. The first is a 3-position RANGE switch that lets you set the type of distortion you want. Unlike other pedals that are full on or off, the Classic lets you focus the distortion to suit your style of play. If you tend to be on the bluesy side of things, try setting the RANGE to low or mid and then fine tune the distortion using the DRIVE control. For fun, try reducing the output level on your guitar by turning down the volume. You will notice that the Classic V9 reacts to this by cleaning up. This also allows you to dig into your notes to add dynamics and a greater degree of feel. If you prefer the heavy side of things, set the RANGE switch to the top position. This adds more distortion and harmonics.
ADJUSTING THE TONE
The Classic-V9 employs a super powerful post-distortion EQ circuit that affects both the tone and the output level. This delivers exceptional control over the tone and works tremendously well when tone shaping with your amp. Try adjusting the HIGH and LOW equalizer and you will quickly become aware of the power that is in these two controls. Radical EQ changes will also produce tremendous level changes.
There are two other switches that work in conjunction with the EQ. The MID and the HIGH switch. The 3-position MID can be used for a number of circumstances. If you are using single-coil pickups, you can use it to fatten up the tone. It is also great to add mid-range to your tone when soloing. This not only helps the guitar cut through, it also increases sustain without the need for extra distortion or a compressor.
The HIGH switch is used to set the V9's overall tone. For instance, when using an overly bright amp like an old Marshall® or Ampeg®, taming the high end by setting the switch in the down position can dramatically improve the tone. Think of Jeff Beck... his tone is dark, yet unmistakably his. You can also brighten up the top end like a presence switch on an amp. This is often used to accentuate the harmonics when a greater degree of distortion is being used.
The last control is the LEVEL knob on the far left. This is used to set the final output. By combining the drive, EQ settings and LEVEL, you can set the Classic V9 to integrate with any amp or pedalboard setup.

• High – for full on saturation
- Med – for crunch
- Low – for slight signal breakup
![graph LR A["INPUT"] --> B["INPUT BUFFER"] B --> C["TONE SHAPING"] C --> D["DRIVE STAGE"] D --> E["TONE CONTROLS"] E --> F["LEVEL"] F --> G["OUTPUT"] C --> H["GAIN RANGE HIGH MID LOW"] D --> I["BRIGHT HIGH MID LOW"] E --> J["MID +12dB +7dB OUT LOW"] E --> K["MID"]](/content/2026/05/911666/images/0f5da95770fb964500705a4f28fc22f98c079a4241efebc250c5cba9a94ac48a.jpg)


Marke : Radial Engineering
Modell : Classic-V9
Kategorie : Effektpedal für E-Gitarre