
CA-R-KO.00C - Auto-Kit PIONEER - Kostenlose Bedienungsanleitung
Finden Sie kostenlos die Bedienungsanleitung des Geräts CA-R-KO.00C PIONEER als PDF.


| Produkttyp | Kit für Autoradio (Kfz-Installationskit) |
| Modell | CA-R-KO.00C |
| Marke | Pioneer |
| Abmessungen (B x H x T) | ca. 15 x 3 x 20 cm |
| Gewicht | ca. 0,3 kg |
| Stromversorgung | 12 V DC (Fahrzeugbordnetz) |
| Hauptfunktionen | Befestigungsrahmen, Kabelsatz, Montagematerial |
| Kompatibilität | Ausgewählte Pioneer-Autoradios und ISO-Fahrzeuge |
| Material | Kunststoff und Metall |
| Farbe | Schwarz |
| Einbauort | Armaturenbrett (1-DIN/2-DIN) |
| Lieferumfang | Rahmen, Kabelsatz, Schrauben, Anleitung |
| Reinigung und Pflege | Mit einem trockenen, fusselfreien Tuch abwischen |
| Sicherheitshinweise | Vor der Installation die Batterie abklemmen |
| Ersatzteile und Reparierbarkeit | Originalteile beim Pioneer-Kundendienst erhältlich |
| Garantie | 2 Jahre (Herstellergarantie) |
| Allgemeine Informationen | Einfache Montage, kein Spezialwerkzeug erforderlich |
Häufig gestellte Fragen - CA-R-KO.00C PIONEER
Benutzerfragen zu CA-R-KO.00C PIONEER
0 Frage zu diesem Gerät. Beantworten Sie die, die Sie kennen, oder stellen Sie Ihre eigene.
Eine neue Frage zu diesem Gerät stellen
Laden Sie die Anleitung für Ihr Auto-Kit kostenlos im PDF-Format! Finden Sie Ihr Handbuch CA-R-KO.00C - PIONEER und nehmen Sie Ihr elektronisches Gerät wieder in die Hand. Auf dieser Seite sind alle Dokumente veröffentlicht, die für die Verwendung Ihres Geräts notwendig sind. CA-R-KO.00C von der Marke PIONEER.
BEDIENUNGSANLEITUNG CA-R-KO.00C PIONEER
Steering wheel control interface installation kit for:
HYUNDAI/KIA
Model:
Various Hyundai & Kia vehicles from 2007 to 2018 without OE soundsystem or OE navigation;
Kit content:
1 pc. of SWC Resistive interface
2 pcs. of Wiring harnesses
1 pc. of Radio adapter
Customer code:
CA-R-KO.00C
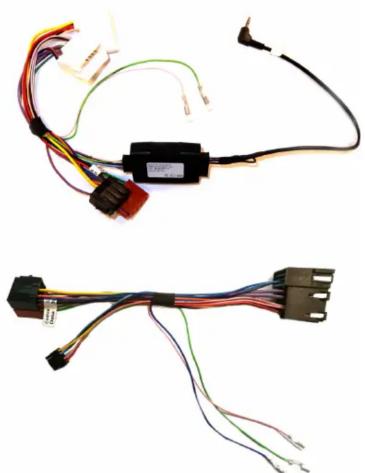
natural_image
Two types of electrical connectors with wires and connectors, shown from different angles (no text or symbols visible)INSTALLATION MANUAL
All installation work must be performed by a qualified professional installer only.
The manufacturer / dealer is not liable for any kind of incidental or indirect damages.
04/2018 ALL RIGHTS RESERVED. Technical changes possible. No liability for misprints.R1
All installation work must be performed by a qualified professional installer only.
The manufacturer / dealer is not liable for any kind of incidental or indirect damages.
04/2018 ALL RIGHTS RESERVED. Technical changes possible. No liability for misprints.
PLEASE NOTE: depending on the car connectors you find behind the original radio, you must choose one of the two possible installation configuration.
CONFIGURATION "A" Configuration "A" is standard.

ATTENTION!
In order to prevent ESD damage, the WHEEL REMOTE JACK must be connected before plugging in the connectors on car side.
Connect cables to the radio side as follow:
1- to ISO CONNECTORS (black and red housings)
2- to WIRED REMOTE SOCKET (NOTE: do not connect to microphone socket)
3- to SERVICES (if required); functions are marked on the wires:
Pink - Speed / Green - Parking
Connect cables to the car side as follow:
4- to CAR CONNECTOR
If configuration "B" is needed instead, unplug the SWC interface from the standard cable harness (configuration "A"), and plug in the cable harness of configuration "B".
CONFIGURATION "B"

natural_image
Electrical wiring diagram showing connections between components labeled 1, 2, 3, and 4 (no text or symbols beyond labels)ATTENTION!
In order to prevent ESD damage, the WHEEL REMOTE JACK must be connected before plugging in the connectors on car side.
Connect cables to the radio side as follow:
1- to ISO CONNECTORS (black and red housings)
2- to WIRED REMOTE SOCKET (NOTE: do not connect to microphone socket)
3- to SERVICES (if required); functions are marked on the wires:
Pink - Speed / Green - Parking / Blue - Antenna power lead
Connect cables to the car side as follow:
4- to CAR CONNECTOR

The steering wheel buttons perform the following functions (if supported by the radio and vehicle):
1- Volume +
2- Volume -
3- Accept incoming call
4- Reject incoming call
5- Preset down
6- Preset up
7- Source
8- Voice (if supported by radio and vehicle)
- Attenuate (if supported by radio and vehicle)


Marke : PIONEER
Modell : CA-R-KO.00C
Kategorie : Auto-Kit