
CA-HM-SMA.002OEM - Auto-Kit PIONEER - Kostenlose Bedienungsanleitung
Finden Sie kostenlos die Bedienungsanleitung des Geräts CA-HM-SMA.002OEM PIONEER als PDF.


| Produkttyp | Einbauset (Double DIN) für Autoradio |
| Marke | Pioneer |
| Modell | CA-HM-SMA.002OEM |
| Teilenummer | CA-HA-SMA.002OEM |
| Kategorie | Kfz-Zubehör |
| Kompatibles Fahrzeug | Smart Fortwo (Baujahr 2011 und neuer) |
| Kompatible Geräte | Pioneer Double DIN Navigationssysteme |
| Lieferumfang | 1 Blende, 2 Montagehalterungen (links/rechts), selbstschneidende Schrauben, Flachkopfschrauben |
| Material | Kunststoff, Metall |
| Farbe | Schwarz |
| Einbauort | Armaturenbrett |
| Montageart | Schraubbefestigung |
| Sicherheitshinweis | Einbau nur durch qualifizierten Fachmann |
| Reinigung | Mit feuchtem Tuch abwischen |
| Ersatzteile | Nicht einzeln erhältlich, bei Defekt Austausch des gesamten Kits |
| Reparierbarkeit | Keine reparierbaren Teile |
| Allgemeine Informationen | Dieses Kit ermöglicht den Einbau eines Pioneer Double DIN Geräts in den Smart Fortwo. |
Häufig gestellte Fragen - CA-HM-SMA.002OEM PIONEER
Benutzerfragen zu CA-HM-SMA.002OEM PIONEER
0 Frage zu diesem Gerät. Beantworten Sie die, die Sie kennen, oder stellen Sie Ihre eigene.
Eine neue Frage zu diesem Gerät stellen
Laden Sie die Anleitung für Ihr Auto-Kit kostenlos im PDF-Format! Finden Sie Ihr Handbuch CA-HM-SMA.002OEM - PIONEER und nehmen Sie Ihr elektronisches Gerät wieder in die Hand. Auf dieser Seite sind alle Dokumente veröffentlicht, die für die Verwendung Ihres Geräts notwendig sind. CA-HM-SMA.002OEM von der Marke PIONEER.
BEDIENUNGSANLEITUNG CA-HM-SMA.002OEM PIONEER
Pioneer
Installation Manual
Double DIN Kit
part-no.: CA-HA-SMA.002OEM
• Smart Fortwo 2011->
Compatible with these Pioneer double DIN devices
Pioneer Navigation

Double DIN Set contents
• (1) facia plate
• (2) mounting bracket right
• (3) mounting bracket left
• (4) self-tapping convex fillister head screw
• (5) flat headed screw
natural_image
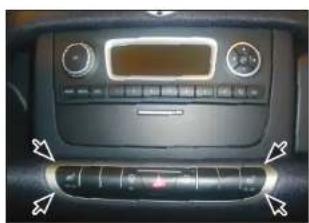
Interior view of a car dashboard with control panel and directional arrows (no text or symbols visible)- Smart Fortwo with OEM head unit Unclip hazard light switch panel (see arrows)

natural_image
Close-up of a car interior showing a hand inserting a cable into a socket (no text or symbols visible)- Remove screw under hazard light switch (see arrow)
Remove panel surrounding OEM head unit

natural_image
Interior view of a car dashboard with control panel and infotainment knob (no visible text or symbols)- Remove screws of tray below OEM head unit (see arrows)
take out tray
natural_image
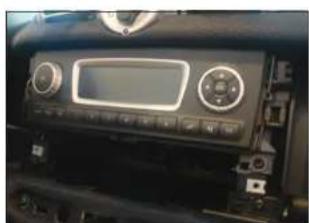
Interior view of a car dashboard with digital display and control buttons (no visible text or symbols)- Remove screws of OEM head unit take out OEM head unit

natural_image
Close-up of a mechanical device with labeled components and arrows indicating features (no readable text or symbols)- Fix mounting bracket left and mounting bracket right to double DIN head unit with 3 flat headed screws (see arrows) at each side
natural_image
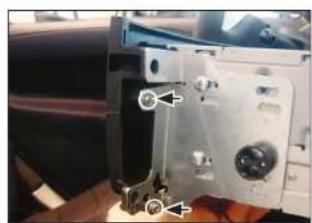
Close-up of a mechanical component with arrows pointing to features (no visible text or symbols)- Push facia plate over double DIN head unit. Fix facia plate with 2 self-tapping convex fillister head screws (see arrows) at each side
natural_image
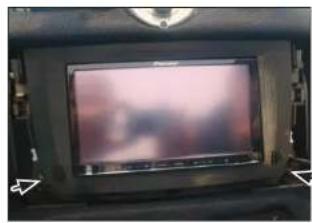
Interior view of a car dashboard with a digital display showing a blurred pink sky (no visible text or symbols)- Connect all required circuit points
Place Double-DIN head unit on dashboard. Fix it with original screws (see arrows)

natural_image
Interior view of a car showing a digital display with a hand pointing to it (no visible text or symbols)- Install everything in reverse order to finish installation
All installation work must be performed by a qualified professional installer only. The manufacturer / dealer is not liable for any kind of incidental or indirect damages.




Marke : PIONEER
Modell : CA-HM-SMA.002OEM
Kategorie : Auto-Kit