
ELVOX 4621.028B - Kamera Vimar - Kostenlose Bedienungsanleitung
Finden Sie kostenlos die Bedienungsanleitung des Geräts ELVOX 4621.028B Vimar als PDF.


| Produkttyp | IP-Kamera (Bullet, Tag & Nacht, Farbe) |
| Sensortyp | 1/2,8" CMOS, progressiver Scan |
| Auflösung | 2 Mpx (1920 × 1080) |
| Objektiv | 2,8 mm, F1.6, feste Brennweite (M12-Anschluss) |
| Tag-/Nachtumschaltung | Mechanischer IR-Filter (ICR) |
| IR-Reichweite | 20–30 m |
| Video-Kompression | H.264, H.265, MJPEG |
| Bildrate | 30 fps (1920×1080 und 704×576) |
| Funktionen | WDR, Smart IR, 3D-DNR, ROI, Privatsphärenmaske, Bewegungserkennung, HLC, BLC, Videoanalyse (Anomalie, Objektverlust/-verlassen, Linienüberquerung, Bereicheindringen) |
| Schutzart | IP67 |
| Netzwerkschnittstelle | RJ45, 10/100 Mbit/s |
| Stromversorgung | 12 V DC / PoE (IEEE 802.3af) |
| Leistungsaufnahme | 3,5 W |
| Speicher | MicroSD-Kartenslot (max. 128 GB, nicht im Lieferumfang) |
| Abmessungen (B×H×T) | 75 × 75 × 168 mm |
| Gewicht | 435 g |
| Betriebstemperatur | −30 °C bis +60 °C |
| Protokolle | TCP/IP, DHCP, NTP, RTSP, PPPoE, DDNS, SMTP, FTP, HTTP, 802.1x, UPnP, HTTPS, QoS, ONVIF |
| Lieferumfang | Kamera, Schnellstartanleitung, Schrauben & Dübel, wasserdichte Kappe, Bohrschablone |
| Reinigung | Weiches, trockenes Tuch; bei hartnäckigem Schmutz neutrales Reinigungsmittel |
| Sicherheitshinweise | Nicht auf extrem helle Objekte richten; vor Hitzequellen schützen; Installation durch Fachpersonal |
Häufig gestellte Fragen - ELVOX 4621.028B Vimar
Benutzerfragen zu ELVOX 4621.028B Vimar
0 Frage zu diesem Gerät. Beantworten Sie die, die Sie kennen, oder stellen Sie Ihre eigene.
Eine neue Frage zu diesem Gerät stellen
Laden Sie die Anleitung für Ihr Kamera kostenlos im PDF-Format! Finden Sie Ihr Handbuch ELVOX 4621.028B - Vimar und nehmen Sie Ihr elektronisches Gerät wieder in die Hand. Auf dieser Seite sind alle Dokumente veröffentlicht, die für die Verwendung Ihres Geräts notwendig sind. ELVOX 4621.028B von der Marke Vimar.
BEDIENUNGSANLEITUNG ELVOX 4621.028B Vimar
Telecamera Bullet IP a colori Day & Night, sensore CMOS 1/2,8", risoluzione 2 Mpx (1920x1080), obiettivo fuoco fisso 2,8 mm, filtro IR meccanico, H.265 e H.264 Multistream, funzioni AV, alimentazione PoE o 12 Vdc, slot SD CARD, IR 20-30 m, funzioni WDR, ROI, 3DNR, HLC, BLC, Mask, Motion, Smart IR, RTSP, protocollo ONVIF, grado di protezione IP67. Dimensioni: 75x75x168 mm. Peso 435 g.
Contenuto della confezione
Una volta ricevuto il dispositivo, controllare gli accessori indicati di seguito. Le illustrazioni sotto riportate hanno solo funzione di riferimento. Far riferimento all'apparecchiatura in dotazione.
IP Bullet Day&Night colour camera, CMOS 1/2.8" sensor, 2 Mpx (1920x1080) resolution, 2.8 mm fixed focus lens, mechanic IR filter, H.265 and H.264 Multistream, VA functions, PoE or 12 Vdc supply, SD CARD slot, IR 20-30 m, WDR, ROI, 3DNR, HLC, BLC, Mask, Motion, Smart IR, RTSP functions, ONVIF protocol, IP67 protection degree. Dimensions: 75x75x168 mm. Weight 435 g.
Package content
After you receive your device, please check the following accessories. The pictures here are for reference only.
| Telecamera Camera | Istruzioni per l'uso Quick and start guide | Viti Screws & spiles | Cappuccio impermeabile Water-proof Cap | Dima di foratura Drill template |
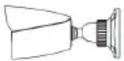 |  |  |  |  |
Introduzione
Questa telecamera IP (abbreviato in IP-CAM) è stata progettata per fornire soluzioni TVCC ad elevate prestazioni. Adotta chip di elaborazione video allo stato dell'arte. Utilizza le tecnologie più avanzate, di codifica e decodifica video ed è conforme al protocollo TCP/IP, SoC.(System on chip) ecc. per assicurare la stabilità e l'affidabilità del sistema. I manuali completi e i software CVM.exe, Iptool.exe e Diskcalculator.exe sono disponibili nella scheda prodotto consultabile nel sito www.vimar.com.
Connessioni
Di seguito sono riportate le principali connessioni della telecamera.
Introduction
This IP-camera (short for IP-CAM) is designed for high performance CCTV solutions. It adopts state of the art video processing chips. It utilizes most advanced technologies, such as video encoding and decoding technology, complies with the TCP/IP protocol, SoC (System on chip), etc to ensure this system more stable and reliable. Complete manuals and CVM.exe, Iptool.exe e Diskcalculator.exe software are available to download in the Product info sheet section of www.vimar.com website.
Connections
Here below the main connections of the camera.
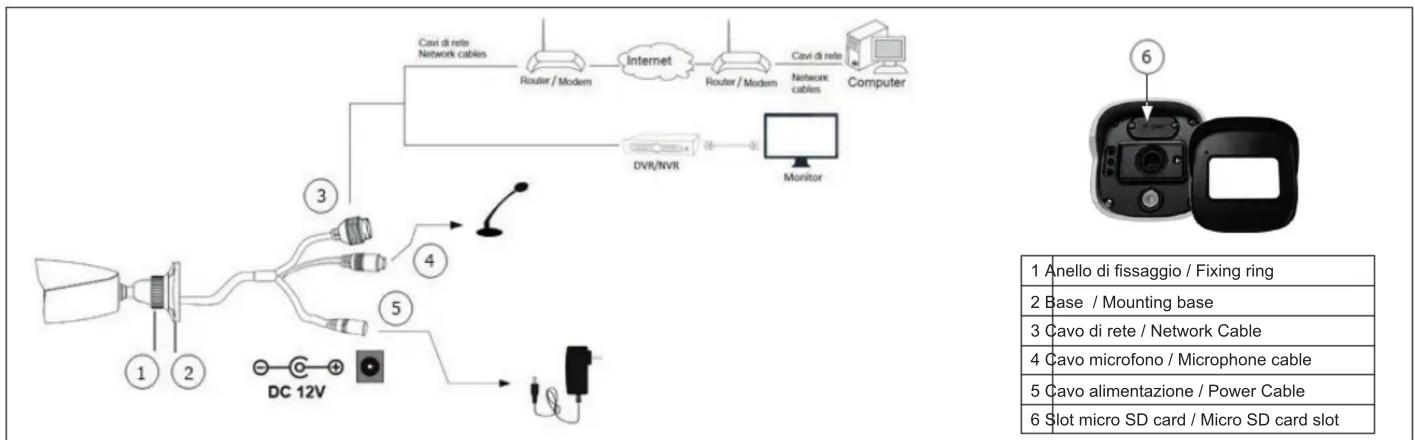
flowchart
graph TD
    A["1 Anello di fissaggio / Fixing ring"] --> B["2 Base / Mounting base"]
    B --> C["3 Cavo di rete / Network Cable"]
    C --> D["4 Cavo microfono / Microphone cable"]
    D --> E["5 Cavo alimentazione / Power Cable"]
    E --> F["6 Slot micro SD card / Micro SD card slot"]
Installazione
Prima di iniziare, assicurarsi che la parete o il soffitto siano sufficientemente solidi per sopportare tre volte il peso della telecamera. Installare la telecamera in ambiente asciutto. La procedura di montaggio è la seguente:
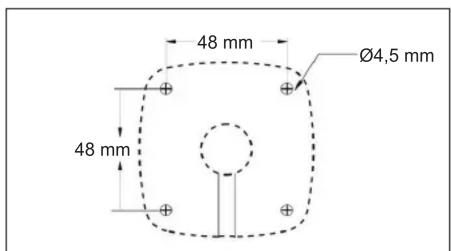
1) Praticare i fori per le viti e per il cavo sulla parete utilizzando la dima di foratura. 2) Passare i cavi e collegare il cavo di alimentazione e il cavo di rete.
3) Fissare la base di montaggio della telecamera alla parete con le viti, come descritto di seguito.
4) Regolazione della staffa. Prima della regolazione, visualizzare l'immagine della telecamera su un monitor e quindi allentare la ghiera di fissaggio per regolare l'angolo di visuale della telecamera.
Installation
Before start, please make sure that the wall or ceiling is strong enough to withstand 3 times the weight of the camera. Please install the camera in the dry environment. The mounting steps are as follows:
1) Drill the screw holes and the cable hole on the wall according to the drill template. 2) Route the cables and connect the power cable and video cable.
3) Secure the mounting base with camera to the wall with screws as shown below.
4) Bracket adjustment. Before adjustment, preview the image of the camera on a monitor and then loosen the fixed ring to adjust the view angle of the camera.
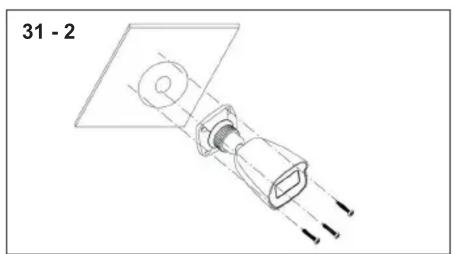
natural_image
Technical line drawing of a mechanical assembly with no visible text or symbols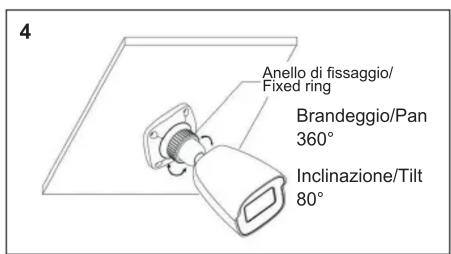
5) Rimuovere delicatamente la pellicola di protezione per completare l'installazione.
5) Remove the protective film to complete the installation procedure.
Connessione alla rete Ethernet
Come esempio, accediamo alla telecamera IP attraverso la LAN. In una LAN è possibile accedere in due modi:
- Accesso tramite IP-Tool
- Accesso diretto tramite Internet Explorer
Accesso alla telecamera tramite IP-Tool
1) Assicurarsi che la telecamera e il PC siano connessi alla LAN.
2) Eseguire il download di IP-Tool dalla sezione prodotto del sito http://www.vimar.com e installarlo sul computer. Infine, avviare IP-Tool come mostrato di seguito.
Network Connections
Here we take accessing IP camera via LAN for example. In LAN, there are two ways to access.
- Access through IP-Tool
- Directly Access through IE Browser
Access the camera through IP-Tool
1) Make sure that the camera and the PC are well connected to the LAN.
2) download IP-Tool Product info sheet section of www.vimar.com website and then install it in the computer. After that, run the IP-Tool as shown below.
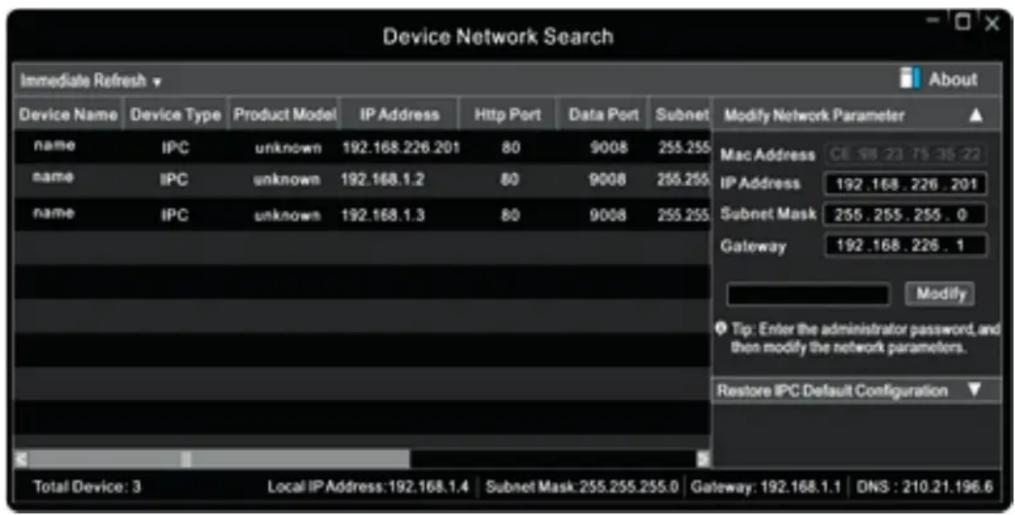
3) Modificare l'indirizzo IP. L'indirizzo IP predefinito di questa telecamera è 192.168.226.201. Fare click sulle informazioni della telecamera elencate nella tabella sopra riportata per visualizzare le informazioni di rete sulla destra. Modificare l'indirizzo IP e il gateway della telecamera e assicurarsi che l'indirizzo di rete si trovi nello stesso segmento della rete locale del computer. Modificare l'indirizzo IP del dispositivo in base alla situazione specifica.
3) Modify the IP address. The default IP address of this camera is 192.168.226.201. Click the information of the camera listed in the above table to show the network information on the right hand. Modify the IP address and gateway of the camera and make sure its network address is in the same local network segment as the computer's. Please modify the IP address of your device according to the practical situation
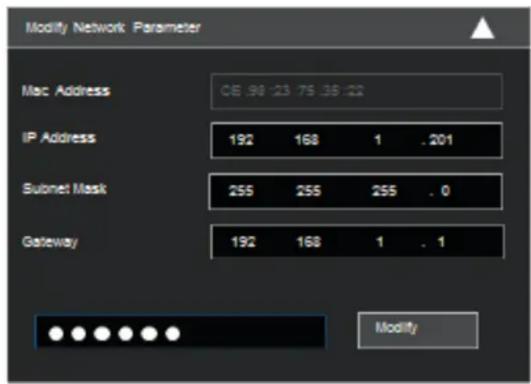
Ad esempio, l'indirizzo IP del computer in uso è 192.168.1.4. Di conseguenza l'indi- rizzo della telecamera deve essere cambiato in 192.168.1.X. Dopo la modifica inserire la password di amministratore e fare clic sul pulsante "Modifica" per modificare l'impostazione.
Aa password predefinita dell'amministratore è 123456.
4) Fare doppio clic sull'indirizzo IP, il sistema aprirà Internet Explorer per collegare l'IP-CAM. Internet Explorer scarica automaticamente i controlli ActiveX. Dopo il download viene visualizzata la finestra di accesso. Immettere User Name (Nome utente) e Password per accedere.
Il Nome Utente predefinito è admin, la Password è 123456
Accesso alla telecamera tramite Internet Explorer
Le impostazioni di rete predefinite sono indicate di seguito:
- Indirizzo IP: 192.168.226.201 HTTP:80
- Subnet Mask: 255.255.255.0 Porta Dati:9008
- Gateway: 192.168.226.1
⚠️ Il Nome Utente predefinito è admin, la Password è 123456
For example, the IP address of your computer is 192.168.1.4. So the IP address of the camera shall be changed to 192.168.1.X.
After modification, please input the password of the administrator and click "Modify" button to modify the setting.
⚠️ The default password of the administrator is 123456.
4) Double-click the IP address and then the system will pop up the IE browser to connect IP-CAM.
IE browser will automatically download the Active X control.
After downloading, a login window will pop up. Input the user name and password to login.
The default password of the administrator is 123456.
Directly Access Through IE
The default network settings are as shown below:
IP address: 192.168.226.201 HTTP:80
Subnet Mask: 255.255.255.0 Data Port:9008
Gateway: 192.168.226.1
The default user is admin, password of the administrator is 123456.
Specifiche/ Specifications
| 4621.028B | ||
| Telecamera Cam | Sensore/ Sensor 1/2,8" CMOS Scansione progressiva / Progressive scan | |
| Pixel immagine/Pixel image 1920 x 1080 | ||
| Otturatore elettronico/Electonic shutter | 1/25s ~ 1/100'000s / AUTO | |
| Sensibilità/ Sensitivity 0,0035 lux @F1.2, AGC ON; 0 lux (IR LED ON) | ||
| Obiettivo/Lens 2,8 mm @ F1.6 (105°) | ||
| Tipo di attacco/Fixing type M12 | ||
| Immagine Image | Compressione Video/Video compression | H.264 - H.265 - MJPEG |
| Risoluzione/Resolution 1080p (1920 x 1080), 720p (1280 x 720), D1, CIF, 480 x 240 | ||
| Bit Rate 64 Kbps ~ 6 Mbps | ||
| Frame rate primarioPrimary frame rate | 30 Fps (1920 x 1080)(1280 x 720) | |
| Frame rate secondarioSecondary frame rate | 30 Fps (704 x 576)(480 x 240)(352 x 288) | |
| Codifica/ Codification VBR/CBR | ||
| Qualità/Quality Livello / Level VBR 5, CBR illimitato / unlimited | ||
| Connessioni Connections | Network | RJ45 |
| Uscita Video CVBS/CVBS video output | No | |
| SD card Si non inclusa (128 GB max) / Yes not included (128 GB max) | ||
| RS485 No | ||
| Audio In/out 1/0 | ||
| Allarme/Alarm In/out 0/0 | ||
| Funzioni Functions | Funzioni/Fucntions | D-WDR , Smart IR, 3D-DNR, ROI, Privacy Mask, Motion, HLC, BLC |
| Sorveglianza remota/remote control | Browser IE, CMS per controllo da remoto / for remote control | |
| Utenti online/Online users | 3 utenti, supporta la trasmissione su più flussi in tempo reale / 3 users, transmission supported on more flux in real time | |
| Protocollo di rete/Network protocol | UDP, IPv4, IPv6, DHCP, NTP, RTSP, PPPoE, DDNS, SMTP, FTP, HTTP, 802.1x, UPnP, HTTPS, QoS | |
| Compatibilità/Compatibility | ONVIF | |
| Archiviazione/Storage | Archiviazione remota, archiviazione SD card / Remote storage, SD card storage | |
| Giorno/Notte / Day&Night | ICR | |
| Analisi Video Intelligente /Intelligent Video Analysis | Anomalia: sfocatura, cambio scena - Oggetto abbandonato o rimosso - Attraversamento linea - Intrusione areaAnomaly: Blur, Scene change - Abandoned or missing object - Line crossing - Area intrusion | |
| Altro Other | PoE | Si/Yes (IEEE802.3 af) |
| Range IR | 20-30 m | |
| Grado/Degree IP | IP67 | |
| Range temperatura/Temperature range | -30°C +60°C con umidità inferiore a 95% / with humidity lower than 95% | |
| Alimentazione/Power supply | 12 Vdc / PoE - 290 mA | |
| Consumi/Consumptions | 3,5 W | |
| Dimensioni/Dimensions (mm) | 75x75x168 | |
| Peso/Weight (g) | 435 | |
| Note/Notes | RTSP, multi-stream, staffa inclusa /bracket included | |
Avvertenze
- Prima di utilizzare il prodotto si raccomanda vivamente di leggere il manuale e di conservarlo in un luogo sicuro per consultazione futura.
- Utilizzare l'alimentazione specificata per il collegamento.
- Evitare di azionare il prodotto in modo improprio, sottoporlo a urti o vibrazioni, forti pressioni che possono danneggiarlo.
- Non utilizzare detergenti corrosivi per pulire il corpo principale della telecamera. Se necessa - rio, utilizzare un panno morbido e asciutto per pulirla; in caso di sporco resistente utilizzare un detergente neutro. È possibile utilizzare detergenti per mobili di qualità.
- Non puntare la telecamera direttamente verso oggetti estremamente luminosi, ad esempio il sole, in quanto si potrebbe danneggiare il sensore d'immagine.
- Seguire le istruzioni per installare la telecamera. Non rovesciare la telecamera, altrimenti rice - verà un'immagine rovesciata.
- Non azionarla se temperatura, umidità e alimentazione non corrispondono ai limiti o valori specificati.
- Tenere lontano da fonti di calore quali radiatori, bocchette dell'aria calda, stufe e simili.
- Il presente documento contiene le istruzioni per l'uso del prodotto. Non è la garanzia di qualità. Ci riserviamo il diritto di correggere errori di stampa, incongruenze con la versione più recente, aggiornamenti del software e miglioramenti, interpretazione e modifiche al prodotto. Tali cam biamenti saranno pubblicati nella versione più recente senza previa notifica.
- Quando il prodotto è in uso, sono applicabili i contenuti di Microsoft, Apple e Google. Le im - magini e le schermate di questo manuale hanno lo scopo di spiegare l'utilizzo del prodotto. La proprietà dei marchi commerciali, dei logo e altre proprietà intellettuali relative a Microsoft, Apple e Google appartengono alle suddette aziende.

Regole di installazione
L'installazione deve essere effettuata da personale qualificato con l'osservanza delle disposizioni regolanti l'installazione del materiale elettrico in vigore nel paese dove i prodotti sono installati.
Conformità normativa
Direttiva EMC. Direttiva RoHS
Norme EN 55032, EN 55035, EN IEC 63000
Regolamento REACH (UE) n. 1907/2006 – art.33. Il prodotto potrebbe contenere tracce di piombo.

RAEE - Informazioni agli utilizzatori
Il simbolo del cassonetto barrato riportato sull'apparecchiatura o sulla sua confezione indica che il prodotto alla fine della propria vita utile deve essere raccolto separatamente dagli altri rifiuti. L'utente dovrà portanto, conferire l'apparecchiatura giunta a fine vita ag idonei centri comunali di raccolta differenziata dei rifiuti elettrotecnici ed elettronici. In alternativa alla gestione autonoma, è possibile consegnare gratuitamente l'apparecchiatura che si desidera smaltire al distributore, al momento dell'acquisto di una nuova apparecchiatura di tipo equivalente. Presso i distributori di prodotti elettronici con superficie di vendita di almeno 400 m² è inoltre possibile consegnare gratuitamente, senza obbligo di acquisto, i prodotti elettronici da smaltire con dimensioni inferiori a 25 cm. L'adeguata raccolta differenziata per l'avvio successivo dell'apparecchiatura dismessa al riciclaggio, al trattamento e allo smaltimento ambientalmente compatibile contribuisce ad evitare possibili effetti negativi sull'ambiente e sulla salute e favorisce il reimpiego e/o riciclo dei materiali di cui è composta l'apparecchiatura.
Privacy
Informativa Privacy
In conformità a quanto previsto dal Regolamento UE 2016/679 in materia di tutela dei dati personali, Vimar S.p.A. garantisce che il trattamento dei dati mediante prodotti elettronici è effettuato riducendo al minimo l'utilizzazione di dati personali e di dati identificativi, limitando il trattamento ai casi in cui è strettamente necessario per il conseguimento degli scopi per i quali sono raccolti. I dati dell'Interessato saranno trattati in base a quanto previsto nella informativa privacy prodotti/applicazione consultabile dal nostro sito www.vimar.com sezione legal (Privacy Policy Prodotti - Applicazioni - Vimar energia positiva).
Ricordiamo che, in base a quanto previsto dal Regolamento UE 2016/679 in materia di tutela dei dati personali, è responsabilità dell'utilizzatore, in qualità di titolare del trattamento dei dati raccolti durante l'utilizzo del prodotto, tutelare e adottare delle misure di sicurezza idonee ad evitare la perdita dei dati personali memorizzati e registrati.
Nel caso in cui la telecamera riprenda aree pubbliche, dovrà essere apposta, in modo visibile, l'informativa di 'area videosorvegliata' prevista dalla normativa privacy e riportata nel sito del Garante della Privacy. Le registrazioni potranno essere conservate per il periodo massimo previsto dalle disposizioni di legge e/o regolamentari dove è stata effettuata l'installazione della telecamera. Se la normativa in vigore nel paese di installazione prevede quindi un periodo massimo di conservazione delle registrazioni delle immagini, l'utilizzatore dovrà provvedere alla loro cancellazione in conformità alle norme applicabili.
Inoltre, l'utilizzatore dovrà garantire e verificare la titolarità e la custodia delle proprie password e dei relativi codici di accesso alle risorse web. L'Interessato al momento della richiesta di intervento al Centro Assistenza Vimar, per poter consentire le attività di assistenza, deve fornire la password di accesso al sistema. La fornitura della stessa è considerata come consenso al trattamento. Ogni Interessato sarà responsabile e dovrà modificare la password di accesso al proprio sistema a seguito di ogni intervento svolto da parte del Centro Assistenza Vimar.'
Cautions
- Before operation, we strongly advise users to read this manual and keep it properly for using later.
- Please use the specified power supply to connect.
- Avoid from in correct operation, shock vibration, heavy pressing which can cause damage to product.
- Do not use corrosive detergent to clean main body of the camera. If necessary, please use soft dry cloth to wipe dirt; for hard contamination, use neutral detergent. Any cleanser for high grade furniture is applicable.
- Avoid aiming the camera directly towards extremely bright objects, such as, sun, as this may damage the image sensor.
- Please follow the instructions to install the camera. Do not reverse the camera, or the reversing image will be received.
- Do not operate it incase temperature, humidity and power supply are beyond the limited stipulations.
- Keep away from heat sources such as radiators, heat registers, stove., etc.
- This is product instructions not quality warranty. We may reserve the rights of amending the typographical errors, inconsistencies with the latest version, software upgrades and product improvements, interpretation and modification. These changes will be published in the latest version without special notification.
- When this product is in use, the relevant contents of Microsoft, Apple and Google will be involved in. The pictures and screenshots in this manual are only used to explain the usage of our product. The ownerships of trademarks, logos and other intellectual properties related to Microsoft, Apple and Google belong to the above-mentioned companies.

Installation rules
Installation should be carried out by qualified staff in compliance with the current regulations regarding the installation of electrical equipment in the country where the products are installed.
Conformity to Standards
EMC Directive. RoHS Directive
Standards EN 55032, EN 55035, EN IEC 63000
REACH (EU) Regulation no. 1907/2006 – Art.33. The product may contain traces of lead.

WEEE - User information
If the crossed-out bin symbol appears on the equipment or packaging, this means the product must not be included with other general waste at the end of its working life. The user must take the worn product to a sorted waste center, or return it to the retailer
when purchasing a new one. Products for disposal can be consigned free of charge (without any new purchase obligation) to retailers with a sales area of at least 400 m^2 , if they measure less than 25 cm. An efficient sorted waste collection for the environmentally friendly disposal of the used device, or its subsequent recycling, helps avoid the potential negative effects on the environment and people's health, and encourages the re-use and/or recycling of the construction materials.
Privacy
Privacy Policy
As required by Regulation (EU) 2016/679 on the protection of personal data, Vimar S.p.A. guarantees that the electronic processing of data minimises the use of personal and other identification information, which is only processed to the extent strictly necessary in order to achieve the purposes for which it was collected. The personal information of the Data Subject is processed in accordance with the product/application privacy policy available on our website www.vimar.com in the legal section (Product - App Privacy Policy - Vimar energia positiva). Please remember that, pursuant to Regulation (EU) 2016/679 on the protection of personal data, the user is the controller of processing for the data collected during use of the products and, as such, is responsible for adopting suitable security measures that protect the personal data recorded and stored, and avoid its loss.
Should the camera monitor public areas, it will be necessary to display - in a visible manner - the information about the 'area under video surveillance' envisaged in the privacy policy and specified on the website of the Italian Data Protection Authority (Garante). The recordings may be stored for the maximum period of time envisaged by legal and/or regulatory provisions in the place where the camera has been installed. If the regulations in force in the country of installation envisage a maximum storage period for the image recordings, the user shall ensure they are deleted in compliance with the applicable regulations.
In addition, the user must guarantee safe possession of and control over its passwords and the related access codes to its web resources. The Data Subject must provide the password for access to its system when requesting help from the Vimar Support Centre, so that the related support can be provided. Provision of the password represents consent for processing. Each Data Subject is responsible for changing the password for access to its system on completion of the work carried out by the Vimar Support Centre.'



- Contenuto della confezione
- Package content
- Introduzione
- Connessioni
- Introduction
- Connections
- Installazione
- Installation
- Connessione alla rete Ethernet
- Accesso alla telecamera tramite IP-Tool
- Network Connections
- Access the camera through IP-Tool
- Accesso alla telecamera tramite Internet Explorer
- Directly Access Through IE
- Avvertenze
- Regole di installazione
- Conformità normativa
- RAEE - Informazioni agli utilizzatori
- Privacy
- Informativa Privacy
- Cautions
- Installation rules
- Conformity to Standards
- WEEE - User information
- Privacy Policy
Marke : Vimar
Modell : ELVOX 4621.028B
Kategorie : Kamera