
ELVOX 46522.028C - Kamera Vimar - Kostenlose Bedienungsanleitung
Finden Sie kostenlos die Bedienungsanleitung des Geräts ELVOX 46522.028C Vimar als PDF.


| Typ | IR-HD-Kamera |
| Marke | Vimar |
| Modell | ELVOX 46522.028C |
| Sensor | 1/3 CMOS, 3.15 Megapixel |
| Effektive Pixel | 2048 (H) x 1536 (V) |
| Bildrate | 25/30 fps |
| Videoformat | PAL / NTSC |
| Minimale Beleuchtung | 0,01 Lux (IR ein) |
| Signal-Rausch-Verhältnis | ≥ 41 dB |
| IR-Reichweite | 20 m (Smart-IR) |
| Schutzart | IP66 (staubdicht und strahlwassergeschützt) |
| Stromversorgung | 12 V DC |
| Stromverbrauch | 150 mA ±15% (IR ein), 62 mA ±15% (IR aus) |
| Objektiv | 2,8 mm HD |
| Videoausgang | AHD |
| OSD-Menü | Ja, unterstützt |
| Besondere Merkmale | IR-CUT, Smart-IR, 2DNR, D-WDR, BLC, HSBLC |
| Betriebstemperatur | -10 °C bis +50 °C |
| Lagertemperatur | -20 °C bis +50 °C |
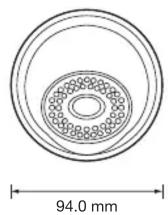
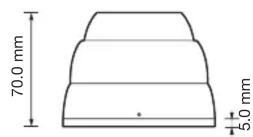
| Abmessungen (H x Durchmesser) | 70 mm x 94 mm |
| Gewicht | 570 g ±15% |
| Reinigung | Außengehäuse: trockenes Tuch; bei hartnäckigem Schmutz mildes Reinigungsmittel. Sensorplatte: Linsenpapier oder in Alkohol getränkter Wattestäbchen. |
| Sicherheitshinweise | Vor dem Öffnen Netzstrom trennen; keine eigenmächtigen Reparaturen; nur qualifiziertes Personal; geeignete Stromversorgung verwenden. |
Häufig gestellte Fragen - ELVOX 46522.028C Vimar
Benutzerfragen zu ELVOX 46522.028C Vimar
0 Frage zu diesem Gerät. Beantworten Sie die, die Sie kennen, oder stellen Sie Ihre eigene.
Eine neue Frage zu diesem Gerät stellen
Laden Sie die Anleitung für Ihr Kamera kostenlos im PDF-Format! Finden Sie Ihr Handbuch ELVOX 46522.028C - Vimar und nehmen Sie Ihr elektronisches Gerät wieder in die Hand. Auf dieser Seite sind alle Dokumente veröffentlicht, die für die Verwendung Ihres Geräts notwendig sind. ELVOX 46522.028C von der Marke Vimar.
BEDIENUNGSANLEITUNG ELVOX 46522.028C Vimar
Videocamera IR HD
Manuale dell'utente
DESCRIZIONE
La videocamera si avvale di un sensore 1/3 CMOS ad alte prestazioni da 3.15 mega pixel. La telecamera utilizza materiale nuovo con classe di impermeabilità IP66, filtro IR-CUT, controllo smart-IR. Design moderno e professionale.
ATTENZIONE
Grazie per aver acquistato questo prodotto. Prima di cercare di collegare o utilizzare il prodotto, leggere attentamente le istruzioni e conservare il manuale per consultazione futura.
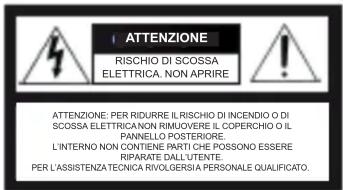
- Utilizzare una rete di alimentazione appropriata. La tensione di ingresso della telecamera è 12 Vdc. Assicurarsi di collegarla a una sorgente di alimentazione idonea. Una connessione errata può causare malfunzionamenti e/o danneggiare la telecamera.
- Non cercare di smontare la telecamera.
Per evitare il rischio di scosse elettriche, non rimuovere viti o coperchi. All'interno non vi sono parti che possono essere riparate dall'utente. Per l'assistenza rivolgersi a un tecnico qualificato.
- Maneggiare la telecamera con cura.
Non utilizzare la telecamera in modo improprio. Evitare colpi, scossoni e simili. La telecamera potrebbe riportare danni a seguito di utilizzo o conservazione non idonei. - Non utilizzare detergenti aggressivi o abrasivi per pulire il corpo della telecamera.
Se la telecamera è sporca, passare un panno asciutto. Se lo sporco risulta difficile da rimuovere, utilizzare un detergente delicato e strofinare leggermente.
- Pulire la piastra anteriore del sensore con cautela.
Per pulire il pannello del sensore, non utilizzare detergenti aggressivi o abrasivi. Utilizzare carta per la pulizia di obiettivi o la punta di un bastoncino cotonato inumidito con alcol. - Non cercare di puntare la telecamera verso il sole o altri oggetti molto luminosi che farebbero comparire macchie anche se la videocamera non è in uso. Si potrebbe danneggiare il sensore.
- Non collocare la telecamera in luoghi soggetti a interferenza.
Quando la telecamera è installata vicino ad apparecchiature come dispositivi che comunicano in wireless, che emettono forti campi elettromagnetici, potrebbero verificarsi alcune irregolarità quali rumore sullo schermo del monitor.
FUNZIONI
- Sensore 1/3 CMOS ad alte prestazioni da 3.15 mega pixel, trasmissione d'immagine in tempo reale, senza compressione e senza ritardo.
- IR-CUT incorporato, assicura che la telecamera funzioni correttamente di giorno e di notte.
- Classe di impermeabilità IP66.
- Design LED IR a lunga durata, con luminosità molto superiore e durata utile molto più lunga rispetto ai normali LED.
- SMART-IR, range di 20 metri.
Design sorgente di luce IR a lunga efficacia
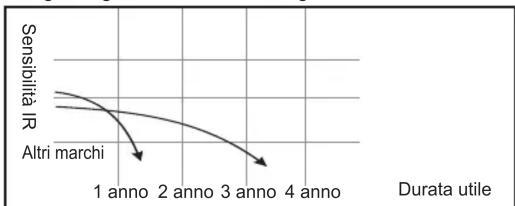
line
| Durata utile | Sensibilità IR | | :--- | :--- | | 1 anno | High | | 2 anno | Medium | | 3 anno | Low | | 4 anno | Low |ISTRUZIONI E INSTALLAZIONE DELLE PARTI
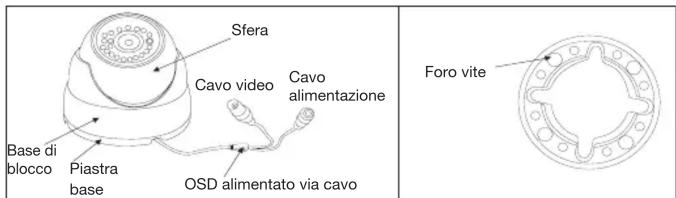
- Estrarre le viti di fissaggio dalla base di blocco utilizzando la chiave a brugola nella borsa accessori. (In alternativa: tenere la piastra di base e ruotarla in senso antiorario)
- Separare la piastra di base dalla base di blocco.
- Utilizzare le viti per fissare la piastra di base nel punto desiderato.
- Inserire quindi la sfera e la base di blocco nell'apposita sede e avvitare le viti di fissaggio.
- Regolare la lunghezza focale.
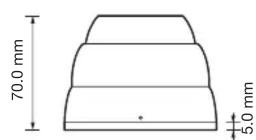
DIMENSIONI (mm)
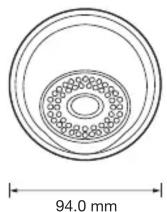
| Modello 46522.028C | |
| Sensore 1/3 CMOS | |
| Pixel effettivi 2048(H)x1536(V) | |
| Frame rate video 25/30fps | |
| Formato video PAL/NTSC | |
| Illuminazione min. 0,01 Lux (IR ON) | |
| Rapporto S/N ≥41 dB | |
| OSD | Supportato |
| AGC | 0-15 |
| Bilanciamento del bianco | ATW / INTERNO / ESTERNO / MANUAL |
| BLC | AUTO |
| NR | 2DNR |
| AES | AUTO 1/50 (1/60) - 1/50,000sec |
| AWB | AUTO |
| Day/Night (Giorno/Notte) | EXT,COLORE,B/W,AUTO |
| Codice Sync | Interno |
| Tensione | 12 Vdc |
| Corrente | 150mA ±15% (IR ON); 62mA ±15% (IR OFF) |
| Obiettivo Obiettivo HD 2.8mm | |
| Raggio IR | 20m |
| Classe di impermeabilità | IP66 |
| Uscita video | AHD |
| Temperatura di stoccaggio | -20°C ~50°C |
| Temperatura di esercizio | -10°C ~ 50°C RH90% MAX |
| Dimensioni | 70mm(H)*94mm(∅) |
| Peso | 570g ±15% |
* Le specifiche sono soggette a modifiche senza preavviso.
Premere il pulsante per accedere al menu principale, impostare la modalità LENS (Obiettivo), EXPOSE (Esposizione), BACKLIGHT (Controluce), WHITE BALANCE (Bilanciamento del bianco), DAY&NIGHT (Giorno e notte), NR (Riduzione del rumore), SPECIAL (Speciali), ADJUST (Regolazione) in base alle esigenze.
| MAIN MENU | |
| 1.EXPOSURE | ↓ |
| 2.BACKLIGHT | OFF(BLC ↓,HSBLC ↓) |
| 3.WHITE BAL | ATW(AWC →SET ↓,INDOOR,OUTDOOR, MANUAL ↓) |
| 4.DAY&NIGHT | EXT ↓(AUTO ↓,COLOR,B/W ↓) |
| 5.NR | ↓ |
| 6.SPECIAL | ↓ |
| 7.ADJUST | ↓ |
| 8.EXIT | RET ↓ |
1. EXPOSURE (Esposizione)
Premere il pulsante menu per accedere al sottomenu EXPOSE e impostare le voci SHUTTER (Otturatore), AGC (Controllo automatico del guadagno), BRIGHTNESS (Luminosità) e D-WDR in base alle esigenze.
| EXPOSURE | |
| 1.SHUTTER | AUTO(1/25,1/50,1/200,1/400,1/1000,1/2000,1/5000,1/10000,1/50000,FLK) |
| 2.AGC | 15 (0-15) |
| 3.BRIGHTNESS | 34 (0-100) |
| 4.D-WDR | AUTO(OFF,ON i) |
| 5.RETURN | RET j |
| D-WDR | |
| 1.LEVEL | 0 (0-15) |
| 2.RETURN | RET↓ |
2. BLC (Compensazione controluce)
Premere il pulsante menu per accedere al sottomenu BLC e impostare le voci LEVEL (Livello), AREA, DEFAULT (Valore predefinito) in base alle esigenze.
| BLC | |
| 1.LEVEL | MIDDLE( )HIGH,LOW |
| 2.AREA | |
| 3.DEFAULT | |
| 4.RETURN | RET |
| HSBLC | |
| 1.SELECT | ARE1-ARE4 |
| 2.DISPLAY | ON (OFF) |
| 3.BLACK MASK | ON(OFF) |
| 4.LEVEL | 1111111111111111111111111111111111111111111111111111111111111111111111111111111111111111111111111111 |
| 5.MODE | ALL DAY(NIGHT) |
| 6.DEFAULT | # |
| 7.RETURN | RET |
| NIGHT MODE | |
| 1.AGC LEVEL | 20 (0-100) |
| 2.RETURN | RET↓ |
3. WB (Bilanciamento del bianco)
Premere il pulsante menu per accedere al sottomenu WB e impostare i toni di BLUE (Blu) e RED (Rosso) in base alle esigenze.
| MANUAL WB | |
| 1.BLUE | 50 (0-100) |
| 2.RED | 50 (0-100) |
| 3.RETURN | RET |
4. DAY&NIGHT (Giorno e Notte)
Premere il tasto SINISTRA o DESTRA per selezionare la modalità D&N, quindi premere il pulsante menu per accedere al sottomenu e impostare i parametri in base alle esigenze.
| D&N EXT | |
| 1.D→N (DELAY) | 2 (0-60) |
| 2.N→D (DELAY) | 2 (0-60) |
| 3.RETURN | RET↓ |
| D&N AUTO | |
| 1.D→N(CDS) | 18 (0-255) |
| 2.D→N (DELAY) | 1 (0-60) |
| 3.N→D(CDS) | 18 (0-255) |
| 4.N→D (DELAY) | 1 (0-60) |
| 5.RETURN | RET |
| B/W | |
| 1.IR SMART | OFF(ON↓) |
| 2.IR PWM | ||||||||| 50 (0-100) |
| 3.RETURN | RET↓ |
| IR SMART | |
| 1.LEVEL | ||||||||| 2 (0-15) |
| 2.AREA | |
| 3.RETURN | RET |
5. NR (Riduzione del rumore)
Premere il pulsante menu per selezionare la modalità NR, quindi premere il pulsante menu per accedere al sottomenu e impostare i parametri in base alle esigenze.
| NR | |
| 1.2D NR | HIGH(MIDDLE,OFF,LOW) |
| 3.RETURN | RET |
6. SPECIAL (Speciali)
Premere il pulsante menu per accedere al sottomenu e impostare le voci MIRROR (Specchio), DPC e LANGUAGE (Lingua) in base alle esigenze.
| SPECIAL | |
| 1.MIRROR | OFF(MIRROR,V-FLIP,ROTATE) |
| 2.DPC | |
| 3.LANGUAGE | END (CHN1 ,CHN2 ,TUR ,NED ,POR ,RUS ,POL ,SPA ,ITA ,FRA ,GER ,JPN ) |
| 4.RETURN | RET |
| DPC | ||
| 1.LEVEL DPC | ON ↓( ) | OFF |
| 2.WHITE DPC | ON ↓( ) | OFF |
| 3.BLACK DPC | ON ↓( ) | OFF |
| 4.RETURN | RET ↓ | |
| LIVE DPC | |
| 1.AGC LEVEL | 128 (0-255) |
| 2.LEVEL | 16 (0-100) |
| 3.RETURN | RET |
| WHITE DPC | |
| 1.POS/SIZE | |
| 2.START | |
| 3.DPC VIEW | ON(OFF) |
| 4.LEVEL | 20 (0-60) |
| 5.AGC | 4 (0-14) |
| 6.RETURN | RET |
| BLACK DPC | |
| 1.POS/SIZE | ←↓ |
| 2.START | ←↓ |
| 3.DPC VIEW | ON(OFF) |
| 4.LEVEL | |||||||||| 20 (0-60) |
| 5.RETURN | RET←↓ |
7. ADJUST (Regolazione)
Premere il pulsante menu per accedere al sottomenu e impostare le voci SHARPNESS (Nitidezza), MONITOR, LSC (Compensazione luce circostante), OUTPUT MODE (Modo uscita) in base alle esigenze.
| ADJUST | |
| 1.SHARPNESS | AUTO↓(OFF) |
| 2.MONITOR | ↓ |
| 3.LSC | ON(OFF) |
| 4.OUTPOT MODE | ↓ |
| 5.RETURN | RET↓ |
| SHARRNESS | |
| 1.LEVEL | |||||||| 2 (0-10) |
| 2.START AGC | |||||||| 20 (0-255) |
| 3.END AGC | |||||||| 20 (0-255) |
| 4.RETURN | RET↓ |
| MONITOR | ||
| 1.GAMMA | USER( ) | 0.45-1.00 |
| 2.BLUE GAIN | |||||||||| 50 (0-100) | |
| 3.RED GAIN | |||||||||| 50 (0-100) | |
| 4.RETURN | RET↓ | |
| OUTPUT MODE | |
| 1.FORMAT | AHD ↓ |
| 2.VIDEO OUT | PAL ↓(NTSC ↓) |
| 3.NRT | OFF |
| 4.RETURN | RET ↓ |
HD IR Camera
User Manual
DESCRIPTION
The camera adopt 3.15 mega pixels high performance 1/3 CMOS sensor. The camera adopt new material with IP66 waterproof standard, IR-CUT filter, smart-IR control. Fashionable and professional design.
ATTENTION
Thank you for your purchasing this product. Before attempting to connect or operate this product, please read these instructions carefully and save this manual for future use.
- Use the Appropriate Power Supply
The input power for the camera is 12 Vdc. Be sure to connect it to the appropriate power. Wrong connection may cause malfunction and/or damage to the video camera.
- Do not attempt to disassemble the camera.
To prevent electric shock, do not remove screws or covers. There are no user serviceable parts inside. Ask a qualified service person for servicing.
- Handle the camera with care.
Do not abuse the camera. Avoid striking, shaking, etc. The camera could be damaged by improper handling or storage.
- Do note use strong or abrasive detergents when cleaning the camera body.
Use a dry cloth to clean the camera when dirty. In case the dirt is hard to remove. Use a mild detergent and wipe gently.
- Clean the sensor faceplate with care.
When cleaning the sensor panel, do not use strong or abrasive detergents. Use a piece of lens tissue or cotton tipped applicator and ethanol.
-
Do not attempt to aim the camera at the sun or other extremely bright objects that causes mear to appear irrespective of whether the camera is operating or not. This can damage the sensor.
-
Do not put the camera in a place with interference.
When this camera is installed near the equipment like wireless communication device which emits strong electromagnetic field, some irregularity such as noise on monitor screen may happen.
FEATURES
- 3.15 Megapixel high performance 1/3 CMOS sensor, no compressed, no delay, and real-time transmission image.
- Built in IR-CUT, ensure the camera work properly both day and night.
- IP66 waterproof standard
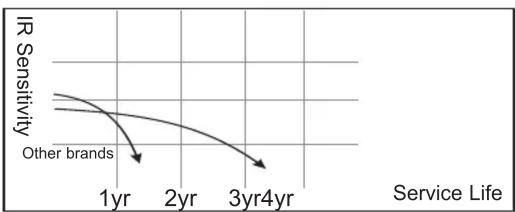
- Long-life IR LED design, whose brightness is several times higher and service life longer than ordinary LED's
- SMART-IR, 20 meters IR range
Long-effective IR Light Source Design
line
| Service Life | IR Sensitivity | | ------------ | -------------- | | 1yr | 0.8 | | 2yr | 0.6 | | 3yr4yr | 0.4 |PARTS INSTRUCTION AND INSTALLATION
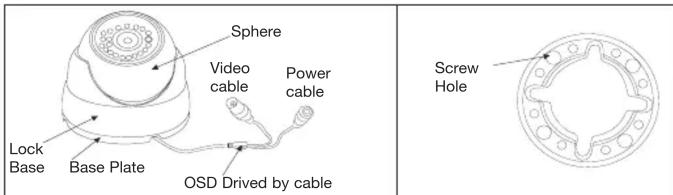
- Take out the fixing screws on the lock base by the allen wrench in the accessory bag. (Another way: hold the base plate and turn it in anti-clockwise direction)
- Separate the base plate from the lock base.
- Use screws to fix the base plate to the needed place.
- Then put the sphere and the lock base to where they belong and screw up the fixing screws.
- Adjust Lens focal length.
DIMENSIONI (mm)
| Model | 46522.028C |
| Sensor | 1/3 CMOS |
| Effective Pixels | 2048(H)x1536(V) |
| Video Frame Rate | 25/30fps |
| Video format | PAL/NTSC |
| Mini-illumination | 0.01 Lux (IR ON) |
| S/N Ration | ≥41 dB |
| OSD | Support |
| AGC | 0-15 |
| White Balance | ATW / INDOOR / OUTDOOR / MANUAL |
| BLC | AUTO |
| NR | 2DNR |
| AES | AUTO 1/50 (1/60) - 1/50,000sec |
| AWB | AUTO |
| Day/Night | EXT, COLOR, B/W, AUTO |
| Sync code | Internal |
| Voltage | 12 Vdc |
| Current | 150mA ±15% (IR ON); 62mA ±15% (IR OFF) |
| Lens | 2.8mm HD Lens |
| IR range | 20m |
| Waterproof standard | IP66 |
| Video output | AHD |
| Storage temperature | -20°C ~50°C |
| Operate Temperature | -10°C ~ 50°C RH 90% MAX |
| Size | 70mm(H)*94mm(∅) |
| Weight | 570g ±15% |
*Specifications subject to change without notice.
Press the button into the main menu, set the LENS mode, EXPOSE, BACKLIGHT, WHITE BALANCE, DAY&NIGHT, NR, SPECIAL, ADJUST as needed.
| MAIN MENU | |
| 1.EXPOSURE | ↓ |
| 2.BACKLIGHT | OFF(BLC ↓,HSBLC ↓) |
| 3.WHITE BAL | ATW(AWC →SET ↓,INDOOR,OUTDOOR, MANUAL ↓) |
| 4.DAY&NIGHT | EXT ↓(AUTO ↓,COLOR,B/W ↓) |
| 5.NR | ↓ |
| 6.SPECIAL | ↓ |
| 7.ADJUST | ↓ |
| 8.EXIT | RET ↓ |
1. EXPOSURE
Press the menu button into the expose's submenu, set the SHUTTER\AGC\ BRIGHTNESS\D-WDR as needed.
| EXPOSURE | |
| 1.SHUTTER | AUTO(1/25,1/50,1/200,1/400,1/1000,1/2000,1/5000,1/10000,1/50000,FLK) |
| 2.AGC | 15 (0-15) |
| 3.BRIGHTNESS | 34 (0-100) |
| 4.D-WDR | AUTO(OFF,ON.) |
| 5.RETURN | RET. |
| D-WDR | |
| 1.LEVEL | 0 (0-15) |
| 2.RETURN | RET. |
2. BLC
Press the menu button into the BLC's submenu, set the LEVEL\ AREA\ DEFAULT as needed.
| BLC | |
| 1.LEVEL | MIDDLE( )HIGH,LOW |
| 2.AREA | |
| 3.DEFAULT | |
| 4.RETURN | RET |
| HSBLC | |
| 1.SELECT | ARE1-ARE4 |
| 2.DISPLAY | ON(OFF) |
| 3.BLACK MASK | ON(OFF) |
| 4.LEVEL | 1111111111111111111111111111111111111111111111111111111111111111111111111111111111111111111111111111 |
| 5.MODE | ALL DAY(NIGHT↓) |
| 6.DEFAULT | ↓ |
| 7.RETURN | RET↓ |
| NIGHT MODE | |
| 1.AGC LEVEL | 20 (0-100) |
| 2.RETURN | RET↓ |
3. WB (WHITE BALANCE)
Press the menu button into the WB's submenu, set the BLUE\ RED tone as needed.
| MANUAL WB | |
| 1.BLUE | 50 (0-100) |
| 2.RED | 50 (0-100) |
| 3.RETURN | RET |
4. D&N (DAY & NIGHT)
Press the LEFT OR RIGHT button choose the D&N's mode, and then press the menu button into the submenu, set the params as needed.
| D&N EXT | |
| 1.D-N (DELAY) | 2 (0-60) |
| 2.N-D (DELAY) | 2 (0-60) |
| 3.RETURN | RET |
| D&N AUTO | |
| 1.D→N(CDS) | 18 (0-255) |
| 2.D→N (DELAY) | 1 (0-60) |
| 3.N→D(CDS) | 18 (0-255) |
| 4.N→D (DELAY) | 1 (0-60) |
| 5.RETURN | RET↓ |
| B/W | |
| 1.IR SMART | OFF(ON) |
| 2.IR PWM | 50 (0-100) |
| 3.RETURN | RET |
| IR SMART | |
| 1.LEVEL | |||||||| 2 (0-15) |
| 2.AREA | |
| 3.RETURN | RET |
5.NR( NOISE REDUCE)
Press the menu button choose the NR mode, and then press the menu button into the submenu, set the params as needed.
| NR | |
| 1.2D NR | HIGH(MIDDLE,OFF,LOW) |
| 3.RETURN | RET ^3 |
6. SPECIAL
Press the menu button into the submenu, set the MIRROR, DPC, LANGUAGE as needed.
| SPECIAL | |
| 1.MIRROR | OFF(MIRROR,V-FLIP,ROTATE) |
| 2.DPC | |
| 3.LANGUAGE | END (CHN1 ,CHN2 ,TUR ,NED ,POR ,RUS ,POL ,SPA ,ITA ,FRA ,GER ,JPN ) |
| 4.RETURN | RET |
| DPC | ||
| 1.LEVEL DPC | ON ↓( ) | OFF |
| 2.WHITE DPC | ON ↓( ) | OFF |
| 3.BLACK DPC | ON ↓( ) | OFF |
| 4.RETURN | RET ↓ | |
| LIVE DPC | |
| 1.AGC LEVEL | |||||||| 128 (0-255) |
| 2.LEVEL | |||||||| 16 (0-100) |
| 3.RETURN | RET |
| WHITE DPC | |
| 1.POS/SIZE | |
| 2.START | |
| 3.DPC VIEW | ON(OFF) |
| 4.LEVEL | |
| 5.AGC | |
| 6.RETURN | RET |
| BLACK DPC | |
| 1.POS/SIZE | ↓↓ |
| 2.START | ↓↓ |
| 3.DPC VIEW | ON(OFF) |
| 4.LEVEL | |||||||| 20 (0-60) |
| 5.RETURN | RET ↓↓ |
7. ADJUST
Press the menu button into the submenu, set the SHARPNESS, MINITOR, LSC, OUTPUT MODE as needed.
| ADJUST | |
| 1.SHARPNESS | AUTO (OFF) |
| 2.MONITOR | |
| 3.LSC | ON(OFF) |
| 4.OUTPOT MODE | |
| 5.RETURN | RET |
| SHARRNESS | |
| 1.LEVEL | |||||||||| 2 (0-10) |
| 2.STARTAGC | |||||||||| 20 (0-255) |
| 3.END AGC | |||||||||| 20 (0-255) |
| 4.RETURN | RET |
| MONITOR | ||
| 1.GAMMA | USER( ) | 0.45-1.00 |
| 2.BLUE GAIN | |||||||||| 50 (0-100) | |
| 3.RED GAIN | |||||||||| 50 (0-100) | |
| 4.RETURN | RET ↓ | |
| OUTPUT MODE | |
| 1.FORMAT | AHD↓ |
| 2.VIDEO OUT | PAL ↓(NTSC ↓) |
| 3.NRT | OFF |
| 4.RETURN | RET↓ |



- Videocamera IR HD
- Manuale dell'utente
- DESCRIZIONE
- ATTENZIONE
- FUNZIONI
- EXPOSURE (Esposizione)
- BLC (Compensazione controluce)
- WB (Bilanciamento del bianco)
- DAY&NIGHT (Giorno e Notte)
- NR (Riduzione del rumore)
- SPECIAL (Speciali)
- ADJUST (Regolazione)
- HD IR Camera
- User Manual
- DESCRIPTION
- ATTENTION
- FEATURES
- EXPOSURE
- BLC
- WB (WHITE BALANCE)
- D&N (DAY & NIGHT)
- 5.NR( NOISE REDUCE)
- SPECIAL
- ADJUST
Marke : Vimar
Modell : ELVOX 46522.028C
Kategorie : Kamera