
TCC-9210 - Autoradio LG - Kostenlose Bedienungsanleitung
Finden Sie kostenlos die Bedienungsanleitung des Geräts TCC-9210 LG als PDF.

| Produkttyp | Autoradio |
| Marke | LG |
| Modell | TCC-9210 |
| Einbaugröße | 1-DIN |
| Abmessungen (B x H x T) | ca. 180 x 50 x 160 mm |
| Gewicht | ca. 0,5 kg |
| Spannungsversorgung | 12 V Gleichstrom (Fahrzeugbordnetz) |
| Stromaufnahme | max. 10 A |
| Ausgangsleistung | 4 x 50 W (max.) |
| Impedanz Lautsprecher | 4 - 8 Ohm |
| Radiofunktionen | AM/FM, RDS, Senderspeicher |
| Wiedergabemedien | CD, CD-R/RW, MP3 via USB, AUX |
| Bluetooth | Freisprecheinrichtung, Audio-Streaming |
| USB-Anschluss | voraussichtlich (Typ A, 5V/1A) |
| Equalizer | voreingestellte EQ-Modi |
| Display | LCD, beleuchtet |
| Fernbedienung | im Lieferumfang enthalten |
| Reinigung und Pflege | Staub und Fingerabdrücke mit weichem, fusselfreiem Tuch entfernen |
| Sicherheit | Diebstahlsicherung (abnehmbares Bedienteil) |
| Ersatzteile und Reparierbarkeit | Sicherung (z.B. 10A Flachsicherung), Bedienteil als Ersatz erhältlich |
| Allgemeine Informationen | CE-gekennzeichnet, RoHS-konform |
Häufig gestellte Fragen - TCC-9210 LG
Benutzerfragen zu TCC-9210 LG
0 Frage zu diesem Gerät. Beantworten Sie die, die Sie kennen, oder stellen Sie Ihre eigene.
Eine neue Frage zu diesem Gerät stellen
Laden Sie die Anleitung für Ihr Autoradio kostenlos im PDF-Format! Finden Sie Ihr Handbuch TCC-9210 - LG und nehmen Sie Ihr elektronisches Gerät wieder in die Hand. Auf dieser Seite sind alle Dokumente veröffentlicht, die für die Verwendung Ihres Geräts notwendig sind. TCC-9210 von der Marke LG.
BEDIENUNGSANLEITUNG TCC-9210 LG

LG
Detachable Front
Panel Car Receiver
OWNER'S MANUAL
MODEL:TCC-9210
Take time to read this OWNER'S MANUAL thoroughly. Familiarity with installation and operating procedures will help you obtain the best performance from your CAR Receiver.

natural_image
Abstract geometric design with circular and angular shapes (no text or symbols)□ Precautions:
▶ Be careful not to touch the rear side panel of the unit when removing the unit from the installation sleeve, since it may be hot. On this side the cooling ribs are located.
The unit is designed to operate only on 12 volt DC negative ground electrical system.
When you replace the fuse, be sure to use a fuse of specified amperage for each wire as mentioned in chapter "Connections". Using a fuse of higher amperage may cause serious damage to the unit.
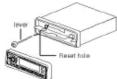
☐ Reset Switch If the event of abnormal operation, insert the Reset hole, located behind the Front Panel, with a lever or thin steel object. (short the jump wire into the Reset hole) Operating the Reset switch will erases all control settings.
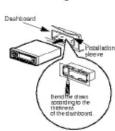
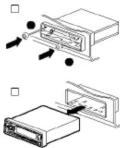
□ Mounting the unit
Notes:
▶ Use only the parts included with the unit to ensure proper installation. The use of unauthorized
arts can cause mallfunctions.
- Consult with your nearest car audio dealer if installation requires the drilling of holes or other modifications of the vehicle.
- Do not use the front panel as a way of gripping the unit during installation and wiring. The front panel may come away and the unit may drop on the floor.
▶ Periodically wipe the contacts on the back of the front panel with a cotton swap moistened with alcohol.

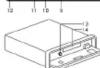
□ When removing the
unit from the installation sleeve If you need to remove the unit from the installation sleeve, proceed as follows. □ Remove the rear supporter from the unit.
□ Remove the front panel
from the unit. ☐ Insert the lever ● into hole on one side of the unit, and pull the lever toward you. Do the same operation on the other side and pull out the unit from the installation sleeve.
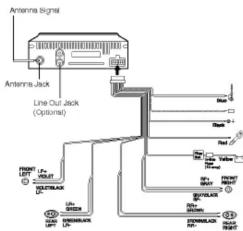
□ Main connector
Connect the main connector to the female connector on the back of the unit.
□ Antenna Connection
Connection Insert the plug of the car antenna cable into the jack at the rear of the unit. Position. If this connection is made incorrectly or is not made at all, the unit will not work. ☐ Line Out
□ Ground
Connection(Black) ▶ Connect the ground lead (black) to a metal part of the vehicle and secure it using the screw provider on the vehicle for this purpose.
▶ If this connection is loose, or if the cord is connected to something other than a metal part of the car, noise or malfunction may result.
□ Power Supply Lead (Red)
Connect the red power supply wire to the 12V + terminal controlled by the car ignition switch.
□ Memory Back-up
Lead (Yellow) Connect the yellow memory power supply wire to a 12V + terminal that is always supplied with power regardless of the vehicle's ignition switch.
position. If this connection is made incorrectly or is not made at all, the unit will not work. □ Line Out
Jacks(Optional)
Connect to the Line-in RCA jacks of the power amplifier.
Power Antenna Lead/External Amplifier Remo Turn-on Lead
Your will find a separate lead, blue with a male terminal suitable to many automatic antenna. This lead is not to be used with non-automatic antenna. If an automatic car antenna is used when
antenna is used, when connecting the lead, the antenna will be automatically extended when the main switch is turned on. This can also be used as a remote turn-on wire connection for amplifiers that have a remote sensing lead. Using this connection will allow simultaneous turning on/off of the radio and an external amplifier.
□ Precautions
▶ Do not bring the connecting cords near parts whose temperature will rise when the vehicle is driven.
- Secure the connectors securely so that they are locked into position. Improper connection can result in noise or hamper operation.
This car receiver is not designed to utilize the vehicle's chassis as the electrical return path from the speaker to the radio. Always use two conductor wire between each speaker and your stereo unit.
☐ 4-Speakers connection Use 4\~8 Ohm impedance speakers. Refer to the following connections diagram.
flowchart
graph TD
    A["Antenna Signal"] --> B["Line Out Jack (Options)"]
    B --> C["1200MHz"]
    B --> D["500MHz"]
    B --> E["100MHz"]
    C --> F["Sensor 1200MHz"]
    D --> G["Sensor 500MHz"]
    E --> H["Sensor 100MHz"]
The front panel of this unit can be detached to prevent theft.
be detached to prevent their.
□ Detaching the Front Panel
□ Press the RELEASE button
(▲) to open the front panel.

Front Panel
□ Pull the front panel toward
you.
^
[NO TEXT]
[Non-Text]
Notes:
Note:
Take care not to put pressure on the display or control
buttons, or drop the front panel
附件:
□ Close the inner lid
(1)基因通过控制 通过控制____,____的合成来控制代谢过程,进而控制生物体的性状。
[Figure]
[NO TEXT]
√
[Non-Text]
[Non-Text]
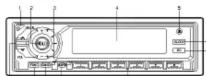
□ POWER/MUTE (O) Button □ MODELOUD(MD/LD) Button □ TUNE/AMS UP/DOWN(±,-) Button
(FF/REW, CLOCK Adjust)
□ LCD Display
□ RELEASE(Button
- CLOCK Button - EQUALIZER(EQ) Button - PRESET Button - AS/PS AMS ON/OFF Button
□ BAND, DIRECTION(◀▶)
Button
□ FUNCTION(FUNG) Button ■ CONTROL USED BY
□ CONTROLS UP/DOWN (AM) Runoff
□ EJECT(▲)Button
□ CASSETTE slot
图 1-2 指定公允价值
m = 311
The Ground Truth image displays a single, solid horizontal line. According to Rule 2 (UNDERSCORE & LINE RULES), this is a stylistic or background line, not a placeholder underscore. Therefore, the OCR result must ignore it and output nothing or only meaningful text. The provided OCR content is "____", which consists of four underscores. This is an incorrect interpretation of the line as a placeholder, violating the rule that stylistic lines must be ignored. The OCR has hallucinated underscores where none should exist based on the GT's visual context. Hence, the OCR result is inconsistent with the Ground Truth.
The Ground Truth image displays a single, solid horizontal line. According to Rule 2 (UNDERSCORE & LINE RULES), if the GT contains lines used for stylistic emphasis or as background elements (like ruled paper), the OCR result must ignore them. The provided OCR content is "____", which consists of four underscores. This is incorrect because underscores are not equivalent to a solid line and are not permitted under the “Stylistic/Background Lines (Ignore)” rule. Outputting underscores for a stylistic line violates the rule and constitutes an error. Therefore, the OCR result is inconsistent with the Ground Truth.
CLOCK
[NO TEXT]
图
N
[Non-Text]
□ Press the CLOC
the display returns to the
previous seconds
2.1.1.3.
[Non-Text]
Power ON and OFF
▶ Press POWER/MUTE(○)
button or any other button to 1um the unit on
▶ Press POWER/MUTE/
button for more than 2
seconds to turn it off.
Note:
Whenever you turn on the unit will arrive at the universe.
will operate at the volume level memorized.
•
□ Loudness Function
Press the MODELOUD(MDLD) button for more than 3 seconds
activates the loudness circuit
which boosts to compensate
he human ear's lack of sensitivity to best at low levels
sensitivity to bass at low levels
□ Mute Function
▶ POWER/MUTE(○)
button is operated as "muted" state on/off
The releasing mode mute
state is when any button is
pressed again.
□ MODE/LOUD(MD/LD)
Button
Press the MODE/LOUD(MDVLD) button to change the control of
lation to change the control of volume, bass, treble, balance
nd fader
Note:
The unit cannot adjust the bas
and treble in the EQ on mode.
CONTROL UP/DOWN □ Basic Operation
Button(∧∨) After you have an
After you have selected the proper mode by using the
MODE/LOUD(MD/LD)
button, control the desired function by pressing this
buttons within 5 seconds
After you finish selecting
modes, the unit returns to the initial mode
Operating display in all
modes:
A numeric display is converted by pressing this
converts by pressing this buttons.
FUNCTION(FUNC
Button
is button serves to switch
er between the audio sources cassette operation (cassette
radio)
EQUALIZER(EQ)
Button
ach press of the EQ button
switches the unit to the neutralizer mode, as follows.
OP → CLASSIC → ROCK
Release → POP .....
DP: Optimized for R&B Soul and Country
sour and country music.
LASSIC: Optimized for
orchestral music.
DOK: Optimized for Hard
Rock and Heavy Metal music.
Switching between
audio sources
Using the button FUNCTION
(FUNC). This button serves to switch over between cassette.
and radio operation even if the
cassette remains inserted. If
you switch over to radio operation the recent time is stopped.
the cassette tape is stopped.
□ Auto Music Search
(AMS)
▶ Your car receiver has the ability to favor something back
ability (by searching track caps) to quickly find the
beginning of next or before
tracks on a cassette.
while the playing, press the AMS UP/DOWN(+/-)
button. The cassette deck
will search for and play the next(before) track
During searching "AMS"
will show in the display.
广力云智慧零售收银系统
[Non-Text]
[Non-Text]
[Non-Text]
[Non-Text]
[Non-Text]
▶ Music search may not
function properly for the following types of recordings
This is due to the recording
and is not a malfunction of
the unit. - There are noises in the
spaces between tracks.
□ Ejecting a Cassette
□ Open the front panel.


□ Press the EJECT(▲) butt


[Non-Text]
[Non-Text]
[Non-Text]
- A blank space is less than
4 seconds long. - A track includes a long
pause or continues at low
volume for several seconds
[Non-Text]
[Non-Text]
(No text)
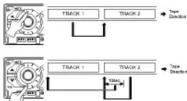
WCK.2 ➕ Type Direction
广力云智慧零售收银系统
[Non-Text]
(No text)
BACK 2 → Tape Direction
1
J
[Non-Text]
[Non-Text]
[Non-Text]
The Ground Truth image displays a single, solid horizontal line. According to Rule 2 (UNDERSCORE & LINE RULES), this is a stylistic or background line, not a placeholder underscore. Therefore, the OCR result must ignore it and output nothing or only meaningful text. The provided OCR content is "____", which consists of four underscores. This is an incorrect interpretation of the line as a placeholder, violating the rule that stylistic lines must be ignored. The OCR has hallucinated underscores where none should exist based on the GT's visual context. Hence, the OCR result is inconsistent with the Ground Truth.
1
[Non-Text]
[Non-Text]
[Non-Text]
9)
1
rata
THE GAS
[Non-Text]
[Non-Text]
[Non-Text]
each of the remaining 5
PRESET buttons.
Auto Store (AS)
stations in the selected bar
n be stored automatically Turn the power ON
Turn the power ON. Select the desired band
stations to be received.
Press the AS/PS button
more than 2 seconds, all then this function
implements.
The selected band is automatically scanned a
the 6 strongest stations
are stored. Then the pres
stations are displayed repeatedly.
Press the AS/PS button
stop scanning the preset stations.
Stations.
Preset Scanning (P)
Store a station for each
one of PRESET (1-6) buttons
When the AS/PS button
pressed, the preset static
are monitored in sequence for 5 seconds each, The
station number is shown the west station in fact
the preset station indicat When the desired station
□ General
Output Power
Power Source Speaker Imp
Speaker Imped Ground System
Dimensions(√ Net) Weight
- Tons Plc
□ Tape Player
Tape Drive S Tape Speed
Wow/Flutter
S/N Habo.... Frequency Re
Distortion (T)
□ Tuner
FM
Frequency R
S/N Ratio ... Distortion (T)
Channel Sep
AM(MW)
Frequency R S/N Ratio
Distortion (T)
广力云智慧零售收银系统
广力云智慧零售收银系统
Note: The d without
(1)基因通过控制 通过控制
The work
the date
(No text)
[Non-Text]
[Non-Text]
[Non-Text]
[Non-Text]
[Non-Text]
[Non-Text]
[Non-Text]
[Non-Text]
[Non-Text]
[Non-Text]
[Non-Text]
[Non-Text]
[Non-Text]
[Non-Text]
[Non-Text]
[Non-Text]
[Non-Text]
[Non-Text]
[Non-Text]
[Non-Text]
[Non-Text]
[Non-Text]
[Non-Text]
[Non-Text]
[Non-Text]
[Non-Text]