Multicook & Grains MK900100 - Multikocher MOULINEX - Kostenlose Bedienungsanleitung
Finden Sie kostenlos die Bedienungsanleitung des Geräts Multicook & Grains MK900100 MOULINEX als PDF.

| Produkttyp | Multikocher |
| Modell | Multicook & Grains MK900100 |
| Marke | Moulinex |
| Abmessungen (B x T x H) | ca. 30 x 30 x 30 cm |
| Gewicht | ca. 5 kg |
| Leistung | 800 W |
| Fassungsvermögen | 5 Liter |
| Material Innentopf | Antihaftbeschichtung |
| Garprogramme | Kochen, Dampfgaren, Schmoren, Backen, Reiskochen, Getreidegaren |
| Temperaturbereich | 60 °C bis 180 °C |
| Zeitschaltuhr | Ja, bis zu 24 Stunden vorwählbar |
| Warmhaltefunktion | Ja, automatisch nach Garzeitende |
| Bedienung | Digitale Anzeige, Touch-Bedienfeld |
| Sicherheitsfunktionen | Überhitzungsschutz, Deckelverriegelung |
| Reinigung | Innentopf spülmaschinengeeignet, Gehäuse abwischbar |
| Zubehör | Dämpfeinsatz, Messbecher, Reisschaufel |
| Energieversorgung | 220-240 V, 50/60 Hz |
| Kabellänge | ca. 1 m |
| Garantie | 2 Jahre |
Häufig gestellte Fragen - Multicook & Grains MK900100 MOULINEX
Benutzerfragen zu Multicook & Grains MK900100 MOULINEX
0 Frage zu diesem Gerät. Beantworten Sie die, die Sie kennen, oder stellen Sie Ihre eigene.
Eine neue Frage zu diesem Gerät stellen
Laden Sie die Anleitung für Ihr Multikocher kostenlos im PDF-Format! Finden Sie Ihr Handbuch Multicook & Grains MK900100 - MOULINEX und nehmen Sie Ihr elektronisches Gerät wieder in die Hand. Auf dieser Seite sind alle Dokumente veröffentlicht, die für die Verwendung Ihres Geräts notwendig sind. Multicook & Grains MK900100 von der Marke MOULINEX.
BEDIENUNGSANLEITUNG Multicook & Grains MK900100 MOULINEX
VOOR HET EERSTE GEBRUIK
Uitpakken
| Programma nummer | Programma's Automatisch Manueel | Temperatuur (°C) Bereidingstijd | Start uitges- teld | |||||
| Standaard | Regelbare temperatuur | Standaard Regelbare tijd | ||||||
| 9 | Witte rijst Pilav / Risotto | 1 Automatisch Automatisch Automatisch Automatisch Automatisch Automatisch Automatisch Automatisch Automatisch Automatisch Automatisch Automatisch Automatisch Automatisch Automatisch Automatisch Automatisch Automatisch Automatisch Automatisch Automatisch Automatisch Automatisch Automatisch Automatisch Automatisch Automatisch Automatisch Automatisch Automatisch Automatisch Automatisch Automatisch Automatisch Automatisch Automatisch Automatisch Automatisch Automatisch Automatisch Automatisch Automatisch Automatisch Automatisch Automatisch Automatisch Automatisch Automatisch Automatisch Automatisch Automisch Automatisch Automatisch Automatisch Automatisch Automatisch Automatisch Automatisch Automatisch Automatisch Automatisch Automatisch Automatisch Automatisch Automatisch Automatisch Automatisch Automatisch Automatisch Automatisch Automatisch Automatisch Automatisch Automatisch Automatisch Automatisch Automatisch Automatisch Automatisch Automatisch Automatisch Automatisch Automatisch Automatisch Automatisch Automatisch Automatisch Automatisch Automatisch Automatisch Automatisch Automatisch Automatisch Automatisch Automatisch Automatisch Automatisch Automatisch Automatisch Automatisch AutomchAutomatisch Automisch Automisch Automisch Automisch Automisch Automisch Automisch Automisch Automisch Automisch Automisch Automisch Automisch Automisch Automisch Automisch Automisch Automisch Automisch Automisch Automisch Automisch Automisch Automisch Automisch Automisch Automisch Automisch Automisch Automisch Automisch Automisch Automisch Automisch Automisch Automisch Automisch Automisch Automisch Automisch Automisch Automisch Automisch Automisch Automisch Automisch Automisch Automisch Automisch Automisch Automich Automisch Automisch Automisch Automisch Automisch Automisch Automisch Automisch Automisch Automisch Automisch Automisch Automisch Automisch Automisch Automisch Automisch Automisch Automisch Automisch Automisch Automisch Automisch Automisch Automisch Automisch Automisch Automisch Automisch Automisch Automisch Automisch Automisch Automisch Automisch Automisch Automisch Automisch Automisch Automisch Automisch Automisch Automisch Automisch Automisch Automisch Automisch Automisch Automisch Automisch Automisch Automisch Automisch Automisch Automisch Automisch Automisch Automisch Automisch Automisch Automisch Automisch Automisch Automisch Automisch Automisch Automisch Automisch Automisch Automisch Automisch Automisch Automisch Automisch Automisch Automisch Automisch Automisch Automisch Automisch Automisch Automisch Automisch Automisch Automisch Automisch Automisch Automisch Automisch Automisch Automisch Automisch Automisch Automisch Automisch Automisch Automisch Automisch Automisch AutomiChAutomisch Automisch Automisch Automisch Automisch Automisch Automisch Automisch Automisch Automisch Automisch Automisch Automisch Automisch Automisch Automisch Automisch Automisch Automisch Automisch Automisch Automisch Automisch Automisch Automisch Automisch Automisch Automisch Automisch Automisch Automisch Automisch Automisch Automisch Automisch Automisch Automisch Automisch Automisch Automisch Automisch Automisch Automisch Automisch Automisch Automisch Automisch Automisch Automisch Automisch Automotive Automation Automation Automation Automation Automation Automation Automation Automation Automation Automation Automation Automation Automation Automation Automation Automation Automation Automation Automation Automation Automation Automation Automation Automation Automation Automation Automation Automation Automation Automation Automation Automation Automation Automation Automation Automation Automation Automation Automation Automation Automation Automation Automation Automation Automation Automation Automation Automation Automation Automation Automation Automation Automation Automation Automation Automation Automation Automation Automation Automation Automation Automation Automation Automation Automation Automation Automation Automation Automation Automation Automation Automation Automation Automation Automation Automation Automation Automation Automation Automation Automation Automation Automation Automation Automation Automation Automation Automation Automation Automation Automation Automation Automation Automation Automation Automation Automation Automation Automation AutomationAutomation Automation Automation Automation Automation Automation Automation Automation Automation Automation Automation Automation Automation Automation Automation Automation Automation Automation Automation Automation Automation Automation Automation Automation Automation Automation Automation Automation Automation Automation Automation Automation Automation Automation Automation Automation Automation Automation Automation Automation Automation Automation Automation Automation Automation Automation Automation Automation Automation Automation Automation Automation Automation Automation Automation Automation Automation Automation Automation Automation Automation Automation Automation Automation Automation Automation Automation Automation Automation Automation Automation Automation Automation Automation Automation Automation Automation Automation Automation Automation Automation Automation Automation Automation Automation Automation Automation Automation Automation Automation Automation Automation Automation Automation Automation Automation Automation Automation Automation Automation Assistance Automation Automation Automation Automation Automation Automation Automation Automation Automation Automation Automation Automation Automation Automation Automation Automation Automation Automation Automation Automation Automation Automation Automation Automation Automation Automation Automation Automation Automation Automation Automation Automation Automation Automation Automation Automation Automation Automation Automation Automation Automation Automation Automation Automation Automation Automation Automation Automation Automation Automation Automation Automation Automation Automation Automation Automation Automation Automation Automation Automation Automation Automation Automation Automation Automation Automation Automation Automation Automation Automation Automation Automation Automation Automation Automation Automation Automation Automation Automation Automation Automation Automation Automation Automation Automation Automation Automation Automation Automation Automation Automation Automation Automation Automation Automation Automation Automation Automation Automation | 7 | 53 | ||||
| TOTAAL STAND MULTICOOK | 60 | |||||||
TECHNISCHE PROBLEMEN OPLOSSEN
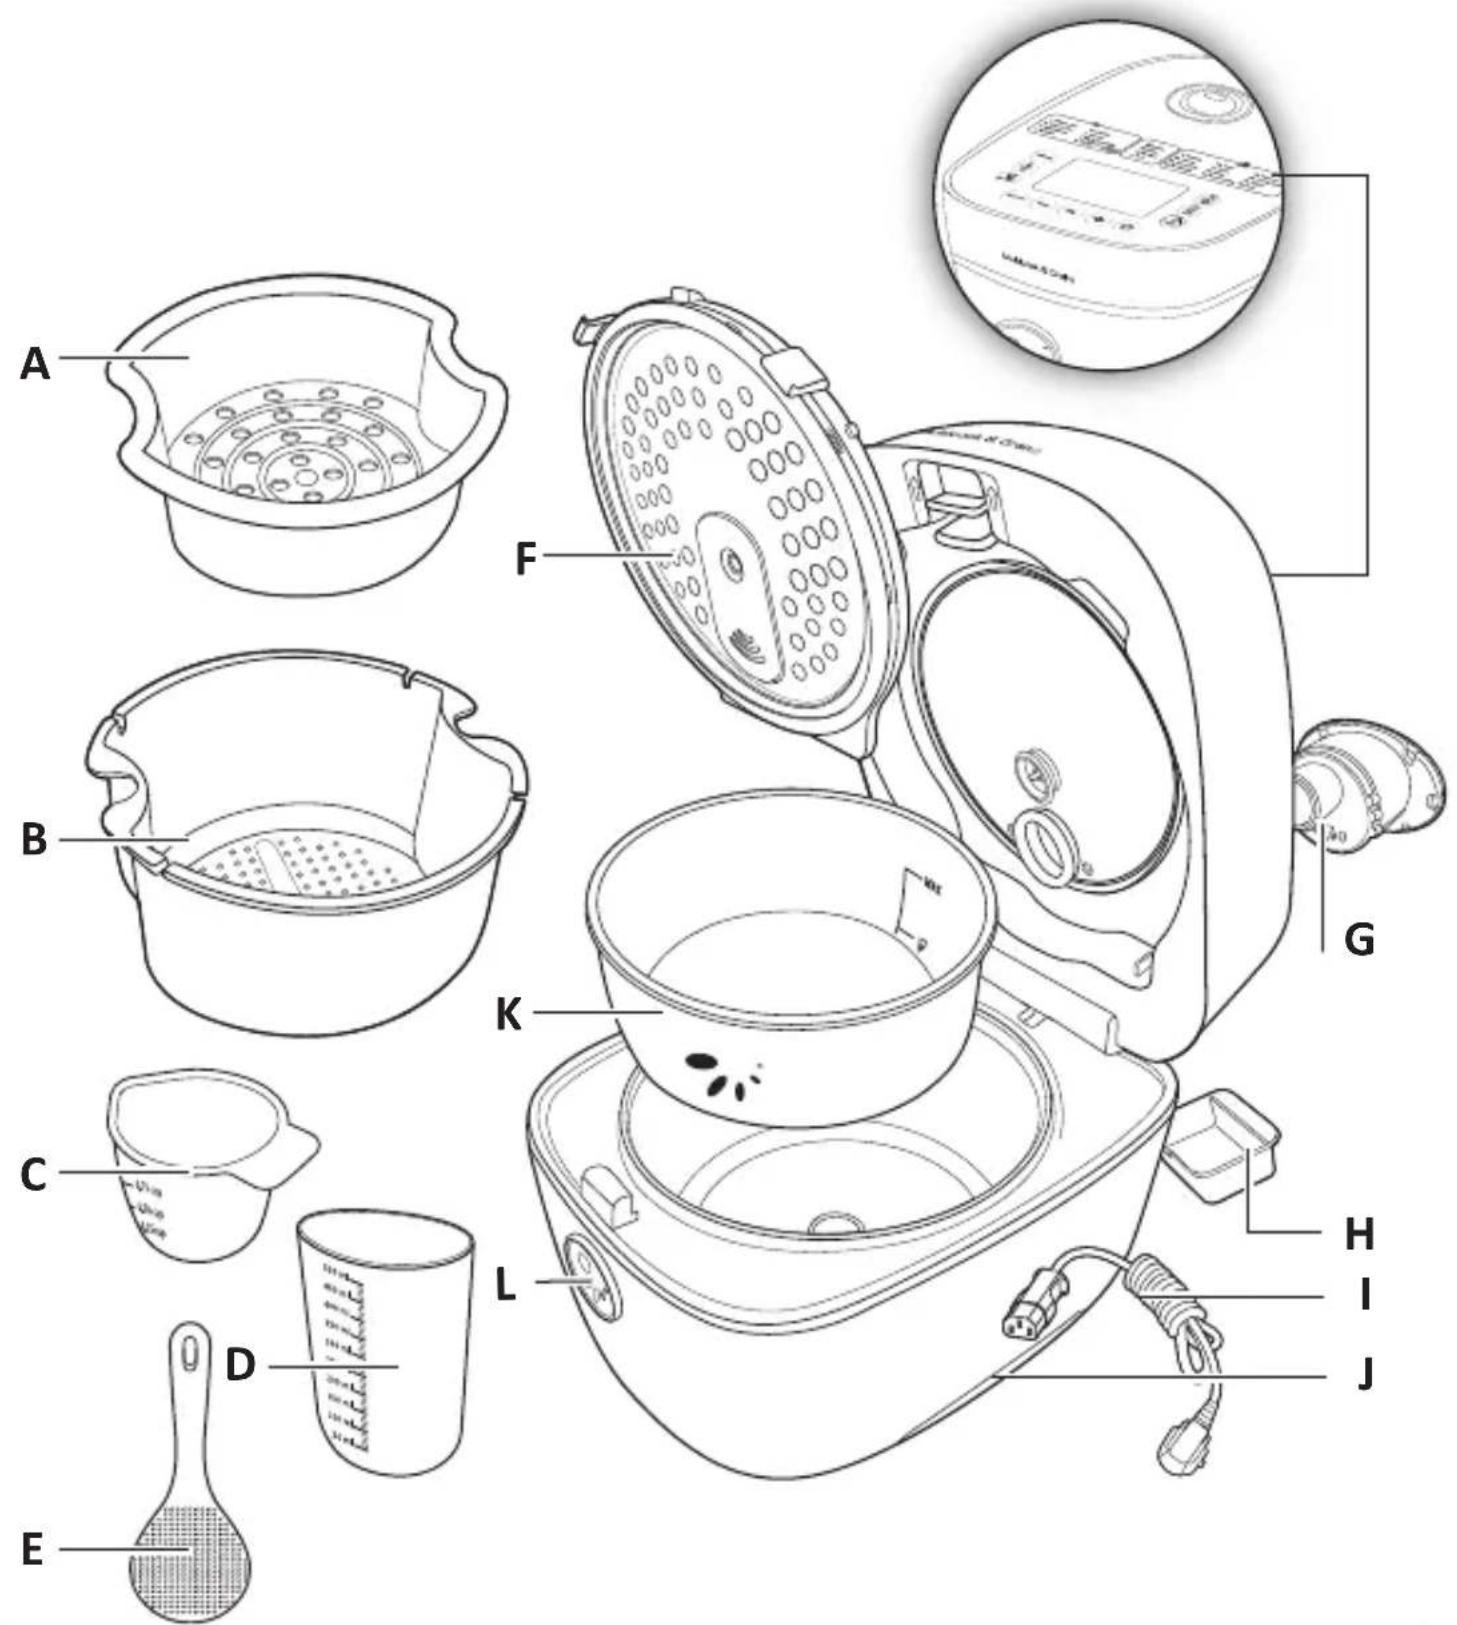
A - Dampfkorb
B - Einweichkorb
C - Messbecher
D - Wassermessbecher
E - Bratwender
F - Innendeckel
G - Ventil
H - Sammelbehälter
I - Netzkabel
J - Tragegriff
K - Herausnehmbarer Behälter
L - Knopf zum Öffnen des Deckels
LISTE DER MENÜS

BESCHREIBUNG DES BEDIENFELDS
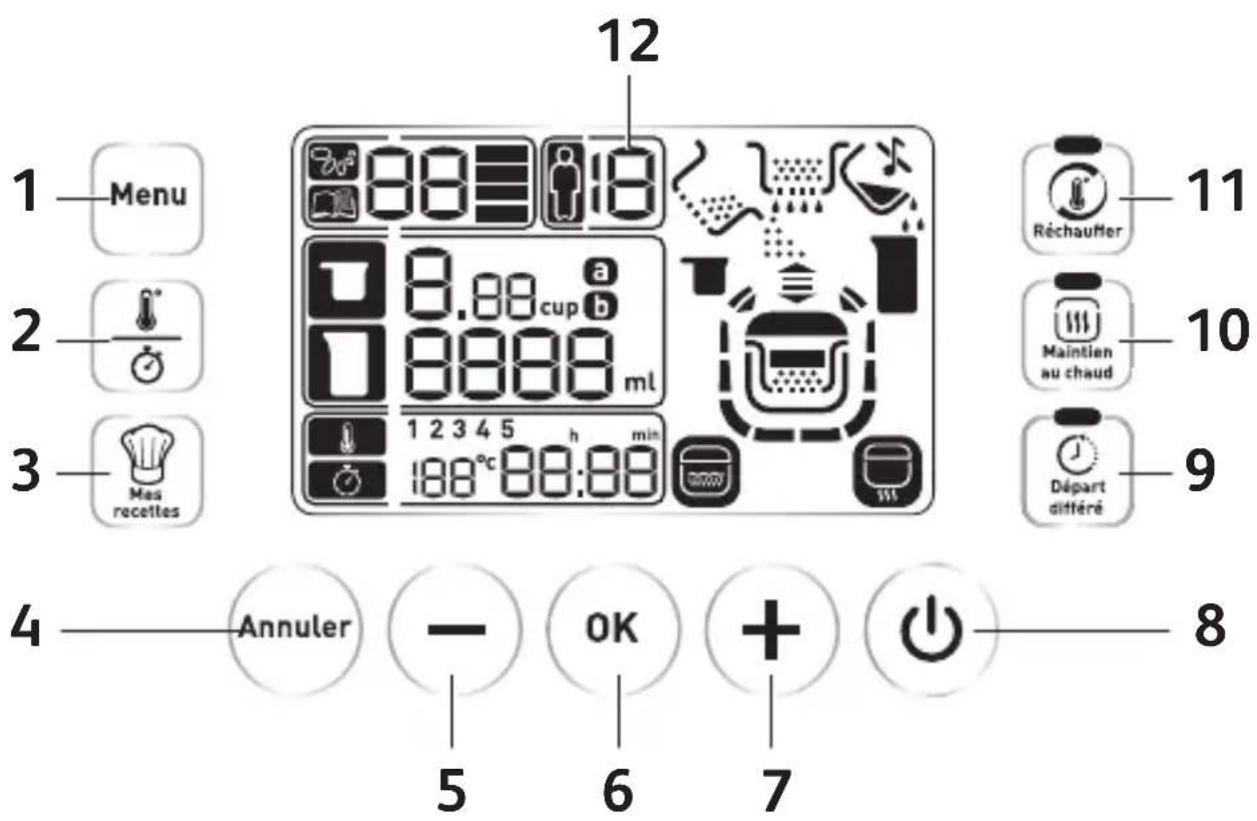
- Menütaste
- Temperatur-/Zeittaste
- „Meine Rezepte“-Taste
- „Abbrechen“-Taste
- „-“-Taste
-
„OK“-Taste
-
„+“-Taste
- Ein/Aus-Taste
- „Verzögerter Start“-Taste
- „Warmhalten“-Taste
- „Aufwärmen“-Taste
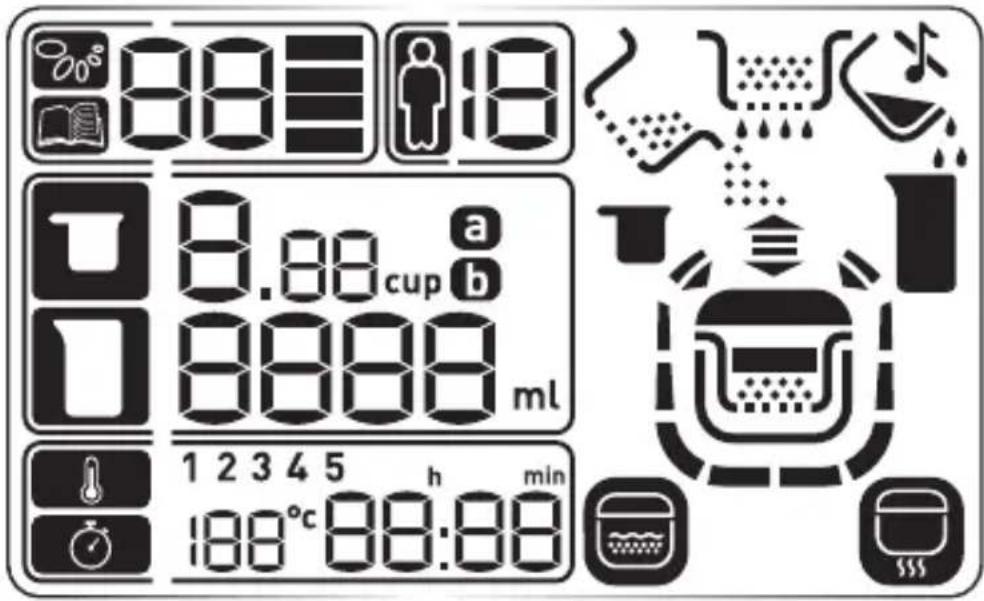
- LCD-Display
ERNÄHRUNGSMENÜ
 | Ernährungsmenü |
 | Programmnummer |
 | Textur |
 | Personenanzahl |
 | Anzahl der Tassen |
 | Wassermenge |
 | Einweichfunktion |
 | Kochfunktion |
 | Automatische Kochfunktion |
MULTIKOCHMENÜ
 | Multikochmenü |
 | Programmnummer |
 | Zeiteinstellung |
 | Temperatureinstellung |
 | Kochfunktion |
 | Automatische Kochfunktion |
VOR DER ERSTEN BENUTZUNG
Auspacken
Nehmen Sie das Gerät aus der Verpackung und packen Sie alle Zubehörteile und Papierunterlagen aus. Öffnen Sie den Deckel durch Drücken der Öffnungstaste auf der Vorderseite des Geräts.
Lesen und beachten Sie die Gebrauchsanweisung.
Reinigung des Geräts:
Entfernen Sie den Behälter, den Innendeckel (Abb. 1 und Abb. 2) und das Ventil (Abb. 5).
Reinigen Sie den Behälter, das Ventil und den Innendeckel mit einem Schwamm.
Reinigen Sie die Außenfläche des Geräts mit einem feuchten Tuch. Wischen Sie alles gründlich ab.
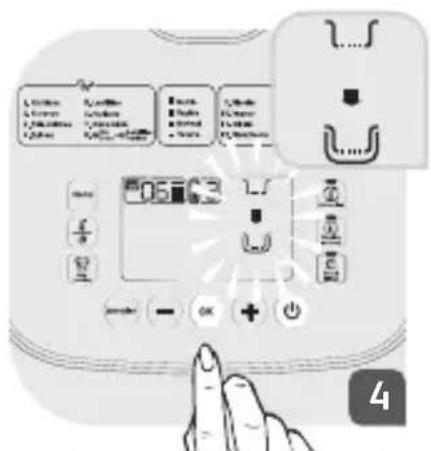
Stellen Sie alle Teile zurück auf ihre ursprüngliche Position. Bringen Sie den Innendeckel durch Ausrichten der Vertiefungen (Abb. 3) und durch sanftes Drücken (Abb. 4) zurück auf seine ursprüngliche Position. Schließen Sie das abnehmbare Kabel an den elektrischen Anschluss an der Unterseite des Geräts an.

- Wischen Sie die Außenfläche des Behälters sorgfältig ab (insbesondere die Unterseite). Stellen Sie sicher, dass sich keine Rückstände oder Flüssigkeiten unter dem Behälter und auf dem Heizelement befinden.
- Stellen Sie den Behälter in das Gerät und sorgen Sie dafür, dass es richtig positioniert ist.
- Prüfen Sie, ob der Innendeckel richtig eingesetzt ist.
- Schließen Sie den Deckel und drücken Sie ihn nach unten, bis er mit einem hörbaren Klick einrastet.
- Schließen Sie das Netzkabel an den elektrischen Anschluss des Schnellkochtopfs an und verbinden Sie dieses anschließend mit einer Steckdose.
• Das voreingestellte Programm ist Nummer 01 - Weißer Reis. - Berühren Sie das Heizelement nicht, wenn der Apparat angeschlossen oder der Garvorgang beendet ist.
- Transportieren Sie das Gerät nicht während des Gebrauchs oder direkt nach dem Garvorgang.
- Dieses Gerät ist ausschließlich für den Gebrauch in Innenräumen vorgesehen.
- Tragen Sie bei der Handhabung des heißen Behälters und der heißen Körbe immer Handschuhe.
- Es wird empfohlen, den Behälter und den Einweichkorb gleichzeitig herauszunehmen und abzuwarten, bis der Dampf entweicht ist, bevor Behälter und Einweichkorb getrennt werden.
- Einweich- und Dampfkorb sind ausschließlich für die vorgesehenen Funktionen zu verwenden.
• Die Dampfausgänge dürfen während des Gebrauchs dieses Produkts nicht verschlossen werden. - Verwenden Sie den Behälter nicht ohne das Produkt (auf dem Gasherd, auf einer Heizplatte, in einem Ofen ...)
- Verwenden Sie zum Umrühren der Nahrung im Behälter keine Kochutensilien aus Metall.
- Der Sammelbehälter muss nach jedem Garvorgang geleert werden.
- Es ist untersagt, mit diesem Gerät Speisen in heißem Öl zuzubereiten.
- Legen Sie die Hand während des Garvorgangs niemals über die Auslassöffnungen für den Dampf, da es sonst zu Verbrennungen kommen kann.
- Verwenden Sie nur den mit dem Gerät gelieferten Behälter.
- Geben Sie niemals Wasser oder Zutaten direkt in das Gerät, wenn sich der Behälter nicht am vorgesehenen Platz befindet.
• Die maximale Wasser- und Zutatenmenge darf die Linie „MAX“ an der Innenseite des Behälters nicht überschreiter
Wenn Sie die Signaltöne ausschalten möchten, drücken Sie 5 Sekunden lang auf die Taste 📄 . Das Symbol ✕ erscheint. Bitte beachten Sie, dass die Signaltöne zu Beginn und zum Ende des Garvorgangs nicht deaktiviert werden können. Wenn Sie die Signaltöne wieder anschalten möchten, drücken Sie 5 Sekunden lang auf die Taste 📄 . Das Symbol ✕ verschwindet. Die Einstellungen bleiben gespeichert.
Wenn Sie die Tasten ⚙️ und – mit dem Finger gedrückt halten, können Sie die Einstellungen schneller erhöhen oder reduzieren.
• Die Aktivierung der Tasten ist nicht möglich, wenn Sie Handschuhe tragen.
Die Tasten werden nur bei geschlossenem Deckel aktiviert.
Sie können Ihr Gerät abschalten, indem Sie 5 Sekunden lang auf die Taste ☐ drücken. Sie hören dann einen langen Signalton. Drücken Sie ein beliebige Taste, um das Gerät wieder anzuschalten.
- Um einen laufenden Garvorgang abzubrechen, drücken Sie 5 Sekunden lang auf die Taste ⏻. Sie können auch ein Programm durch langes Drücken auf die Taste „Abbrechen“ abbrechen.
- Um eine laufende Einstellung abzubrechen, drücken Sie auf die Taste „Abbrechen“.
ERNÄHRUNGSMENÜ

Bei den Funktionen „Menu Nutrition“ handelt es sich um automatische Kochfunktionen. Das Gerät zeigt Ihnen die verschiedenen Schritte zur Durchführung Ihrer Garvorgänge an. Die verschiedenen zur Verfügung stehenden Texturen so die Personenanzahl (min./max.) entnehmen Sie bitte der nachfolgenden Tabelle.
| Programm-nummer | Programme Textur Automatisch Manuell | Geschätzte Einweichzeit | Geschätzte Garzeit | Personen-anzahl (min./max.) | ||
| 1 Weißer Reis | Nutri + 1 40 – 50 Min | 2 – 12 | ||||
| Schnell 1 20 – 30 Min | ||||||
| Normal 1 30 – 40 Min | ||||||
| Schonend 1 40 – 50 Min | ||||||
| 2 Naturreis | Nutri + 1 1 Std – 1 Std 10 Min | 2 – 12 | ||||
| Schnell 1 40 – 50 Min | ||||||
| Normal 1 50 Min – 1 Std | ||||||
| Schonend 1 50 Min – 1 Std | ||||||
| 3 | Kichererbsen | Nutri + | 1 | 1 Std. 40 Min. | 50 Min – 1 Std | 2 – 6 |
| 4 | Quinoa | Nutri + 1 | 2 Std 20 min – 2 Std 30 min | 2 – 8 | ||
| Schnell 1 20 – 30 Min | ||||||
| Normal 1 | 30 – 40 Min | |||||
| 5 | Linsen | Nutri + 1 50 Min – 1 Std | 40 - 50 Min | 2 – 10 | ||
| Schnell 1 | ||||||
| Schonend 1 1 Std – 1 Std 10 Min | ||||||
| 6 | Bohnen | Nutri + 1 | 50 Min 1 Std 30 Min – 1 Std 40 Min | 2 – 6 | ||
| Normal 1 | 50 Min 2 Std 15 Min - 2 Std 30 Min | |||||
| 7 Babymenü | 1 (4-6 Monate) 1 20 – 30 Min | 2 | ||||
| 2 (7-9 Monate) 1 1 Std – 1 Std 10 Min | ||||||
| 3 (10-12 Monate) | 1 50 Min – 1 Std | |||||
| 4 (13-14 Monate) | 1 40 – 50 Min | |||||
| 8 | Naturreis + Grüne Linsen | Nutri + | 1 | 1 Std 20 Min – 1 Std 30 Min | 2 – 8 | |
GESAMTMODUS ERNÄHRUNG
22
Weißer Reis (01) / Naturreis (02) / Quinoa (04) / Linsen (05)
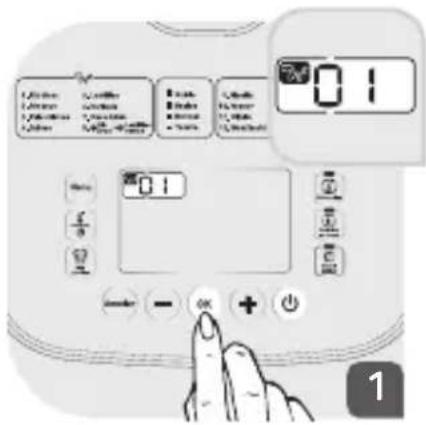
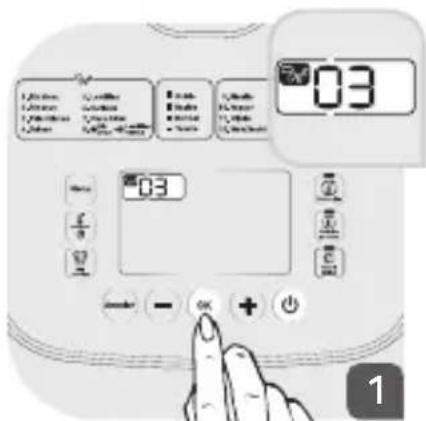
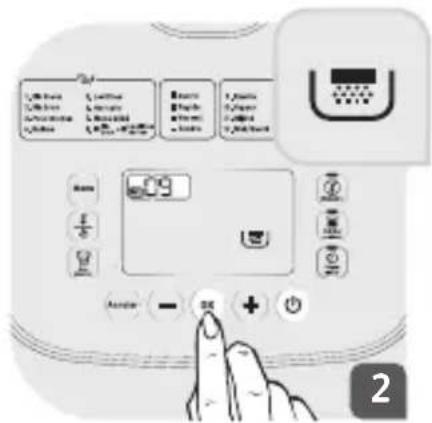
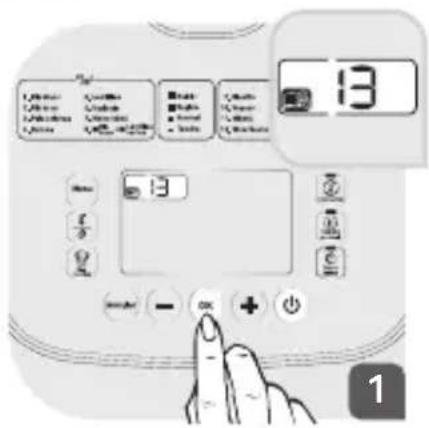
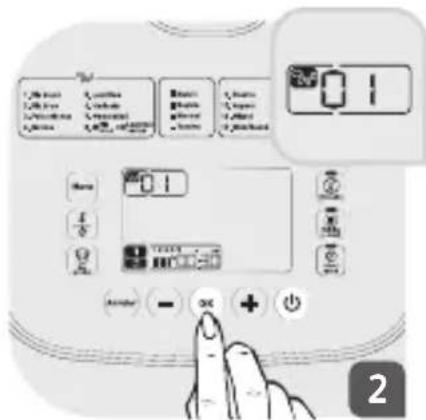
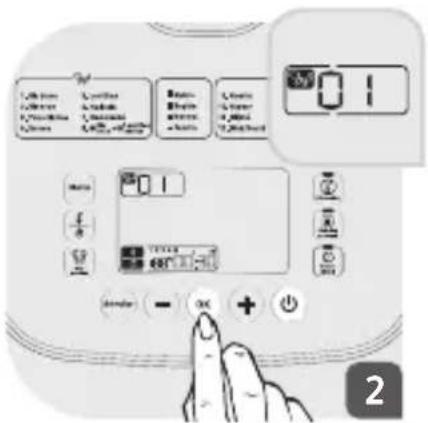
Wählen Sie die Nummer Ihres Programms durch Drücken auf die Tasten und . Drücken Sie auf , um Ihre Auswahl zu bestätigen.

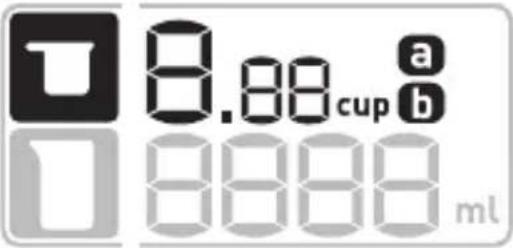
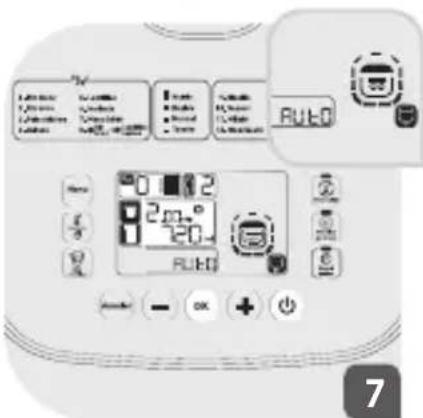
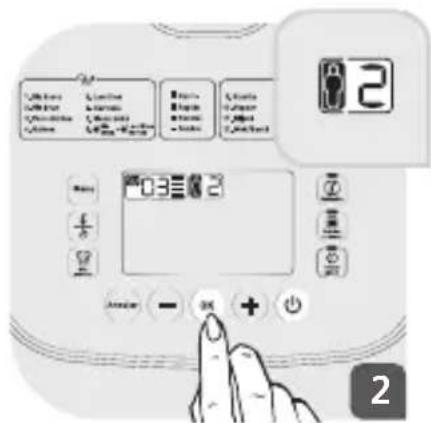
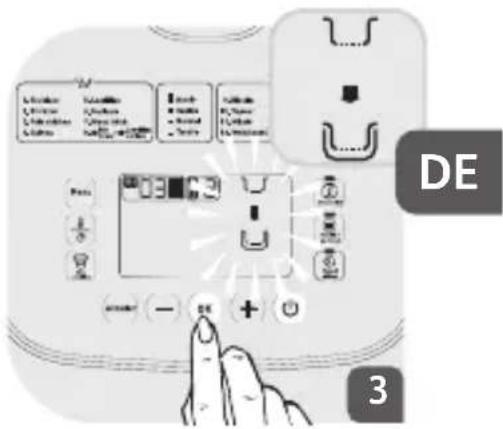
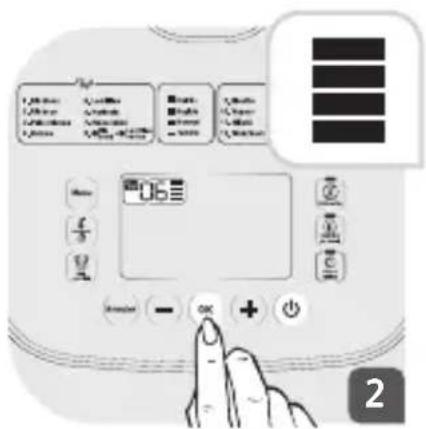
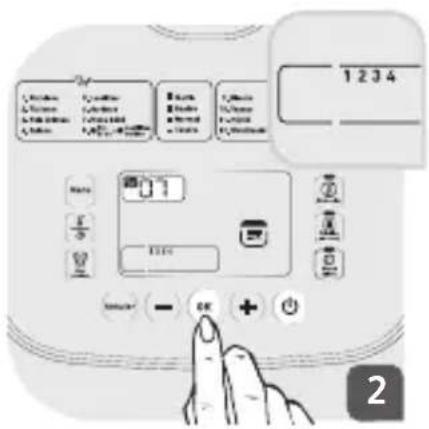
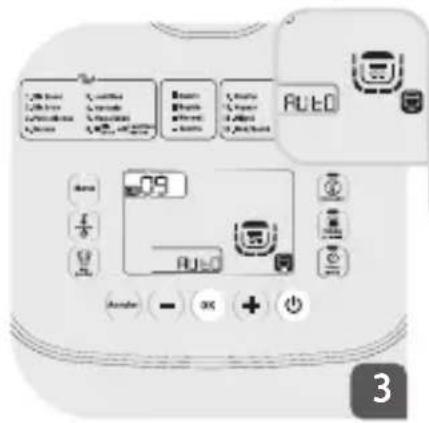
Das Symbol Blinkt auf dem Bildschirm. Es zeigt Ihnen an, welche Körnermenge (Anzahl der Tassen) in den Behälter zu geben ist. Nachdem Sie die Körner in den Behälter gegeben haben, klappen Sie den Deckel nach unten und bestätigen Ihre Auswahl durch Drücken auf ☑.
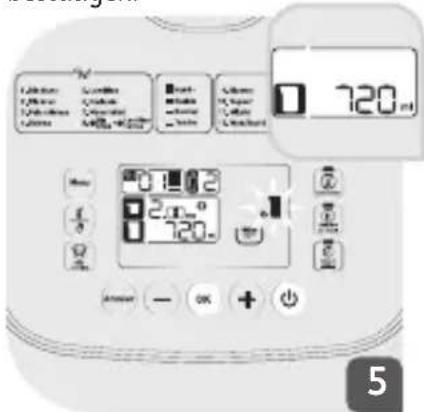
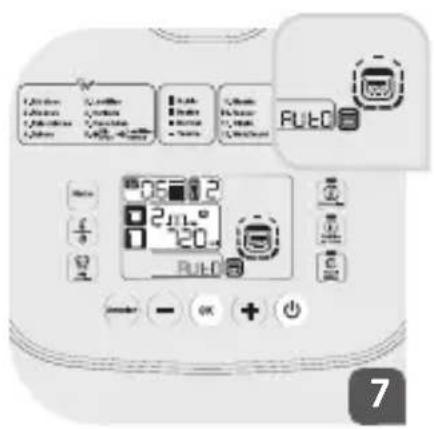
Das Gerät geht in die automatische Kochfunktion über: die Symbole RUEO,
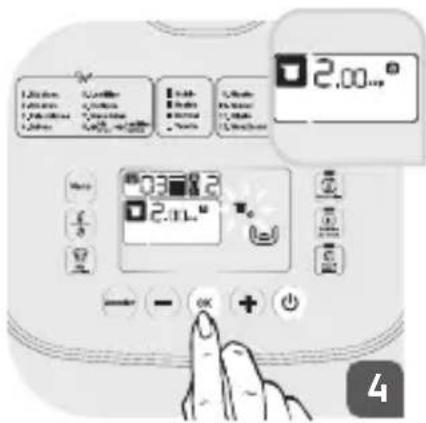
Wählen Sie die gewünschte Textur durch Drücken auf die Tasten und . Drücken Sie auf , um Ihre Auswahl zu bestätigen.
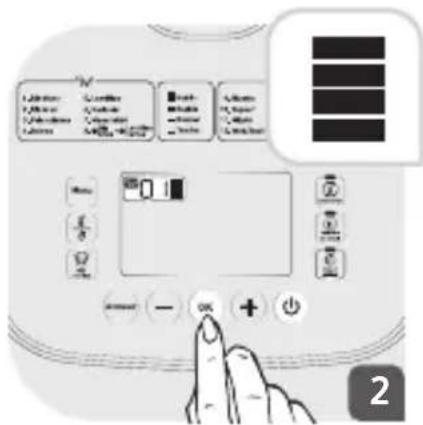
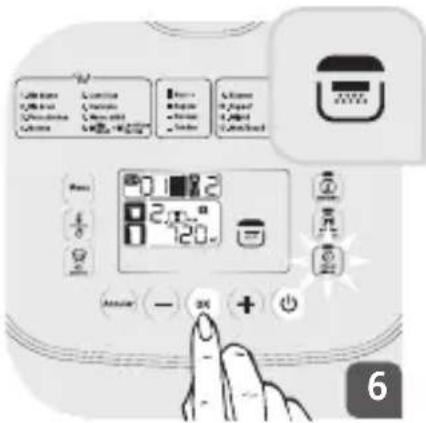
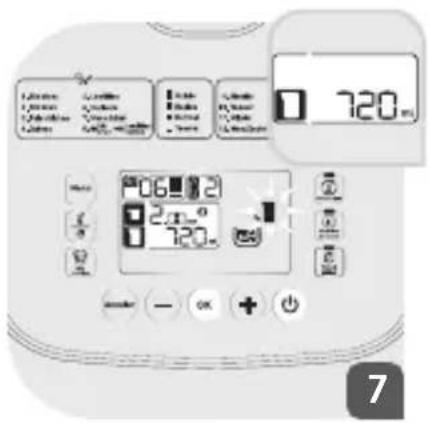
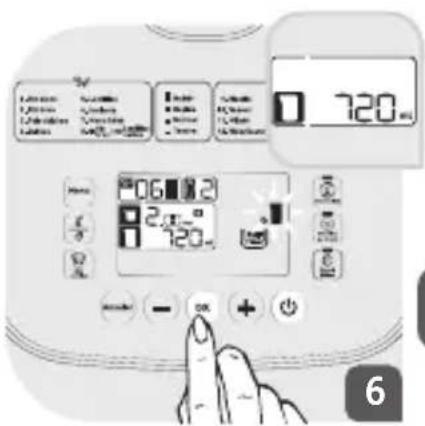
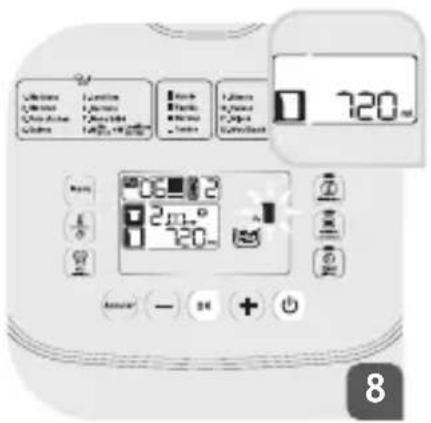
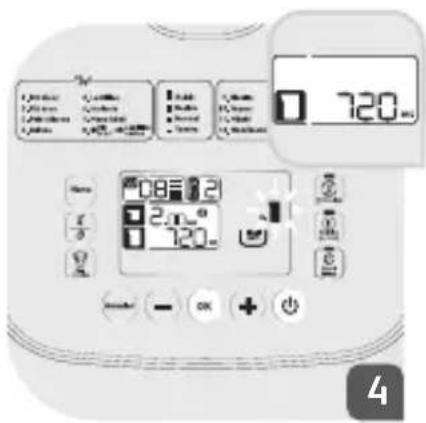
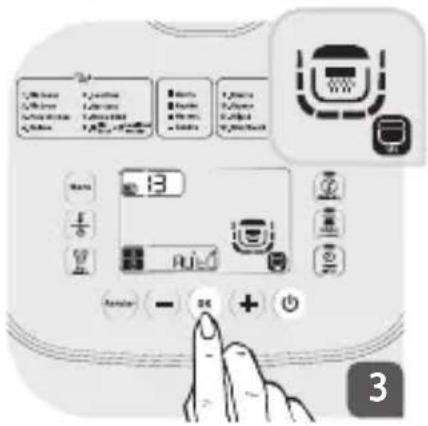
Das Symbol blinkt auf dem Bildschirm. Es zeigt Ihnen die Wassermenge an, die hinzuzufügen ist. Verwenden Sie den mitgelieferten Wassermessbecher, um die exakte Wassermenge zu erhalten. Nachdem Sie das Wasser in den Behälter gegeben haben, klappen Sie den Deckel nach unten und bestätigen Ihre Auswahl durch Drücken Sie auf die Taste
und scheinen auf dem Bildschirm.
Das SymbolAU=0 verschwindet vor dem Ende des Garvorgangs. Das Gerät gibt zwei Signaltöne ab und die verbleibende Garzeit wird auf dem Bildschirm angezeigt. Diese Zeit kann je nach ausgewähltem Programm und gewünschter Textur abweichen. Am Ende des Garvorgangs gibt das Gerät 3 Signaltöne ab und geht in den Warmhalte-Modus über (die Kontrolllampe leuchtet auf).
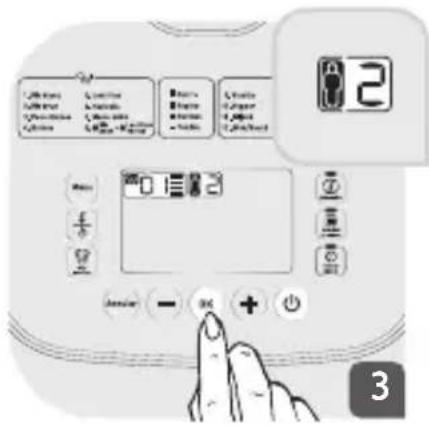
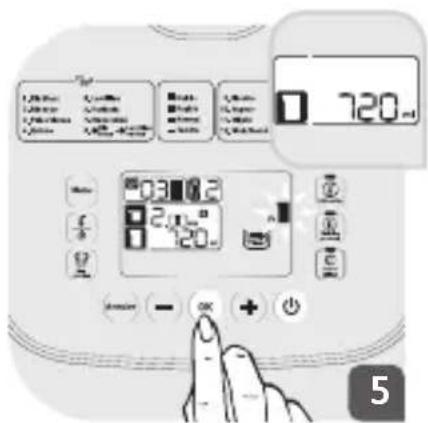
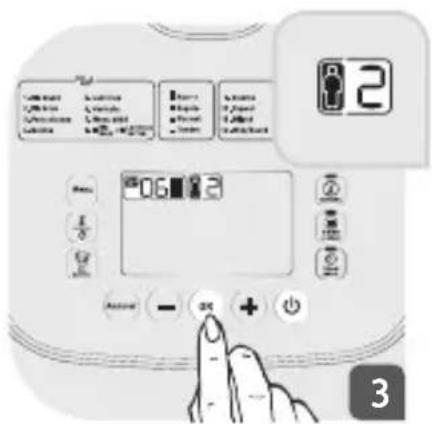
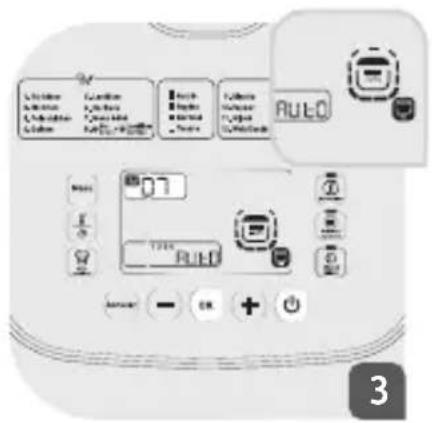
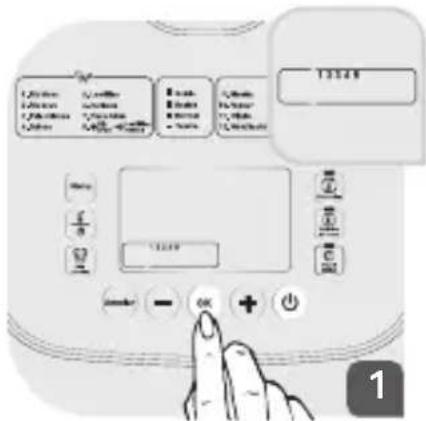
Wählen Sie die Personenanzahl durch Drücken auf die Tasten und . Drücken Sie auf , um Ihre Auswahl zu bestätigen.
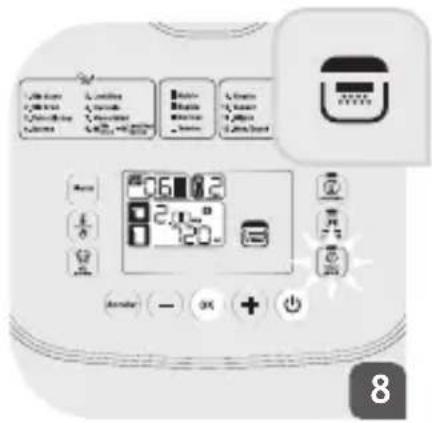
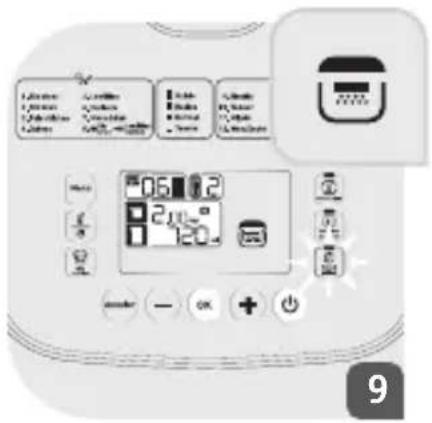
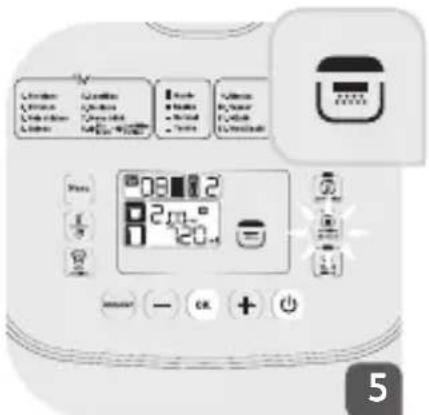
Das Symbol 📋 erscheint auf dem Bildschirm und zeigt Ihnen an, dass Sie den Deckel schließen müssen. Die Taste „Verzögerter Start“ blinkt. Sie können den Garvorgang verzögert (Anleitungen dazu siehe Kapitel „Verzögerter Start“) oder sofort starten. Drücken Sie auf die Taste 🔘, um den Garvorgang sofort zu starten. Das Gerät gibt einen langen Signalton ab, der den Beginn des Garvorgangs anzeigt.
Hinweis: Die Wassermenge für die Zubereitung von Reis kann ganz nach Ihrem Geschmack angepasst werden: Geben Sie etwas mehr Wasser hinzu, um klebrigeren Reis zu erhalten und etwas weniger Wasser, wenn Sie festeren Reis mögen.
Kichererbsen (03)
Wählen Sie die Nummer Ihres Programms durch Drücken auf die Tasten – und ☑ Drücker Sie auf ☺, um Ihre Auswahl zu bestätigen.
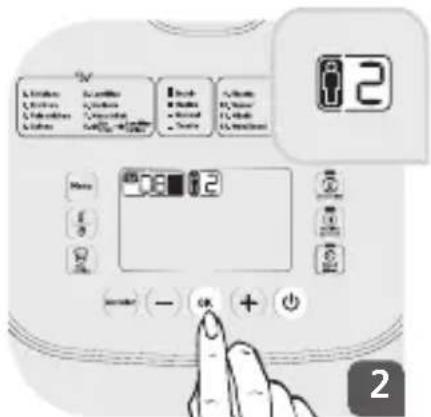
Wählen Sie die Personenanzahl durch Drücken auf die Tasten und +. Drücken Sie auf um Ihre Auswahl zu bestätigen.
Das Gerät zeigt Ihnen an, dass Sie den Einweichkorb in den Behälter stellen müssen. Das Symbol blinkt auf dem Bildschirm.
Das Symbol blinkt auf dem Bildschirm. Es zeigt Ihnen an, welche Körnermenge (Anzahl der Tassen) in den Behälter zu geben ist. Nachdem Sie die Körner in den Behälter gegeben haben, klappen Sie den Deckel nach unten und bestätigen Ihre Auswahl durch Drücken auf ☺
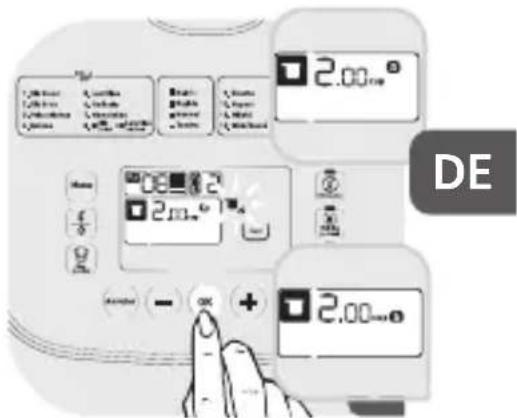
Das Symbol blinkt auf dem Bildschirm. Es zeigt Ihnen die Wassermenge an, die hinzuzufügen ist. Verwenden Sie den mitgelieferten Wassermessbecher, um die exakte Wassermenge zu erhalten. Senken Sie den Deckel ab und bestätigen Sie Ihre Auswahl durch Drücken auf ☐.

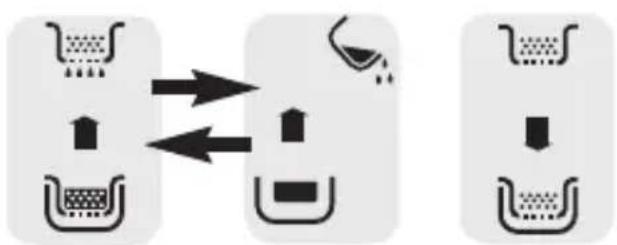
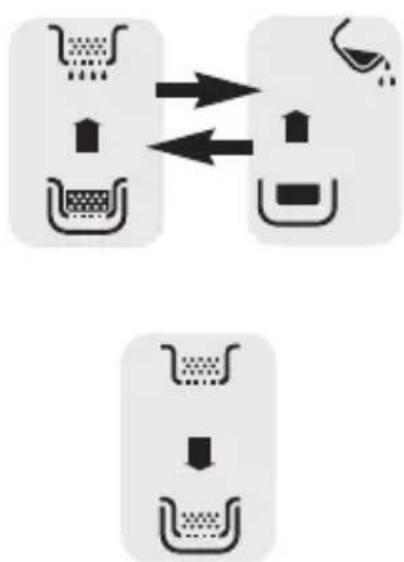
Das Gerät gibt einen langen Signalton ab, der den Beginn des Garvorgangs anzeigt. Das Gerät geht in den automatischen Einweichmodus über: Die Symbole AUTO, und erscheinen auf dem Bildschirm. Am Ende der Einweichzeit gibt das Gerät 2 Signaltöne ab und das untenstehende Symbol blinkt. Es zeigt Ihnen an, dass Sie das Einweichwasser abgießen müssen.
flowchart
graph TD
    A["Shopping Cart"] --> B["Store"]
    C["Shopping Cart"] --> D["Store"]
    E["Shopping Cart"] --> F["Store"]
    G["Shopping Cart"] --> H["Store"]
    I["Shopping Cart"] --> J["Store"]
    K["Shopping Cart"] --> L["Store"]
Nachdem Sie das Einweichwasser abgegossen haben, stellen Sie den Einweichkorb in den Behälter zurück, um die Garphase zu beginnen.
Es zeigt Ihnen die Wassermenge an, die hinzuzufügen ist. Drücken Sie auf, um die Garphase zu beginnen.
Das Symbol erscheint auf dem Bildschirm und zeigt Ihnen an, dass Sie den Deckel schließen müssen. Die Taste „Verzögerter Start“ blinkt. Sie können den Garvorgang verzögert (Anleitungen dazu siehe Kapitel „Verzögerter Start“) oder sofort starten.
Drücken Sie auf die Taste, um den Garvorgang sofort zu starten. Das Gerät gibt einen langen Signalton ab, der den Beginn des Garvorgangs anzeigt.
Das Gerät geht in die automatische Kochfunktion über: Die Symbole RUEO, und erscheinen auf dem Bildschirm.
Das Symbol verschwindet vor dem Ende des Garvorgangs. Das Gerät gibt zwei Signaltöne ab und die verbleibende Garzeit wird auf dem Bildschirm angezeigt. Diese Zeit kann je nach ausgewähltem Programm und gewünschter Textur abweichen.
Am Ende des Garvorgangs läutet das Gerät 3 Mal und geht in den Warmhalte-Modus über (die LED leuchtet auf).
Bohnen (06)

Wählen Sie die Nummer Ihres Programms durch Drücken auf die Tasten und. Drücken Sie auf, um Ihre Auswahl zu bestätigen.
Wählen Sie die gewünschte Textur durch Drücken auf die Tasten – und ① Drücken Sie auf , um Ihre Auswahl zu bestätigen.
Wählen Sie die Personenanzahl durch Drücken auf die Tasten und Drücken Sie auf, um Ihre Auswahl zu bestätigen.
Das Gerät zeigt Ihnen an, dass Sie den Einweichkorb in den Behälter stellen müssen. Das Symbol blinkt auf dem Bildschirm.
Drücken Sie auf 😊, nachdem der Einweichkorb in seine Position gebracht wurde.

Das Symbol blinkt auf dem Bildschirm. Es zeigt Ihnen an, welche Körnermenge (Anzahl der Tassen) in den Behälter zu geben ist. Nachdem Sie die Körner in den Behälter gegeben haben, klappen Sie den Deckel nach unten und bestätigen Ihre Auswahl durch Drücken auf
Das Symbol blinkt auf dem Bildschirm. Es zeigt Ihnen die Wassermenge an, die hinzuzufügen ist. Verwenden Sie den mitgelieferten Wassermessbecher, um die exakte Wassermenge zu erhalten. Senken Sie den Deckel ab und bestätigen Sie Ihre Auswahl durch Drücken auf
Das Gerät gibt einen langen Signalton ab, der den Beginn des Garvorgangs anzeigt. Das Gerät geht in den automatischen Einweichmodus über: Die Symbole RUED, und erscheinen auf dem Bildschirm. Am Ende der Einweichzeit läutet das Gerät 2 Mal und das untenstehende Symbol blinkt. Es zeigt Ihnen an, dass Sie das Einweichwasser abgießen müssen.
flowchart
graph TD
    A["Shopping Cart"] --> B["Handling Box"]
    B --> C["Cleaning Box"]
    C --> D["Clearing Screen"]
Nachdem Sie das Einweichwasser abgegossen haben, stellen Sie den Einweichkorb in den Behälter zurück, um den Garvorgang zu beginnen.
Es zeigt Ihnen die Wassermenge an, die hinzuzufügen ist. Drücken Sie auf ☐, um die Garphase zu beginnen.
Hinweis: Der Sammelbehälter muss zwischen diesen beiden Schritten (Einweichen und Garen) geleert werden, um den Behälter im letzten Garschritt vor Überfüllung zu schützen..
Das Symbol erscheint auf dem Bildschirm und zeigt Ihnen an, dass Sie den Deckel schließen müssen. Die Taste „Verzögerter
Start" blinkt. Sie können den Garvorgang verzögert (Anleitungen dazu siehe Kapitel „Verzögerter Start“) oder sofort starten. Drücken Sie auf die Taste ☎, um den Garvorgang sofort zu starten. Das Gerät gibt einen langen Signalton ab, der den Beginn des Garvorgangs anzeigt. Das Gerät geht in den automatischen Garmodus über: Die Symbole AUEO, ☎ und ☎ erscheinen auf dem Bildschirm. Das Symbol AUEOverschwindet vor dem Ende des Garvorgangs. Das Gerät gibt zwei Signaltöne ab und die verbleibende Garzeit
wird auf dem Bildschirm angezeigt. Diese Zeit kann je nach ausgewähltem Programm und gewünschter Textur abweichen. Am Ende des Garvorgangs läutet das Gerät 3 Mal und geht in den Warmhalte-Modus über (die LED leuchtet auf).
Babymenü (07)
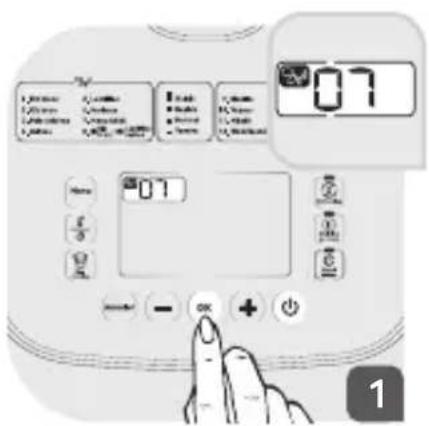
Wählen Sie die Nummer Ihres Programms durch Drücken auf die Tasten und . Drücken Sie auf ☎, um Ihre Auswahl zu bestätigen.
Wählen Sie die dem Alter Ihres Babys entsprechende Nummer durch Drücken auf die Tasten – und +. Drücken Sie auf - um Ihre Auswahl zu bestätigen.
1 => 4 bis 6 Monate
2 => 7 bis 9 Monate
3 => (10 bis 12 Monate)
4 => (13 bis 14 Monate)
Das Gerät geht in den automatischen Garmodus über: Die ausgewählte Nummer sowie die Symbole AUTO, anderscheinen auf dem Bildschirm.
Das Symbol AUTO, verschwindet vor dem Ende des Garvorgangs. Das Gerät gibt zwei Signaltöne ab und die verbleibende Garzeit wird auf dem Bildschirm angezeigt. Diese Zeit kann je nach ausgewähltem Programm und gewünschter Textur abweichen. Am Ende des Garvorgangs gibt das Gerät mehrere Signaltöne ab und geht in den Warmhalte-Modus über (die Kontrolllampe leuchtet auf).
Naturreis + Grüne Linsen (08)
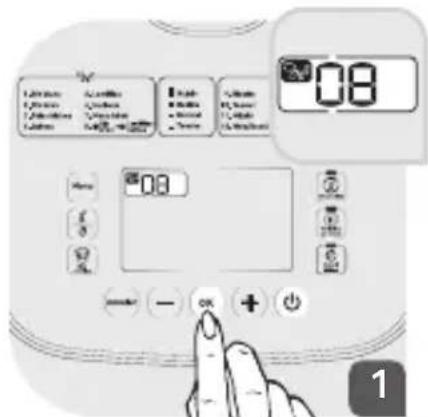
Wählen Sie die Nummer Ihres Programms durch Drücken auf die Tasten und . Drücken Sie auf , um Ihre Auswahl zu bestätigen.
Wählen Sie die Personenanzahl durch Drücken auf die Tasten und Drücken Sie auf, um Ihre Auswahl zu bestätigen.
Das Gerät zeigt an:
a) welche Körnermenge (Anzahl der Tassen) in den Behälter zu geben ist. Nachdem Sie den Naturreis in den Behälter gegeben haben, klappen Sie den Deckel nach unten und bestätigen Ihre Auswahl durch Drücken auf. b) welche Menge an grünen Linsen (Anzahl der Tassen) in den Behälter zu geben ist. Nachdem Sie die grünen Linsen in den Behälter gegeben haben, klappen Sie den Deckel nach unten und bestätigen Ihre Auswahl durch Drücken auf.
Das Symbol blinkt auf dem Bildschirm. Es zeigt Ihnen die Wassermenge an, die hinzuzufügen ist. Verwenden Sie den mitgelieferten Wassermessbecher, um die exakte Wassermenge zu erhalten. Senken Sie den Deckel ab und bestätigen Sie Ihre Auswahl durch Drücken auf
Das Symbol erscheint auf dem Bildschirm und zeigt Ihnen an, dass Sie den Deckel schließen müssen. Die Taste „Verzögerter Start“ blinkt. Sie können den Garvorgang verzögert (Anleitungen dazu siehe Kapitel „Verzögerter Start“) oder sofort starten. Drücken Sie auf die Taste ☉, um den Garvorgang sofort zu starten. Das Gerät gibt einen langen Signalton ab, der den Beginn des Garvorgangs anzeigt.

Das Gerät gibt einen langen Signalton ab, der den Beginn des Garvorgangs anzeigt.
Das Gerät geht in den automatischen Garmodus über: Die Symbole RUTO, und erscheinen auf dem Bildschirm.
Das Symbol AUOverschwindet vor dem Ende
des Garvorgangs. Das Gerät gibt zwei Signaltöne ab und die verbleibende Garzeit wird auf dem Bildschirm angezeigt. Diese Zeit kann je nach ausgewähltem Programm und gewünschter Textur abweichen.
Am Ende des Garvorgangs läutet das Gerät 3 Mal und geht in den Warmhalte-Modus über (die LED leuchtet auf).
| Programmnummer | Programme Automatisch Manuell | Températur (°C) Garzeit | Verzögerter Start | ||||||
| Standard | Einstellbare Temperatur | Standard | Einstellbare Zeit | ||||||
| 9 | Weißer Pilawreis Risotto | 1 Automatisch Automatisch Automatisch Automatisch Automatisch Automatisch Automatisch Automatisch Automatisch Automatisch Automatisch Automatisch Automatisch Automatisch Automatisch Automatisch Automatisch Automatisch Automatisch Automatisch Automatisch Automatisch Automatisch Automatisch Automatisch Automatisch Automatisch Automatisch Automatisch Automatisch Automatisch Automatisch Automatisch Automatisch Automatisch Automatisch Automatisch Automatisch Automatisch Automatisch Automatisch Automatisch Automatisch Automatisch Automatisch Automatisch Automatisch Automatisch Automatisch Automatisch Automisch Automatisch Automatisch Automatisch Automatisch Automatisch Automisch Automatisch Automisch Automisch Automisch Automisch Automisch Automisch Automisch Automisch Automisch Automisch Automisch Automisch Automisch Automisch Automisch Automisch Automisch Automisch Automisch Automisch Automisch Automisch Automisch Automisch Automisch Automisch Automisch Automisch Automisch Automisch Automisch Automisch Automisch Automisch Automisch Automisch Automisch Automisch Automisch Automisch Automisch Automisch Automisch Automisch Automisch Automisch Automisch Automisch Automisch Automisch Automich Automisch Automisch Automisch Automisch Automisch Automisch Automisch Automisch Automisch Automisch Automisch Automisch Automisch Automisch Automisch Automisch Automisch Automisch Automisch Automisch Automisch Automisch Automisch Automisch Automisch Automisch Automisch Automisch Automisch Automisch Automisch Automisch Automisch Automisch Automisch Automisch Automisch Automisch Automisch Automisch Automisch Automisch Automisch Automisch Automisch Automisch Automisch Automisch Automisch Automisch Automisch Automisch Automisch Automisch Automisch Automisch Automisch Automisch Automisch Automisch Automisch Automisch Automisch Automisch Automisch Automisch Automisch Automisch Automisch Automisch Automisch Automisch Automisch Automisch Automisch Automisch Automisch Automisch Automisch Automisch Automisch Automisch Automisch Automisch Automisch Automisch Automisch Automisch Automisch Automisch Automisch Automisch Automisch Automisch Automisch Automisch Automisch Automisch Automisch Automischer Automisch Automisch Automisch Automisch Automisch Automisch Automisch Automisch Automisch Automisch Automisch Automisch Automisch Automisch Automisch Automisch Automisch Automisch Automisch Automisch Automisch Automisch Automisch Automisch Automisch Automisch Automisch Automisch Automisch Automisch Automisch Automisch Automisch Automisch Automisch Automisch Automisch Automisch Automisch Automisch Automisch Automisch Automisch Automisch Automisch Automisch Automisch Automisch Automisch Automisches Automisch Automisch Automisch Automisch Automisch Automisch Automisch Automisch Automisch Automisch Automisch Automisch Automisch Automisch Automisch Automisch Automisch Automisch Automisch Automisch Automisch Automisch Automisch Automisch Automisch Automisch Automisch Automisch Automisch Automisch Automisch Automisch Automisch Automisch Automisch Automisch Automisch Automisch Automisch Automisch Automisch Automisch Automisch Automisch Automisch Automisch Automisch Automisch Automisch Automische Automisch Automisch Automisch Automisch Automisch Automisch Automisch Automisch Automisch Automisch Automisch Automisch Automisch Automisch Automisch Automisch Automisch Automisch Automisch Automisch Automisch Automisch Automisch Automisch Automisch Automisch Automisch Automisch Automisch Automisch Automisch Automisch Automisch Automisch Automisch Automisch Automisch Automisch Automisch Automisch Automisch Automisch Automisch Automisch Automisch Automisch Automisch Automisch Automisch Automuchim, Automisch Automisch Automisch Automisch Automisch Automisch Automisch Automisch Automisch Automisch Automisch Automisch Automisch Automisch Automisch Automisch Automisch Automisch Automisch Automisch Automisch Automisch Automisch Automisch Automisch Automisch Automisch Automisch Automisch Automisch Automisch Automisch Automisch Automisch Automisch Automisch Automisch Automisch Automisch Automisch Automisch Automisch Automisch Automisch Automisch Automisch Automisch Automisch Automisch Automusch Automisch Automisch Automisch Automisch Automisch Automisch Automisch Automisch Automisch Automisch Automisch Automisch Automisch Automisch Automisch Automisch Automisch Automisch Automisch Automisch Automisch Automisch Automisch Automisch Automisch Automisch Automisch Automisch Automisch Automisch Automisch Automisch Automisch Automisch Automisch Automisch Automisch Automisch Automisch Automisch Automisch Automisch Automisch Automisch Automisch Automisch Automisch Automisch Automisch Automi-30000000000000000000000000000000000000000000000000000000000000000000000000000000000000000000000000000 | |||||||
| 10 Dampf 1 Automatisch Automatisch Automatisch Automatisch Automatisch Automatisch Automatisch Automatisch Automatisch Automisch Automisch Automisch Automisch Automisch Automisch Automisch Automisch Automisch Automisch Automisch Automisch Automisch Automisch Automisch Automisch Automisch Automisch Automisch Automisch Automisch Automisch Automisch Automisch Automisch Automisch Automisch Automisch Automisch Automisch Automisch Automisch Automisch Automisch Automisch Automisch Automisch Automisch Automisch Automisch Automisch Automisch Automisch Automisch Automisch Automisch Automisch Automisch AutomichAutomisch Automisch Automisch Automisch Automisch Automisch Automisch Automisch Automisch Automisch Automisch Automisch Automisch Automisch Automisch Automisch Automisch Automisch Automisch Automisch Automisch Automisch Automisch Automisch Automisch Automisch Automisch Automisch Automisch Automisch Automisch Automisch Automisch Automisch Automisch Automisch Automisch Automisch Automisch Automisch Automisch Automisch Automisch Automisch Automisch Automisch Automisch Automisch Automisch Automisch Automotive Automation Automation Automation Automation Automation Automation Automation Automation Automation Automation Automation Automation Automation Automation Automation Automation Automation Automation Automation Automation Automation Automation Automation Automation Automation Automation Automation Automation Automation Automation Automation Automation Automation Automation Automation Automation Automation Automation Automation Automation Automation Automation Automation Automation Automation Automation Automation Automation Automation Automation Automation Automation Automation Automation Automation Automation Automation Automation Automation Automation Automation Automation Automation Automation Automation Automation Automation Automation Automation Automation Automation Automation Automation Automation Automation Automation Automation Automation Automation Automation Automation Automation Automation Automation Automation Automation Automation Automation Automation Automation Automation Automation Automation Automation Automation Automation Automation Automation Automation AutomationAutomation Automation Automation Automation Automation Automation Automation Automation Automation Automation Automation Automation Automation Automation Automation Automation Automation Automation Automation Automation Automation Automation Automation Automation Automation Automation Automation Automation Automation Automation Automation Automation Automation Automation Automation Automation Automation Automation Automation Automation Automation Automation Automation Automation Automation Automation Automation Automation Automation Automation Automation Automation Automation Automation Automation Automation Automation Automation Automation Automation Automation Automation Automation Automation Automation Automation Automation Automation Automation Automation Automation Automation Automation Automation Automation Automation Automation Automation Automation Automation Automation Automation Automation Automation Automation Automation Automation Automation Automation Automation Automation Automation Automation Automation Automation Automation Automation Automation Automation Automation Satisfaction Automation Automation Automation Automation Automation Automation Automation Automation Automation Automation Automation Automation Automation Automation Automation Automation Automation Automation Automation Automation Automation Automation Automation Automation Automation Automation Automation Automation Automation Automation Automation Automation Automation Automation Automation Automation Automation Automation Automation Automation Automation Automation Automation Automation Automation Automation Automation Automation Automation Automation Automation Automation Automation Automation Automation Automation Automation Automation Automation Automation Automation Automation Automation Automation Automation Automation Automation Automation Automation Automation Automation Automation Automation Automation Automation Automation Automation Automation Automation Automation Automation Automation Automation Automation Automation Automation Automation Automation Automation Automation Automation Automation Automation Automation Automation Automation Automation Automation Automation Assistance Automation Automation Automation Automation Automation Automation Automation Automation Automation Automation Automation Automation Automation Automation Automation Automation Automation Automation Automation Automation Automation Automation Automation Automation Automation Automation Automation Automation Automation Automation Automation Automation Automation Automation Automation Automation Automation Automation Automation Automation Automation Automation Automation Automation Automation Automation Automation Automation Automation Automation Automation Automation Automation Automation Automation Automation Automation Automation Automation Automation Automation Automation Automation Automation Automation Automation Automation Automation Automation Automation Automation Automation Automation Automation Automation Automation Automation Automation Automation Automation Automation Automation Automation Automation Automation Automation Automation Automation Automation Automation Automation Automation Automation Automation Automation Automation Automation Automation Automation Transportation Automation Automation Automation Transportation Automation Transportation Automation Transportation Automation Transportation Automation Transportation Automation Transportation Automation Transportation Automation Transportation Automation Transportation Automation Transportation Automation Transportation Automation Transportation Automation Transportation Automation Transportation Automation Transportation Automation Transportation Automation Transportation Automation Transportation Automation Transportation Automation Transportation Automation Transportation Automation Transportation Automation Transportation Automation Transportation Automation Transportation Automation Transportation Automation Transportation Automation Transportation Automation Transportation Automation Transportation Automation Transportation Automation Transportation Automation Transportation Automation Transportation Automation Transportation Automation Transportation Automation Transportation Automation Transportation Automation Transportation Automation Transportation Automation Transportation Automation Transportation Automation Transportation Automation Transportation Automation Transportation Automation Transportation Automation Transportation Automation Transportation Automation Transportation Automation Transportation Automation Production Automation Production Automation Production Automation Production Automation Production Automation Production Automation Production Automation Production Automation Production Automation Production Automation Production Automation Production Automation Production Automation Production Automation Production Automation Production Automation Production Automation Production Automation Production Automation Production Automation Production Automation Production Automation Production Automation Production Automation Production Automation Production Automation Production Automation Production Automation Production Automation Production Automation Production Automation Production Automation Production Automation Production Automation Production Automation Production Automation Production Automation Production Automation Production Automation Production Automation Production Automation Production Automation Production Automation Production Automation Production Automation Production Automation Production Automation Production Automation Production Automation Production Automation Product Production Automation Production Automation Production Automation Production Automation Production Automation Production Automation Production Automation Production Automation Production Automation Production Automation Production Automation Production Automation Production Automation Production Automation Production Automation Production Automation Production Automation Production Automation Production Automation Production Automation Production Automation Production Automation Production Automation Production Automation Production Automation Production Automation Production Automation Production Automation Production Automation Production Automation Production Automation Production Automation Production Automation Production Automation Production Automation Production Automation Production Automation Production Automation Production Automation Production Automation Production Automation Production Automation Production Automation Production Automation Production Automation Production Automation Production Automation Production Automation Production Automation ProductionAutomation Production Automation Production Automation Production Automation Production Automation Production Automation Production Automation Production Automation Production Automation Production Automation Production Automation Production Automation Production Automation Production Automation Production Automation Production Automation Production Automation Production Automation Production Automation Production Automation Production Automation Production Automation Production Automation Production Automation Production Automation Production Automation Production Automation Production Automation Production Automation Production Automation Production Automation Production Automation Production Automation Production Automation Production Automation Production Automation Production Automation Production Automation Production Automation Production Automation Production Automation Production Automation Production Automation Production Automation Production Automation Production Automation Production Automation Production Automation Production Automation Production Automation Production automation production production production production production production production production production production production production production production production production production production production production production production production production production production production production production production production production production production production production production production production production production production production production production production production production production production production production production production production production production production production production production production production production production production production production production production production production production production production production production production production production production production production production production production production production production production production production production production production production production production production production product production production product production product production product production product production product production product production product production product production product production product production product production product production product production product production product production product production product production product production product production product production product production product production product production product production product production product production product production product production product production product production product production product production product production product production product production product production product production product production product production product production product production product production product production product production product production product production product production product production product production product production production product production product production product production product production product production product production product production product production product production product production product production product production product production product production product production product production product production product production product production product production product production product production product production product production product production product production product production product production product production product production product production product production product production product production product production product production product production product production product production product production product production product production product production product production product production product production product production product product production product production product production product production product production product production product production product production product production product production product production product production product production product production product production product production product production product production product production product production product production product production product production product production product production product production product production product production product production product production product production product production product production product production product production product production product production product production product production product production product production product production product production product production product production product production product production product production product production product product production product product production product production product production product production product production product production product production product production product production product production product production product production product production product production product production product production product production product production product production product production product production product production product production product production product production product production product production product production product production product production product production product production product production product production product production product production product production product production product production product production product production product production product production product production product production product production product production product production production product production production product production product production product production product production product production product production product production product production product production product production product production product production product production product production product production product production product production product production product production product production product production product production product production product production product production product production product production product production product production product production product production product production product production product production product production product production product production product production product production product production product production product production product production product production product production product production product productionproduct production product production product production product production product production product production product production product production product production product production product production product production product production product production product production product production product production product production product production product production product production product production product production product production product production product production product production product production product production product production product production product production product production product production product production product production product production product production product production product production product production product production product production product production product production product production product production product production product production product productionproduct production product productionproduct productionproduct productionproduct productionproduct productionproduct productionproduct productionproduct productionproduct productionproduct productionproduct productionproduct productionproduct productionproduct productionproduct productionproduct productionproduct productionproduct productionproduct productionproduct productionproduct productionproduct productionproduct productionproduct productionproduct productionproduct productionproduct productionproduct productionproduct productionproduct productionproduct productionproduct productionproduct productionproduct productionproduct productionproduct productionproduct productionproduct productionproduct productionproduct productionproduct productionproduct productionproduct productionproduct productionproduct productionproduct productionproduct productionproduct productionproduct productionproduct productionproduct productionduration dimension: 250000000000000000000000000000000000000000000000000000000000000000000000000000000000000000000000000001000000000000000000000000000000000000000000000000000000000000000000000000000000000000000000000000000600000000000000000000000000000000000000000000000000000000000000000000000000000000000000000000000000080000000000000000000000000000000000000000000000000000000000000000000000000000000000000000000000000004000000000000000000000000000000000000000000000000000000000000000000000000000000000000000000000000000500000000000000000000000000000000000000000000000000000000000000000000000000000000000000000000000000850000000000000000000000000000000000000000000000000000000000000000000000000000000000000000000000000055555555555555555555555555555555555555555555555555555555555555555555555555555555555555555555555555551555555555555555555555555555555555555555555555555555555555555555555555555555555555555555555555555555 | |||||||||
Wählen Sie die Nummer Ihres Programms durch Drücken auf die Tasten und . Drücken Sie auf , um Ihre Auswahl zu bestätigen.
Das Symbol erscheint auf dem Bildschirm und Sie können Ihre Zutaten hinzugeben. Drücken Sie anschließend auf die Taste Die Taste „Verzögerter Start“ blinkt. Sie können den Garvorgang für die in der Tabelle angegebenen Funktionen verzögert (Anleitungen dazu siehe Kapitel „Verzögerter Start“) oder sofort starten. Drücken Sie auf die Taste, um den Garvorgang sofort zu starten.
Das Gerät geht in den automatischen Garmodus über: Die Symbole AUTO, und erscheinen auf dem Bildschirm. Am Ende des Garvorgangs läutet das Gerät 3 Mal und geht in den Warmhalte-Modus über (die LED leuchtet auf).
Dampfgaren (10) / Schmoren (11) / Aus dem Wok (12) / Backen (1
Suppen (15) / Hefeteig (16) / Desserts (17) / Frischkäse (18) /
Joghurt (19) / Konfitüre (20)
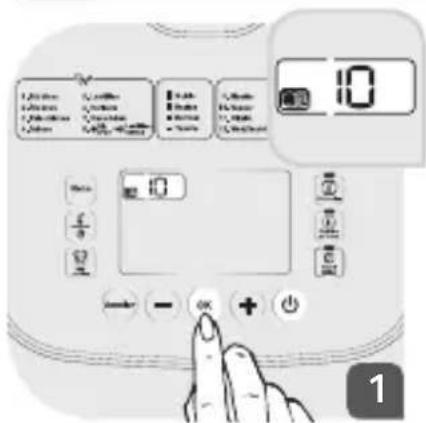
Wählen Sie die Nummer Ihres Programms durch Drücken auf die Tasten – und +. Drücken Sie auf, um Ihre Auswahl zu bestätigen.
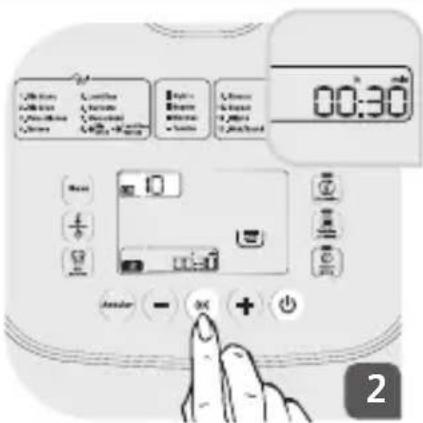
Die voreingestellte Zeit wird auf dem Bildschirm angezeigt. Sie können die Zeit durch Drücken auf die Taste anpassen.
EDrücken Sie anschließend auf die Tasten – und ④, um die Garzeit einzustellen. Drücken Sie auf , um Ihre Auswahl zu bestätigen.
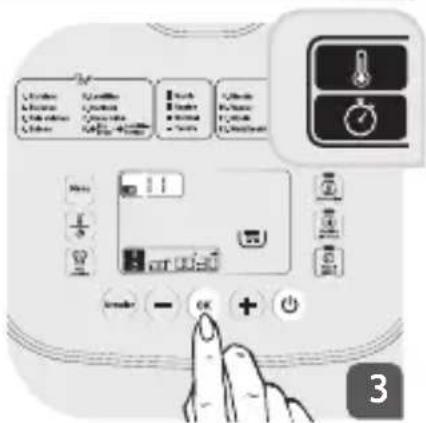
Für bestimmte Funktionen können Sie die Temperatur (siehe Tabelle) vor der Garzeit einstellen. Drücken Sie auf die Taste und stellen Sie die gewünschte Temperatur durch Drücken auf die Tasten – und ein.
Drücken Sie auf ☉, um Ihre Auswahl zu bestätigen. Danach nehmen Sie die Einstellung der Garzeit wie oben beschrieben vor.
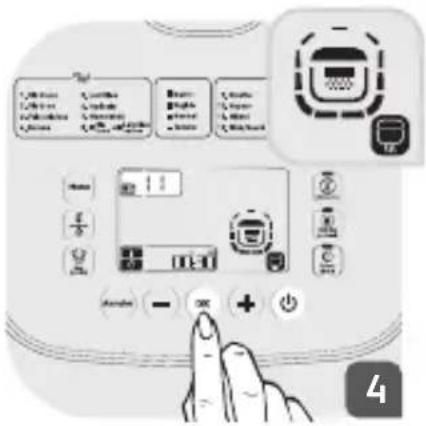
Das Symbol erscheint auf dem Bildschirm und Sie können Ihre Zutaten hinzugeben. Drücken Sie anschließend auf die Taste. Die Taste „Verzögerter Start“ blinkt. Sie können den Garvorgang für die in der Tabelle angegebenen Funktionen verzögert (Anleitungen dazu siehe Kapitel „Verzögerter Start“) oder sofort starten. Drücken Sie auf die Taste ☺, um den Garvorgang sofort zu starten.
Das Gerät gibt einen langen Signalton ab, der den Beginn des Garvorgangs anzeigt. Das Symbol erscheint auf dem Bildschirm. Die verbleibende Garzeit und die Temperatur (wenn verfügbar) werden ebenfalls auf dem Bildschirm angezeigt.
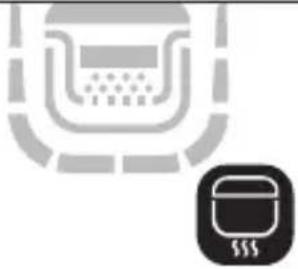
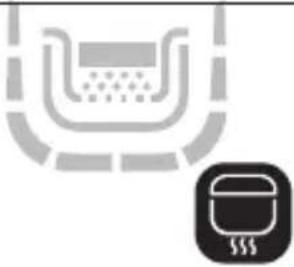
Für all diese Funktionen, mit Ausnahme von „Aus dem Wok“ und „Konfitüre“, erscheint das Symbol auf dem Bildschirm. Es zeigt Ihnen dass, dass der Deckel geschlossen bleiben muss.
Für die Funktionen „Aus dem Wok“ und „Konfitüre“ erscheint das Symbol auf dem Bildschirm und zeigt Ihnen an, dass der Deckel geöffnet bleiben muss.
Am Ende des Garvorgangs läutet das Gerät 3 Mal und geht in den Warmhalte-Modus über (die LED leuchtet auf).
Hinweis: Für die Funktion „Konfitüre“ muss der Deckel geöffnet bleiben. Kochen Sie nicht mehr als 500 g Früchte.
AUSWAHL DER ZUTATEN FÜR DEN JOGHURT
Die Milch
Welche Milch ist geeignet?
Sofern nichts anderes angegeben ist, basieren all unsere Rezepte auf Kuhmilch. Die Verwendung anderer Milchsorten ist möglich (z. B. Ziegen- oder Schafsmilch, Sojamilch oder andere Milchsorten pflanzlichen Ursprungs), jedoch kann die Konsistenz des Joghurts je nach verwendeter Milchsorte variieren. Rohmilch, Milch mit langer Haltbarkeit und alle nachfolgend beschriebenen Milchsorten sind für die Verwendung in unserem Gerät geeignet:
- Sterilisierte Milch mit langer Haltbarkeit:
Haltbare Vollmilch ergibt festeren Joghurt. Teilentrahmte Milch ergibt weniger festen Joghurt. Eine Alternative besteht darin, teilentrahmte Milch zu verwenden und einen oder zwei Esslöffel Milchpulver hinzuzufügen.
Diese Milchsorte ergibt cremigeren Joghurt mit einer dünnen Schicht auf der Oberfläche.
• Rohmilch (Frischmilch):
Diese Milchsorte muss vorab gekocht werden. Es wird auch empfohlen, diese Milch lange kochen zu lassen. Es wäre gefährlich, diese Milchsorte ohne vorheriges Kochen zu verwenden. Lassen Sie die Milch anschließend abkühlen, bevor Sie sie in das Gerät geben. Joghurtkulturen auf Basis von Rohmilch werden nicht empfohlen.
- Milchpulver:
Diese Milchsorte ergibt sehr cremigen Joghurt. Folgen Sie stets den Herstellerangaben auf der Verpackung.
Wählen Sie eine Vollmilch mit der von Ihnen gewünschten Haltbarkeit.
Wenn Sie Frischmilch (Rohmilch) oder nicht-pasteurisierte Milch verwenden, bringen Sie diese
zum Kochen, lassen Sie sie anschließend abkühlen und entfernen Sie die Schicht von der Oberfläche.
Fermentationsmittel Für den Joghurt
Das Fermentationsmittel kann sein:
- ein Naturjoghurt aus dem Supermarkt mit einem möglichst langen Haltbarkeitsdatum: So wird Ihr Joghurt fester und enthält mehr aktive Fermentationsmittel.
- ein lyophilisiertes Fermentationsmittel.
In diesem Fall beachten Sie bitte die in der Gebrauchsanweisung des Fermentationsmittels angegebene Aktivierungszeit. Diese Mittel sind in Supermärkten, Apotheken und einigen Reformhäusern erhältlich.
- ein von Ihnen kürzlich zubereiteter Joghurt – hierbei muss es sich um einen
Naturjoghurt handeln, den Sie zuletzt zubereitet haben. Diesen Vorgang nennt man Kultivieren. Nach fünf Kultivierungszyklen verliert der verwendete Joghurt seine aktiven Fermentationsmittel und kann an Festigkeit verlieren. Beginnen Sie mit einem Joghurt aus dem Supermarkt oder einem lyophilisierten Fermentationsmittel.
Lassen Sie die Milch nach dem Kochen auf Raumtemperatur abkühlen, bevor Sie das Fermentationsmittel hinzufügen. Die Eigenschaften der Mittel können durch zu hohe Temperaturen zerstört werden.
Fermentationsdauer
- Gemäß den Zutaten der verwendeten Basis und dem gewünschten Ergebnis dauert die Fermentation von Joghurt zwischen 6 und 12 Stunden.
DE

line
| Phase | Duration (Std.) | | :--- | :--- | | Flüssig | 6 | | Mild | 7 | | Flüssig | 8 | | Mild | 9 | | Flüssig | 10 | | Fest | Std. 12 | | Sauer | Std. |- Stellen Sie den Joghurt nach dem Garvorgang für mindestens 4 Stunden in den Kühlschrank und verzehren Sie ihn innerhalb von 7 Tagen.
Teig (13)
1 Wählen Sie die Nummer Ihres Programms durch Drücken auf die Tasten und . Drücken Sie auf, um Ihre Auswahl zu bestätigen.
Hinweis: Es gibt 2 Schritte für diese Funktion, das Aufkochen von Wasser und das Kochen von Teigwaren.

2 Sie haben die Möglichkeit, die Garzeit Ihrer Teigwaren zu ändern. Drücken Sie auf die Taste 18 Drücken Sie anschließend auf die Tasten – und +um die Garzeit einzustellen. Schließen Sie den Deckel. Drücken Sie auf ^6 , um Ihre Auswahl zu bestätigen. Sie gehen nun zu Schritt 1 über.
3 Schritt 1: Wasser aufkochen Die Symbole und erscheinen auf dem Bildschirm. Wenn die Siedetemperatur erreicht ist, gibt das Gerät 2 Signaltöne alle 10 Sekunden ab, bis Sie den Deckel öffnen und die Teigwaren hinzufügen. Sie können nun zum zweiten Schritt übergehen.
4 Schritt 2: Teigwaren kochen Öffnen Sie den Deckel und geben Sie die Teigwaren in den Behälter. Drücken Sie anschließend auf 🔒, um die Garphase zu beginnen.
Um ein Überlaufen zu vermeiden, muss der Deckel während dieser Phase geöffnet bleiben.
Das Gerät geht in die Kochfunktion über. Die Symbole 📋 und 📋 erscheinen auf dem Bildschirm. Die Garzeit wird auf dem
Bildschirm angezeigt und der Timer beginnt zu laufen.
Nach Ende der Garzeit gibt das Gerät 3 Signaltöne ab.
Für diese Funktion gibt es keine Warmhalteoption.
MEINE REZEPTE
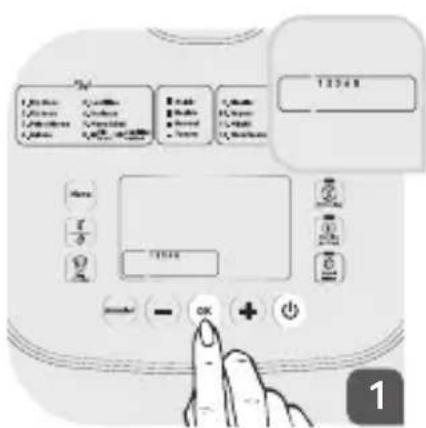
Sie haben die Möglichkeit, 5 Einstellungen zu speichern. Sie können ein bestehendes Menü oder Ihre eigenen Einstellungen (Zeit und Temperatur) speichern. Drücken Sie auf die Taste 🎨 . Wenn die Nummer 1 blinkt, drücken Sie auf 😊, um in das erste Rezeptprogramm zu gelangen.
Auf dem Bildschirm werden das Standardmenü 01 sowie die voreingestellte Temperatur und Garzeit angezeigt, wenn Sie Ihre eigenen Einstellungen speichern möchten.
Auswahl eines bestehenden Menüs
Durch Drücken auf die Tasten und und können Sie die Programmnummer ändern und das gewünschte Programm auswählen. Sie können die Zeit
und Temperatur (sofern verfügbar, siehe Tabelle) durch Drücken auf ändern und durch Drücken auf die Tasten und einstellen. Nachdem Sie Ihre
Parameter eingestellt haben, drücken Sie auf um Ihr Rezept zu starten.
Auswahl Ihrer eigenen Einstellungen
Wenn die Nummer 1 blinkt, drücken Sie auf, um in das erste Rezeptprogramm zu gelangen.
Das Standardmenü sowie die voreingestellte Temperatur und Garzeit werden auf dem Bildschirm angezeigt. Drücken Sie auf 12 , um Ihre eigenen Parameter einzustellen. Die
Menünummer verschwindet und Sie können die Temperatur und Zeit durch Drücken auf die Tasten – und ändern. Nachdem Sie Ihre Parameter eingestellt haben, drücken Sie auf ☺, um Ihr Rezept zu starten.
Hinweis: Sie können die Nummer von „Meine Rezepte“ durch Drücken auf die Tasten und ändern.
AUFWÄRMFUNKTION
Diese Funktion ist ausschließlich für das Aufwärmen gekochter Lebensmittel vorgesehen.
Drücken Sie auf die Taste . Die Kontrolllampen der Tasten , und blinken.
Die voreingestellte Temperatur und Garzeit erscheinen auf dem Bildschirm. Wenn Sie diese Einstellungen ändern möchten, drücken Sie auf die Taste und drücken Sie auf die Tasten und , um die Temperatur einzustellen.
Hinweis: Für die Aufwärmfunktion stehen Ihnen lediglich 2 Temperaturen zur Verfügung (80 und 100°C).
Drücken Sie nach dem Ändern der Temperatur auf . Zur Einstellung Ihrer Garzeit drücken Sie auf die Tasten und.
Nachdem Sie Ihre Parameter eingestellt haben, drücken Sie auf ^ca , um die Aufwärmfunktion zu starten.
Das Gerät gibt einen langen Signalton ab, der den Beginn des Aufwärmvorgangs anzeigt. Die Kontrolllampe leuchtet auf. Das Symbol 📁 scheint auf dem Bildschirm. Die verbleibende Zeit wird auf dem Bildschirm angezeigt.
Am Ende des Aufwärmvorgangs gibt das Gerät 3 Signaltöne ab und geht in den Warmhalte-Modus über (die Kontrolllampe leuchtet auf).
ACHTUNG
Kalte Lebensmittel dürfen die Hälfte des Gerätevolumens nicht überschreiten. Wenn sich zu viele Lebensmittel im Gerät befinden, kann ein gleichmäßiges Aufwärmen nicht gewährleistet werden. Die wiederholte Verwendung der Aufwärmfunktion für zu wenige Lebensmittel kann diese verbrennen und eine harte Schicht auf dem Behälterboden. Es wird empfohlen, grobes Porridge nicht aufzuwärmen, da dieses mehlig werden kann.
Es wird empfohlen, die Lebensmittel während des Aufwärmvorgangs umzurühren, um eine gleichmäßige Temperaturverteilung zu erreichen.
Bitte verwenden Sie die Aufwärmfunktion niemals zum Auftauen von Lebensmitteln.
Bitte verwenden Sie die Aufwärmfunktion niemals zum Aufwärmen von tiefgefrorenen Lebensmitteln.
WARMHALTEFUNKTION
- Sie können die Warmhaltefunktion manuell auswählen.
Drücken Sie auf die Taste, die Kontrolllampe blinkt grün. Drücken Sie anschließend auf die Taste, um Ihre Auswahl zu bestätigen.
Das Gerät gibt einen langen Signalton ab, der den Beginn des Warmhaltevorgangs anzeigt und die Kontrolllampe leuchtet auf. Die Warmhaltezeit wird auf dem Bildschirm angezeigt.
- Sie können die automatische Warmhaltefunktion ausschließlich für den nächsten Garvorgang deaktivieren.
- Drücken Sie 5 Sekunden lang auf die Taste, um die Warmhaltefunktion zu deaktivieren. Sie können die Warmhaltefunktion auch durch langes Drücken auf die Taste „Abbrechen“ deaktivieren. Drücken Sie 5 Sekunden lang auf die Taste, um die automatische Warmhaltefunktion abzubrechen. Das Gerät gibt einen langen Signalton ab und die grüne Kontrolllampe der Taste leuchtet auf. Wenn Sie die Warmhaltefunktion wieder aktivieren möchten, drücken Sie erneut 5 Sekunden lang auf die Taste. Die grüne Kontrolllampe leuchtet auf.
Empfehlung: Um den besten Geschmack Ihrer Speisen zu gewährleisten, wird empfohlen, die Speisen nicht länger als 12 Stunden warmzuhalten.
Hinweis: Bitte verwenden Sie diese Funktion niemals zum Auftauen von Lebensmitteln.
VERZÖGERTER START-FUNKTION
- Um die Funktion „Verzögerter Start“ zu nutzen, müssen Sie bereits ein Menü und die Garzeit wählen. Wenn Sie diese Einstellungen ausgewählt haben, blinkt die Kontrolllampe vor dem Beginn des Garvorgangs.
Drücken Sie anschließend auf die Taste ^2 , die Garzeit blinkt auf dem Bildschirm. Für die automatischen Kochprogramme wird die voreingestellte Garzeit auf dem Bildschirm angezeigt. Wählen Sie die Zeit für den verzögerten Start durch Drücken auf die Tasten und aus.
Diese programmierte Zeit schließt die Garzeit ein.
REINIGUNG UND INSTANDHALTUNG
- Stellen Sie sicher, dass der Schnellkochtopf vor der Reinigung und Pflege nicht an die Stromversorgung angeschlossen und vollständig abgekühlt ist.
- Es wird nachdrücklich empfohlen, das Gerät nach jeder Benutzung mit einem Schwamm zu reinigen.
- Der Behälter, der Innendeckel, die Messbecher und der Bratwender sind spülmaschinenfest.
Behälter, Dampfkorb, Einweichkorb und Innendeckel
- Nehmen Sie den Behälter aus dem Gerät heraus. Reinigen Sie den Behälter, den Dampfkorb, den Einweichkorb und den Innendeckel mit warmem Wasser, flüssigem Spülmittel und einem Schwamm.
- Verwenden Sie weder Scheuerpulver noch Schwämme mit kratzender Oberfläche.
- Wenn sich Kochrückstände am Boden des Behälters absetzen, füllen Sie Wasser in den Behälter und lassen Sie die Rückstände vor der Reinigung des Behälters einweichen.
- Lassen Sie den Behälter anschließend gut trocknen.
Pflege des Behälters
Beachten Sie bitte sorgfältig die nachfolgenden Anweisungen:
- Um die Qualität des Behälters zu gewährleisten, wird empfohlen, keine Nahrungsmittel im Behälter zu schneiden.
- Stellen Sie sicher, den Behälter immer wieder in den Reiskocher einzusetzen.
- Verwenden Sie den mitgelieferten Plastiklöffel oder einen Holzlöffel. Verwenden Sie keine Utensilien aus Metall, um die Oberfläche des Behälters nicht zu beschädigen.
- Um jedes Korrosionsrisiko zu vermeiden, verwenden Sie keinen Essig.
- Die Oberflächenfarbe des Behälters kann sich nach dem ersten Gebrauch oder nach einem längeren Gebrauch ändern. Diese Farbänderung ist auf die Einwirkung von Dampf und Wasser zurückzuführen und beeinträchtigt weder den Gebrauch des Reiskochers noch Ihre Gesundheit. Die weitere Verwendung ist problemlos möglich.
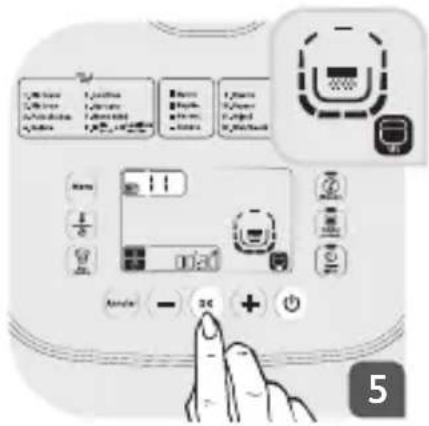
Reinigung des Druckventils
- Ziehen Sie das Druckventil zur Reinigung vom Deckel ab und öffnen Sie es durch Drehen in die von der Markierung „öffnen“ angegebenen Richtung. Trocknen Sie das Ventil nach der Reinigung ab und setzen Sie es wieder in den Deckel ein.
Reinigung und Pflege der anderen Geräteteile
- Reinigen Sie die Außenflächen des Schnellkochtopfs, die Innenseite des Deckels und das Kabel mit einem feuchten Tuch und trocknen Sie die Teile anschließend ab.
- Verwenden Sie keine Scheuermittel.
- Verwenden Sie zur Reinigung der Innenseiten des Gerätegehäuses kein Wasser, da es zu Beschädigungen des Wärmesensors kommen kann.
- Nehmen Sie den Innendeckel nach jedem Gebrauch ab, um anhaltende Lebensmittelgerüche im Gerät zu verhindern. Reinigen Sie den Deckel in warmem Wasser und mit flüssigem Spülmittel.
UMWELTSCHUTZ


Helfen Sie uns, die Umwelt zu schützen!
Ihr Gerät enthält Materialien, die wiederverwertbar sind oder recycelt werden können. Bringen Sie das Gerät in Ihre örtliche Abfallsammelstelle.
TECHNISCHE UNTERSTÜTZUNG
| Beschreibung der Funktionsstörung | Ursachen Lösungen | |
| Eine Kontrolllampe ist aus und das Gerät heizt nicht auf. | Das Gerät ist nicht an das Stromnetz angeschlossen. | Schließen Sie das Gerät an die Steckdose an. Wenn die Lampen nicht dauerhaft aufleuchten und sich das Gerät nicht aufheizt, schicken Sie das Gerät an eine zugelassene Kundendienststelle zur Reparatur. |
| Eine Kontrolllampe ist aus und das Gerät heizt nicht auf. | Verbindungsproblem der Kontrolllampe oder defekte Kontrolllampe. | Schicken Sie das Gerät an eine zugelassene Kundendienststelle zur Reparatur. |
| Entweichender Dampf während des Garvorgangs.. | Der Deckel ist nicht richtig geschlossen. | Öffnen Sie den Deckel und schließen sie ihn erneut. Wenn das Problem weiterhin besteht, schicken Sie das Gerät an eine zugelassene Kundendienststelle zur Reparatur. |
| Das Mikrosicherheitsventil ist nicht richtig eingesetzt. | Stoppen Sie den Garvorgang (Ziehen Sie den Stecker aus der Steckdose!) und überprüfen Sie, ob das Ventil vollständig (mit 2 miteinander verriegelten Teilen) und korrekt eingesetzt ist. | |
| Der Deckel oder die Verbindung des Mikrosicherheitsventils ist beschädigt. | Schicken Sie das Gerät an eine zugelassene Kundendienststelle zur Reparatur. | |
| Der Innendeckel ist nicht richtig eingesetzt. | Entfernen Sie den Innendeckel und setzen Sie ihn anschließend wieder in die richtige Position. Starten Sie den Garvorgang neu. | |
| Der Reis ist nur halbgar oder der Garvorgang dauert zu lang. | Es wurde übermäßig oder unzureichend Wasser für die Menge an Reis verwendet. | Entnehmen Sie die Wassermengen bitte der Referenztabelle. |
| Der Reis ist nur halbgar oder der Garvorgang dauert zu lang. | Er ist noch nicht gar. | Falsche Wassermenge: Entnehmen Sie die Wassermenge bitte dem Rezeptbuch. Geben Sie nach dem Reis immer Wasser in den Behälter. |
| Die automatische Funktion „Warmhalten“ ist defekt (das Gerät heizt nicht auf oder verbleibt in der Kochfunktion). | Die Warmhaltefunktion wurde bei der Einstellung des Geräts versehentlich deaktiviert (siehe Kapitel „Warmhaltefunktion“). | Lesen Sie den Abschnitt „Warmhaltefunktion“ der Bedienungsanleitung. Die automatische Warmhaltefunktion steht für die Funktionen Joghurt, Frischkäse, Dessert und Teigwaren nicht zur Verfügung. Wenn das Problem weiterhin besteht, schicken Sie das Gerät an eine zugelassene Kundendienststelle zur Reparatur. |
| E0 | Der Sensor im oberen Kreislauf ist offen oder es handelt sich um einen Kurzschluss. | Schicken Sie das Gerät an eine zugelassene Kundendienststelle zur Reparatur. |
| E1 | Der Sensor im unteren Kreislauf ist offen oder es handelt sich um einen Kurzschluss. | Stoppen Sie das Gerät und starten Sie das Programm neu. Wenn das Problem weiterhin besteht, schicken Sie das Gerät an eine zugelassene Kundendienststelle zur Reparatur. |
| E3 | Der Behälter befindet sich nicht in der richtigen Position oder ist leer. | Stellen Sie den Behälter in das Gerät, ziehen Sie den Stecker und stecken Sie das Gerät anschließend wieder ein, um das Programm erneut zu starten. |
Hinweis: Wenn der Innenbehälter deformiert ist, verwenden Sie diesen nicht weiter und fordern Sie einen neuen Behälter in einer zugelassenen Kundendienststelle an.