
Discman D-808K - CD-Player SONY - Kostenlose Bedienungsanleitung
Finden Sie kostenlos die Bedienungsanleitung des Geräts Discman D-808K SONY als PDF.

| Produkttyp | Portabler CD-Player (Discman) |
| Modell | Discman D-808K |
| Marke | Sony |
| Abmessungen (B × H × T) | ca. 139 × 31,5 × 159,9 mm (inkl. vorstehender Teile) |
| Gewicht | ca. 315 g (ohne Batterie) |
| Stromversorgung | DC 6 V (Netzadapter), 2,4 V Akku BP-DM1, 2 × AA Alkali-Batterien |
| Leistungsaufnahme | 2,5 W DC (bei eingeschalteter Hintergrundbeleuchtung) |
| Frequenzgang | 20 – 20.000 Hz ±1 dB |
| D/A-Wandlung | 1-Bit Quarz-Zeitachsensteuerung |
| Laserdiode | GaAlAs, Wellenlänge 780 nm, Dauerstrich, <44,6 μW |
| Kopfhörerausgang | 9 mW + 9 mW an 16 Ω (Stereo-Miniklinke) |
| Line-Ausgang | 0,55 V rms an 50 kΩ (Stereo-Miniklinke) |
| Wiedergabemodi | Normal, Intro, Einzeltitel, Programm, Zufallswiedergabe (Shuffle), Wiederholung |
| Klangfunktionen | Bass Boost, DDS (Digital Dynamic Sound) |
| Suchfunktionen | AMS (Automatic Music Sensor), Vor-/Rückwärtssuche |
| Resume-Funktion | Ja (Fortsetzung ab letzter Position) |
| Hold-Schalter | Ja (Tastensperre) |
| Beleuchtung | Umschaltbar grün/bernstein |
| Reinigung der Linse | Mit Linsenreinigungsset KK-9 (nicht im Lieferumfang) |
| Sicherheitshinweis | Laserprodukt der Klasse 1; Gehäuse nicht öffnen; nur qualifiziertes Personal |
| Mitgeliefertes Zubehör | Netzadapter, Autohalterung, Autoverbindungsset, Verbindungskabel |
| Optionales Zubehör | Akku BP-DM1, Funkfernbedienungsset, Kopfhörer mit Fernbedienung, Aktivlautsprecher SRS-57 |
Häufig gestellte Fragen - Discman D-808K SONY
Benutzerfragen zu Discman D-808K SONY
0 Frage zu diesem Gerät. Beantworten Sie die, die Sie kennen, oder stellen Sie Ihre eigene.
Eine neue Frage zu diesem Gerät stellen
Laden Sie die Anleitung für Ihr CD-Player kostenlos im PDF-Format! Finden Sie Ihr Handbuch Discman D-808K - SONY und nehmen Sie Ihr elektronisches Gerät wieder in die Hand. Auf dieser Seite sind alle Dokumente veröffentlicht, die für die Verwendung Ihres Geräts notwendig sind. Discman D-808K von der Marke SONY.
BEDIENUNGSANLEITUNG Discman D-808K SONY
D-808K
Operating Instructions
Before operating the unit, please read this manual thoroughly and retain it for future reference.
Owner's Record
The model and serial numbers are located at the bottom. Record the serial number in the space provided below. Refer to them whenever you call upon your Sony dealer regarding this product.
Model No. D-808K Serial No.
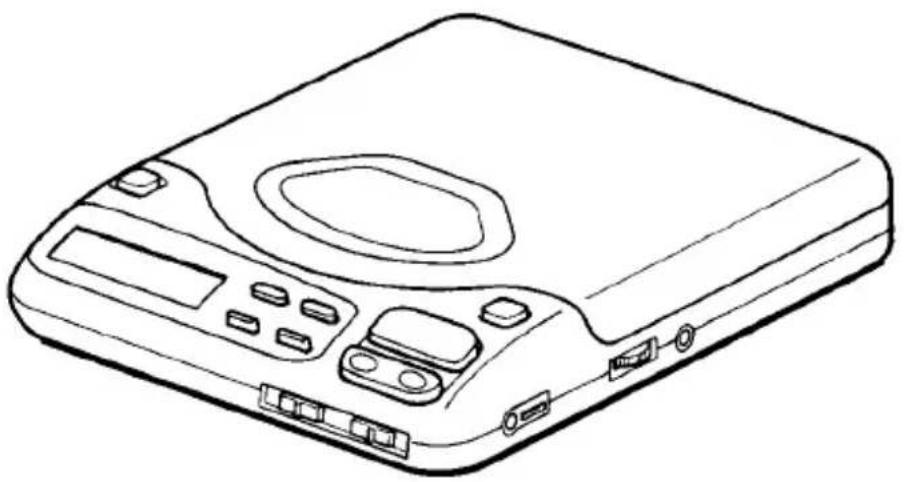
natural_image
Line drawing of a portable electronic device with ports and buttons (no text or symbols)Discman
WARNING
To prevent fire or shock hazard, do not expose the unit to rain or moisture.
To avoid electrical shock, do not open the cabinet. Refer servicing to qualified personnel only.
INFORMATION (For the Customers in U.S.A.)
This equipment generates and uses radio frequency energy and if not installed and used properly, that is, in strict accordance with the manufacturer's instructions, may cause interference to radio and television reception. It has been type tested and found to comply with the limits for a Class B computing device in accordance with the specifications in Subpart J of Part 15 of FCC Rules, which are designed to provide reasonable protection against such interference in a residential installation. However, there is no guarantee that interference will not occur in a particular installation. If this equipment does cause interference to radio or television reception, which can be determined by turning the equipment off and on, the user is encouraged to try to correct the interference by one or more of the following measures: Reorient the receiving antenna Relocate the equipment with respect to the receiver Move the equipment away from the receiver Plug the equipment into a different outlet so that equipment and receiver are on different branch circuits. If necessary, the user should consult the dealer or an experienced radio/television technician for additional suggestions. The user may find the following booklet prepared by the Federal Communications Commission helpful: "How to Identify and Resolve Radio-TV Interference Problems". This booklet is available from the U.S. Government Printing Office, Washington, DC 20402, Stock No. 004-000-00345-4.
CAUTION
The use of optical instruments with this product will increase eye hazard.
For the Customers in the United Kingdom
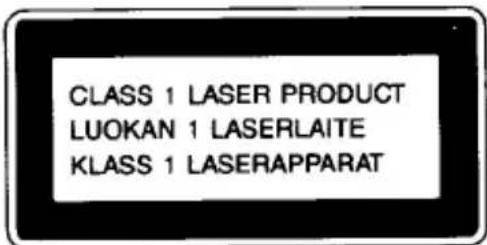
This Compact Disc player is classified as a CLASS 1 LASER product. The CLASS 1 LASER PRODUCT label is located on the bottom exterior.
Table of Contents
Precautions 4
Location and function of controls 6
Preparations
Power sources 8
Using in a car 11
Operation
Disc playing 18
Locating a particular selection or part of a disc 21
Various playing modes 22
Playing the first part of all the selections 22
Playing only one selection 22
Playing the selections in the desired order 24
Playing the selections in a random order 24
Connecting with other equipments 28
Maintenance 29
Specifications 31
Troubleshooting guide back cover
For the Customers in the United Kingdom
Important
The wires in this mains lead are coloured in accordance with the following code:
Blue: Neutral
Brown: Live
As the colours of the wires in the mains lead of this apparatus may not correspond with the coloured markings identifying the terminals in your plug proceed as follows:
The wire which is coloured blue must be connected to the terminal which is
marked with the letter N or coloured black. The wire which is coloured brown must be connected to the terminal which is marked with the letter L or coloured red.
Do not connect either wire to the earth terminal in the plug which is marked by the letter E or by the safety earth symbol 12 or coloured green or green-yellow.
Precautions
On safety
- As the laser beam used in this compact disc player is harmful to the eyes, do not attempt to disassemble the casing. Refer servicing to qualified personnel only.
- Do not put any foreign objects in the safety slot inside the disc compartment. If you do so, the laser beam may come out when the lid is opened.
- Do not put any foreign objects in the DC IN 6 V (external power input) jack.
- Should any solid objects or liquid fall into the unit, disconnect the power supply and have the unit checked by qualified personnel before operating it any further.
On power sources
- Use the rechargeable battery pack (not supplied), batteries (not supplied), or house current.
- For AC operation, use the AC power adaptor supplied to this unit. Do not use any other AC power adaptor as it may cause a malfunction.
For car battery operation, use the mount plate (supplied) and car connecting pack (supplied). - If the unit is not going to be used for a long period of time, be sure to disconnect the power supply (AC power adaptor, batteries, rechargeable battery pack, or mount plate) from the unit. To remove the AC power adaptor from the wall outlet, grasp the adaptor itself; never pull it by the cord.
On operation
- Since the CD system offers a wide dynamic range, the peaks of the high level inputs are recorded with high fidelity, and the noise level is very low. Do not turn up the volume while listening to a part of disc with no audio signals or very low level inputs.
If you do so, the speakers may be damaged when the peak level of the sound is played.
- The lens on the disc table should be kept clean. Do not touch the lens or poke at it. If you do so, the lens may be damaged and the unit will not operate properly.
On installation
- Never install the unit where it would be subjected to:
— heat sources such as radiators or airducts.
— direct sunlight.
— excessive dust.
— moisture or rain.
— mechanical vibration or shock.
— unleveled surface.
- When the unit is used with the AC power adaptor, do not wrap the unit in a cloth, blanket, etc. If you do so, the temperature inside and outside the unit may rise considerably, resulting in malfunctioning of the unit or serious accidents.
- If the unit is brought directly from a cold to a warm location, or is placed in a very damp room, moisture may condence on the lens inside the unit. Should this occur, the unit will not operate. In this case, remove the disc and leave the unit in a warm place for several hours until the moisture evaporates.
- For the unit to operate at its best, it should not be subjected to temperatures below 5°C (41°F) or above 35°C (95°F).
About the headphones
- Road safety
Never use headphones while driving or cycling etc. It can be dangerous to turn up the volume too much even while walking. Doing so may hinder your hearing and can be hazardous especially at level crossings or pedestrian crossings.
• Preventing hearing damage
Avoid using headphones with the volume turned up for an extended period of time. Doing so can damage your hearing. It is advisable to keep the volume at a moderate level at all times.
• Caring for others
Remember not to disturb people around you with the sound leaking from your headphones.
Keep the volume level moderate even in noisy places so that you will be able to hear other people when they talk to you.
If you have any questions or problems concerning your unit, please consult your nearest Sony dealer.
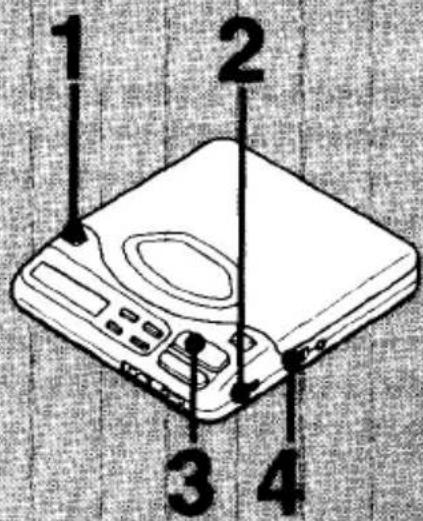
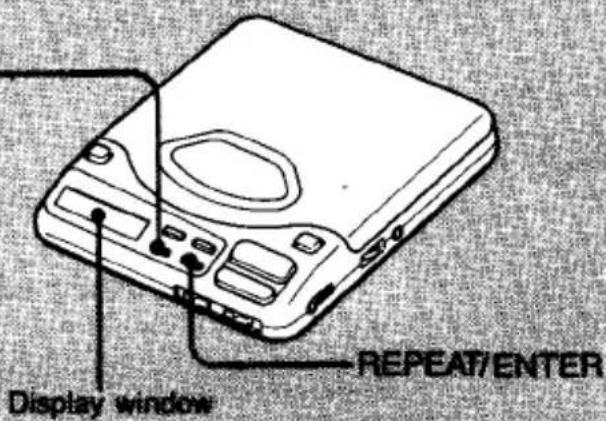
Location and Function of Controls
See the pages in ● for more details.
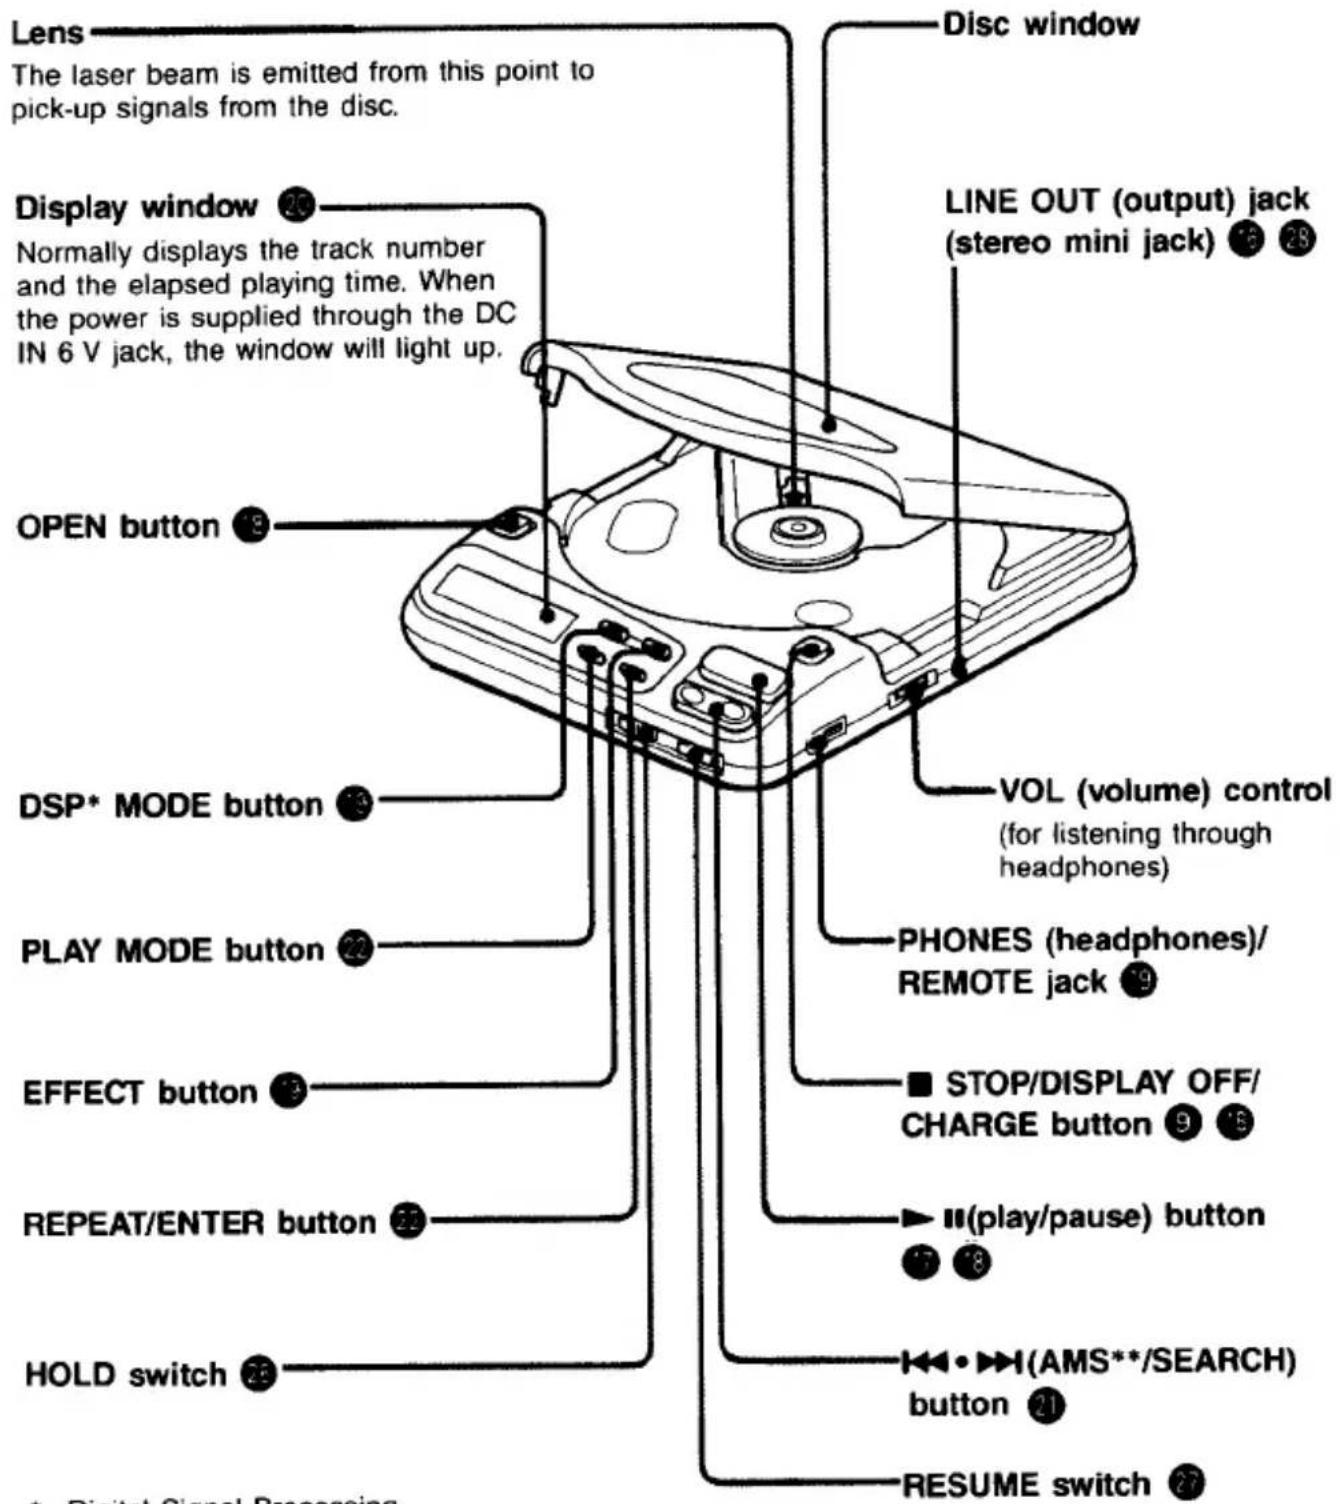
* Digital Signal Processing
** Automatic Music Sensor
REMOTE jack
Connect the optional remote control unit.
LOCK switch
Set the switch to the direction of the arrow to prevent an accidental opening of the disc compartment lid.
ILLUMINATION switch
Battery compartment lid
DC IN 6 V (external power input) jack 9
natural_image
Line drawing of a device rear panel with connectors and a central oval feature (no text or symbols)To change the illumination colors
Slide the ILLUMINATION switch to GREEN or AMBER.
When the "BASS BOOST" or
"DDS***" indication appears on the display window, DSP MODE button is illuminated with opposite color to the other buttons'.
| DSP MODE button | Other buttons |
| amber | green |
| green | amber |
*** Digital Dynamic Sound
Power Sources
Using with Batteries (Not Supplied)
Insert two size AA (LR6) alkaline batteries according to the and indications of the battery compartment.
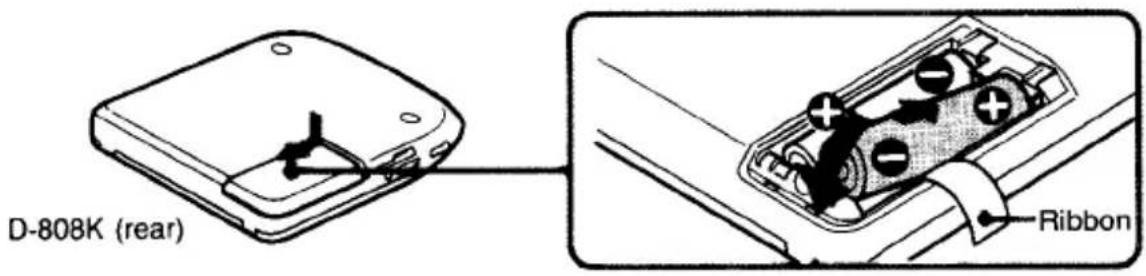
Note
Make sure to pull out the ribbon when you insert the rechargeable battery pack (not supplied) or alkaline batteries (not supplied) into the unit.
Alkaline battery life
When two size AA (LR6) alkaline batteries are used, approx. 2.5 hours of playback is possible. (When the unit is used on a flat and stable place.)
Notes on batteries
- Insert batteries with correct polarity.
- Do not use old batteries with new ones or different types of batteries together.
- If the electrolyte inside the battery should leak, wipe the contaminated area of the battery case with a cloth and replace the old batteries with new ones.
- Do not attempt to charge the batteries.
- When the unit is not to be used for a long period of time, remove the batteries.
When the battery is low or dead The disc may rotate rapidly but you will not be able to hear sound. In this case, replace the battery with a new one.
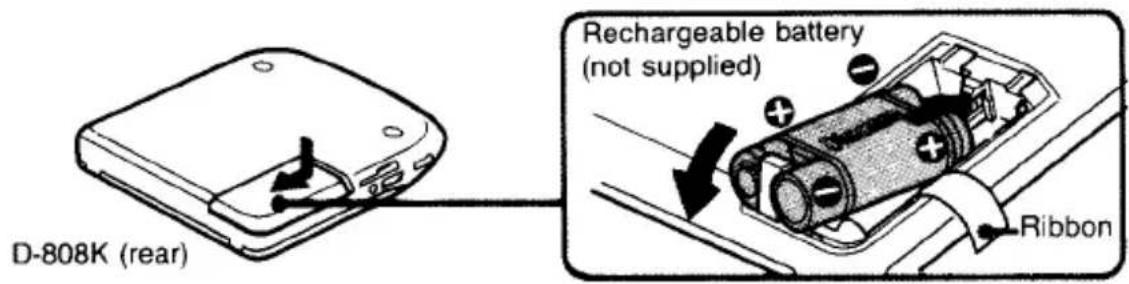
Using with Rechargeable Battery Pack (Not Supplied)
When using the rechargeable battery pack (not supplied) for the first time, make sure to charge it for 3 hours.
Installing rechargeable battery pack
Install the rechargeable battery pack (not supplied) with the "Discman" logo facing up and according to the ⊕ and ⊖ indications of the battery compartment.
Set the indented part of the rechargeable battery pack to the projected part of the unit.
To charge the battery pack
1 Connect the AC power adaptor (supplied) when the unit is in the stop mode with the display and back light off.

2 Press the ■ button.
The BATT CHG indication will appear on the display window, and the indication bars of the level meter will move up and down while charging. The indication will disappear when the charging is completed.
3 Disconnect the AC power adaptor.
Charging with the mount plate (supplied) is also possible.
Rechargeable battery life
| Charging time | Playing time |
| 3 hours (full charge) | approx. 1.5 hours |
(When the unit is used on a flat and stable place.)
When to replace the rechargeable battery pack (not supplied)
If the operating time of the unit is reduced by half even if the rechargeable battery pack is charged fully, replace it with a new one (BP-DM1, not supplied).
Notes on the rechargeable battery pack (Ni-Cd battery)
- Be sure to use the supplied AC power adaptor.
- Remember to recharge the battery pack after every use. Leaving it uncharged may shorten its life
- When charging it for the first time or after a long period of time, the playing time may become shorter. In such a case, charge and use it up several times.
- Store the battery pack in the temperature between 5°C (41°F) and 35°C (95°F) to make it work at its best.
- Never throw the battery pack into a fire.
- Never short-circuit the battery pack terminals.
- Do not disassemble the battery pack. If the electrolyte inside the battery pack should come into contact with clothes or skin, wash the contaminated parts with water immediately.
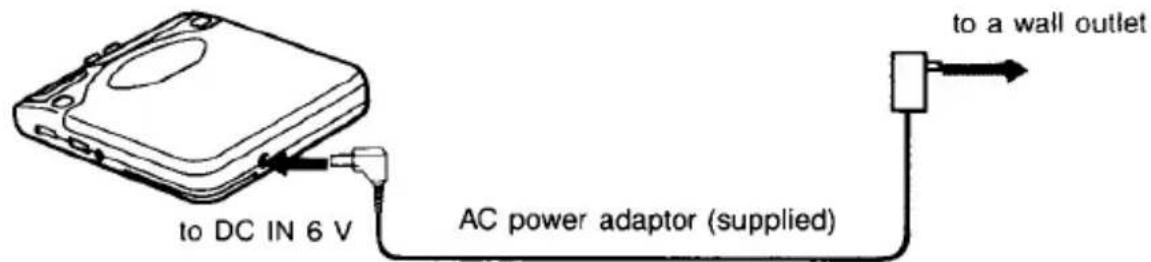
Using on House Current
Connect the supplied AC power adaptor in the same way as for charging the rechargeable battery.
When the unit is not being used, be sure to disconnect the AC power adaptor.
Note on the AC power adaptor
Use only the supplied AC power adaptor. Never use any other adaptors manufactured by Sony because the polarity of the supplied adaptor is opposite of conventional adaptors. Do not use the supplied AC power adaptor or the optional AC power adaptor such as the AC-D6M on other "Discman" CD compact players with DC IN 9 V jack.
Polarity of the plug (Unified polarity type)
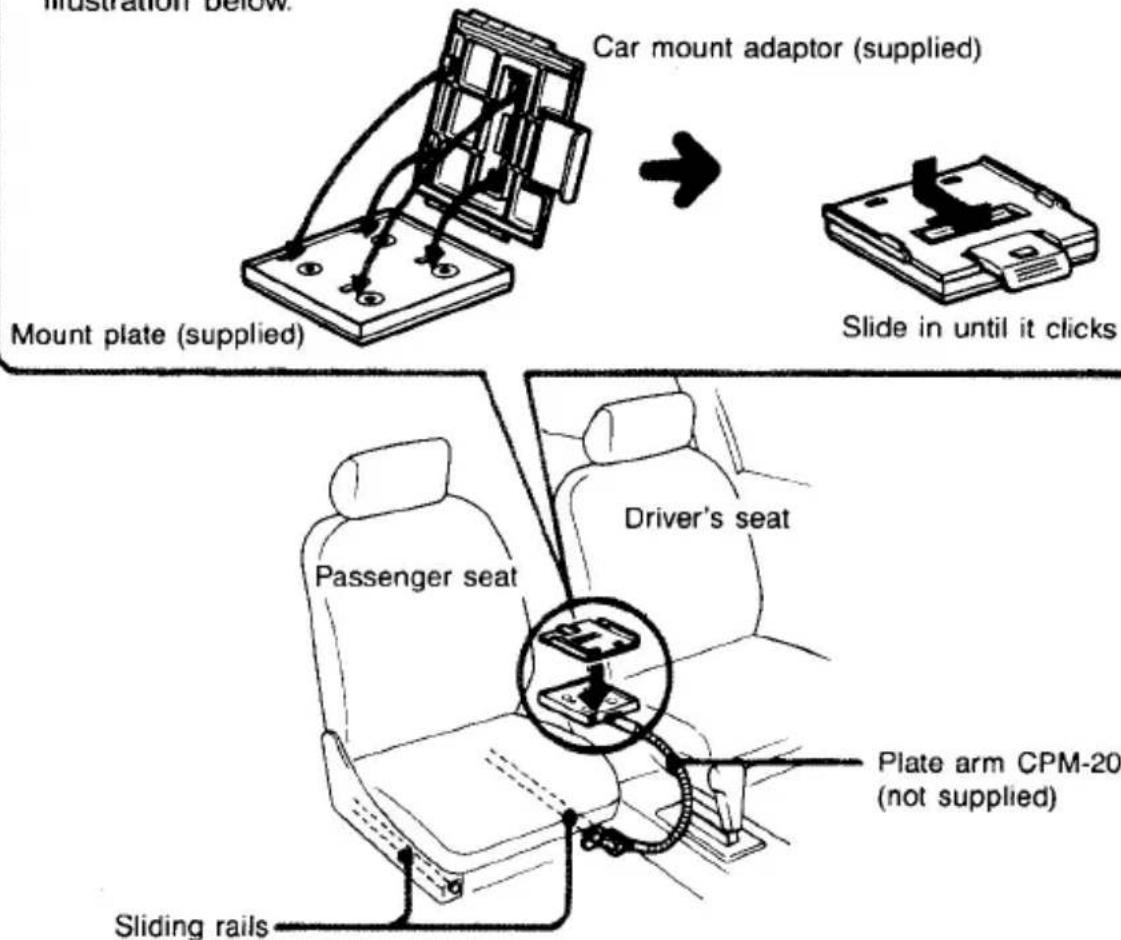
Using in a Car
You can use this unit with a cassette car stereo by connecting it with the supplied mount plate, car mount adaptor and car connecting pack.
Precautions
- Do not install the unit in a location which:
— interferes with your driving.
— may be dangerous for passengers.
— interferes with the glove box lid or ashtray when opening it.
— is near a heat source.
— is subject to direct sunlight, excessive dust, or moisture.
Please understand that we will not incur any obligations for troubles caused by incorrect installation.
Do not install the unit on the dashboard of a car: avoid exposing it to direct sunlight.
- The mount plate, car mount adaptor and car connecting pack are designed for negative ground 12 V DC operation only and cannot be used in cars with 24 V electrical systems.
- For the polarity and voltage of your car battery, consult your car dealer.
• These supplied accessories may not be compatible with some types of car.
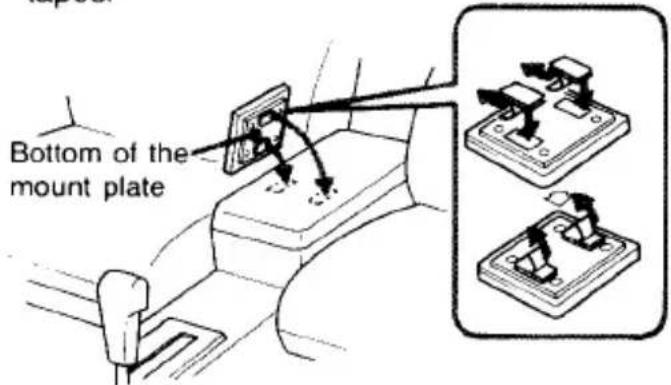
Parts Identification of Mount Plate and Car Connecting Pack
Mount plate
DC output plug supplies power to the CD player.
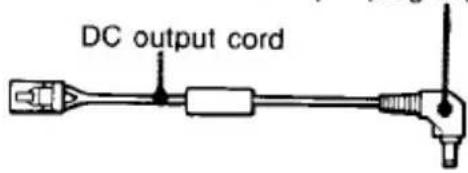
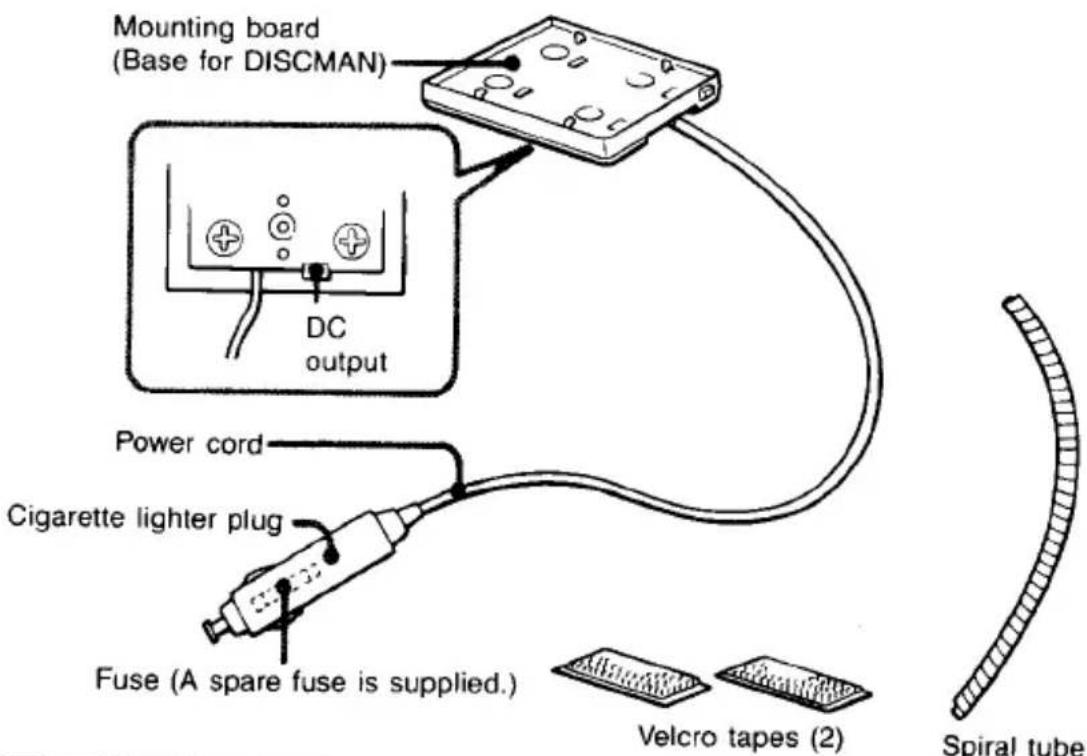
Car connecting pack
Installation
Attach the car mount adaptor (supplied) to the mount plate following the illustration below.
To install with velcro tapes
The mount plate can be installed directly on a level surface with the supplied velcro tapes.
Notes
- When you intend to park your car for a long period of time, remove the mount plate from the velcro tapes so that the CD player will not be exposed to direct sunlight.
- Do not install the mount plate in an unstable place or where any objects around it may interfere with it.
- Do not install the mount plate on a dashboard.
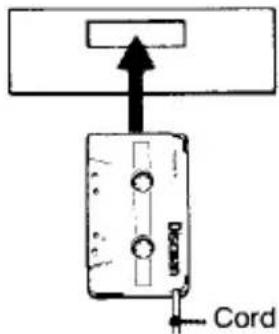
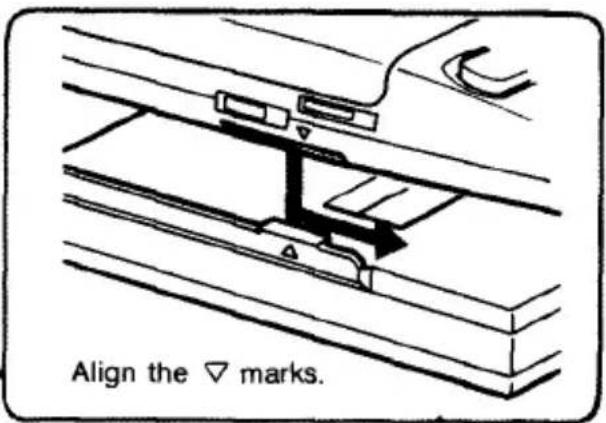
About the Car Connecting Pack
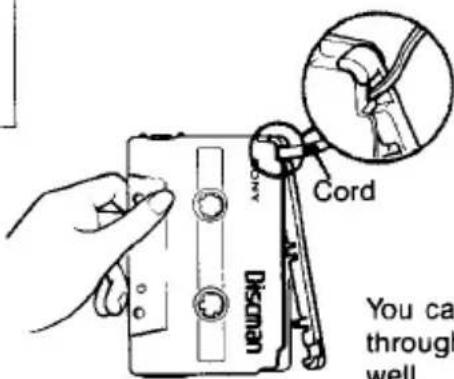
When you have a cassette car stereo with a tape head on the right side, you can use the car connecting pack as it is. In other cases, you need to change the side where the cord exits.
1
Remove the cord cover.
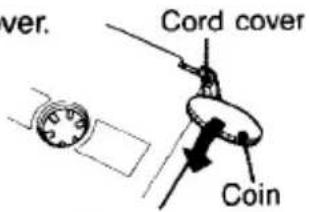

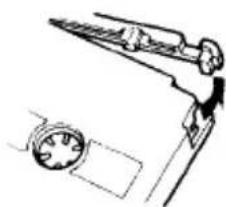
natural_image
Simple line drawing of a mechanical device with a circular component and a pointer (no text or symbols)2
Change the cord to the appropriate side according to your cassette car stereo, and replace the cover again.
Cassette car stereo with a tape head on the left side
First attach this side.
Cassette car stereo with a tape head inner

Notes
- When you replace the removed cord cover, make sure to fit it firmly.
- The cord should be placed so that it does not hinder driving.
- Never insert the cord end of the car connecting pack into the cassette slot. Otherwise, the cord may break or the cassette car stereo may be damaged.
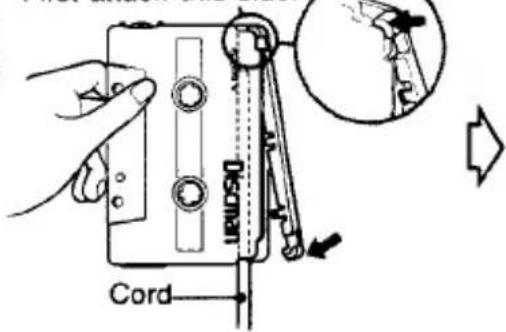
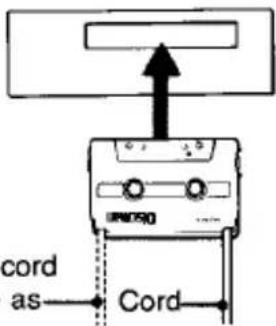
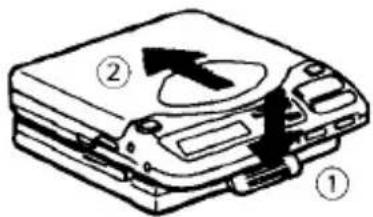
Installing the Unit on the Mount Plate
Install the unit on the car mount adaptor attached to the mount plate.
natural_image
Line drawing of a CD-ROM device with attached cable and connectors (no text or symbols)Mount plate with the car mount adaptor
To remove the unit
Slide the unit to the direction of the arrow ② while releasing the catch ①.
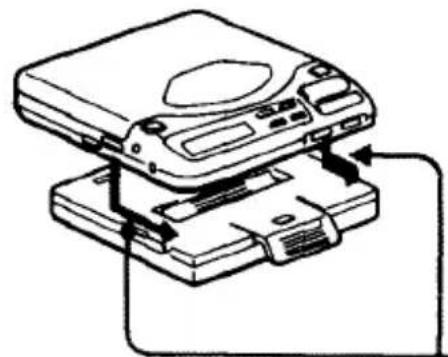
Connection
To listen to the CD player through the cassette car stereo, make the connections as shown below. Connect the appropriate power cords to the cassette car stereo and the CD player.
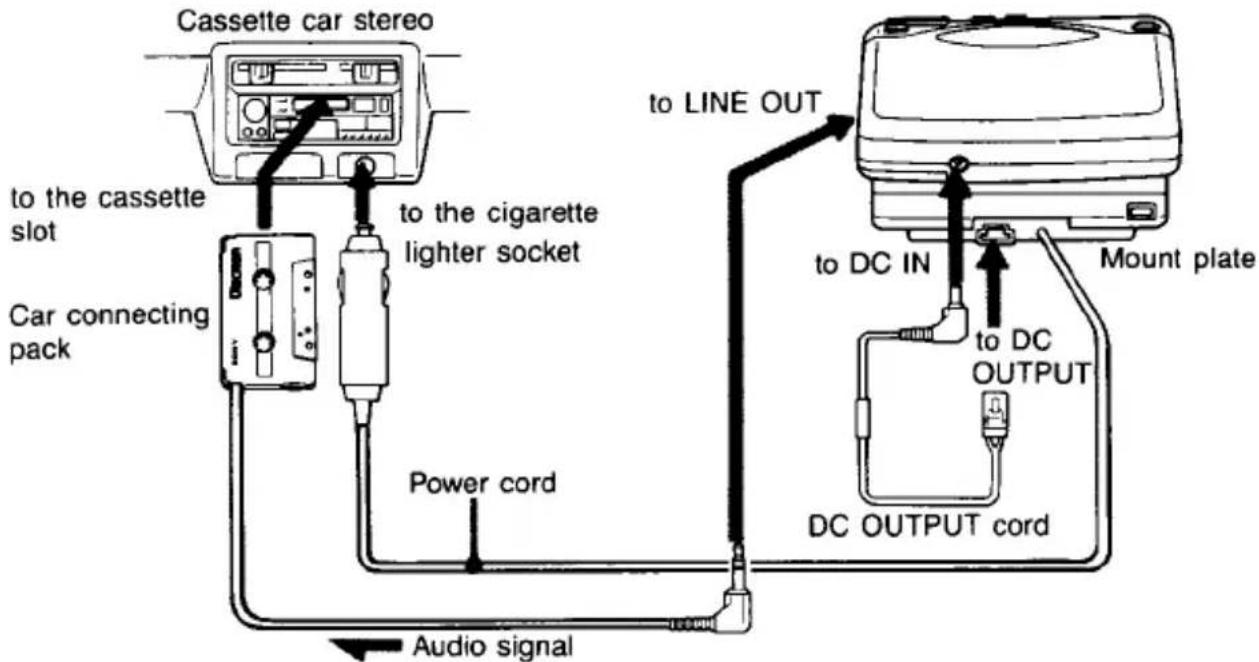
Notes
- Route the cords by using the supplied spiral tube so that they do not interfere with your driving.
• To disconnect the cord from the CD player, pull it out by grasping the plug. Never pull the plug out by the cord.
The use of the car connecting pack may not be suitable for certain types of cassette car stereo.
Operation
1 Insert the car connecting pack into the cassette slot of your cassette car stereo.
2 Set the tape selector to the normal (TYPE I) position and the DOLBY NR switch to the off position if your car is equipped with them.
3 Start playback
If the cassette deck of your cassette car stereo has a reversible playback head, make sure that it is set in the normal (forward) direction.
4 Press the ▶ button on the Discman to start CD playback.
Adjust the volume with your cassette car stereo.
If no sound is heard, change the direction of playback on the tape deck of the cassette car stereo.
Note
To remove the car connecting pack, press the ▲ (eject) button of the cassette car stereo.
When you turn off the engine
Even when the rechargeable battery pack or the alkaline batteries are installed in the unit, the unit will stop operating when you turn off the engine of the car (Switched ignition function). This function is not available with every model of car. In such a case, press the button to stop operation.
Accessory for use in a car (not supplied)
Plate arm CPM-200A
Notes
- Unplug the unit from the cigarette lighter socket when it is not in use. Otherwise, it may drain the car battery.
- Do not put the unit on a dashboard or leave it in a car parked in direct sunlight since the temperature may rise excessively.
- If the unit is connected to the cassette car stereo by the car connecting pack other than the optional one, some interference noise may be heard during playback.
Disc Playing

2
Other operations
| Operation | Button to be pressed |
| To pause | ▶II |
| To release the pause mode | ▶II |
| To stop | ■ |
When you press the ■ button, disc playing will stop and the power will be turned off automatically.
The number of the selections of the disc, total playing time and back light will be indicated for about one minute. If you want to turn off the indication and back light just after you press the ■ button, press it again.
To play an 8 cm (3-inch) disc
You can play it without an adaptor.
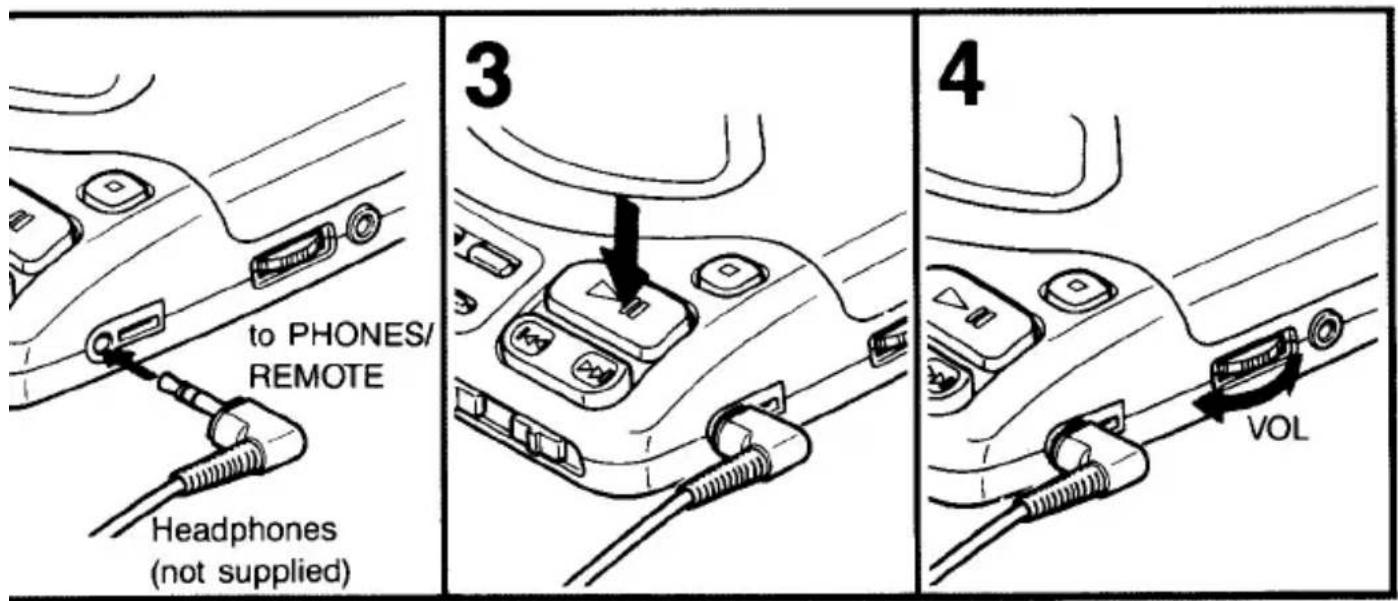
About the headphones
You can use this unit with the stereo headphones with stereo miniplug or stereo headphones with remote controller (not supplied).
Notes
- If you press the ▶ button with the disc inserted upside down or no disc, the "00 cc" indication will appear on the display window, and the sound will not come out.
Press the ■ button to stop the disc playback and reinsert the disc with the labeled side up. - When the 12 cm disc with many selections is followed by a disc with a few selections (such as CD single or CDV, etc.), it may take more than 10 seconds before playback starts.
| Emphasizing the bass sound*Press the DSP MODE button to get the “BASS BOOST” indication on the display window. Then adjust the bass sound with the EFFECT button. The bass sound will be boosted more powerfully. | 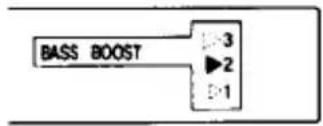 |
| Emphasizing the small and inaudible sound**Press the DSP MODE button to get the “DDS” indication on the display window when listening to small sound. Then adjust the level of DDS with the EFFECT button. The sound will be boosted for better audibility. | 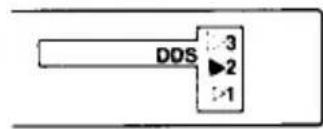 |
* The bass boost effect may be decreased according to the output level of the recorded sound.
** While playing back hard and stressed sound, the DDS may not give efficient effect.
| On the Display Window | ||
| Time counter | When you the press the▶■button The number of the selections on the disc and the total playing time will appear for 2 seconds. | Example 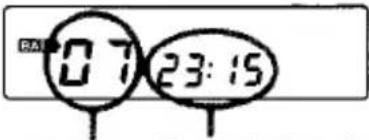 Number of the selections Total playing time Number of the selections Total playing time |
| During the playback The track number and the elapsed playing time of the currently played selection will appear. | 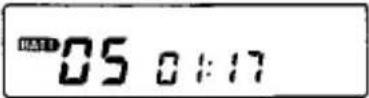 1 min. 17 sec. has elapsed from the beginning of the fifth selection. 1 min. 17 sec. has elapsed from the beginning of the fifth selection. | |
| During the pause The elapsed playing time of the current point flashes. | 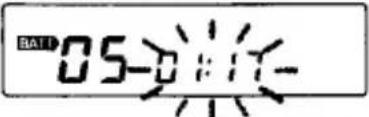 Pause mode at the point 1 min. 17 sec. from the beginning of the fifth selection Pause mode at the point 1 min. 17 sec. from the beginning of the fifth selection | |
| Between the selections The time to the beginning of the next selection will appear. | 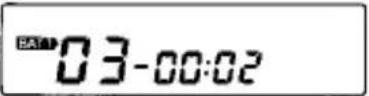 2 sec. to the beginning of the 3rd selection 2 sec. to the beginning of the 3rd selection | |
| Level meter | During the playback, the level meter appears like the illustration on the right. | 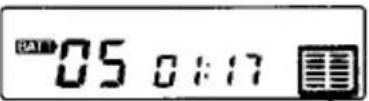 Level meter Level meter |
On BATT indication
The BATT indication appears on the display window when the unit operates on either the rechargeable battery pack or alkaline batteries. The indicator flashes when the battery becomes weak. When the batteries become completely exhausted, the indicator disappears and the operation will be stopped automatically.
In this case, charge the rechargeable battery pack or replace all the alkaline batteries with new ones.
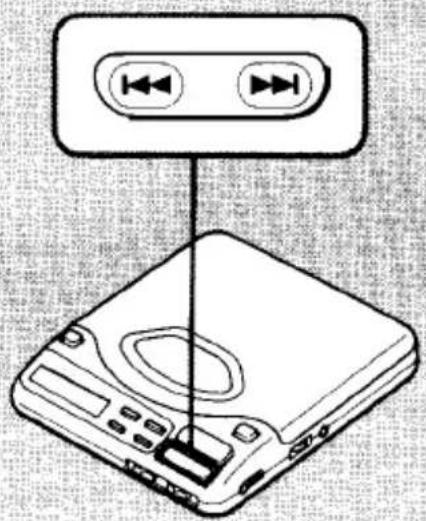
Locating a Particular Selection or Part of a Disc
natural_image
Diagram of a CD-ROM device with two left-pointing buttons and a central indicator (no text or symbols)| Locating a Particular Selection —AMS | |
| To locate the beginning of the current or a preceding selection | Press the ◀ button lightly and repeatedly. |
| To locate the beginning of a succeeding selection | Press the ► button lightly and repeatedly. |
| Locating a Particular Part of Selection —SEARCH | |
| To go back at high speed | Keep the ◀ button pressed. |
| To go ahead at high speed | Keep the ► button pressed. |
On AMS function
- Each time you press the ◀ button, the unit will locate the current and previous selections. Each time you press the ▶ button, the unit will locate the next selections. The unit will stop at the last selection.
- If you press the ◀◀ or ▶▶ button during the pause, the unit will pause at the beginning of your desired selection.
Various Playing Modes
PLAY MODE
| Playing the first part of all the selections—Intro-play | Press  (during playback) (during playback) The “INTRO” indication appears on the display window and will flash. The “INTRO” indication appears on the display window and will flash. |
| Playing only one selection—Single play | Press  (during playback) (during playback) |
This unit has 10 different kinds of playing modes.
To change the playing mode
Press the PLAY MODE button during playback.
Each time you press the PLAY MODE button, playing mode changes cyclically and indications for each mode will appear on the display window as follows:

flowchart
graph LR
    A["INTRO"] --> B["1"]
    B --> C["RMS"]
    C --> D["SHUFFLE"]
    D --> E["display off\n(normal play mode)"]
To repeat the operations
Press REPEAT/ENTER button during playback.
The "REPEAT" indication appears on the display window.
When the unit is in the normal play mode, it plays the whole disc repeatedly. When the last selection of the disc is finished, it will go back to the beginning of the first selection and start playback again.
Press it again to cancel the repeat play.
| REPEAT/ENTER button is pressed | |
| Press the▶■button.The indication stops flashing and the first ten seconds of all selections will be played in order.Press the▶■button again to cancel this function.The currently played selection can be listened to the end. |  The first ten seconds of all selections in order repeatedly.When the▶■button is pressed again to cancel the intro-play function, the playing mode will change to that of normal repeat play. The first ten seconds of all selections in order repeatedly.When the▶■button is pressed again to cancel the intro-play function, the playing mode will change to that of normal repeat play. |
| Playback will stop when the currently played selection is finished. | 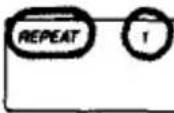 After the currently played selection is finished, the same selection will be played repeatedly. After the currently played selection is finished, the same selection will be played repeatedly. |
Various Playing Modes
| Playing the selections in the desired order - Program play (RMS*) | Press (during playback) | |
| 1 Choose the selection with the or button. Desired selection number | 2 Press the REPEAT/ ENTER button.** The next selection | |
| * Random Music Sensor | ||
| Playing the selections in a random order - Shuffle play | Press (during playback) | |
Press the PLAY MODE button again to return to normal play mode.
To stop the playback, press the ■ button.
**When the REPEAT/ENTER button is kept pressed for more than 2 seconds instead of being pressed lightly, total time of the programmed selections will appear on the display window.
If a disc contains more than 24 tracks and you wish to program the 24th selection or a selection after the 24th one, the total playing time of the program will not be displayed.
("--:--" indication will appear instead.) However it is possible to program such selections.
During shuffle play
To locate the beginning of the currently played selection, press the ◀◀.
To locate the next selection, press the ▶ button.
You cannot locate a previous selection even if you keep the ◀ button pressed.
| The “RMS” indication appears on the display window and will flash. | 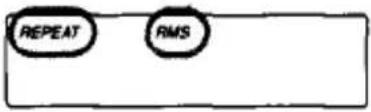 The selections will be played in the programmed order repeatedly. The selections will be played in the programmed order repeatedly. | |
| 3Repeat the steps 1 and 2.(Up to 22 selections) | 4Press the ▶■button.The “RMS” indication stops flashing and playback will start. | |
| Plays every selection in a random order. | 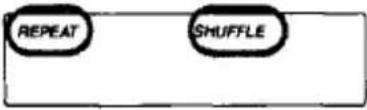 After the every selection has been played in random order, they will be reshuffled and played repeatedly in a different order each time. After the every selection has been played in random order, they will be reshuffled and played repeatedly in a different order each time. | |
During shuffle or program play
An interval of approx. 3 seconds will automatically be placed between the selections.
If an additional selection is to be added after all the 22 selections have been memorized.
The first selection will be erased and the new one will be memorized in its place.
To Check the Contents of the Program during Programming
To check the programmed order of playback
Press the REPEAT/ENTER button lightly during programing.
Example: Selection number 2, 4 and 6 are programmed in order.

flowchart
graph LR
    A["02"] --> B["04"]
    B --> C["06"]
    C --> D["00"]
Selection Playing order number
Locking the Buttons
When you set the HOLD switch to the direction of the arrow, all the buttons will be locked to prevent an accidental pressing of buttons.

When the unit is in the stop mode, you can operate this unit as follows when the indication appears on the display window.
| When the RESUME switch is in the OFF position | When the RESUME switch is in the ON position | ||
| You can operate the DSP MODE button and adjust the level with the EFFECT button.10 47:53 | Number of the selections and total playing time | You can operate the PLAY MODE, REPEAT/ENTER, DSP MODE, ▶▶ and▶▶buttons.04 02:34 | The selection number played last time and elapsed time when the■ button is pressed |
You can change the indication with the RESUME switch though the unit is in the stop mode.
Using the Resume Play Function
When you press the ▶ button with the RESUME switch in the ON position, you can resume the disc play in the same playing mode and from the point where you pressed the ■ button last time.
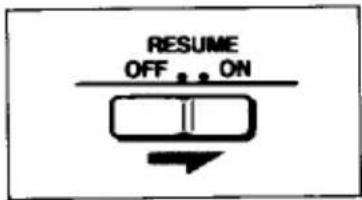
Indication on the display window
When you start the playback again, the indication on the display window will change as follows:

While the remaining indication appears in the stop mode.

When the RESUME switch is in the ON position
Example: When you stop the playback at the point of 2 min. and 34 sec. of the 4th selection.
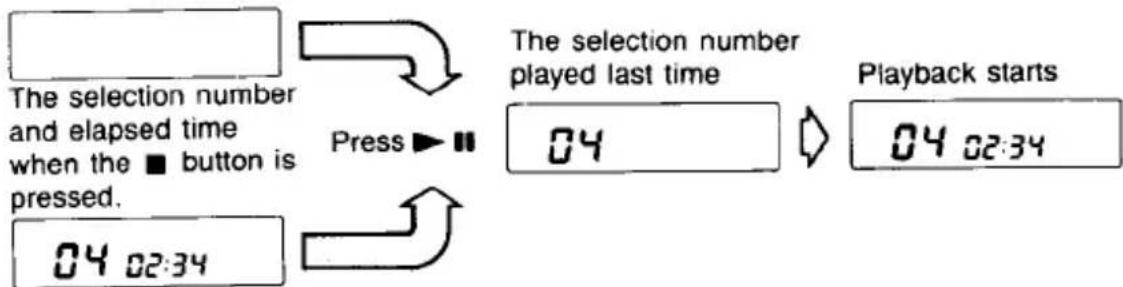
flowchart
graph TD
    A["The selection number and elapsed time when the ■ button is pressed."] --> B["Press ▶"]
    B --> C["The selection number played last time"]
    C --> D["04"]
    D --> E["Playback starts"]
    F["04 02:34"] --> G["→"]
Notes
- You cannot use this function if the lid has been opened when the unit is connected to the power supply.
- BASS BOOST and DDS functions are always memorized regardless of the position of the RESUME switch unless the power supply is disconnected.
- The resume play may start about 30 seconds behind or ahead of the stopped point if the AC power adaptor or car battery cord is disconnected or batteries are removed. However, the memories of DSP mode, playing mode and repeat mode will be erased.
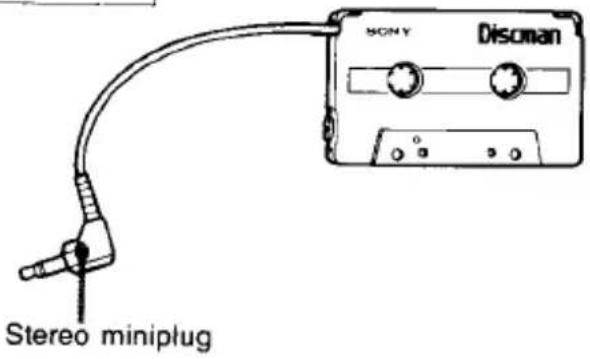
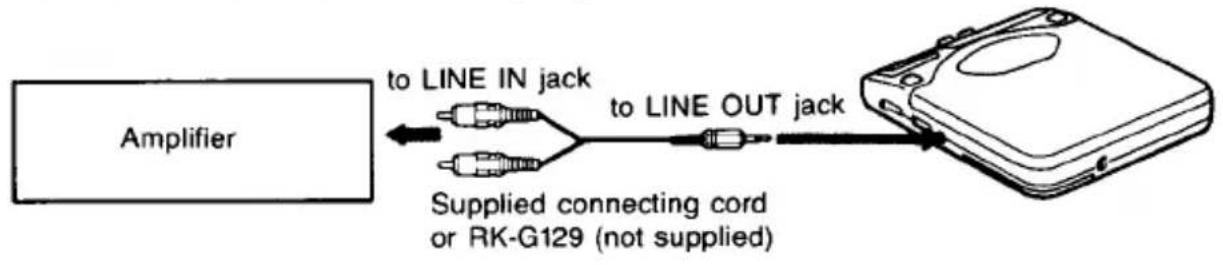
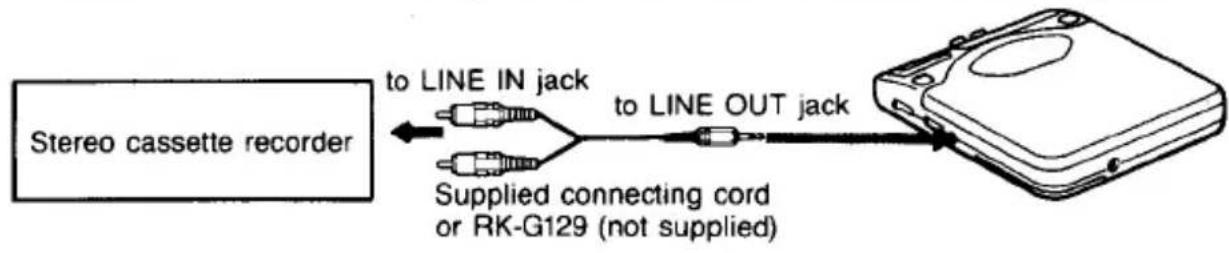
Connecting with Other Equipments
To listen to the CD sound through speakers
flowchart
graph LR
    A["Amplifier"] -->|to LINE IN jack| B["Two resistors"]
    B --> C[" supplied connecting cord or RK-G129 (not supplied) "]
    C --> D[" to LINE OUT jack "]
    D --> E[" finally hard disk"]
To record the CD sound using stereo cassette recorder with LINE IN jack
To record the CD sound using cassette recorder with MIC jack

flowchart
graph LR
    A["Cassette recorder"] -->|to MIC jack| B["RK-G134 (not supplied)"]
    B -->|to LINE OUT jack| C["Internal RAM module"]
Notes on connection
- Turn off each equipment before making connections.
- Plug in the white plug to the L (left channel) jack, and the red plug to the R (right channel) jack.
-
Do not connect the output from LINE OUT with the PHONO jacks of the amplifier.
-
Make sure to insert the plugs of the cable firmly into the jacks. A loose connection may cause a humming noise.
- If the unit causes interference to the radio or television reception, turn off the unit or move the unit away from the receiver.
Maintenance
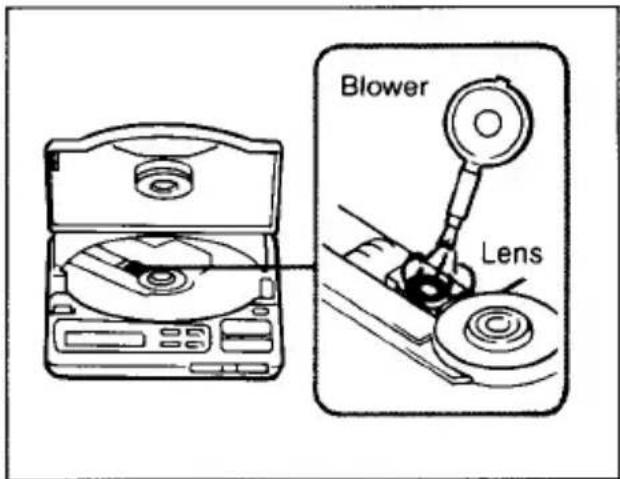
Cleaning the lens
If you have accidentally touched the lens with fingers or if dust on the lens prevents the unit from operating properly, open the disc compartment lid and clean the lens with the lens cleaning kit KK-9 (not supplied).
Cleaning the headphones plug
Keep the plug of your headphones clean to obtain optimum sound. Wipe it with a dry, soft cloth.
Cleaning the casing
Clean the casing with a soft cloth slightly moistened with water or a mild detergent solution. Do not use any type of abrasive pad, scouring powder or solvent such as alcohol or benzine as they may mar the finish of the casing.
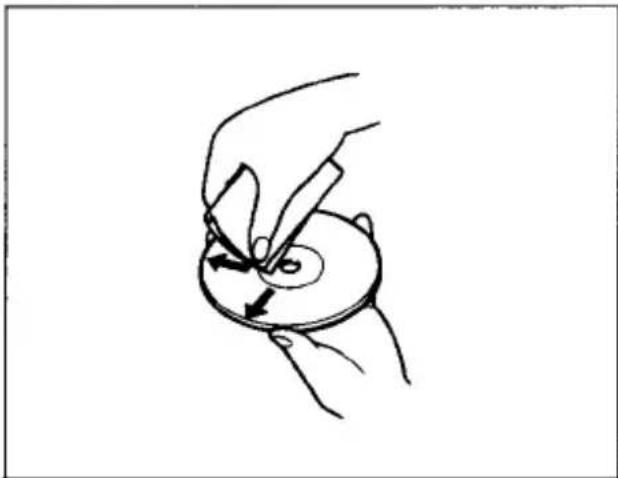
Notes on compact discs
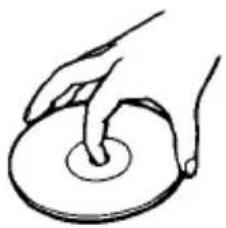
- Before playback, clean the disc with a cleaning cloth. Wipe the disc from the center outwards.
natural_image
Line drawing of a hand holding a circular object with arrows indicating direction (no text or symbols)- Do not use solvents such as benzine, thinner, commercially available cleaners or anti-static spray intended for analog discs.
- Do not expose the disc to direct sunlight or heat sources such as hot air ducts, nor leave it in a car parked in direct sunlight as there could be a considerable rise in temperature inside the car.
• After playback, store the disc in its case.
If there is a scratch, dirt or fingerprints on the disc, it may cause a tracking error.
Handling the disc
natural_image
Simple line drawing of a hand pressing down on a circular object (no text or symbols)Handle the disc by its edge.
Not this way

natural_image
Hand holding a circular object with a black X mark, no text or symbols presentDo not touch the surface.
Not this way

Do not stick paper or tape nor write anything on the surface.
Fuse Replacement
If the unit does not operate, check the fuse and if it is blown, replace it as follows:
1 Turn off the unit and remove the cigarette lighter plug from the cigarette lighter socket.
2 Remove the plug end by turning it counterclockwise.
3 Remove the fuse from the plug.
4 Insert the supplied spare fuse into the plug.
5 Attach the plug end by turning it clockwise.
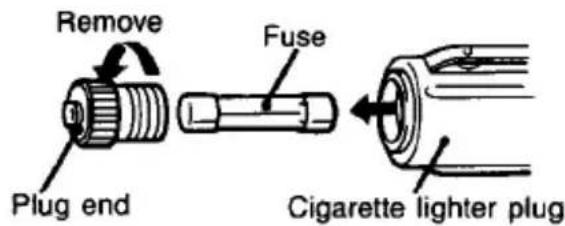
Notes on fuse replacement
- Make sure to use the supplied spare fuse.
- If the fuse is blown again after you have replaced it, consult your nearest Sony dealer.
Specifications
| System | Compact disc digital audio system |
| Laser diode properties | Material: GaAlAsWavelength: λ = 780 nmEmission duration: ContinuousLaser output: Less than 44.6 μW(This output is the value measured at a distance of 200 mm from the objective lens surface on the Optical Pick-up Block.) |
| Error correction | Sony Super Strategy Cross Interleave Reed Solomon Code |
| D-A conversion | 1 bit quarz time-axis control |
| Frequency response | 20 - 20,000 Hz ±1 dB(measured by EIAJ CP-307) |
| Output (at 6 V input level) | Line output (stereo minijack)Output level 0.55 V rms at 50 kilohmsLoad impedance over 10 kilohmsHeadphones (stereo minijack)9 mW + 9 mW at 16Ω |
General
Power requirements
Supplied:
• DC IN 6 V jack accepts:
the Sony AC power adaptor for use on
120 V AC, 60 Hz in USA,
240 V AC, 50 Hz in United Kingdom/Australia
the mount plate for use with 12 V car battery
Not supplied:
• DC 2.4 V Rechargeable battery pack BP-DM1
• DC 3 V two size AA (LR6) alkaline batteries
2.5 W DC (While the back light is on)
Power consumption
Approx. 139 × 31.5 × 159.9 mm (51/2 × 11/4 × 63/8 in.)
Dimensions
(w/h/d) incl. projecting parts and controls
Weight
Approx. 315 g (11.1 oz.) not incl. battery
Supplied accessories
AC power adaptor (1)
Car mount adaptor (1)
Connecting cord (1)
Mount plate (1)
(phone plug × 2 ↔ stereo miniplug)
Car connecting pack (1)
Design and specifications subject to change without notice.
Optional accessories
Rechargeable battery BP-DM1
Wireless receiver kit MDR-FM101K
Wireless remote control kit RM-DM5K
Stereo headphones with remote controller
Wired remote controller RM-DM2
MDR-A21DM1, MDR-A21DM2
Plate arm CPM-200A
Active speaker system SRS-57
Your dealer may not handle some of the above listed accessories. Please ask the dealer for detailed information.
Note
This appliance conforms with EEC Directive 87/308/EEC regarding interference suppression.
Troubleshooting Guide
Should any problem persist after you have made the following checks, consult your nearest Sony service facility.
| Symptom | Cause and/or solution |
| Disc play does not start. | The disc is inserted upside down or incorrectly.→ Insert the disc correctly with the labeled surface up.Dusty or defective disc. (See page 29.)Dirty or dusty lens. (See page 29.)The disc compartment lid is not closed.Moisture condensation. → Leave the player in a warm place until the moisture evaporates.The AC power adaptor is not plugged into the wall outlet.The mount plate is not firmly connected to a cigarette lighter socket.The unit is not placed on a level surface.The HOLD switch is set to the direction of the arrow.Weak rechargeable battery (See pages 9 and 20.)Weak alkaline batteries (See pages 8 and 20.)The ribbon is caught between the battery/ rechargeable battery and the battery terminal. |
| No sound from the headphones | The headphones plug is not firmly connected to the PHONES/REMOTE jack.Adjust the VOL control.Dirty plug. |
| No sound from the connected speakers | Check the connections.The amplifier is not turned on. |
| No sound from the connected car stereo | When the car connecting pack is used, change the playback direction of the tape deck. |
| Skipping of sound | Dirty or defective disc.Dirty lens.Strong vibration. |
| Charging is not possible. | Check if the ribbon is caught between the battery and the battery terminal. |
- D-808K
- Operating Instructions
- Owner's Record
- Discman
- WARNING
- INFORMATION (For the Customers in U.S.A.)
- CAUTION
- For the Customers in the United Kingdom
- Table of Contents
- Preparations
- Operation
- Important
- Precautions
- On safety
- On power sources
- On operation
- On installation
- About the headphones
- - Road safety
- • Preventing hearing damage
- • Caring for others
- Location and Function of Controls
- REMOTE jack
- LOCK switch
- ILLUMINATION switch
- To change the illumination colors
- Power Sources
- Using with Batteries (Not Supplied)
- Note
- Alkaline battery life
- Notes on batteries
- Using with Rechargeable Battery Pack (Not Supplied)
- Installing rechargeable battery pack
- To charge the battery pack
- When to replace the rechargeable battery pack (not supplied)
- Notes on the rechargeable battery pack (Ni-Cd battery)
- Using on House Current
- Note on the AC power adaptor
- Using in a Car
- Parts Identification of Mount Plate and Car Connecting Pack
- Mount plate
- Car connecting pack
- Installation
- To install with velcro tapes
- Notes
- About the Car Connecting Pack
- 1
- 2
- Installing the Unit on the Mount Plate
- To remove the unit
- Connection
- When you turn off the engine
- Accessory for use in a car (not supplied)
- Disc Playing
- To play an 8 cm (3-inch) disc
- On BATT indication
- Locating a Particular Selection or Part of a Disc
- On AMS function
- Various Playing Modes
- This unit has 10 different kinds of playing modes.
- To change the playing mode
- To repeat the operations
- During shuffle play
- During shuffle or program play
- If an additional selection is to be added after all the 22 selections have been memorized.
- To Check the Contents of the Program during Programming
- Locking the Buttons
- Using the Resume Play Function
- Indication on the display window
- While the remaining indication appears in the stop mode.
- When the RESUME switch is in the ON position
- Connecting with Other Equipments
- Notes on connection
- Maintenance
- Cleaning the lens
- Cleaning the headphones plug
- Cleaning the casing
- Notes on compact discs
- Handling the disc
- Fuse Replacement
- Notes on fuse replacement
- Specifications
- General
- Supplied:
- Not supplied:
- Supplied accessories
- Optional accessories
- Troubleshooting Guide
Marke : SONY
Modell : Discman D-808K
Kategorie : CD-Player