
Discman D-132CK - CD-Player SONY - Kostenlose Bedienungsanleitung
Finden Sie kostenlos die Bedienungsanleitung des Geräts Discman D-132CK SONY als PDF.


| Produkttyp | Tragbarer CD-Player (Discman) für den Einsatz im Auto |
| Modell | Discman D-132CK |
| Marke | Sony |
| Abmessungen (Montageplatte) | Ca. 126 × 25 × 116 mm (B × H × T) ohne Überstände |
| Abmessungen (Auto-Anschlusspaket) | Ca. 102,4 × 12,1 × 63,8 mm (B × H × T) mit Überständen |
| Gewicht (Montageplatte) | Ca. 120 g |
| Gewicht (Auto-Anschlusspaket) | Ca. 45 g |
| Stromversorgung | 12 V Autobatterie über Zigarettenanzünder (Kabel im Lieferumfang) |
| Ausgangsspannung (DC-Stecker) | 4,5 V (nach EIAJ-Standard) |
| Frequenzgang (Auto-Anschlusspaket) | 50 – 20.000 Hz (abhängig vom Autoradio) |
| Kabellänge (Auto-Anschlusspaket) | 1,5 m |
| Hauptfunktionen | CD-Wiedergabe über Autoradio via Kassettendeck (mit beiliegendem Anschlusspaket) |
| Anzeige | LED-Lampe (leuchtet bei eingeschaltetem Gerät) |
| Bedienelemente | Übersprech-Einstellschalter (Cross talk adjust) |
| Lieferumfang | CD-Player, Auto-Anschlusspaket, Montageplatte, Auto-Montageadapter, Autobatteriekabel, Ersatzsicherung, Klettbänder (2), Spiralschlauch |
| Wartung | Sicherungswechsel (Ersatzsicherung im Lieferumfang) |
| Sicherheitshinweise | Montageplatte nicht an Stellen anbringen, die die Fahrt behindern; kein direkter Kontakt mit Hitze, Feuchtigkeit oder Staub; Kabel ordentlich verlegen |
| Zubehör (optional) | Plattenarm CPM-300A |
| Kompatibilität | Nur für Autoradios mit Kassettendeck und Tonkopf auf der rechten Seite (umschaltbar) |
| Sonstiges | Kopfschutzfolie nicht entfernen; Dummy-Band nicht herausziehen oder verschmutzen |
Häufig gestellte Fragen - Discman D-132CK SONY
Benutzerfragen zu Discman D-132CK SONY
0 Frage zu diesem Gerät. Beantworten Sie die, die Sie kennen, oder stellen Sie Ihre eigene.
Eine neue Frage zu diesem Gerät stellen
Laden Sie die Anleitung für Ihr CD-Player kostenlos im PDF-Format! Finden Sie Ihr Handbuch Discman D-132CK - SONY und nehmen Sie Ihr elektronisches Gerät wieder in die Hand. Auf dieser Seite sind alle Dokumente veröffentlicht, die für die Verwendung Ihres Geräts notwendig sind. Discman D-132CK von der Marke SONY.
BEDIENUNGSANLEITUNG Discman D-132CK SONY
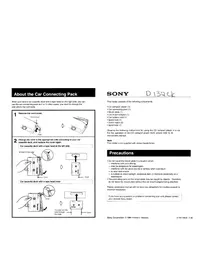
Über das Auto-Anschlussset
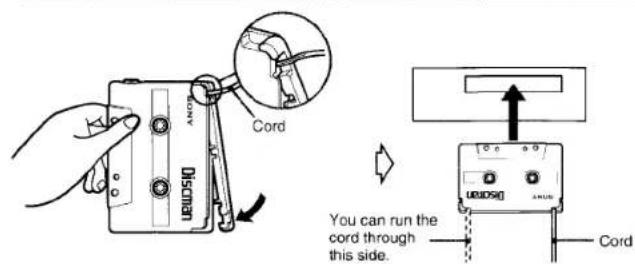
Wenn Sie ein Auto-Kassettenfach mit einem Tonkopf auf der rechten Seite haben, können Sie das Auto-Anschlussset direkt verwenden. In anderen Fällen müssen Sie die Seite ändern, an der das Kabel austritt.
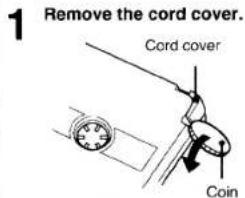
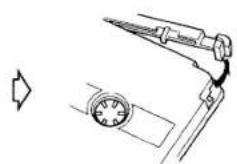
2 Ändern Sie das Kabel auf die passende Seite entsprechend Ihrem Auto-Kassettenfach und setzen Sie die Abdeckung wieder auf.
Auto-Kassettenfach mit Tonkopf auf der linken Seite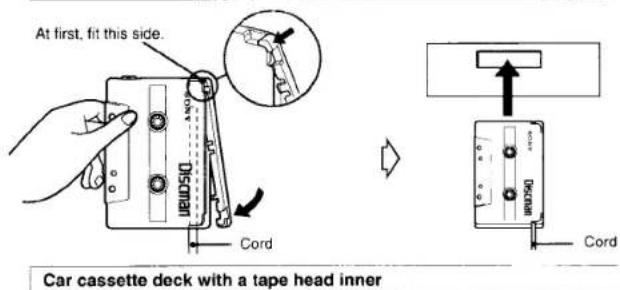
SONY
D 13:2CK
Dieses Modell besteht aus den folgenden Komponenten:
• CD-Player (1) • Auto-Anschlussset (1) - Montageplatte (1) • Auto-Halterungsadapter (1) • Auto-Batteriekabel (1) - Ersatzsicherung (1) - Klettbänder (2) - Spiralschlauch (1)
Beachten Sie die folgenden Hinweise zur Verwendung des CD-Players im Auto. Für den Betrieb des CD-Players selbst lesen Sie bitte dessen Bedienungsanleitung.
Hinweis
Dieses Modell wird nicht mit Stereo-Kopfhörern geliefert.
Vorsichtsmaßnahmen
- Installieren Sie die Montageplatte nicht an einem Ort, der:
— Ihre Sicht beim Fahren behindert. — für Passagiere gefährlich sein könnte. — das Öffnen des Handschuhfachs oder des Aschenbechers behindert. — in der Nähe einer Wärmequelle liegt. — direkter Sonneneinstrahlung, übermäßigem Staub oder Feuchtigkeit ausgesetzt ist (insbesondere auf einem Armaturenbrett).
- Die hervorstehenden Teile der Montageplatte können sich an Gegenständen verfangen. Lassen Sie die Montageplatte daher nicht ohne den Auto-Halterungsadapter liegen.
Bitte beachten Sie, dass wir keine Haftung für Störungen übernehmen, die durch unsachgemäße Installation verursacht werden.
Wenn Sie Fragen oder Probleme mit Ihrem Gerät haben, wenden Sie sich bitte an Ihren nächsten Sony-Händler.
Sicherungswechsel
Wenn der CD-Player nicht funktioniert, überprüfen Sie die Sicherung. Wenn sie durchgebrannt ist, ersetzen Sie sie wie folgt:
1 Schalten Sie den CD-Player aus und ziehen Sie den Zigarettenanzünderstecker aus der Zigarettenanzünderbuchse. 2 Drehen Sie das Steckerende gegen den Uhrzeigersinn, um es zu entfernen. 3 Entfernen Sie die defekte Sicherung aus dem Stecker. 4 Setzen Sie die mitgelieferte Ersatzsicherung in den Stecker ein. 5 Drehen Sie das Steckerende im Uhrzeigersinn, um es wieder anzubringen.
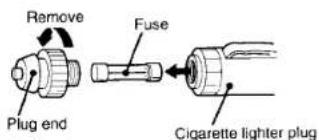
Hinweise zum Sicherungswechsel
- Verwenden Sie unbedingt die mitgelieferte Ersatzsicherung. Verwenden Sie niemals ein Stück Draht als Ersatz für die Sicherung.
- Wenn die Sicherung nach dem Ersetzen erneut durchbrennt, wenden Sie sich an Ihren nächsten Sony-Händler. Bringen Sie in diesem Fall die mitgelieferte Ersatzsicherung mit zum Händler.
Technische Daten
Montageplatte
Abmessungen
Ca. 126 × 25 × 116 mm (5 × 1 × 4 3 / 8 Zoll) (l/h/t) ohne
überstehende Teile
Ca. 120 g (4,3 oz.)
Fahrzeug-Anschlusspack
Frequenzgang
50 - 20.000 Hz
- Abhängig von Ihrem Kassettenspieler im Auto.
Ca. 102,4 × 12,1 × 63,8 mm (4 1 /8 × 1/2 × 2 5 /8 in.) (B/H/T)
einschließlich hervorstehender Teile
Abmessungen
Ca. 45 g (1,5 oz.)
Gewicht
1,5 m
Kabellänge
Plattenarm CPM-300A
Optionales Zubehör
Änderungen ohne Vorankündigung vorbehalten.
Mitgeliefertes Zubehör und Teileidentifikation
Montageplatte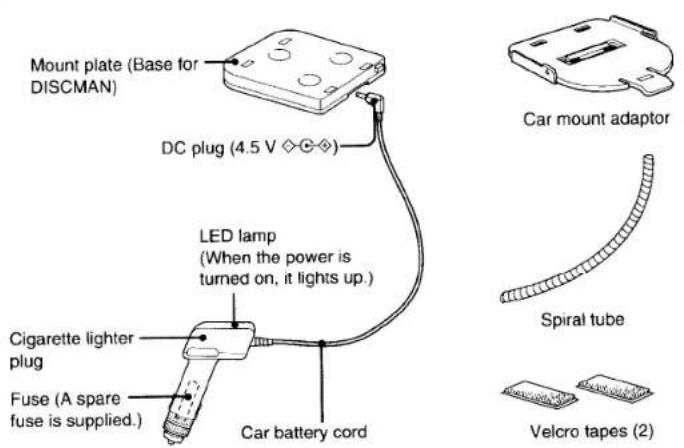
Car Connecting Pack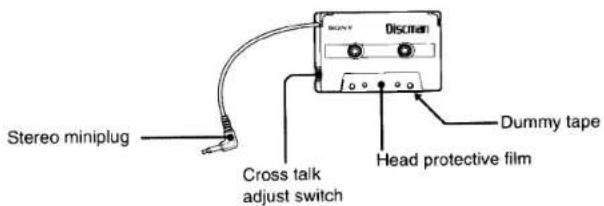
Hinweise
- Wählen Sie die Position des Übersprech-Abgleichschalters, um die optimale Klangqualität zu erzielen.
- Entfernen Sie nicht die Schutzfolie des Kopfes (Metallteil).
- Ziehen Sie das Dummy-Band nicht heraus und verunreinigen Sie es nicht.
Anschluss
Um den CD-Player über das Autoradio-Kassettendeck zu hören, schließen Sie die Geräte wie abgebildet an.
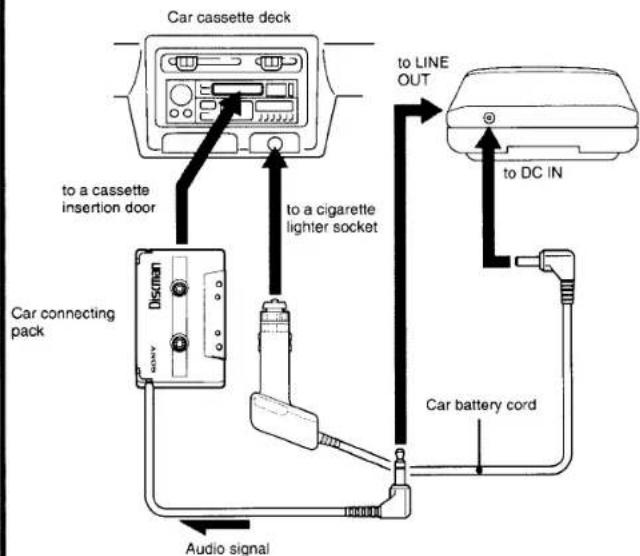
Hinweis: Verlegen Sie die Kabel so, dass sie Ihre Fahrweise nicht beeinträchtigen.
Hinweis zum Gleichstromstecker
Der mit dem Autobatteriekabel gelieferte 4,5-V-Gleichstromstecker entspricht den vorgeschlagenen Standards der Electronic Industries Association of Japan (EIAJ). Schließen Sie ihn nicht an andere CD-Player an.
Polarität des Steckers (EIAJ-Standards)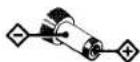
1. Setzen Sie das Car Connecting Pack in das Autoradio-Kassettendeck ein. 2. Stellen Sie den Bandwahlschalter auf Normal (Typ I) und schalten Sie DOLBY NR, REPEAT und BLANK SKIP aus, falls vorhanden. 3. Starten Sie die Wiedergabe. Wenn Ihr Autoradio-Kassettendeck über einen reversiblen Wiedergabekopf verfügt, stellen Sie sicher, dass er auf normale (Vorwärts-)Richtung eingestellt ist. 4. Starten Sie die Wiedergabe am CD-Player. 5. Stellen Sie die Lautstärke ein.
Wenn kein Ton zu hören ist oder das Car Connecting Pack ausgeworfen wird, ändern Sie die Wiedergaberichtung am Autoradio-Kassettendeck.
Zum Entfernen des Car Connecting Packs drücken Sie die △-Taste (Auswurf) des Autoradio-Kassettendecks.
Hinweise
- Führen Sie das Kabelende des Auto-Anschlusspakets niemals in den Kassetteneinschub ein. Andernfalls kann das Kabel brechen oder das Autoradio-Kassettendeck beschädigt werden.
- Das Auto-Anschlusspaket kann nicht mit allen Autoradio-Kassettendecks verwendet werden.
- Wenn Sie die entfernte Kabelabdeckung wieder anbringen, stellen Sie sicher, dass sie fest sitzt. • Das Kabel sollte so verlegt werden, dass es die Fahrt nicht behindert.
- Um das Kabel vom CD-Player zu trennen, ziehen Sie es am Stecker heraus. Ziehen Sie niemals am Kabel selbst.
- Bei manchen Autoradio-Kassettendecks kann es zu einem Klappergeräusch vom Auto-Anschlusspaket kommen. Dies ist jedoch kein Zeichen für eine Fehlfunktion.
Verlegen Sie die Kabel mit der mitgelieferten Spiralschutzhülle.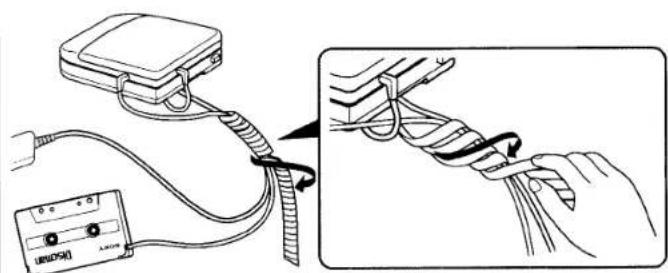
Installation
Anbringen des CD-Players
1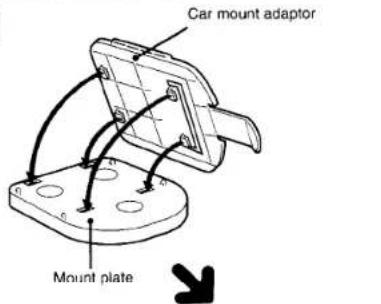
Hineinschieben, bis es einrastet.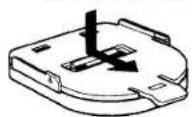
Zum Entfernen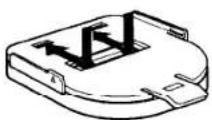
2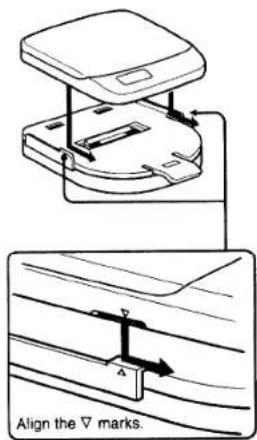
Zum Entfernen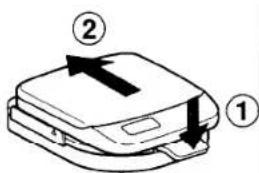
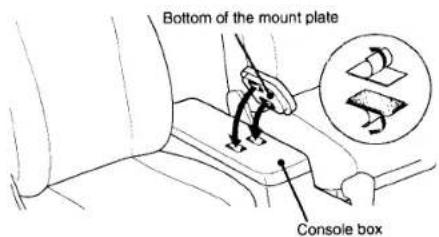
Installation mit Klettbändern
Die Montageplatte kann mit den mitgelieferten Klettbändern direkt auf einer Konsole angebracht werden.
Hinweise
- Wenn Sie Ihr Auto für einen längeren Zeitraum parken, entfernen Sie die Montageplatte von den Klettbändern, damit der CD-Player nicht direktem Sonnenlicht ausgesetzt ist.
- Installieren Sie die Montageplatte nicht an einem instabilen Ort oder an einem Ort, an dem Gegenstände sie behindern könnten.
- Installieren Sie die Montageplatte nicht auf dem Armaturenbrett. • Installieren Sie das Gerät so, dass es Ihre Fahrweise nicht beeinträchtigt.
Anschluss
Sicherungswechsel
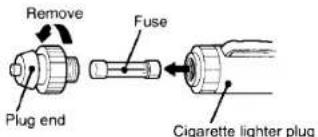
Wenn der CD-Player nicht funktioniert, überprüfen Sie die Sicherung. Wenn sie durchgebrannt ist, ersetzen Sie sie wie folgt:
1 Schalten Sie den CD-Player aus und ziehen Sie den Zigarettenanzünderstecker aus der Zigarettenanzünderbuchse. 2 Entfernen Sie das Steckerende, indem Sie es gegen den Uhrzeigersinn drehen. 3 Entfernen Sie die defekte Sicherung aus dem Stecker. 4 Setzen Sie die mitgelieferte Ersatzsicherung in den Stecker ein. 5 Setzen Sie das Steckerende wieder auf, indem Sie es im Uhrzeigersinn drehen.
Hinweise zum Sicherungswechsel
- Verwenden Sie unbedingt die mitgelieferte Ersatzsicherung. Verwenden Sie niemals ein Stück Draht als Ersatz für die Sicherung.
- Wenn die Sicherung nach dem Ersetzen erneut durchbrennt, wenden Sie sich an Ihren nächsten Sony-Händler. Bringen Sie in diesem Fall die mitgelieferte Ersatzsicherung mit.
Technische Daten
Montageplatte
Abmessungen
Ca. 126 × 25 × 116 mm (5 × 1 × 4 5/8 Zoll) (L/H/T) ohne
vorstehende Teile
ca. 120 g (4,3 oz.)
Masse
Auto-Anschlusspack
Frequenzgang
50 - 20.000 Hz 9
- 1. Januar 2017
* Abhängig von Ihrem Kassettentonbandgerät im Auto.
Abmessungen
ca. 102,4 × 12,1 × 63,8 mm (4 1 / 8 × 1/2 × 2 5 / 8 Zoll) (B/H/T)
einschließlich vorstehender Teile
Masse
ca. 45 g (1,5 oz.)
Kabellänge
1,5 m
Optionales Zubehör
Plattenarm CPM-300A
Änderungen an Design und Spezifikationen vorbehalten.
Mitgeliefertes Zubehör und Teileidentifikation
Montageplatte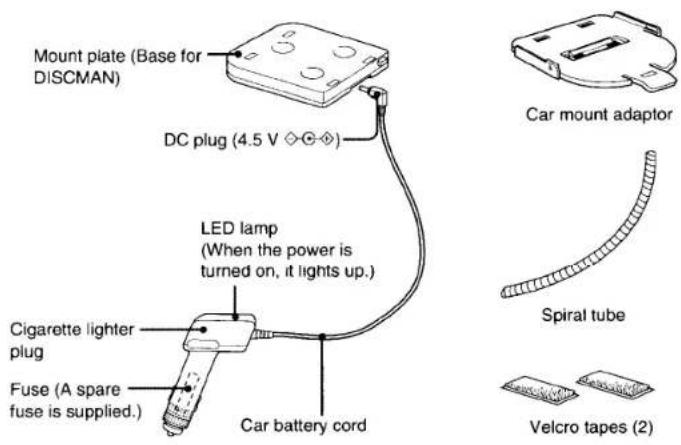
Auto-Verbindungspack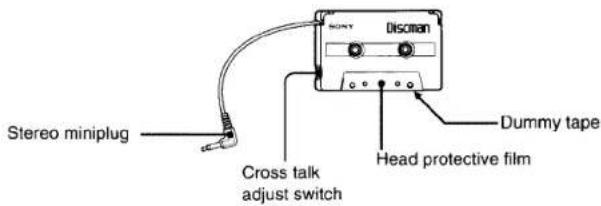
Hinweise
- Wählen Sie die Position des Übersprech-Einstellschalters, um die optimale Klangqualität zu erzielen.
- Entfernen Sie nicht die Schutzfolie des Kopfes (Metallteil).
- Ziehen Sie das Dummy-Band nicht heraus und verunreinigen Sie es nicht.
- ÜBER DAS AUTO-ANSCHLUSSSET
- SONY
- D 13:2CK
- HINWEIS
- VORSICHTSMASSNAHMEN
- SICHERUNGSWECHSEL
- HINWEISE ZUM SICHERUNGSWECHSEL
- TECHNISCHE DATEN
- MONTAGEPLATTE
- FAHRZEUG-ANSCHLUSSPACK
- MITGELIEFERTES ZUBEHÖR UND TEILEIDENTIFIKATION
- HINWEISE
- ANSCHLUSS
- HINWEIS ZUM GLEICHSTROMSTECKER
- INSTALLATION
- ANBRINGEN DES CD-PLAYERS
- INSTALLATION MIT KLETTBÄNDERN
- AUTO-ANSCHLUSSPACK
Marke : SONY
Modell : Discman D-132CK
Kategorie : CD-Player