
Discman D-240 - CD-Player SONY - Kostenlose Bedienungsanleitung
Finden Sie kostenlos die Bedienungsanleitung des Geräts Discman D-240 SONY als PDF.


| Produkttyp | CD-Player (tragbar) |
| Marke / Modell | Sony Discman D-240 |
| Abmessungen (B/H/T) | ca. 130 × 30,5 × 142 mm |
| Gewicht (ohne Akku) | ca. 270 g |
| Stromversorgung | Netzteil (DC IN 4,5 V), Akku BP-DM10/BP-DM20, 2× LR6 (AA) Alkali-Batterien |
| Akkulaufzeit (BP-DM10) | ca. 3,5 h (ESP ein) / 4,0 h (ESP aus) |
| Akkulaufzeit (BP-DM20) | ca. 5,5 h (ESP ein) / 7,0 h (ESP aus) |
| Batterielaufzeit (Alkali) | ca. 8 h (ESP ein) / 12 h (ESP aus) |
| Kopfhörerausgang | 15 mW + 15 mW an 16 Ω (Stereominiklinke) |
| Line-Ausgang | 0,7 V RMS an 50 kΩ (Stereominiklinke) |
| Frequenzgang | 20 – 20.000 Hz |
| ESP (elektronischer Stoßschutz) | Pufferspeicher für ca. 3 Sekunden |
| Bass-Boost | Einstellbar auf NORM / MID / MAX |
| AVLS (Lautstärkebegrenzung) | Ja (umschaltbar ON/OFF) |
| Wiedergabemodi | Normal, Wiederholen (Titel/alle), Zufall (Shuffle), Programmiert (RMS bis 22 Titel), Intro-PGM |
| Resume-Funktion | Ja (Weiterspielen ab Unterbrechung, umschaltbar ON/OFF) |
| Tastensperre (HOLD) | Ja |
| Laserklasse | 1 (GaAlAs, 780 nm) |
| Betriebstemperatur | 5 °C bis 35 °C |
| Lieferumfang (D-240) | Stereo-Kopfhörer, Tragetasche (nur UK-Modell) |
| Reinigung der Linse | Mit Reinigungskit KK-DM1 (empfohlen) |
| Reinigung des Gehäuses | Weiches, leicht feuchtes Tuch; keine Lösungsmittel |
| Ersatzakku / -netzteil | Ersatzakku BP-DM10 oder BP-DM20; Netzteil AC-E45HG |
Häufig gestellte Fragen - Discman D-240 SONY
Benutzerfragen zu Discman D-240 SONY
0 Frage zu diesem Gerät. Beantworten Sie die, die Sie kennen, oder stellen Sie Ihre eigene.
Eine neue Frage zu diesem Gerät stellen
Laden Sie die Anleitung für Ihr CD-Player kostenlos im PDF-Format! Finden Sie Ihr Handbuch Discman D-240 - SONY und nehmen Sie Ihr elektronisches Gerät wieder in die Hand. Auf dieser Seite sind alle Dokumente veröffentlicht, die für die Verwendung Ihres Geräts notwendig sind. Discman D-240 von der Marke SONY.
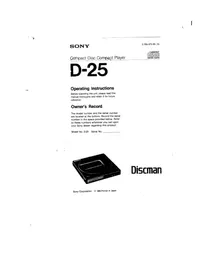
BEDIENUNGSANLEITUNG Discman D-240 SONY
Compact Disc Compact Player
Bedienungsanleitung
Discman

D-240
D-242CK
D-242SK
D-245
D-247
Sony Corporation ©1995 Gedruckt in Malaysia
Willkommen!
Vielen Dank, dass Sie sich für den Sony Compact Disc Compact Player entschieden haben. Bevor Sie Ihren Discman in Betrieb nehmen, lesen Sie bitte diese Anleitung und bewahren Sie sie zum späteren Nachschlagen auf. Informationen zum mitgelieferten Zubehör für Ihren Discman finden Sie unter "Mitgeliefertes Zubehör" am Ende dieser Anleitung.
Eigentümer-Notiz
Die Modell- und Seriennummern befinden sich auf der Unterseite. Notieren Sie diese Nummern in den unten vorgesehenen Feldern. Beziehen Sie sich darauf, wenn Sie Ihren Sony-Händler zu diesem Produkt kontaktieren.
Modell-Nr.
Serien-Nr.
WARNUNG
Um Brand- oder Stromschlaggefahr zu vermeiden, setzen Sie das Gerät nicht Regen oder Feuchtigkeit aus.
Um einen elektrischen Schlag zu vermeiden, öffnen Sie nicht das Gehäuse. Überlassen Sie Wartungsarbeiten nur qualifiziertem Fachpersonal.
VORSICHT
Die Verwendung optischer Instrumente mit diesem Produkt erhöht die Gefahr von Augenschäden.
INFORMATION
Für Kunden in den USA
Dieses Gerät wurde getestet und entspricht den Grenzwerten für ein digitales Gerät der Klasse B gemäß Teil 15 der FCC-Bestimmungen.
Diese Grenzwerte sollen einen angemessenen Schutz gegen schädliche Störungen in einer Wohnanlage bieten. Dieses Gerät erzeugt, verwendet und kann Hochfrequenzenergie ausstrahlen und kann, wenn es nicht gemäß den Anweisungen installiert und verwendet wird, schädliche Störungen des Funkverkehrs verursachen. Es gibt jedoch keine Garantie, dass in einer bestimmten Installation keine Störungen auftreten. Wenn dieses Gerät schädliche Störungen des Radio- oder Fernsehempfangs verursacht, was durch Ein- und Ausschalten des Geräts festgestellt werden kann, wird der Benutzer aufgefordert, die Störungen durch eine oder mehrere der folgenden Maßnahmen zu beheben:
- Richten Sie die Empfangsantenne neu aus oder verlegen Sie sie.
- Vergrößern Sie den Abstand zwischen dem Gerät und dem Empfänger.
- Schließen Sie das Gerät an eine Steckdose an, die zu einem anderen Stromkreis gehört als der des Empfängers.
- Wenden Sie sich an den Händler oder einen erfahrenen Radio-/Fernsehtechniker. Sie werden darauf hingewiesen, dass Änderungen oder Modifikationen, die nicht ausdrücklich in diesem Handbuch genehmigt sind, Ihre Berechtigung zum Betrieb dieses Geräts aufheben können.
Für Kunden in Großbritannien
Dieser CD-Player ist als LASERPRODUKT DER KLASSE 1 klassifiziert. Das Etikett „LASERPRODUKT DER KLASSE 1“ befindet sich an der Unterseite des Geräts.
LASERPRODUKT DER KLASSE 1
LASERGERÄT DER KLASSE 1
LASERGERÄT DER KLASSE 1
Für Kunden in Australien
Das Netzkabel des Netzadapters kann nicht ersetzt werden; wenn das Kabel beschädigt ist, muss der Netzadapter entsorgt werden.
CD sofort abspielen!
Wenn Sie sofort eine CD abspielen möchten, verwenden Sie Ihren Discman am Hausstrom. Weitere Optionen sind die folgenden drei: Akku, Trockenbatterien (siehe "Stromquellen" auf der Rückseite) und Autobatterie.
1 Anschließen
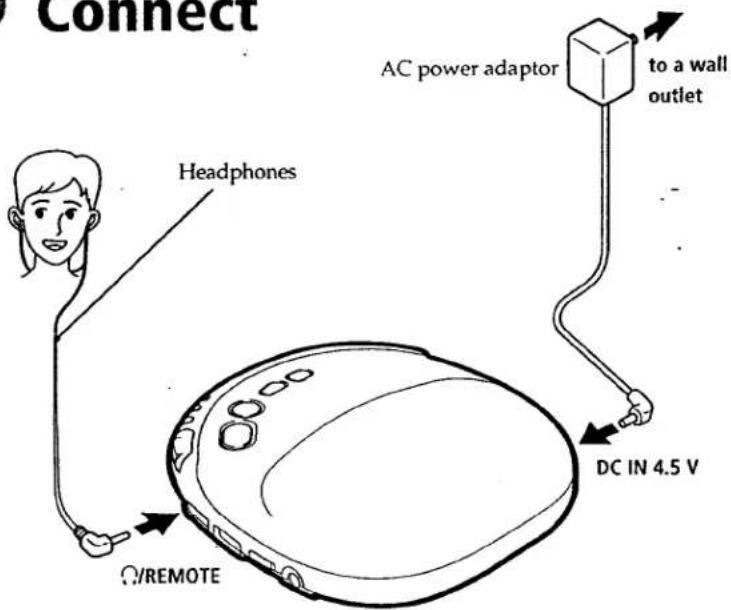
Für Modelle mit mitgeliefertem Netzstecker-Adapter
Wenn der Netzadapter nicht in die Steckdose passt, verwenden Sie den Netzstecker-Adapter.
Hinweis
Die Art der Kopfhörer kann von Ihren Kopfhörern abweichen.

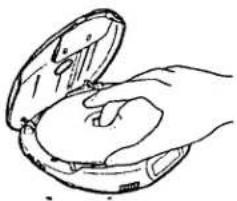
CD einlegen
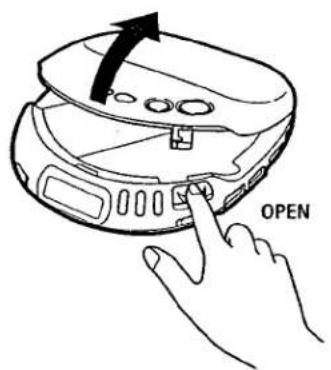
① Drücken Sie OPEN und öffnen Sie den Deckel.
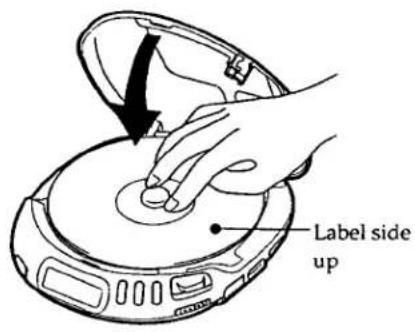
② Legen Sie die CD auf die Spindel.
③ Wiedergabe
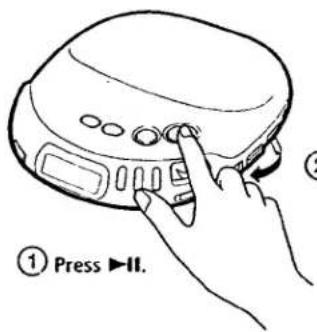
② Lautstärke einstellen.
Zum Stoppen der Wiedergabe ■ drücken.
| To | Press |
| Pause | ▶II |
| Resume play after pause | ▶II |
| Find the beginning of the current track (AMS*) | ▶◀ once** |
| Find the beginning of previous tracks (AMS) | ▶◀ repeatedly** |
| Find the beginning of the next track (AMS) | ▶◀ once** |
| Find the beginning of succeeding tracks (AMS) | ▶◀ repeatedly** |
| Go forward quickly | Hold down ▶▶I ** |
| Go backwards quickly | Hold down ▶◀ ** |
*AMS = Automatic Music Sensor **Diese Bedienungen sind sowohl während der Wiedergabe als auch während der Pause möglich.
Entfernen der CD
CD entfernen, während der Drehpunkt gedrückt wird.
Hinweise zur Anzeige
- Wenn Sie ▶II drücken (wenn RESUME auf OFF gesetzt ist), erscheinen die Gesamtzahl der Titel der CD und die Gesamtspielzeit für 2 Sekunden.
- Während der Wiedergabe erscheinen die Titelnummer und die abgelaufene Spielzeit des aktuellen Titels.
▶Weitere Bedienungen
Wiederholtes Abspielen von Titeln (Repeat Play)
Sie können Titel im Normal-, Intro-, Shuffle- oder RMS-Modus (Random Music Sensor) wiederholt abspielen. Wiederholen Sie alle Titel oder nur einen Titel.
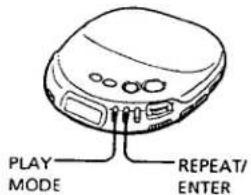
Um alle Titel zu wiederholen
Während der Wiedergabe REPEAT/ENTER drücken. Die Anzeige „←“ erscheint.
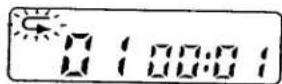
Zum Abbrechen der Wiederholungswiedergabe REPEAT/ENTER erneut drücken.
Zum Wiederholen eines einzelnen Titels
1 Drücken Sie REPEAT/ENTER, während der Titel, den Sie wiederholen möchten, abgespielt wird. Die Anzeige "⊆" erscheint.
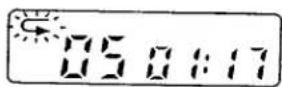
2 Drücken Sie PLAY MODE wiederholt, bis "1" erscheint.
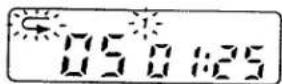
Um einen anderen Titel zu wiederholen, drücken Sie ◀◀ oder ▶▶.
- Während der Pause blinkt die abgelaufene Spielzeit im Display.
- Zwischen den Titeln erscheint die Zeit bis zum Beginn des nächsten Titels mit dem Hinweis "-".
Hinweise zur Handhabung von CDs
• Halten Sie die CD am Rand, um sie sauber zu halten. Berühren Sie nicht die Oberfläche. - Kleben Sie kein Papier oder Klebeband auf die CD. - Setzen Sie die CD nicht direktem Sonnenlicht oder Wärmequellen wie Warmluftkanälen aus. Lassen Sie die CD nicht in einem in direktem Sonnenlicht geparkten Auto liegen.
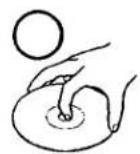
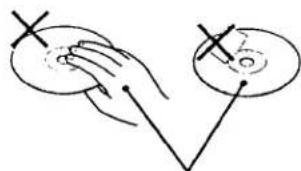
Nicht so
Zum Abbrechen der Wiederholung drücken Sie erneut REPEAT/ENTER.
Nur die gewünschten Titel abspielen (INTRO PGM-Wiedergabe)
Sie können Ihre Lieblingstitel auswählen und abspielen, indem Sie den Anfang jedes Titels auf einer CD abtasten.
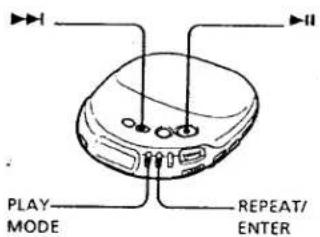
1 Drücken Sie während der Wiedergabe PLAY MODE wiederholt, bis "INTRO PGM" blinkt.
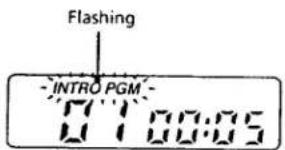
2 Drücken Sie ▶H, um das Abtasten zu starten. Der Discman spielt die ersten 15 Sekunden jedes Titels ab und "INTRO PGM" blinkt schneller.
3 Drücken Sie REPEAT/ENTER, während der gewünschte Titel abgespielt wird. Um den Titel zu überspringen, drücken Sie ▶▶ oder warten Sie einfach auf den nächsten Titel.
Wenn Sie die CD durchgehen, hört "INTRO PGM" auf zu blinken und die von Ihnen gewählten Titel werden automatisch abgespielt.
Um die Programmierung zu beenden, bevor Sie die CD durchhören, drücken Sie ▶II. Die ausgewählten Titel werden abgespielt.
Um die INTRO-PGM-Wiedergabe abzubrechen, drücken Sie PLAY MODE wiederholt, bis im Display kein Wiedergabemodus mehr angezeigt wird.
Um die RMS-Wiedergabe abzubrechen, drücken Sie PLAY MODE, bis "RMS" verschwindet.
So überprüfen Sie das Programm
Zur Überprüfung während der Programmierung drücken Sie vor Schritt 5 REPEAT/ENTER. Zur Überprüfung während der RMS-Wiedergabe drücken Sie PLAY MODE wiederholt, bis "RMS" blinkt, und dann REPEAT/ENTER.
Jedes Mal, wenn Sie die Taste drücken, erscheinen die Titelnnummern in der von Ihnen festgelegten Reihenfolge.
Hinweis
- Wenn Sie nach dem 22. Titel einen weiteren Titel programmieren, wird der zuerst programmierte Titel gelöscht und der neue Titel stattdessen programmiert.
Titel in zufälliger Reihenfolge abspielen (Shuffle Play)
Sie können die Titel einer CD in zufälliger Reihenfolge abspielen.
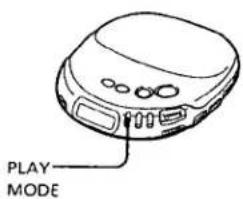
Drücken Sie während der Wiedergabe PLAY MODE wiederholt, bis "SHUF" erscheint. Die Titel werden in zufälliger Reihenfolge abgespielt.
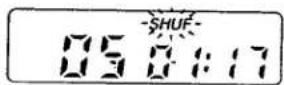
Um die Shuffle-Wiedergabe abzubrechen, drücken Sie PLAY MODE wiederholt, bis im Display kein Wiedergabemodus mehr angezeigt wird.
Hinweis
- Während der Shuffle-Wiedergabe können Sie nicht durch Drücken von ◀◀ zu vorherigen Titeln zurückkehren.
Verwendung anderer Funktionen
Für einen kräftigeren Bassklang Sie können einen kraftvoll verstärkten Bass genießen.
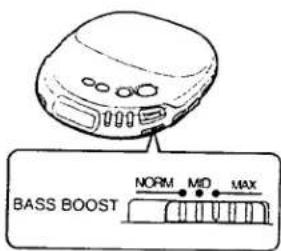
Setzen Sie BASS BOOST auf die gewünschte Position.
Hinweis
- Wenn der Klang bei verstärktem Bass verzerrt ist, drehen Sie die Lautstärke herunter.
Zur Vermeidung von Tonaussetzern (ESP)
Die ESP-Funktion (Electronic Shock Protection) verhindert Tonaussetzer, indem sie einen Pufferspeicher verwendet, der Musikdaten für etwa 3 Sekunden speichert. Verwenden Sie diese Funktion beim Hören während eines Spaziergangs oder bei der Wiedergabe im Auto.
Wiedergabe von Titeln in der gewünschten Reihenfolge (RMS-Wiedergabe)
Sie können bis zu 22 Titel in einer von Ihnen gewählten Reihenfolge programmieren.
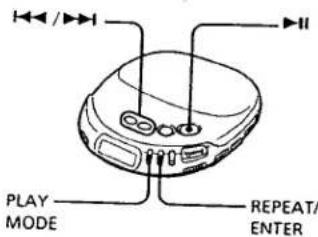
1 Drücken Sie während der Wiedergabe wiederholt PLAY MODE, bis "RMS" blinkt.
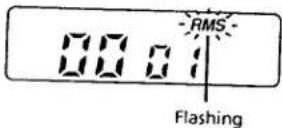
2 Drücken Sie ◀◀ oder ▶▶, um einen Titel auszuwählen. Die Titelnnummer und die Wiedergabereihenfolge erscheinen.

3 Drücken Sie REPEAT/ENTER, um den Titel zu programmieren.
4 Wiederholen Sie die Schritte 2 und 3, um die restlichen Titel zu programmieren.
5 Drücken Sie ▶II. "RMS" hört auf zu blinken und die ausgewählten Titel werden in der von Ihnen festgelegten Reihenfolge abgespielt.
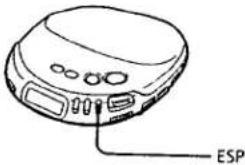
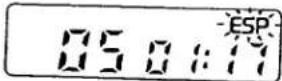
Drücken Sie ESP. Die ESP-Anzeige erscheint.
Hinweise
- Die Wiedergabe kann stoppen, wenn der Discman einen starken Stoß erhält, selbst wenn die ESP-Funktion eingeschaltet ist. - Wenn Sie eine CD mit einem Kassettenrekorder, der eine Leerlauf-Suchfunktion hat, auf eine Kassette aufnehmen, stellen Sie sicher, dass die ESP-Anzeige nicht angezeigt wird (die ESP-Funktion ist ausgeschaltet).
- Wenn Sie ein Geräusch oder Tonaussetzer hören, wenn: - Sie eine verschmutzte oder zerkratzte CD hören, - Sie einen Audio-Test-CD hören oder - der Discman kontinuierlichen Stößen ausgesetzt ist, drücken Sie erneut ESP, sodass die ESP-Anzeige ausgeschaltet wird.
• Der Ton kann überspringen, wenn Sie ESP während der Wiedergabe drücken.
Weiter auf der Rückseite →
zum Sperren der Tasten
Sie können Ihren Discman gegen versehentliche Bedienung sperren.
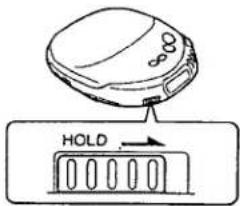
Schieben Sie HOLD in Pfeilrichtung. Wenn Sie eine Taste drücken, erscheint "Hol d" im Display.
Zum Entsperren schieben Sie HOLD zurück.
Zum Schutz Ihres Gehörs (AVLS) Die AVLS-Funktion (Automatic Volume Limiter System) begrenzt die maximale Lautstärke, um Ihre Ohren zu schützen.
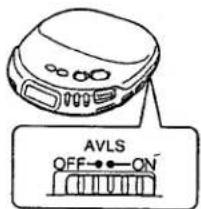
Setzen Sie AVLS auf ON.
Hinweis
- Wenn der Klang verzerrt ist, wenn Sie den bassverstärkten Klang mit der AVLS-Funktion hören, drehen Sie die Lautstärke herunter.
Zum Fortsetzen der Wiedergabe ab dem Punkt, an dem Sie die CD gestoppt haben (Resume Play) Normalerweise beginnt die Wiedergabe bei jedem Stopp und erneuten Start von Anfang der CD. Die Resume-Play-Funktion ermöglicht es Ihnen jedoch, ab dem Punkt zu hören, an dem Sie den Discman zuletzt ausgeschaltet haben.
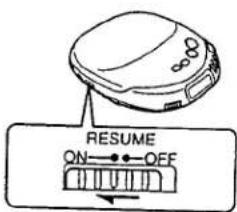
Setzen Sie RESUME auf ON.
Zum Abbrechen der Wiedergabefortsetzung setzen Sie RESUME auf OFF.
Hinweise
• Selbst wenn RESUME auf ON gesetzt ist, beginnt die Wiedergabe von Anfang an, wenn Sie den Deckel öffnen. • Die Fortsetzungsposition kann um etwa 30 Sekunden ungenau sein.
So schalten Sie den Signalton aus
Sie können den Signalton ausschalten, der bei der Bedienung Ihres Discmans ertönt.
Während Sie ■ gedrückt halten, schließen Sie die Stromquelle an.
Anschluss an andere Stereoanlagen
Sie können die CD über andere Stereoanlagen hören oder eine CD auf eine Kassette aufnehmen. Einzelheiten finden Sie in der Bedienungsanleitung der anderen Geräte. Schalten Sie vor dem Anschließen alle Geräte aus.
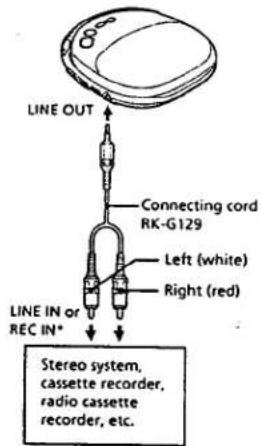
*Zum Anschluss eines Geräts ohne LINE IN- oder REC IN-Buchse verwenden Sie das Verbindungskabel RK-G134 und schließen es an die MIC-Buchse an.
Hinweis
- Bevor Sie die CD abspielen, verringern Sie die Lautstärke des angeschlossenen Geräts, um die angeschlossenen Lautsprecher nicht zu beschädigen.
Abspielen einer CD im Auto
Sie können Ihren Discman wie unten abgebildet im Auto verwenden.
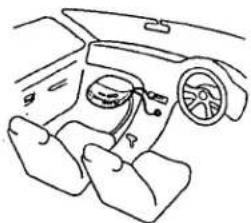
Zum Anschluss Ihres Discmans an ein Auto-Kassettendeck benötigen Sie folgendes Zubehör:
• Montageplatte CPM-3001
• Plattenarm CPM-300A
• Auto-Anschlussset CPA-4, CPA-8 oder
- Montagearm CPM-300PK (Montageplatte + Plattenarm) und Auto-Anschlussset CPA-I, CPA-8
- Montageset CPM-300CK (Montageplatte + Plattenarm + Auto-Anschlussset)
oder, um Ihren Discman auf einer Konsole zu platzieren.
- Montageset CPM-300PC (Montageplatte + Auto-Anschlussset)
Einzelheiten entnehmen Sie bitte der Bedienungsanleitung des jeweiligen Zubehörs.
Bei Verwendung der Montageplatte CPM-300P
Befestigen Sie den mitgelieferten Auto-Montageadapter an der CPM-300P, bevor Sie den Discman installieren.
Hinweise
- Legen Sie den Discman nicht auf das Armaturenbrett.
- Lassen Sie den Discman nicht in einem in der Sonne geparkten Auto.
- Verwenden Sie ein Sony Auto-Anschlussset zur Reduzierung von Störgeräuschen.
Zündungsabhängige Funktion
Mit dieser Funktion stoppt Ihr Discman automatisch, wenn Sie den Motor des Autos ausschalten. (Diese Funktion ist bei einigen Fahrzeugen je nach Modell nicht möglich).
Stromquellen
Verwendung des Akkus (BP-DM10)
Laden Sie den Akku vor der ersten Verwendung auf.
1 Öffnen Sie den Deckel des Batteriefachs.
(Rückseite)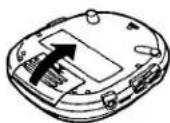
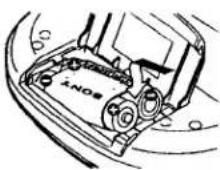
2 Legen Sie den Akku so ein, dass das Wort "Discman" in die gleiche Richtung zeigt wie in der Abbildung im Deckel, und schließen Sie den Deckel.
3 Schließen Sie das Netzteil an und drücken Sie CHARGE. Laden Sie etwa 2 Stunden lang. Die Anzeige "CHG" leuchtet auf.
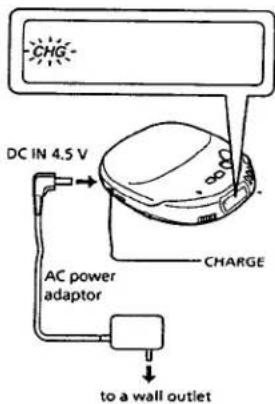
4 Wenn der Akku vollständig geladen ist, trennen Sie das Netzteil.
Wann der Akku geladen werden sollte
Wenn der Akku entladen ist, erscheint die Anzeige im Display. Laden Sie den Akku auf.
Akkulaufzeit
Wenn Sie den Discman auf einer ebenen und stabilen Oberfläche verwenden, sind ca. 3,5 Stunden (mit ESP) und 4,0 Stunden (ohne ESP) ununterbrochene Wiedergabe möglich.
Hinweise
- Die Ladezeit variiert je nach Verwendung des Akkus.
- Wenn der Akku neu ist oder längere Zeit nicht verwendet wurde, kann es sein, dass er erst nach mehreren Lade- und Entladevorgängen vollständig geladen wird.
- Wenn die Akkulaufzeit um etwa die Hälfte kürzer wird, ersetzen Sie den Akku durch den Sony BP-DM10- oder BP-DM20-Akku. Verwenden Sie keinen anderen Akku.
Wenn Sie den Akku BP-DM20 verwenden
Sie können den BP-DM20 auf die gleiche Weise wie den BP-DM10 verwenden.
Die Ladezeit beträgt jedoch ca. 3 Stunden. Die Akkulaufzeit beträgt ca. 5,5 Stunden (mit ESP) und ca. 7 Stunden (ohne ESP).
Verwendung von Trockenbatterien
1 Öffnen Sie den Deckel des Batteriefachs.
(Rückseite)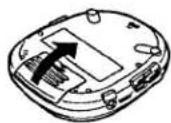
2 Legen Sie zwei LR6-Batterien (Größe AA) ein, indem Sie die ⊕- und ⊖-Markierungen mit dem Diagramm im Batteriefach abgleichen, und schließen Sie den Deckel.
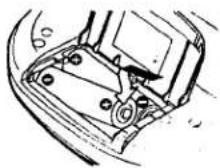
Wann die Trockenbatterien ersetzt werden sollten
Wenn die Batterien erschöpft sind, erscheint die Anzeige ∞ im Display. Ersetzen Sie alle Batterien durch neue.
Lebensdauer der Alkaline-Batterien
Wenn Sie den Discman auf einer ebenen und stabilen Oberfläche verwenden, sind ca. 8 Stunden (mit ESP) und 12 Stunden (ohne ESP) ununterbrochene Wiedergabe möglich.
Hinweise
• Laden Sie die Trockenbatterien nicht auf. • Mischen Sie keine neuen Batterien mit alten. - Verwenden Sie nicht verschiedene Batterietypen zusammen.
▶Zusätzliche Informationen
Vorsichtsmaßnahmen
Zur Sicherheit
- Falls feste Gegenstände oder Flüssigkeiten in das Gerät gelangen, ziehen Sie den Netzstecker und lassen Sie es von qualifiziertem Personal überprüfen, bevor Sie es weiter verwenden.
- Stecken Sie keine Fremdkörper in die DC IN 4,5 V (externer Stromanschluss) Buchse.
Zu den Stromquellen
- Wenn Sie das Gerät längere Zeit nicht verwenden, trennen Sie alle Stromquellen vom Gerät.
- Das Typenschild mit Betriebsspannung, Leistungsaufnahme usw. befindet sich auf der Rückseite des Netzadapters (nur für den Nahen Osten).
Zum Netzadapter
- Verwenden Sie nur den mitgelieferten Netzadapter. Wenn Ihr Gerät nicht damit geliefert wird, verwenden Sie den Netzadapter AC-E45HG. Verwenden Sie keinen anderen Netzadapter.
Polarität des Steckers
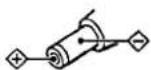
- Ziehen Sie den Netzadapter aus der Steckdose, indem Sie den Adapter selbst festhalten, nicht am Kabel ziehen.
Zu Trocken- und Akkubatterien
- Werfen Sie die Batterien nicht ins Feuer.
- Tragen Sie den Akku nicht mit Münzen oder anderen Metallgegenständen. Es kann Wärme erzeugen, wenn die positiven und negativen Anschlüsse der Batterie versehentlich durch einen Metallgegenstand kontaktiert werden.
Zum Gerät
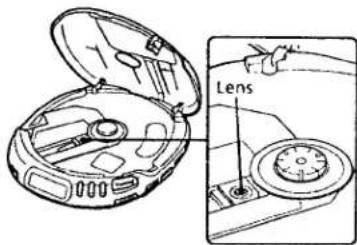
- Halten Sie die Linse des Geräts sauber und berühren Sie sie nicht. Wenn Sie dies tun, kann die Linse beschädigt werden und das Gerät funktioniert nicht ordnungsgemäß.
- Legen Sie keine schweren Gegenstände auf das Gerät. Das Gerät und die CD können beschädigt werden.
- Lassen Sie das Gerät nicht in der Nähe von Wärmequellen oder an Orten liegen, die direkter Sonneneinstrahlung, übermäßigem Staub oder Sand, Feuchtigkeit, Regen, mechanischen Stößen, unebenen Oberflächen oder in einem Auto mit geschlossenen Fenstern ausgesetzt sind.
- Wenn das Gerät Störungen beim Radio- oder Fernsehempfang verursacht, schalten Sie das Gerät aus oder entfernen Sie es vom Radio oder Fernseher.
- Wickeln Sie das Gerät während des Gebrauchs nicht in ein Tuch oder eine Decke, da dies zu Fehlfunktionen oder schweren Unfällen führen kann.
Zu Kopfhörern
Straßensicherheit
Verwenden Sie Kopfhörer nicht beim Fahren, Radfahren oder beim Bedienen eines motorisierten Fahrzeugs. Dies kann eine Verkehrsgefahr darstellen und ist in einigen Gebieten illegal. Es kann auch potenziell gefährlich sein, Ihre Kopfhörer mit hoher Lautstärke zu verwenden, während Sie gehen, insbesondere an Fußgängerüberwegen. Sie sollten äußerste Vorsicht walten lassen oder die Verwendung in potenziell gefährlichen Situationen einstellen.
Vermeidung von Hörschäden
Vermeiden Sie die Verwendung von Kopfhörern mit hoher Lautstärke. Hörexperten raten von kontinuierlichem, lautem und längerem Spielen ab. Wenn Sie ein Klingeln in Ihren Ohren bemerken, reduzieren Sie die Lautstärke oder stellen Sie die Verwendung ein.
Rücksicht auf andere
Halten Sie die Lautstärke auf einem moderaten Niveau. Dies ermöglicht es Ihnen, Außengeräusche zu hören und Rücksicht auf die Menschen in Ihrer Umgebung zu nehmen.
Wartung
Reinigung der Linse
Reinigen Sie die Linse mit einem Linsenreinigungsset KK-DM1.
Reinigen des Gehäuses
Verwenden Sie ein weiches, leicht mit Wasser oder einer milden Reinigungslösung angefeuchtetes Tuch. Verwenden Sie keinen Alkohol, kein Benzin und keinen Verdünner.
Fehlerbehebung
Sollte ein Problem nach diesen Überprüfungen weiterhin bestehen, wenden Sie sich an Ihren nächsten Sony-Händler.
Die CD spielt nicht ab oder "no di SC" erscheint im Display, obwohl eine CD eingelegt ist.
→ Die CD ist verschmutzt oder defekt. → Legen Sie die CD mit der Etikettseite nach oben ein. → Es hat sich Feuchtigkeit kondensiert. Lassen Sie das Gerät einige Stunden stehen, bis die Feuchtigkeit verdunstet ist. → Die Linse ist verschmutzt. → Schließen Sie den Deckel des Geräts und das Batteriefach fest. → Stellen Sie sicher, dass die Batterien richtig eingelegt sind. → Schließen Sie den Netzadapter fest an eine Steckdose an.
Kein Ton oder Rauschen ist zu hören.
→ Stecken Sie die Stecker fest ein. → Die Stecker sind verschmutzt. Reinigen Sie die Stecker regelmäßig mit einem trockenen, weichen Tuch.
"HI dc I n" erscheint im Display.
→ Verwenden Sie nur den mitgelieferten Netzadapter oder den empfohlenen Netzadapter AC-E45HG (nicht im Lieferumfang enthalten).
"Hol d" erscheint im Display, wenn Sie eine Taste drücken.
→ Die Tasten sind gesperrt. Schieben Sie HOLD zurück.
Die Batterielebensdauer ist kurz.
→ Es werden Manganbatterien verwendet. Verwenden Sie Alkalibatterien. → Ersetzen Sie die Batterien durch neue.
Die Lautstärke ist auf einen bestimmten Pegel begrenzt, auch wenn Sie versuchen, sie zu erhöhen.
→ Der AVLS-Schalter ist auf ON eingestellt. Stellen Sie ihn auf OFF.
Technische Daten
System
Compact-Disc-Digital-Audiosystem
- Eigenschaften der Laserdiode
Material: GaAlAs
Wellenlänge: λ = 780 nm
Emissionsdauer: Kontinuierlich
Laserleistung: Weniger als 44,6 μW (gemessen bei
200 mm Abstand (von der Objektivlinse)
Fehlerkorrektur
Sony Super Strategy Cross Interleave Reed
Solomon-Code
D/A-Wandlung
1-Bit-Quarz-Zeitachsensteuerung
Frequenzgang
20 - 20.000 Hz * dB (gemessen nach EIAJ CP-
307)
Ausgangsleistung (bei 4,5 V Eingangspegel)
Kopfhörer (Stereo-Miniklinke)
15 mW + 15 mW an 16 Ohm
Line-Ausgang (Stereo-Miniklinke)
Ausgangspegel 0,7 V eff. an 50 kOhm
Empfohlene Lastimpedanz über 10
kOhm
Allgemeines
Stromversorgung
• Akku: 2,4 V Gleichspannung
- Zwei LR6 (AA) Batterien: 3 V Gleichspannung
• Netzteil (DC IN 4,5 V Buchse):
220 - 230 V, 50 Hz (europäisches und asiatisches Modell)
Modell
120 V, 60 Hz (USA, Kanada, Mittel- und Südamerika-Modell)
Südamerika-Modell)
110 - 240 V, 50/60 Hz (Modell für den Nahen Osten)
Modell)
240 V, 50 Hz (britisches und australisches Modell)
100 - 240 V, 50/60 Hz (Modell für andere Länder)
Länder)
Sony CPM-300P-Montageplatte und CPM-300PK-Montagearm für den Einsatz an einer Autobatterie.
300PK-Montagearm für den Einsatz an einer Autobatterie.
4,5 V Gleichstrom
Abmessungen (B/H/T) (ohne hervorstehende Teile und Bedienelemente)
und Bedienelemente)
Ca. 130 × 30,5 × 142 mm
5¼ × 1¼ × 5⅛ Zoll (ca.)
Gewicht (ohne Akku)
Ca. 270 g (9,6 oz)
Betriebstemperatur
5 °C – 35 °C (41 °F – 95 °F)
Mitgeliefertes Zubehör
D-240
Stereo-Kopfhörer (1)
Tragetasche* (1)
*Nur für britisches Modell
D-242CK
Netzteil* (1)
Anschlusskabel** (Phono-Stecker × 2 auf Stereo-
Ministecker) (1)
Autobatteriekabel (1)
Auto-Anschlusspack (1)
Spiralschlauch (1)
Ersatzsicherung (1)
Klettbänder (2)
*Nicht im Lieferumfang für Großbritannien und Europa enthalten
Modell
**Nicht im Lieferumfang für Großbritannien, USA, Europa enthalten
Modell und Weltmodell
D-2425K
Netzteil (1)
Stereo-Kopfhörer (1)
Autobatteriekabel (1)
Auto-Anschlusspack (1)
Spiralschlauch (1)
Klettbänder (2)
Ersatzsicherung (1)
Originalkappe (1)
D-245
Netzteil (1)
Stereo-Kopfhörer (1)
Verbindungskabel (Phonostecker × 2 ↔ Stereo-
Klinkenstecker)* (1)
Akku BP-DM10** (1)
Tragetasche*** (1)
*Nicht im Lieferumfang des Modells für Großbritannien und Europa enthalten.
Modell für Welt
**Nur beim Modell für Welt
***Nur beim Modell für Großbritannien und Welt
D-247
Netzteil (1)
Anschlusskabel (Telefonstecker × 2 ↔ Stereo-Ministecker) (1)
Stereo-Kopfhörer (1)
Akku BP-DM10 (1)
Änderungen an Design und technischen Daten vorbehalten.
Empfohlenes Zubehör
Bügelarm CPM-300A
Montageplatte CPM-300P
Montagearm CPM-300PK
Montagesatz CPM-300PC
Montagesatz CPM-300CK
Auto-Anschlusspaket CPA-4, CPA-8
Autobatteriekabel DCC-E245HC
Aktives Lautsprechersystem SRS-A50
Akku BP-DM10, BP-DM20
Wiederaufladbarer Akku BP-DM10, BP-DM20
Anschlusskabel RK-G129
Netzteil AC-E45HG
Stereo-Kopfhörer MDR-25, MDR-E747
Ihr Händler führt möglicherweise nicht alle oben
aufgeführten Zubehörteile. Bitte fragen Sie den Händler
nach detaillierten Informationen über das Zubehör in
Ihrem Land.
- COMPACT DISC COMPACT PLAYER
- WILLKOMMEN
- EIGENTÜMER-NOTIZ
- WARNUNG
- UM BRAND- ODER STROMSCHLAGGEFAHR ZU VERMEIDEN, SETZEN SIE DAS GERÄT NICHT REGEN ODER FEUCHTIGKEIT AUS
- VORSICHT
- INFORMATION
- FÜR KUNDEN IN DEN USA
- FÜR KUNDEN IN GROSSBRITANNIEN
- FÜR KUNDEN IN AUSTRALIEN
- CD SOFORT ABSPIELEN
- ANSCHLIESSEN
- CD EINLEGEN
- ③ WIEDERGABE
- ENTFERNEN DER CD
- HINWEISE ZUR ANZEIGE
- WEITERE BEDIENUNGEN
- WIEDERHOLTES ABSPIELEN VON TITELN (REPEAT PLAY)
- UM ALLE TITEL ZU WIEDERHOLEN
- ZUM WIEDERHOLEN EINES EINZELNEN TITELS
- HINWEISE ZUR HANDHABUNG VON CDS
- NUR DIE GEWÜNSCHTEN TITEL ABSPIELEN (INTRO PGM-WIEDERGABE)
- SO ÜBERPRÜFEN SIE DAS PROGRAMM
- HINWEIS
- TITEL IN ZUFÄLLIGER REIHENFOLGE ABSPIELEN (SHUFFLE PLAY)
- VERWENDUNG ANDERER FUNKTIONEN
- ZUR VERMEIDUNG VON TONAUSSETZERN (ESP)
- WIEDERGABE VON TITELN IN DER GEWÜNSCHTEN REIHENFOLGE (RMS-WIEDERGABE)
- HINWEISE
- SO SCHALTEN SIE DEN SIGNALTON AUS
- ANSCHLUSS AN ANDERE STEREOANLAGEN
- ABSPIELEN EINER CD IM AUTO
- BEI VERWENDUNG DER MONTAGEPLATTE CPM-300P
- ZÜNDUNGSABHÄNGIGE FUNKTION
- STROMQUELLEN
- VERWENDUNG DES AKKUS (BP-DM10)
- WANN DER AKKU GELADEN WERDEN SOLLTE
- AKKULAUFZEIT
- WENN SIE DEN AKKU BP-DM20 VERWENDEN
- VERWENDUNG VON TROCKENBATTERIEN
- WANN DIE TROCKENBATTERIEN ERSETZT WERDEN SOLLTEN
- LEBENSDAUER DER ALKALINE-BATTERIEN
- ZUSÄTZLICHE INFORMATIONEN
- VORSICHTSMASSNAHMEN
- ZUR SICHERHEIT
- ZU DEN STROMQUELLEN
- ZUM NETZADAPTER
- ZU TROCKEN- UND AKKUBATTERIEN
- ZUM GERÄT
- ZU KOPFHÖRERN
- STRASSENSICHERHEIT
- VERMEIDUNG VON HÖRSCHÄDEN
- RÜCKSICHT AUF ANDERE
- WARTUNG
- REINIGUNG DER LINSE
- REINIGEN DES GEHÄUSES
- FEHLERBEHEBUNG
- DIE CD SPIELT NICHT AB ODER "NO DI SC" ERSCHEINT IM DISPLAY, OBWOHL EINE CD EINGELEGT IST
- KEIN TON ODER RAUSCHEN IST ZU HÖREN
- HOL D" ERSCHEINT IM DISPLAY, WENN SIE EINE TASTE DRÜCKEN
- DIE BATTERIELEBENSDAUER IST KURZ
- DIE LAUTSTÄRKE IST AUF EINEN BESTIMMTEN PEGEL BEGRENZT, AUCH WENN SIE VERSUCHEN, SIE ZU ERHÖHEN
- TECHNISCHE DATEN
- ALLGEMEINES
- MITGELIEFERTES ZUBEHÖR
Marke : SONY
Modell : Discman D-240
Kategorie : CD-Player