
Discman D-2001 - CD-Player SONY - Kostenlose Bedienungsanleitung
Finden Sie kostenlos die Bedienungsanleitung des Geräts Discman D-2001 SONY als PDF.


Benutzerfragen zu Discman D-2001 SONY
0 Frage zu diesem Gerät. Beantworten Sie die, die Sie kennen, oder stellen Sie Ihre eigene.
Eine neue Frage zu diesem Gerät stellen
Laden Sie die Anleitung für Ihr CD-Player kostenlos im PDF-Format! Finden Sie Ihr Handbuch Discman D-2001 - SONY und nehmen Sie Ihr elektronisches Gerät wieder in die Hand. Auf dieser Seite sind alle Dokumente veröffentlicht, die für die Verwendung Ihres Geräts notwendig sind. Discman D-2001 von der Marke SONY.
BEDIENUNGSANLEITUNG Discman D-2001 SONY
D-2001
OPERATING INSTRUCTIONS
Before operating the unit, please read this manual thoroughly and retain it for future reference.
OWNER'S RECORD
The model and serial numbers are located at the bottom. Record the serial number in the space provided below. Refer to these numbers whenever you call upon your Sony dealer regarding this product.
Model No. D 2001 Serial No. ____
natural_image
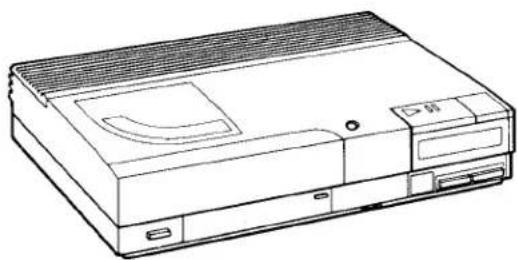
Line drawing of a computer monitor with ventilation grille and drive slots (no text or symbols)TABLE OF CONTENTS
BASIC INFORMATION
Warning 2
Notes on compact disc 3
Precautions 3
Location and function of controls 4
BASIC OPERATION
Connections 8
To listen to CDs 10
SPECIAL USES
Using the controls under the center panel ..... 12
To find out the remaining time and number of selections.... 13
To search for selections.... 14
To listen to your favorite parts again and again 16
To change the order of selections (RMS, SHUFFLE) 20
FURTHER CONNECTIONS/GENERAL
For use with other components. 22
Specifications 25
Troubleshooting 26
FEATURES
• Built-in amplifier for high-power music output
- Convenient front-loading system
WARNING
To prevent fire or shock hazard, do not expose the unit to rain or moisture.
text_image
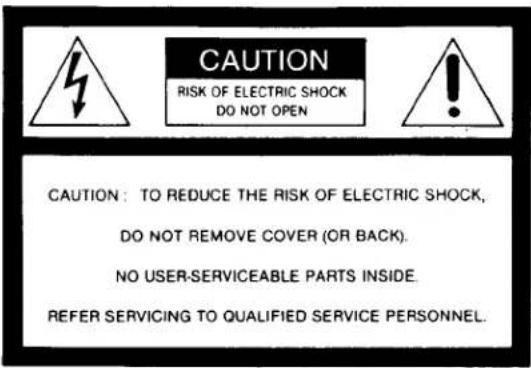
CAUTION RISK OF ELECTRIC SHOCK DO NOT OPEN CAUTION: TO REDUCE THE RISK OF ELECTRIC SHOCK, DO NOT REMOVE COVER (OR BACK). NO USER-SERVICEABLE PARTS INSIDE REFER SERVICING TO QUALIFIED SERVICE PERSONNEL.
This symbol is intended to alert the user to the presence of uninsulated "dangerous voltage" within the product's enclosure that may be of sufficient magnitude to constitute a risk of electric shock to persons.
This symbol is intended to alert the user to the presence of important operating and maintenance (servicing) instructions in the literature accompanying the appliance.
CAUTION
The use of optical instruments with this product will increase eye hazard.
INFORMATION
This equipment generates and uses radio frequency energy and if not installed and used properly, that is, in strict accordance with the manufacturer's instructions, may cause interference to radio and television reception. It has been type tested and found to comply with the limits for a Class B computing device in accordance with the specifications in Subpart J of Part 15 of FCC Rules, which are designed to provide reasonable protection against such interference in a residential installation. However, there is no guarantee that interference will not occur in a particular installation. If this equipment does cause interference to radio or television reception, which can be determined by turning the equipment off and on, the user is encouraged to try to correct the interference by one or more of the following measures:
Reorient the receiving antenna
Relocate the equipment with respect to the receiver
Move the equipment away from the receiver Plug the equipment into a different outlet so that equipment and receiver are on different branch circuits.
If necessary, the user should consult the dealer or an experienced radio/television technician for additional suggestions. The user may find the following booklet prepared by the Federal
Communications Commission helpful:
"How to Identify and Resolve Radio-TV Interference Problems". This booklet is available from the U.S.
Government Printing Office, Washington, DC 20402, Stock No. 004-000-00345-4.
NOTES ON COMPACT DISC
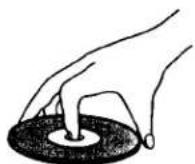
NOT this way
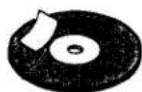
Handle the disc by its edge, and to keep the disc clean do not touch the rainbow colored surface. Do not stick paper or tape or write anything on the labeled surface.
text_image
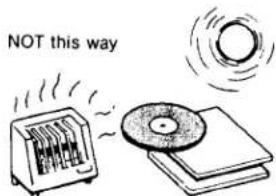
NOT this wayDo not expose the disc to direct sunlight or heat sources such as hot air ducts, nor leave it in a car parked in direct sunlight where there can be a considerable rise in the temperature.
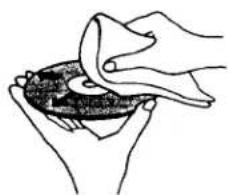
Before playing, clean the disc with the optional cleaning cloth. Wipe the disc from the center out.
natural_image
Illustration of hands cleaning a dark object (no text or symbols)Do not use solvents such as benzine, thinner, commercially available cleaners or anti-static spray intended for records.
After playing, store the disc in its case.
PRECAUTIONS
On safety
- Operate the unit only on 120V AC, 60Hz.
- Should any liquid or solid object fall into the cabinet, unplug the unit and have it checked by qualified personnel before operating it any further.
- Unplug the unit from the wall outlet if it is not to be used for an extended period of time. to disconnect the cord, pull it out by grasping the plug. Never pull the cord itself.
- As the laser beam used in this Compact Disc player is harmful to the eyes, do not attempt to disassemble the cabinet. Refer servicing to qualified personnel only.
On installation
- Do not install the unit in a location near heat sources such as radiators or air ducts, or in a place subject to direct sunlight, excessive dust, mechanical vibration or shock.
- Good air circulation is essential to prevent internal heat build-up in the unit. Place the unit in a location with adequate air circulation.
- Do not place any object on top of the unit. This may damage the unit: also, the disc tray may not open.
- Do not place the unit on a cushion or pillow. This will disrupt ventilation.
- Place the unit on a level surface.
- Do not wrap the unit a cloth, blanket, etc. If you do, the temperature inside may rise, resulting in malfunction.
- If the CD player causes interference to radio or television reception, turn the player off or move the player away from TV or radio.
On moisture condensation
If the player is brought directly from a cold to a warm location, or is placed in a very damp room, moisture may condense on the lenses inside the unit. Should this occur, the player will not operate properly. In this case, remove the disc and wait about an hour for the moisture to evaporate.
On operation
Do not put objects (including "disc stabilizers") on top of the disc. This may prevent the disc compartment from opening.
On cleaning the cabinet
Clean the cabinet, panel and controls with a soft cloth lightly moistened with mild detergent solution. Do not use any type of abrasive pad, scouring powder or solvent such as alcohol or benzine.
If you have any questions or problems concerning your unit, please contact your nearest Sony dealer.
LOCATION AND FUNCTION OF CONTROLS
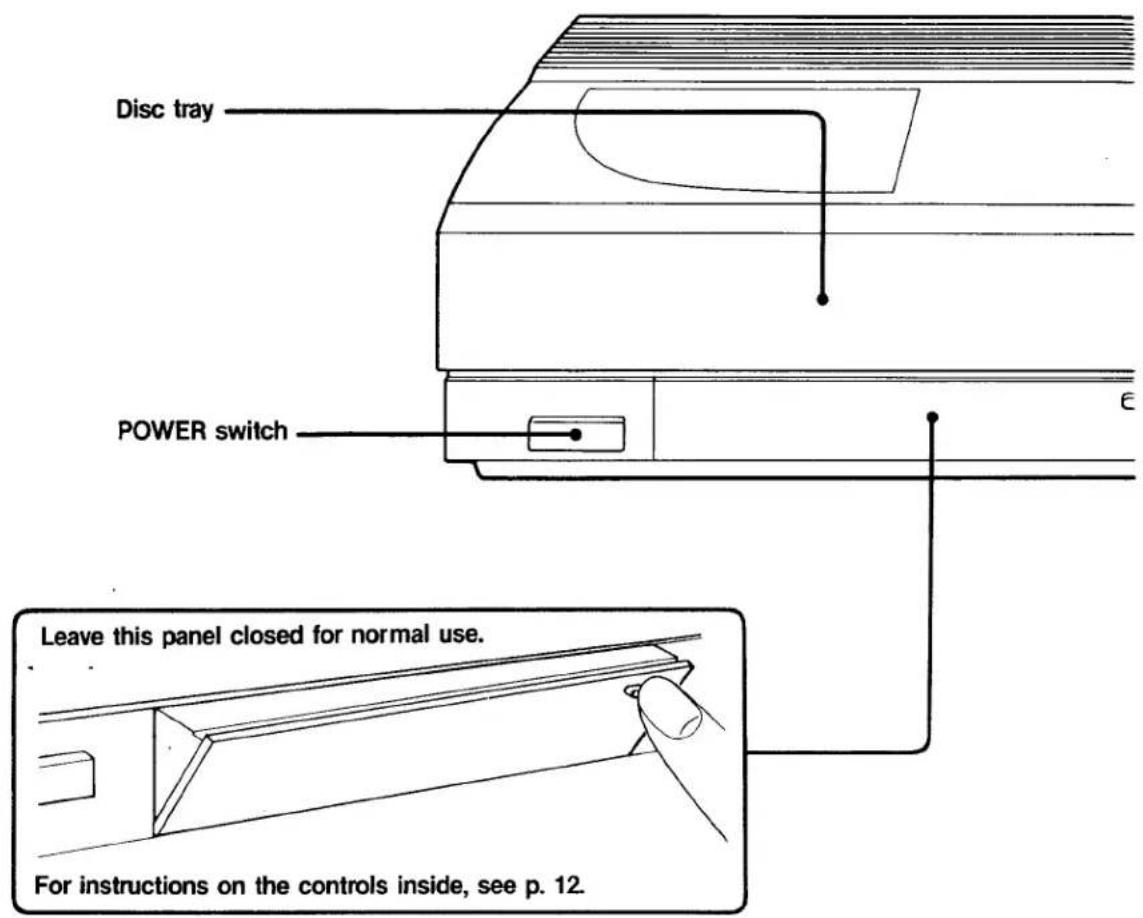
text_image
Disc tray POWER switch Leave this panel closed for normal use. For instructions on the controls inside, see p. 12.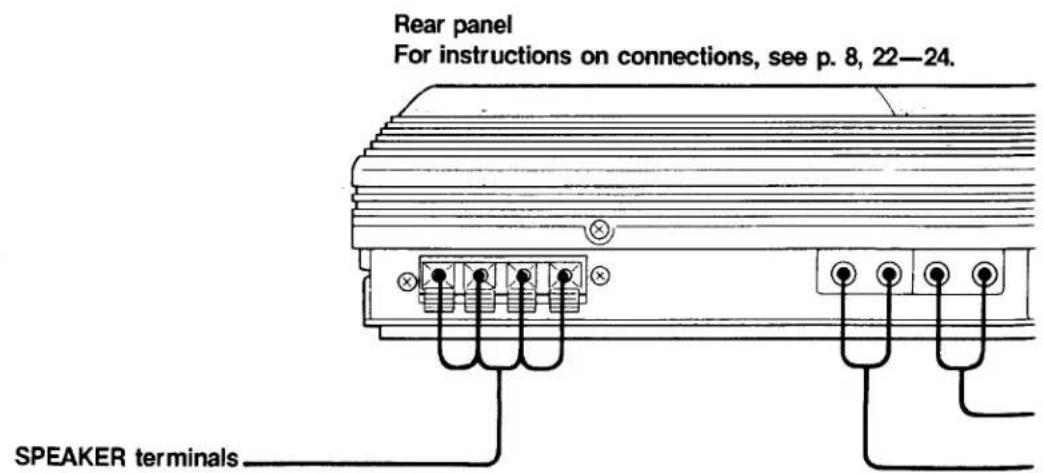
text_image
Rear panel For instructions on connections, see p. 8, 22—24. SPEAKER terminals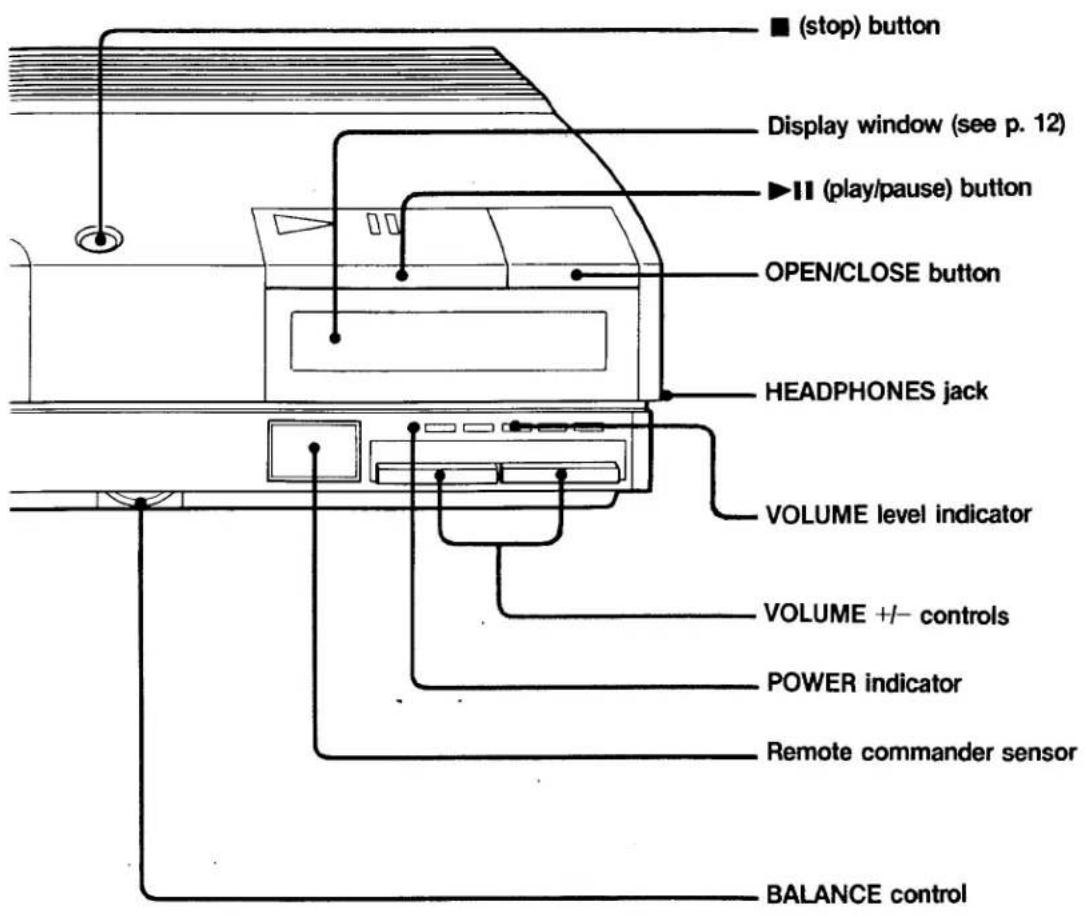
text_image
(stop) button Display window (see p. 12) ► II (play/pause) button OPEN/CLOSE button HEADPHONES jack VOLUME level indicator VOLUME +/- controls POWER indicator Remote commander sensor BALANCE control
text_image
AC power cord LINE IN jack (phono jack) CD OUT jack (phono jack)Location of controls
REMOTE COMMANDER
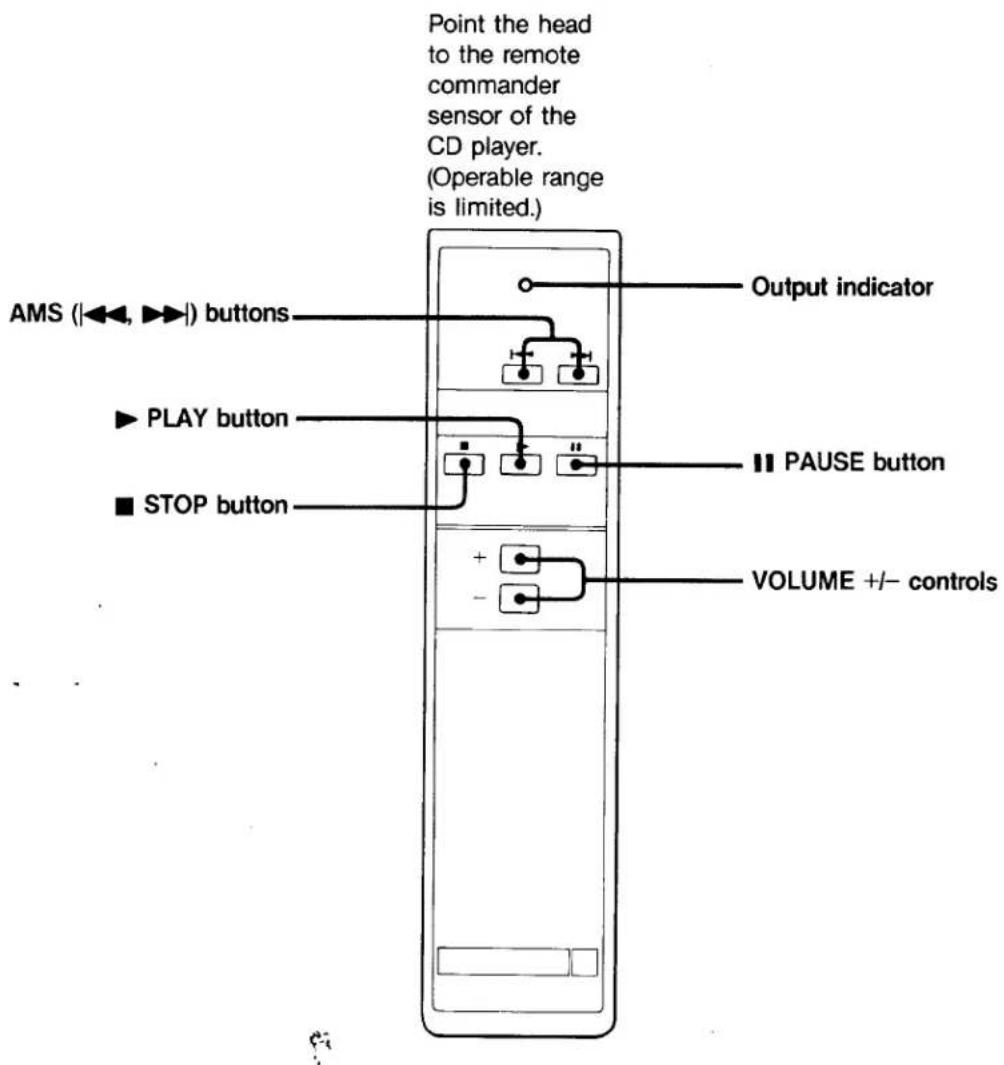
text_image
Point the head to the remote commander sensor of the CD player. (Operable range is limited.) AMS (|◀◀, ▶▶) buttons ▶ PLAY button ■ STOP button Output indicator ■ PAUSE button + - VOLUME +/- controlsImportant precaution about the remote commander
Do not expose the remote commander sensor on the CD player to direct sunlight. This may cause the commander to break down.
WHAT THE REMOTE COMMANDER CAN DO
Without leaving your chair, you can:
- Play CDs.
- Pause play.
- Stop play.
- Adjust volume.
- Search for selections.
Notes on the remote commander
- Keep the remote commander away from extremely hot or humid places.
- Avoid dropping any foreign objects into the remote commander unit, particularly when replacing batteries.
- Do not press two or more buttons at once.
- When you will not be using the remote commander for a long period of time, remove the batteries. Otherwise, the batteries may leak, and cause damage.
TO INSTALL THE BATTERIES
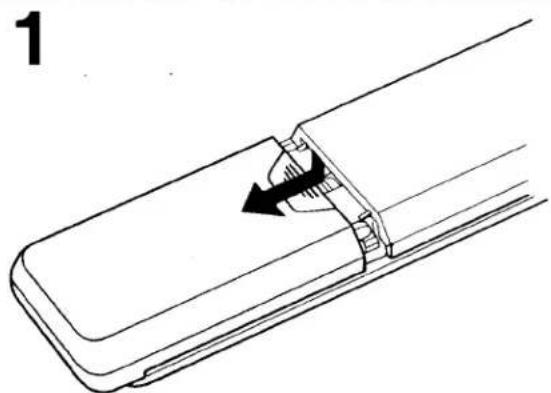
natural_image
Diagram of a mechanical component with an arrow indicating a rotation or movement (no text or symbols present)2
Insert 2 size AA (R6) batteries.
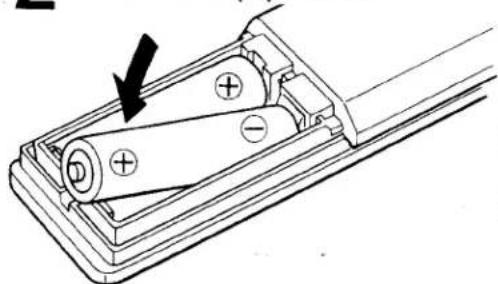
natural_image
Diagram of a battery pack with two cylindrical cells and an arrow indicating direction (no text or symbols)Replacing the batteries
Batteries will last approx. 6 months in normal use. When the operating range of the commander grows shorter, it is time to change batteries. Replace both batteries with new ones.
CONNECTIONS
TO PLAY CD'S THROUGH THE MAIN SPEAKERS (Speakers are supplied)
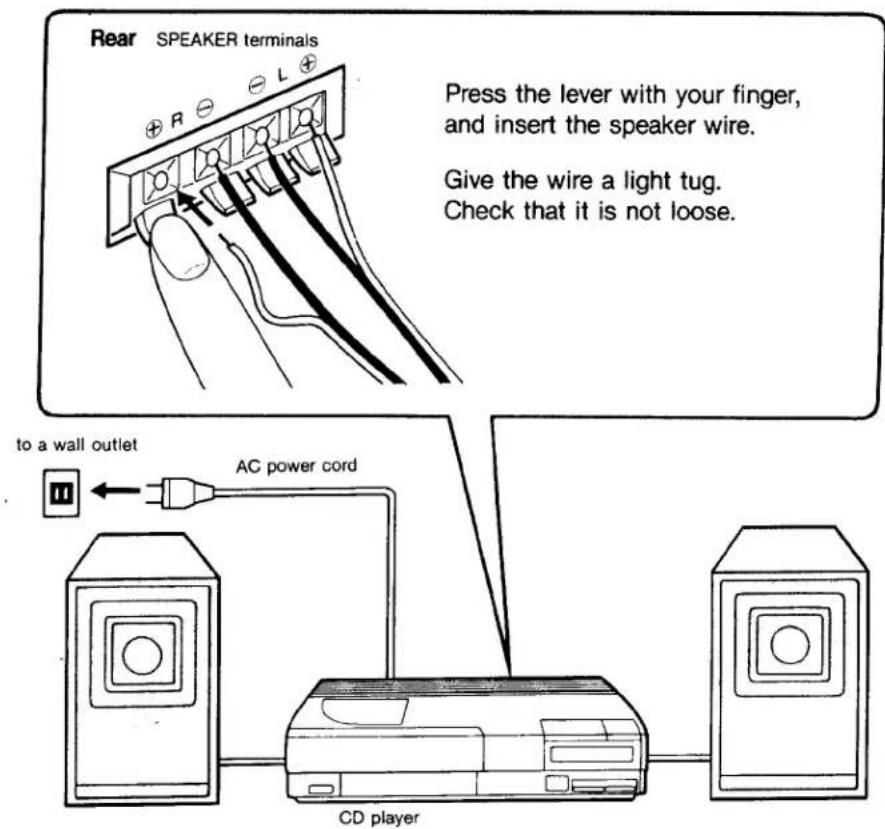
text_image
Rear SPEAKER terminals Press the lever with your finger, and insert the speaker wire. Give the wire a light tug. Check that it is not loose. to a wall outlet AC power cord CD playerNote
Make sure POWER is off (☐) before making connections.
To listen from the speakers, make sure headphones are not plugged into HEADPHONES jack. If they are, no sound will come from the speakers.
To connect speakers
Connect the left (as you face the CD player) speaker to the L terminal (on the rear panel). Connect the right speaker to the R terminal. Look at the ⊕ terminal on the speaker. Notice the color of the connected wire. Connect the same color wire to the ⊕ terminal on the CD player. (If you reverse ⊕ and ⊖ connections, low sounds will be muffled, and some musical instruments will not sound correct.
TO LISTEN THROUGH HEADPHONES (Headphones are sold separately)
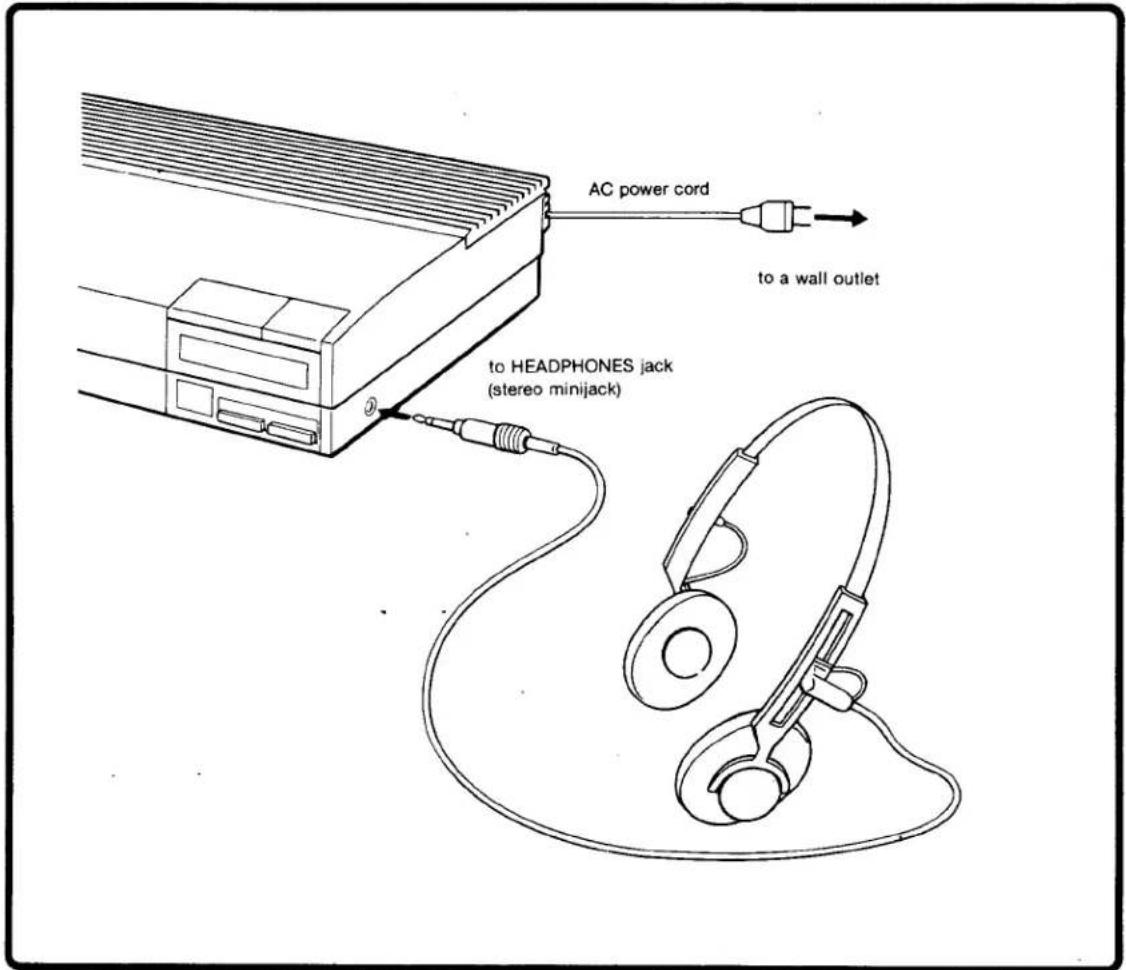
text_image
AC power cord to a wall outlet to HEADPHONES jack (stereo minijack)TO LISTEN TO CDs
text_image
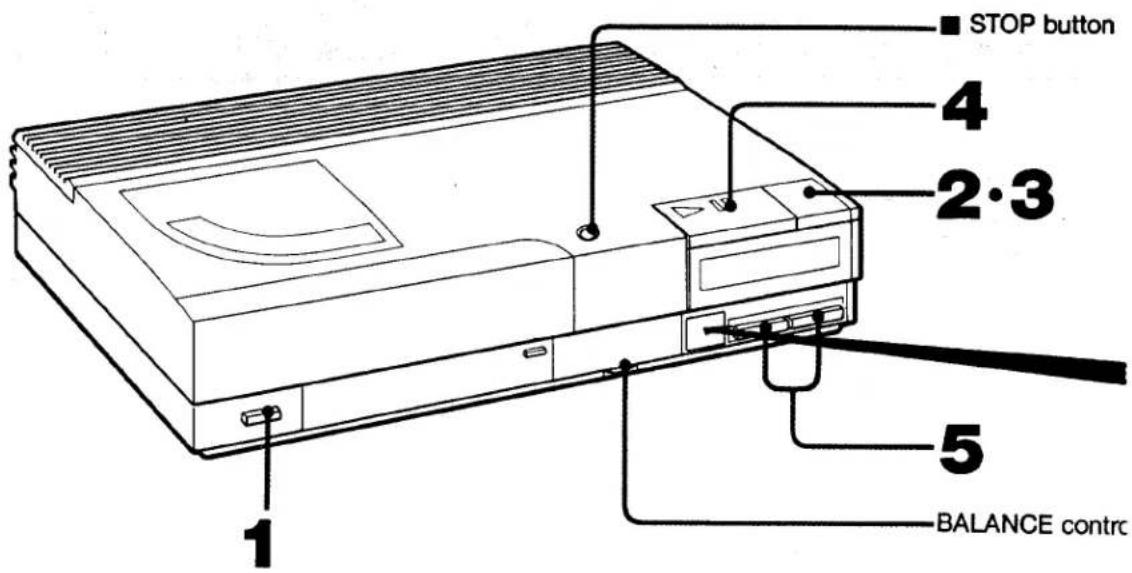
STOP button 4 2·3 1 5 BALANCE contrc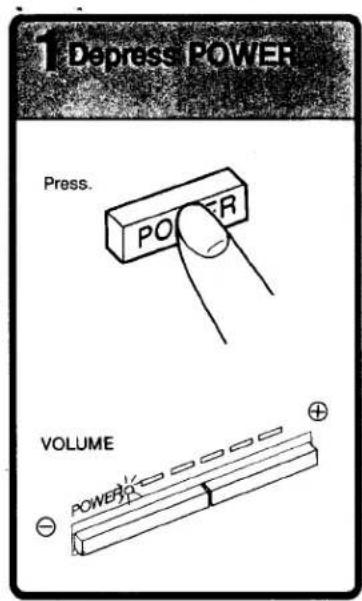
text_image
1 Depress POWER Press. POWER VOLUME POWER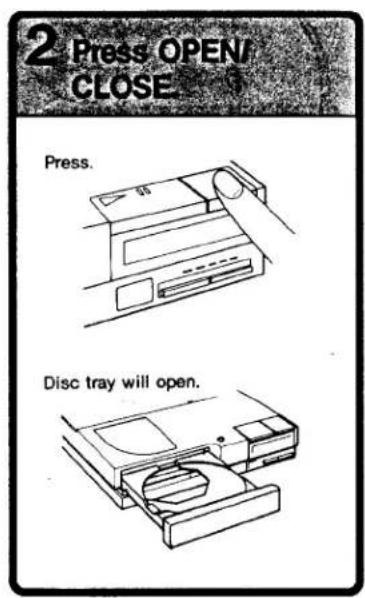
text_image
2 Press OPEN/ CLOSE Press. Disc tray will open.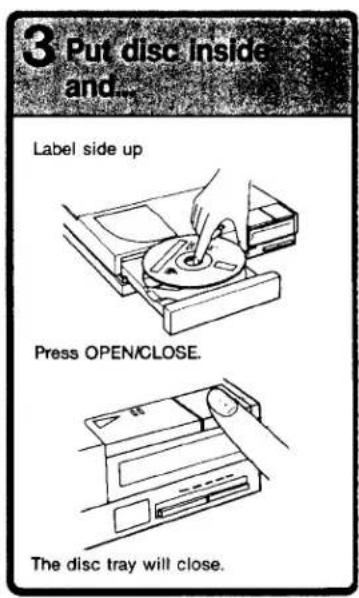
text_image
3 Put disc inside and... Label side up Press OPEN/CLOSE. The disc tray will close.Important caution about VOLUME setting
Do not turn up the volume when listening to quiet or silent passages. Your speakers may be damaged if a louder passage follows.
If you press ▶II with the tray open
The tray will close, and play will begin from the first selection.
To close the disc tray
ALWAYS use the OPEN/CLOSE button or ▶■ button to close the disc compartment. Do not push the compartment itself.

natural_image
Completely black image with no visible content, text, or symbols.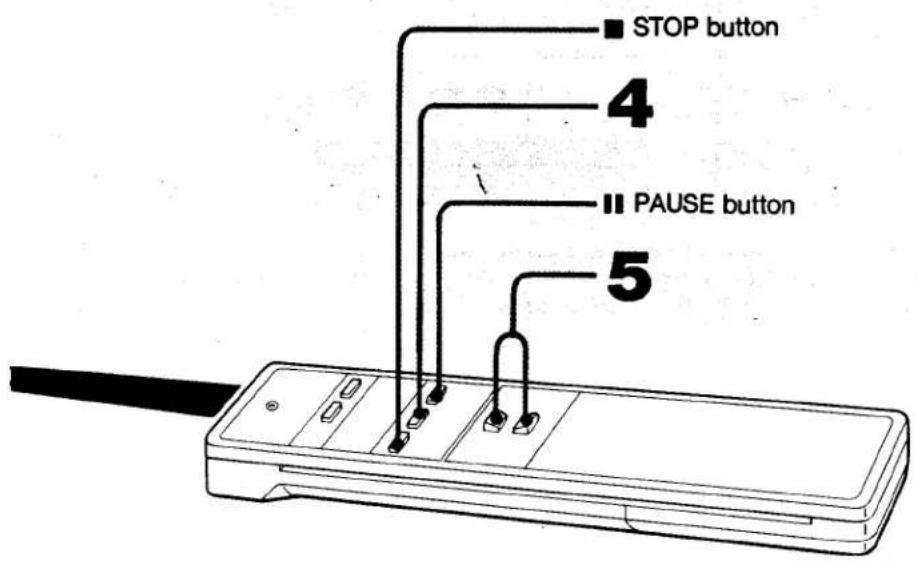
text_image
■ STOP button 4 II PAUSE button 5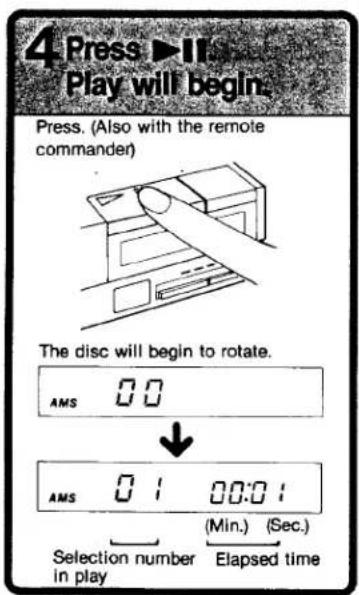
text_image
4 Press ▶ Play will begin. Press. (Also with the remote commander) The disc will begin to rotate. AMS 00 AMS 01 00:01 Selection number Elapsed time in play (Min.) (Sec.)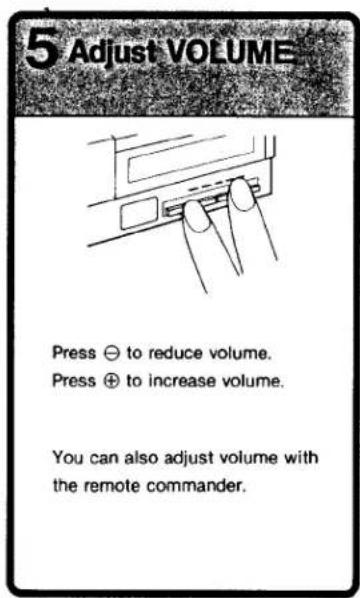
text_image
5 Adjust VOLUME Press ⊖ to reduce volume. Press ⊕ to increase volume. You can also adjust volume with the remote commander.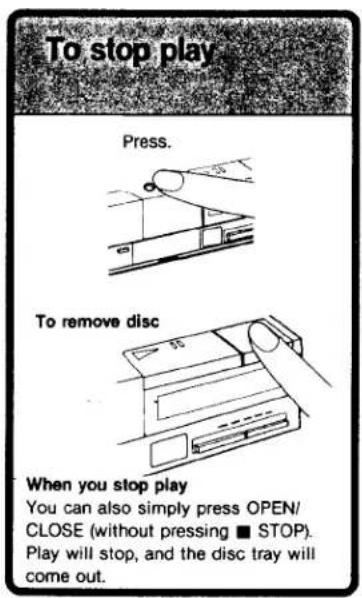
text_image
To stop play Press. To remove disc When you stop play You can also simply press OPEN/ CLOSE (without pressing ■ STOP). Play will stop, and the disc tray will come out.If you press ▶II and no sound comes from the speakers
Check that:
• the disc is inserted label side up
- POWER is on
• VOLUME is not turned all the way down
- headphones are not plugged into HEAD-PHONES jack.
To pause during play
Press ▶II. The minutes and seconds display will begin to flash. The disc is still spinning, but no sound will come from the speakers. To resume play, press ▶II (or II on the remote commander) again.
To adjust left-right balance
If you are listening through the speakers, and either left or right output sounds stronger than the other, adjust the
BALANCE control until the sound balance sounds right to you. The white mark of the balance control is its center position.
USING THE CONTROLS UNDER THE CENTER PANEL
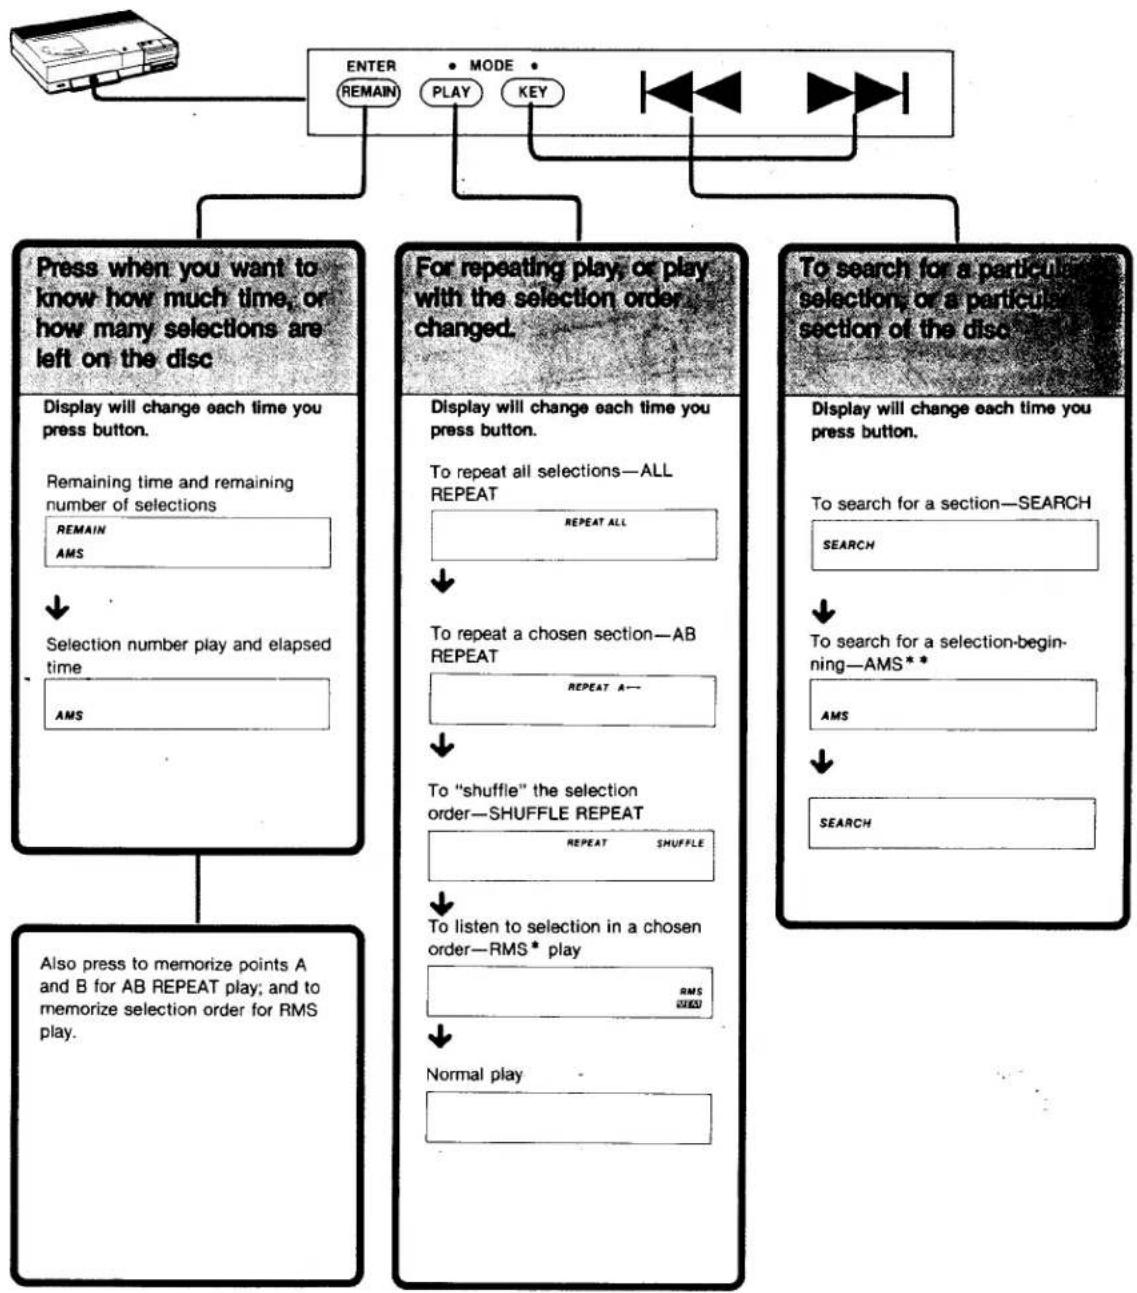
flowchart
graph TD
    A["User"] --> B["ENTER (REMAIN)"]
    B --> C["MODE"]
    C --> D["KEY"]
    D --> E["Press when you want to know how much time, or how many selections are left on the disc"]
    E --> F["Display will change each time you press button."]
    F --> G["Remaining time and remaining number of selections"]
    G --> H["AMS"]
    H --> I["Selection number play and elapsed time"]
    I --> J["AMS"]
    J --> K["Also press to memorize points A and B for AB REPEAT play; and to memorize selection order for RMS play."]

    L["For repeating play, or play with the selection order changed."] --> M["Display will change each time you press button."]
    M --> N["To repeat all selections—ALL REPEAT"]
    N --> O["REPEAT ALL"]
    O --> P["To repeat a chosen section—AB REPEAT"]
    P --> Q["REPEAT A—"]
    Q --> R["To “shuffle” the selection order—SHUFFLE REPEAT"]
    R --> S["REPEAT SHUFFLE"]
    S --> T["To listen to selection in a chosen order—RMS* play"]
    T --> U["RMS USED"]
    U --> V["Normal play"]

    W["To search for a particular selection or a particular section of the disc."] --> X["Display will change each time you press button."]
    X --> Y["To search for a section—SEARCH SEARCH"]
    Y --> Z["To search for a selection-beginning—AMS** AMS"]
    Z --> AA["SEARCH"]
*RMS stands for Random Music Sensor.
**AMS stands for Automatic Music Sensor.
TO FIND OUT THE REMAINING TIME AND NUMBER OF SELECTIONS
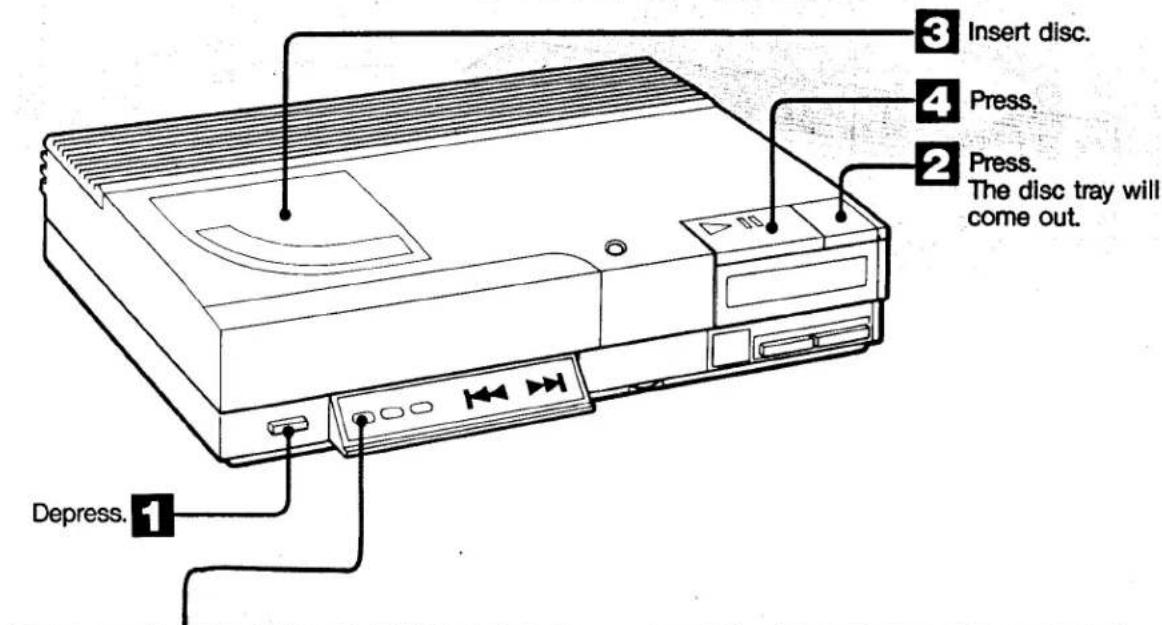
This can be done only during play. To start play, follow 1·4.
text_image
3 Insert disc. 4 Press. 2 Press. The disc tray will come out. Depress. 1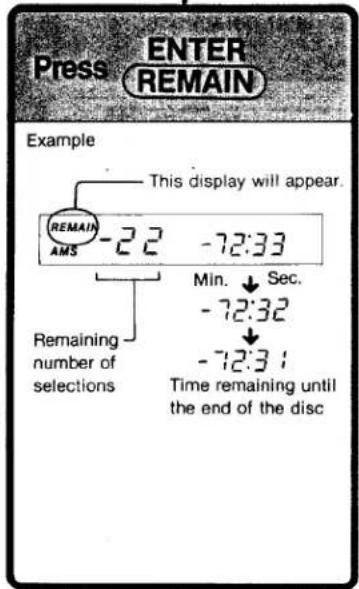
text_image
Press ENTER REMAIN Example This display will appear. REMAIN -2.2 -7:33 AMS Remaining number of selections Min. ↓ Sec. -7:32 -7:31 Time remaining until the end of the disc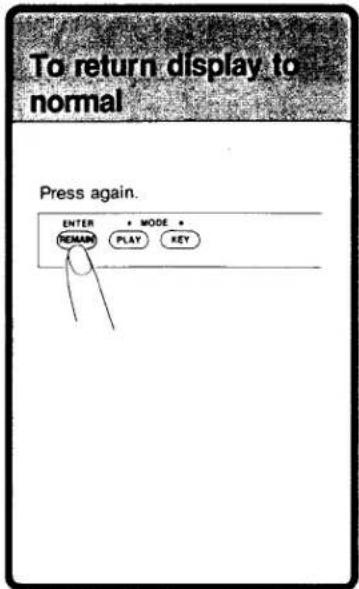
text_image
To return display to normal Press again. ENTER • MODE • REMAIN PLAY KEY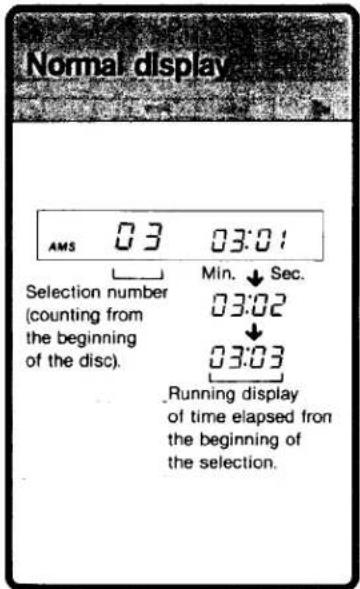
text_image
Normal display AMS 03 03:01 Selection number (counting from the beginning of the disc). Min. ↓ Sec. 03:02 ↓ 03:03 Running display of time elapsed from the beginning of the selection.During pause mode
Remaining time continues to be displayed.
You cannot view remaining time when...
1 RMS play is under way.
2 You are choosing RMS selections.
3 You are in AB repeat mode.
In cases 2 and 3, this button serves as ENTER button.
When — appears before the minutes setting
The disc play is between selections.

The CD player is now "playing" the gap between selections 3 and 4. 2 seconds have elapsed since the gap began.
TO SEARCH FOR SELECTIONS (AMS, SEARCH)
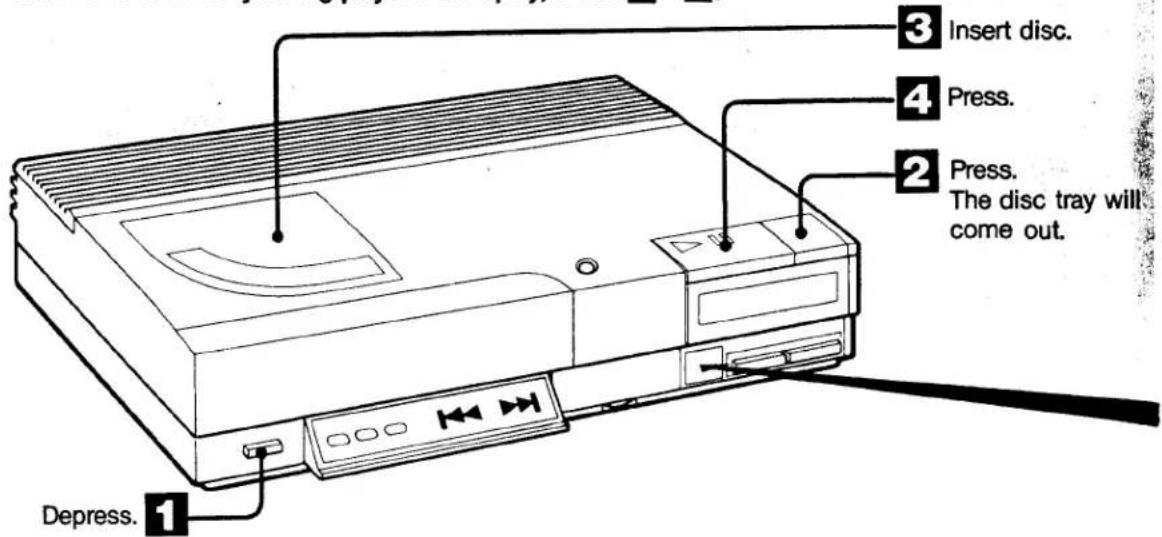
Use this function only during play. To start play, follow 1—4.
text_image
3 Insert disc. 4 Press. 2 Press. The disc tray will come out. Depress. 1To return to the beginning of the present selection, or to search for previous selections.
To skip the remainder of the current selection, and search for later selections.
1
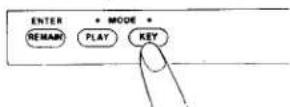
Press once if the display on the right is not showing.

2 Press |
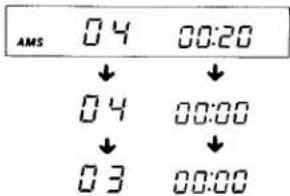
Ex.
text_image
AMS 04 00:20 ↓ ↓ 04 00:00 ↓ ↓ 03 00:00Press once to return to beginning of pre-sent selection.
As you continue pressing, you will return to the beginning of the next previous selection.
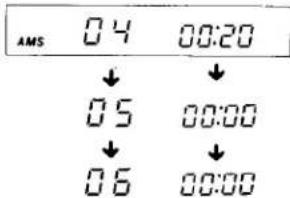
2 Press ▶▶.
Ex.
text_image
AMS 04 00:20 ↓ ↓ 05 00:00 ↓ ↓ 06 00:00Press once to move to next selection.
As you continue pressing you will advance to succeeding selection beginnings.
3 Release your finger when you find the selection you want. Play will begin from that selection.
To find out the selection name and number
Consult the liner of the CD.
AMS during pause
You can use AMS even when in the pause mode. Press or ▶▶. Release your finger when the selection number of the selection you want to hear appears. The CD player will pause there. Press ▶▶ when you want to hear the selection.
text_image
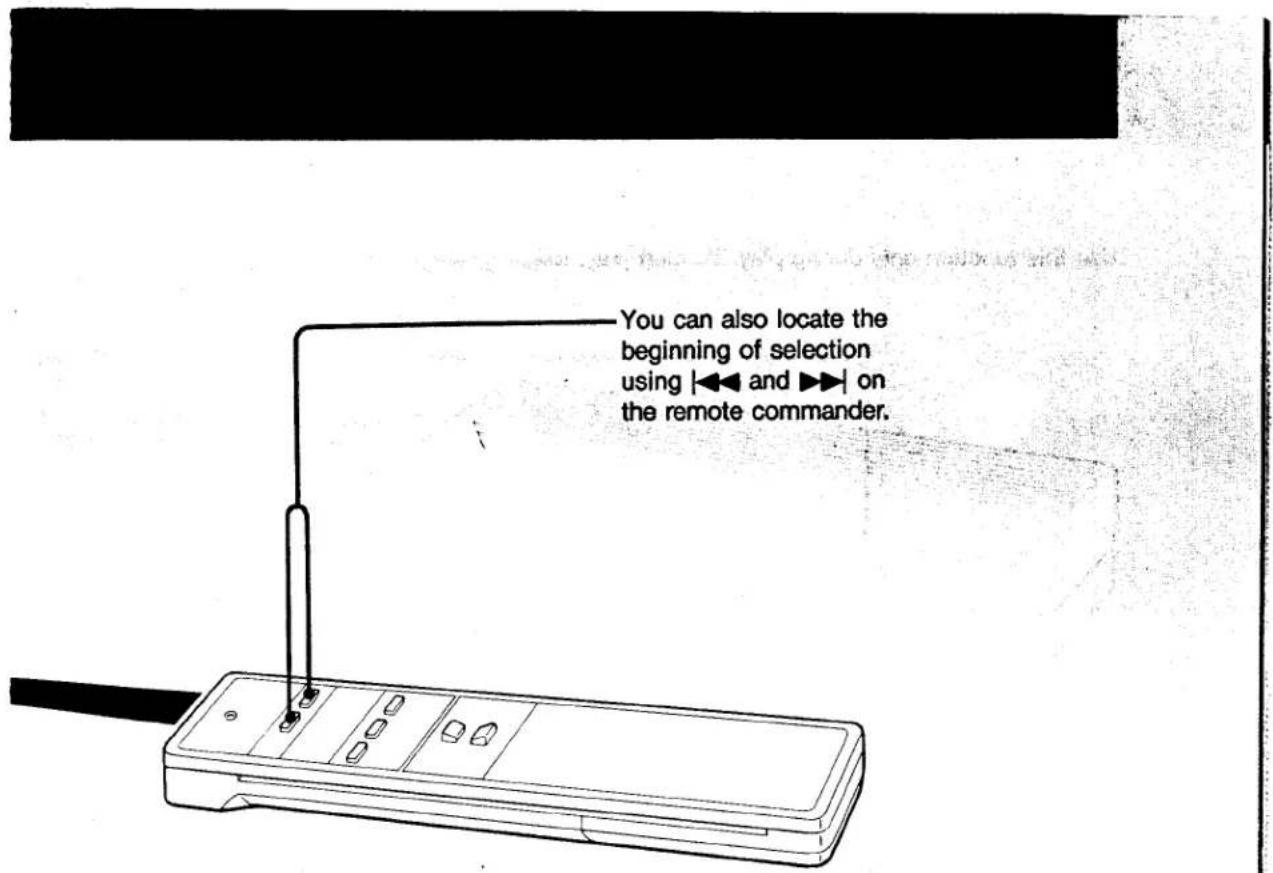
You can also locate the beginning of selection using |◀◀ and ▶▶ on the remote commander.To search among finished material
To search among material which is to come
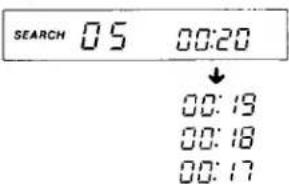
If you press once, the display on the right will appear.
SEARCH
2 Press
text_image
SEARCH 05 00:20 ↓ 00:19 00:18 00:17As you continue to press, you will move backwards through the disc. The music will be output in muted form, to make searching easier.
2 Press ▶▶.
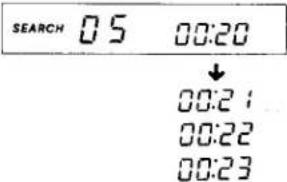
text_image
SEARCH 05 00:20 ↓ 00:21 00:22 00:23As you continue to press, you will move forwards through the disc. The music will be output in muted form, to make searching easier.
3 Release your finger when you find the point you want. Play will begin from that point.
;EARCH during pause
You can search even when in the pause mode. However, no sound will come from the speakers. When you release your finger, the player will pause at that point. Press ▶II when you want to play from the point. (SEARCH during pause lets you search more quickly than during play.)
What does this display mean?
SEARCH

This display appears after the last selection on the disc. It will disappear if you press
SEARCH

This display means you have tried to return past the first selection of the disc.
TO LISTEN TO YOUR FAVORITE PARTS AGAIN AND
Use this function only during play. To start play, follow 1—4.
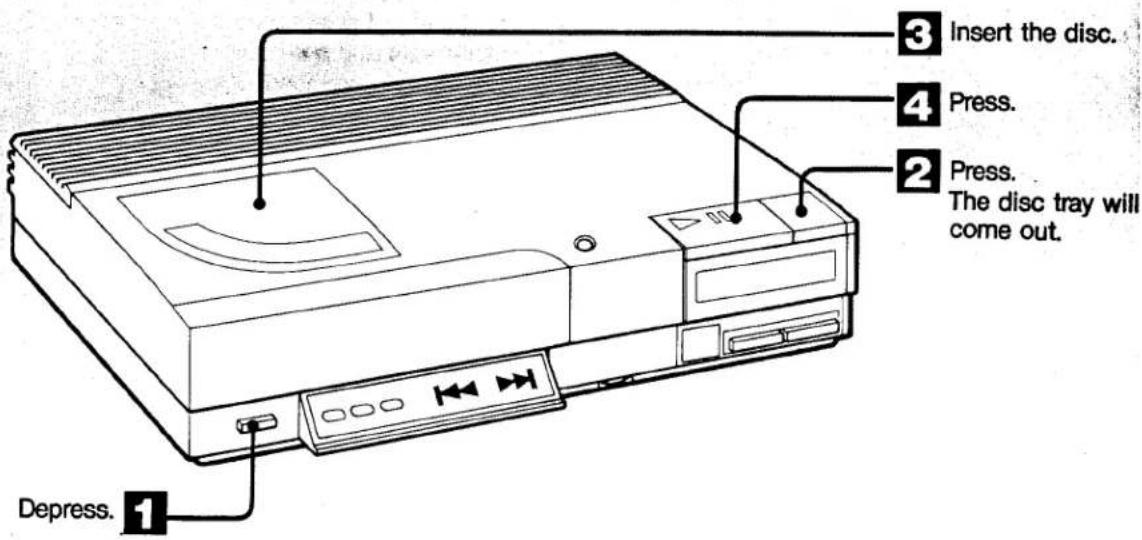
text_image
3 Insert the disc. 4 Press. 2 Press. The disc tray will come out. Depress. 1To listen to the entire disc again and again (ALL REPEAT)

text_image
Press until REPEAT ALL appears ENTER • MODE • REMAIN PLAY KEY REPEAT ALL AMS Play will continue from the present selection to the end of the disc—and then continue from the beginning of the disc.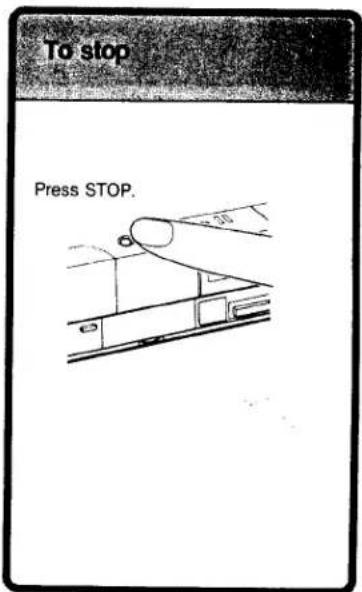
text_image
To stop Press STOP.GAIN
To listen repeatedly to a chosen section (AB REPEAT)
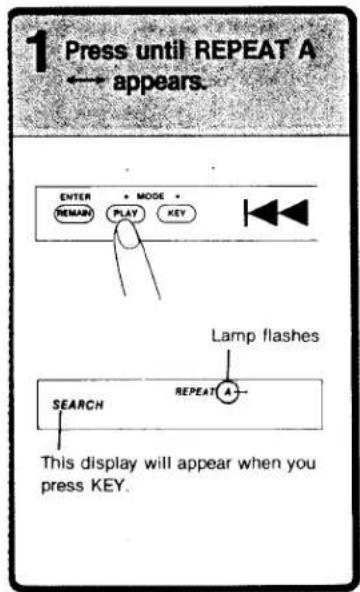
text_image
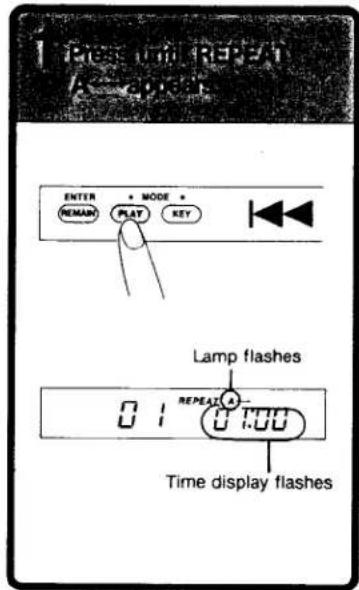
1 Press until REPEAT A ←→ appears. ENTER REMAR + MODE + PLAY KEY Lamp flashes SEARCH REPEAT A This display will appear when you press KEY.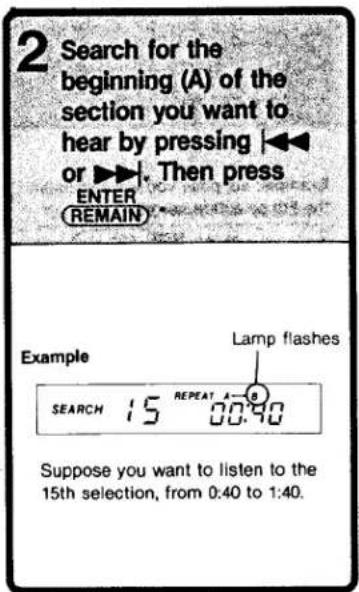
text_image
2 Search for the beginning (A) of the section you want to hear by pressing |◀◀ or ▶▶▶. Then press ENTER REMAIN Example Lamp flashes SEARCH 15 REPEAT 08:40 Suppose you want to listen to the 15th selection, from 0:40 to 1:40.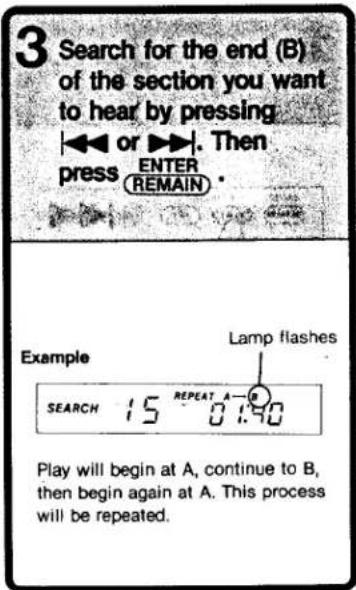
text_image
3 Search for the end (B) of the section you want to hear by pressing or ▶. Then press ENTER REMAIN Example Lamp flashes SEARCH 15 REPEAT A-0 Play will begin at A, continue to B, then begin again at A. This process will be repeated.TO LISTEN TO YOUR FAVORITE PARTS AGAIN AND AGAIN
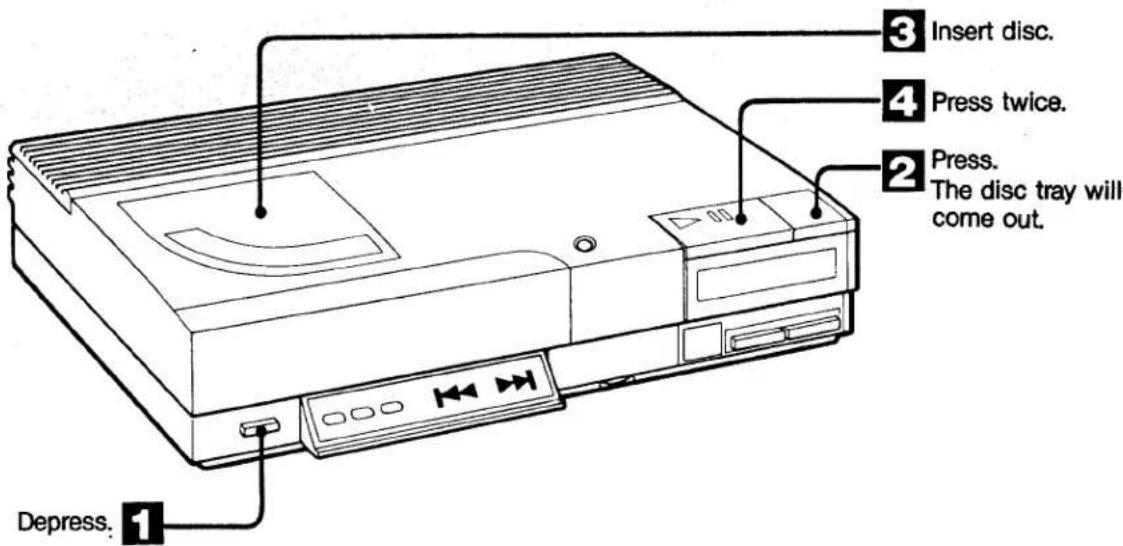
Use this function only during pause. To get to the pause mode, follow 1—4
text_image
3 Insert disc. 4 Press twice. 2 Press. The disc tray will come out. Depress. 1To hear one selection repeatedly
text_image
Times to Repeat A → Spring ENTER * MODE * REMAIN PLAY KEY Lamp flashes 0 : REPEAT A Time display flashes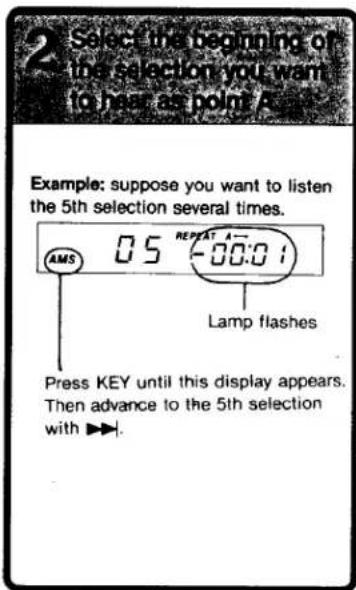
text_image
2 Select the beginning of the selection you want to hear as point A Example: suppose you want to listen the 5th selection several times. AMS 05 -00:01 Lamp flashes Press KEY until this display appears. Then advance to the 5th selection with ▶▶.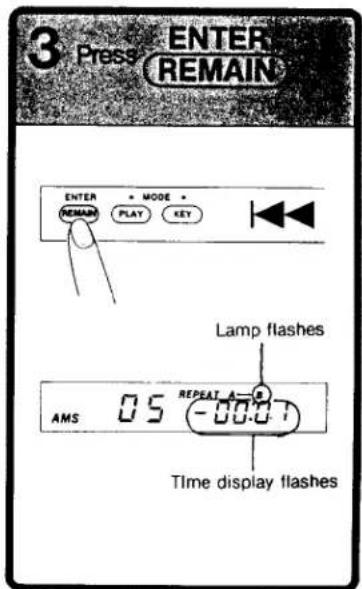
text_image
3 Press ENTER REMAIN ENTER • MODE * REMAR PLAY KEY Lamp flashes AMS 0.5 -0.0.0.1 Time display flashes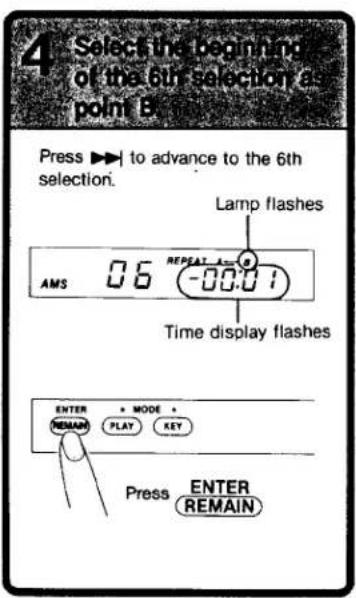
text_image
4 Select the beginning of the 6th selection as point B. Press ▶▶ to advance to the 6th selection. Lamp flashes AMS 0.6 -0.0:0.1 Time display flashes ENTER • MODE • REMAIN PLAY KEY Press ENTER REMAIN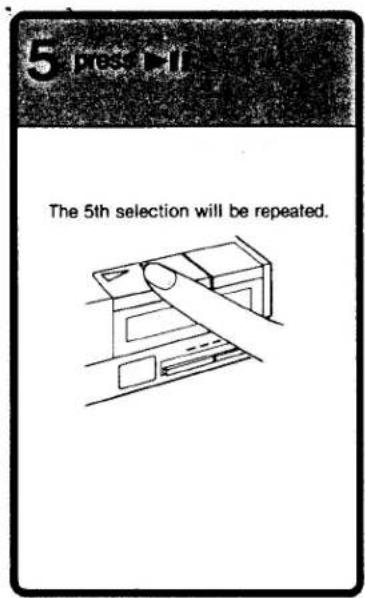
text_image
The 5th selection will be repeated.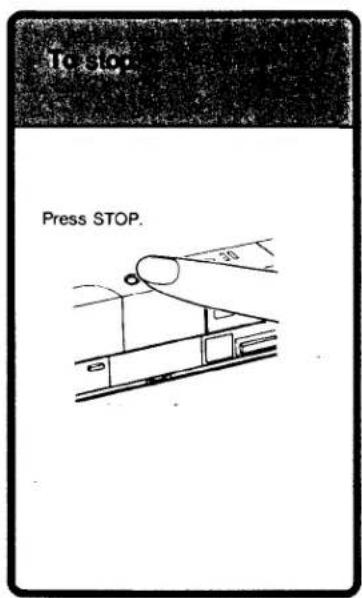
text_image
Press STOP.When you want to skip a certain selection
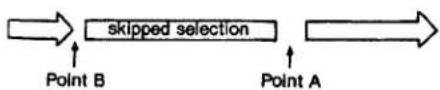
flowchart
graph LR
    A["Point A"] --> B["skipped selection"]
    B --> C["Point B"]
You can select points A and B as above.
TO CHANGE THE ORDER OF SELECTIONS (RMS, SHUFFLE)
Use these functions only during play. To start play, follow 1—4.
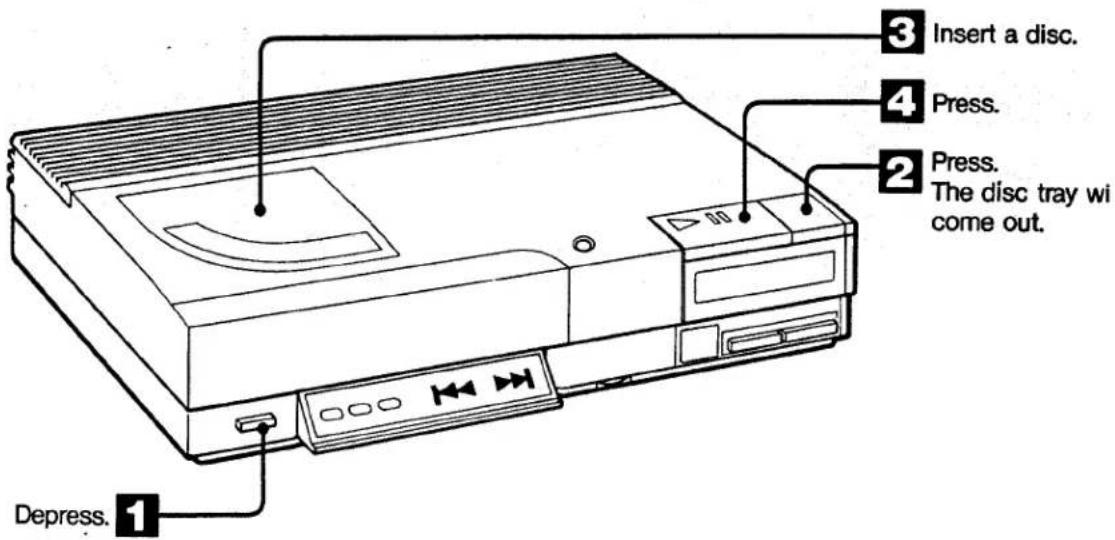
text_image
3 Insert a disc. 4 Press. 2 Press. The disc tray wi come out. Depress. 1TO PLAY CHOSEN SELECTIONS IN A DESIRED ORDER (RMS program play)
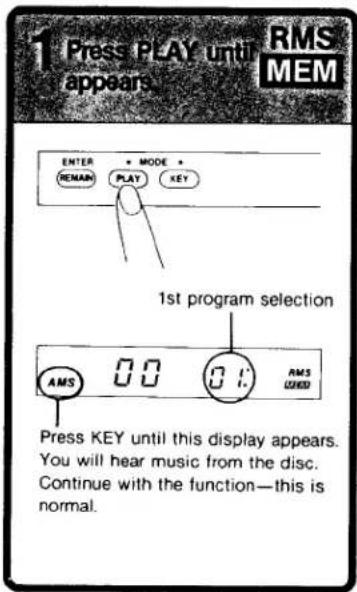
text_image
1 Press PLAY until appears RMS MEM ENTER • MODE • REMAIN PLAY KEY 1st program selection AMS 00 01 RMS USED Press KEY until this display appears. You will hear music from the disc. Continue with the function—this is normal.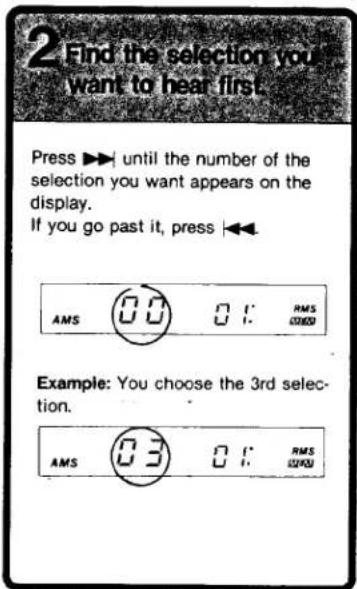
text_image
2 Find the selection you want to hear first. Press ▶ until the number of the selection you want appears on the display. If you go past it, press ◀◀ AMS 00 01: RMS 0000 Example: You choose the 3rd selec- tion. AMS 03 01: RMS 0000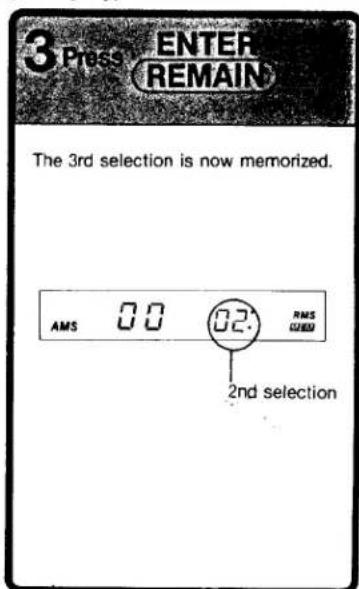
text_image
3 Press ENTER REMAIN The 3rd selection is now memorized. AMS 0.0 02. RMS USED 2nd selectionThe above function can be carried out in the pause mode When RMS MEM appears, the selection display will flash, and you can choose the first selection. Press ▶II twice to play your RMS program.
To reconfirm your RMS program or
change entries
Before pressing ▶II, if you press
ENTER
ENTER REMAIN, your RMS program will be displayed one selection at a time, beginning with the first selection. You can change selections if you like.
After you press ▶II, you cannot reconfirm your program; nor can you change it, except by pressing STOP and beginning memorizing again.
TO PLAY SELECTIONS IN RANDOM ORDER (SHUFFLE REPEAT PLAY)
text_image
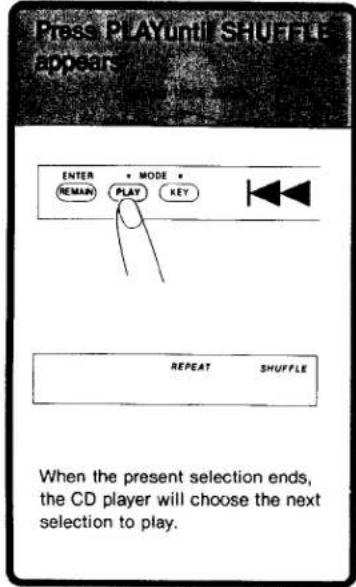
Press PLAY until SHUFFLE appears ENTER REMAN MODE PLAY KEY REPEAT SHUFFLE When the present selection ends, the CD player will choose the next selection to play.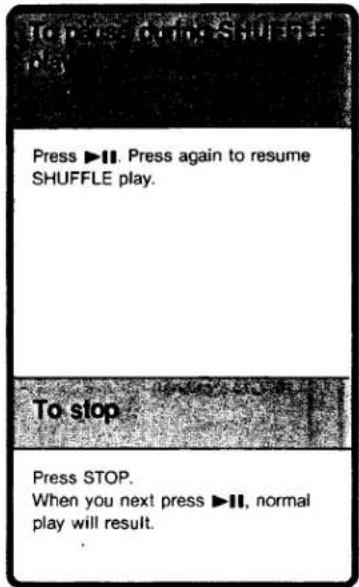
text_image
Top is the Shuffle Press ▶II. Press again to resume SHUFFLE play. To stop Press STOP. When you next press ▶II, normal play will result.
text_image
Scanned document with handwritten Chinese text and a small diagram, likely a form or technical drawing.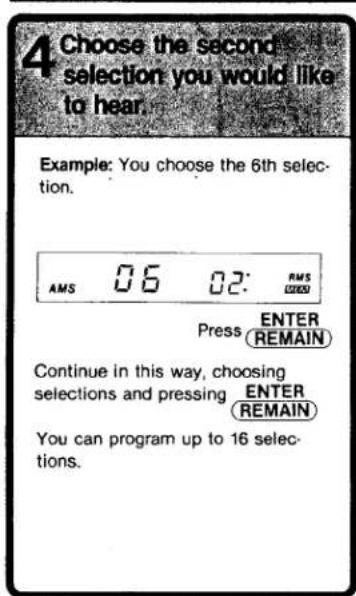
text_image
4 Choose the second selection you would like to hear. Example: You choose the 6th selec- tion. AMS 06 02: RMS (2025) Press ENTER REMAIN Continue in this way, choosing selections and pressing ENTER REMAIN You can program up to 16 selec- tions.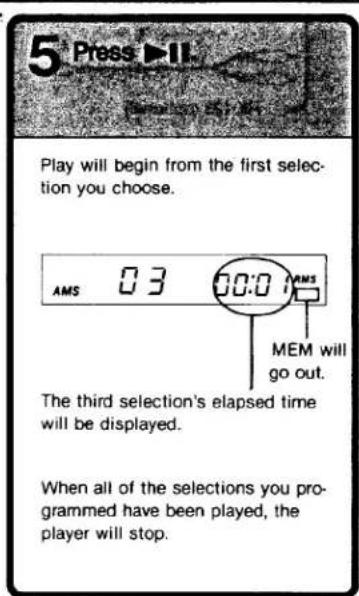
text_image
5 Press ▶II Play will begin from the first selec- tion you choose. AMS 03 00:01 AMS MEM will go out. The third selection's elapsed time will be displayed. When all of the selections you pro- grammed have been played, the player will stop.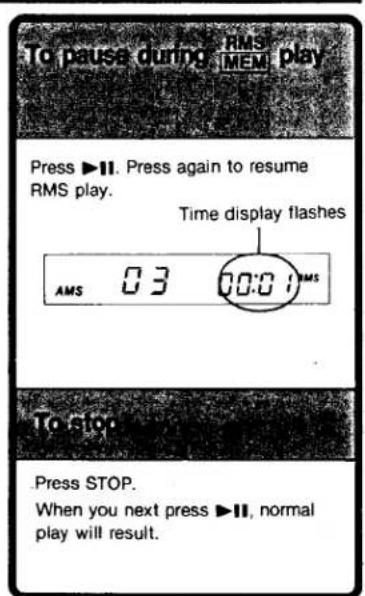
text_image
To pause during RMS MEM play Press ▶II. Press again to resume RMS play. Time display flashes AMS 03 00:01 RMS To stop Press STOP. When you next press ▶II, normal play will result.After selecting the 16th selection in your program
Your 1st selection will be displayed. If you now enter another selection, your 1st selection will be erased.
AMS and SEARCH are possible during RMS play
See page 14.
During SHUFFLE play, you can search only for selections which have not yet been played.
When all selections have been played in SHUFFLE mode
Play begins again with a new order.
You can select SHUFFLE play even when in pause mode
After the SHUFFLE display appears, press ▶II.
FOR USE WITH OTHER COMPONENTS
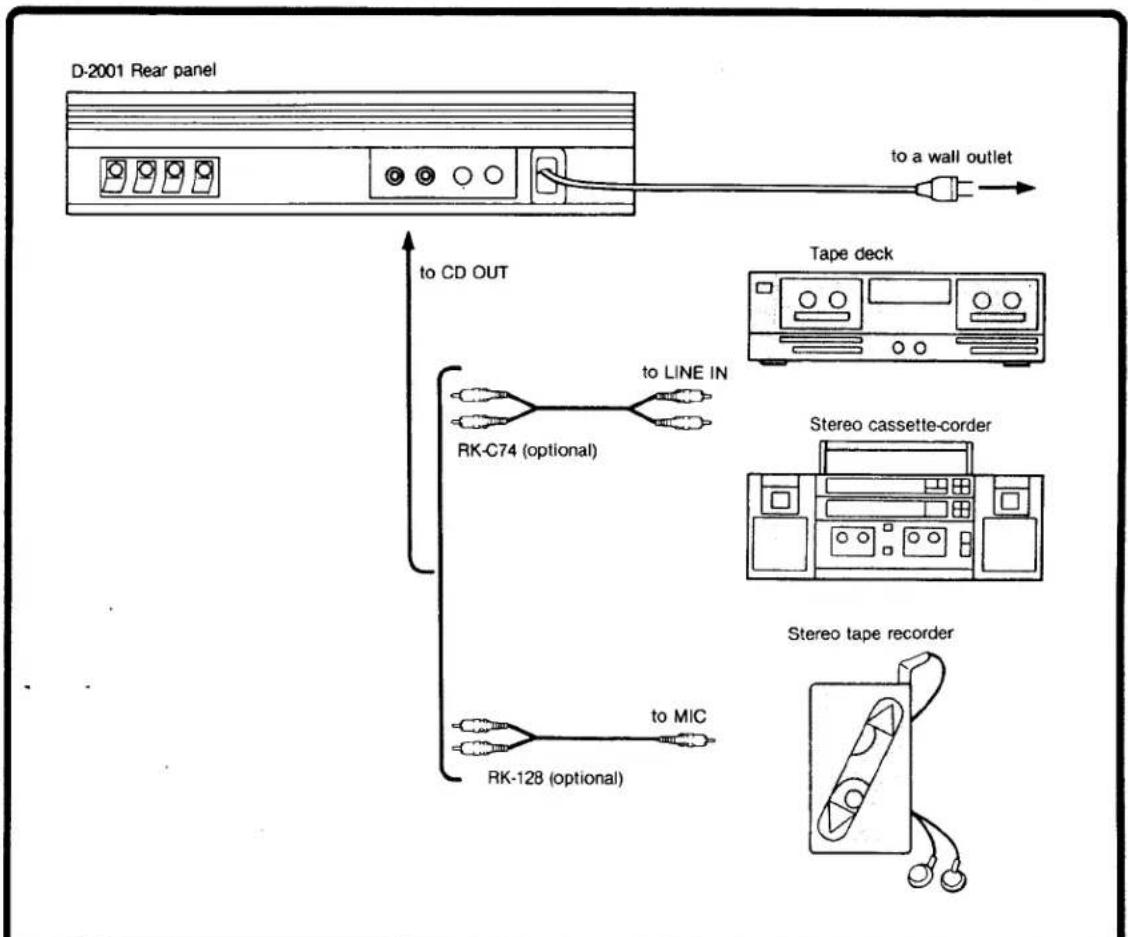
TO RECORD FROM CD TO A TAPE RECORDER
text_image
D-2001 Rear panel to a wall outlet to CD OUT to LINE IN RK-C74 (optional) to MIC RK-128 (optional) Tape deck Stereo cassette-corder Stereo tape recorderOPERATION
1 Begin play on the CD player.
2 Put the connected tape component into record mode.
FOR PLAY WITH OTHER STEREO COMPONENTS
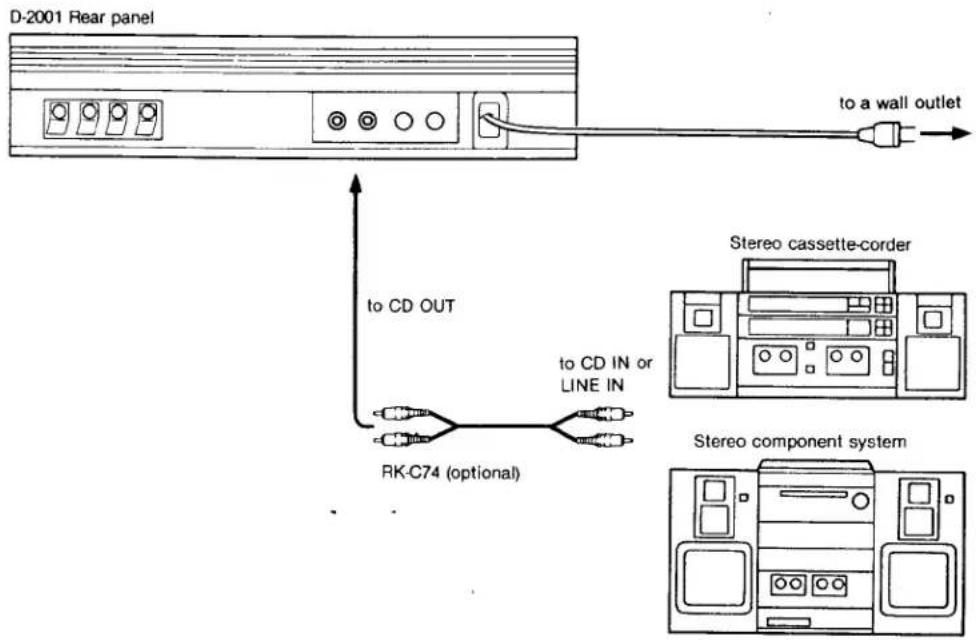
To listen to CDs through the speakers of other components
text_image
D-2001 Rear panel to a wall outlet to CD OUT RK-C74 (optional) Stereo cassette-corder to CD IN or LINE IN Stereo component systemOPERATION
1 Set the stereo cassette-corder or component to a mode (such as "CD" or "AUX") in which you can listen to CD play.
2 Begin play on the CD player.
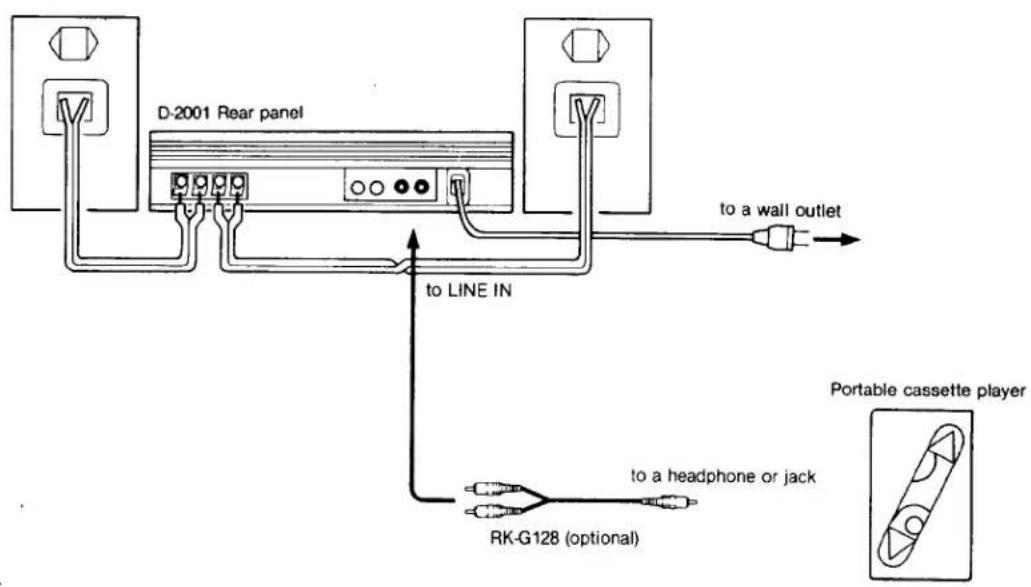
To listen to a portable cassette player through the speakers connected to the D-2001
text_image
D-2001 Rear panel to LINE IN to a wall outlet to a headphone or jack RK-G128 (optional) Portable cassette playerOPERATION
1 Turn CD player POWER on.
2 Start tape playback on the portable tape player.
3 Adjust VOLUME on the CD player.
Notes on making connections
- Turn power off on all components before making connections.
- When connecting LINE IN and/or CD OUT, insert the white plug in the L (left channel) jack and the red plug in the R (right channel) jack. (Remember: "Red = R = Right".)
- Insert plugs firmly into jacks. Loose connections may cause hum and noise.
-
When removing plugs, grasp the plug firmly and pull. Do NOT grasp by the cord. This may break the cord.
-
When recording, make a test recording first, to make sure that connections are secure.
- Do NOT connect CD OUT to the PHONO input jacks of an amplifier.
- Connection diagrams are based on Sony products. Products of other makers may be different. For details consult the operating instructions, or ask the maker.
SPECIFICATIONS
AUDIO POWER SPECIFICATIONS
POWER OUTPUT AND TOTAL HARMONIC DISTORTION:
With 6 ohm loads both channels driven, from 30-20,000 Hz; rated 21 watts per channel minimum RMS power, with no more than 10% total harmonic distortion in AC operation.
Compact disc player section
System Compact disc digital audio system
Information retrieval system
Non-contact optical reading (using semiconductor laser)
Laser diode properties
Material: GaAlAs
Wave length: 780nm
Emission duration: continuous
Laser output: max. 0.4 mW*
*This output is the value measured at a distance of about 1.6mm from the objective lens surface on the Optical Pick-up Block.
Frequency response
20-20.000 :1dB
High frequency distortion
Less than 0.009%
Channel separation More than 85dB (1kHz)
Dynamic range
More than 85dB (1kHz)
Wow and flutter
Below measurable limit
Amplifier section
Input
Line input (phono jacks)
sensitivity 0.25mW, 47kilohms
Outputs
CD output (phono jacks)
Output Level: 1.6V rms (47 kilohms)
Load impedance: less than 10 kilohms
Headphones (stereo minijack)
20mW + 20mW, at 10% harmonic distortion
Speaker output terminal
Load impedance: 6–8 ohms
General
Power requirements
120 V AC, 60 Hz
Power consumption
50W
Dimensions
Approx. 260×64×200 mm (w/h/d)
(10 ^3 / 4 × 2 ^5 / 8 × 7 ^7 / _8 inches)
incl. projecting parts and controls
Weight
Approx. 2.2kg (4lb 14oz)
Supplied accessories
Sony SUM-3 (NS) batteries (2)
Remote commander RM-D2001
Speaker system SRS-015
Remote commander RM-D2001
Type
Infrared pulse
Power requirements
DC 3V: supplied by 2 AA (R6) batteries
Dimensions
43×18×175mm (w/h/d)
Weight
110g, incl. batteries
Optional accessory Sereo headphones MDR-CD7
Design and specifications subject to change without notice.
TROUBLESHOOTING
First check your system connections, then the following list. If trouble persists, consult your nearest Sony service facility.
Disc play does not start.
• The disc is inserted with the labeled surface face down.
- No disc in tray.
- Power is off→plug the AC power cord into a wall outlet and depress POWER.
• VOLUME is turned all the way down→press the VOLUME + button.
- You are attempting to play through the speakers with the headphones inserted.
• Dusty or defective disc.
Play skips.
• The disc is dirty→clean it.
- Place the CD player in a location which is not subject to vibration.
• The disc is badly scratched→replace disc.
Sound comes only from the left (or right) speaker.
- The BALANCE control is all the way to the left or the right.
Disc tray does not retract.
- POWER is off→turn on POWER and press OPEN/CLOSE.
Disc compartment does not close.
- Press ▶II or ≠.
Remaining number of selections or remaining time is not displayed.
- During RMS play, these will not be displayed even when REMAIN is pressed.
- Player is not located on a leve surface.