
Discman D-220 - CD-Player SONY - Kostenlose Bedienungsanleitung
Finden Sie kostenlos die Bedienungsanleitung des Geräts Discman D-220 SONY als PDF.


Benutzerfragen zu Discman D-220 SONY
0 Frage zu diesem Gerät. Beantworten Sie die, die Sie kennen, oder stellen Sie Ihre eigene.
Eine neue Frage zu diesem Gerät stellen
Laden Sie die Anleitung für Ihr CD-Player kostenlos im PDF-Format! Finden Sie Ihr Handbuch Discman D-220 - SONY und nehmen Sie Ihr elektronisches Gerät wieder in die Hand. Auf dieser Seite sind alle Dokumente veröffentlicht, die für die Verwendung Ihres Geräts notwendig sind. Discman D-220 von der Marke SONY.
BEDIENUNGSANLEITUNG Discman D-220 SONY
Specifications
System
Laser diode properties
Compact disc digital audio system
Material: GaAlAs
Wavelength: 1 =780 nm
Emission duration: Continuous
Laser output: Less than 44.6 μW
(This output is the value measured at a distance of 200 mm
from the objective lens surface on the Optical Pick-up Block
Sony Super Strategy Cross Interlaval Reed Solomon Code
1-nd Quaktz Turn-up 2009
20 - 20.000 Hz - 4B
(###)
(messured by EIAO CF-307)
One dBut (stereo mm/ack)
Output level 0.8 V rms at 50 kilohms
Load impedance over 10 kilohms
Headphones (stereo minjack)
4 mW + 4 mW at 16 Ω
General
Power requirements
Supplied:
- DC 2.4 V Rechargeable battery pack
• DC IN 4.5 V jack accepts the Sony AC power adaptor for
use on
| Where purchased | Operating voltage |
| European and Asian countries | 220 - 230 V AC, 50 Hz |
| U.S.A. Canada, Central and South America | 120 V AC, 60 Hz |
| Middle East | 110 - 240 V AC, 50/60 Hz |
| United Kingdom, Australia | 240 V AC, 50 Hz |
| Other countries | 100 - 240 V AC, 50/60 Hz |
Not supplied:
• DC IN 4.5 V accepts the Sony CPM-300P mount plate and
CPM-300PK mount arm for use on car battery.
• DC 3 V two-size AA (LR6) alkaine ballenes
Appendix 132 x 26.8 x 151 mm (5 % x 1 % x 6 in L/when)
incl. projecting parts and controls
Apporo. 300 g (1.1 oz) incl. rechargeable battery pack
AC power adaptor (1)
Recharge rate battery pack (1)
Connection card (phone 240 x 2:1 stereo manual) (1)
Correlating lens (phone plug + E - Siemens mini-up) (1) Siereo headphones (1)
Dimensions
Mass
Supplied accessories
Design and specifications subject to change without notice.
Accessories not supplied
Plate arm CPM-300A
Mount plate CPM-300P
Mount arm CPM-300PK
Mount kit CPM-300PC
Mount # CPM-300CK
Car connecting pack CPA-3/CPA-4
Car battery cord DCC-E145L
Active speaker system SRS-58
Rechargeable battery pack BP-DM10
Your dealer may not handle some of the above listed accessories. Please ask the dealer for detailed information about the accessories in your country.
Note
This appliance conforms with EEC Directive 87/306/EEC regarding interference suppression.
SONY.
3-757-210-21 (1)
Compact Disc Compact Player

D-220
Operating Instructions
Before operating the unit, please read this manual thoroughly and retain it for future reference.
Sony Corporation © 1993 Printed in Japan
Discman
Owner's Record
The model number and the serial number are located at the bottom. Record the serial number in the space provided below. Refer to these numbers whenever you call upon your Sony dealer regarding this product
Model No. D-220 Serial No.
WARNING
To prevent fire or shock hazard, do not expose the unit to rain or moisture.
To avoid electrical shock, do not open the cabinet. Refer servicing to qualified personnel only.
CAUTION
The use of optical instruments with this product will increase eye hazard.

This equipment has been tested and found to comply with the limits for a Class B digital device, pursuant to Part 15 of the FCC Rules. These limits are designed to provide reasonable protection against harmful interference in a residential installation. This equipment generates, uses, and can radiate radio frequency energy and, if not installed and used in accordance with the instructions, may cause harmful interference to radio communications. However, there is no guarantee that interference will not occur in a particular installation. If this equipment does cause harmful interference to radio or television reception, which can be determined by turning the equipment off and on, the user is encouraged to try to correct the interference by one or more of the following measures:
- Reorient or relocate the receiving antenna.
- Increase the separation between the equipment and receiver.
- Connect the equipment into an outlet on a circuit different from that to which the receiver is connected.
- Consult the dealer or an experienced radio/TV technician for help.
You are cautioned that any changes or modifications not expressly approved in this manual could void your authority to operate this equipment.
For the Customers in the United Kingdom
This Compact Disc player is classified as a CLASS 1 LASER product.
The CLASS 1 LASER PRODUCT label is located on the bottom exterior.

THIS APPARATUS COMPLIES WITH THE CLASS B LIMITS FOR RADIO NOISE EMISSIONS SET OUT IN RADIO INTERFERENCE REGULATIONS.
Precautions
On safety
- As the laser beam used in this compact disc player is harmful to the eyes, do not attempt to disassemble the casing. Refer servicing to qualified personnel only.
- Do not put any foreign objects in the safety slot inside the disc compartment. If you do so, the laser beam may come out when the lid is opened.
- Do not put any foreign objects in the DC IN 4.5 V (external power input) jack.
- Should any solid objects or liquid fall into the unit, disconnect the power supply and have the unit checked by qualified personnel before operating it any further.
On power sources
- Use the rechargeable battery (supplied), alkaline batteries (not supplied), house current or a car battery.
- For AC operation: Use the AC power adaptor supplied with this unit. Do not use any other AC power adaptor as it may cause malfunction.
- For car battery operation: Use the car mount arm CPM-300PK (not supplied) or mount plate CPM-300P (not supplied) and car connecting pack CPA-3/CPA-4 (not supplied).
- If the unit is not going to be used for a long period of time, be sure to disconnect the power supply (AC power adaptor, rechargeable battery, alkaline batteries, or mount plate) from the unit. To remove the AC power adaptor from the wall outlet, grasp the adaptor itself, never pull it by the cord.
- The nameplate indicating operating voltage, power consumption, etc. is located on the bottom exterior. (AC power adaptor for Middle East only.)
On operation
- Since the CD system offers a wide dynamic range, the peaks of the high level inputs are recorded with high fidelity, and the noise level is very low. Do not turn up the volume while listening to a part of disc with no audio signals or very low level inputs. If you do so, the speakers may be damaged when the peak level of the sound is played.
- The lens on the disc table should be kept clean. Do not touch the lens or poke at it. If you do so, the lens may be damaged and the unit will not operate properly.
On installation
- Never install the unit where it would be subject to:
- heat sources such as radiators or airducts.
- direct sunlight.
- excessive dust.
- moisture or rain
- mechanical vibration or shock.
- unleveled surface
- Do not put the unit on a dashboard nor leave it in a car parked in sunlight since the temperature may rise excessively.
- When the unit is used with the AC power adaptor, do not wrap the unit in a cloth, blanket, etc. If you do so, the temperature inside and outside the unit may rise considerably, resulting in malfunctioning of the unit or serious accidents.
- Do not put any heavy object on top of the unit. The unit and disc may be damaged.
- If the unit is brought directly from a cold to a warm location, or is placed in a very damp room, moisture may condense on the lens inside the unit. Should this occur, the unit will not operate. In this case, remove the disc and leave the unit in a warm place for several hours until the moisture evaporates.
- For the unit to operate at its best, it should not be subjected to temperatures below 5^ (41°F) or above 35^ (95°F).
Notes on headphones
- Road safety
Do not use headphones while driving, cycling, or operating any motorized vehicle. It may create a traffic hazard and is illegal in some areas. It can also be potentially dangerous to play your headsets at high volume while walking, especially at pedestrian crossings. You should exercise extreme caution or discontinue use in potentially hazardous situations.
• Preventing hearing damage
Avoid using headphones at high volume. Hearing experts advise against continuous, icud and extended play. If you experience a ringing in your ears, reduce volume or discontinue use.
• Caring for others
Keep the volume at a moderate level. This will allow you to hear outside sounds and to be considerate to the people around you.
If you have any questions or problems concerning your unit, please consult your nearest Sony dealer.
Location and Function of Controls
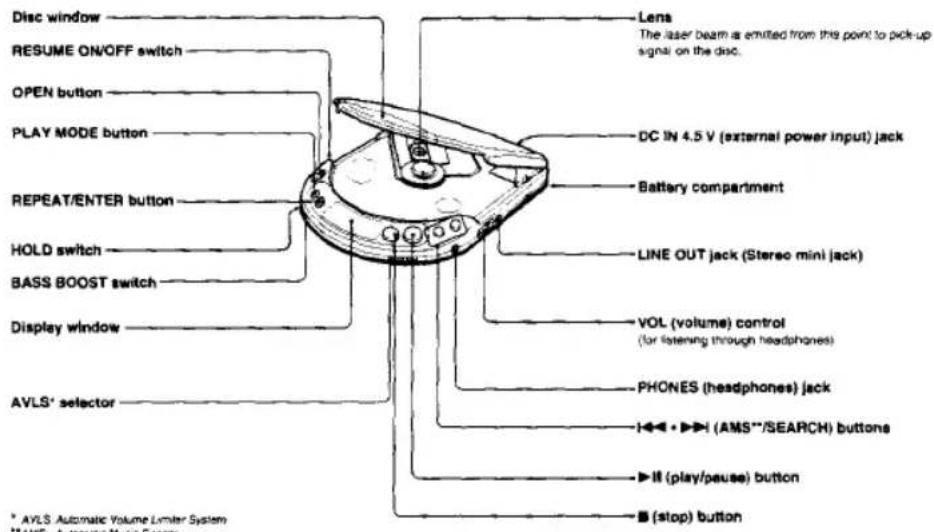
text_image
Disc window RESUME ON/OFF switch OPEN button PLAY MODE button REPEAT/ENTER button HOLD switch BASS BOOST switch Display window AVLS' selector Lens The laser beam is emitted from this point to pick-up signal on the disc. DC IN 4.5 V (external power input) jack Battery compartment LINE OUT jack (Stereo mini jack) VOL (volume) control (for listening through headphones) PHONES (headphones) jack ▶▶▶ (AMS"//SEARCH) buttons ▶▶▶ (play/pause) button ■ (stop) button * AVLS Automatic Volume Limiter System * AMRS Automatic Motor SystemTroubleshooting Guide
Should any problem persist after you have made the following checks, consult your nearest Sony service facility.
| Diode Syncope | Cause and/or solution |
| Disc play does not start. | The disc is inserted upside down or incorrectly. Insert the disc correctly with the label surface up.Dusty or defective discDirty or dusty lensThe disc compartment lid is not closed.Moisture condensation → Leave the unit in a warm place until the moisture evaporates.The AC power adaptor is not plugged into the wall outlet.The mount plate is not firmly connected to a cigarette lighter socket.The disc is not placed on a level surface.The HOLD switch is set in the direction of the arrow.When the 12 cm CD which contains many tracks is replaced with a disc with a few tracks (such as CD single or CDV, etc.), it may take more than 10 seconds before play starts.Weak rechargeable battery or alkaline batteries |
| No sound from the headphones | The headphones plug is not firmly connected to the PHONES jack.Adjust the VOL control.Dirty plug |
| No sound from the connected speakers | Check the connections.The amplifier is not turned on. |
| Skipping of sound | Dirty or defective discDirty lensStrong vibration |
| Disc play does not stop when you turn off the engine of the car. | Press to stop operation. |
| The "no disc" indication appears in the display window. | Place the CD with the label surface up.Replace the CD if it is badly damaged. |
| The "HI dc in" indication appears in the display window. | Use the supplied AC power adaptor. |
| Charging is not possible. | Insert the rechargeable battery with the side marked "Sony Discman" facing up. |
| "Hold" appears when you press a button. | The HOLD switch is set in the direction of the arrow. |
| When using with batteries, the battery life is short. | Manganese batteries are used. Use alkaline batteries. |
To make the display window not to be illuminated
You can make the display window not to be illuminated when using the unit on the rechargeable battery or alkaline batteries.
1 Disconnect the power sources (AC power adaptor, rechargeable battery, alkaline batteries).
2 While keeping PLAY MODE pressed, insert the rechargeable battery or alkaline batteries.
The illumination setting remains as long as the rechargeable battery or alkaline batteries are not removed.
Maintenance
If you have accidentally touched the lens with dirty fingers or if dust on the lens prevents the unit from operating property, open the disc compartment lid and clean the lens with lens cleaning kit (KK-9, not supplied).
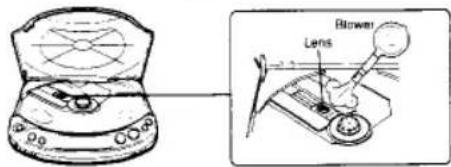
text_image
Diagram showing a portable radio with a dial and a lever mechanism labeled 'Blower Lens' in its view.
Keep the plug of your headphones clean to obtain optimum sound. Wipe it with a dry, soft cloth.

Clean the casing with a soft cloth slightly moistened with water or a mild detergent solution. Do not use any type of abrasive pad, scouring powder or solvent such as alcohol or benzine as they may mar the finish of the casing.

- Before playing, clean the disc with a cleaning cloth. Wipe the disc from the center out.
- Do not use solvents such as benzine, thinner, commercially available cleaners or anti-static spray intended for analog discs.
- Do not expose the disc to direct sunlight or heat sources such as hot air ducts, nor leave it in a car parked in direct sunlight as there can be a considerable rise in the temperature inside the car.
• After playing, store the disc in its case.
If there is a scratch, dirt or fingerprints on the disc, it may cause tracking error.
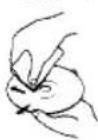
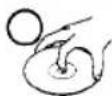
Handle the disc by its edge.
Not this way
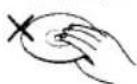
Do not touch the surface.
Not this way

Do not stick paper or tape nor write anything on the surface.
Power Sources
When using the supplied rechargeable battery for the first time, make sure to charge it.
Charging the battery
1 Insert the rechargeable battery with the side marked with "Sony Discman" facing up, as illustrated beside the battery compartment.
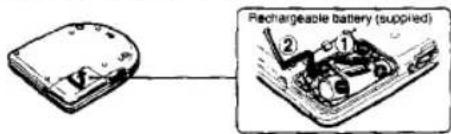
text_image
Rechargeable battery (supplied)2 Set the unit to stop mode and connect the supplied AC power adaptor.
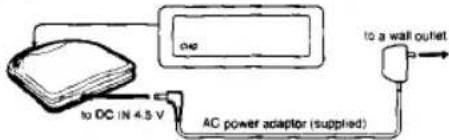
text_image
to DC IN 4.5 V AC power adaptor (supplied) to a wall outlet"CHG" appears in the display window. It will disappear when charging is completed.
3 Disconnect the AC power adaptor.
Rechargeable battery life
(When the unit is used on a flat and stable place.)
| Charging time | CD playing |
| Max. 2 hours* | Approx. 2 hours |
* The charging time varies depending on how the rechargeable battery is used.
When to replace the rechargeable battery
If the operating time reduces approximately by half even if you charge it fully, replace it with a new BP-DM10 (not supplied). You cannot use BP-DM1 battery pack.
Notes on the rechargeable battery (Ni-Cd battery)
- Be sure to use the supplied AC power adaptor
- Remember to recharge the battery after every use. Leaving the rechargeable battery discharged may shorten its life.
- When charging the battery for the first time or after being unused for a long time, playing time may reduce. In this case, charge and discharge it several times.
- Store the battery in a temperature between 5°C (41°F) and 35°C (95°F) to make it work at its best.
• Never throw the battery into fire. - Never short-circuit the battery terminal
- Do not disassemble the battery. If the electrolyte inside the battery should come into contact with cloth or skin, wash the contaminated objects with water immediately.
On □□ indication
The CIO indication appears on the display window to show that the battery is used up when the unit operates with either the rechargeable battery or the alkaline batteries. The indicator flashes when the battery becomes weak and the operation automatically stops. Then, the indicator stays lit. In this case, charge the rechargeable battery or replace all the alkaline batteries with new ones.

Insert two size AA (LR5) alkaline batteries according to the ⊕ and ⊗ indications in the battery compartment.
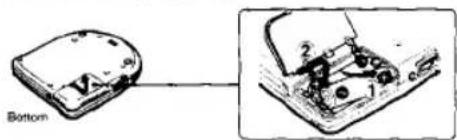
text_image
BottomVarious Ways of Using
Refer to the operating manual of each equipment for more details.
You can listen to the disc through a car cassette deck by using the following equipment (not supplied).
- Mount arm CPM-300PK (CPM-300A + CPM-300P)
- Plate arm CPM-300A
• Mount plate CPM-300P - Car connecting pack CPA-3/CPA-4
- Mount kit CPM-300PC (CPM-300P + CPA-4)
• Mount kit CPM-300CK (CPM-300A + CPM-300P + CPA-4)
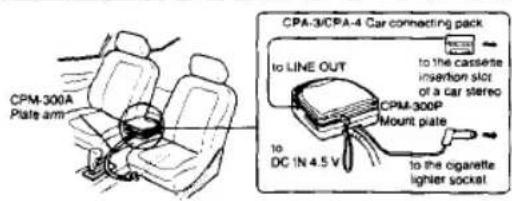
text_image
CPM-300A Plate arm CPA-3/CPA-4 Car connecting pack to LINE OUT to the cassette insertion slot of a car stereo CPM-300P Mount plate 10 DC IN 4.5 V to the cigarette lighter socketYour dealer may not handle some of the above listed accessories. Please ask the dealer for detailed information about the accessories in your country.
When you use the mount plate (CPM-300P)
First, attach the car mount adaptor which is supplied with CPM-300P to the mount plate, then install the CD player.
When you turn off the engine
Even when the rechargeable battery or alkaline batteries are inserted in the unit, the unit stops operations when you turn off the engine of the car. (Switched ignition function) This function is not available with every model of the car. If not, press ■ button to stop operation.
Note
Any connection other than the Sony's car connecting pack may cause noise.
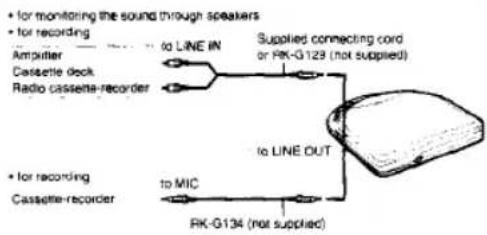
text_image
• for monitoring the sound through speakers • for recording Amperiter Cassette deck Radio cassette-recorder • for recording Cassette-recorder to LINE IN Supplied connecting cord or RK-G123 (not supplied) • for recording Cassette-recorder to MIC RK-G134 (not supplied) to LINE OUTNotes on connection
• Turn off each equipment before making connections.
- Plug in the while plug to the L (left channel) jack, and the red plug to the R (right channel) jack.
- Do not connect the output from LINE OUT with the PHONO jacks of the amplifier.
- Make sure to insert the plugs of the cable firmly into the jacks. A loose connection may cause a humming noise.
- If the unit causes interference to the radio or television reception, turn off the unit or move the unit away from the receiver
On display window
When you use the unit on the rechargeable battery or alkaline batteries, the display window is illuminated for about 5 seconds when you press an operating button (except for ■ and OPEN). If you do not want the display window to be illuminated, see "Troublesmooting Guide".
When you use the unit on the AC power adaptor or car battery, the display window is always illuminated. (The illumination goes out when you press ■ or when the disc stops.)
When you press ▶■ (When RESUME is set to OFF)
The number of the tracks in the disc and the total playing time appear for 2 seconds.
Example
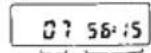
Number of the tracks Total playing time
During play
The track number and the elapsed playing time of the current track appear.
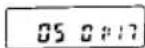
1 min. 17 sec. has elapsed from the beginning of the fifth track
During pause
The elapsed playing time of the current track flashes.
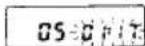
Pause mode at the point 1 min. 17 sec. from the beginning of the fifth track

Set the RESUME switch to ON to activate the resume play function. You can resume the disc play from the point where you last pressed ■
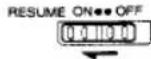
Notes
- If you open the lid after pressing ■, the memory of the position where you pressed ■ is canceled. The play starts from the first track.
- If you remove the rechargeable battery, alkaline batteries or disconnect the external power source, resume play may start at a point about 30 seconds behind or ahead of the position where you pressed ■.
Notes on alkaline batteries
- insert batteries with correct polarity.
- Do not use old batteries together with new ones or different types of batteries together.
- If the electrolyte inside the battery should leak, wipe the contaminated parts in the battery compartment with a cloth and replace the old batteries with new ones.
- Do not charge the batteries
- When the unit is not to be used for a long period of time, remove the batteries
Alkaline battery life
When the unit is used on a flat and stable place, approx. 5 hours of continuous play is possible.
When the battery compartment lid comes off
The lid can be removed when it is pulled forcibly. If this happens, attach the lid as illustrated


Connect the supplied AC power adaptor in the same way as for charging the rechargeable battery.
When the unit is not to be used, be sure to disconnect the AC power adaptor.
For the customers whose unit is supplied with an AC plug adaptor Use the AC plug adaptor if the AC power adaptor does not fit the outlet.
Note on the AC power adaptor
Use only the supplied AC power adaptor (for DC 4.5 V, unified polarity type). If you use any other AC power adaptors, the unit may be damaged. Do not use the AC power adaptor supplied with other "Discman" CD compact players equipped with DC IN 6V or 9V jack, nor an optional AC power adaptor for DC 6V or 9V.

3 Press REPEAT/ENTER.
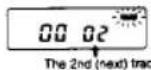
4 Repeat steps 2 and 3 (up to 22 tracks).
- If another track is memorized after 22 tracks have been memorized, the first track will be cleared and the new one will be memorized in its place.
- If you keep pressing REPEAT/ENTER for about 1 second, the number and the total playing time of the programmed tracks is displayed while you are pressing REPEAT/ENTER. If you enter the 32nd or later track in the disc or if the total playing time becomes more than 100 minutes. “----” is displayed instead of the total playing time. Though, you can keep programming.
5 Press ▶II. "RMS" stops flashing and play starts.
To repeat program play, press REPEAT/ENTER. To resume normal play, press PLAY MODE again. • RMS: Random Music Sensor
To check the contents of the program during programing Press REPEAT/ENTER shortly during programing before pressing ▶II
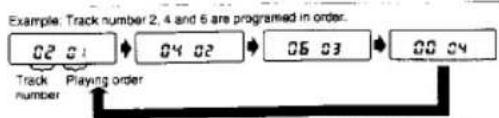
flowchart
graph LR
    A["02 01"] --> B["04 02"]
    B --> C["05 03"]
    C --> D["00 04"]
    E["Track number"] --> F["Playing order"]
Various Playing Modes
text_image
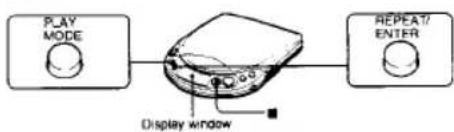
PLAY MODE REPEAT/ ENTER Display windowThe unit has INTRO PGM play, one-track play, SHUFFLE play, RMS* (program) play modes. Each mode has normal and repeat play modes. * RMS: Random Music Sensor
To change the mode
Press PLAY MODE during play. The current mode appears in the display window.
To play repeatedly (REPEAT play)
Press REPEAT/ENTER. "C" appears in the display window. Press again to cancel the repeat play.
To stop the disc Press ■

There is no play mode indication in the display window. To repeat the whole disc, press REPEAT/ENTER
Disc Playing
text_image
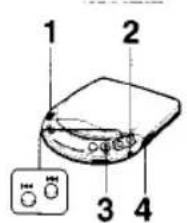
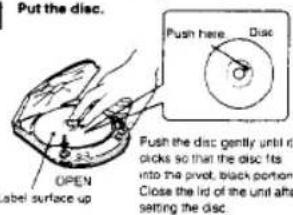
1 2 3 41 Put the disc.
text_image
Put the disc. Open label surface up Push here. Disc Push the disc gently until it picks so that the disc fits into the pivot, black portion. Close the lid of the unit after setting the disc.Other operations
| Operation | Press |
| To pause | ▶II |
| To release pause | ▶II |
| To stop | ■Disc playing stops and the power is turned off automatically. |
| To locate the beginning of the current track/previous tracks—AMS | I▶▶ lightly/repeatedly. |
| To locate the beginning of the next track/tracks—AMS | ▶▶ lightly/repeatedly. |
| To go back at high speed (Search) | Keep ▶▶ depressed. |
| To go ahead at high speed (Search) | Keep ▶▶ depressed. |
- The unit pauses at the beginning of the located track when you press lightly H or H in the pause mode.
- During the program play, the AMS operates in the programmed order.
To remove the disc
Pick up the disc, holding the edge, while pressing the pivot gently as illustrated.
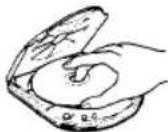
To play an 8 cm (3-inch) disc
You can play it without an adaptor.
2 Connect the supplied headphones.
3 Press ▶II.
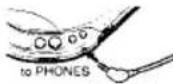
Headphones
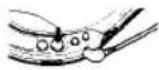
4 Adjust the volume.

To enjoy more powerful bass sound
When using the headphones, set BASS BOOST to a desired position. You can then enjoy a powerful bass-boosted sound.
NORM MID MAJ BASS BOOST

Notes
- The effect of the BASS BOOST function may be decreased according to a position of the volume control or the recording level of a disc.
- Sound may be cracked or distorted if you set the volume too high. In this case, turn down the volume.
To limit the volume at a moderate level
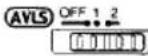
The AVLS (Automatic Volume Limiter System) selector allows you to limit the maximum volume of your unit.
- When the AVLS selector is set to either position 1 or 2, the volume will be kept at a moderate level, even if you attempt to turn the volume up higher.
- When the AVLS selector is set to either position 1 or 2, the playback sound may be distorted or unstable according to the music (especially bass-boosted part). If this happens, turn down the volume.
- When the AVLS selector is set to OFF, you will be able to enjoy the full volume capability of your unit.

and Be and not more
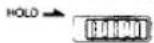
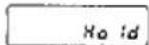
Side the HOLD switch in the direction of arrow to avoid accidental pressing of buttons on the unit. If you press a button in this condition,
"Hold" appears in the display window.

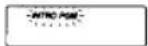
1 Press PLAY MODE until "INTRO PGM" flashes slowly in the display window.
2 Press ▶ N.
*INTRO PGM* starts flashing fast and the unit starts to play the first 15 (approximately) seconds of each track from the first track.
3 During 15 seconds of play, press REPEAT/ENTER if it is your desired track to enter it in the program.
When it is not your desired track, do not press any button during 15 seconds of play, or press to skip the track. Select your desired tracks in this way. After the beginning of the last track is played, "INTRO PGM" stops flashing and the selected tracks will be played automatically in the order of the track number of the disc.
To finish programming before hearing through the disc, press ▶. The selected tracks are played.
To try the programming again
Press ⬆ to go back. As the programming of the tracks returned is canceled, select the desired tracks from that point.
To repeat your programmed tracks, press REPEAT/ENTER while the selected tracks are played.
To repeat the beginning of all the tracks, press REPEAT/ENTER first and then press PLAY MODE until "INTRO PGM" flashes. Then press ▶II. If you did not enter any tracks in the program, the beginning of all the tracks will be repeated.

Press PLAY MODE during play until "1" appears in the display window.
The unit plays only one track and stops at the end of the track.
To play only one track repeatedly, press REPEAT/ENTER.

Press PLAY MODE until "SHUFFLE" appears in the display window.
Play starts from the next track.
To play the tracks in random order repeatedly, press REPEAT/ENTER. After all the tracks have been played in random order, they will be reshuffled and played repeatedly in a different order each time.
During shuffle play
To locate the beginning of the forthcoming tracks, press ▶▶▶ repeatedly To locate the beginning of the current track, press ◀◀. Even if you continue to press ◀◀, the player will not go back to previous track. The play starts from the beginning of the current track.

1 Press PLAY MODE during play until "RMS" flashes in the display window.
2 Press I◀◀ or ▶▶▶ to select the desired track.
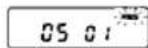
You can program the tracks in the desired order regardless of their track numbers.
Desired track The first track number