
Discman D-211 - CD-Player SONY - Kostenlose Bedienungsanleitung
Finden Sie kostenlos die Bedienungsanleitung des Geräts Discman D-211 SONY als PDF.


| Produkttyp | CD-Player (Discman) |
| Marke | Sony |
| Modell | D-211 |
| Abmessungen (B x H x T) | 132,5 x 26,8 x 157,7 mm |
| Gewicht (inkl. Akku) | ca. 350 g |
| Stromversorgung | DC 2,4 V (Akku BP-DM1), DC 3 V (2x AA), DC 6 V (Netzteil) |
| Leistungsaufnahme | 1,8 W |
| Frequenzgang | 20–20.000 Hz ±3 dB |
| Kopfhörerausgang | 9 mW + 9 mW an 16 Ω |
| Line-Ausgang | 0,9 V rms an 50 kΩ |
| Fehlerkorrektur | Sony Super Strategy Cross Interleave Reed Solomon Code |
| D/A-Wandler | 1-Bit Quarz-Zeitachsensteuerung |
| Wiedergabemodi | Normal, Intro (10 s), Einzeltitel, Programm, Zufall (Shuffle), Wiederholung |
| Besondere Funktionen | DSP (Bass Boost, DDS), Resume, HOLD, BATT LIGHT |
| Mitgeliefertes Zubehör | Netzteil, Akku BP-DM1, Kopfhörer mit Fernbedienung, Autoadapter, Verbindungskabel |
| Pflege der Linse | Reinigung mit Linsen-Reinigungsset KK-9 (nicht mitgeliefert) |
| Reinigung des Gehäuses | Weiches, leicht feuchtes Tuch; keine Lösungsmittel |
| Disc-Reinigung | Von innen nach außen mit weichem Tuch wischen |
| Sicherheitshinweis | Laser Klasse I; Gehäuse nicht öffnen; nur qualifiziertes Personal |
| Betriebstemperatur | 5 °C bis 35 °C |
| Stromversorgung Auto | 12 V über CPM-203P/200P Montageplatte und Zigarettenanzünder |
| Akku-Ladezeit | ca. 3 Stunden (vollständig geladen) |
| Akku-Spielzeit | ca. 2 Stunden (BATT LIGHT aus) |
| Alkali-Batterie-Spielzeit | ca. 3,5 Stunden (2x AA, BATT LIGHT aus) |
Häufig gestellte Fragen - Discman D-211 SONY
Benutzerfragen zu Discman D-211 SONY
0 Frage zu diesem Gerät. Beantworten Sie die, die Sie kennen, oder stellen Sie Ihre eigene.
Eine neue Frage zu diesem Gerät stellen
Laden Sie die Anleitung für Ihr CD-Player kostenlos im PDF-Format! Finden Sie Ihr Handbuch Discman D-211 - SONY und nehmen Sie Ihr elektronisches Gerät wieder in die Hand. Auf dieser Seite sind alle Dokumente veröffentlicht, die für die Verwendung Ihres Geräts notwendig sind. Discman D-211 von der Marke SONY.
BEDIENUNGSANLEITUNG Discman D-211 SONY
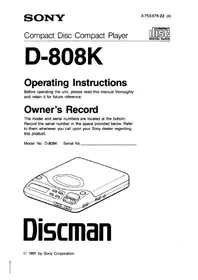
D-211
Bedienungsanleitung
Bitte lesen Sie diese Anleitung vor der Inbetriebnahme des Geräts sorgfältig durch und bewahren Sie sie für späteres Nachschlagen auf.
Eigentümer-Notiz
Die Modell- und Seriennummern befinden sich an der Unterseite. Notieren Sie die Seriennummer im unten vorgesehenen Feld. Beziehen Sie sich darauf, wenn Sie Ihren Sony-Händler bezüglich dieses Produkts kontaktieren.
Modell-Nr. D-211 Serien-Nr.
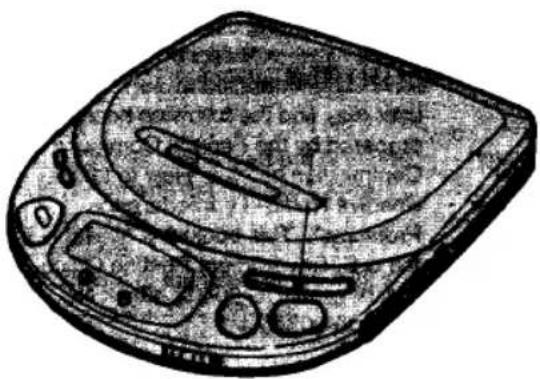
Discman
© 1992 Sony Corporation
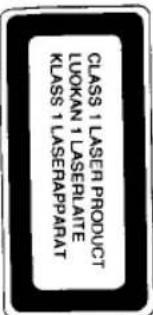
Für Kunden im Vereinigten Königreich und in Australien
Dieser CD-Player ist als LASER-PRODUKT DER KLASSE I eingestuft. Das Etikett „LASER-PRODUKT DER KLASSE I“ befindet sich an der Unterseite des Geräts.
Die Adern der Netzzuleitung sind gemäß folgendem Code gefärbt: Braun: Phase Blau: Neutralleiter Da die Adern der Netzzuleitung dieses Geräts möglicherweise nicht mit den farbigen Markierungen der Klemmen in Ihrem Stecker übereinstimmen, gehen Sie wie folgt vor: Die blaue Ader muss an die Klemme angeschlossen werden, die mit dem Buchstaben L oder rot gekennzeichnet ist. Schließen Sie keine der Adern an die Erdungsklemme im Stecker an, die mit dem Buchstaben E oder dem Schutzleiter-Symbol + oder grün oder grün-gelb gekennzeichnet ist. Da die Adern der Netzzuleitung dieses Geräts möglicherweise nicht mit den farbigen Markierungen der Klemmen in Ihrem Stecker übereinstimmen, gehen Sie wie folgt vor: Die blaue Ader muss an die Klemme angeschlossen werden, die mit dem Buchstaben L oder rot gekennzeichnet ist. Schließen Sie keine der Adern an die Erdungsklemme im Stecker an, die mit dem Buchstaben E oder dem Schutzleiter-Symbol + oder grün oder grün-gelb gekennzeichnet ist.
Hinweise für Kunden im Vereinigten Königreich.
14 Verschiedene Wiedergabemodi Einmalige Wiedergabe der gesamten CD Wiedergabe der ersten zehn Sekunden aller Titel Wiedergabe nur eines Titels Wiedergabe der Titel in gewünschter Reihenfolge Wiedergabe der Titel in zufälliger Reihenfolge Nützliche Funktionen Wartung Technische Daten Fehlerbehebung Fehlerbehebung 27 Bedienung 4 Anwendungen 6 Registrierung und Funktion der Bedienelemente 8 Verschiedene Verwendungsmöglichkeiten 11 Hören im Auto 11 Anschluss an andere Geräte 13
WARNUNG
Um Feuer oder Stromschlag zu vermeiden, setzen Sie das Gerät nicht Regen oder Feuchtigkeit aus. Um einen elektrischen Schlag zu vermeiden, öffnen Sie nicht das Gehäuse. Überlassen Sie Wartungsarbeiten nur qualifiziertem Personal.
VORSICHT Die Verwendung von
Dieses Gerät erzeugt und verwendet Funkstörungen. Beheben Sie die Störung durch eine oder mehrere der folgenden Maßnahmen: Richten Sie die Empfangsantenne neu aus. Vergrößern Sie den Abstand zwischen dem Gerät und dem Empfänger.
Schließen Sie das Gerät an eine andere Steckdose an als die, an der der Empfänger angeschlossen ist.
Empfänger Schließen Sie das Gerät an eine andere Steckdose an als die, an der der Empfänger angeschlossen ist.
Gerät gemäß den Spezifikationen in Unterabschnitt J von Teil 15 der FCC-Bestimmungen, die dazu bestimmt sind,
FCC-Bestimmungen, die dazu bestimmt sind,
solche Störungen in einer Wohngegend zu verhindern.
Es gibt jedoch keine Garantie dafür, dass
Störungen in einer bestimmten Installation nicht auftreten. Wenn dieses Gerät Störungen verursacht,
Installation. Wenn dieses Gerät Störungen verursacht,
was durch Ein- und Ausschalten des Geräts festgestellt werden kann,
sollte der Benutzer versuchen, die Störung zu beheben, indem er eine oder mehrere der folgenden Maßnahmen ergreift:
Inhaltsverzeichnis
- Wenn das Gerät längere Zeit nicht benutzt wird, trennen Sie die Stromversorgung (Netzteil, Batterien, Akkupack oder Halterung) vom Gerät. Um das Netzteil aus der Steckdose zu ziehen, fassen Sie das Netzteil selbst an; ziehen Sie niemals am Kabel. Verwenden Sie nur das mitgelieferte Netzteil oder den optionalen Akku-Adapter CPA-2/CPA-3 (nicht im Lieferumfang enthalten). Verwenden Sie kein anderes Netzteil, da dies zu Fehlfunktionen führen kann.
- Für den Betrieb mit Autobatterie: Verwenden Sie den Auto-Halterungsarm CPM-203PK oder die Halterungsplatte CPM-203P (nicht im Lieferumfang enthalten) und das Auto-
- Für den Betrieb mit Wechselstrom: Verwenden Sie das mitgelieferte Netzteil.
- Verwenden Sie den mitgelieferten Akku, Batterien (nicht im Lieferumfang enthalten), Haushaltsstrom oder eine Autobatterie.
- DC IN 6 V (Buchse für externe Stromversorgung).
- Falls feste Gegenstände oder Flüssigkeiten in das Gerät gelangen, trennen Sie die Stromversorgung und lassen Sie das Gerät von qualifiziertem Personal überprüfen, bevor Sie es weiter verwenden. Wenn Sie dies tun, kann der Laserstrahl beim Öffnen des Deckels austreten.
- Legen Sie keine Fremdkörper in den
- Da der in diesem CD-Player verwendete Laserstrahl schädlich für die Augen ist, versuchen Sie nicht, das Gehäuse zu zerlegen. Überlassen Sie Wartungsarbeiten nur qualifiziertem Personal.
- Legen Sie keine Fremdkörper in den Sicherheitsschlitz im Disc-Fach.
- Da das CD-System einen großen Dynamikbereich bietet, werden die Spitzen der hochpegeligen Eingänge mit hoher Wiedergabetreue aufgezeichnet, und der Rauschpegel ist sehr niedrig. Drehen Sie die Lautstärke nicht auf, während Sie einen Teil der Disc ohne Audiosignale oder mit sehr niedrigem Eingangspegel anhören. Wenn Sie dies tun, können die Lautsprecher beschädigt werden, wenn der Spitzenpegel des Tons abgespielt wird. Die Linse auf dem Disc-Tisch sollte sauber gehalten werden. Berühren Sie die Linse nicht und stochern Sie nicht darauf herum. Wenn Sie dies tun, kann die Linse beschädigt werden und das Gerät funktioniert nicht ordnungsgemäß. Für einen optimalen Betrieb sollte das Gerät keinen Temperaturen unter 5 °C (41 °F) oder über 35 °C (95 °F) ausgesetzt werden. Wenn Feuchtigkeit im Gerät kondensiert, entfernen Sie die Disc und lassen Sie das Gerät mehrere Stunden an einem warmen Ort, bis die Feuchtigkeit verdunstet ist. Sollte dies auftreten, funktioniert das Gerät nicht. Wenn das Gerät direkt aus einer kalten Umgebung gebracht wird, an einen warmen Ort gestellt wird oder in einem sehr feuchten Raum aufgestellt wird, kann Feuchtigkeit kondensieren, was zu Fehlfunktionen des Geräts oder ernsthaften Schäden führen kann. Wenn Sie das Gerät mit einem Tuch, einer Decke usw. umwickeln, kann die Temperatur im Inneren und Äußeren des Geräts ansteigen. Verwenden Sie das Netzteil nicht, wenn das Gerät in ein Tuch gewickelt ist.
- Bei Verwendung des Geräts mit dem Netzteil • Vermeidung von Hörschäden
- Legen Sie keine schweren Gegenstände auf das Gerät. Gefährliche Situationen. Gefährliche Situationen. Gefährliche Situationen.
- Legen Sie keine schweren Gegenstände auf
- Legen Sie keine schweren Gegenstände auf — mechanische Vibrationen oder Stöße. — unebene Oberfläche. — Feuchtigkeit oder Regen — Feuchtigkeit oder Regen — übermäßiger Staub. — direkte Sonneneinstrahlung — Wärmequellen wie Heizkörper oder Lüftungsschächte. — Wärmequellen wie Heizkörper oder Lüftungsschächte.
- Installieren Sie das Gerät niemals an Orten, an denen es folgenden Bedingungen ausgesetzt wäre:
- Hinweise zur Verkehrssicherheit bei Kopfhörern
Zu Stromquellen
Zur Sicherheit
Vorsichtsmaßnahmen
Zum Betrieb
Zur Installation
Hinweise zu Kopfhörern • Verkehrssicherheit
* DSP: Digital Signal Processing ** AMS: Automatic Music Sensor
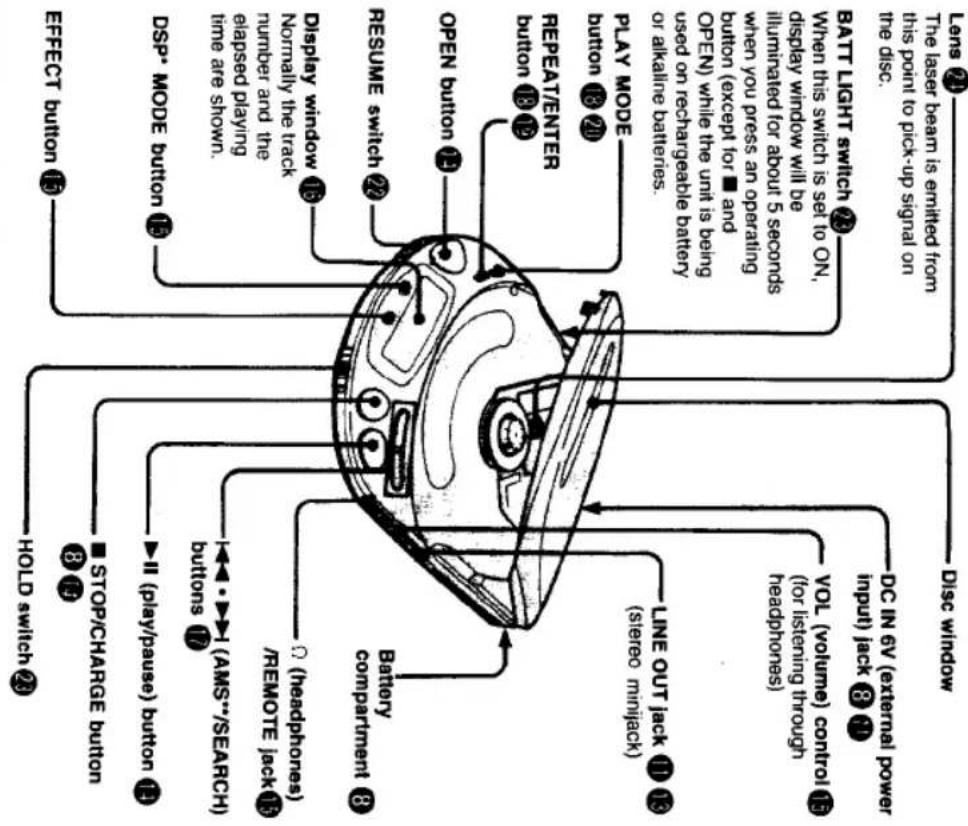
Weitere Einzelheiten finden Sie auf den Seiten in ●.
Kopfhörer mit Fernbedienung![graph TD A["Ear receivers"] --> B["■ (stop) button 8 14"] A --> C["VOL (volume) control 7 13"] A --> D["DSP (BASS BOOST, DDS) button 15"] E["HOLD indicator"] --> F["This indicator turns red when the HOLD switch is set to HOLD."] G["HOLD switch"] --> H["When you are not using the remote commander, se…](/content/2026/05/805568/images/af8f4ed062f0fc075353aab2b25795d03d8a1e1c3e31f18fc318d55befbb9dd2.jpg)
Grundsätzlich ja. Sie sind nicht betriebsbereit.
mit dem Fernbedienungsbefehl?
CD-Player und CD-Player
Ist es möglich, andere
Bedienung des Fernbedienungsgeräts.
Ω/REMOTE-Buchse, um Batterieverbrauch durch versehentliches
Lösen Sie die Fernbedienung vom
Fernbedienung
Wenn Sie die Fernbedienung nicht verwenden,
Stellen Sie sicher, dass sich der Player im Stoppmodus befindet.
Fernbedienung an das Gerät Stellen Sie sicher, dass sich der Player im Stoppmodus befindet.
Wenn Sie die Fernbedienung anschließen,
Wiedergabe.
Fernbedienung sicher. Eine lose Verbindung kann während
Schließen Sie die Kopfhörer an die Fernbedienung an
Vor der Verwendung
DSP-Taste (BASS BOOST, DDS) 15 Fernbedienung
LAUTSTÄRKE-Regler (VOL) ⑦
■ (Stopp)-Taste 8 14
→
Bedienung der Tasten.
HOLD, um versehentliche Bedienung zu verhindern
Wenn Sie die Fernbedienung nicht verwenden, stellen Sie den
HOLD-Schalter 23
auf HOLD.
Diese Anzeige leuchtet rot, wenn der HOLD-Schalter auf
HOLD-Anzeige
sofort mit Wasser abspülen.
die kontaminierten Gegenstände mit Wasser abwaschen.
(Wenn das Gerät auf einer ebenen und stabilen Oberfläche verwendet wird.)
| Charging time | Playing time |
| 3 hours (com-pletely charged) | approx. 2 hours(BATT LIGHT switch:OFF) |
Akkulaufzeit Die Spieldauer des CD-Players hängt wie folgt von der Ladezeit ab:
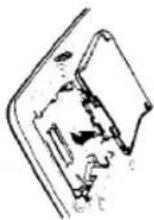
Abbildung.
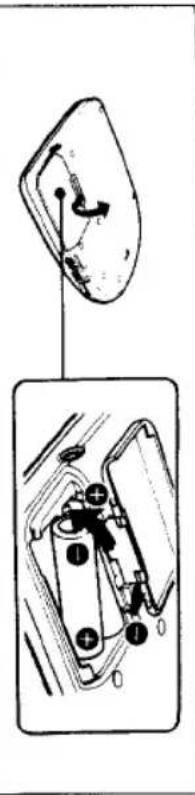
gewaltsam. Wenn dies passiert, setzen Sie den Deckel wieder auf,
Dieser Deckel kann abgenommen werden, wenn er gezogen wird
abgenommen wird
Wenn der Deckel des Batteriefachs
Angaben im Batteriefach.
Batterien gemäß der ⊕- und ⊖-Markierung ein.
Legen Sie zwei AA-Batterien (LR6) (Alkaline) ein.
(Kein Text)
So laden Sie den Akku
Batteriefach. zur ⊕- und ⊖-Markierung in der Nähe der mit "Sony Discman" nach oben zeigenden Seite, gemäß Legen Sie den Akku ein, die Seite
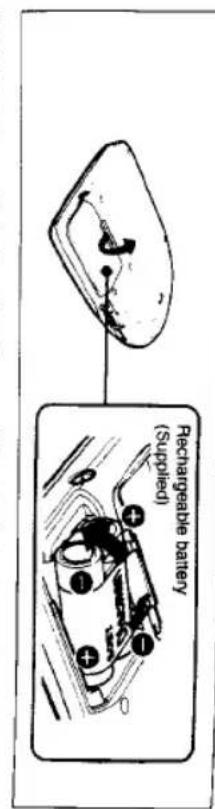
Anbringen des Akkus
Stunden. Wenn Sie den Akku zum ersten Mal verwenden, laden Sie ihn unbedingt 3 Stunden lang.
Verwendung mit Akku
Stromquellen
Verwendung mit Batterien,
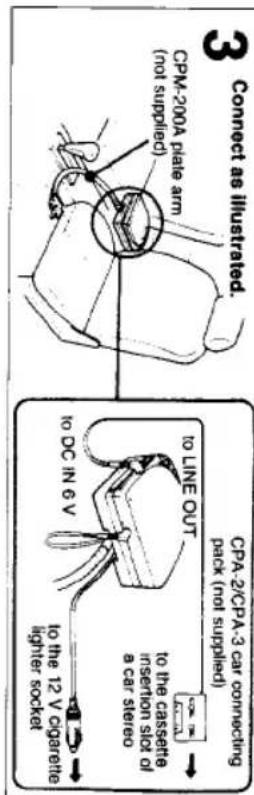
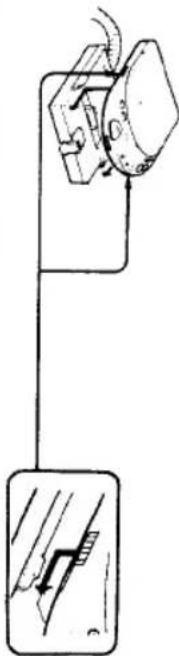
2 Installieren Sie den Player auf dem Autohalterungsadapter, der an der Montageplatte befestigt ist.
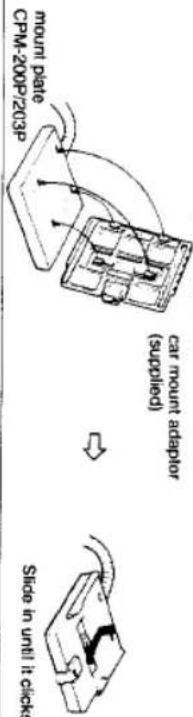
1 Befestigen Sie den mitgelieferten Autohalterungsadapter an der Montageplatte CPM-200P/203P (nicht im Lieferumfang enthalten). Sie können den CD-Player über ein Auto-Kassettendeck mit der folgenden Ausrüstung hören. Stellen Sie sicher, dass Sie den mitgelieferten Autohalterungsadapter vor dem Anschluss am Gerät befestigen. Die Stromversorgung erfolgt über den Zigarettenanzünder. Weitere Einzelheiten finden Sie in der Bedienungsanleitung der jeweiligen Ausrüstung.
Hören im Auto
Verschiedene Verwendungsmöglichkeiten
Stromquellen
Lebensdauer der Alkalibatterien
Wenn zwei AA-Batterien (LR6) verwendet werden, sind ca. 3,5 Stunden ununterbrochene Wiedergabe möglich. (Wenn das Gerät auf einer ebenen und stabilen Oberfläche verwendet wird und der BATT-LIGHT-Schalter auf OFF steht.)
Hinweise zu Batterien - Setzen Sie Batterien mit korrekter Polarität ein. - Verwenden Sie keine alten Batterien zusammen mit neuen oder verschiedene Batterietypen zusammen. - Wenn der Elektrolyt in der Batterie
Laden Sie die Batterien nicht auf. Wenn das Gerät längere Zeit nicht verwendet wird, entfernen Sie die Batterien.
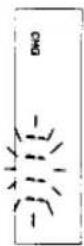
aufgebraucht ist, wenn das Gerät entweder mit dem Akku oder den Alkalibatterien betrieben wird. Die Anzeige blinkt, wenn die Batterie schwach wird, und der Betrieb stoppt automatisch. Dann leuchtet die Anzeige dauerhaft. In diesem Fall laden Sie den Akku auf oder ersetzen Sie alle Alkalibatterien durch neue.
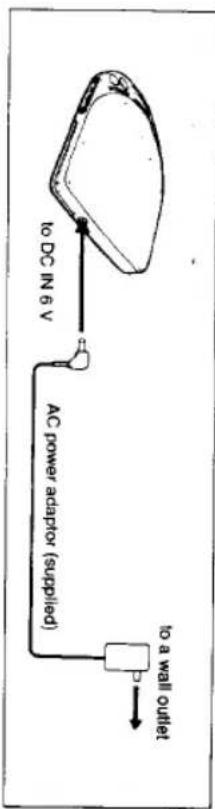
Verwendung mit Netzstrom
Polarität des Steckers (Einheitspolaritätstyp) Adapter für andere "Discman"-CD-Player mit DC-IN-9-V-Buchse, noch den optionalen Netzadapter wie den AC-D6M. von Sony, da die Polarität des mitgelieferten Adapters entgegengesetzt zu herkömmlichen Adaptern ist. Verwenden Sie nicht den mitgelieferten AC-Netzadapter. Hinweis zum AC-Netzadapter
Verwenden Sie nur den mitgelieferten AC-Netzadapter oder den AC-E4M AC-Netzadapter (nicht im Lieferumfang enthalten).
Verwenden Sie niemals andere Adapter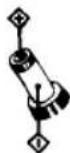
im Lieferumfang enthalten). Verwenden Sie niemals
Verwenden Sie nur das mitgelieferte Netzteil oder das AC-E4M-Netzteil (nicht
Hinweis zum Netzteil
mitgeliefert). Verwenden Sie niemals
Verwenden Sie nur das mitgelieferte Netzteil oder das AC-E4M-Netzteil (nicht
mitgeliefert). Verwenden Sie niemals
Verwenden Sie nur das mitgelieferte Netzteil oder das AC-E4M-Netzteil (nicht
mitgeliefert). Verwenden Sie niemals
Verwenden Sie nur das mitgelieferte Netzteil oder das AC-E4M-Netzteil (nicht
mitgeliefert). Verwenden Sie niemals
mitgeliefert). Verwenden Sie niemals andere Netzteile
Verwenden Sie nur das mitgelieferte Netzteil oder das AC-E4M-Netzteil (nicht
mitgeliefert). Verwenden Sie niemals
Verwenden Sie nur das mitgelieferte Netzteil oder das AC-E4M-Netzteil (nicht
mitgeliefert). Verwenden Sie niemals
Verwenden Sie nur das mitgelieferte Netzteil oder das AC-E4M-Netzteil (nicht
Verwenden Sie nur das mitgelieferte Netzteil oder das Netzteil AC-E4M (nicht
mitgeliefert). Verwenden Sie niemals
Verwenden Sie nur das mitgelieferte Netzteil oder das Netzteil AC-E4M (nicht
mitgeliefert). Verwenden Sie niemals
Verwenden Sie nur das mitgelieferte Netzteil oder das Netzteil AC-E4M (nicht
mitgeliefert). Verwenden Sie niemals
Verwenden Sie nur das mitgelieferte Netzteil oder das Netzteil AC-E4M (nicht
mitgeliefert) Verwenden Sie niemals
Verwenden Sie nur das mitgelieferte Netzteil oder das Netzteil AC-E4M (nicht
mitgeliefert) Verwenden Sie niemals
Verwenden Sie nur das mitgelieferte Netzteil oder das Netzteil AC-E4M (nicht
mitgeliefert) Verwenden Sie niemals
Verwenden Sie nur das mitgelieferte Netzteil oder das Netzteil AC-E4M (nicht
mitgeliefert) Verwenden Sie niemals
Verwenden Sie nur das mitgelieferte Netzteil oder das AC-E4M-Netzteil (nicht
im Lieferumfang enthalten). Verwenden Sie niemals
im Lieferumfang enthalten). Verwenden Sie niemals
im Lieferumfang enthalten). Verwenden Sie niemals
im Lieferumfang enthalten). Verwenden Sie niemals
im Lieferumfang enthalten). Verwenden Sie niemals
im Lieferumfang enthalten). Verwenden Sie niemals andere Adapter
im Lieferumfang enthalten). Verwenden Sie niemals
im Lieferumfang enthalten). Verwenden Sie niemals
im Lieferumfang enthalten). Verwenden Sie niemals
im Lieferumfang enthalten). Verwenden Sie niemals
im Lieferumfang enthalten). Verwenden Sie niemals
im Lieferumfang enthalten). Verwenden Sie niemals
im Lieferumfang enthalten). Verwenden Sie niemals
im Lieferumfang enthalten). Verwenden Sie niemals
mitgeliefert) Niemals verwenden
Verstärker. (rechter Kanal) Buchse. Schließen Sie den Ausgang von LINE OUT nicht an die PHONO-Buchsen des (Kanal) Buchse an, und den roten Stecker an die R-Anschlüsse. - Stecken Sie den weißen Stecker in die L (linke • Schalten Sie jedes Gerät aus, bevor Sie Verbindungen herstellen. Hinweise zum Anschluss Receiver. • Wenn das Gerät Störungen beim Radio- oder Fernsehempfang verursacht, schalten Sie das Gerät aus oder entfernen Sie es von der Störquelle. Kabel fest in die Buchsen stecken. Eine lose Verbindung kann ein Brummen verursachen. • Schalten Sie jedes Gerät aus, bevor Sie Verbindungen herstellen. Hinweise zum Anschluss
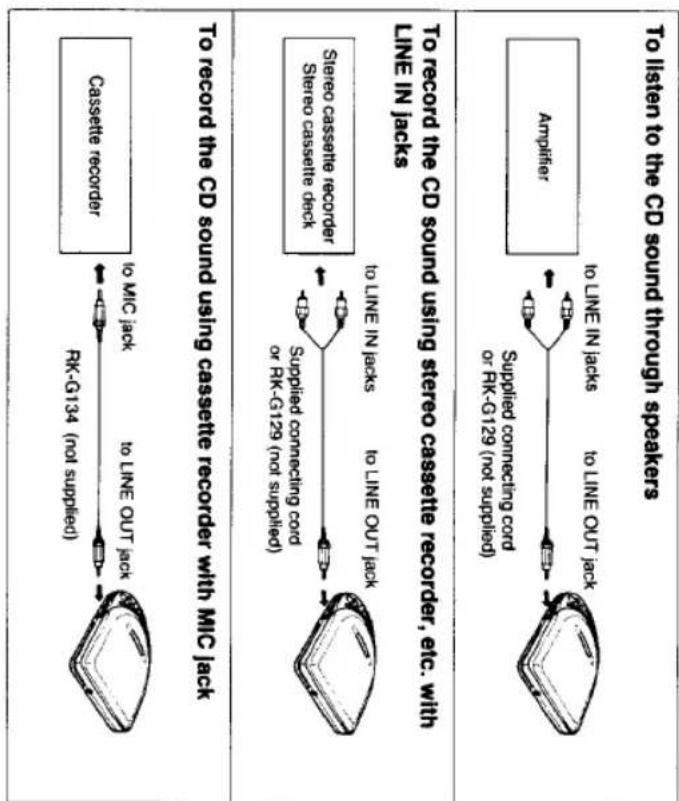
verwendet werden
Um den CD-Sound mit einem Kassettenrekorder mit MIC-Buchse aufzunehmen
Um den CD-Sound mit einem Stereo-Kassettenrekorder usw. mit LINE IN-Buchsen aufzunehmen
Um den CD-Sound über Lautsprecher zu hören
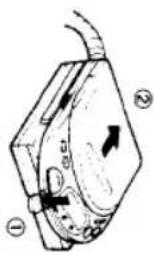
①. Pfeil ②, während Sie den Teil drücken. Zum Entfernen des DISCMAN Schieben Sie das Gerät in Richtung ①. Pfeil ②, während Sie den Teil drücken. Schieben Sie das Gerät in Richtung des Zum Entfernen des DISCMAN
keine ausreichende Wirkung.
schmaler Dynamikbereich, kann der DDS
... Bei der Wiedergabe von Titeln mit schnellem Tempo oder Titeln mit
Fernbedienung.
kann nicht mit der Fernbedienung eingestellt werden
Der Pegel von "BASS BOOST" und "DDS"
Hinweis
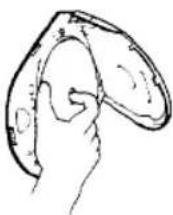
verzerrt oder verzerrt sein. Wenn die Lautstärke zu hoch ist, drehen Sie den VOL-Regler herunter.)
Lautstärkeregelung des Geräts, der Ton kann
(Wenn Sie die Lautstärke mit dem
wird der Klang stärker verstärkt.
mit der EFFECT-Taste. Der Bass
Fenster. Stellen Sie dann den Bassklang ein
Drücken Sie die DSP MODE-Taste, um die Anzeige "BASS BOOST" im Display zu erhalten.
Betonung des Bassklangs**
Wenn Sie ■ drücken, stoppt die Disc-Wiedergabe und das Gerät schaltet sich automatisch aus.
und das Gerät schaltet sich aus.
Zum Stoppen Langer Piepton. Die Disc stoppt das Drehen.
Zum Aufheben der Pause ▶▼ Ein sehr kurzer Piepton ist einmal zu hören.
Die Pause wird aufgehoben. Drücken Sie die DSP MODE-Taste, um die Anzeige "BASS BOOST" im Display zu erhalten.
Beim Hören an lauten Orten***
und kraftvoller Klang wird für eine bessere Hörbarkeit betont.
Pegel, unhörbarer Klang wird verstärkt
EFFECT-Taste. Während Sie bei niedriger Lautstärke hören
Stellen Sie dann den Pegel des DDS mit dem
"DDS"-Anzeige im Display-Fenster.
Drücken Sie die DSP-MODE-Taste, um die
Beim Hören an lauten Orten***
So verwenden Sie DSP* (BASS BOOST und DDS)
Weitere Bedienvorgänge
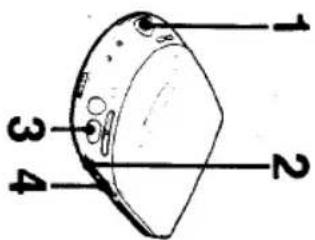
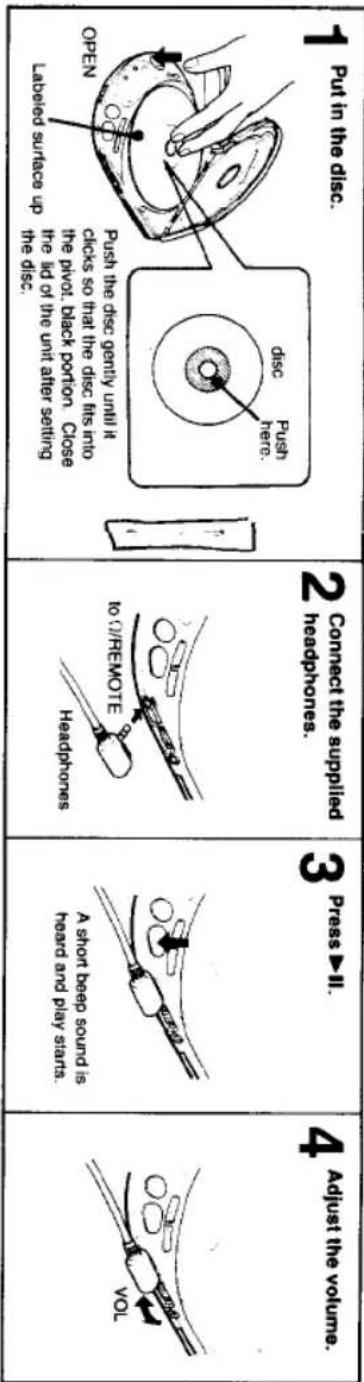
- Während der Suche erscheint die abgelaufene Wiedergabezeit im Display-Fenster.
Mal Sie ▶▶ drücken, lokalisiert der Player
lokalisiert die vorherige Auswahl. Jedes
• Jedes Mal, wenn Sie ◀◀ drücken, der Player
kurz ◀◀ oder ▶▶ im Pausenmodus
• Der Player pausiert am Anfang der lokalisierten Auswahl, wenn Sie
Hinweise
markiert die vorherige Auswahl. Jedes
• Jedes Mal, wenn Sie ◀◀ drücken, wird der Player
kurz ◀◀ oder ▶▶ im Pausenmodus
• Der Player pausiert am Anfang der markierten Auswahl, wenn Sie
Hinweise
- Während der Zufallswiedergabe können Sie keine vorherige Auswahl ansteuern, auch wenn Sie kurz ◀◀◀ drücken oder ◀◀◀ gedrückt halten
| To go back at high speed | Keep ▶◀ ▶ depressed. |
| To go ahead at high speed | Keep ▶▶ ▶ depressed. |
Ansteuern einer bestimmten Stelle in einer Auswahl — SUCHE
| To locate the beginning of the current selection | Press ◀◀◀ shortly. Three short beeps are heard. |
| To locate the beginning of the next selection | Press ▶▶▶I shortly. Two short beeps are heard. |
Ansteuern einer bestimmten Auswahl — AMS
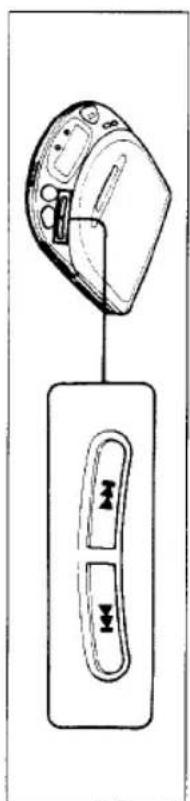
Eine bestimmte Auswahl oder eine bestimmte Stelle kann während der Wiedergabe oder Pause angesteuert werden.
Ansteuern eines bestimmten Abschnitts
Disc-Wiedergabe
Hinweise
- Wenn Sie ▶ mit eingelegter Disc drücken
auf dem Kopf, erscheint die Anzeige "00" im Displayfenster und die
Es kommt kein Ton. Drücken Sie ■, um
die Wiedergabe der Disc zu stoppen und sie erneut einzulegen.
- Wenn die 12-cm-CD, die
- Wenn die 12-cm-CD, die viele Titel enthält, durch eine Disc
mit wenigen Titeln (wie z.B. CD
als 10 Sek. bis der Start erfolgt.
erneut.
Im Anzeigefenster
Wenn Sie ▶II drücken
AUS.)
Die Anzahl der Titel auf der Disc und die Gesamtspielzeit erscheinen für 2 Sekunden.
Anzahl der Gesamtspielzeit Titel
05 0:17
1 Min. 17 Sek. sind seit Beginn des fünften Titels vergangen.
05.011
Pausenmodus an Punkt 1 Minute 17 Sekunden ab Beginn der fünften Auswahl
| Between the selectionsThe time to the beginning of the next selectionappears. | 03-00:022 sec. to the beginning of the 3rdselection. |
Auffinden eines bestimmten Abschnitts
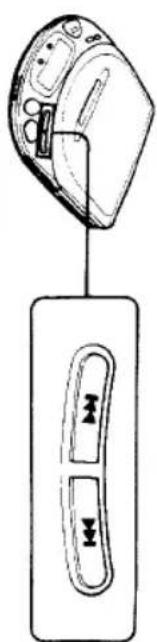
(Fortsetzung auf der nächsten Seite)
| RePEAT/ENTER button is not pressed | Repeat/ENTER button is pressed | |||
| Display window | Play mode | Discovery window | Play mode | |
| Playing the whole disc once—Normal play | Repeats the whole disc. | |||
| Playing the first ten seconds of all the selectionsagain and again. | Plays the first ten seconds of all the selectionsagain and again. | |||
| Playing the first tenseconds of all theselections | When you find your desired selection, press ▶ again. The currently played selection can be listened from that point to the end(in REPEAT INTRO play, whole disc play repeals.) | |||
| To start playingPress ▶!“INTRO” stops flashingand playing starts fromthe first selection. | ||||
| Playing only one selectionPlays one selection andstops at the end of theselection. | Plays a single selection repeatedly. | |||
Zum Anhalten der Disc die Taste ■ drücken.
Erneut drücken, um die Wiederholungswiedergabe abzubrechen
"REPEAT" erscheint im Display
Für wiederholte Wiedergabe REPEAT/ drücken
Modus erscheint im Displayfenster. Zum Ändern des Modus während der Wiedergabe die Taste PLAY MODE drücken. Der aktuelle Modus. Dieses Gerät verfügt über 10 Wiedergabemodi.
![graph LR A["Play MODE"] --> B["Display window"] B --> C["Repeat entry"] style A fill:#f9f,stroke:#333 style B fill:#ccf,stroke:#333 style C fill:#cfc,stroke:#333](/content/2026/05/805568/images/e938f92ed05696c0cd9f8e4048b090f5414965f85855f76a355343860ba534e8.jpg)
Verschiedene Wiedergabemodi
| RePEAT/ENTER button is not pressed | MakeATENTER button is pressed | |||
| Display window | Play mode | Display window | Play mode | |
| . RMS is the abDevlation of Random Music Sensor. | Play (RMS). | |||
| Play MODE | Play4 or ▶ Play (RMS) | |||
| . RMS is the abDevlation of Random Music Sensor. | 20.00Press REPEAT/ 3 Repeat the steps 4 Press ▶ ▶ of the unit. FTack No. of the desired selection. The first selection | Flashes. | ||
| During the play | The 2nd (next) selection. | Frashes. | ||
| PLAY MODE | Press REPEAT/ 3 Repeat the steps 4 Press ▶ ▶ of the unit. FTack No. of the desired selection. The first selection | Flashes. | ||
| .. When the REPEAT/ENTER button is pressed for more than 1 second, total playing time of the programmed selections will appear on the display window while the button is pressed. If a disc contains more than 32 tracks and you wish to program the 32nd selection or a selection after the 32nd new one will be memo#zed in its place. | After the every selection has been played in random order, they will be resufficed and played repeatedly in a different order each time. | After the every selection has been played in random order, they will be resufficed and played repeatedly in a different order each time. | ||
| Press PLAY MODE button again to return to normal play mode. | one or if the total playing time is 100 minutes or more, the total playing time of the program will not be displayed. (----:--"indication will appear instead). However it is possible to program such selections. | |||
| Example: Selection number 2, 4 and 6 are programmed in order. | The first selection will be cleared and the memo#zed after 22 selections have been new one will be memo#zed in its place. | |||
(Fortsetzung von der vorherigen Seite)
Verschiedene Wiedergabemodi
Tasten) gedrückt wird. Taste (außer ■ und OPEN etwa 5 Sekunden, wenn das Displayfenster beleuchtet wird. Bei aufladbaren Batterien oder Alkalibatterien den Schalter BATT LIGHT auf ON schieben. Wenn das Gerät mit
Bei Verwendung des Geräts in einem schwach beleuchteten Bereich
HOLD-Schalter an der Fernbedienung
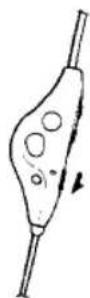
HOLD-Schalter am Gerät
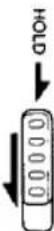
Wenn Sie den HOLD-Schalter in Pfeilrichtung stellen, werden alle Tasten verriegelt, um eine versehentliche Betätigung der Tasten zu verhindern.
Verriegeln der Tasten
Stromquelle zusammen mit dem
- Bei Verwendung des Geräts mit einer externen
Alkalibatterien.
mit dem Akku oder mit
entfernt. Um dies zu vermeiden, verwenden Sie das Gerät
Speicher der Stopposition ist
- Wenn die Stromversorgung unterbrochen wird, ist es
Bei Verwendung mit dem 16-V-Netzteil oder Autobatterie
Bei Verwendung mit dem Wechselstromnetzteil
werden beibehalten.
der Stopposition und des DSP-Modus
Die Resume-Funktion funktioniert und der Speicher
wird gestoppt. In diesem Fall wird die
Stromversorgung von der externen Stromquelle,
dem Akku oder den Alkaline-Batterien unterbrochen. Die Wiedergabe stoppt, wenn die
Halten Sie den RESUME-Schalter in der Position ON. Wenn Sie die Taste ▶■ drücken, beginnt die Wiedergabe an der Stelle, an der Sie die Taste ■ gedrückt haben. Die Resume-Funktion funktioniert in jedem Wiedergabemodus.
So spielen Sie ab der Stelle, an der Sie gestoppt haben – Resume-Wiedergabefunktion
Nützliche Funktionen
![graph LR A["Press ▶II"] --> B["00"] B --> C["10 47:53"] C --> D["01 00:00"] E["Press ▶II"] --> F["04"] F --> G["04 02:34"] style A fill:#f9f,stroke:#333 style B fill:#ccf,stroke:#333 style C fill:#cfc,stroke:#333 style D fill:#fcc,stroke:#333 style E fill:#ffc,stroke:#333 style F fill:#cff,stroke:#3…](/content/2026/05/805568/images/4699119a4652a8cff776ee41ad7986253618a5a4b5f3af1947afac09ec9581b8.jpg)
- Wenn Sie nach dem Drücken der Taste den Deckel öffnen, wird der Speicher der Stopp-Position gelöscht, wodurch die Resume-Funktion aufgehoben wird. Die Wiedergabe beginnt mit der ersten Auswahl. - DSP bleibt erhalten, solange die Stromversorgung angeschlossen ist, unabhängig vom RESUME-Schalter.
Hinweise
- Die Resume-Wiedergabe kann an einem Punkt beginnen, der etwa 30 Sekunden hinter oder vor der Stopp-Position liegt, wenn Sie die Batterien oder den Akku entfernen. Batterien oder den Akku entfernen. Stopp-Position liegt, wenn Sie die 30 Sekunden hinter oder vor der Resume-Wiedergabe kann an einem Punkt beginnen, der etwa
| System | Compact disc digital audio system |
| Laser diode properties | Material: GaAlAsWavelength: λ =780 nmEmission duration: ContinuousLaser output: Less than 44.6 μW(This output is the value measured at a distance of 200 mm from the objective lens surface on the Optical Pick-up Block.) |
| Error correction | Sony Super Strategy Cross Interleave Reed Solomon Code |
| D-A conversion | 1-bit quartz time-axis control |
| Frequency response | 20–20,000 Hz 1/3 dB(measured by EIAJ CP-307) |
| Output (at 6 V input level) | Line output (stereo minijack)Output level 0.9 V rms at 50 kilohmsLoad impedance over 10 kilohmsHeadphones (stereo minijack)9 mW + 9 mW at 16Ω |
| General | |
| Power requirements | DC 2.4 V Rechargeable battery pack BP-DM1 (supplied)DC 3 V two size AA (LR6) alkaline batteries (not supplied)DC IN 6 V jack accepts the Sony AC power adaptor (supplied) for use on:120 V AC, 60 Hz (in U.S.A.)240 V AC, 50 Hz (in United Kingdom/Australia)Sony CPM-203P/CPM-200P mount plate and CPM-200PK/CPM-203PK Car mount arm (not supplied) for use on 12 V car battery. |
| Power consumption | 1.8 W DC |
| Dimensions | Approx. 132.5 x 26.8 x 157.7 mm ( 51/4 x 11/16 x 61/4 in.) (w/h/d) incl. projecting parts and controls |
| Weight | Approx. 350 g (12.4 oz.) incl. rechargeable battery |
Technische Daten
Wartung
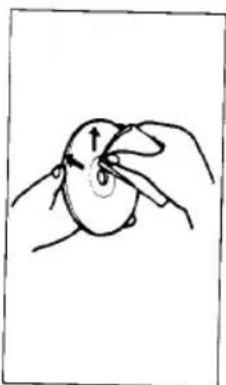
Hinweise zu Compact Discs - Verwenden Sie keine Lösungsmittel wie Benzin. Reinigen Sie die Disc vor dem Abspielen mit einem Reinigungstuch. Wischen Sie die Disc von der Mitte nach außen. Hinweise zu Compact Discs Hinweise zu Compact Discs - Reinigen Sie die Disc vor dem Abspielen mit einem Reinigungstuch. Wischen Sie die Disc von der Mitte nach außen. - Verwenden Sie keine Lösungsmittel wie Benzin, Verdünner, handelsübliche Reiniger oder Antistatik-Spray, die für
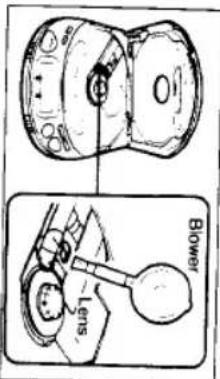
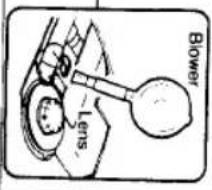
Wenn Sie die Linse versehentlich mit schmutzigen Fingern berührt haben oder wenn Staub auf der Linse den ordnungsgemäßen Betrieb verhindert, öffnen Sie das Disc-Fach und reinigen Sie die Linse mit einem Linsenreinigungsset (KK-9, nicht im Lieferumfang enthalten).
Reinigen des Kopfhörersteckers Halten Sie den Stecker Ihrer Kopfhörer sauber, um einen optimalen Klang zu erzielen. Wischen Sie ihn mit einem trockenen, weichen Tuch ab. Reinigen des Gehäuses Halten Sie den Stecker Ihrer Kopfhörer sauber, um einen optimalen Klang zu erzielen. Wischen Sie ihn mit einem trockenen, weichen Tuch ab. Reinigen des Gehäuses Halten Sie den Stecker Ihrer Kopfhörer sauber, um einen optimalen Klang zu erzielen. Wischen Sie ihn mit einem trockenen, weichen Tuch ab.
Reinigen Sie das Gehäuse mit einem weichen, leicht mit Wasser oder einer milden Reinigungslösung angefeuchteten Tuch. Verwenden Sie keine scheuernden Schwämme, Scheuerpulver oder Lösungsmittel wie Alkohol oder Benzin, da diese die Oberfläche des Gehäuses beschädigen können.
Handhabung der Disc
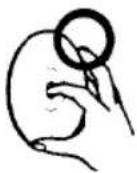
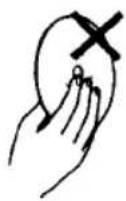
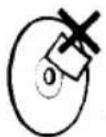
Halten Sie die Disc am Rand.
Berühren Sie die Oberfläche nicht.
Kleben Sie kein Papier oder Klebeband auf die Oberfläche und schreiben Sie nichts darauf.
Technische Daten
Mitgeliefertes Zubehör
Netzteil (1) Akku
Anschlusskabel (Phonostecker x 2 • Stereoklinkenstecker) (1) Kopfhörer mit Fernbedienung (1) Auto-Halterung (1)
Änderungen an Design und technischen Daten vorbehalten.
Nicht mitgeliefertes Zubehör
Plattenarm CPM-200A Montageplatte CPM-203P/CPM-200P
Auto-Halterungsarm CPM-200PK/CPM-203PK Auto-Anschlussset CPA-2/CPA-3
Auto-Anschlussset CPA-2/0 Autobatteriekabel DCC-E160L
Aktives Lautsprechersystem SRS-D4K Akku BP-DM1
Ihr Händler führt möglicherweise nicht alle oben aufgeführten Zubehörteile. Bitte fragen Sie Ihren Händler nach detaillierten Informationen über das Zubehör in Ihrem Land.
Hinweis
Dieses Gerät entspricht der EG-Richtlinie 87/308/EWG bezüglich der Entstörung.
| Symptom | Cause and/or solution |
| Disc play does not start. | The HOLD switch is set to the direction of the arrow.The disc is inserted upside down or incorrectly.Insert the disc correctly with the label surface up.Dusty or defective disc. (See page 24.)Dirty or dusty lens. (See page 24.)The disc compartment lid is not closed.Moisture condensation. ·Leave the player in a warm place until the moisture evaporate.The AC power adaptor is not plugged into the wall outlet.The mount plate is not firmly connected to a cigarette lighter socket.The unit is not placed on a level surface.The rechargeable battery is inserted incorrectly.Insert the battery with the side marked “Sony Discman” facing up.Weak rechargeable battery (See page 9.) |
| No sound from the headphones. | The headphones plug is not firmly connected to the Ω/REMOTE jack.Adjust the VOL control. ·Dirty plug.Connect the ear receivers and the remote commander securely. |
| No sound from the connected speakers. | Check the connections. ·The amplifier is not turned on.Connect the speakers correctly. |
| Skipping of sound | Dirty or defective disc. ·Dirty lens. ·Strong vibration. |
| Charging not possible | Insert the rechargeable battery with the side marked “Sony Discman” facing up.Make sure that the battery compartment lid is closed firmly.Release the HOLD condition of the HOLD/RESUME switch and press the ■ STOP/CHARGE. |
| The cord is disconnected from the headphones.(for U.S.A. model) | Align the projection with the groove and connect. Make sure you connect the L (left) and R (right) channels correctly.[IMAGE] |
Sollte nach den folgenden Überprüfungen weiterhin ein Problem bestehen, wenden Sie sich an Ihre nächste Sony-Kundendienststelle.
Fehlerbehebungsanleitung
- D
- BEDIENUNGSANLEITUNG
- EIGENTÜMER-NOTIZ
- DISCMAN
- FÜR KUNDEN IM VEREINIGTEN KÖNIGREICH UND IN AUSTRALIEN
- WARNUNG
- INHALTSVERZEICHNIS
- ZU STROMQUELLEN
- ZUR SICHERHEIT
- VORSICHTSMASSNAHMEN
- ZUM BETRIEB
- ZUR INSTALLATION
- HINWEISE ZU KOPFHÖRERN • VERKEHRSSICHERHEIT
- VERSCHIEDENE VERWENDUNGSMÖGLICHKEITEN
- STROMQUELLEN
- VERWENDUNG MIT NETZSTROM
- UM DEN CD-SOUND MIT EINEM KASSETTENREKORDER MIT MIC-BUCHSE AUFZUNEHMEN
- UM DEN CD-SOUND MIT EINEM STEREO-KASSETTENREKORDER USW. MIT LINE IN-BUCHSEN AUFZUNEHMEN
- UM DEN CD-SOUND ÜBER LAUTSPRECHER ZU HÖREN
- SO VERWENDEN SIE DSP* (BASS BOOST UND DDS)
- HINWEISE
- IM ANZEIGEFENSTER
- VERSCHIEDENE WIEDERGABEMODI
- BEI VERWENDUNG DES GERÄTS IN EINEM SCHWACH BELEUCHTETEN BEREICH
- VERRIEGELN DER TASTEN
- SO SPIELEN SIE AB DER STELLE, AN DER SIE GESTOPPT HABEN – RESUME-WIEDERGABEFUNKTION
- NÜTZLICHE FUNKTIONEN
- TECHNISCHE DATEN
- WARTUNG
- HANDHABUNG DER DISC
- NICHT MITGELIEFERTES ZUBEHÖR
- FEHLERBEHEBUNGSANLEITUNG
Marke : SONY
Modell : Discman D-211
Kategorie : CD-Player