
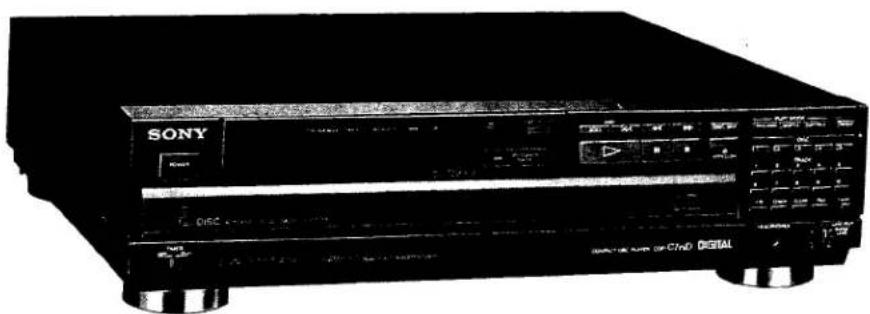
CDP-C7ESD - CD-Player SONY - Kostenlose Bedienungsanleitung
Finden Sie kostenlos die Bedienungsanleitung des Geräts CDP-C7ESD SONY als PDF.

| Produkttyp | CD-Player mit 5-Disc-Wechsler (Magazin) |
| Modell | CDP-C7ESD |
| Marke | Sony |
| Abmessungen (B x H x T) | 430 x 125 x 380 mm |
| Gewicht | 10,5 kg |
| Stromversorgung | 220-230 V, 50/60 Hz, 15 W |
| Wiedergabeformate | CD-Audio, CD-R, CD-RW |
| DA-Wandler | 1-Bit Pulscodemodulation |
| Ausgänge | Analoge Cinch, optischer Digitalausgang |
| Klangregelung | Vorprogrammierte Equalizer-Modi |
| Fernbedienung | Ja, im Lieferumfang enthalten |
| Magazinkapazität | 5 CDs |
| Zufallswiedergabe | Ja, Shuffle-Modus |
| Wiederholfunktionen | Titel, Disc, Alle, Programm |
| Timerfunktion | Einschlaf-Timer |
| Gehäusematerial | Aluminiumfront, Stahlchassis |
| Betriebstemperatur | 5 °C bis 35 °C |
| Reinigung | Gehäuse mit weichem, trockenem Tuch abwischen; Linse mit speziellem Reinigungs-CD |
| Sicherheitshinweise | Gerät nicht öffnen, keine Flüssigkeiten eindringen lassen, Netzstecker bei Gewitter ziehen |
| Reparatur und Ersatzteile | Nur durch autorisiertes Fachpersonal; originale Ersatzteile über Sony-Service |
| Umgebungsbedingungen | Nur für den Innenbereich, relative Luftfeuchtigkeit unter 80 % |
| Garantie | 2 Jahre gesetzliche Gewährleistung |
| Lieferumfang | CD-Player, Fernbedienung, 2x AAA-Batterien, Netzkabel, Bedienungsanleitung |
Häufig gestellte Fragen - CDP-C7ESD SONY
Benutzerfragen zu CDP-C7ESD SONY
0 Frage zu diesem Gerät. Beantworten Sie die, die Sie kennen, oder stellen Sie Ihre eigene.
Eine neue Frage zu diesem Gerät stellen
Laden Sie die Anleitung für Ihr CD-Player kostenlos im PDF-Format! Finden Sie Ihr Handbuch CDP-C7ESD - SONY und nehmen Sie Ihr elektronisches Gerät wieder in die Hand. Auf dieser Seite sind alle Dokumente veröffentlicht, die für die Verwendung Ihres Geräts notwendig sind. CDP-C7ESD von der Marke SONY.
BEDIENUNGSANLEITUNG CDP-C7ESD SONY
CDP-C7ESD
Operating Instructions
Before operating the unit, please read this manual thoroughly and retain it for future reference.
Owner's Record
a model and serial numbers are located at the rear. Record a serial number in the space provided below. Refer to them whenever you call upon your Sony dealer regarding this product.
del No. CDP-C7ESD
Serial No. ____
Warning
o prevent fire or shock hazard, do not expose the unit to rain or moisture.
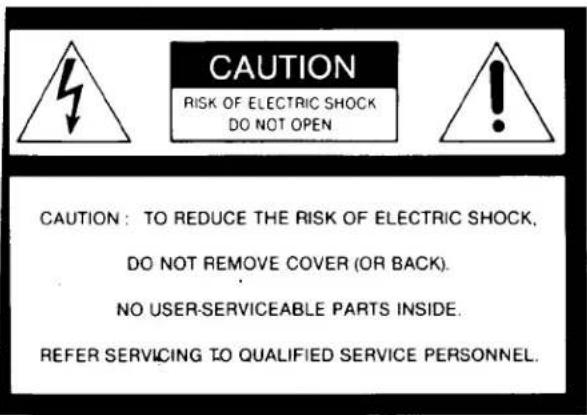
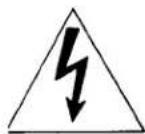
This symbol is intended to alert the user to the presence of uninsulated "dangerous voltage" within the product's enclosure that may be of sufficient magnitude to constitute a risk of electric shock to persons.

This symbol is intended to alert the user to the presence of important operating and maintenance (servicing) instructions in the literature accompanying the appliance.
INFORMATION
This equipment generates and uses radio frequency energy and if not installed and used properly, that is, in strict accordance with the manufacturer's instructions, may cause interference to radio and television reception. It has been type tested and found to comply with the limits for a Class B computing device in accordance with the specifications in Subpart J of Part 15 of FCC Rules, which are designed to provide reasonable protection against such interference in a residential installation. However, there is no guarantee that interference will not occur in a particular installation. If this equipment does cause interference to radio or television reception, which can be determined by turning the equipment off and on, the user is encouraged to try to correct the interference by one or more of the following measures:
Reorient the receiving antenna
Relocate the equipment with respect to the receiver Move the equipment away from the receiver
Plug the equipment into a different outlet so that equipment and receiver are on different branch circuits. If necessary, the user should consult the dealer or an experienced radio/television technician for additional suggestions. The user may find the following booklet prepared by the Federal Communications Commission helpful:
"How to Identify and Resolve Radio-TV Interference Problems". This booklet is available from the U.S. Government Printing Office, Washington, DC 20402, Stock No. 004-000-00345-4.
CAUTION
The use of optical instruments with this product will increase eye hazard.
Table of Contents
Getting Started
Features 3
Precautions 4
Note on the Transit Key 4
Installation 5
Connections Notes on connection .... 6 Connection diagram .... 6
Parts Identification Front panel .... 8 Remote commander .... 9
Basic Operation
Using Your Compact Disc Player
Disc Playing 10
Playing a single disc 11
Playing a single selection in the disc 11
Displaying informations on the time 11
Selecting a desired disc 12
Locating a particular selection 12
Locating a particular point in a selection 12
Advanced Operation
Playing in a Specific Order—Program Play 13
Playing in Random Order—Shuffle Play 15
Repeating Selections—Repeat Play 17
Writing a comment about a disc 18
Keeping the program in memory 20
Timer Activated Play 22
Maintaining Your Unit
Maintenance 23
Getting into the Details
Specifications 23
Troubleshooting
Troubleshooting Guide 24
Features
The compact disc player equipped with 5-disc changer for a long continuous play of CDs.
You can select the desired disc at any time.
Various play modes
- Program play plays up to 32 selections on any disc in the desired order.
- Shuffle play plays selections in random order.
- Repeat play plays a single selection, a single disc, or all the discs repeatedly.
Custom file
• Disc memo keeps your comments on about a disc.
- Program bank function for storing a programmed playing order.
Precautions
On safety
- Operate the unit only on 120 V AC, 60 Hz.
- Should any liquid or solid object fall into the cabinet, unplug the unit and have it checked by qualified personnel before operating it any further.
- Unplug the unit from the wall outlet if it will not be used for a long time. To disconnect the cord, pull it out by grasping the plug. Never pull the cord itself.
- As the laser beam used in this compact disc player is harmful to the eyes, do not attempt to disassemble the cabinet. Refer servicing to qualified personnel only.
On operation
When the unit is not used, turn the power off, to conserve energy and to extend the useful life of your unit.
important
Since the CD system boasts a wide dynamic range, the peaks of high level inputs are recorded with high fidelity, and the noise level is very low. Do not turn up the volume while listening to a portion with no audio signals or very low level inputs. If you do, the speakers may be damaged when a peak level portion is played.
For detailed safety precautions, see the leaflet "IMPORTA: SAFEGUARDS".
If you have any questions or problems concerning your un- please contact your nearest Sony dealer.
Note on the Transit Key
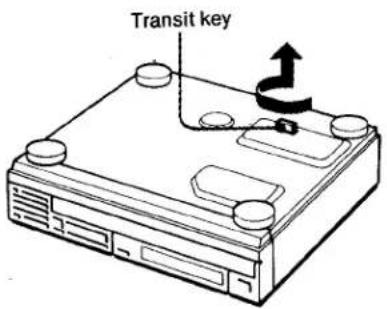
The white transit key on the bottom exterior of the unit protects the optical system against shock during transportation. Before operating the CD player, be sure to remove the key by following the instructions on the label, and store it in a safe place.
When transporting the unit:
1 Turn off the power after the cursor under the disc number in the display window (see page 10) stops blinking.
2 Replace the key in its original hole and lock it in place.
Installation
Notes on Installation
Place the unit in a location with adequate air circulation to prevent internal heat build-up in the unit.
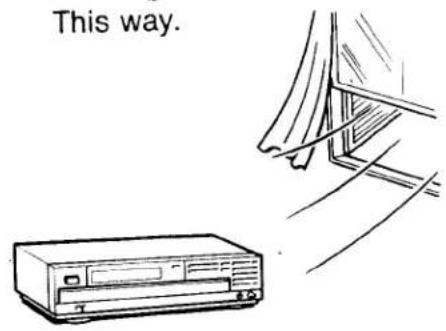
Do not place the unit on a soft surface, such as a rug that would block the ventilation holes on the bottom.
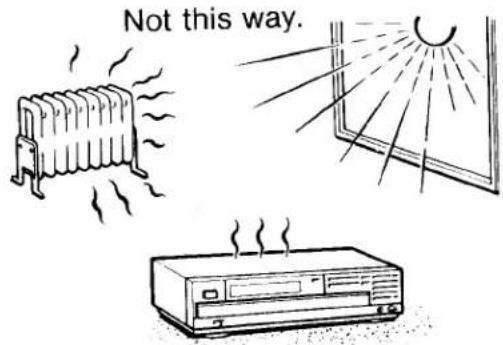
- Do not install the unit:
— near heat sources such as radiators or air ducts.
— in a place subject to direct sunlight, excessive dust, mechanical vibration or shock. - Do not move the unit while the discs are inside, otherwise the discs may fall out of the tray and you will be unable to remove them.
• On moisture condensation
If the player is brought directly from a cold to a warm location, or is placed in a very damp room, moisture may condense on the lens inside the unit.
Should this occur, the player will not operate. In this case, remove the disc and leave the player turned on for about an hour until the moisture evaporates.
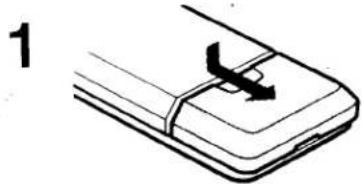
Installing Batteries
Install the batteries in the supplied remote commander for remote control operation.
natural_image
Line drawing of a smartphone with a cable and a switch, no text or symbols present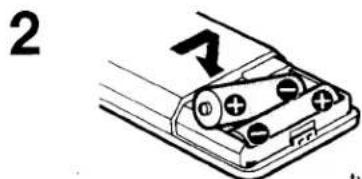
two size AA (R6) batteries
When You Use the Unit for the First Time
Turn on the power by pressing POWER while keeping ERASE and FILE pressed.
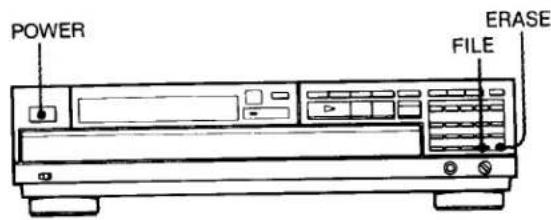
This will clear the internal memory if you have been instructed how to use the custom file function at the shop you purchased the CD player. Thus the player returns the same status as it was manufactured at factory.
On battey life
About half a year of normal operation can be expected when using the Sony SUM-3 (NS) batteries.
When the batteries are run down, the remote commander will not operate the unit. In this case, replace both batteries with new ones.
To avoid damage caused by battery leakage and corrosion
When the commander will not be used for a long time, remove the batteries.
Do not throw away the carton and the packing material!
It will be an ideal container when transporting the unit or shipping it for servicing.
Connections
Notes on Connection
- Turn off the amplifier before making connections.
- Be sure to insert the plugs firmly into the jacks. Loose connections may cause hum and noise.
- Leave a little slack in the connecting cord to allow for inadvertent shock or vibration.
- Connect the red plug of the supplied connecting cord to the right-channel jack (R) of the amplifier and the white plug to the left-channel jack (L). Otherwise, the right and left channels will be reversed.
Connection Diagram
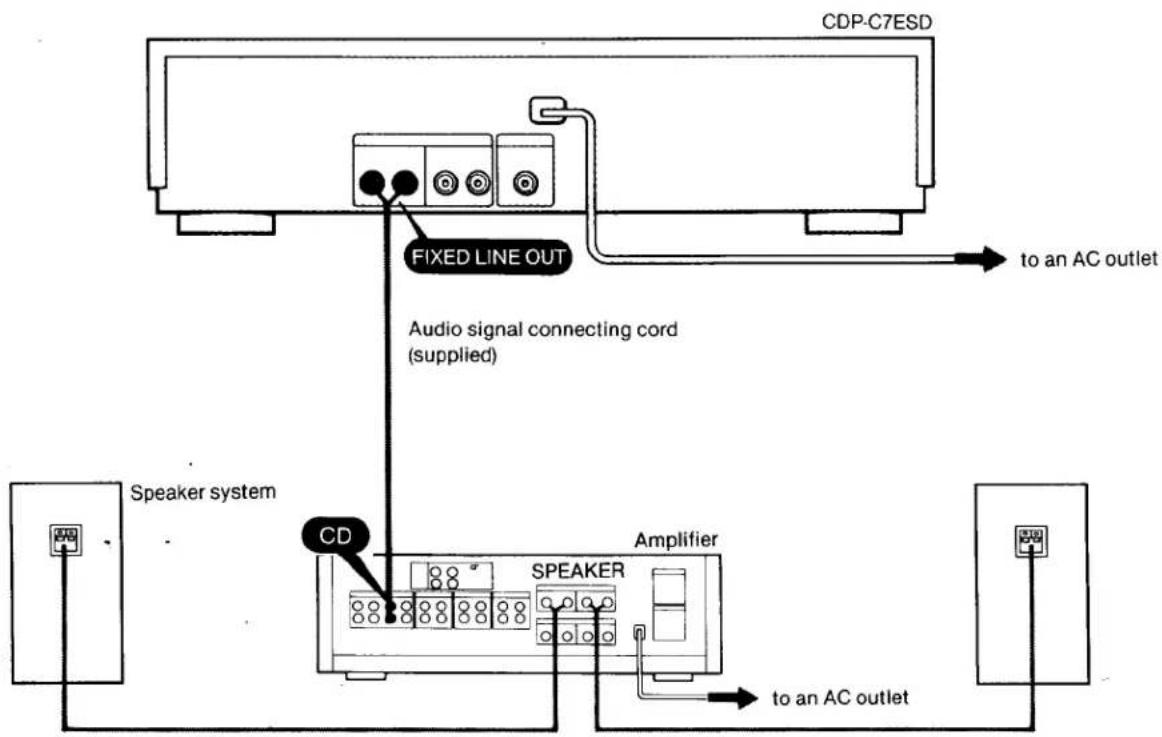
Notes on the LINE OUT jacks
These jacks can be connected to the CD or auxiliary input jacks of an amplifier.
FIXED: Normally use these jacks.
Output level is fixed.
VARIABLE: Output level can be varied with the LINE OUT/PHONE LEVEL control.
Note: The LINE OUT/PHONE LEVEL control adjusts the output level of the HEADPHONES jack and the VARIABLE LINE OUT jacks.
If the LINE OUT/PHONE LEVEL control is turned while recording through the VARIABLE LINE OUT jacks, the level of the recorded sound will be different from that set by the recording level controls of the tape deck.
Connecting D/A Converter Unit and Amplifier
Sony DAS-702ES D/A converter unit or other equivalent D/A converter using a digital audio interface can be connected to the DIGITAL OUT jack.
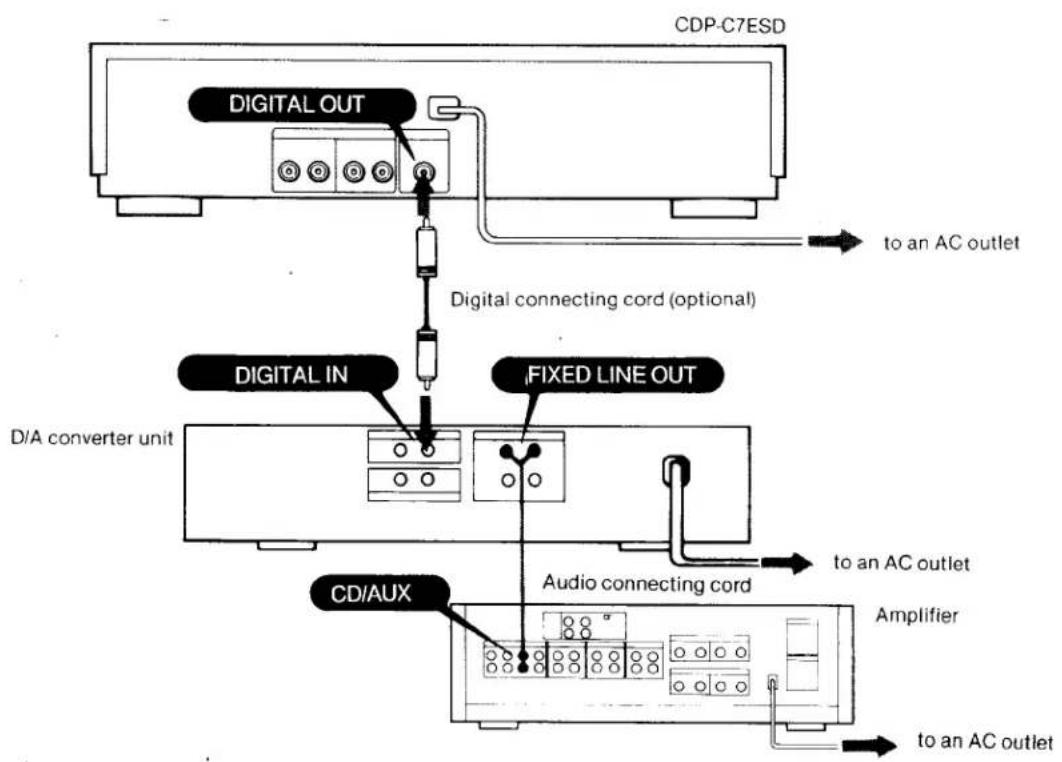
flowchart
graph TD
    A["CDP-C7ESD"] --> B["Digital OUT"]
    B --> C["Digital connecting cord (optional)"]
    C --> D["D/A converter unit"]
    D --> E["CD/AUX"]
    E --> F["Audio connecting cord"]
    F --> G["Amplifier"]
    G --> H["to an AC outlet"]
    B --> I["Digital IN"]
    I --> J["FIXED LINE OUT"]
    J --> K["to an AC outlet"]
Parts Identification
Refer to the pages indicated in ● for details.
Front Panel
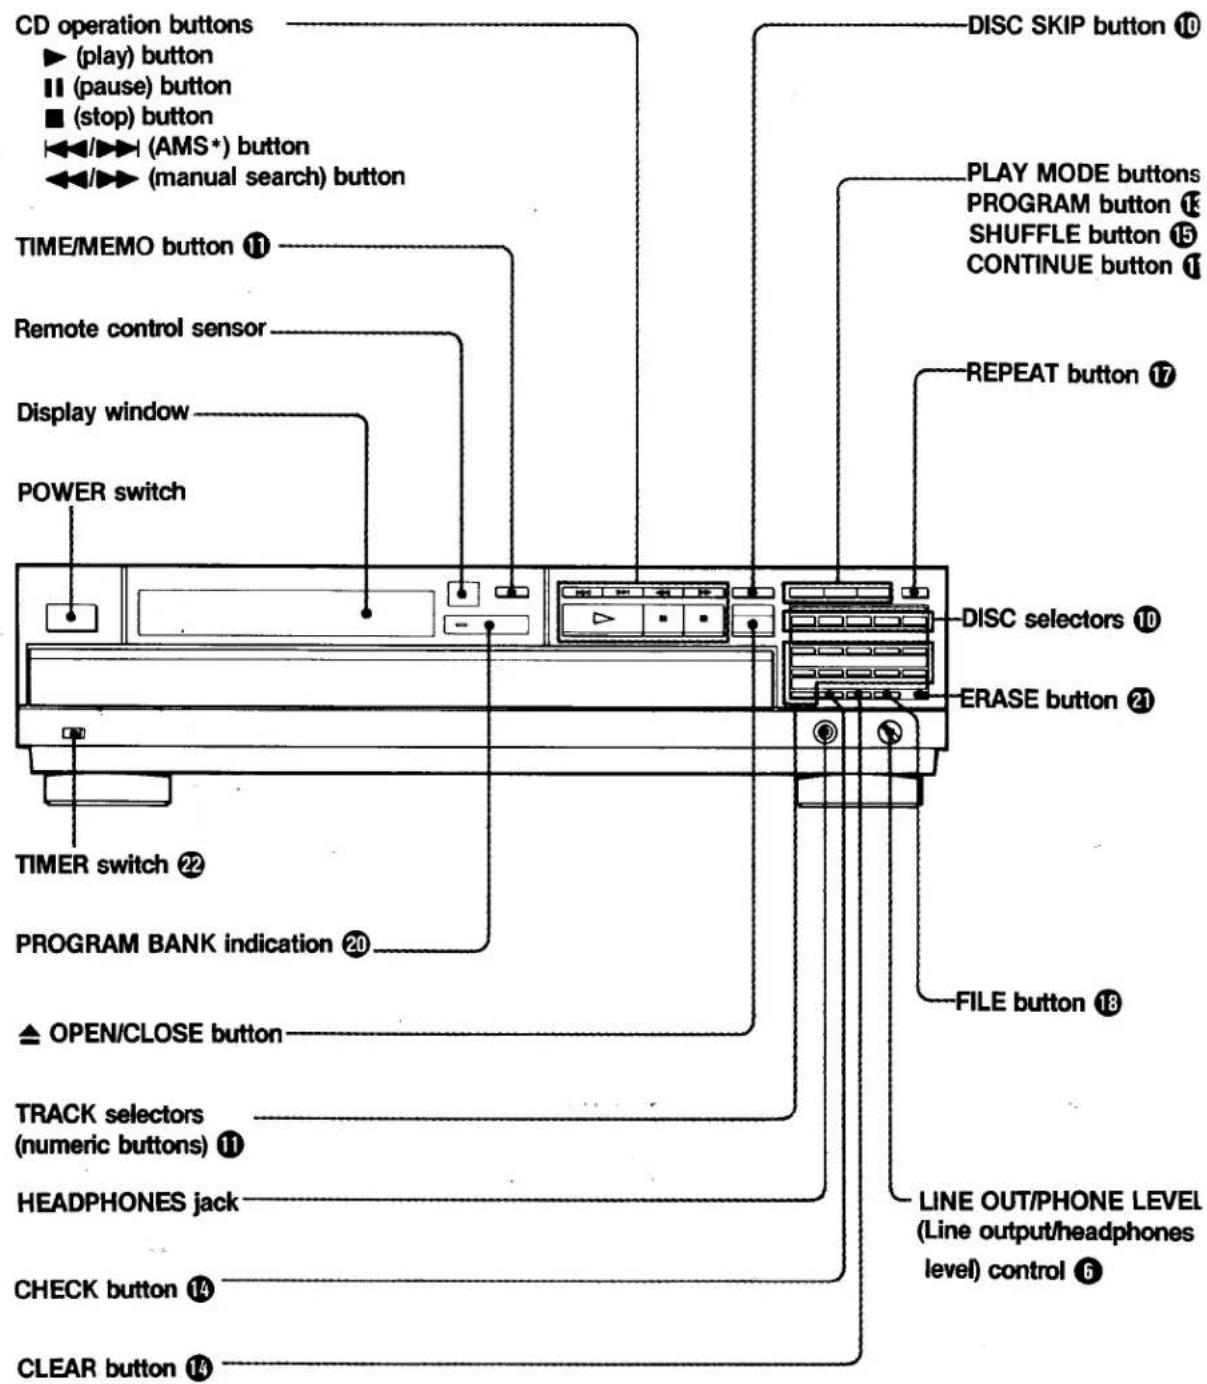
* AMS is the abbreviation of Automatic Music Sensor.
Remote Commander
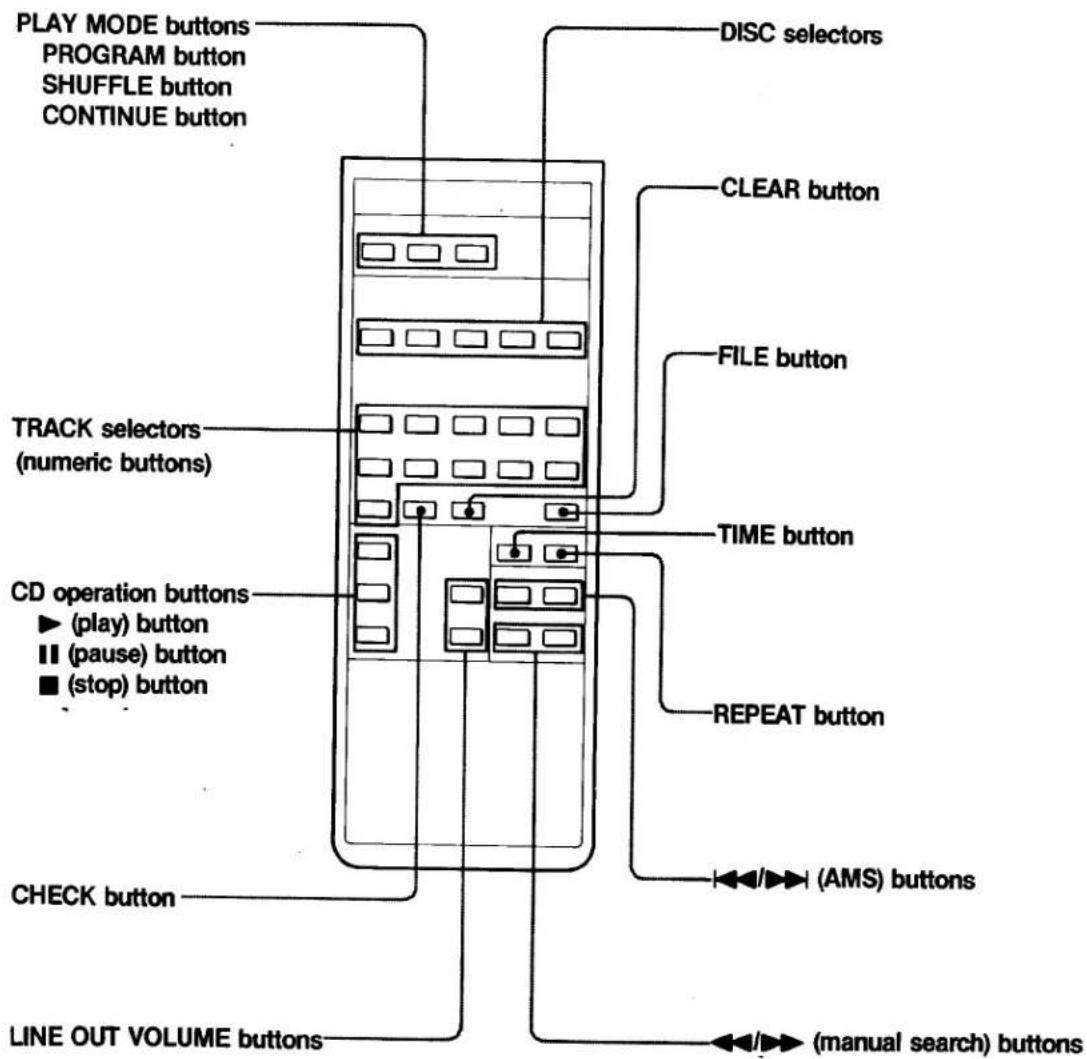
Notes on the remote commander and remote control operation
- Keep the commander away from extremely hot or humid places.
- Avoid dropping any foreign objects into the commander casing, particularly when replacing the batteries.
- To avoid a malfunction, do not simultaneously depress two or more buttons.
- Avoid exposure of the remote control sensor to direct sunlight or lighting apparatus. Such exposure can cause a malfunction.
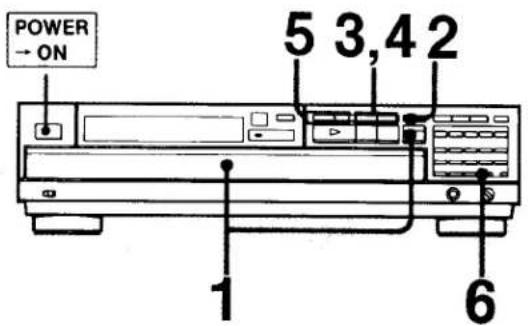
Disc Playing
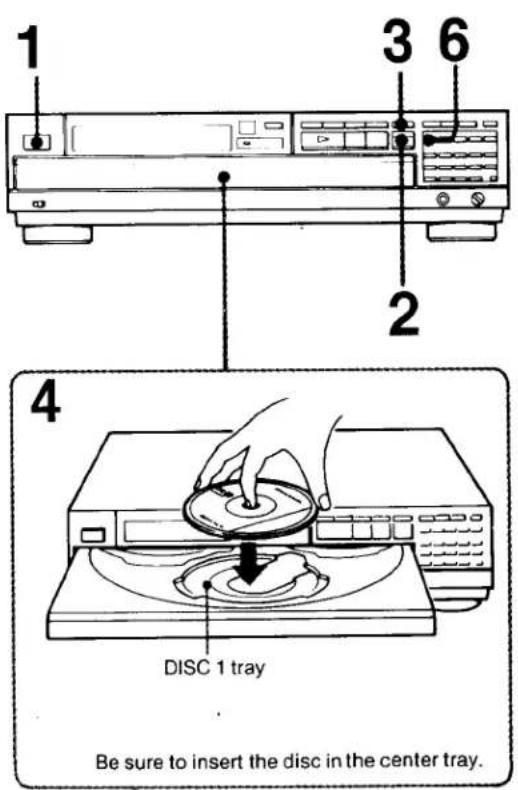
1 Depress POWER.
2 Press ▲.
The compartment will open.
3 Press DISC SKIP so that the Disc 1 tray rotates into the front position.
4 Put the disc in the DISC 1 tray with the label side up.
5 To play more than one disc, repeat steps 3 and 4 to put additional discs in the order you want.
6 Press DISC 1.
The compartment will close, and play will begin from the first selection on the disc in the DISC 1 tray.
Shows that the tray is occupied.
Stopping play
| To pause during play | Press ||.To restart play, press || again. |
| To stop play | Press ■. |
| To stop play and open the compartment | Press ▲.To close the compartment, press ▲ or the compartment itself. |
Place an empty tray in the front position, and put the disc in it. If you insert the disc into a tray other than the one in the front, the unit may not be able to find the disc. Be sure to use DISC SKIP to rotate to the next empty tray.
Note on 3 inch CD
You can play an 3 inch CD on the inside circle of the tray. Do not put a normal CD (size of 5 inch) over it.
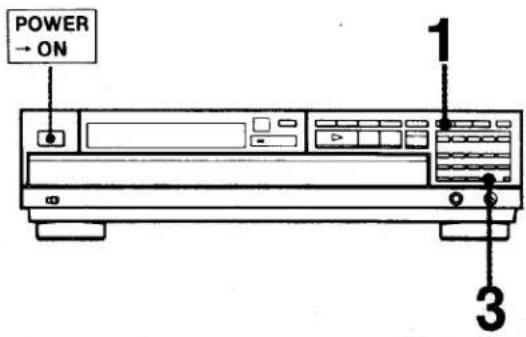
Playing a Single Disc
1 Press ≈.
2 Put the disc in the tray with the label side up.
3 Press ≠.
4 Press CONTINUE until "1 DISC" is displayed.
5 Press desired DISC selector. Play will begin from the first selection of the selected disc.
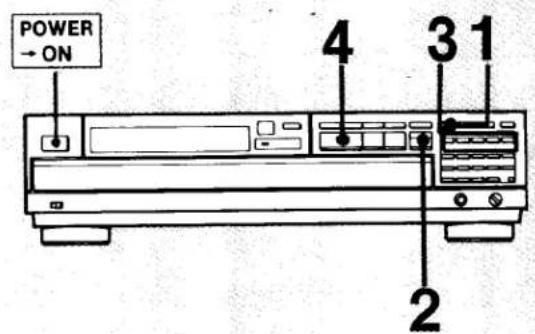
Playing a Single Selection in the Disc
1 Press ≈.
2 Put the disc in the tray with the label side up.
3 Press ≈.
4 Press CONTINUE unitl "1" is displayed.
5 Press the desired DISC selector.
6 Select the desired selection number with TRACK selectors.
Only the selected selection will be played.
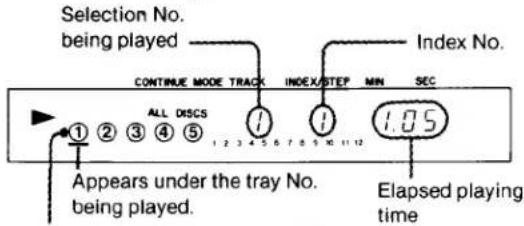
Displaying Informations on the Time
To display the total number of selections
If you press ▲ or the compartment itself to close the compartment, the total number of selections and the total playing time of the last disc you put are displayed for a few seconds.

When a disc containing more than 20 selections is inserted, OVER (meaning: "over 20 selections") appears.
To display the time remaining in a selection Press TIME/MEMO once during play or pause.

To return to the normal display, press TIME/MEMO twice. But when you wrote a disc memo to the disc (see page 18), press TIME/MEMO three times.
To display the remaining time of the disc and number of the selections in the disc Press TIME/MEMO twice.

To return to the normal display, press TIME/MEMO once. But when you wrote a disc memo to the disc, press TIME/MEMO twice.
Notes on discs
Handle the disc by its edge. To keep the disc clean, do not touch the surface.
This way

Do not stick paper or tape.
Not this way
Do not expose the disc to direct sunlight or heat sources such as hot air ducts, or leave it in a car parked in direct sunlight where there can be a considerable rise in the temperature.
What is this indication?
While a selection number 21 or higher is
selected, this indication appears on the
display window instead of the number if you press TIME/MEMO.
Disc Playing
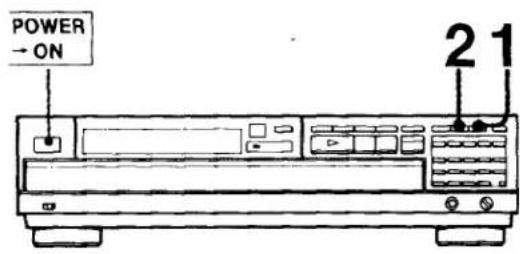
Selecting a Desired Disc
By using the DISC selectors or the DISC SKIP button during play, you can locate the beginning of any disc.
| To select a particular disc | Press the corresponding DISC selector. |
| To move to the disc tray next to the current one | Press DISC SKIP. |
Locating a Particular Selection
Locating a selection in sequence (Automatic Music Sensor)
You can locate the beginning of a selection on the disc being played.
| To locate the beginning of the selection being played | Press ▶ once. |
| To locate the beginning of the next selection. | Press ▶ once. |
Continue to press until the selection you wanted has been located.
Locating a selection directly
Press the TRACK selectors (1 to 10) to enter the desired track number.
Locating a Particular Point in a Selection
Locating a point in sequence (Manual Search)
You can locate a particular point in a selection during play by monitoring the high-speed sound.
| To go back at high speed | Keep ←→ pressed. |
| To go ahead at high speed | Keep ►→ pressed. |
Release the button when you reach the point in the selection you want.
To choose directly a selection whose number is greater than 10 Use +10 and 1 to 10 buttons.
Ex. To play from track No. 32
1 Press +10 three times.
2 Press 2.
Ex. To play from track No. 30
1 Press +10 twice.
2 Press 10.
To locate at high speed
Press ◀◀ or ▶▶ in the pause mode. Search speed will increase three times, but there will be no sound. Find the desired point by watching the numbers in the display.
Playing in a Specific Order —Program Play
Programming Selections
You can play up to 32 selections in the desired order.
1 Press CONTINUE until the "ALL DISCS" indication appears.
2 Press PROGRAM.
3 Press the DISC selector which corresponds to the disc you want.
4 Enter the desired selection number with the TRACK selectors.
5 To program additional selections on the same disc, repeat step 4.
To program additional selections on another disc, repeat steps 3 and 4.
Playing the Programmed Selections Press ▶.
To return to normal play mode Press CONTINUE.
To insert a pause into your program
While programming, press Ⅱ at a point between two selections. When the program is played and reaches this point, the disc will stop and stand by until you press Ⅱ again. This function allows you to change the tape when making a recording. A pause cannot be programmed first in the program line up.

P (pause) has been programmed. It is 3rd in the program line up.
If you program selections on a particular disc
Either the "ALL DISCS" or "1 DISC" indication can be displayed in step 1.
The maximum number of selections which can be played in the desired order
When the "ALL DISCS" is displayed: up to 32 selections
When the "1 DISC" is displayed: up to 20 selections
Selections number which can be programmed
When the "ALL DISCS" is displayed: to the 30th selection on each disc
When the "1 DISC" is displayed: to the 99th selection
To display the total playing time of the program Press TIME/MEMO before starting play.

(ex. 1 hour, 36 minutes, and 25 seconds.)
To display the time remaining in a selection
Press TIME/MEMO once while the unit is in the play or pause mode.
To return to normal display, press TIME/MEMO until normal display appears.
To program while observing the disc labels
You can program the selections with the disc compartment open.
Playing in a Specific Order—Program Play
To program a whole disc under a single program number
A disc has been selected using the DISC selectors. The TRACK indicator will show BLL, which means that all the selections on the disc have been programmed under a single program number.
Adding selections to a program during program play To add a selection, press the TRACK selectors which correspond to the selection number you want to add while the unit is in the play or pause mode.
To add a whole disc, press the DISC selector which corresponds to the disc number you want.
The program will be cleared in the following situations
- is pressed during stop.
- is pressed.
• Power is turned off.
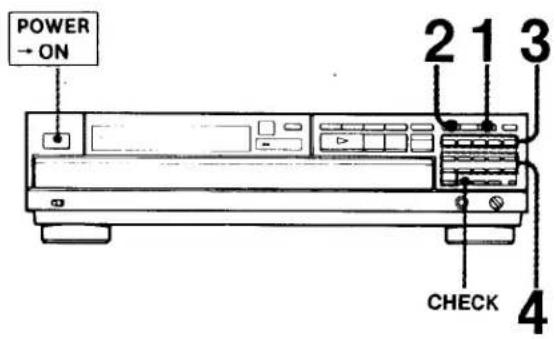
Checking the Programmed Selections
Press CHECK.
Each time you press CHECK, a selection will be displayed for a few seconds, in the order they have been programm
Clearing the Programmed Selections
Clearing the whole program
Press ■ once during stop, or twice during play. All the selections will be cleared.
Clearing the last selection in a program
Press CLEAR during stop or play. The last selection will be cleared each time CLEAR is pressed.
Clearing a specific selection
1 Press CHECK repeatedly until the selection to be clear is displayed.
2 Press CLEAR while the selection number is displayed. selection will be cleared from the program.
Skipping to the next selection programmed Press ▶▶ during play.
Going back to the beginning of the selection being played Press ◀ during play.
To stop program play
Press ■.
To resume play, press ▶. Play begins from the beginning of the program.
What is this indication?
End
This indication will appear when the last selection is reached while checking the selections you have programmed.
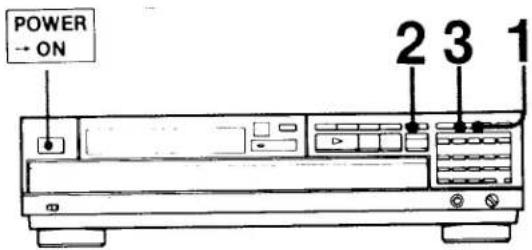
Playing in Random Order—Shuffle Play
ying All the Selections in the Tray in a Random Order
1 Press CONTINUE until "ALL DISCS" is displayed.
2 Press SHUFFLE
3 Press ▶.
Shuffle play will begin.
When two or more discs are in the compartment:
All the discs and selections will be played in random order. After one selection is played, the next selection will be from another disc.
When a single disc is in the compartment:
After all the selections have been played in random order, play will stop.
To return to normal play
Press CONTINUE.
at is this indication?
This indication appears while the player is "shuffling" the selections.
Playing All the Selections in a Disc in a Random Order
1 Press CONTINUE until "1 DISC" is displayed.
2 Select the desired disc with DISC SKIP.
3 Press SHUFFLE.
4 Press ▶.
epeating Selections—Repeat Play
You can repeat play of all the discs in the tray, a whole disc or a single selection. The program or shuffle play can be repeated.
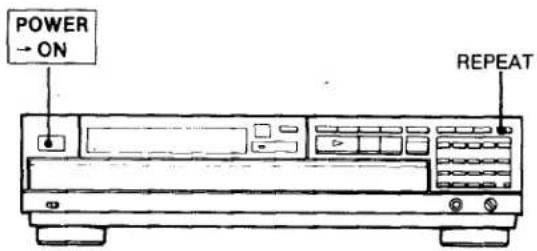
Press REPEAT during play or pause.
Repeat play begins according to the current play mode.
| Play mode | Selections to be repeated | |
| ALL DISCS | All the selections of all discs | |
| 1 DISC | All the selections on a disc | |
| 1 | The selection being played | |
| PROGRAM | ALL DISCS | All the programmed selections |
| 1 DISC | All the programmed selections on a disc | |
| SHUFFLE | ALL DISCS | All the selections of all discs |
| 1 DISC | All the selections on a disc | |
Writing a Comment on a Disc—Disc Memo
Writing a Disc Memo
Using the disc memo function, you can write a comment of up to 10 letters about a disc.
The memo appears in the window every time you put the disc in the player.
You can write one disc memo to a disc.
1 Put the discs in the tray and press to close it.
2 Select the disc you want, using DISC SKIP.
3 Press ◀◀ or ▶▶.
A blinking cursor (indicating where a letter will be written) appears.
4 Press ◀◀ or ▶▶ until the desired letter appears.
Example: If ▶▶ is pressed 6 times

5 Press ▶▶ to move the cursor to the next position, and select the desired letter.

Repeat steps 4 and 5 to complete the memo.
6 Press FILE
"FILE" appears in the window. After a few seconds, the memo you have written will be displayed.
To write a comment another disc, repeat steps 2 to 6.
Each time the disc is inserted into the player, the memo will be displayed.
What is this indication?
FULL
This indicates that there is no room in the memory to store a new file.
This indication appears when FILE is pressed while no custom file can be memorized for the disc currently put in the player. To make a custom file for the disc, clear the custom file of another disc.
Usable letters and symbols
For the disc memo, 46 letters and symbols and a space can be used. When the ◀◀/▶▶ button is pressed for the first time, the space appears. Each time ▶▶ is pressed, letters and symbols appear in the following order.
(space) A B C D E F G H I J K L M N O P Q R S T U V W X Y Z ※ 0 * 4 + / 1 > < 9876543210 -
Use ◀◀ to call up a previous character.
Clearing the Disc Memo
1 Put the disc whose memo you want to clear in the player.
2Press ◀◀ or ▶▶ on the player.
The ◀◀/▶▶ buttons on the remote commander cannot be used.
3Press CLEAR.
4Press FILE
"FILE CLR" is displayed in the window.
Keeping the Program in Memory—Program Bank
Memorizing a Program
After programming selections, you can keep the program memorized, so that the disc is played always in the fixed order. The memorized program is called "program bank".
1 Press PROGRAM twice so that "PGM" and "PROGRAM BANK" indication light up.
2 Program the selections as you want. (see page 13.)
3 Press FILE
CONTINUE MODE TRACK INDEX/STEP MIN SEC
PGM ALL DISCS PGMFILE
① ② ③ ④ ⑤ Disappears approx. one second later.
The program is stored into the memory. Only one program bank can be made for a disc.
Playing the Disc Using the Program Bank
1 Press PROGRAM twice.
PROGRAM BANK indication light up.
2 Press and put the disc in the tray.
3 Press the DISC selector which corresponds to the disc you want.
4 Press ▶.
What is this indication?
FULL
This indicates that there is no room in the memory to store a new file.
This indication appears when FILE is pressed while no custom file can be memorized for the disc currently put in the player. To make a custom file for the disc, clear the custom file of another disc.
Clearing the Program Bank
1 Put the disc whose program bank is to be cleared in the player.
2 Press DISC selector which corresponds to the disc you want to clear the program.
3 Press ■ to clear the program.
4 Press FILE
"PGM CLR" is displayed, and the program bank is cleared.
On "Custom Files"
The CD player incorporates a memory in which you can store two types of informations called "custom files".
How many discs can be assigned custom files? You can give custom files to up to 225 discs.
Memory backup for the custom files Custom files, once memorized, are retained in the compact disc player's memory for approximately 1 month without AC power supply.
Timer Activated Play
By connecting a commercially available timer, disc play can be started at any desired time.
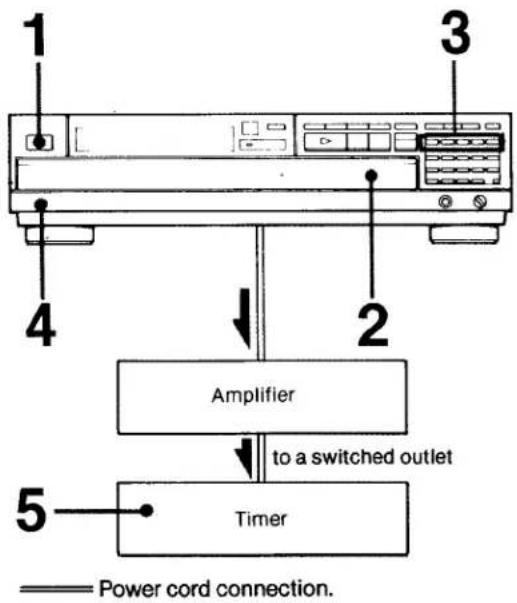
1 Press POWER.
2 Set the discs in the disc compartment and close the compartment.
3 Select the disc to be played first with DISC selectors.
4 Set TIMER to ON.
5 Set the timer for desired time.
Play will begin automatically at the preset time.
To start PROGRAM play at the preset time
At the step 3 above, preset as follows
1 Memorize the program
(PROGRAM BANK: see page 20).
2 Press PROGRAM, so that the PGM indication lights up.
3 Repeat the steps 4 and 5 above.
To start SHUFFLE play at the preset time
At the step 3 above, press SHUFFLE and select the play mode with CONTINUE.
Maintenance
Cleaning the cabinet
Clean the cabinet, panel and controls with a soft cloth lightly moistened with mild detergent solution. Do not use any type of abrasive pad, scouring powder or solvent such as alcohol or benzine.
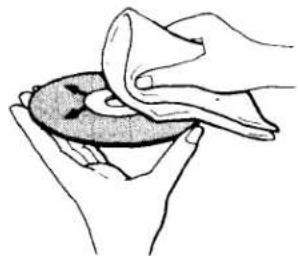
Cleaning discs
Before playing, clean the disc with the cleaning cloth. Wipe the disc from the center out.
natural_image
Illustration of hands cleaning a circular object with a cloth (no text or symbols)Do not use solvents such as benzine, thinner, commercially available cleaners or anti-static spray intended for analog discs.
After playing, store the disc in its case.
Specifications
COMPACT DISC PLAYER
| System | Compact disc digital audio system |
| Laser | Semiconductor laser ( = 780 nm)Emission duration: continuous |
| Laser output | Max. 0.4 mWThis output is the value measured at a distance of about 1.6 mm from the objective lens surface on the Optical Pick-up Block. |
Frequency response
| 2 Hz - 20 kHz (±0.3 dB) |
Signal to noise ratio
| More than 100 dB |
Dynamic range
| More than 90 dB |
Harmonic distortion
| Less than 0.05% (1 kHz) |
Channel separation
| More than 95 dB (1 kHz) |
Wow and flutter
| Below measurable limit |
Outputs
| Max. output level | Load impedance | Output impedance | |
| LINE OUT (FIXED) | 2 V (50 kilohms) | More than 10 kilohms | 2 kilohm |
| LINE OUT - (VARIABLE) | 2 V (50 kilohms) | More than 50 kilohms | — |
| HEAD-PHONES | 28 mW Variable, max | 32 ohms | — |
| DIGITAL OUT | 0.5 V p-p | 75 ohms | 75 ohms |
General
Power requirements
120 V AC, 60 Hz
Power consumption
12W
Dimensions
Approx. 430 × 110 × 385 mm (w/h/d)
(17 × 4³/8 × 15¹/4 inches)
not including projecting parts and controls
Weight
Approx. 5.7 kg (12 lbs 10 oz), net
REMOTE COMMANDER
Remote control system
Infrared control
Power requirements
3 V DC with two size AA (R6) batteries
Dimensions
Approx. 67 × 18 × 175 mm (w/h/d)
(2^7 / 8×^3 / 4× 7 inches)
Weight
Approx. 130 g (5 oz)
including batteries
SUPPLIED ACCESSORIES
Remote commander (1)
Audio signal connecting cord (phono × 2←→phono × 2) (1)
Sony batteries SUM-3 (NS) (2)
Design and specifications subject to change without notice.
Troubleshooting Guide
The following checks will assist in the correction of most problems which you may encounter with your unit. Should any problem persist after you have made these checks, consult your nearest Sony service facility. Before going through the check list below, first refer back to the connection and operating procedures.
| Trouble | Causes | Remedy |
| No audio from one or both channels | Incorrect operation of the amplifier | Operate correctly. |
| Loose connection | Connect the cords firmly. | |
| Play does not begin. | No disc in the disc compartment | Put disc(s) in the compartment. |
| The player is in the pause mode. | Press III to release pause. | |
| Moisture condensation | Leave the player turned on for about an hour. | |
| The disc is set upside down. | Set the disc with the label side up. | |
| The disc is tilted. | Set the disc correctly. | |
| The disc is extremely dirty. | Clean the disc. | |
| Discs cannot be played continuously. | Play did not start from the disc in the DISC 1 tray. | Press DISC 1 to start play. |
| Remote commander does not operate the unit. | The batteries are exhausted. | Replace both batteries. |
| The remote commander is not pointed at the remote control sensor. | Point the remote commander to the sensor. | |
| There is an obstacle between the remote commander and the unit. | Remove the obstacle. | |
| The remote commander is too far from the unit. | Move closer. | |
| Any operation is not possible. | The internal control program may not run. | Turn OFF the power and turn it ON again. |