
SG-1200 - Hi-Fi-System PANASONIC - Kostenlose Bedienungsanleitung
Finden Sie kostenlos die Bedienungsanleitung des Geräts SG-1200 PANASONIC als PDF.

| Produkttyp | Kompakte Stereoanlage (Hi-Fi-System) |
| Marke | Panasonic |
| Modell | SG-1200 |
| Abmessungen (H x B x T) | 176 mm x 570 mm x 387 mm |
| Gewicht | 9,5 kg |
| Stromversorgung | AC 110-240 V, 50/60 Hz (umschaltbar) |
| Leistungsaufnahme | 55 W |
| Ausgangsleistung | MPO 2 x 12,5 W an 4 Ohm, RMS 2 x 10 W |
| Frequenzbereich | 20 Hz - 20 kHz |
| Tunerbereiche | FM (UKW), MW, LW |
| Plattenspieler | Automatisch, 33 1/3 und 45 U/min, Riemenantrieb |
| Tonabnehmer | Magnetisch (EPC78SMAD), Diamantnadel (EPS34STSD) |
| Kassettendeck | Auto-Stop, 4-Spur, 2-Kanal, Aufnahmepegel automatisch |
| Bandgeschwindigkeit | 4,75 cm/s |
| Entzerrung | Bass ±8 dB (100 Hz), Höhen ±10 dB (10 kHz) |
| Kopfhöreranschluss | 6,3 mm Klinke (8 Ohm oder mehr) |
| Lautsprecheranschluss | 2 Paar (rechts/links), 4 Ohm |
| Besondere Merkmale | FM Stereo mit AFC, Tape-Monitor, getrennte Klangregelung, beleuchteter Zeiger |
| Reinigung Tonköpfe | Mit Alkohol und Wattestäbchen, ca. alle 100 Betriebsstunden |
| Sicherheitshinweise | Netzstecker bei Gewitter ziehen; Gerät vor Feuchtigkeit und direkter Sonne schützen |
| Zubehör | 45-rpm-Adapter, eingebaute FM- und AM-Antennen, Bedienungsanleitung |
Häufig gestellte Fragen - SG-1200 PANASONIC
Benutzerfragen zu SG-1200 PANASONIC
0 Frage zu diesem Gerät. Beantworten Sie die, die Sie kennen, oder stellen Sie Ihre eigene.
Eine neue Frage zu diesem Gerät stellen
Laden Sie die Anleitung für Ihr Hi-Fi-System kostenlos im PDF-Format! Finden Sie Ihr Handbuch SG-1200 - PANASONIC und nehmen Sie Ihr elektronisches Gerät wieder in die Hand. Auf dieser Seite sind alle Dokumente veröffentlicht, die für die Verwendung Ihres Geräts notwendig sind. SG-1200 von der Marke PANASONIC.
BEDIENUNGSANLEITUNG SG-1200 PANASONIC
Operating Instructions
Compact Stereo
SG-1200L
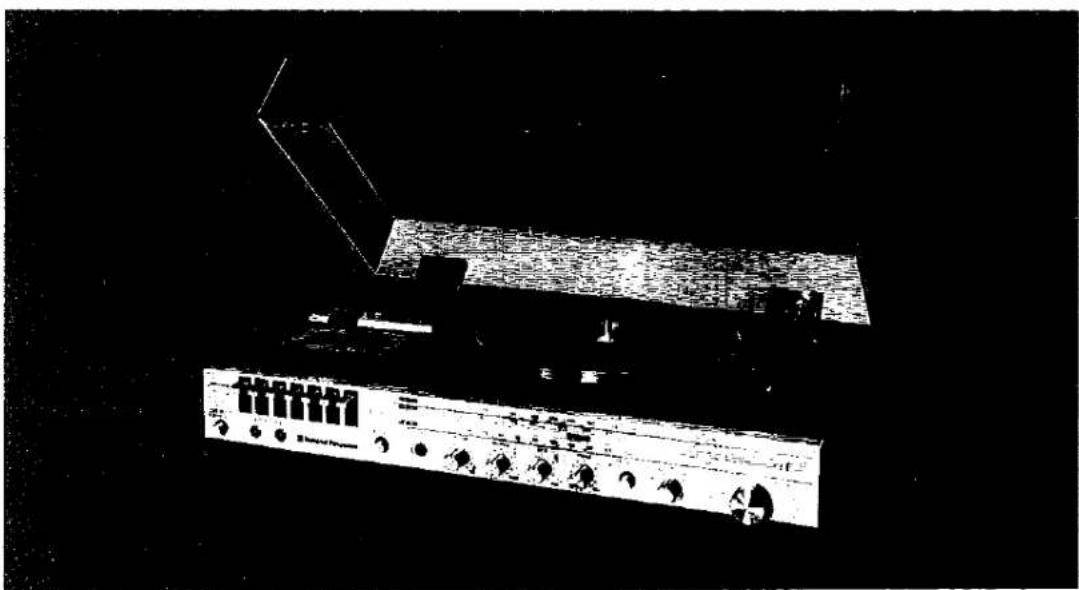
natural_image
Black-and-white photo of a vintage electronic instrument with control knobs and a speaker, set against a dark background (no visible text or symbols)
National Panasonic
Before operating this set, please read these instructions completely. (UK)
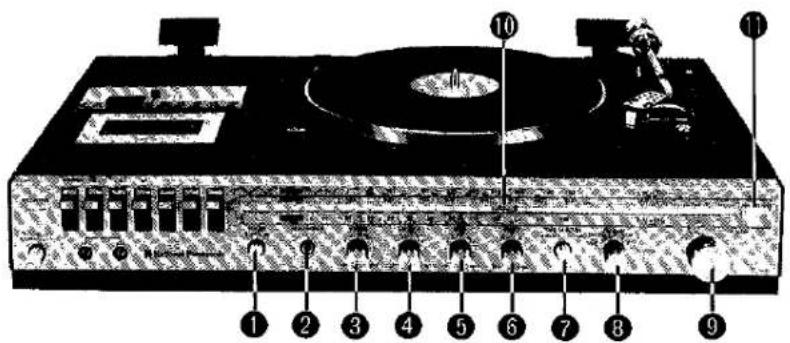
Fig. 1
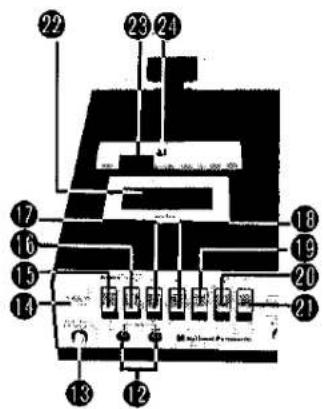
Fig. 2
Special Features
RADIO
* Smartly designed Tuning Dial and "easy-to-spot" illuminated Dial Pointer
* FM AUTO position automatically switches the radio to "stereo" when the program is being broadcast in FM STEREO
* Built-in "Automatic Frequency Control" (AFC) on FM AUTO position to give you drift-free FM reception
CASSETTE TAPE RECORDER
* Auto-Stop Cassette System that operates at the end of the tape in both the play and record mode
* The built-in "Automatic Recording level Control" gives you the finest recording and saves you from keeping on adjusting knobs
* Convenient "Pause" control for short intermission during play and recording mode
* Equipped with a "Tape Selector" switch which enables yC change the frequency characteristics for either "NORMAL" or "CrO2" cassette tapes
PHONO
* Auto-Return and Auto-Stop "Belt-drive" Automatic Turntable
* Convenient "viscous-damped" Cueing Control
* Magnetic Type Phono Cartridge
OTHERS
* Separate Bass and Treble tone controls
* Tape-monitor facilities are provided for you to monitor the tape while making the recording.
Installation Instructions
Power Supply
IMPORTANT: MAINS PLUG WIRING
The wires in this mains lead are coloured in accordance with the following code:
Blue: Neutral
Brown: Live
As the colours of the wires in the mains lead of this appliance may not correspond with the coloured markings identifying the terminals in your plug, proceed as follows; The wire which is coloured blue must be connected to the terminal which is marked with the letter N or coloured black.
The wire which is coloured brown must be connected to the terminal which is marked with the letter L or coloured red.
IF IN DOUBT, CONSULT A COMPETENT ELECTRICIAN.
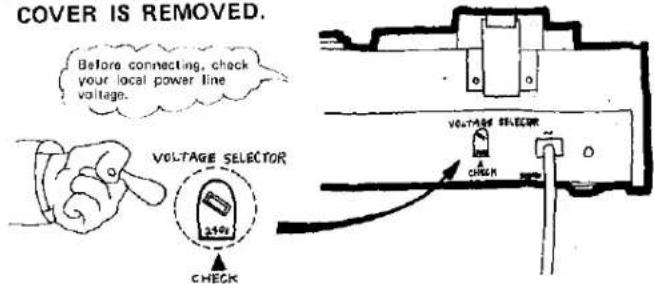
Before playing your unit, ascertain the AC line voltage selector. Make sure that it is adjusted for the voltage in your area. The voltage to which it has been set at factory (240V, 50Hz) can be seen on the rear of this unit.
CAUTION: Disconnect the AC power cord ⑦ from an AC outlet, before adjusting the voltage selector ⑥.
If necessary, reset the AC line voltage selector with a screwdriver. NEVER OPERATE THIS UNIT WITHOUT BOTH SPEAKER SYSTEMS CONNECTED.
WARNING: LIVE PARTS ARE ACCESSIBLE WHEN BOTTOM COVER IS REMOVED.
Contents
| Special Features | 1 |
| Installation Instructions | 2 |
| Power Supply | 2 |
| Safety Tips | 3 |
| Controls | 4 |
| Rear Panel Terminals | 4 |
| Rear Panel Information | 5 |
| Aerials and Earth | 6 |
| Radio Operation | 6 |
| Phono Operation | 7 |
| Stylus replacement | 7 |
Tape Operation 8
Selection of cassette tapes 8
Auto-Stop cassette system 8
Playback
Recording 9
Recording from radio or phone .....10
Recording from the microphone(s) 10
Erase and erase-protection .....10
Head cleaning
Additional Components 12
Some Helpful Hints 13
Specifications....14
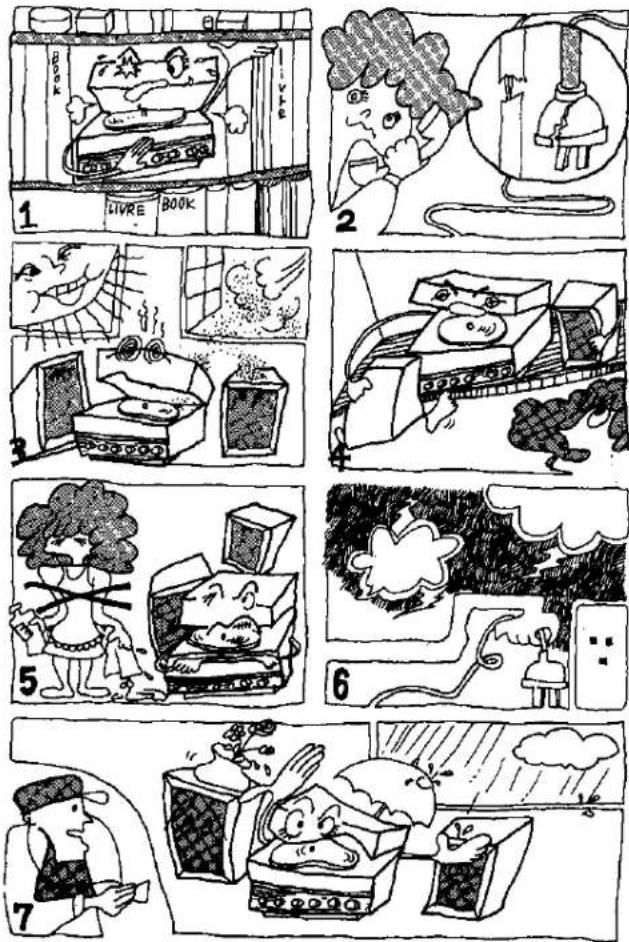
Safety Tips
Electrical energy can perform many useful functions. This unit has been engineered and manufactured to assure your personal safety. But improper use can result in electrical shock or fire hazards. Do not defeat the safeguards incorporated in this unit, please read and strictly observe the following precautionary measures.
1 This unit is provided with ventilation openings in the cabinet to allow heat generated during operation to be released. Never place the set near or over radiator or heat register, or on a too crowded location.
2 Overloaded AC outlets and extension cords are dangerous, and so are frayed power cords and broken plugs. Call your service technician for replacement of dangerous power cords.
3 This unit should not be directly exposed to sunlight, and should be kept free from dust, moisture and vibration.
4 To avoid personal injury, do not place the unit on a sloping shelf unless properly secured.
5 Turn off the unit before cleaning the cabinet. Use a slightly damp (not wet) cloth. Never use solvents such as alcohol, benzine, or thinner as they may mar the finish of the cabinet.
6 For added protection of the unit during a lightning storm or when the set is to be left unattended for an extended period of time, unplug it from the wall outlet.
7 Never operate the unit if liquid has been spilled into it, or if the unit becomes damp or wet. Pull out the mains plug and have the unit inspected by a service technician before further use. We urge you to consult your nearest National Panasonic dealer for instructions concerning repairs or technical information.
Controls
MAINS CONTROLS
① Power push-button (POWER)
② Headphones jack (HEADPHONES)
For private listening from all program sources, plug a stereo headphones, optional, (8 ohms or more) into the Headphones jack ②. The speakers will be automatically disconnected.
CAUTION: Be sure to disconnect the headphones when playing at a high volume level. Such high level of audio power can overload and severely damage the headphones, not to mention your eardrums.
③ Volume control (VOLUME)
④ Balance control (BALANCE)
⑤ Bass control (BASS)
⑥ Treble control (TREBLE)
⑦ Tape monitor switch (TAPE MONITOR)
Use this switch only while playing or monitoring external tape deck through this unit. The source should be a tape deck (optional) connected to the "REC/PLAY" jack of this unit with a "DIN" type connecting cable (optional). This switch should be in "EXT TAPE" (▲).
* This switch should always be in "SOURCE" (■) when operating the built-in radio, phono, or cassette tape, otherwise sounds from the speakers cannot be heard.
⑧ Function selector (TAPE·MIC/PHONO/FM AUTO/MW/LW)
⑨ Tuning control (TUNING)
⑩ Dial pointer
⑪ FM STEREO eye (FM STEREO)
CASSETTE TAPE RECORDER CONTROLS
⑫ Microphone jacks (MIC)
⑬ Tape Selector switch (TAPE SELECT)
Recording lamp (RECORDING)
⑮ Record button (RECORD)
⑯ Rewind button (REWIND)
⑰ Fast forward button (FF)
⑱ Play button (PLAY)
Stop button (STOP)
20 Pause button (PAUSE)
② Eject button (EJECT)
② Cassette holder
② Tape counter (TAPE COUNTER)
② Reset button (RESET)
PHONO CONTROLS
25 Speed select lever
20 Stop lever
⑳ Cueing lever
28 Clamp
② Pickup arm
30 Turntable
31 45 rpm adaptor
Rear Panel Terminals
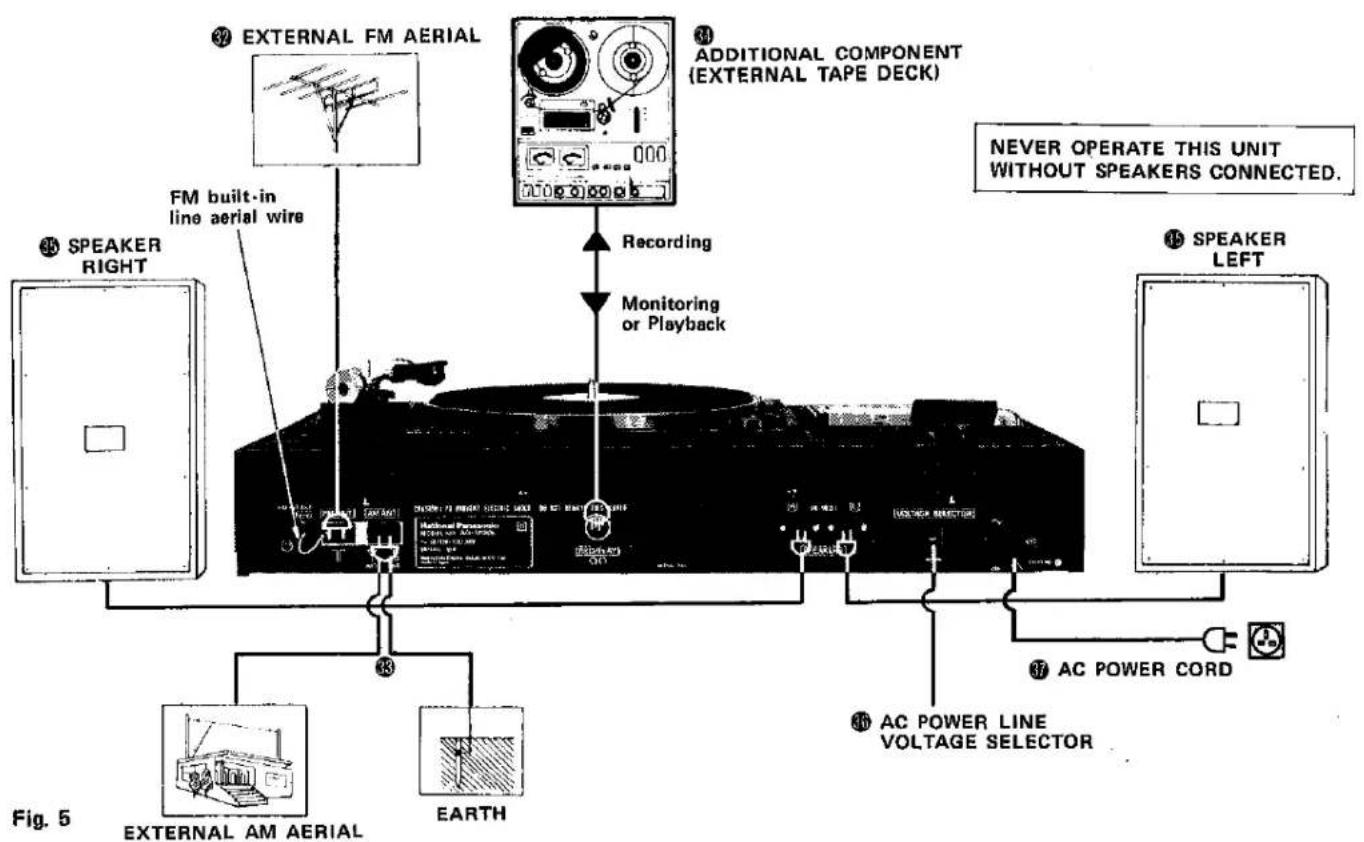
32 External FM aerial terminals (FM ANT) (See "Aerials and Earth" on Page 6).
3 Terminals for external AM aerial (AM ANT) and earth (GND) (See "Aerials and Earth" on Page 6).
34 Record/Play jack (REC/PLAY)
(See "Additional Components" on Page 12).
35 Speaker jacks (SPEAKERS)
AC power line voltage selector (See "Power Supply" on Page 2)
37 AC power cord
Aerials and Earth
FM AERIAL (FM ANT)
Built-in line aerial: This unit has been connected to the built-in FM line aerial at the factory. Stretch out the power cord completely and change the direction of the power cord until optimum FM or FM Stereo reception is obtained.
External FM aerial: For FM Stereo (FM AUTO) reception in fringe areas, or where the built-in line cord aerial does not provide satisfactory reception, connect an FM dipole aerial to the FM aerial terminals 32.
Always disconnect the built-in line aerial wire from the FM aerial terminal before connecting an external FM aerial. (Fig. 5)
Your National Panasonic dealer is most familiar with the type of reception in your particular area and, if necessary, should be consulted for further information.
AERIAL (AM ANT) and EARTH (GND)
The built-in extra-sensitive ferrite core aerial assures excellent MW and LW reception in most areas. However, should you wish to receive a very distant broadcast, connect an external AM aerial to this unit's AM aerial terminal ⌘.
To reduce noise, connect a wire between the ground terminal and earth. (See Fig. 5)
LOCATION :
Find a suitable place for this unit away from any source of heat, and one that allows at least 2·3 inches of ventilation space above and behind the chassis. Keep this unit away from some large metallic parts.
Radio Operation
Set the following controls:
1) Function selector Ⓗ → to your desired radio band, either "FM AUTO", "MW" or "LW".
2) Power push-button ① → to "ON" (■).
3) Tuning control ⑨ → to your desired radio station. The Dial pointer ⑩ indicates your tuning station.
4) Volume control ③ → to the desired volume level.
5) Balance control so that sound seems to come from the center by adjusting the sound balance from your left and right speaker systems.
6) Bass ⑤ and Treble ⑥ controls → to obtain the desired tonal quality.
After listening, switch the Power push-button ① to "OFF" (1).
FM STEREO RECEPTION
The FM STEREO EYE will automatically light up when the program is being broadcast in FM Stereo. You are listening to FM Stereo only when the FM STEREO EYE is lit and the Function selector is set to "FM AUTO". The built-in AFC (Automatic Frequency Control) automatically locks in your signal on "FM AUTO" to give you drift-free reception. It eliminates frequency drift.
Phono Operation
1) Function selector ⑧ → to "PHONO".
2) Power push-button ① → to "ON" (=).
3) Speed select lever to the type of record to be played, either "33" or "45" rpm.
4) Gently place the record on the Turntable 30.
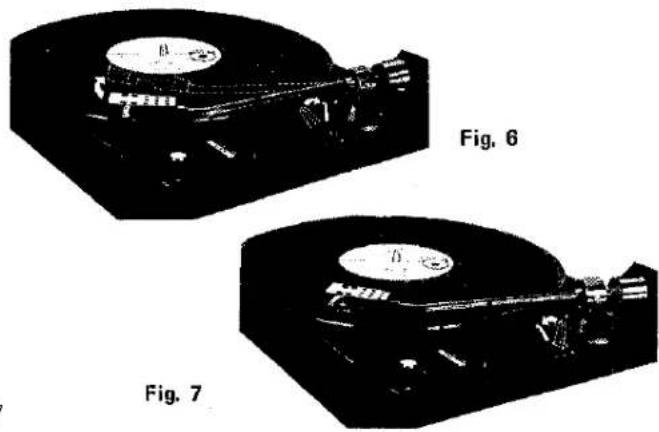
5) Move the Cueing lever ⑦ to ▼ position to lift the Pickup arm ⑩ from its rest position. (Fig. 6)
6) Move the Pickup arm ⑲ above the record on the selected point. At this stage, the Turntable ⑳ starts to rotate.
7) Move the Cueing lever ② to ▼ position to lower the Pickup arm ⑲ onto the record. (Fig. 7) The Pickup arm will descend slowly to the groove and start playing.
8) Adjust the volume, balance, bass and treble controls as you would for radio operation.
9) At the finish of the record, the Pickup arm will return to the rest position and the turntable will shut off automatically.
* When playing 45 rpm records with a large center hole, simply place the 45 rpm adaptor Ⓗ into the center spindle.
natural_image
Two black-and-white images of a mechanical component, labeled Fig. 6 and Fig. 7, showing internal components without any text or symbols.To interrupt .....
To interrupt the playing of record, raise the Cueing lever ② to the ▼ position to lift the Pickup arm.
The Pickup arm will descend slowly and resume playing in the same groove when the Cueing lever is set to ▼ position.
To stop .....
To stop during play, move Stop lever 26 to "STOP" position. The Pickup arm will return to the rest position and the turntable will shut off automatically.
After using .....
depress the Power push-button ① to "OFF" (■).
STYLUS REPLACEMENT
Replace the stylus at the first sign of wear to assure please sound at all times and to prevent damage to records. This is easily done by following these instructions.
1) Lift Pickup arm to a position that will make the stylus accessible.
2) Gently pull out worn stylus and replace new stylus into correct position. (Fig. 8)
RECOMMENDED STYLUS:
EPS-34STSD (Diamond type)
CAUTION: Be sure to switch off the power to the unit when replacing the stylus. And remember to use the correct stylus to prevent damage to your records.
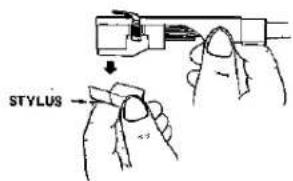
Fig. 8
Tape Operation
Selection of Cassette Tapes
A wide selection of cassette tapes is available today. To make tapes longer than 60 minutes, it is necessary to use thinner tape, which is fragile and must be handled with extreme care. Because the likelihood of a cassette failure increases greatly as the playing time is increased, we recommend not using tapes longer than necessary.
Sixty-minute tapes will provide optimum performance with this unit.
NOTE: Should the tape develop a slack (Fig. 9, arrow 1), tighten the tape tension by lightly turning the hub of the cassette (Fig. 9, arrow 2) with an ordinary pencil before inserting the cassette into the cassette holder.
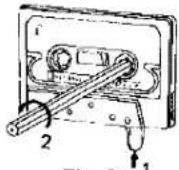
Fig. 9
SOME IMPORTANT HINTS FOR PROPER
ERATION OF THE TAPE RECORDER BUTTONS
Always depress the STOP button before changing the mode of operation (For example: Play → Stop → FF → Stop → Rewind → Stop → Record → Stop → etc.)
By depressing the STOP button, the previously depressed operating button will return to its original position.
Do not depress buttons or lift them up by force.
If the RECORD button cannot be depressed easily, do NOT FORCE it, but check the erase protection device on your TAPE. (See the ERASE AND ERASE PROTECTION SECTION for details on Page 10.)
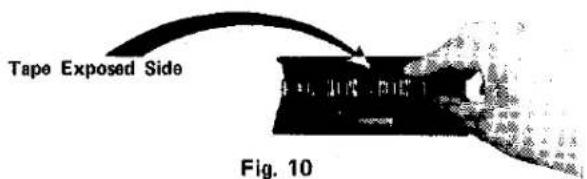
Inserting the Cassette
1) Depress the cassette Eject button Ⓡ to open the Cassette holder Ⓡ.
2) Insert the cassette firmly with the openings (tape exposed side) facing you. (Fig. 10) Be careful not to touch the exposed tape.
3) Close the cassette holder manually.
Removing the Cassette
1) Depress the Stop button ⑲.
2) Depress the cassette Eject button ② to open the cassette holder and remove the cassette.
AUTO STOP CASSETTE SYSTEM
When the tape reaches its end, during playback or recording, it automatically stops and the record button and play button return to their original positions. Note, however, that this feature does not function during rewind or fast forward and that the stop button must be pushed.
■ When the tape comes to an end, it automatically stops. At this time, because the mechanical stop device operates, the play button will not lock (stay depressed) when pushed.
■ To continue operation (recording or playback), you must rewind the tape or press the eject button and turn the cassette over.
Rewind and Fast Forward
To rewind the tape to the left reel, push the Rewind button ⑩. To advance the tape rapidly to the right, push the Fast Forward button ⑰. (Fig. 11)
CAUTION: Always be sure to depress the STOP button after every operation of the REWIND or FAST FORWARD button. When the REWIND or FAST FORWARD button is left depressed accidentally, it may cause problems with the proper operation of your unit.
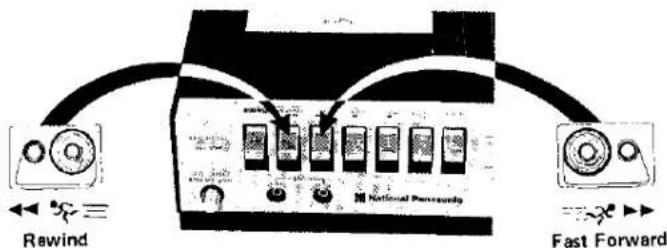
Fig. 11
Tape Counter and Reset Button
The Tape Counter Ⓜ will automatically start to count when playing back or when recording. This counter will help you determine approximately where to re-play or re-record. Therefore, it will be convenient for you to set the tape counter to "000" by pushing the Reset button Ⓞ before the start of any playback or recording.
Pause Control
To interrupt the tape movement temporarily during playback or recording, depress the Pause button. To resume playing, simply release this button by pushing it once again.
PLAYBACK
1) Function Selector to "TAPE/MIC".
2) Power push-button ①→ to "ON" ( = ).
3) Insert the pre-recorded cassette tape firmly.
4) Play button ⑩ → depress.
5) Adjust the volume, balance, and tone controls as you would for radio operation.
6) Stop button 19 → push in order to stop playback.
RECORDING
This unit has provisions for monitoring (except in "microphone" recording) through its speakers, which is particularly useful when making recordings. When recording, volume, balance, bass and treble control settings do not affect recording level and tonal quality.
Automatic Recording Level Control
This unit's recording level control system adjusts and maintains proper recording level automatically. Thus, manual recording level adjustment is not necessary. It saves you from adjusting knobs every time you make a recording.
Recording Lamp
This will illuminate when you are recording through the built-in cassette tape recorder.
Tape Selector ⑬
NORMAL ( 1 )... For recording on standard cassette tapes only.
CrO_2 ( = )... For recording on chromium dioxide cassette tapes only.
* This switch enables you to change the frequency characteristics for either standard "NORMAL" or the chromium dioxide "CrO₂" cassette tapes. Set this selector to the desired position when recording or playing back depending on your cassette tape.
Recording from Radio or Phono
* Be sure no microphone is connected to the Microphone jack ⑫. Then proceed as follows:
1) Operate as you would for radio, phono operation and choose the radio program or phono record you wish to record.
2) Depress the Pause button 20.
3) While pressing the Record button 15, push the Play button 18.
4) To start recording, release the Pause button 20.
5) To stop recording, simply push the Stop button ⑲.
Recording from the Microphone(s)
1) Connect the microphones to the "LEFT" and "RIGHT" Microphone jacks ②.
* For monaural recording, you may connect the microphone to either "L" or "R" jack.
2, Function Selector ③ → to "TAPE/MIC".
3) Follow items 2 to 5 of the "Recording from Radio or Phono" section.
CAUTION: When NOT recording from the microphone(s), disconnect the microphone(s) from the microphone jack (s) ②.
ERASE AND ERASE-PROTECTION
Erasing
Any recorded material on a tape is automatically erased when the tape is again recorded upon and only the new sound remains. To erase the tape without adding a new recording, proceed as follows.
1) Disconnect the microphones.
2) Function Selector → "TAPE/MIC".
3) Let the tape run as if recording. All previous recordings will be erased.
Erase-Protection
Cassette incorporate a convenient erase-protection device to prevent accidental erasure. When the small "tabs" at the rear of a cassette are broken out, the erase-protection device will be activated, preventing accidental erasure of pre-recorded tapes. To protect side 1 recording, break out the tab for side 1. For protection of side 2, break out the tab for side 2. (Fig. 12)
NOTE: If, for some reason, you want to record on a track for which the "tab" has already been removed, simply cover the slot with a small piece of cellophane or vinyl tape. (Fig. 13)
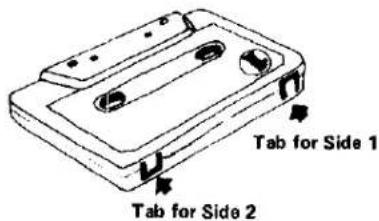
Fig. 12
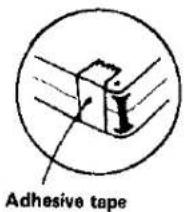
Fig. 13
HEAD CLEANING (Fig. 14)
The REC/PLAY and ERASE heads in the cassette deck may accumulate dust and tape residue, causing poor and wavering sound. This residue should be cleaned periodically (about every 100 hours of playing and recording time). Clean the surface of the heads gently with a cotton swab moistened with alcohol or by using available head cleaning tape commercially sold.
CAUTION: Do not use any solution other than alcohol for head cleaning. Never touch the REC/PLAY and ERASE heads with metal objects such as screwdrivers and never bring a magnet close to the tape mechanism. To obtain optimum performance from your cassette deck, these instructions should be remembered:
\* Using cotton swab
1) Depress the Eject button ②. Remove the cassette from the Cassette holder ②. Clean the rubber pressure roller and the capstan shaft with a soft, lint-free cloth slightly moistened with alcohol.
CAUTION: Never apply solutions other than alcohol or commercial tape head cleaner.
2) Push the Play button 18. The record/playback and erase heads will then be accessible. Clean these heads with a soft, lint-free cloth slightly moistened with alcohol.
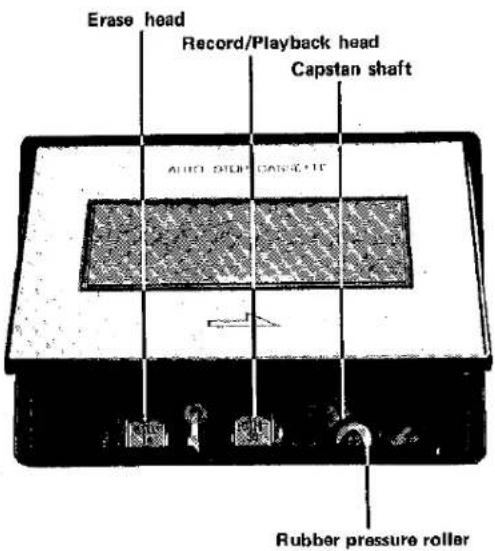
Fig. 14
Additional Components
■ To use External Tape Deck through "REC/PLAY" terminal
You may record any program source to which you are listening by connecting an external tape deck to this unit's "REC/PLAY" jack using appropriate "DIN" type connecting cable (optional). See Fig. 5.
RECORDING
Please refer to the "Instruction Manual" of the external tape deck for details.
1) Tape Monitor ⑦ → to "SOURCE" (■).
2) Select the program you wish to record by turning the Function selector.
NOTES:
- When recording from radio or phono through an external tape deck and through your built-in tape deck simultaneously, some strange sound (beating) may be heard from the speakers. Such kind of external tape deck as mentioned above is not appropriate for "simultaneous" recording and not to be used with this unit.
- When recording "AM" program from this unit through an external tape deck, some noise may be heard from the speakers. This is because the external tape deck and this unit are placed too close to each other. Please keep the tape deck away from this unit.
- Do not connect this unit to any low level input(s) on the external tape unit such as "MICROPHONE". The recordings will be severely overloaded and distorted.
MONITORING
If your stereo tape unit has true tape-monitor facilities (separate circuits and head for recording and for playback), you may monitor the tape while making the recording. This will allow you to compare its sound quality with that of the original
program material. To monitor the tape, alternate the Tape Monitor ⑦ between "SOURCE" (■) (to hear the original program material) and "EXT TAPE" (=) (to hear the same material a fraction of a second later, as it sounds on tape).
NOTE: Remember to set the Tape Monitor back to "SOURCE" (1) when you have finished recording, otherwise a program chosen with the Function selector cannot be heard.
PLAYBACK
When playing back tapes from your external tape deck, set the Tape Monitor to "EXT. TAPE" (=). The recorded sound will then be heard. Adjust the volume, balance, and tone as you would for radio operation.
Some Helpful Hints
| When Using | Symptom | Probable Cause | Possible Remedy |
| RADIO | Background noise (hiss) is higher during FM STEREO broadcast' than during FM MONO reception. | It is normal for FM Stereo to have higher noise level than FM Mono broadcast. | Turn Bass and Treble controls to "Low" (minimum) position.Connect an external FM Antenna to the FM ANT terminal on the rear panel for better reception. |
| Noise is heard when motor vehicles pass nearby. | Ignition noise from the engine of the motorvehicle. | Change direction of FM external antenna away from the street. | |
| Noise is heard continually during "FM Stereo & FM monaural broadcasts" reception. | Antenna placement is incorrect. | Select the best location of the FM external antenna by trying different directions and placement until optimum reception is achieved. | |
| PHONO | Abnormal Noise(distortion or unusual vibration, scratchiness, etc.) | Dust on the disc or on the tip of the stylus. | Any dust on the surface of the disc and on the tip of the stylus interferes with satisfactory reproduction. Be sure therefore, to clean away dust completely, using a cleaner or other effective method. |
| The stylus is bent, or out of position. | If positional adjustment or stylus cleaning fails to correct sound output, stylus may be chipped and requires replacement. Refer to "Stylus Replacement". | ||
| The stylus is worn out. | The stylus can be used for up to 1,000 hours depend on condition and care of records and equipment. It used longer, noise will increase and the disc may be damaged. Replace stylus with a new one. Refer to "Stylus Replacement". | ||
| The disc is worn out. | Do not use a worn out disc. | ||
| CASSETTE TAPE RECORDER | No Sound(mechanical defects) | Cassette tape is worn out, or is caught on the capstan shaft. | Replace or remove the cassette tape from the cassette holder. |
| Poor or Weak recording or playback, or incomplete erasure. | Dirty REC/PLAY and ERASE heads. | Clean heads of tape mechanism according to "Head Cleaning" instructions in this booklet. | |
| COMMON | No Sound(from speakers) | AC cord loose or disconnected.Speaker cords are disconnected. | Make sure AC cord and speaker cords are securely connected. |
| Selector switch is not correctly set. | Set the Selector switch to the correct function to which you want to listen. | ||
| Headphones left in the Headphone jack. | Unplug the headphones. | ||
| Volume control is set to "MIN" position. | Turn Volume control toward "MAX" position. |
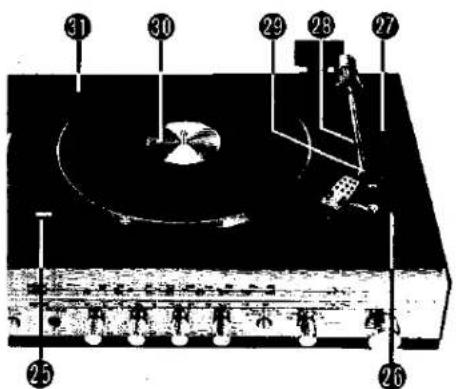
Fig. 3
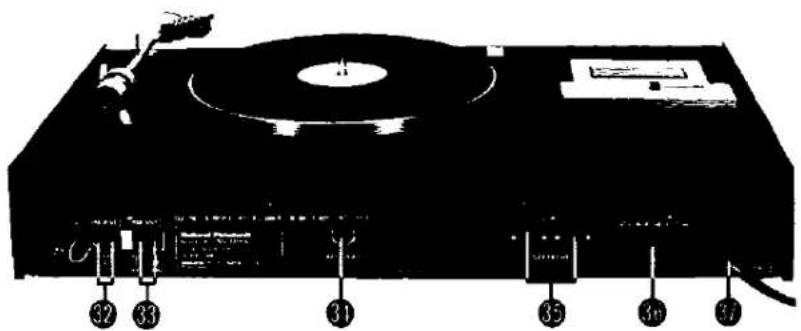
Fig. 4
Specifications
AMPLIFIER SECTION
| Power Output: | MPO 2 x 12.5 W (THD 5%, 4 ohms) |
| RMS 2 x 10 W (One Channel, 5%, 4 ohms) | |
| Frequency Response: | 20 Hz ~ 20 kHz |
| Input Sensitivity and Impedance: | |
| Tape: | 300mV, 25k ohms |
| REC OUT & Impedance: DIN; | 40mV, 80k ohms |
| Tone Controls: | |
| Bass; | ±8dB at 100Hz |
| Treble; | ±10dB at 10kHz |
FM TUNER SECTION
| Frequency Range: | 87.5MHz~108MHz |
| Intermediate Frequency (IF): | 10.7MHz |
| Sensitivity: | 2μV (S/N 30dB, MOD 40kHz) |
| Image Ratio: | 30dB (98MHz) |
| Signal to Noise Ratio: | 60dB (at 1kHz, 60dB, 75kHz) |
| Distortion: | 0.5% (MONO) (at 1kHz, 60dB, 30%) |
| Cage Separation: | 30dB (at 1kHz, 60dB, 30%) |
AM TUNER SECTION
| Frequency Range: | MW; | 525kHz~1605kHz (572m~187m) |
| LW; | 145kHz~285kHz (2070m~1050m) | |
| Intermediate Frequency (IF): | 470kHz | |
| Sensitivity: | MW; | 100μV/m for 50mW |
| LW; | 300μV/m for 50mW | |
| Image Ratio: | MW; | 35dB (1MHz) |
| LW; | 45dB (220kHz) | |
RECORD PLAYER SECTION
| Turntable: | 25cm (10") |
| Turntable Speed: | 33-1/3 and 45 r.p.m., 2-speeds |
| Phonomotor: | Electronic Governor DC Motor |
| Cartridge: | Magnetic {EPC78SMAD} |
| Stylus: | Diamond (EPS34STSD) |
| Stylus Pressure: | 3 ± 0.5 g |
| Wow & Flutter: | 0.25% (DIN) |
TAPE DECK SECTION
| Deck System: | Auto Stop Cassette System |
| Track System: | 4 Track, 2 channel |
| Recording System: | AC Bias, 50 kHz |
| Erasing System: | AC Erase, 50 kHz |
| Tape Speed: | 4.75 cm/sec (1-7/8 i.p.s.) |
| Frequency Response: | 50 Hz ~ 10 kHz (NORMAL)40 Hz ~ 12 kHz ( CrO_2 ) |
| Wow & Flutter: | 0.2% (WRMS) |
POWER CONSUMPTION: 55 W
| POWER SUPPLY: | AC 110V, 120V, 220V, 240V, 50/60Hz |
DIMENSIONS (H × W × D)
| Center Unit: | 176mm × 570mm × 387mm(6·15/16") (22·7/16") (15·1/4") |
WEIGHT
| Center Unit: | 9.5 kg (20 lb 15 oz) |
These specifications might be modified with development of technology.
To obtain service:
Should at any time your unit require service
• Contact your National Panasonic dealer
* Quote MODEL NUMBER and SERIAL NUMBER
Matsushita Electric Trading Co., Ltd. P.O. Box 288, Central Osaka Japan