
SL-PS840 - Hi-Fi-System PANASONIC - Kostenlose Bedienungsanleitung
Finden Sie kostenlos die Bedienungsanleitung des Geräts SL-PS840 PANASONIC als PDF.


Benutzerfragen zu SL-PS840 PANASONIC
0 Frage zu diesem Gerät. Beantworten Sie die, die Sie kennen, oder stellen Sie Ihre eigene.
Eine neue Frage zu diesem Gerät stellen
Laden Sie die Anleitung für Ihr Hi-Fi-System kostenlos im PDF-Format! Finden Sie Ihr Handbuch SL-PS840 - PANASONIC und nehmen Sie Ihr elektronisches Gerät wieder in die Hand. Auf dieser Seite sind alle Dokumente veröffentlicht, die für die Verwendung Ihres Geräts notwendig sind. SL-PS840 von der Marke PANASONIC.
BEDIENUNGSANLEITUNG SL-PS840 PANASONIC
Technics
Compact Disc Player
SL-PS840
Operating Instructions
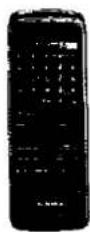
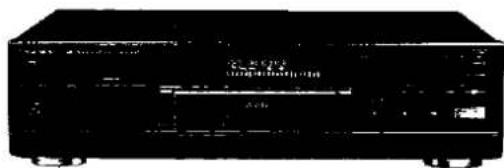
natural_image
Black electronic device with no visible text or symbols on its body, numbers, or labels.
Notes:
- Specifications differ according to the area code.
The "EB" area code, for example, indicates United Kingdom specifications.
●The "EB" indication is shown on the packing case.
Before operating this unit, please read these instructions completely.
E EB GC GN
RQT1801-B
F0193L0
Table of Contents
Caution for AC Mains Lead 3
Suggestions for Safety 4
Installation 5
Preparations 5
Concerning the Remote Control ..... 7
Front Panel Controls and Functions 8
Basic Operating Procedure
(Sequential Play) 10
Direct Access Play .....12
Random Play 13
Program Play 14
Search Function 16
Skip Function 17
Special Features 18
Recording from Compact Discs .....22
Concerning Compact Discs 26
Maintenance 26
Technical Specifications 26
Troubleshooting Guide ....27
Before Transporting the Unit 27
CAUTION:
The AC voltage is different according to the area.
Be sure to set the proper voltage in your area before use.
(For details, please refer to the page 6.)
CAUTION!
THIS PRODUCT UTILIZES A LASER.
USE OF CONTROLS OR ADJUSTMENTS OR PERFORMANCE OF PROCEDURES OTHER THAN THOSE SPECIFIED HEREIN MAY RESULT IN HAZARDOUS RADIATION EXPOSURE.
DO NOT OPEN COVERS AND DO NOT REPAIR YOURSELF. REFER SERVICING TO QUALIFIED PERSONNEL.
SUOM!
VAROITUS!
LAIYTEEN KÄYTTÄMINEN MUULLA KUIN TÄSSÄ KÄYTTÖOHJEESSA MAINITULLA TAVALLA SAATTAA ALTISTAA KÄYTTÄJÄN TURVALLISUUSLUOKAN 1 YLITTÄVALLE NÄKYMÄTTÖMÄLLE LASERSÄTEIL- LYLLE.
DANSK
BEMAERK!
I DETTE APPARAT ANVENDES EN LASER.
BRUG AF BETJENINGSKNAPPER ELLER REGULERINGER ELLER FREMGANGSMÄDER UDOVER DE I DENNE BETJENINGSVEJLEDNING ANGIVNE, KANMEDFÖRE FARE FOR BESTRÅLING. ÅBN IKKE KABINETTET OG FORSOG IKKE AT UDFÖRE REPARATIONER SELV. REPARATIONER MÅ KUN FORETAGES AF KVALIFICEREDE TEKNIKERE.
NORSK
ADVARSEL!
DETTE PRODUKTET ANVENDER EN LASER.
BETJENING AV KONTROLLER, JUSTERINGER ELLER ANDRE INNGREP ENN DE SOM ER BESKRÉVENT I DENNE BRUKSANVISNING, XAN FÖRE TIL FARLIG BESTRÅLING.
DEKSLER MÅ IKKE ÅPNES, OG FORS∅K ALDRI Å REPARERE APPARATET PÅ EGENHÅND.
ALT SERVICE OG REPARASJONSARBEID MÅ UT- FÖRES AV KVALIFISERT PERSONELL.
DANGER-Invisible
laser radiation when
open
AVOID DIRECT EX-
POSURE TO BEAM
(Inside of product)
ADVARSEL: USYNLIG LASERSTRÅLING
VED ABNING, Når SIKKERHEDSAF-
BRYDERE ER UDE AF FUNKTION.
UNDGÅ UDSÄTTELSE FOR STRÅLING.
(incers den al apparatel)
VAROI Avittances |
suojsikilus ohltetzessa
olet sitinna nákymató Ieneraftelbille
Igoi batonyina. Ain katan adisocoon
WARNING! Osynllg
tasserstråning när denna
del är oppnad och
spanen at urkoppian. Reiside si styken.
ADVERSE! Uayning
laserstralling ne deksel
apnes og sikkernhedstis
bytes. Unimga stappening
stepundering for strain.
(Tuotten sisälla)
(Apparaters insida)
(Produktets: nnside)
CLASS 1 LASER PRODUCT
(Back of product)
Caution for AC Mains Lead
(For United Kingdom)
("EB" area code model only)
For your safety, please read the following text carefully.
This appliance is supplied with a moulded three pin mains plug for your safety and convenience.
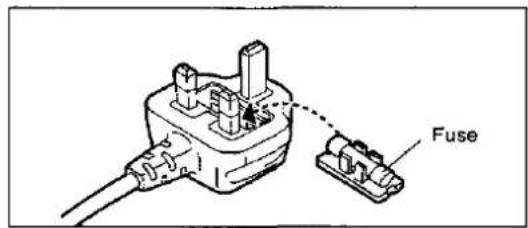
A 5-ampere fuse is fitted in this plug.
Should the fuse need to be replaced please ensure that the replacement fuse has a rating of 5-ampere and that it is approved by ASTA or BSI to BS1362.
Check for the ASTA mark 📂 or the BSI mark 🌼 on the body of the fuse.
If the plug contains a removable fuse cover you must ensure that it is refitted when the fuse is replaced.
If you lose the fuse cover the plug must not be used until a replacement cover is obtained.
A replacement fuse cover can be purchased from your local dealer.
CAUTION!
IF THE FITTED MOULDED PLUG IS UN- SUITABLE FOR THE SOCKET OUTLET IN YOUR HOME THEN THE FUSE SHOULD BE REMOVED AND THE PLUG CUT OFF AND DISPOSED OF SAFELY.
THERE IS A DANGER OF SEVERE ELECTRICAL SHOCK IF THE CUT OFF PLUG IS INSERTED INTO ANY 13-AMPERE SOCKET.
If a new plug is to be fitted please observe the wiring code as shown below.
If in any doubt please consult a qualified electrician.
IMPORTANT
The wires in this mains lead are coloured in accordance with the following code:
Blue: Neutral
Brown: Live
As the colours of the wires in the mains lead of this appliance may not correspond with the coloured markings identifying the terminals in your plug, proceed as follows:
The wire which is coloured BLUE must be connected to the terminal in the plug which is marked with the letter N or coloured BLACK.
The wire which is coloured BROWN must be connected to the terminal in the plug which is marked with the letter L or coloured RED.
Under no circumstances should either of these wires be connected to the earth terminal of the three pin plug, marked with the letter E or the Earth Symbol 12 .
Before use
Remove the connector cover as follows.
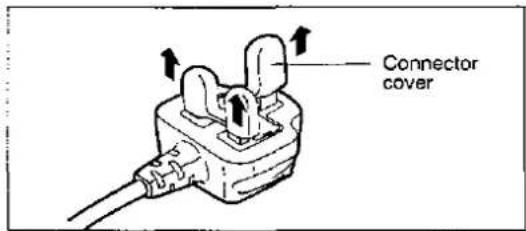
text_image
Connector coverHow to replace the fuse
- Remove the fuse cover with a screwdriver.
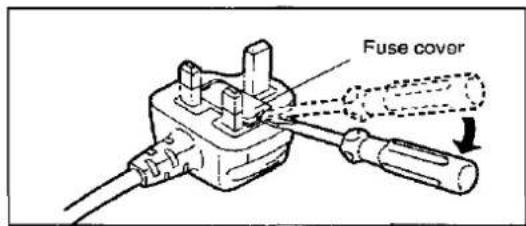
text_image
Fuse cover- Replace the fuse and attach the fuse cover.
text_image
FuseSuggestions for Safety
■ Use a standard AC wall outlet
- Use from an AC power source of high voltage, such as that used for an air conditioner, is very dangerous.
A fire might be caused by such a connection.
- A DC power source cannot be used.
Be sure to check the power source carefully, especially on a ship or other place where DC is used.
■ Grasp the plug when disconnecting the power supply cord
- Wet hands are dangerous.
A dangerous electric shock may result if the plug is touched by wet hands.
- Never place heavy items on top of the power supply cord, nor force it to bend sharply.
■ Place the unit where it will be well ventilated
Place this unit at least 10 cm (4") away from wall surfaces, etc.
■ Avoid places such as the following:
in direct sunlight or in other places where the temperature is high.
In places where there is excessive vibration or humidity.
Such conditions might damage the cabinet and/or other component parts and thereby shorten the unit's service life.
■ Be sure to place the unit on a flat, level surface
If the surface is inclined, a malfunction may result.
■ Never attempt to repair nor reconstruct this unit
A serious electric shock might occur if this unit is repaired, disassembled or reconstructed by unauthorized persons, or if the internal parts are accidentally touched.
■ Take particular care if children are present
Never permit children to put anything, especially metal, inside this unit. A serious electric shock or malfunction could occur if articles such as coins, needles, screwdrivers, etc. are inserted through the ventilation holes, etc. of this unit.
■ If water is spilled on the unit
Be extremely careful if water is spilled on the unit, because a fire or serious electric shock might occur. Immediately disconnect the power cord plug, and consult with your dealer.
■ Avoid spray-type insecticides
Insecticides might cause cracks or "cloudiness" in the cabinet and plastic parts of this unit. The gas used in such sprays might, moreover, be ignited suddenly.
■ Never use alcohol or paint thinner
These and similar chemicals should never be used, because they might cause flaking or cloudiness of the cabinet finish.
■ Disconnect the power supply cord if the unit will not be used for a long time
If the unit is left for a long time with the power ON, this not only will shorten its useful operation life, but also may cause other trouble.
■ If trouble occurs
If, during operation, the sound is interrupted or indicators no longer illuminate, or if an abnormal odour or smoke is detected, immediately disconnect the power cord plug, and contact with your dealer or an Authorized Service Center
Installation
Notes of placement
This unit is a precision instrument. Be sure to place it on a flat surface.
■ Avoid places such as the following:
- Near any equipment or device that generates strong magnetism.
- On any heat-generating equipment or device, or in any place where the temperature is high (35°C or higher).
- Extremely cold place (5°C or below).
- Near a tuner or TV. (It may cause noise in the broadcast, or disturbance of the TV picture.)
■ When carrying or storing the unit, handle it with care so it is not subjected to any strong bumps.
Always remove the disc before storing the unit for any period of time.
■ To avoid problems due to vibration.
- Do not place a book or similar object under this unit.
- Do not route the connection cables (of this or other units) across the operation panel, across the top, or under the unit.
Preparations
Supplied accessories
Check the packing carton for these accessories.
Note:
The configuration of the AC power supply cord differs according to area.
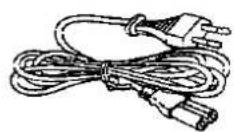
AC power supply cord 1
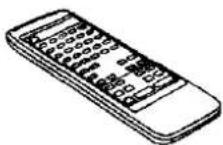
Remote control transmitter 1 (RAK-SL512W)
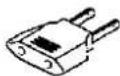
Power plug adaptor 1
(For areas except Europe, Australia and New Zealand)
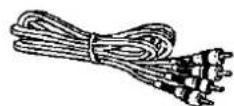
Stereo connection cable 1
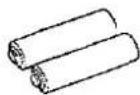
Batteries 2
(UM-4, AAA, R03)
Preparations (continued)
Connections
Before making connections, be sure that the power of this unit and all other system components is first turned off. See the operating instructions of the amplifier or the cassette deck for details.
FOR UNITED KINGDOM ONLY BE SURE TO READ THE CAUTION FOR AC POWER SUPPLY CORD ON PAGE 3 BE- FORE PROCEEDING TO STEP 4.
CLASS 1 LASER PRODUCT
LUOKAN 1 LASERLAITE
KLASS 1 LASER APPARAT
flowchart
graph TD
    A["Household AC outlet"] --> B["Voltage selector (VOLT ADJ)"]
    B --> C["AC IN~"]
    B --> D["VOLT ADJ"]
    C --> E["(red) (white)"]
    D --> F["(red) (white)"]
    E --> G["(L) (white)"]
    E --> H["(R) (red)"]
    G --> I["1"]
    H --> J["2"]
    I --> K["3"]
    J --> L["4"]
    K --> M["Output"]
    L --> N["Output"]
    style A fill:#f9f,stroke:#333
    style B fill:#ccf,stroke:#333
    style C fill:#cfc,stroke:#333
    style D fill:#fcc,stroke:#333
    style E fill:#ffc,stroke:#333
    style F fill:#ffc,stroke:#333
    style G fill:#fcc,stroke:#333
    style H fill:#fcc,stroke:#333
    style I fill:#fff,stroke:#333
    style J fill:#fff,stroke:#333
    style K fill:#fff,stroke:#333
    style L fill:#fff,stroke:#333
    style M fill:#fff,stroke:#333
Rear panel of this unit (Tutoteen takaosassa) (Apparatens baksida)
Note: The configuration of the AC outlet and AC power supply cord differs according to area
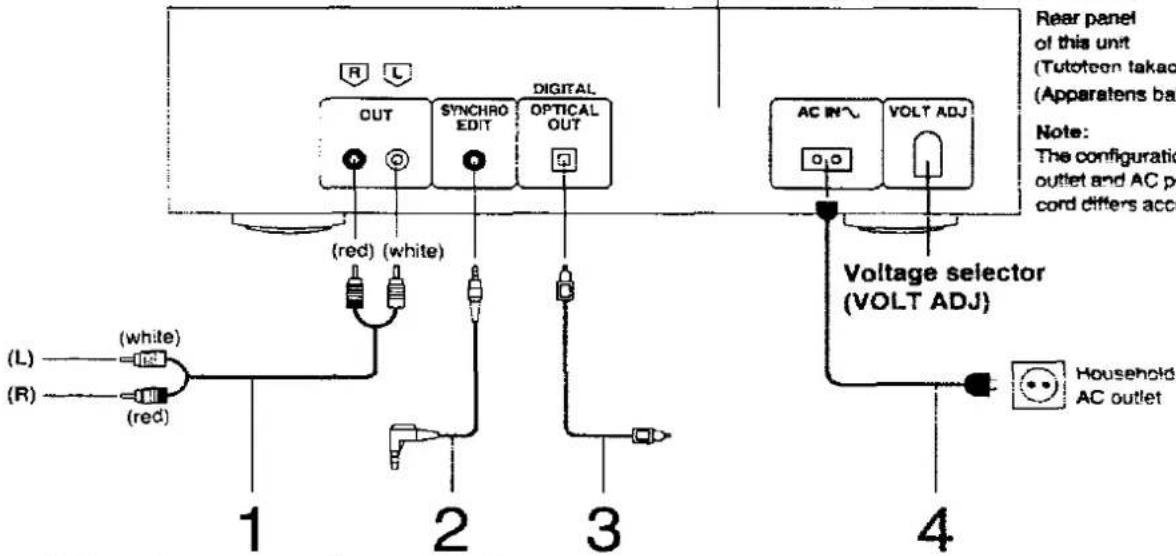
1 Connect the stereo connection cable (included) to the "CD" or "AUX" terminals of the amplifier.
When using the synchro edit function, be sure to connect the stereo connection cable to the amplifier even if the optical-fiber cable has been connected. (See pages 22–25.)
2 Connect the synchro edit cable (included with the cassette deck) to the "SYNCHRO EDIT" terminal of the Technics cassette deck.
3 Connect the optical-fiber cable (not included) to the "DIGITAL INPUT" terminal of the amplifier.
This terminal can be used for connection with other equipment that has a digital input terminal, such as an amplifier, by using an optical-fiber cable. A dust-protection cap is inserted in this terminal. Remove this cap only when a connection is to be made to this terminal.
natural_image
Two mechanical components with mounting holes and wiring, no visible text or symbolsFor areas except Europe, Australia and New Zealand Set the voltage selector (VOLT ADJ) to the voltage setting for the area in which the unit will be used.
- Use a minus (-) screwdriver.
- Note that this unit will be seriously damaged if this setting is not made correctly.
- If the power supply in your area is 117 V or 120 V, set to the "127 V" position.
4 Connect the AC power supply cord (Included) to the "AC OUTLET" of the amplifier or the household AC outlet.
For areas except Europe, Australia and New Zealand If the power plug will not fit your socket, use the power plug adaptor (included).
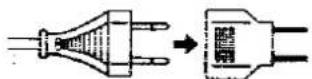
For areas except Australia and New Zealand
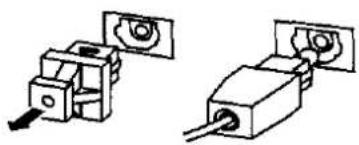
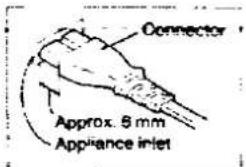
Insertion of Connector
Even when the connector is perfectly inserted, depending on the type of inlet used, the front part of the connector may jut out as shown in the drawing
However there is no problem using the unit.
text_image
Connector Approx. 5 mm Appliance inletConcerning the Remote Control
Battery installation
natural_image
Diagram of a mechanical component with arrows indicating direction (no text or symbols)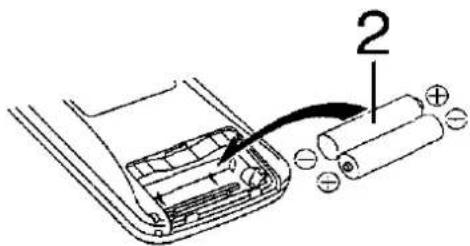
text_image
2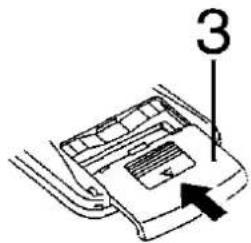
text_image
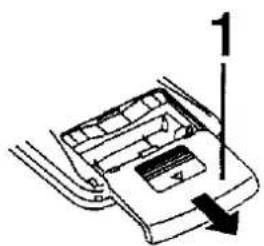
31 Open the cover.
Press gently and slide the cover out.
2 Insert the batteries Included with this unit.
- When you need to replace these batteries, use two UM-4 "AAA", IEC R03 (1.5 V) or equivalent batteries.
- Be sure to insert batteries so that their positive (+) and negative (−) polarities match the indications in the compartment. Batteries installed incorrectly may leak and cause damage.
- Refer to "Use of batteries" below for additional information.
3 Close the cover.
Use of batteries
- Do not mix old and new batteries or batteries of different types (carbon and alkaline, etc.).
- The average battery life is about one year. Although the battery life varies depending on how often the device is used, you should generally replace the batteries about once a year.
- Replace the batteries if commands from the remote control transmitter do not operate the unit even when the transmitter is held close to the front panel.
- Never subject batteries to excessive heat or flame; do not attempt to disassemble them; and be sure they are not short-circulted.
-
If you will not be using the remote control for a long period of time, remove the batteries and store in a cool, dark place.
-
If a battery leaks, remove all batteries and dispose of them properly. Thoroughly clean the battery compartment before inserting new batteries.
- If the leaking electrolyte comes in contact with skin or clothes, flush with water immediately.
- Keep batteries out of reach of children.
- Do not use rechargeable-type (nickel-cadmium) batteries.
- Do not attempt to recharge alkaline or carbon batteries.
- Always remove old, weak, or worn-out batteries and dispose of them properly.
- Do not dispose of used batteries in household rubbish.
Operation notes
CD player
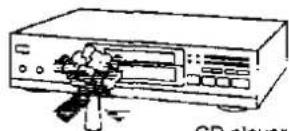
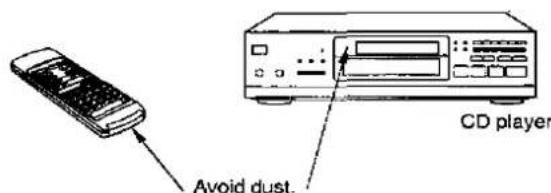
Aim the remote control's transmission window toward the CD player's sensor. Avoid any obstacles.
text_image
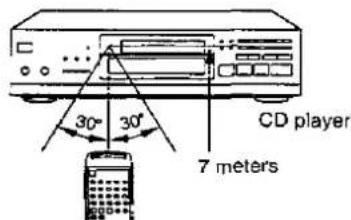
CD player 30° 30° 7 meters- Use the remote control with a 60-degree angle of the CD player.
- Maximum distance is within 7 meters directly facing toward the CD player.
text_image
Avoid dust. CD player- Be sure the transmission window and the CD player's sensor are free from dust. Excessive dust might prevent reception.
- If direct sunlight or another strong light source strikes the remote control signal sensor part of the CD player, it may impair the remote control's operation. If there is a problem, place the CD player away from the light source.
- If this unit is installed in a rack with glass doors, the glass doors' thickness or color might make it necessary to use the remote-control transmitter a shorter distance from the unit.
Front Panel Controls and Functions
text_image
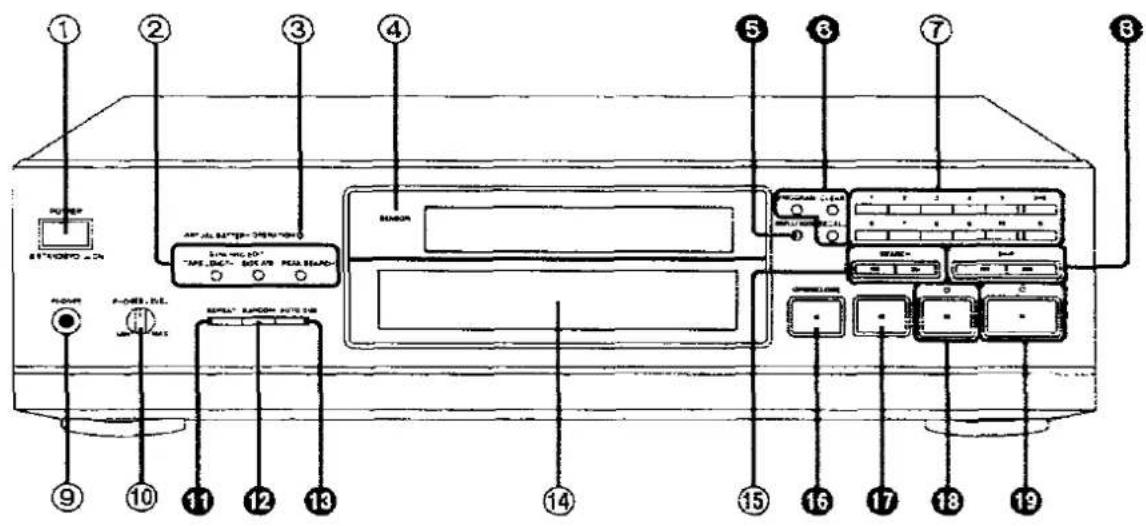
Diagram of a front panel with labeled ports and indicators, including power, alarm, and control panels.Control section
Numbers with black background (for example 5) indicate functions available on the remote control. (See page 9.)
① Power "STANDBY ⏻/ON" switch (POWER, ■ STANDBY ⏻ ON)
This switch switches ON and OFF the secondary circuit power only. The unit is in the "standby" condition when this switch is set to the STANDBY position. Regardless of the switch setting, the primary circuit is always "live" as long as the power cord is connected to an electrical outlet.
② Buttons for CD-Edit function
• Tape length button (TAPE LENGTH)
• Tape side select button (SIDE A/B)
• Peak search button (PEAK SEARCH)
③ Virtual Battery Operation Indicator (VIRTUAL BATTERY OPERATION)
④ Remote control signal sensor (SENSOR)
⑤ Display mode button (DISPLAY MODE)
6 Buttons for program function
• Program button (PROGRAM)
• Clear button (CLEAR)
• Recall button (RECALL)
⑦ Numeric buttons (1–10, >10, 0)
⑧ Skip buttons (|◀◀ SKIP▶▶)
⑨ Headphones jack (PHONES)
⑩ Headphones volume control (PHONES LEVEL)
⑪ Repeat button (REPEAT)
12 Random button (RANDOM)
13 Auto cue button (AUTO CUE)
⑭ Disc tray
⑮ Search buttons (◀◀ SEARCH▶▶)
⑯ Disc tray open/close button (▲ OPEN/CLOSE)
⑪ Stop button (■)
18 Pause button and indicator (11)
19 Play button and indicator (▶)
text_image
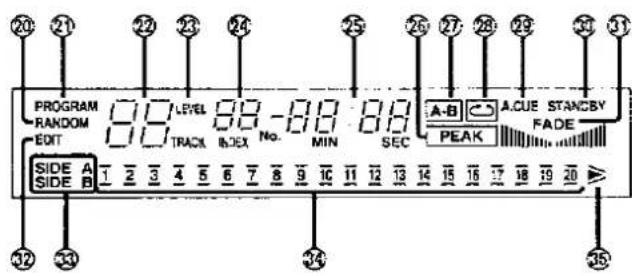
PROGRAM RANDOM EDIT SIDE A SIDE B 1 2 3 4 5 6 7 8 9 10 11 12 13 14 15 16 17 18 19 20 LEVEL TRACK INDEX No. MIN SEC A-B ACUE STANCEV FADE PEAK 32 33 34 35Display section
⑳ Random play indicator (RANDOM)
② Program indicator (PROGRAM)
② Track number display
②3 Level control indicator (LEVEL)
②4 Index/program sequence display
⑳ Time display
26 Peak search indicator ( PEAK )
②7 A-B repeat indicator (A-B)
28 Repeat indicator ( )
⑲ Auto cue indicator (A.CUE)
③ Standby indicator (STANDBY)
③1 Fade in/out indicator (FADE)
32 Compact disc edit indicator (EDIT)
33 Tape side indicator (SIDE A, SIDE B)
③4 Track number indicator (1-20)
③5 "Over" mark ( ≧ )
text_image
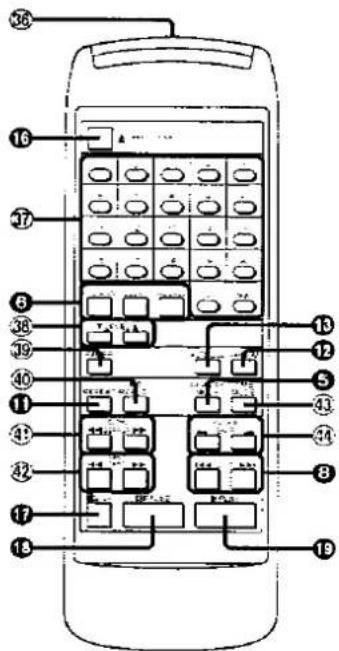
Diagram of a mobile phone keypad with numbered compartments and function keysRemote control section
The functions 5, 6, 9, 11, 12, 13, 14, 15, 17, 18 and 19 are described under "Control section" on page 8.
36 Remote control transmission window
③7 Numeric buttons (1-20, 0, >20)
③8 Level control buttons (▼ LEVEL ▲)
39 Fade in/out button (FADER)
④0 A-B repeat button (A-B REPEAT)
④1 Slow search button (◀◀ SLOW SEARCH ▶▶)
④2 Fast search button (◀◀ FAST SEARCH ▶▶)
④3 Time mode select button (TIME MODE)
④4 Index skip button (←INDEX SKIP ▶)
Basic Operating Procedure (Sequential Play)
text_image
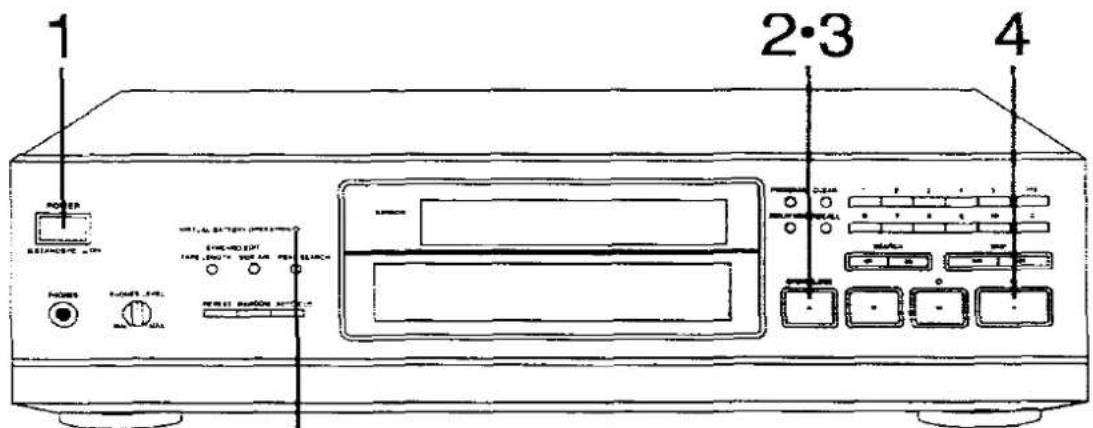
1 2·3 4VIRTUAL BATTERY OPERATION
1 Press POWER to switch on the power.
If there is a disc in the disc tray, play will start from the first track.
2 Press ▲ OPEN/CLOSE to open the disc tray and insert a disc.
(Also available from the remote control)
Label must face upward.
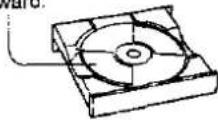
Before attempting to use the remote control transmitter to open the disc tray, make sure that there are no obstructions in front of the unit.
3 Press ▲ OPEN/CLOSE again to close the disc tray.
(Also available from the remote control)
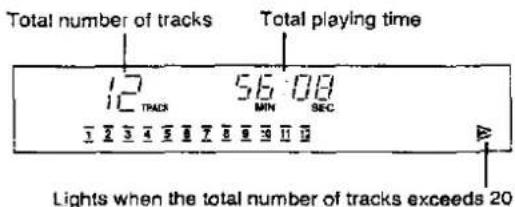
text_image
Total number of tracks 12 TRACKS 56:08 MIN SEC Lights when the total number of tracks exceeds 20- The total playing time displayed includes the silent sections between tracks. For this reason, it may be a few seconds longer than the playing time indicated on the disc.
- You can skip this step and press play button (▶) The disc tray will be automatically closed and then play will start from the first track.
4 Press play button (▶).
(Also available from the remote control)
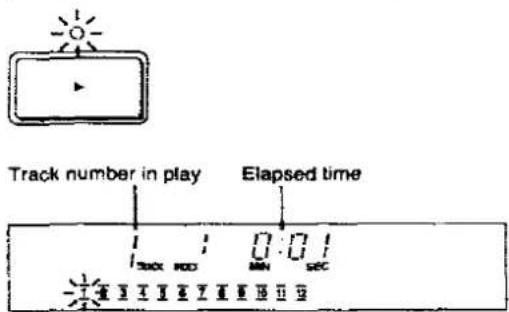
text_image
Track number in play Elapsed time 300x 100 0.01 MIN SECThe unit stops automatically when the last track finishes playing.
■ VIRTUAL BATTERY OPERATION Indicator
This indicates that the circuit (virtual battery) for eliminating the very faint noise contained in the power supply during play is now operating.
The indicator lights in both play and pause modes.
text_image
2 1·3To stop disc play
(Also available from the remote control)
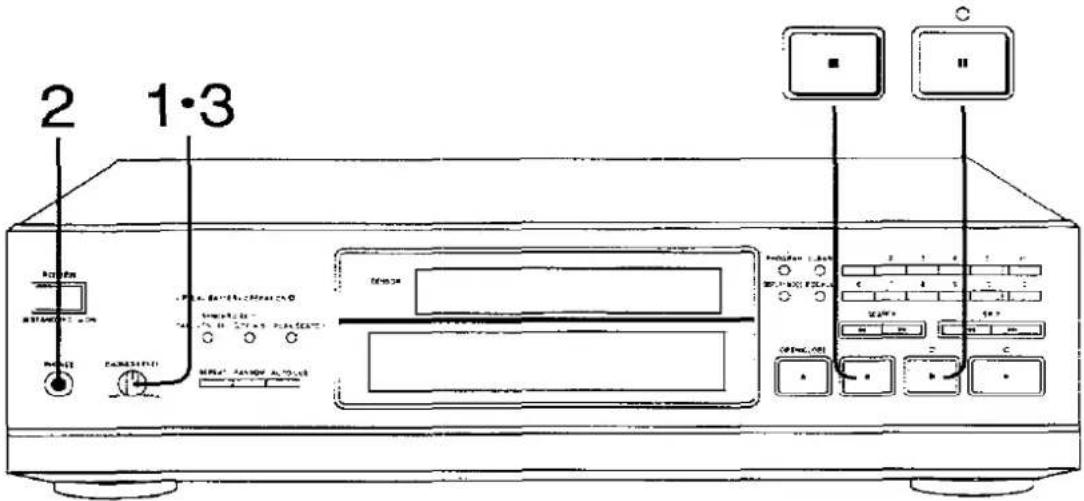
Press stop button (■).
To temporarily stop disc play
(Also available from the remote control)
Press pause button (II).
Press play button (▶) to resume play.
How to use headphones
1 Reduce the headphones volume level.
2 Connect the headphones (not included) to the headphones jack.
Plug type: Stereo large plug
3 Adjust the volume.
Note:
Avoid listening for prolonged periods of time to prevent hearing damage.
Direct Access Play
text_image
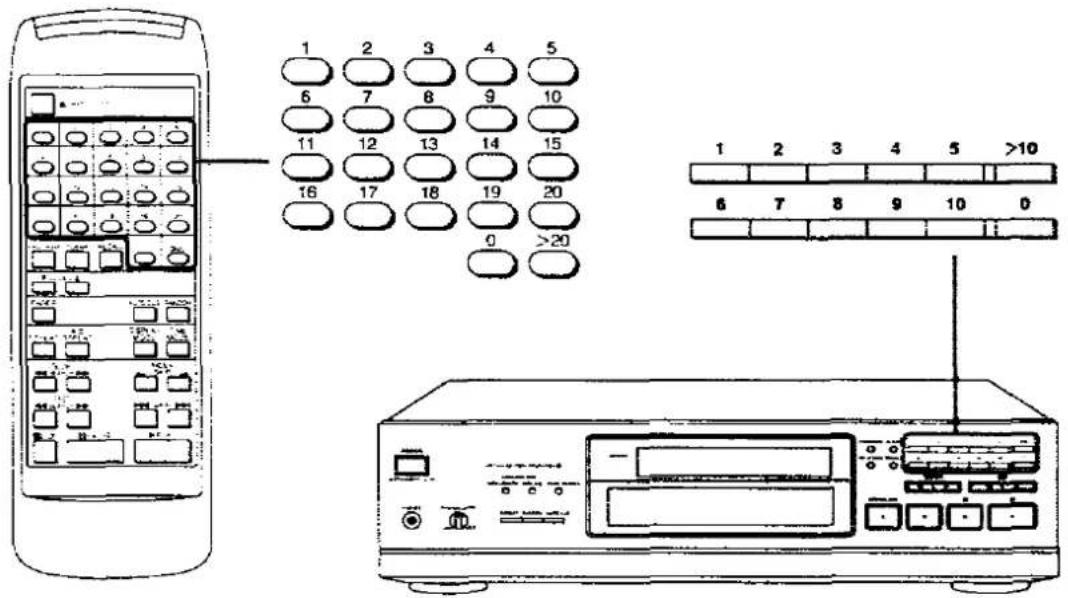
1 2 3 4 5 6 7 8 9 10 11 12 13 14 15 16 17 18 19 20 0 >20 1 2 3 4 5 >10 6 7 8 9 10 0To start sequential play from a desired track. Play will progress to the last track of the disc.
Before beginning, follow steps 1–3 of "Basic Operating Procedure" on page 10.
From the remote control
Press the numeric button to select the track.
• To select a track between 1 and 20:
Press the corresponding number on the keypad.
•To select a two-digit track number over 20:
Press >20 then one of the buttons from 2 to 9 to select the "tens" digit. Then press one of the buttons from 0 to 9 to select the "unit" digit.
For example:
•To select track number 25:

• To select track number 30:

Play begins with the track selected and continues to the end of the disc. The unit will stop automatically when the last track finishes playing.
From the main unit
Press the numeric button to select the track.
•To select a track between t and 10:
Press the corresponding number on the keypad.
•To select a two-digit track number over 10:
Press >10 then one of the buttons from 1 to 9 to select the "tens" digit. Then press one of the buttons from 0 to 9 to select the "unit" digit.
For example:
•To select track number 17:

●To select track number 20:

Random Play

text_image
STOP RANDOMThe unit will automatically select the sequence of selections to be played from the disc in a random manner.
(Also available from the main unit)
Before beginning, follow steps 1–3 of "Basic Operating Procedure" on page 10.
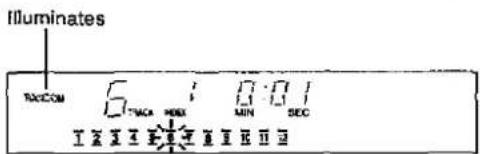
Press RANDOM in play or stop mode.
text_image
Illuminates TACOM 5 10 1 TACA HMX MIN SEC I X I X E I X I I I IThe unit stops automatically when all tracks have played once. (Random play mode will be cancelled.)
•In the program play mode (see page 14): The unit plays only the programmed tracks in random manner.
To cancel random play
Press ■ STOP.

When you press RANDOM in the play mode, play continues from subsequent tracks in the normal order to the end of the disc.
Program Play
text_image
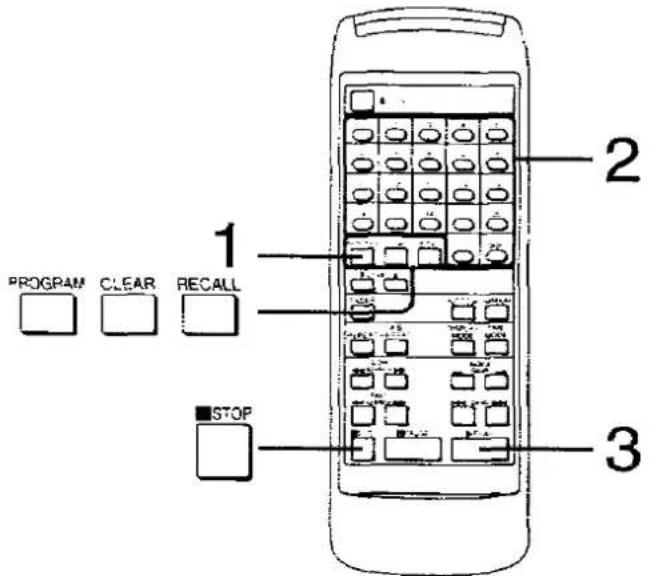
PROGRAM CLEAR RECALL 1 2 3 STOPYou can program up to 32 tracks in any order you desire.
(Aiso available from the main unit)
Before beginning, follow steps 1–3 of "Basic Operating Procedure" on page 10.
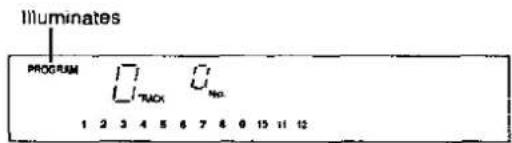
1 In the stop mode, press PROGRAM.
If you press this button in the play mode, the track in play will be programmed.
text_image
Illuminates PROGRAM I TACK U No. 1 2 3 4 5 6 7 8 9 10 11 122 Press a numeric button to specify the track number.
• To select a track between 1 and 20:
Press the corresponding number on the keypad.
• To select a two-digit track number over 20:
Press >20 then one of the buttons from 2 to 9 to select the "tens" digit. Then press one of the buttons from 0 to 9 to select the "unit" digit.
For example:
• To select track number 25:

• To select track number 30:

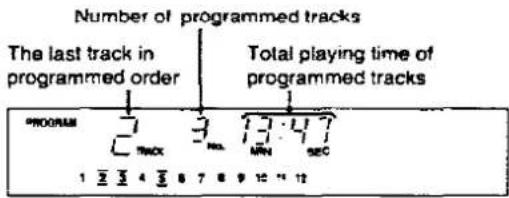
For example, if you press 5. 3. 2.
text_image
Number of programmed tracks The last track in programmed order Total playing time of programmed tracks PROGRAM 1 2 3 4 5 6 7 8 9 10 11 12 TRACK 13:47 MIN SECIf you press a wrong number by mistake, press CLEAR.
- When the 33rd program has been performed, the following display indicates that no more tracks can be added

text_image
PROGRAM - F 1 2 3 4 5 6 7 8 9 10 11 12- If the total playing time exceeds 99 minutes 59 seconds or if the track number 33 or higher has been specified, the display reads as follows:

text_image
PROPER 32 1 2 3 4 5 6 7 8 9 10 11 12 13 14 15 16 17 18 19 203 Press ▶ PLAY to start.
- The unit stops automatically when all the programmed tracks have finished playing.
- Even after play is completed, the program sequence will remain in the unit's memory. You can play the sequence again by pressing ▶ PLAY
To switch to sequential mode during play
Press PROGRAM.

This clears all programmed contents from memory.
To cancel the program play mode
Press ■ STOP.

Press once in the stop mode and twice during play.
This clears all programmed contents from memory.
Turning off the power will also cancel the program play mode.
To confirm the program
Press RECALL.

Each time you press RECALL, the display shows programmed track number and its sequence, so that you can verify the entire program.
For example:
The diagram shows a program consisting of tracks 5, 3, 2.
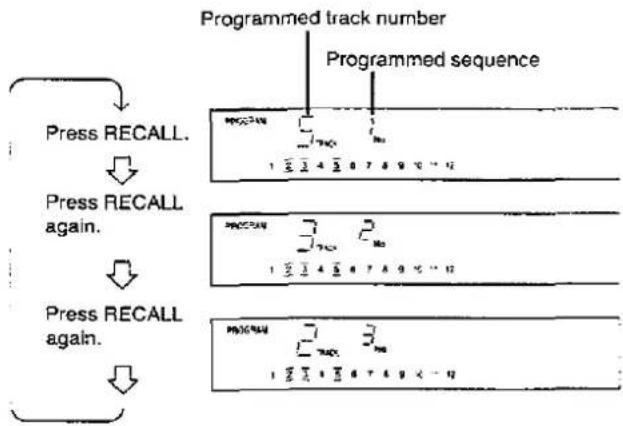
flowchart
graph TD
    A["Press RECALL"] --> B["Press RECALL again."]
    B --> C["Press RECALL again."]
    D["Programmed track number"] --> E["Programmed sequence"]
    E --> F["1 2 3 4 5 6 7 8 9 10 ... 12"]
    G["Press RECALL"] --> H["Press RECALL again."]
    H --> I["Press RECALL again."]
    J["Press RECALL"] --> K["Press RECALL again."]
    K --> L["Press RECALL again."]
The normal display will resume in about 4 seconds.
To enter additional tracks
Press a numeric button to specify the track number.
(See page 14.)
To clear the entry
■ To clear the last track in the sequence, press CLEAR in the stop mode.

■ To cancel a track in the middle of the sequence, press RECALL repeatedly until the display shows the track number to be cancelled, then press CLEAR.


■ To cancel all the programmed tracks, press PROGRAM twice in the stop mode and return to step 2 on the previous page.

Search Function
text_image
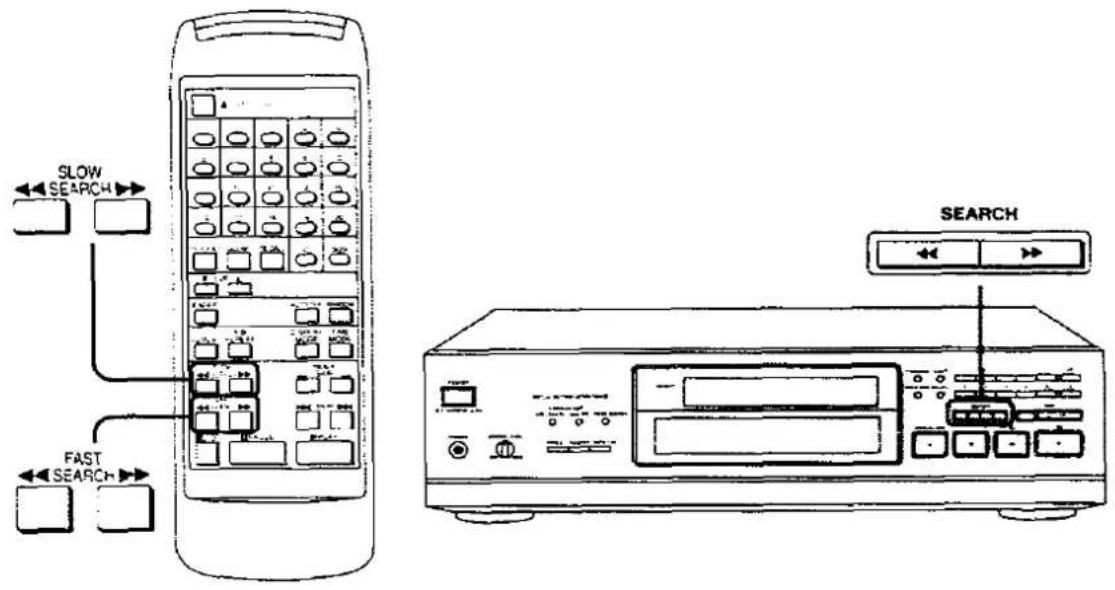
SLOW SEARCH FAST SEARCH SEARCHIn play or pause mode, you can search rapidly forward or backward on the disc for specific sections.
From the remote control
To search at slow speed, press ◀◀ SLOW SEARCH ▶▶.
(Backward)
(Forward)
To search at high speed, press ◀FAST SEARCH ▶.
(Backward)
(Forward)
- In the pause mode, no sound is heard. It remains at the point where you release the button.
• In the random and program play mode:
You can search forward and backward within the track in play.
• During A-B repeat play (see page 19):
You can search out of the range between A and B.
From the main unit
Press ◀◀ SEARCH ▶▶.
SEARCH
(Backward)
(Forward)
You can search slowly at first and then rapidly if the button is held down for more than about three seconds.
Skip Function
text_image
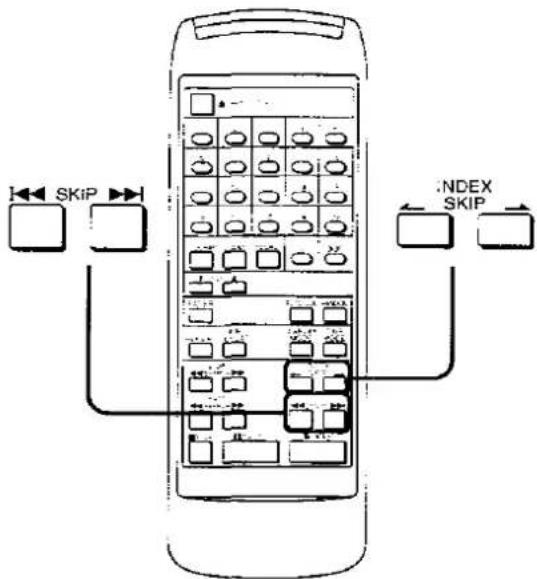
SKIP INDEX SKIPTo skip tracks
(Also available from the main unit).
To skip forward, press SKIP ▶▶.

You can skip as many tracks as the number of times you press the button.
To skip backward, press SKIP.

You can skip to the beginning of the track being played. If you press this button again quickly, you can skip to the beginning of the previous track. Remember that in a backward skip, the track in play is included in the count.
•In the pause mode:
The unit will move to the beginning of the selected track and switch back to the pause mode.
•In the stop mode:
The unit displays only the selected track number. Press ▶ PLAY to start.
•in the program play mode:
You can skip forward and backward in the programmed sequence.
•In the random play mode:
▶▶: You can skip to the beginning of a track in random manner.
You can skip to the beginning of the track in play.
Index skip
Index skip works with discs which have the INDEX mark printed on their liner notes.
Press ← INDEX SKIP → .
(Backward)
(Forward)
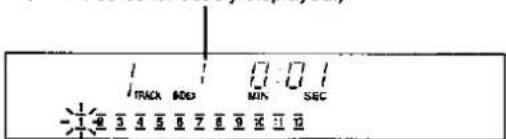
Index number
(For discs without index numbers,
“!”will be continuously displayed.)
text_image
1 TRACK ADD MIN SEC -1 2 3 4 5 6 7 8 9 10 11 12Special Features
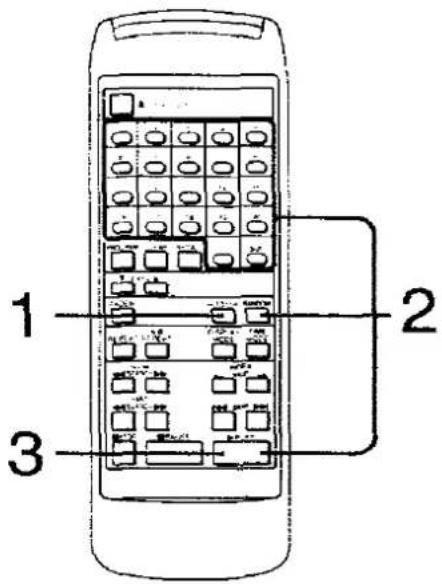
text_image
1 2 3Auto cue
The auto cue function allows the unit to wait in a standby condition at the beginning of each track so as to start play right when you are ready.
When each track finishes playing, the unit skips to the beginning of the next track and switches to the play standby mode.
(Also available from the main unit)
1 Press AUTO CUE.
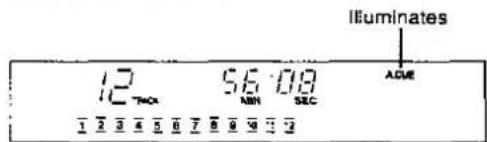
text_image
Illuminates TIMA 56:08 MIN SEC 1 2 3 4 5 6 7 8 9 10 11 12■ To cancel auto cue
Press AUTO CUE again.

Note:
The auto cue may fail to function at the proper point if the selected track begins with a very soft passage or if there is a lot of background noise.
2 Select the desired play mode.
• To play desired track, press the numeric button.
■To play the disc randomly, press RANDOM.
• To play track 1. press ▶ PLAY.
(Also available during program play. See page 14.)
The unit switches to the play standby mode.
Illuminates
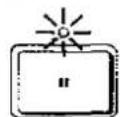
Flashes
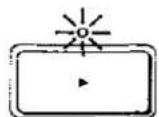
3 Press ▶ PLAY to start.
Press ▶ PLAY at the beginning of each track.
text_image
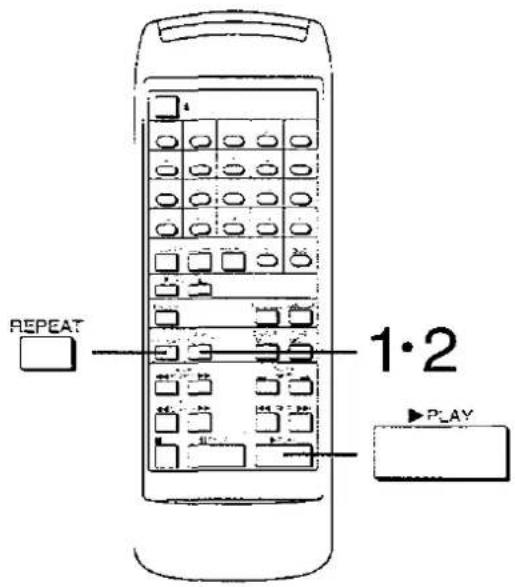
REPEAT 1·2 PLAYRepeat function
■ To repeat tracks
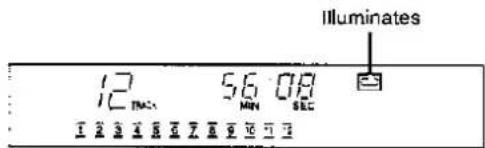
Press REPEAT. (Also available from the main unit)
text_image
Illuminates 12 56 08 MAC Mon SEC I I I I I I I I I I I I I I I I I I I I I I I I I I I I I I I I I I I I I I I I I I I I I I I I I I I I I I I I I I I I I I I I I IDuring program play. the unit plays only the programmed tracks repeatedly.
To cancel repeat function, press REPEAT again.

■ A-B repeat play
You can specify the beginning point (A) and the ending point (B) of the section and repeat only that section.
This function works during sequential and direct access play.
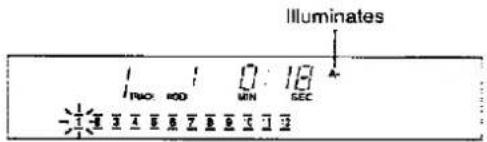
1 During play, press A-B REPEAT at the point where you want the repetition to begin.
text_image
Illuminates I_RHO = 0.00 0:10 MIN SEC -1 3 4 5 6 7 8 9 10 11 122 Press A-B REPEAT again at the point where you want the repetition to end.
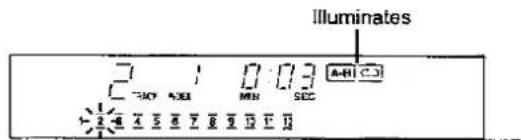
The unit will play the section between A and B repeatedly.
text_image
Illuminates A-H1 CJ MIN SEC 2-4 5 6 7 8 9 10 11To cancel the A-B repeat, press A-B REPEAT again.

Hint:
To return to the (A) point during A-B repeat play, press ▶ PLAY. You can specify only the beginning point (A). Press ▶ PLAY to skip to (A) point. (Cue memory function)
Notes:
●A-B repeat function and cue memory function do not work on the program play and random play modes.
- A search can be conducted outside the A-B range during A-B repeat play. (The A-B repeat indicator remains lighted.)
Special Features (continued)
text_image
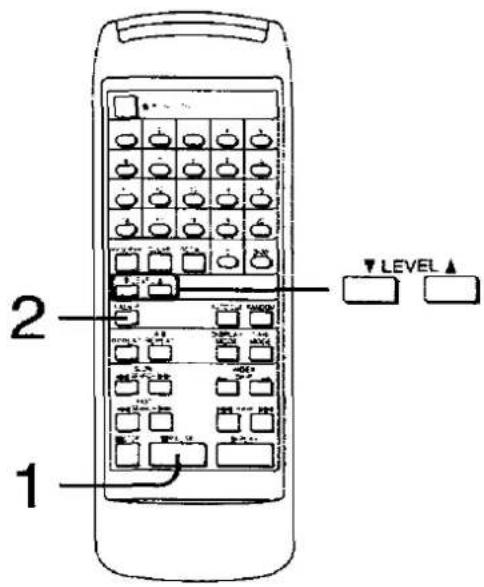
1 2 LEVEL▲Fade in/out function
The fade in function enables the unit to start playing quietly, then gradually increase the volume.
The fade out function enables the unit to end play with the sound gradually becoming smaller.
Fade in
1 Press II PAUSE at the point where you want to start play.
2 Press FADER to start.
The play begins with a 5-second fade-in.
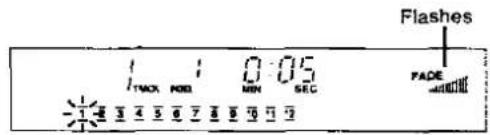
text_image
Flashes 1 1 0.05 TMAX MBD MIN SEC FADE -1-8 3 4 5 6 7 8 9 10 11 12■ Fade out
Press FADER during play.
The play ends with fade out of 5 seconds, then the unit goes into the pause mode.
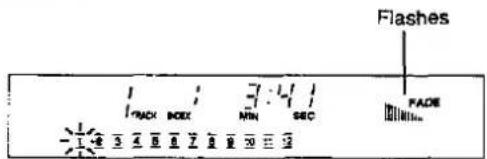
text_image
Flashes PACK BOX MIN SEC FADE -1/3 4 6 8 7 8 9 10 11 12Note:
During auto cue mode, activating the fade in/fade out function will cancel the auto cue function.
Output level control
The output level can be temporarily decreased by this means, instead of adjusting the volume of the amplifier.
Press ▼ LEVEL to lower the output level.

You can reduce the output level from 0 dB (normal level) down to -12 dB by 2 dB steps.
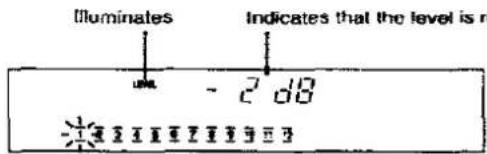
text_image
Illuminates Indicates that the level is n - 2 00 -1 1 1 1 1 1 1 1 1 1 1 1The display returns to the original state after about 2 seconds. When the power is switched off and then switched back on again, the level returns to 0 dB.
To raise the output level, press LEVEL ▲.

Note:
This unit is designed so that the output level cannot be adjusted in the edit mode to avoid changing the recording level.
text_image
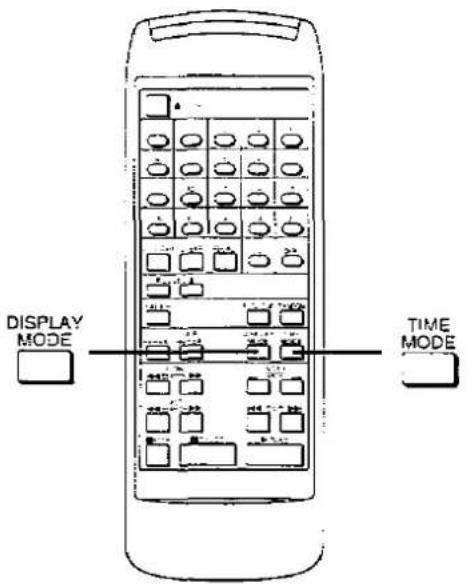
DISPLAY MODE TIME MODEDisplay off/on
(Also available from the main unit)
Press DISPLAY MODE to turn off the indication.
text_image
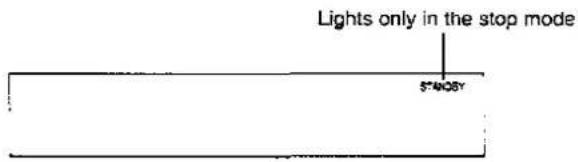
Lights only in the stop mode 5°408YIf you press one of the function buttons, the normal display will resume for about 4 seconds. When the power is switched off and then switched back on again, the display will resume.
Press DISPLAY MODE to resume the indication.

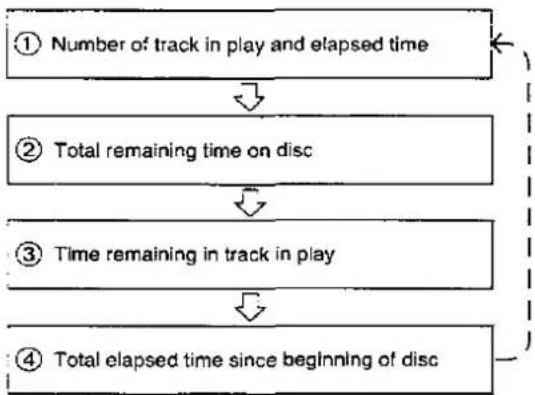
Time mode selection
Press TIME MODE in the play or pause mode.
Each time you press the button, the information will change as follows.
flowchart
graph TD
    A["① Number of track in play and elapsed time"] --> B["② Total remaining time on disc"]
    B --> C["③ Time remaining in track in play"]
    C --> D["④ Total elapsed time since beginning of disc"]
- When the track in play is number 33 or higher:
The “----:--” Indication will appear on display ③
•in the random play mode:
The "----:" indication will appear on display ② and "--:--" on display ④.
• In the edit mode:
The remaining time of each side of the tape will appear on display ②.
• In the program play mode:
The information displayed on displays ② and ④ is only within the programmed tracks.
Recording from Compact Discs
The edit function of this unit is used when recording from compact discs to tape. Tracks can be recorded on both sides (sides A and B) of the tape, considering the length of the tape used, so that there is no interruption of tracks at the end of one tape side.
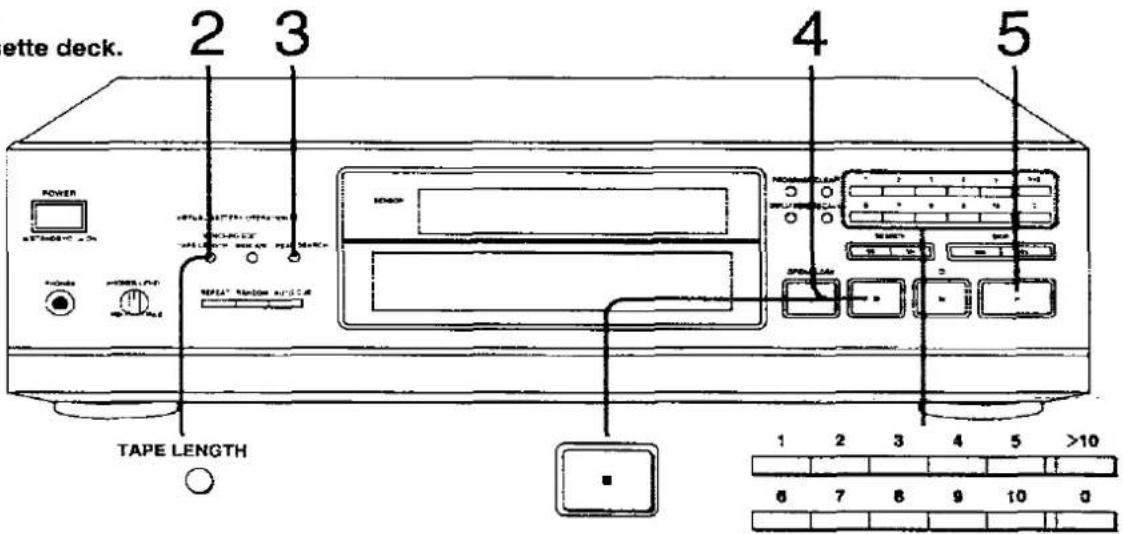
1 Prepare the cassette deck.
text_image
ette deck. 2 3 4 5 POWER TAPES LENGTH TAPE LENGTH 1 2 3 4 5 >10 6 7 8 9 10 0Sequential recording (Automatic editing)
If you use this unit in combination with the Technics cassette deck which has the SYNCHRO EDIT terminal, recording on the cassette deck will start automatically at the same time you start CD play. (Synchro recording function)
Also, if you set the cassette deck to the auto-reverse mode, both sides of the tape will automatically be recorded.
The maximum numbers of tracks allowable for editing is 32 and the biggest track number allowable for editing is 32. The edit function does not work for more than 32 tracks nor the track number over 32.
1 Prepare the cassette deck for recording. (See next page.)
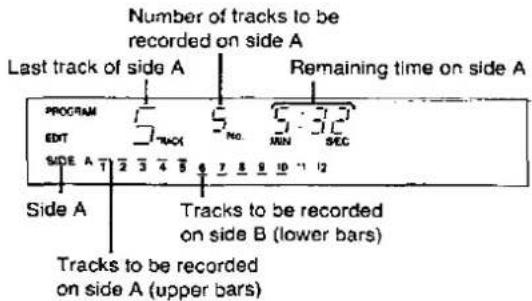
2 Press TAPE LENGTH to select the tape length. Each time the button is pressed the tape length indicator changes as follows. Choose the length of the tape to be used.

● To enter desired recording time, see next page.
●The unit will calculate how many tracks can be entered onto tape side A and B, and then program them automatically.
text_image
Number of tracks to be recorded on side A Last track of side A Remaining time on side A PROGRAM EDIT 5 7 3 4 5 6 7 8 9 10 11 12 SEC 5:32 5 NO. 5 TRACK SIDE A 1 2 3 4 5 6 7 8 9 10 11 12 Side A Tracks to be recorded on side B (lower bars) Tracks to be recorded on side A (upper bars)- In the edit mode, silent gaps of approximately 4 seconds will be automatically inserted between tracks automatically (Auto space function)
- To enter additional tracks at the tape end of side B, see "To change the programmed contents" on page 25.
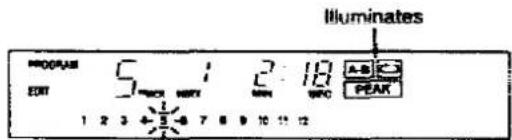
3 Press PEAK SEARCH to search for the peak point then adjust the recording level on the cassette deck.
It takes about 1.5 minutes to find the peak point for a 60-minute compact disc.
text_image
PROGRAM EDIT 5:1 2:18 A B C PEAK 1 2 3 4 5 6 7 8 9 10 11 12 Illuminates- When the peak point is found, the unit repeatedly produces the sound for about 6 seconds around the peak point.
- As there are many peak points on the disc, each time you make a new peak level search the unit might find a different point as the peak point.
(Refer to operating instructions for the cassette deck to find out how to adjust the recording level.)
4 Press stop button (■).
5 Press play button (▶) to start.
Recording on the cassette deck will start at the same time
- If the cassette deck is set to the auto-reverse mode, recording from tape side B will follow automatically.
- When recording from tape side B is finished, the CD player will automatically stop and the cassette deck will switch to recording standby mode.
To cancel the edit mode
Press stop button (■) after recording has finished.
How to prepare the cassette deck for recording
- Insert the cassette tape into the cassette holder of the deck for the synchro-edit-recording. (Be sure the tape is rewound.)
- Select the noise-reduction system and the reverse mode (C=).
- Check to be sure that the forward-side indicator (▶) of the deck to be used is illuminated.
- Set the cassette deck to the recording standby mode. (Refer to operating instructions for the cassette deck to be used.)
If the cassette deck has no SYNCHRO EDIT terminal
Press the play button of the cassette deck at the same time as pressing play button (▶) on the CD player to start recording.
- When the deck has reverse mode, set to one-way ( = ).
- When the recording for side A is finished, the CD player will go to the pause mode. The cassette deck will keep recording.
- To record on side B, first press the stop button on the cassette deck, then start recording again on side B while at the same time pressing play button (▶) on the CD player.
To enter desired recording time other than 46, 60 or 90 minutes
Press TAPE LENGTH to select "C---" then press the numeric buttons to enter the tape's total playing time in minutes.

text_image
TAPE LENGTH 1 2 3 4 5 >10 6 7 8 9 10 0For example: To enter C-52, press 5 → 2
If you make a mistake, select "C----" again and enter the correct number.
Recording from Compact Discs (continued)
text_image
1 Prepare the cassette deck. 2 Enter the track numbers. 3 4 5 Adjust the recording level. 6 CLEAR 1 2 3 4 5 >10 RECALL 6 7 8 9 10 0 POWER AC/DC/DC/DC/DC SINN SINN BLACK BLK OFF/ON/OFF OFF/ON/OFF OFF/ON/OFF OFF/ON/OFFProgram editing
You can make an original tape consisting of your favorite tracks, in any sequence desired.
The maximum number of tracks allowable for editing is 32 and the biggest track number allowable for editing is 32. The edit function does not work for more than 32 tracks nor the track number over 32.
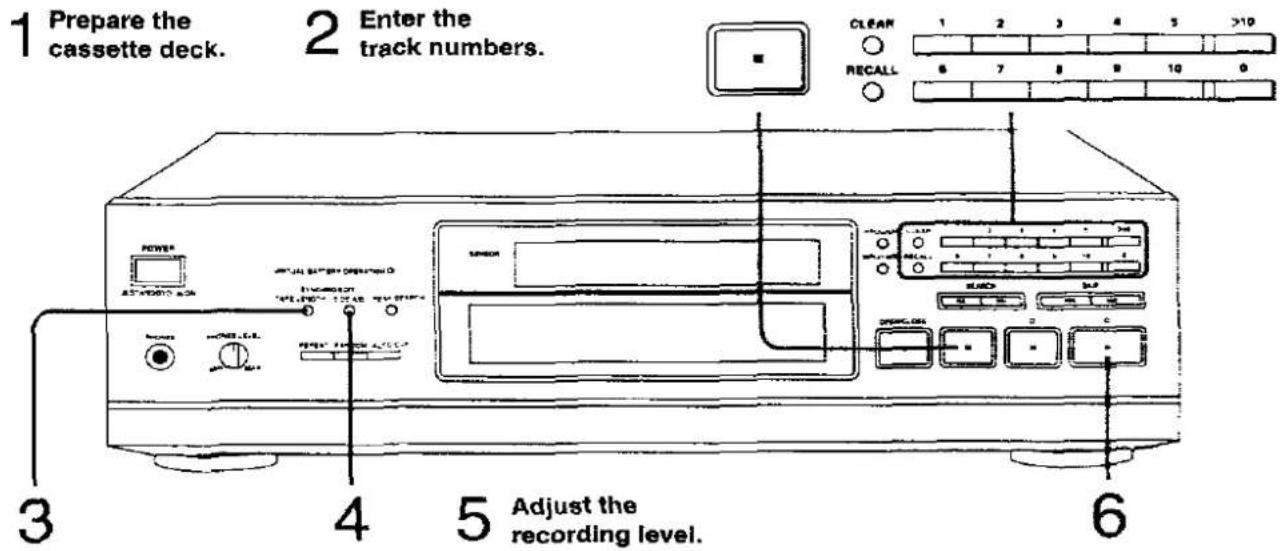
1 Prepare the cassette deck for recording.
(See page 23.)
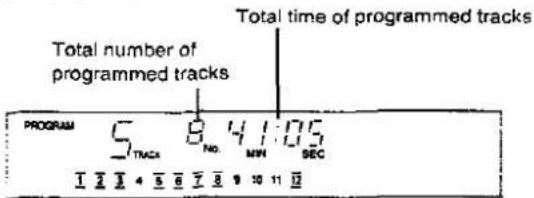
2 Enter the desired track numbers and the desired sequence.
(See page 14.)
text_image
Total number of programmed tracks Total time of programmed tracks PROGRAM 5 NO. 41:05 TRACK SEC I I I I 4 5 6 7 8 9 10 11 12In the edit mode, silent gaps of approximately 4 seconds will be automatically inserted between tracks automatically. (Auto space function)
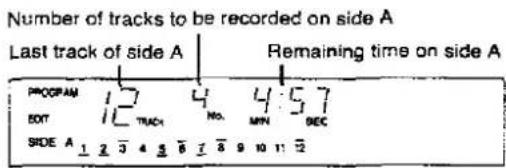
3 Press TAPE LENGTH to select the tape length. (See step 2 on page 22.)
text_image
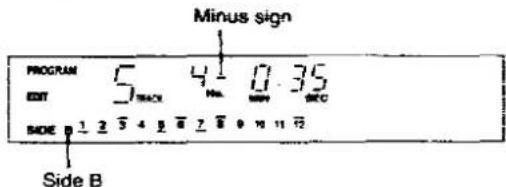
Number of tracks to be recorded on side A Last track of side A Remaining time on side A PROGRAM 12 4 4:57 EXIT 11 TRACK No. MIN DEC SIDE A 1 2 3 4 5 6 7 8 9 10 11 124 Press SIDE A/B to view the time remaining on side B.
A minus (−) sign on the remaining time display indicates that the total time of programmed tracks exceeds the tape length, and the programmed contents should be changed. (See page 25.)
text_image
MINUS sign PROGRAM 5 4 0.35 EDIT TIME MIN MIN MIN SIDE 1 2 3 4 5 6 7 8 9 10 11 12 Side B5 Adjust the recording level on the cassette deck.
(Follow steps 3 and 4 on page 22.)
6 Press play button (▶) to start.
Recording on the cassette deck will start at the same time
- If the cassette deck is set to auto-reverse, recording on tape side B will begin automatically.
- When recording on tape side B has finished, the CD player will automatically stop and the cassette deck will switch to recording standby mode.
To cancel the edit mode
Press stop button (■) after recording has finished.
If the cassette deck has no SYNCHRO EDIT terminal
Press the play button of the cassette deck at the same time as pressing play button (▶) on the CD player to start recording.
- When the deck has reverse mode, set to one-way ( ).
- When the recording for side A is finished, the CD player will go to the pause mode. The cassette deck will keep recording.
•To record on slide B, first press the stop button on the cassette deck, then start recording again on slide B while at the same time pressing play button (▶) on the CD player.
To change the programmed contents
■ Press SIDE A/B to indicate the desired tape side.
SIDE A/B
■ To enter additional tracks at the end of side A or B, press the numeric button.
(See page 14.)
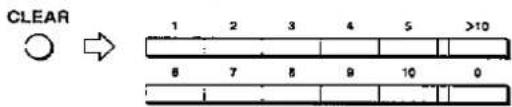
■ To clear the last track on the tape side A or B, press CLEAR.
CLEAR ◯
■ To clear and re-enter the last track on side A or B, press CLEAR and press the numeric button for the new track.
text_image
CLEAR 1 2 3 4 5 >10 6 7 8 9 10 0 i■ To clear a track in the middle of the sequence, press RECALL to display the track number to be cleared and then press CLEAR.
RECALL ◯ → CLEAR
Concerning Compact Discs
Only compact discs having this mark can be used with this unit.

Handling precautions
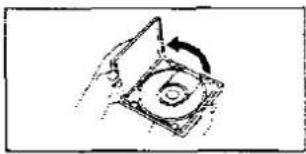
To open the case, gently press the sides of the top, holding the top at both sides.
natural_image
Hand holding a circular object with an arrow indicating rotation (no text or symbols)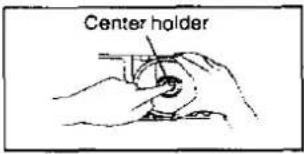
text_image
Center holder- To remove the disc from the case, press the center holder and lift the disc, holding by the edges.
- To return the disc to the case, insert the disc with label facing up and press downward at the center.
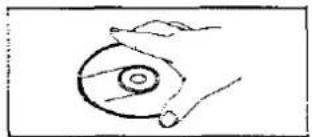
- Hold compact discs by the edges so the surface is not soiled with fingerprints. Fingerprints, dirt and scratches can cause skipping and distortion.
natural_image
Simple line drawing of a hand holding a circular object with a ring (no text or symbols)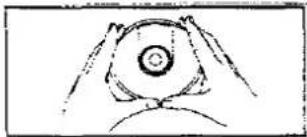
natural_image
Simple line drawing of a hand holding a circular object with a central dot (no text or symbols)- Do not use record cleaning sprays, benzine, thinner, static electricity prevention liquids or any other solvent.
- If the surface is soiled, wipe gently with a soft, damp (water only) cloth.
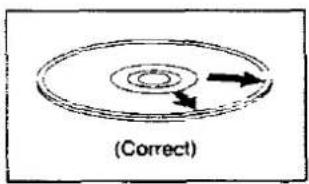
●Always move the cloth directly outward from the center of the disc, not in a circular motion as with standard phonograph records.
text_image
(Correct)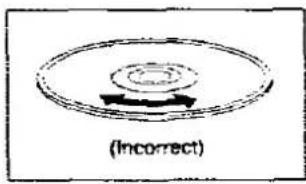
text_image
(Incorrect)- If the disc is brought from a cold to a warm environment, moisture may form on the disc. Wipe this off with a soft, dry, lint free cloth before using the disc.
- Do not write on the label side with a ball-point pen or other writing instrument.
Storage precautions
Be sure to store discs in their cases to protect them from dust, scratches and warping.
Do not place or store discs in the following places:
1) Locations exposed to direct sunlight
2) Humid or dusty locations.
3) Locations directly exposed to a heat outlet or heating appliance.
4) In the glove compartment or rear ledge of an automobile.
Maintenance
To clean this unit, use a soft, dry cloth. If the surfaces are extremely dirty, use a soft cloth, dipped into a soap-and-water solution or weak detergent solution. Wring the cloth well before wiping the unit. Wipe once again with a soft, dry cloth.
Never use alcohol, paint thinner, benzine, nor a chemically treated cloth to clean this unit.
Such chemicals may damage the finish or your unit.
Technical Specifications
Audio
No. of channels 2 (left and right, stereo)
Frequency response 2-20.000 Hz, ±0.3 dB
Output voltage 2.3 V (at 0 dB)
Dynamic range 99 dB
S/N 118 dB
Harmonic distortion 0.0015% (1 kHz, 0 dB)
Total harmonic distortion 0.0018% (1 kHz, 0 dB)
Channel separation 110 dB
Wow and flutter Below measurable limit
DA converter Advanced MASH (1 bit)
Output impedance Approx. 1 kΩ
Load Impedance More than 10 kΩ
Headphone output level 15 mW max. 32Ω (adjustable)
Pickup
Wavelength 780 nm
Laser Power No hazardous radiation is emitted
(with safety protection)
■ General
Power consumption 17 W
Power supply
For Europe, Australia and
New Zealand: AC 50/60 Hz, 230–240 V
For others: AC 50/60 Hz, 110 V/127 V/220 V/240 V
Dimensions (W×H×D) 430×125×335 mm
Weight 6.3 kg
MASH is a trademark of NTT.
Note:
Specifications are subject to change without notice
Weight and dimensions are approximate
For United Kingdom
This apparatus was produced to BS 800.
Troubleshooting Guide
Before requesting service for this unit, check the chart below for a possible cause of the problem you are experiencing. Some simple checks or a minor adjustment on your part may eliminate the problem and restore proper operation If you are in doubt about some of the check points, or if the remedies indicated in the chart do not solve the problem, refer to the directory of Authorized Service Centers (enclosed with this unit) to locate a convenient service center, or consult your dealer for instructions.
| Problem | Probable cause(s) | Suggested remedy |
| The disc in the unit will not play. | Moisture has condensed in the unit. | ●Switch ON and allow the unit to dry out for about one hour before using the unit. |
| The disc is upside down. | ●Be sure the label is facing upward. | |
| The disc is dirty. | ●Wipe the disc with a soft cloth. | |
| The disc is scratched. | ●Replace the disc with a new disc. | |
| The disc is warped | ||
| The disc is not within specified standards. | ||
| A certain music passage won't play correctly. | The disc is dirty. | ●Wipe the disc with a soft cloth. |
| The disc is scratched. | ●Replace the disc with a new one. | |
| There is noise from the tuner or disturbance on the TV screen. | Caused by high-frequency signals of this unit. | ●Use the unit farther away from the tuner or TV.●If the tuner's or TV's antenna is the indoor type, use an outdoor one. |
| Remote control does not operate correctly. | The batteries are dead. | ●Replace batteries with new ones. |
| There is an obstruction between the remote control and the unit. | ●Remove the obstruction. | |
| The batteries are inserted incorrectly.[The (+) and (−) polarities are reversed.] | ●Reinsert batteries so that the polarities are correct. | |
Before Transporting the Unit
To safeguard against damage in transit, be sure to secure the optical pickup by following the procedure below.
1 Remove the compact disc inside, and set the power switch to STANDBY ○ with the disc tray still open.
2 Slowly push in the disc tray by hand.
Do not tilt the unit while doing this.
If the disc tray is not pushed in slowly, the optical pick-up may not be secured properly.
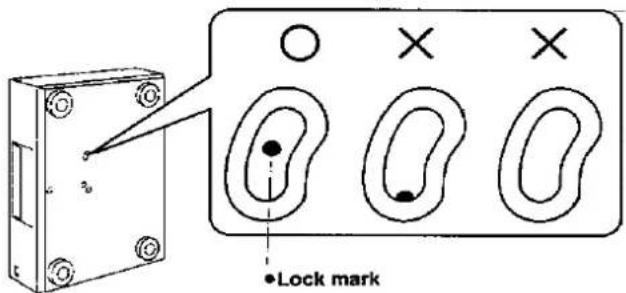
3 Check that the lock mark can be seen in its entirety as shown in the figure on the right.
The optical pickup will be automatically released when using the unit again.
text_image
Lock mark482
Matsushita Electric Industrial Co., Ltd.
Central P.O. Box 288, Osaka 530-91, Japan