
RQ-SX1V - Hi-Fi-System PANASONIC - Kostenlose Bedienungsanleitung
Finden Sie kostenlos die Bedienungsanleitung des Geräts RQ-SX1V PANASONIC als PDF.


Benutzerfragen zu RQ-SX1V PANASONIC
0 Frage zu diesem Gerät. Beantworten Sie die, die Sie kennen, oder stellen Sie Ihre eigene.
Eine neue Frage zu diesem Gerät stellen
Laden Sie die Anleitung für Ihr Hi-Fi-System kostenlos im PDF-Format! Finden Sie Ihr Handbuch RQ-SX1V - PANASONIC und nehmen Sie Ihr elektronisches Gerät wieder in die Hand. Auf dieser Seite sind alle Dokumente veröffentlicht, die für die Verwendung Ihres Geräts notwendig sind. RQ-SX1V von der Marke PANASONIC.
BEDIENUNGSANLEITUNG RQ-SX1V PANASONIC
text_image
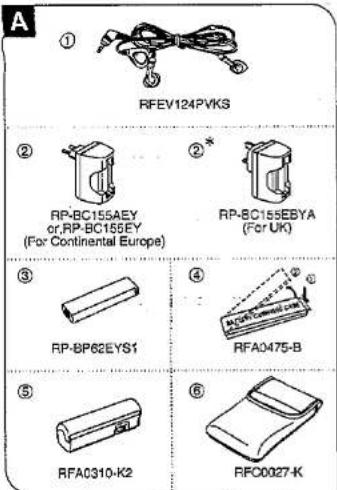
A ① RFEV124PVKS ② RP-BC155AEY or,RP-BC155EY (For Continental Europe) ③ RP-BP62EYS1 ④ RFA0475-B ⑤ RFA0310-K2 ⑥ RFC0027-KPanasonic®
Stereo Radio Cassette Player
RQ-SX1V
Operating Instructions
Note:
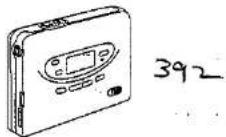
The "EB" Indication shown on the packing case indicates United Kingdom.

Before connecting, operating or adjusting this product, please read these instructions completely.
Matsushita Electric Industrial Co., Ltd.
Central P.O. Box 288, Osaka 530-91, Japan
Printed in Japan
RQT2717-B F1294N0
text_image
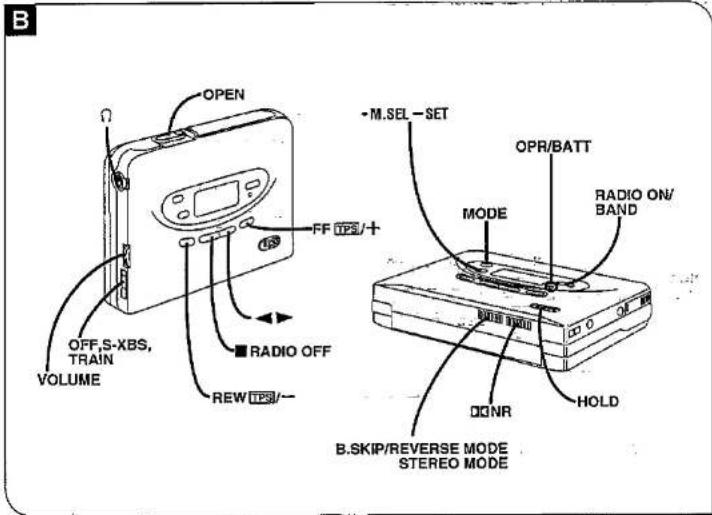
B OPEN OFF,S-XBS, TRAIN VOLUME ■ RADIO OFF REW I25/-- -M.SEL-SET OPR/BATT MODE RADIO ON/ BAND DONR HOLD B.SKIP/REVERSE MODE STEREO MODE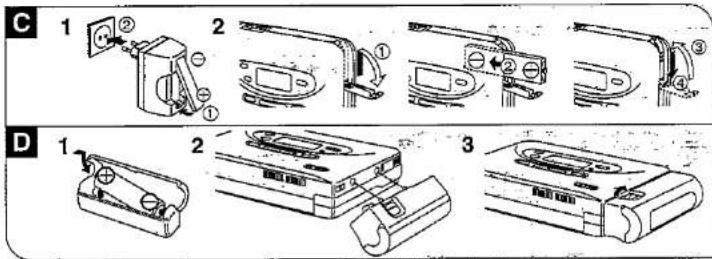
text_image
C 1 2 ① ② ③ D 1 2 3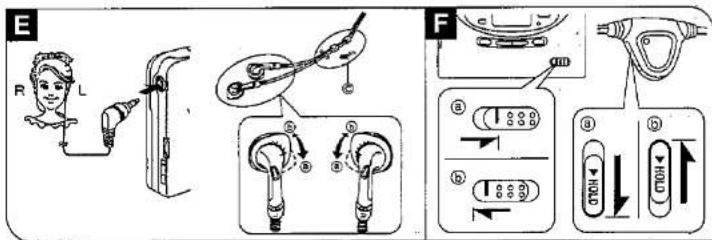
text_image
E R L F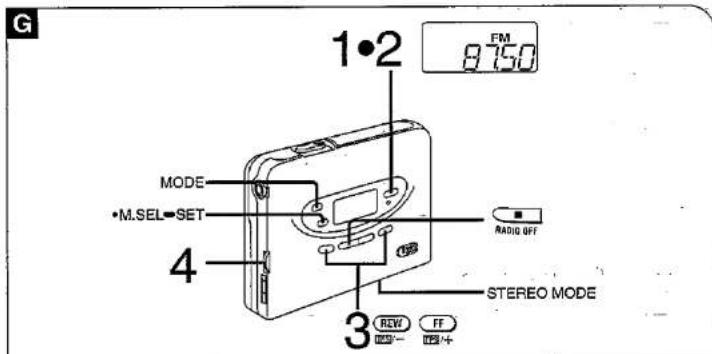
text_image
G 1·2 FM 8750 MODE •M.SEL→SET 4 RADIO OFF STEREO MODE 3 REW FF +
text_image
H M 7 8:00 FM ③ENGLISH
Supplied Accessories
① Stereo earphones with remote controller
② Charger
③ Rechargeable battery
- This one is in the carrying case (④).
④ Rechargeable battery carrying case
⑤ Dry cell battery case
⑥ Carrying bag
Precautions
Avoid using or placing this unit near sources of heat. Do not leave it in an automobile exposed to direct sunlight for a long period of time with the doors and windows closed, as this may deform the cabinet.
Precautions for Listening with the Headphones
- Do not play your headset at a high volume. Hearing experts advise against continuous extended play.
- If you experience a ringing in your ears, reduce volume or discontinue use.
- Do not use while operating a motorized vehicle. It may create a traffic hazard and is illegal in many areas.
- You should use extreme caution or temporarily discontinue use in potentially hazardous situations.
- Even if your headset is an open-air type designed to let you hear outside sounds, don't turn up the volume so high that you can't hear what's around you.
- Load new battery with their polarities (⊕ and ⊖) aligned correctly.
- Do not apply heat to betteries, or internal shortcircuit may occur.
- If this unit is not to be used for a long period of time, remove the batteries and store them in a cool and dry place.
- Remove spent batteries immediately.
Do not peel of the plastic covering on the rechargeable battery. Short-circuiting may result which is dangerous.
Notice about the rechargeable battery
The battery is designated recyclable.
Please follow your local recycling regulations.
Carrying batteries around
When putting dry batteries and rechargeable battery in a pocket or bag, ensure that no other metal objects such as a necklace be placed together with them. Contact with metal may cause short-circuiting which, In turn, may cause a fire. The same caution needs to be heeded with the battery case containing a dry battery. When carrying rechargeable batteries around, be absolutely sure to place them inside the included rechargeable battery carrying case.
Power Sources
This unit operates on either the rechargeable battery (included) or a dry cell battery (not included).
Rechargeable battery
For initial use after purchase or after a long interval (more than three months), be sure to recharge the rechargeable battery.
Normally, 2 hours of recharging will give approximately 4 hours of cassette tape playback (at 25°C). However, playback time may become shorter depending on the operating conditions, e.g. repeating fast-forward or rewind, etc.
1 Recharge the rechargeable battery.
- For UK, the shape of the adaptor is different.
2 Insert the charged battery into the unit.
Dry cell battery
1 Insert one R6/LR6 battery (UM-3 or equivalent, not included) into the battery case.
2 Attach the battery case to the unit.
3 Turn the screw until it locks.
■ To extend the playback time
Install both rechargeable and dry cell batteries in the unit.
■ When the battery becomes weak
As the OPR/BATT indicator dims or turns off, recharge the rechargeable battery or replace the dry cell battery with new one.
Before Use
Connecting the stereo earphones E
Unless the earphones are firmly inserted into the jack, the sound may become intermittent, or, operation using the remote controller may become impossible.
The size of the earpiece can be adjusted.
When it's too loose in the ear, turn the fitting ring to Ⓐ, when it's too tight, turn to ⓑ.
When not using the stereo earphones, slide up the slider (©) to prevent entanglement of the cord.
Release from the "hold" state F
With the "hold" function in effect, making every button ineffective, wrong operation and subsequent battery wear can be avoided (①).
Before operation, be sure to slide the HOLD switch on either the main unit or the remote controller with which you are going to operate, so that the "hold" function won't work (6).
Both the main unit and remote controller have a HOLD switch, and each of them works individually.
Listening to Radio
You can enjoy the FM broadcast with stereo sound and AM with monaural.
1 Press RADIO ON/BAND to switch on the power.
2 Press RADIO ON/BAND to select the band. Each press changes the indication between AM and FM.
3 Press FF TPS/+ or REW TPS/— to select the desired station.
Each press changes the frequency one step at a time.
FF TPS/+: Frequency becomes higher.
REW TPS/—: Frequency becomes lower.
To reach the station faster:
Press and hold FF TPS/+ or REW TPS/— for more than one second, and the frequency indication starts to run fast. It stops when a broadcast is received. To end this search, press FF TPS/+ or REW TPS/— one more time.
4 Adjust the volume.
To stop listening, press RADIO OFF.
Note:
If a cassette tape is inserted while listening to the radio, the sound pauses for about two seconds.
To obtain good reception
When listening to AM broadcast:
As the built-in ferrite antenna works, try various directions to catch optimum reception.
When listening to FM broadcast:
As the cord of the earphone acts as an antenna, use it as extended as possible, not coiled.
When there is a noise during FM reception
Set the STEREO MODE selector to the MONO position. Though the sound becomes monaural, noise is reduced.
Preset tuning
■ Storing radio station in the memory
Frequencies of up to 18 radio stations (9 each AM and FM) can be stored.
-
Tune in the station to be stored.
-
Press MODE to have "M" indicated (flashing).
-
While "M" is flashing, press • M.SEL — SET to give the received station a memory number (H-8).
-
While "M" is flashing, press and hold • M.SEL = SET for more than one second.
To store another station in the memory:
Repeat steps 1 through 4 above.
■ Listening to a station stored in the memory
- Press RADIO/ON BAND to switch on the power.
- Press RADIO/ON BAND to select the band.
- Press • M.SEL ■ SET to select the station.
As the button is pressed, the stations stored in the memory are received in order from small to large memory numbers.
■ To remove an unnecessary station from the memory - Tune in the station you want to remove.
- Press MODE to have "---" indicated.
- Press and hold • M.SEL = SET for more than one second.
1
text_image
Forward side Reverse side 1 2 FWD PLAY REW/IPS FF/IPS/+ 3 NR B.Skip/REVERSE MODE RADIO OFFJ
text_image
OFF 5-105 TMM 0.0 0.0K
text_image
OPR VOLUMEL
flowchart
graph TD
    A["RADIO OFF"] --> B["Beep"]
    B --> C["RADIO ON"]
    C --> D["M.SEL"]
    C --> E["BAND"]
    D --> F["Beep Beep"]
    D --> G["Beep"]
    D --> H["Beep"]
    D --> I["..."]
    D --> J["9"]
    E --> K["AM"]
    E --> L["FM"]
    E --> M["Beep"]
    E --> N["Beep"]
M
flowchart
graph TD
    A["STOP"] --> B["PLAY"]
    B --> C["BEep"]
    B --> D["FF"]
    B --> E["REW"]
    C --> F["STOP"]
    C --> G["DIR"]
    D --> H["PLAY"]
    E --> I["PLAY"]
    J["Beep Beep"] --> K["TPS+"]
    L["Beep Beep"] --> M["TPS-"]
N
text_image
Technical diagram showing mechanical assembly steps with labeled components and directional arrows0
text_image
Technical diagram showing a device with labeled components and connections, including a switch, battery, and motor.ENGLISH
Listening to Tape
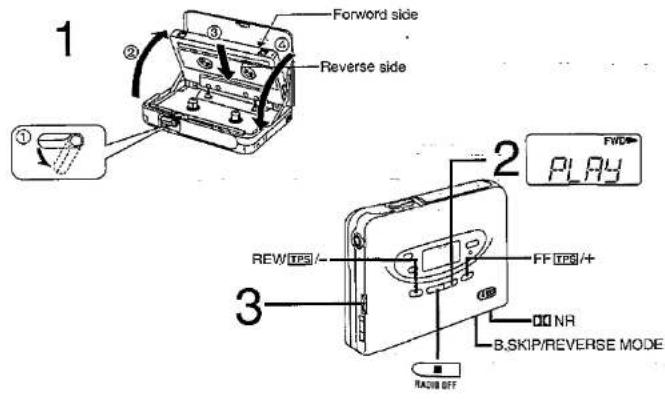
Either normal, CrO_2 or metal cassette can be used. The type of cassette is automatically selected.
1 insert a cassette tape.
Closing the cover, the tape slack will be wound automatically and playback will be expected to start from the forward side.
2 Press ◀ ▶.
Unless the lid is opened and closed, playback starts from the side that was played when the cassette player was switched off.
The indication informs which side of the cassette is in play:
FWD ▶: Forward side
REV: Reverse side
3 Adjust the volume.
To stop playback, press ■.
To fast-forward or rewind
Press FF [IPS]/+ in the stop mode to fast-forward. Press REW [IPS]/- in the stop mode to rewind.
To change the side to play
Press ◀▶ during playback.
\*Dolby noise reduction system
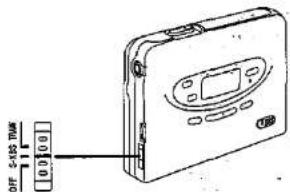
When a cassette recorded with Dolby NR (type B) is played, set the ☐☐ NR selector to the ON position.
•Dolby noise reduction manufactured under license from Dolby Laboratories Licensing Corporation.
"DOLBY" and the double-D symbol □□ are trademarks of Dolby Laboratories Licensing Corporation.
To change the play mode
Select the position of the B.SKIP/REVERSE MODE selector.
ON/
Both sides of the cassette are played continuously. Blank-skip function works.
OFF/→:
The forward and reverse sides of the cassette are played once and then the playback stops.
Blank-skip function doesn't work.
Blank-skip function (B.SKIP):
When a silent part of more than 13 seconds is detected during playback, fast-forwarding automatically starts and then playback of the opposite side of the cassette starts from the beginning.
- When playback is started at the point close to the end of the last song, it may not work properly.
- When small sound continues for more than 13 seconds, the unit may start fast-forwarding. When you listen to a classical music, set the selector to the OFF/→ position to release the Blank-skip function.
To repeat the song currently in play
Press MODE while the song is in play.
To release the above mode:
Press MODE one more time.
To find the beginning of a song
(TPS: Tape Program Sensor)
When the cassette tape is in play:
Press FF TPS/+ to skip the current song and start playing the following song (TPS +).
Press REW TPS/— to go back to the beginning of the current song and start playing (TPS —).
Note:
Since making use of the silent part between songs, the repeating of the song in play and the TPS function may fail to function properly in the following situations:
- When the silent part between songs is less than 4 seconds or has noise.
- When the next silent part is less than 10 seconds away.
- When there is a long silent part or particularly low or small sound in the song.
- When there is a part where the sound gradually goes up or goes down in the song.
Changing the Tone
■ To listen with emphasized low sound (S-XBS)
Set the tone selector to the S-XBS position.
If the sound is distorted, turn down the volume a little.
■ To listen in the train (TRAIN)
Set the tone selector to the TRAIN position.
More natural quality is added to the sound to reduce the fatigue of listening for a long time. Also, leak of the noise from the earphones, which can be unpleasant in the train, is reduced.
Using Remote Controller
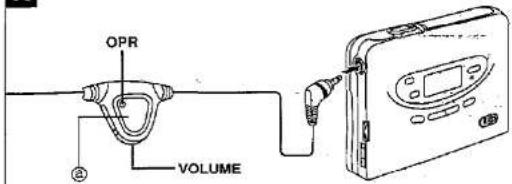
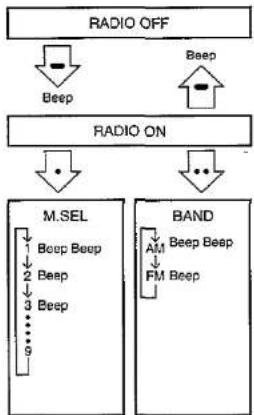
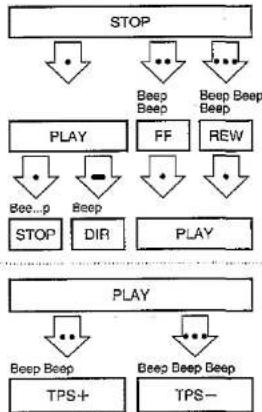
Various radio and cassette player functions can be operated only with one remote control button (⑧) by changing how to press it.
When pressing the button twice or three times in succession, press it within one second and at equal interval.
Confirmation beep can be heard as shown on the figure L and M.
■Before adjusting VOLUME on the remote controller, be sure to set VOLUME on the main unit between the levels 5 and 7.
- The OPR lamp on the remote controller lights up to indicate that the main unit is in operation. (It is not for the indication of battery wear.)
- The beep tone, which is emitted when the button is pressed once in the stop mode, indicates that a cassette is not inserted.
Operating the radio
: Press and hold to switch on and off the radio.
•: Press once to change the memory number.
••: Press twice to change the band.
Operating the cassette player M
•: Press once to play and stop.
-: Press and hold to change the direction.
••: Press twice for last-forward or TPS +
•••: Press three times for rewind or TPS -.
Care and Use
Rechargeable battery and charger:
• Use only the included charger when recharging
- During recharging, it is normal for the charger and the rechargeable battery to get slightly warm.
- Do not leave the charger turned on for more than 24 hours at one time, otherwise, the rechargeable battery life may be shortened.
- Avoid recharging or placing the rechargeable battery near sources of heat or humidity.
- The included rechargeable battery can be recharged about 300 times. After that, its operation time becomes shortened, which will be the time to replace it.
Endless tapes:
Failure to operate these tapes correctly may cause the tape to wind around the revolving pants.
For this unit, it is recommended to use the tape which is appropriate to the auto reverse mechanism.
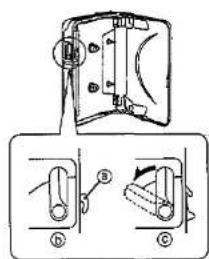
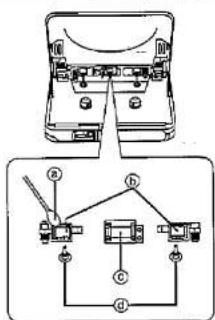
Cassette compartment cover: R
If the catch is in the position shown in the figure ⑤, the cassette compartment cover doesn't close. If this occurs, slide OPEN so that the catch (⑥) is in the position shown in the figure ⑦.
If an attempt is made to close the cover forcibly, the compartment cover may get bent out of shape.
Maintenance
Head care:
To ensure good sound quality for tape operation, be sure to clean the head after approximately every 10 hours of use. Clean it with a cotton swab dampened with a little alcohol. Do not bring metal articles or magnetic material, such as a screwdriver, near the head assembly.
① Cotton swab ② Pressure rollers
⑥ Head. ⑥ Capstans
Main unit:
Clean it with a cloth, dampened in a mild solution of soap and water. Do not clean the cabinet with benzine or thinner. Avoid excessive moisture. Avoid spray aerosol type cleaner. Some cleaners contain corrosive chemicals that may cause internal damage and cabinet deformation.
Specifications
RADIO
Frequency ranges:
AM: 522-1611 kHz
FM: 87.5-109.0 MHz
CASSETTE PLAYER
Track system:
4 back, 2 channel, stereo
Frequency range (Normal/Co/Metal)
15-20,000 Hz (-6 dB)
GENERAL
Output jack:
PHONES
Power output
5 mW + 5 mW
Power requ
(1) 本报告书的摘要、报告内容及正文(包括但不限于全文、公告、公告编号)
Rechargeable battery;
DC 1.2 V (included rechargeable
- 2017年1月1日
battery)
Battery;
DC 1.5 V (one H&LH) 100.6×77.5×52.0 min
Dimension Weight
182 o (with rechargeable battery)
CHARGER
1.2.3.4.5.6.7.8.9.10.11.12.13.14.15.16.17.18.19.20.21.22.23.24.25.26.27.28.29.30.31.32.33.34.35.36.37.38.39.40.41.42.43.44.45.46.47.48.49.50.51.52.53.54.55.56.57.58.59.60.61.62.63.64.65.66.67.68.69.70.71.72.73.74.75.76.77.78.79.80.81.82.83.84.85.86.87.88.89.90.91.92.93.94.95.96.97.98.99.100
input:
AC 220 V (For UK, 240 V)
1.2.3.4.5.6.7.8.9.10.11.12.13.14.15.16.17.18.19.20.21.22.23.24.25.26.27.28.29.30.31.32.33.34.35.36.37.38.39.40.41.42.43.44.45.46.47.48.49.50.51.52.53.54.55.56.57.58.59.60.61.62.63.64.65.66.67.68.69.70.71.72.73.74.75.76.77.78.79.80.81.82.83.84.85.86.87.88.89.90.91.92.93.94.95.96.97.98.99.100
50 Hz, 4 W
Output:
Note:
Specifications are subject to change without notice. Weight and dimensions are approximate.