
DS-9120PMG - Leinwand OPTOMA - Kostenlose Bedienungsanleitung
Finden Sie kostenlos die Bedienungsanleitung des Geräts DS-9120PMG OPTOMA als PDF.


| Produkttyp | Bildschirmleinwand (Projektionsleinwand) |
| Marke | Optoma |
| Modell | DS-9120PMG |
| Diagonale | 120 Zoll (16:9) |
| Bildformat | 16:9 |
| Gehäusematerial | Metall, weiß mit PVC-Beschichtung |
| Leinwandmaterial | Mattweiß, für breiten Betrachtungswinkel und weiche Farben |
| Geschwindigkeitsregelung | Ja (Speed Control) mit Selbstverriegelung |
| Betätigung | Manuell: herunterziehen, 3 Sek. halten, einrasten; zum Einrollen leicht herunterziehen und loslassen |
| Montage | Wand- und Deckenmontage (Schlüssellochaufhängung) |
| Befestigungsarten | Holz- oder Betonwand/-decke, verdeckte Montage möglich |
| Zubehör | 2x 5×40 mm Dübel & Schrauben, 4x 5×60 mm Schrauben, Montageanleitung |
| Sicherheitshinweise | Sichere Montage erforderlich; Leinwand nach Gebrauch aufrollen; nicht auf die Oberfläche schreiben/zeichnen |
| Reinigung | Mit weichem Tuch und lauwarmem Wasser; keine Reinigungsmittel verwenden |
| Verwendung | Bildungseinrichtungen, Heimkino, Besprechungsräume, Kontrollräume |
| Reparatur/Hinweis | Nur vom Fachmann; keine eigenmächtigen Reparaturen |
Häufig gestellte Fragen - DS-9120PMG OPTOMA
Benutzerfragen zu DS-9120PMG OPTOMA
0 Frage zu diesem Gerät. Beantworten Sie die, die Sie kennen, oder stellen Sie Ihre eigene.
Eine neue Frage zu diesem Gerät stellen
Laden Sie die Anleitung für Ihr Leinwand kostenlos im PDF-Format! Finden Sie Ihr Handbuch DS-9120PMG - OPTOMA und nehmen Sie Ihr elektronisches Gerät wieder in die Hand. Auf dieser Seite sind alle Dokumente veröffentlicht, die für die Verwendung Ihres Geräts notwendig sind. DS-9120PMG von der Marke OPTOMA.
BEDIENUNGSANLEITUNG DS-9120PMG OPTOMA
Optoma
Optoma Asia Corporation
5F., No 108, Minchiuan Rd., Xindian City, Taipei 231
Tel: 886-2-2218-2360 Fax: 886-2-2218-2312
Fax: 886-2-22 18-231 www.optoma.com.tw
Optoma USA
715 Sycamore Drive
Milpitas, CA 95035 USA Tel: 408-283-3700
Tel: 408-383-3700 Fax: 408-383-3702
www.optomausa.com
Optoma Europe Ltd.
42 Caxton Way
The Watford Business Park
Watford Hertfordshire WD18 8QZ UK
Tel: +44 (0) 1923 691 800 Fax: +44 (0) 1923 691 888
Fax: +44 (0) 1923 691 888 www.ontoma.co.uk
www.optoma.co.uk

Optoma
natural_image
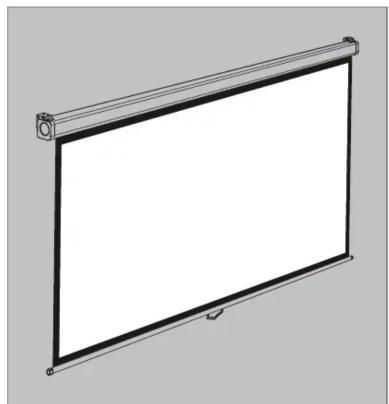
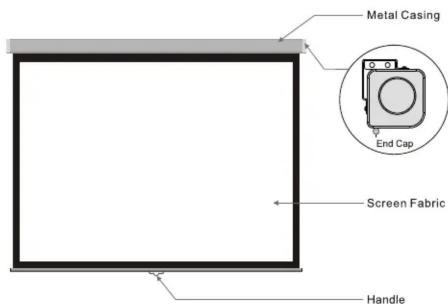
Simple line drawing of a blank rectangular frame with a roller behind it (no text or symbols)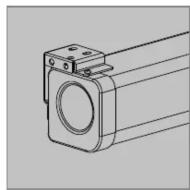
Installation Guide for
Optoma Manual Pull-Down with Speed Control Mechanism
- Easy to operate and reflects vivid and colourful images.
- Applicable for education venues, meeting rooms, control rooms, boardrooms, training facilities and home theatres.
- Specially suited for specific use projectors.
Evaliable Spec
| Model # | Dia.Size | Format | Model # | Dia.Size | Format |
| DS-3072PMG+ | 72" | 4:3 | DS-9084PMG+ | 84" | 16:9 |
| DS-3084PMG+ | 84" | 4:3 | DS-9092PMG+ | 92" | 16:9 |
| DS-3100PMG+ | 100" | 4:3 | DS-9106PMG+ | 106" | 16:9 |
| DS-3120PMG+ | 120" | 4:3 | DS-9120PMG+ | 120" | 16:9 |
Product Safety
To ensure your safety, please read "Product Manual and Warnings"
■ The ceiling or wall used for fixture installation must be secure to prevent the screens from falling.
Please read the following as any damage to the screen surface will affect the quality of the picture:
-
Avoid contact or touching the screen surface as it may cause scratches or tears.
-
Do not write or draw on the surface
-
Clean the screen with a soft cloth and lukewarm water. Do not use any detergent or cleaning products.
■ Roll up the screen after every use.
■ Ensure that the screen is level when installing; do not pull on the sides or fold the screen.
■ To prevent unnecessary damage, the operating and maintenance of the screen should be done by adults.
Product Features
■ Trendy and Elegant
The metal casing is compact and elegant. The white cover is coated with PVC technology that enhances the feel and esthetics.
■ Resolution
The matte white material provide different brightness and viewing ranges, flexible to suit every setting. The matte white allows a wider view range and soft colors.
■ Speed Control
Some manual screens have locking systems that secure screens into place but do not have speed-reducing mechanisms. Screens may retract too fast and damage both the screen and casing. It may cause rips in the screen or the bottom bar to detach. In more serious cases, the whole screen may fall. series are equipped to control both the speed and self-lock, which prevents any damage to screen and casing.
■ Location
It is suited for various venues such as education facilities, home theaters, boardrooms, or other entertainment sites.
Instructions
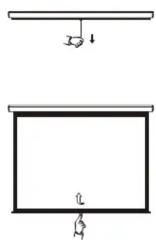
Pull down to the desired height; pause for 3 seconds, and the screen will self-lock.
- Use rope to pull down bottom rod until with in hand reach distance.
- Continue to pull down with hand to desired height, and then hold for 3 seconds.
- To retract screen, pull down lightly to release locking system, let go and the screen will return to casing.
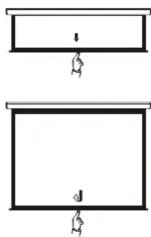
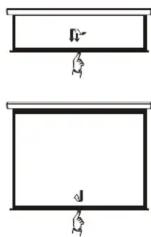
Warnings
| Inn#d | Ignoring the safety warnings may lead to injuries and/or damagingthe product. | Fixtures should be installed in a secure place to avoid accidents or the screen falling. | |
| Inn#d | Please contact your local dealer for repairs or maintenance . Please contact our company if you have any further questions . Avoid taking apart the fixtures yourself . Loose parts may cause the screen to fall. | Roll up the screen after every use . Leaving it hanging for a long period of time may cause the fabric to loosen. |
Do not take apart and replace with unknown parts. If there are any problems, please contact your local dealer. Product specifications are subject to change.
Ceiling Mount
Using a tape measure find out the distance between the two keyholes on the casing (figure 1). According to the measurement, use the drill to drill identical holes of the appropriate size on the ceiling and ensure that it is level (figure 2 & 3). Screw in the hook screws (not provided), and lift the screen into the hook screws to hang (figure 4). To ensure that the screen is level, use a level to check (figure 5).
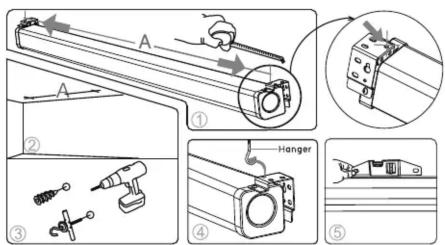
Wall/Ceiling Mounting Installation
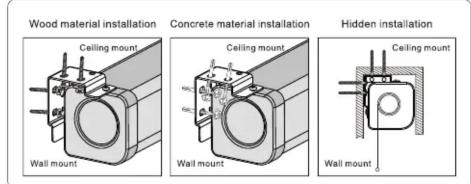
Description
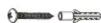
Accessories
■ 5x40mm Screws and Anchors (2)
■ 5x60mm Screw ( 4 )
■ Installation Manual

Installation
- This projection screen should be installed at the best possible viewing position for the audience. Take out all the parts from the packaging and follow the accessories guideline to ensure you have all the parts. The parts needed will vary depending on which installation you choose to use. For installation on a wood wall or ceiling, use 5 x 40 anchors and screws.
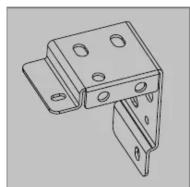
- There are two way for wall brackets to fix on the housing. As you can see on the figure 1, which is our normal fixed way(namely factory set). While the other fixed way is to interchange the left and right wall brackets, and then fix onto the housing(namely functional installation way, as figure 2).
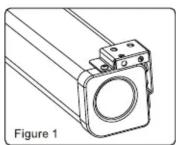
Factory-set installation way
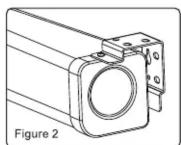
Functional installation way
Installation one (Factory-set installation way)
Wall Mount
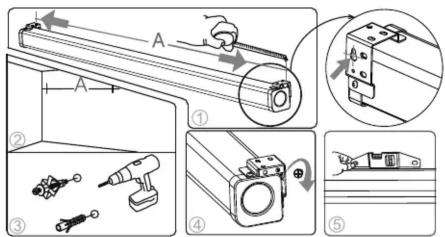
Using a tape measure, measure the distance between the two keyholes on the casing (figure 1). According to the measurement, use the drill to drill identical holes of the appropriate size on the wall (use a smaller drill bit than the actual screws) and ensure that it is level (figure 2 & 3). Screw in the appropriate screws, either 5 × 40 by itself for wood walls or with anchors for drywalls, leaving enough space at the end to hang the casing (figure 4). To ensure that the screen is level, use a level to check (figure 5).
Ceiling Mount
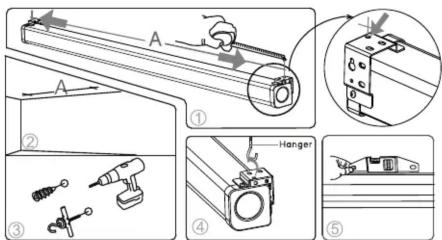
Using a tape measure find out the distance between the two keyholes on the casing (figure 1). According to the measurement, use the drill to drill identical holes of the appropriate size on the ceiling and ensure that it is level (figure 2 & 3). Screw in the hook screws (not provided), and lift the screen into the hook screws to hang (figure 4). To ensure that the screen is level, use a level to check (figure 5).
Installation two (Functional installation way)
For Functional installation way, we can not only use wall mounting, ceiling mounting to fix the housing, but also can just nail the housing onto the wall and ceiling via wall brackets using spare screws. Please make sure that, using this installation way, you have to take off the factory-set wall brackets and then interchange left & right brackets before mounting.
Wall Mount
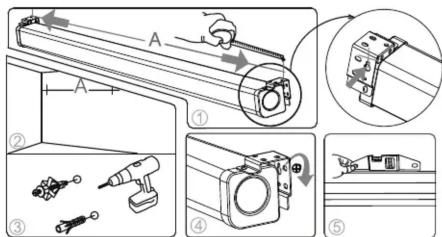
Using a tape measure, measure the distance between the two keyholes on the casing (figure 1). According to the measurement, use the drill to drill identical holes of the appropriate size on the wall (use a smaller drill bit than the actual screws) and ensure that it is level (figure 2 & 3). Screw in the appropriate screws, either 5 × 40 by it self for wood walls or with anchors for drywalls, leaving enough space at the end to hang the casing (figure 4). To ensure that the screen is level, use a level to check (figure 5).

- Optoma Asia Corporation
- Optoma USA
- Optoma Europe Ltd.
- Installation Guide for
- Optoma Manual Pull-Down with Speed Control Mechanism
- Product Safety
- Product Features
- Instructions
- Ceiling Mount
- Installation
- Installation one (Factory-set installation way)
- Wall Mount
- Installation two (Functional installation way)
Marke : OPTOMA
Modell : DS-9120PMG
Kategorie : Leinwand