
ST6100C - Temperaturregler HONEYWELL - Kostenlose Bedienungsanleitung
Finden Sie kostenlos die Bedienungsanleitung des Geräts ST6100C HONEYWELL als PDF.

| Produkttyp | Temperaturregler / Zeitschaltuhr |
| Marke | Honeywell |
| Modell | ST6100C |
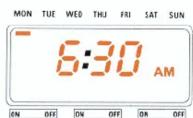
| Display | LCD, 12/24-Stunden-Format umschaltbar |
| Programmierbare Schaltzeiten | 3 Ein/Aus-Zeiten pro Tag, 7-Tage-Programm |
| Betriebsarten | Aus, Auto, Einmal, Dauer |
| Übersteuerungstaste (Override) | Schaltet Gerät manuell ein/aus ohne Programmänderung |
| Extra-Stunden-Taste | Bis zu 3 Stunden Zusatzbetrieb |
| Kopierfunktion | Programm von einem Tag auf andere übertragbar |
| Reset-Taste | Rücksetzung auf Werkseinstellungen |
| Batterie für Netzausfall | Eingebaut, hält Programm bis zu 4 Tage |
| Spannungsversorgung | 230 V AC, 50 Hz |
| Nennstrom | 10 A (typisch) |
| Abmessungen (ca.) | 90 x 90 x 40 mm |
| Gewicht (ca.) | 150 g |
Häufig gestellte Fragen - ST6100C HONEYWELL
Benutzerfragen zu ST6100C HONEYWELL
0 Frage zu diesem Gerät. Beantworten Sie die, die Sie kennen, oder stellen Sie Ihre eigene.
Eine neue Frage zu diesem Gerät stellen
Laden Sie die Anleitung für Ihr Temperaturregler kostenlos im PDF-Format! Finden Sie Ihr Handbuch ST6100C - HONEYWELL und nehmen Sie Ihr elektronisches Gerät wieder in die Hand. Auf dieser Seite sind alle Dokumente veröffentlicht, die für die Verwendung Ihres Geräts notwendig sind. ST6100C von der Marke HONEYWELL.
BEDIENUNGSANLEITUNG ST6100C HONEYWELL
OPERATING YOUR TIMER
For normal operation the setting slider must be in the RUN PROGRAMME position.
A red indicator lamp shows when the appliance is switched ON.
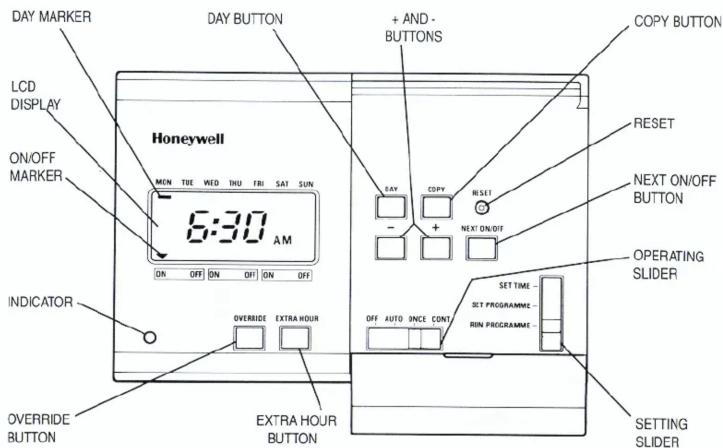
An OPERATING SLIDER is provided to select how the appliance is controlled.
The OPERATING SLIDER has four positions:
OFF
The appliance will remain OFF.
AUTO
The appliance will be switched ON and OFF automatically according to the programme.
ONCE
The appliance will come ON at the first programmed ON time and go OFF at the last programmed OFF time.
CONT.
The appliance will remain ON continuously.
Further presses of the EXTRA HOUR button will increase the extra hour period by one hour for each button press, up to a maximum of 3 hours. The display will change to show the number of extra hours, for example +2 HR or +3 HR.
To cancel the extra hours, keep pressing the EXTRA HOUR button until the + (1,2 or 3) HR message disappears from the display.
RESET
To reset the timer back to the original built-in programme press the RESET button with the tip of a pen or pencil.
POWER FAILURE
Your timer has a built-in battery to ensure correct operation after a mains supply power cut. No action should be necessary after a power cut of up to 4 days. Longer power cuts may require you to reprogramme.
OVERRIDE
The OVERRIDE button switches the appliance ON or OFF without altering the programme.
When the indicator lamp is ON, pressing the OVERRIDE button switches the appliance OFF until the next programmed ON time.
When the indicator lamp is OFF, pressing the OVERRIDE button switches the appliance ON until the next programmed OFF time.
EXTRA HOUR
The EXTRA HOUR button switches the appliance ON for up to 3 extra hours without altering the programme. Pressing the button once will give one extra hour, and the message +1 HR shows on the display to confirm the button has been pressed.
When the red indicator lamp is OFF, pressing the EXTRA HOUR button switches the appliance ON for just one hour.
When the red indicator lamp is ON, pressing the EXTRA HOUR button extends the programmed ON period by one hour.
Honeywell
ST6100C Timer

INTRODUCTION
The ST6100C timer can be used to control any application requiring to be switched ON and OFF at fixed times during the day.
FEATURES
• 7-day programme.
• Three ON/OFF switching times each day.
• Built-in programme with typical ON/OFF times.
• Programme override button.
- Extra hour button.
• Built-in battery to prevent loss of programme during power cuts.
• 12 hour am/pm or 24 hour clock format.
The ST6100C may be used with other Honeywell controls to form part of a total control system.
12 HOUR AM/PM or 24 HOUR CLOCK DISPLAY
Your timer can operate on 12 hour am/pm or 24 hour clock formats. To change the format, ensure the setting slider is in the RUN PROGRAMME position then press the + and - buttons together for about 5 seconds. All the displayed times will automatically be changed to the new format.
Repeating this procedure will change the clock display back to the original format.
IF DISPLAY REMAINS BLANK AFTER SWITCH ON – PRESS RESET SETTING YOUR TIMER
SETTING THE CORRECT TIME AND DAY
To set the correct time and day open the flap on the front of the timer.
STEP 1
Move the setting slider to the SET DAY/TIME position. The time and day marker on the display will now be flashing to indicate they can be changed.
STEP 2
To change the time, press the + or - buttons until the correct time is displayed.
Each press of the button will change the time by one minute. Holding the button down for more than a few seconds will change the time slowly at first, then quickly.
STEP 3
To change the day, press the DAY button until the day marker is positioned under the correct day. Each press of the button moves the marker by one day.
STEP 4
Moving the setting slider to the next position completes setting the time and day.
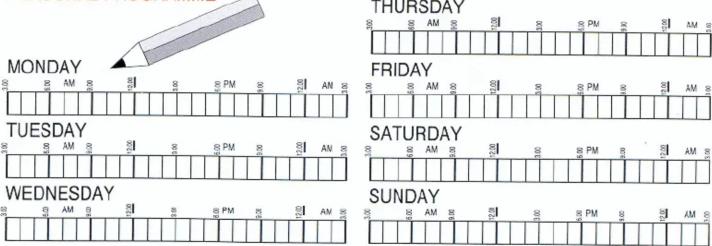
SETTING THE PROGRAMME
The programme has three ON/OFF switching times for every day. Each time can be set between 3.00am and 2.50am (on the next day) to allow you to programme the appliance to stay ON after midnight, if required.
STEP 5
Move the setting slider to the SET PROGRAMME position. The first ON time for MONday will be flashing.
STEP 6
Use the + and - buttons to set the first ON time. Each press of the button will change the time by 10 minutes.
STEP 7
Press the NEXT ON/OFF button once to display the first OFF time. Set this time using the + and - buttons.
STEP 8
By pressing the NEXT ON/OFF and + or - buttons the two remaining ON/OFF times for Monday can be set.
If you only require two ON/OFF times per day it is recommended you set the second OFF time to equal the second ON time.
STEP 9
You now have a choice to set the programme for the next day:
Choice 1 Press the DAY button to step the day marker to TUESday The ON/OFF times for Tuesday can then be set as described in steps 6 to 8.
or
Choice 2 Press the COPY button to copy Monday's programme into Tuesday. To set several days of the week to the same programme, press the COPY button repeatedly.
STEP 10
The programme for the remaining days of the week can be set by following steps 6 to 9.
•NOTE•
1 When pressing the + button, the next ON or OFF marker may start to flash. If this happens the next programme time will have been changed. Press the NEXT ON/OFF button to check and adjust this programme time if necessary.
2 When pressing the - button, the previous ON or OFF marker may start to flash. If this happens the previous programme time will have been changed. Follow the procedure in "REVIEWING PROGRAMME TIMES" to check and adjust this time, if necessary.
Moving the setting slider to the next position completes setting the programme.
REVIEWING PROGRAMME TIMES
To review your programme move the setting slider to the SET PROGRAMME position.
To review the programme times for a day press the NEXT ON/OFF button repeatedly. Any of these times can be adjusted by using the + and - buttons.
Press the DAY button to review consecutive days.
IF DISPLAY REMAINS BLANK AFTER SWITCH ON - PRESS RESET
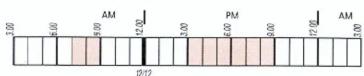
BUILT-IN PROGRAMME

histogram
| Time Period | AM | PM | AM | |---|---|---|---| | Monday to Friday | 3.00 | 4.00 | 5.00 | | Monday to Friday | 6.30 | 5.00 | 6.00 | | Monday to Friday | 8.30 | 7.00 | 8.00 | | Monday to Friday | 9.00 | 10.00 | 11.00 | | Monday to Friday | 12.00 | 12.90 | 12.90 | | Monday to Friday | 1.00 | 2.00 | 3.00 | | Monday to Friday | 3.00 | 4.00 | 5.00 | | Monday to Friday | 4.00 | 5.00 | 6.00 | | Monday to Friday | 5.00 | 6.00 | 7.00 | | Monday to Friday | 6.30 | 7.90 | 8.00 | | Monday to Friday | 8.30 | 11.00 | 11.90 | | Monday to Friday | 12.90 | 12.90 | 12.90 | | Monday to Friday | 1.00 | 2.00 | 3.00 | | Monday to Friday | 3.00 | 4.00 | 5.00 | | Monday to Friday | 4.00 | 5.00 | 6.00 | | Monday to Friday | 5.00 | 6.90 | 7.90 | | Monday to Friday | 6.30 | 8.00 | 8.90 | | Monday to Friday | 8.30 | 11.90 | 12.90 | | Monday to Friday | 12.90 | 12.90 | 12.90 | | Monday to Friday | 1.00 | 2.00 | 3.00 | | Monday to Friday | 3.00 | 4.30 | 5.30 | | Monday to Friday | 4.30 | 5.30 | 6.30 | | Monday to Friday | 5.30 | 6.30 | 7.30 | | Monday to Friday | 6.30 | 7.30 | 8.30 | | Monday to Friday | 8.30 | 11.90 | 12.90 | | Monday to Friday | 12.90 | 12.90 | 12.90 | | Monday to Friday | 1.00 | 2.90 | 3.90 | | Monday to Friday | 3.90 | 4.90 | 5.90 | | Monday to Friday | 4.90 | 5.90 | 6.90 | | Monday to Friday | 6.90 | 7.70 | 8.70 | | Monday to Friday | 8.70 | 8.70 | 9.70 | | Monday to Friday | 11.70 | 9.70 | 11.70 | | Monday to Friday | 12.79 | 12.79 | 12.79 | | Monday to Friday | 12.97 | 12.97 | 12.97 | | Monday to Friday | 12.97 | 12.97 | AM | | Monday to Friday | 12.97 | 12.97 | AM | | Saturday and Sunday | 3.30 | 4.30 | 5.30 | | Saturday and Sunday | 5.30 | 6.30 | 7.30 | | Saturday and Sunday | 6.30 | 8.30 | 9.30 | | Saturday and Sunday | 8.30 | 11.90 | 12.90 | | Saturday and Sunday | 12.39 | 12.97 | AM | | Saturday and Sunday (Friday) | - | - | - | | Saturday and Sunday (Friday) (Saturday) | - | - | - | | Saturday and Sunday (Friday) (Sunday) (Friday) | - | - | - | | Saturday and Sunday (Friday) (Sunday) (Sunday) (Friday) (Friday) (Friday) (Friday) (Friday) (Friday) (Friday) (Friday) (Friday) (Friday) (Friday) (Friday) (Friday) (Friday) (Friday) (Friday) (Friday) (Friday) (Friday) (Friday) (Friday) (Friday) (Friday) (Friday) (Friday) (Friday) (Friday) (Friday) (Friday) (Friday) (Friday) (Friday) (Friday) (Friday)PERSONAL PROGRAMME

- OPERATING YOUR TIMER
- OFF
- AUTO
- ONCE
- CONT.
- RESET
- POWER FAILURE
- OVERRIDE
- EXTRA HOUR
- Honeywell
- INTRODUCTION
- FEATURES
- HOUR AM/PM or 24 HOUR CLOCK DISPLAY
- IF DISPLAY REMAINS BLANK AFTER SWITCH ON – PRESS RESET SETTING YOUR TIMER
- SETTING THE CORRECT TIME AND DAY
- STEP 1
- STEP 2
- STEP 3
- STEP 4
- SETTING THE PROGRAMME
- STEP 5
- STEP 6
- STEP 7
- STEP 8
- STEP 9
- •NOTE•
- REVIEWING PROGRAMME TIMES
Marke : HONEYWELL
Modell : ST6100C
Kategorie : Temperaturregler