
SA-150L - Empfänger PANASONIC - Kostenlose Bedienungsanleitung
Finden Sie kostenlos die Bedienungsanleitung des Geräts SA-150L PANASONIC als PDF.

| Produkttyp | Empfänger |
| Marke | Panasonic |
| Modell | SA-150L |
| Gehäusematerial | Metall / Kunststoff |
| Abmessungen (B x H x T) | 430 x 140 x 330 mm |
| Gewicht | 7,5 kg |
| Stromversorgung | 220-240 V, 50/60 Hz |
| Leistungsaufnahme | 150 W |
| FM-Tuner | 87,5 - 108 MHz |
| AM-Tuner | 530 - 1600 kHz |
| Ausgangsleistung | 2 x 50 W an 8 Ohm |
| Audioeingänge | Aux, Phono, Tape, Tuner |
| Lautsprecheranschlüsse | Schraubklemmen für 2 Paare |
| Kopfhörerausgang | 6,3 mm Klinke |
| Reinigung | Mit trockenem Tuch abwischen |
| Sicherheitshinweis | Netzstecker vor Reinigung ziehen |
| Ersatzteile | Beim Panasonic-Kundendienst erhältlich |
| Reparaturindex | 8,5 / 10 |
Häufig gestellte Fragen - SA-150L PANASONIC
Benutzerfragen zu SA-150L PANASONIC
0 Frage zu diesem Gerät. Beantworten Sie die, die Sie kennen, oder stellen Sie Ihre eigene.
Eine neue Frage zu diesem Gerät stellen
Laden Sie die Anleitung für Ihr Empfänger kostenlos im PDF-Format! Finden Sie Ihr Handbuch SA-150L - PANASONIC und nehmen Sie Ihr elektronisches Gerät wieder in die Hand. Auf dieser Seite sind alle Dokumente veröffentlicht, die für die Verwendung Ihres Geräts notwendig sind. SA-150L von der Marke PANASONIC.
BEDIENUNGSANLEITUNG SA-150L PANASONIC

natural_image
Completely black image with no visible content or text.Technics
QUARTZ Synthesizer FM/AM Stereo Receiver
SA-150 OPERATING INSTRUCTIONS
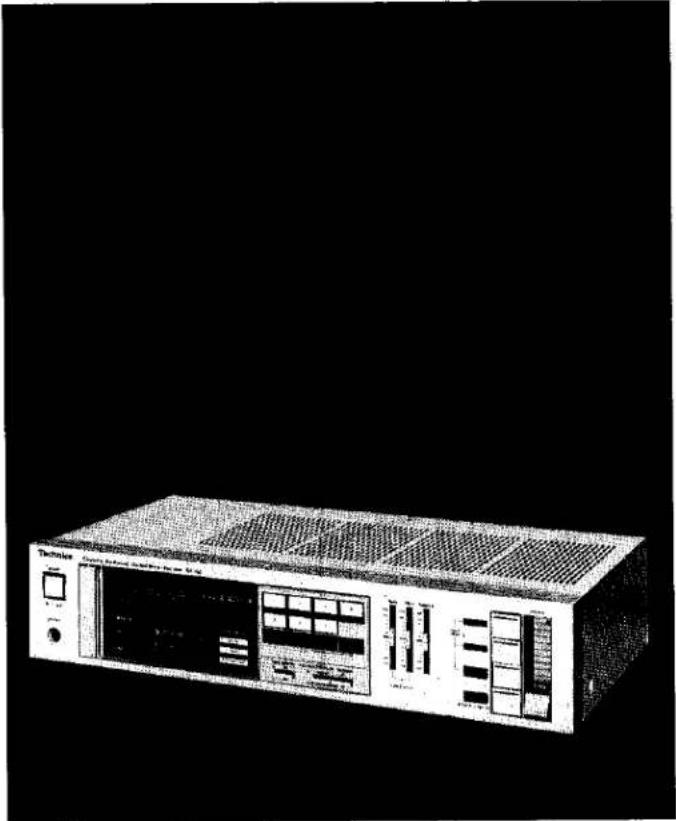
natural_image
Front view of a vintage electronic device with control panel and display (no visible text or symbols)Also available in black.
Notes:
- Specifications differ according to the area code.
- The "EK" area code, for example, indicates United Kingdom specifications.
- The "EK" indication is shown on the packing case and serial number tag.
Before operating this unit, please read these instructions completely.
Dear Stereo Fan
We want to thank you for selecting this product and to welcome you to the growing family of satisfied Technics product owners around the world.
We feel certain you will get maximum enjoyment
from this new addition to your home.
Please read these operating instructions carefully, and be sure to keep them handy for convenient reference.
CONTENTS
- ACCESSORIES 2
- BEFORE USING THIS UNIT.... 2
• FOR UNITED KINGDOM 2
• FOR AUSTRALIA 2
• MAINTENANCE OF EXTERNAL SURFACES ..... 2
• FOR SAFE USE OF THIS UNIT 3
• BATTERIES (option): THEIR USE AND INSERTION/REMOVAL 4
• IF THE BATTERIES BECOME WEAK 4
• FM ANTENNA 5
• AM ANTENNA 5
• FRONT PANEL CONTROLS AND THEIR FUNCTIONS 6
• PROTECTION CIRCUITRY 7
•HOW TO PRESET RADIO BROADCAST FREQUENCIES 8
• TECHNICAL SPECIFICATIONS 9
•TROUBLESHOOTING GUIDE .... 10
ACCESSORIES
• FM indoor antenna.... 1
- AM loop antenna 1
- AM antenna holder.... 2
- Screws 2
- AC power supply cord (Except for Australia) 1
BEFORE USING THIS UNIT
Be sure to disconnect the mains cord before adjusting the voltage selector.
Use a minus (−) screwdriver to set the voltage selector (on the bottom panel) to the voltage setting for the area in which the unit will be used.
Note that this unit will be seriously damaged if this setting is not made correctly. (There is no voltage selector for some countries; the correct voltage is already set.)
FOR UNITED KINGDOM
"EK" area code model only)
The "EK" indication is shown on the name plate.
Important
THE WIRES IN THIS MAINS LEAD ARE COLOURED IN ACCORDANCE WITH THE FOLLOWING CODE.
BLUE: NEUTRAL
BROWN: LIVE
As the colours of the wires in the mains lead of this unit may not correspond with the coloured markings identifying the terminals in your plug, proceed as follows. The wire which is coloured BLUE must be connected to the terminal which is marked with the letter N or coloured BLACK.
The wire which is coloured BROWN must be connected to the terminal which is marked with the letter L or coloured RED.
FOR AUSTRALIA
For your safety
To ensure safe operation the three-pin plug supplied must be inserted only into a standard three-pin power point which is effectively earthed through the normal household wiring. Extension cords used with the unit must be three-core and be correctly wired to provide connection to earth. Wrongly wired extension cords are a major cause of fatalities.
The fact that the unit operates satisfactorily does not imply that the power point is earthed and that the installation is completely safe. For your safety, if in any doubt about the effective earthing of the power point, consult a qualified electrician.
MAINTENANCE OF EXTERNAL SURFACES
To clean, use a soft dry cloth.
If the surfaces are extremely dirty, use a soft cloth, dipped into a soap and water solution or a weak detergent solution.
Wring the cloth well before wiping the unit.
Wipe once again with a soft dry cloth.
Never use alcohol, paint thinner, benzine, nor a chemically treated cloth to clean this unit.
Such chemicals may damage the finish of your unit.
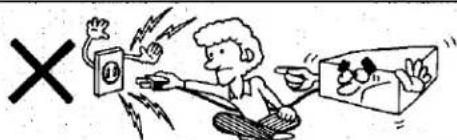
FOR SAFE USE OF THIS UNIT
■ Use a standard electrical AC wall outlet
- Use from an AC power source of high voltage, such as for air conditioners, is very dangerous.
Be extremely careful not to make a connection to the electrical outlet for a large air conditioner or central-heating unit which uses high voltage, because there is the possibility of fire.
- A DC power source cannot be used.
Be sure to check the power source carefully, especially on a ship or other place where DC is used.
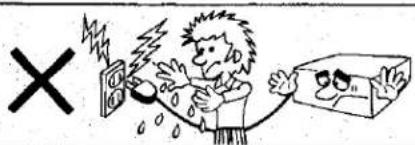
■ Connection and removal of the power cord plug
- Wet hands are dangerous.
A dangerous electric shock may result if the plug is touched by wet hands.
- Don't pull the power cord.
Always grasp the plug; never pull the cord itself.
■ Never attempt to repair or reconstruct this unit
A serious electric shock might occur if this unit is repaired, disassembled or reconstructed by unauthorized persons, or if the internal parts are accidentally touched.
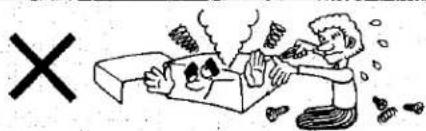
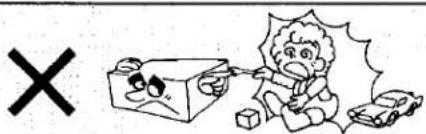
■ For families with children
Never permit children to put anything, especially metal, inside this unit. A serious electric shock or malfunction could occur if articles such as coins, needles, screwdrivers, etc. are inserted through the ventilation holes, etc. of this unit.
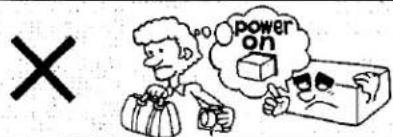
■ Turn off after use
If the unit is left for a long time with the power on, this will not only shorten its useful operation life, but may also cause other unexpected trouble.
■ If water is spilled on the unit
Be extremely careful if water is spilled on the unit, because a fire or serious electric shock might occur. Immediately disconnect the power cord plug, and consult with your dealer.

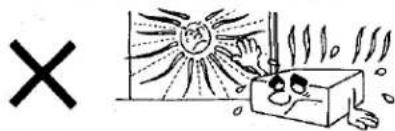
■ Place the unit where it will be well ventilated, and away from direct sunlight
Place this unit at least 10 cm (4") away from wall surfaces, etc., and away from direct sunlight. Be careful that curtains and similar materials do not obstruct the ventilation holes.
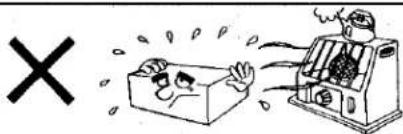
- Keep the unit away from stoves, etc.
Heat can damage the external surfaces as well as internal circuits and components.
■ Avoid spray-type insecticides
Insecticides might cause cracks or "cloudiness" in the cabinet and plastic parts of this unit. The gas used in such sprays might, moreover, be ignited suddenly.

■ Never use alcohol or paint thinner
These and similar chemicals should never be used, because they may damage the finish.
■ If trouble occurs
If, during operation, the sound is interrupted or indicators no longer illuminate, or if abnormal odor or smoke is detected, immediately disconnect the power cord plug, and contact your dealer or an Authorized Service Center.
BATTERIES (option): THEIR USE AND INSERTION/REMOVAL
Batteries [size AA (SUM-3) 1.5V] are required to assure continued operation of the memory systems.
When AC power to the unit is turned off or is interrupted, the preset tuning ^1 and "most-recent" memory ^2 will be erased and must be reset again. Be sure to install the required batteries before operating this unit.
\*1.Preset tuning
The preset tuning is a system by which any desired broadcast station which has been preset by using one of the preset-tuning buttons can be tuned by simply touching one button.
\*2. Most-recent memory
The most-recent memory is a system by which the unit "remembers" the FM or AM broadcast station last heard when any of the functions of this unit are turned off, and automatically tunes to that station the next time the power is turned on.
■ Type of batteries
Use three AA-size (SUM-3: 1.5V) batteries for this unit.
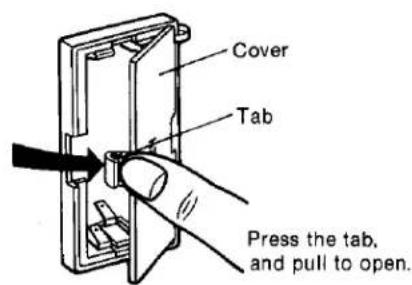
■ Insertion of batteries
- Open the cover.
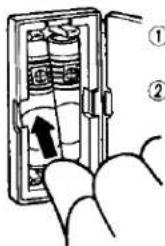
- Insert the batteries.
Insert in the rear.
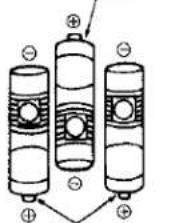
chemical
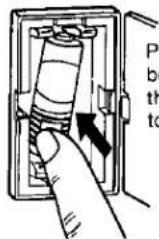
Diagram of three cylindrical battery cells with positive charges and an arrow indicating directionInsert in the front.
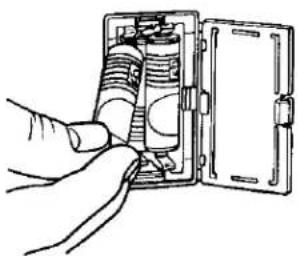
natural_image
Hand inserting a cylindrical component into a rectangular device (no text or symbols visible)- Close the cover.
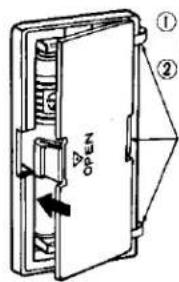
① Insert the three projecting parts.
② Close the cover.
Projecting parts
■ Removal of batteries
- To remove the front batteries
- To remove the rear battery
Press the bottom of the battery to remove.
■ Battery life
About 1 year.
■ Notes concerning the batteries
- Be sure the batteries are inserted so that the positive (+) and negative (−) polarities are correct.
- Never subject the batteries to excessive heat or flame; do not attempt to disassemble them; and be sure they are not short-circuited.
- If the unit is not to be used for a long time, remove the batteries and store them in a cool dark place.
- Always remove old, weak or worn-out batteries promptly and dispose of them.
- Never mix old and new batteries, nor batteries of different types.
IF THE BATTERIES BECOME WEAK
If the batteries are consumed, the "preset tuning" and the "most-recent" memory are erased, making it necessary to re-program the memory.
If the batteries are consumed, the display will show 87.50 MHz for FM and 522 kHz for AM no matter which of the preset-tuning buttons is pressed.
FM ANTENNA
For best reception of FM broadcasts, select an FM antenna with the best characteristics for the area in which the unit is used.
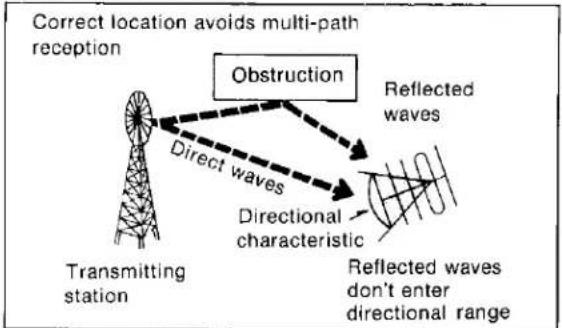
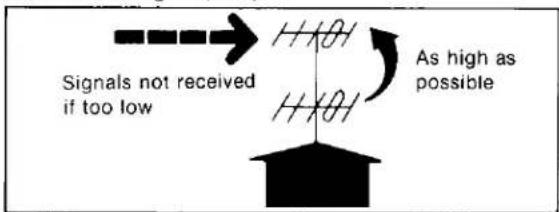
■ Location of antenna
- Where it will receive FM broadcast signals directly; not in the "shadow" of a building.
flowchart
graph TD
    A["Transmitting station"] --> B["Direct waves"]
    B --> C["Directional characteristic"]
    C --> D["Reflected waves"]
    D --> E["Obstruction"]
    style A fill:#f9f,stroke:#333
    style B fill:#ccf,stroke:#333
    style C fill:#cfc,stroke:#333
    style D fill:#fcc,stroke:#333
    style E fill:#ffc,stroke:#333
Note:
Multi-path distortion results from the reception of two types of signals: those reflected from nearby buildings, mountains, etc., and those received directly from the broadcasting station.
- Away from busy roads, and away from neon signs.
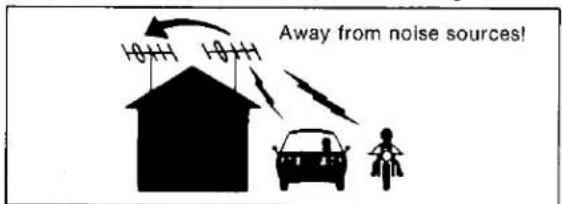
- At least 4 meters (13 feet) above the ground (except in mountainous regions, etc.).
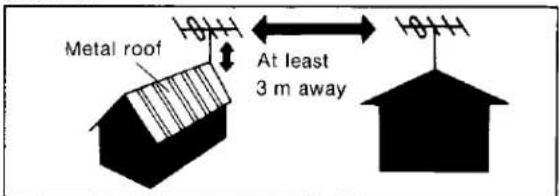
- At least 3 meters (10 feet) away from a metal roof or other antennas.
- To avoid danger, away from electric power lines.

Note:
An outdoor antenna should be installed by a competent technician only.
AM ANTENNA
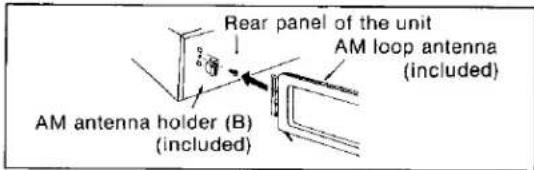
This unit includes an AM loop antenna. No outdoor antenna is necessary unless the broadcast signals in your area are especially weak. (Connect the loop antenna even if an outdoor antenna is used; if it is not connected, AM reception will not be possible.)
■ Installation of the AM loop antenna
Pay attention to the following points when attaching the antenna.
1) Do not attach it horizontally (to do so would impair reception).
2) Do not attach it close to metal surfaces (to do so would result in noise).
3) Do not attach it close to power cords, speaker wires, etc. (to do so would result in noise).
4) Do not attach it close to a tape deck (when the tape deck is being used, chirping or beeping sounds may be received).
- Connect the AM loop antenna to the AM antenna terminals located on the rear panel of the unit.
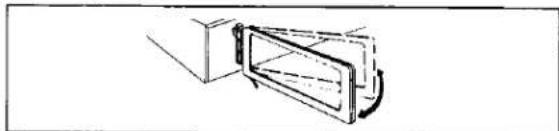
- Find the height and direction of the antenna where reception is best and then fix it vertically to the wall, rack, etc.
1) When attaching the antenna to a wall, cloumn or rack.
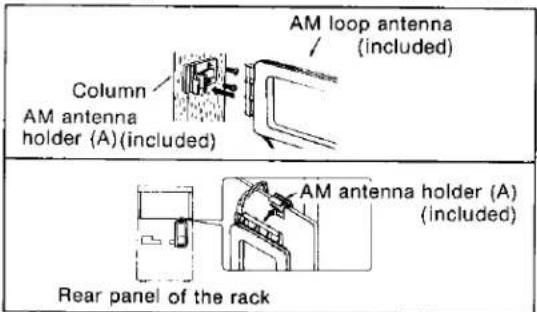
2) When attaching the antenna to the unit. This type of installation may cause impaired reception or result in signal noise. If possible, attach the antenna to the rack, a wall, or a column.
- Move the antenna toward the right or left to find the point of best reception.
natural_image
Simple line drawing of a door opening with a handle and lid, no text or symbols present■ Connection of an outdoor antenna
If an outside AM antenna is installed (in mountainous regions or between reinforced-concrete buildings), install it in a location away from utility poles, high-voltage power lines, high buildings and busy roads.
Note:
An outdoor antenna should be installed by a competent technician only.
FRONT PANEL CONTROLS AND THEIR FUNCTIONS
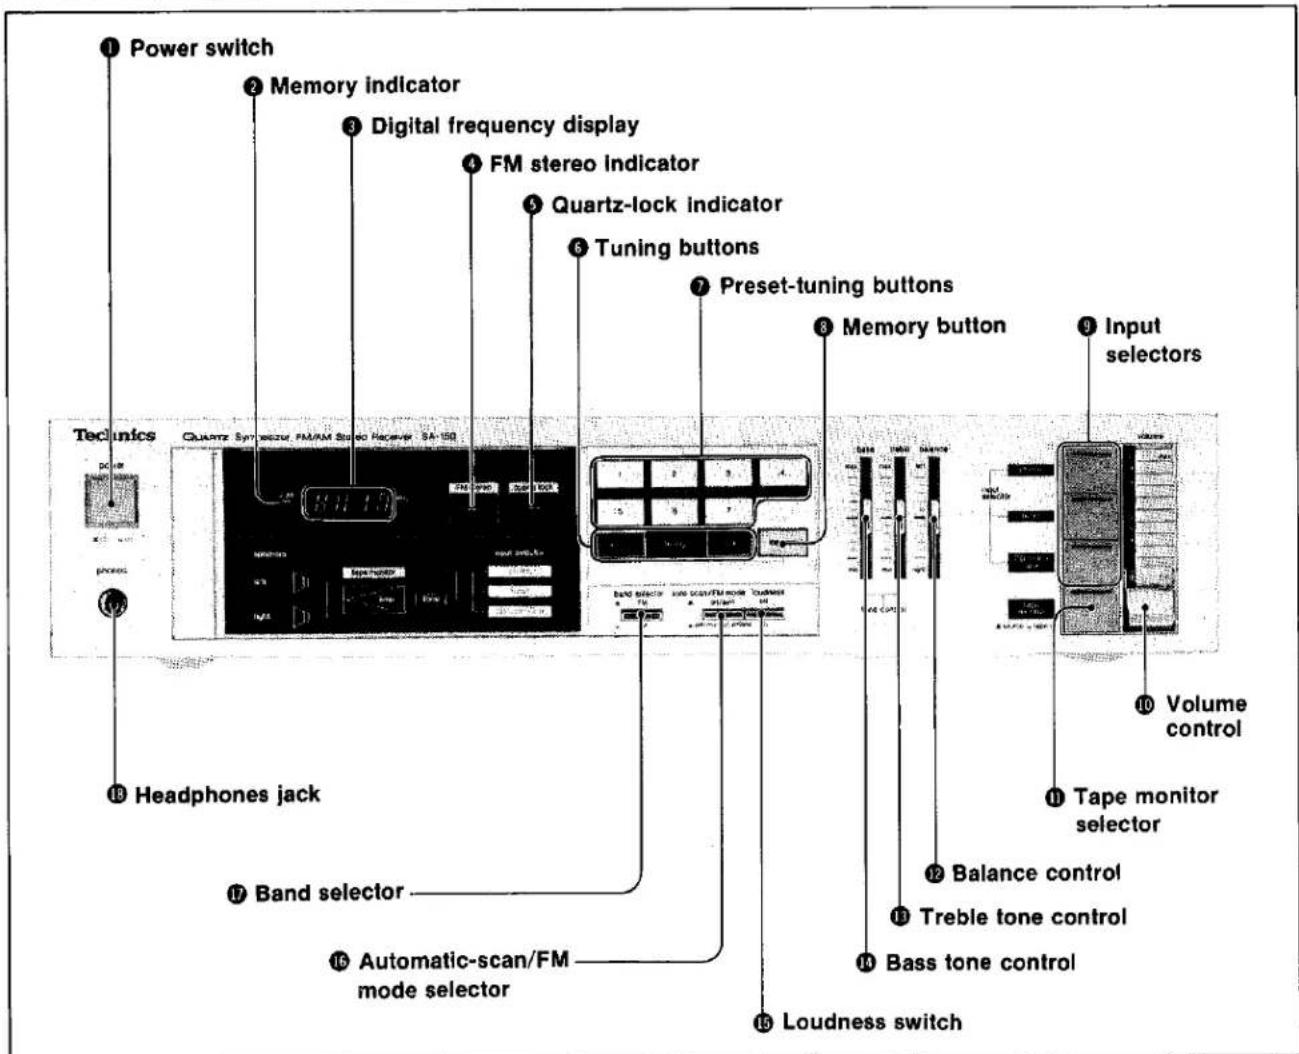
Power switch (power)
Note:
Be sure to turn the volume control Ⓞ to the minimum ("0") position before turning on the power.
② Memory indicator
This indicator illuminates when the memory button Ⓐ is pressed.
When presetting the frequency of an FM or AM broadcast station, press one of the preset-tuning buttons ⑦ during the time that this indicator is illuminated (about 5 seconds).
③ Digital frequency display
The reception frequency of the FM or AM broadcast selected, by using the tuning buttons ⑥ or the preset tuning buttons ⑦ is indicated by a digital display.
④ FM stereo indicator (FM stereo)
This indicator automatically illuminates when an FM stereo broadcast is being received.
Note:
It will not illuminate if the automatic-scan/FM mode selector ⑯ is set to the "off (manual)/mono" position.
⑤ Quartz-lock indicator (quartz lock)
This indicator illuminates when a broadcast is received. It will not illuminate if the signal from the broadcast station is weak.
⑥ Tuning buttons (tuning)
These buttons are used for tuning to a desired broadcast station.
Press the left button to change the frequency downward, and press the right button to change the frequency upward. There are two types of tuning: automatic and manual. Tune a station by using the following procedure.
Automatic tuning:
Set the automatic-scan/FM mode selector ⑯ to the "on/auto" position, and then press one of the buttons. (The next station will automatically be tuned in.)
Note that a station will not automatically be tuned in if the broadcast signal is weak. If this occurs, make the tuning manually.
Note:
In order to stop automatic tuning, set the automatic-scan/FM mode selector ⑯ to the "off (manual)/mono" position.
Manual tuning:
Set the automatic-scan/FM mode selector ⑯ to the "off (manual)/mono" position, and then press one of the buttons. The frequency is changed by 0.05 MHz for FM and 9 kHz for AM. If the button is pressed continuously, the frequency will continue to change.
⑦ Preset-tuning buttons (FM/AM preset tuning)
These buttons (1 \~ 7) are used to preset FM and AM broadcast frequencies into the memory of this unit, and are also pressed to select the desired preset frequencies.
A total of 14 frequencies (7 FM and 7 AM) can be preset into the memory of this unit. After a frequency has been correctly preset, it is only necessary to press the corresponding button to tune to that frequency.
8 Memory button
This button is used when one of the preset-tuning buttons ⑦ is used to program an FM or AM broadcast frequency into the memory of this unit. When this button is pressed, the memory indicator ② will illuminate, and the broadcast frequency should be programmed into the memory during the time that it is illuminated.
⑨ Input selectors (input selector)
phono:
Press this button to listen to phono discs.
tuner:
Press this button to listen to radio broadcasts.
CD/video/aux:
Press this button to listen to equipment connected to the auxiliary input terminals ("CD/VIDEO/AUX").
⑩ Volume control (volume)
This control is used to adjust the volume level.
Note:
Be absolutely sure to set this control to its minimum ("0") position when turning the power on. After the power switch is turned on, please wait several seconds before increasing the volume level.
⑪ Tape monitor selector (tape monitor)
source ( □→□ ):
Set to this position to listen to a phono disc or radio broadcast, or to listen to equipment connected to the auxiliary-input terminals ("CD/VIDEO/AUX").
tape/ext ( Ⅱ→Ⅲ):
Press the right selector inward to play back or monitor the sound from tape deck, or to use a space dimension controller or a microphone-mixing amplifier connected to the "TAPE/EXT" terminals.
⑫ Balance control (balance)
While listening to an AM broadcast or a monaural FM broadcast, balance the sound so that it seems to be heard from the center, between the speakers.
⑬ Treble tone control (treble)
This control can be used to make adjustment of the tone quality of the high-range sound.
⑭ Bass tone control (bass)
This control can be used to make adjustment of the tone quality of the low-range sound.
⑮ Loudness switch (loudness)
Set to the "on" position when listening to music at low volume. Auditory perception of sound in the low frequency range falls off at low volume, but when the switch is in this position, this deficiency is compensated for, so that the full impact of the musical performance can be enjoyed.
⑯ Automatic-scan/FM mode selector (auto scan/FM mode)
This selector can be used to select either automatic scan tuning or manual step tuning for both AM and FM broadcast. Use in conjunction with the tuning buttons ⑥ to change stations. This selector is also used to select either stereo or monaural reception of FM broadcasts. (The FM mode selector does not operate for AM broadcasts.)
on/auto(→);
Set to this position for ordinary use. FM stereo and monaural broadcasts can be received.
When one of the tuning buttons is pressed once, the next strong station will automatically be tuned in.
off (manual)/mono(■→■):
All broadcasts, stereo and monaural, will always be received monaurally.
The frequency will change by one "step" when one of the tuning buttons is pressed once, or will change continuously while a tuning button is pressed continuously.
⑰ Band selector (band selector)
FM(■→■):
Set to this position for reception of FM broadcasts.
AM(且→):
Set to this position for reception of AM broadcasts.
⑱ Headphones jack (phones)
The sound will not be heard when headphones are connected from the speaker systems to the jack.
Note:
Be sure to set the volume control ⑩ to its minimum ("0") position before connecting headphones.
Note:
A delay of several seconds from the time the power is turned on to the time sound will be heard is normal and is part of the design of this unit.
PROTECTION CIRCUITRY
The protection circuitry may have operated if either of the following conditions is noticed:
• No sound is heard when the power is turned on.
• Sound stops during a performance.
The function of this circuitry is to prevent circuitry damage if, for example, the positive and negative speaker connection wires are "shorted", or if speaker systems with an impedance less than the indicated rated impedance of this unit are used.
If this occurs, follow the procedure outlined below:
- Turn off the power.
- Determine the cause of the problem and correct it.
- Turn on the power once again.
Note:
When the protection circuitry functions, the unit will not operate unless the power is first turned off and then on again.
TROUBLESHOOTING GUIDE
Before requesting service for this unit, check this table to determine if the problem can be solved as described below. If the problem still persists after making these checks, or if there are symptoms of malfunction not described in this table, it is recom-
mended that you consult the store where this unit was purchased or your local Service Center (see list included) for further information and assistance.
| Problem | Probable cause(s) | Suggested remedy | |
| During disc play | A loud and unusual sound ("howling") is heard when the volume level is increased. | The location of the turntable and speaker systems is unstable. | ·If the equipment is unstable because it is located upon a soft surface, such as a carpet, place a solid material (such as concrete blocks, bricks, a hard board, etc.) beneath the speaker systems.·Close the cover of the turntable.·Try moving the turntable farther away from the speaker systems.·Try placing a cushioning material (such as felt or commercially available audio insulators) beneath the turntable. |
| Unusual scratching noises are heard. | Disc is old or scratched. | ·Turn the treble tone control to reduce the treble sound. | |
| Dust in disc grooves. | ·Use a disc cleaner to remove the dust from the disc grooves. | ||
| Stylus needle is worn. | ·If the noise is heard even when a new disc is played, probably the stylus is worn. Replace it with a new stylus. | ||
| Dust is attached to stylus tip. | ·Remove the dust by using a soft brush. | ||
| While listening to FM broadcasts | An unusual hissing noise is heard when listening to the broadcast in stereo, but not heard when listening monaurally. | A slight noise may be heard because the method used for modulation of FM stereo broadcasts is different than that used for monaural broadcasts. | ·Try reducing the treble sound by turning the treble tone control.·Set the automatic-scan/FM mode selector to the "off (manual)/mono" position.·Try changing the location, height and/or direction of the antenna.·If an interior antenna is being used, change to an exterior antenna.·Try using an antenna with more elements. |
| Noise is excessive in both stereo and monaural broadcasts. | Poor location and/or direction of the antenna. | ||
| Transmitting station is too far away. | |||
| The FM stereo indicator or quartz lock indicator flickers, without completely illuminating. | Poor location and/or direction of the antenna. | ·Try changing the location, height and/or direction of the antenna.·If an interior antenna is being used, change to an exterior antenna.·Try using an antenna with more elements. | |
| Transmitting station is too far away. | |||
| Sound is distorted and/or the volume level becomes low. | Broadcast signals are being disturbed. | ||
| Nearby automobile traffic or airplanes. | |||
| Excessive distortion in the sound of stereo broadcasts. | Nearby building or mountain.[Multi-path distortion is being caused by the mutual interference of broadcast signals received directly from the transmitting station (direct waves) and signals being reflected from nearby buildings or mountains (reflected waves).] | ||
| An unusual "popping" noise is heard when automobiles pass. | Such noise is called ignition noise, and occurs while the automobile engine is running. | ·Relocate the antenna and the connection wires leading to it to a place farther away from where automobiles pass. | |
| A strange hissing noise is produced continuously or intermittently. | Caused by the "discharge phenomenon" and the "oscillation phenomenon" of electric appliances (such as fluorescent lights, TV, small series-type motors, rectification equipment, etc.). | ·Try placing this unit farther away from such equipment.·Install noise-prevention equipment on this unit or on the electric appliance. | |
| Station selection cannot be made by using the preset-tuning buttons. | The preset-tuning buttons have not been preset. | ·Make the presettings. | |
| The batteries have become extremely weak, and the memory has been erased. | ·Replace the batteries with new ones, and preset the frequencies once again. | ||
| While listening to AM broadcasts | An unusual "beat" sound is heard. | Unit is being used at the same time as the television set. | •Turn off the television set, or use this unit farther away from it. |
| Interference from adjacent broadcast signal. | •By using the treble tone control, try reducing the treble sound. | ||
| A low-pitched "hum" sound is heard when the broadcast is tuned. | The antenna connection wires are too close to the power cord. | •Place the antenna connection wires and the power cord farther apart. | |
| The power supply frequency from the power cord is modulated and heard from the speakers. | •Try reversing the connection of the power cord plug.•Install a special exterior antenna. | ||
| A strange hissing noise is produced continuously or intermittently. | Caused by the "discharge phenomenon" and the "oscillation phenomenon" of electric appliances (such as fluorescent lights, TV, small series-type motors, rectification equipment, etc.). | •Try placing this unit farther away from such equipment.•Install noise-prevention equipment on this unit or on the electric appliance. | |
| Station selection cannot be made by using the preset-tuning buttons. | The preset-tuning buttons have not been preset. | •Make the presettings. | |
| The batteries have become extremely weak, and the memory has been erased. | •Replace the batteries with new ones, and preset the frequencies once again. | ||
| Problems noted at all times | No sound is heard when the power is turned on. | The power cord plug is not completely inserted. | •Confirm that the power cord plug is connected completely. |
| Connections are incomplete or incorrect to the speaker systems, etc. | •Check to be sure that all connection wires are correctly connected. | ||
| The setting of the input selectors has not been completely or correctly made. | •Check to be sure that the selectors are set to the correct position. | ||
| The tape-monitor selector is incorrectly set to the "tape/ext" position when a tape deck is connected. | •Except for tape playback, set the tape-monitor selector to the "source" position. | ||
| Headphones are connected. | •Disconnect the headphones from this unit. | ||
| When listening to stereo sound, the sound of the various musical instruments is not heard from its correct position. | The positive (+) and negative (-) connections of the speaker connection wires are reversed. | •Reconnect the speaker connection wires so that the positive and negative connections are correct. | |
| When listening to stereo sound, the left and right sounds are reversed. | The left and right connections of the speaker connection wires are reversed. | •Check the speaker connection wires and connect them correctly if necessary. | |
| The left and right connections of the connection wires connected to other equipment are reversed. | •Check the connection wires to other equipment and connect them correctly if necessary. | ||
| A low-pitched noise ("hum" or "buzz") is heard. | The power cord or a fluorescent light, etc., is near the connection wires. | •Try separating this unit from the electric appliance as far as possible.•Reverse the connection of the power cord plug. | |
| The connection of the ground wire is incorrect or incomplete. | •Check to be sure that the grounding connection is correct.•If the unit is not grounded, try doing so. | ||
| Sound is not heard from the speaker system on one side. | The speaker connection wires are disconnected. | •Check and correct the connections of the speaker connection wires. | |
| The balance control is not set to the center position. | •Set the mark on the balance control to the center position. | ||
| The volume level for a radio broadcast is different from that for disc play. | The strength of the broadcast signal is not the same as the output from the turntable. | •Adjust the volume level by using the volume control. | |
| Sound stops during a performance, or no sound is heard when the power is turned on. | The protection circuitry has functioned because the positive and negative speaker connection wires are "shorted" or speaker systems with an impedance less than the indicated rated impedance of the amplifier are used. | •Turn off the power, and, after determining and correcting the cause, turn on the power once again. |
Estimado Estereoaficionado
Al mismo tiempo que le expresamos nuestro agradecimiento por habernos honrado con la selección del presente aparato, nos es grato darle la bienvenida a la creciente familia de los satisfechos propietarios de productos Technics en el mundo.
No nos cabe duda que la incorporación de este
nuevo equipo a los que ya posee le acarreará momentos felices inolvidables.
Quisiéramos pedirle que lea detenidamente las instrucciones para el uso aquí dadas y las conserve a mano para poder recurrir a ellas con comodidad cuando se presente el caso.
INDICE
• ACCESORIOS .... 12
• ANTES DE HACER FUNCIONAR
EL APARATO....12
• MANTENIMIENTO DE LAS SUPERFICIES EXTERNAS 12
• PARA UN USO SEGURO
DEL PRESENTE APARATO .... 13
• PILAS (a opción): SU USO y MANERA
DE METERLAS y DE SACARLAS 14
• SI LAS PILAS SE DEBILITAN 14
• ANTENA PARA FM 15
• ANTENA PARA AM 15
• CONTROLES DEL PANEL DELANTERO
Y SUS RESPECTIVAS FUNCIONES ..... 16
• CIRCUITERIA DE PROTECCION ..... 17
• MANERA DE FIJAR DE ANTEMANO LAS FRECUENCIAS DE LAS TRANSMISIONES POR RADIO 18
• ESPECIFICACIONES TECNICAS ..... 19
• GUIA PARA LA LOCALIZACION
DE LAS FALLAS....20
ACCESORIOS
- Antena de FM para uso dentro de casa.... 1
- Antena de cuadro para AM 1
- Portador de la antena para AM 2
• Tornillos .... 2 - Cable alimentacion de corriente .... 1
ANTES DE HACER FUNCIONAR EL APARATO
Sirviéndose de un destornillador (−), poner el selector de voltaje (ubicado en el panel de abajo) a la posición que corresponda al voltaje de la región en que habrá de ser usado el aparato. Es de recordar que de no hacer este ajuste como es debido, el aparato resultará seriamente perjudicado.
(En el caso de algunos países, no hay selector de voltaje; el voltaje ya viene puesto como es debido.)
MANTENIMIENTO DE LAS SUPERFICIES EXTERNAS
Para limpiar conviene usar un trapo suave y seco. Si la superficie estuviese muy sucia conviene usar un trapo suave mojado en una solución de agua y jabón o en una solución detergente débil. Exprimir bien el trapo antes de frotar este aparato. Volver a frotar con un trapo suave y seco. No usar nunca alcohol, diluyentes de pintura o bencina, ni trapos tratados químicamente, para limpiar este aparato. Tales productos químicos podrían dañar el acabado de su aparato.
- Technics
- Notes:
- Dear Stereo Fan
- CONTENTS
- ACCESSORIES
- BEFORE USING THIS UNIT
- FOR UNITED KINGDOM
- Important
- FOR AUSTRALIA
- For your safety
- MAINTENANCE OF EXTERNAL SURFACES
- FOR SAFE USE OF THIS UNIT
- ■ Use a standard electrical AC wall outlet
- ■ Connection and removal of the power cord plug
- ■ Never attempt to repair or reconstruct this unit
- ■ For families with children
- ■ Turn off after use
- ■ If water is spilled on the unit
- ■ Place the unit where it will be well ventilated, and away from direct sunlight
- - Keep the unit away from stoves, etc.
- ■ Avoid spray-type insecticides
- ■ Never use alcohol or paint thinner
- ■ If trouble occurs
- BATTERIES (option): THEIR USE AND INSERTION/REMOVAL
- \*1.Preset tuning
- \*2. Most-recent memory
- ■ Type of batteries
- ■ Insertion of batteries
- ■ Removal of batteries
- ■ Battery life
- ■ Notes concerning the batteries
- IF THE BATTERIES BECOME WEAK
- FM ANTENNA
- ■ Location of antenna
- Note:
- AM ANTENNA
- ■ Installation of the AM loop antenna
- ■ Connection of an outdoor antenna
- FRONT PANEL CONTROLS AND THEIR FUNCTIONS
- Power switch (power)
- ② Memory indicator
- ③ Digital frequency display
- ④ FM stereo indicator (FM stereo)
- ⑤ Quartz-lock indicator (quartz lock)
- ⑥ Tuning buttons (tuning)
- Automatic tuning:
- Manual tuning:
- ⑦ Preset-tuning buttons (FM/AM preset tuning)
- Memory button
- ⑨ Input selectors (input selector)
- ⑩ Volume control (volume)
- ⑪ Tape monitor selector (tape monitor)
- ⑫ Balance control (balance)
- ⑬ Treble tone control (treble)
- ⑭ Bass tone control (bass)
- ⑮ Loudness switch (loudness)
- ⑯ Automatic-scan/FM mode selector (auto scan/FM mode)
- ⑰ Band selector (band selector)
- ⑱ Headphones jack (phones)
- PROTECTION CIRCUITRY
- TROUBLESHOOTING GUIDE
- Estimado Estereoaficionado
- INDICE
- ACCESORIOS
- ANTES DE HACER FUNCIONAR EL APARATO
- MANTENIMIENTO DE LAS SUPERFICIES EXTERNAS
Marke : PANASONIC
Modell : SA-150L
Kategorie : Empfänger