
EW3152W - Blutdruckmessgerät PANASONIC - Kostenlose Bedienungsanleitung
Finden Sie kostenlos die Bedienungsanleitung des Geräts EW3152W PANASONIC als PDF.

| Produkttyp | Oberarm-Blutdruckmessgerät |
| Modell | EW3152W |
| Marke | Panasonic |
| Manschettengröße | 22–32 cm Umfang |
| Anzeige | LCD-Digitalanzeige |
| Messmethode | Oszillometrisch |
| Messbereich | Systolisch: 60–250 mmHg, Diastolisch: 40–180 mmHg, Puls: 40–180 Schläge/min |
| Genauigkeit | Blutdruck: ±3 mmHg, Puls: ±5% |
| Stromversorgung | 4 AA-Batterien (nicht im Lieferumfang) oder Netzteil (optional) |
| Batterielebensdauer | Ca. 300 Messungen mit Alkali-Batterien |
| Speicher | 90 Messwerte (Datum und Uhrzeit) |
| Arrhythmie-Erkennung | Ja (Herzrhythmusstörungsanzeige) |
| WHO-Klassifikation | Automatische Einstufung der Messwerte (grün/gelb/orange/rot) |
| Durchschnittsberechnung | Mittelwert der letzten 3 Messungen |
| Maße (Gerät) | Ca. 140 × 100 × 60 mm (B × H × T) |
| Gewicht (Gerät) | Ca. 250 g (ohne Batterien) |
| Manschettenmaterial | Textil (Klettverschluss) |
| Reinigung | Manschette mit feuchtem Tuch abwischen, Gerät mit trockenem Tuch reinigen |
| Sicherheitsmerkmale | Automatische Abschaltung, Manschettenüberdruckerkennung |
| Garantie | 2 Jahre (gemäß den gesetzlichen Bestimmungen) |
| Ersatzteile | Ersatzmanschette (Modellnummer: EW3109) und Netzteil (Modell: KX-TCA...) |
| Reparatur | Kundendienst durch autorisierte Panasonic-Werkstätten |
Häufig gestellte Fragen - EW3152W PANASONIC
Benutzerfragen zu EW3152W PANASONIC
0 Frage zu diesem Gerät. Beantworten Sie die, die Sie kennen, oder stellen Sie Ihre eigene.
Eine neue Frage zu diesem Gerät stellen
Laden Sie die Anleitung für Ihr Blutdruckmessgerät kostenlos im PDF-Format! Finden Sie Ihr Handbuch EW3152W - PANASONIC und nehmen Sie Ihr elektronisches Gerät wieder in die Hand. Auf dieser Seite sind alle Dokumente veröffentlicht, die für die Verwendung Ihres Geräts notwendig sind. EW3152W von der Marke PANASONIC.
BEDIENUNGSANLEITUNG EW3152W PANASONIC
Panasonic®
Upper Arm Blood Pressure Monitor Monitor de presión arterial de brazo
Operating Instructions Instrucciones de funcionamiento
Model No. EW3152 Modelo No. EW3152
natural_image
Illustration of a Panasonic portable air purifier with control panel and display screen (no text or symbols on body)Before operating this device, please read these instructions completely and save this manual for future use.
Antes de utilizar este dispositivo, lea completamente estas instrucciones y conserve este manual para futura referencia.
Table of Contents
Introduction 3
Basics of Blood Pressure 3
Important Instructions Before Use 4
Precautions to Ensure Safe, Reliable Operation 6
Easily Check Your Blood Pressure Readings Against the JNC 7* Classification 7
Parts Identification 8
When using the AC adapter 10
When using batteries 11
Before starting measurements 12
Cautions during measurements 14
Taking a reading 14
Alarm function signals high blood pressure 17
Storing measurement values 19
Recalling stored measurement values 20
After use/Specifications 21
Cautions during measurements 22
Q & A 23
Care and Maintenance 25
Troubleshooting 26
Introduction
Thank you for purchasing the Panasonic Upper Arm Blood Pressure Monitor EW3152.
Measuring your own blood pressure is an important way of monitoring your health. High blood pressure (hypertension) is a major health problem which can be treated effectively once detected. Measuring your blood pressure between doctor visits on a regular basis in the comfort of your home, and keeping a record of the measurements, will help you monitor any significant changes in your blood pressure. Keeping an accurate record of your blood pressure will help your doctor diagnose and possibly prevent any health problems in the future.
Basic of Blood Pressure
Your heart acts like a pump, sending blood surging through your blood vessels each time it contracts. Blood pressure is the pressure exerted by blood pumped from the heart on the walls of blood vessels. Systolic pressure is the pressure exerted when the heart contracts and pumps blood into the arteries. Diastolic pressure is the pressure exerted when the heart expands, or relaxes. When you or your doctor take your blood pressure, both your systolic and diastolic pressures are measured. If your blood pressure measurement is 120 over 80 (120/80), for example, your systolic pressure is 120 while your diastolic pressure is 80.
Important Instructions Before Use
-
Do not confuse self-monitoring with self-diagnosis. Blood pressure measurements should only be interpreted by a health professional who is familiar with your medical history.
-
If you are taking medication, consult with your physician to determine the most appropriate time to measure your blood pressure. NEVER change a prescribed medication without first consulting with your physician.
-
Blood pressure can vary based on many factors, including age, gender, weight and physical condition. In general, a person's blood pressure is lower during sleep and higher when he or she is active. Blood pressure can change easily in response to physiological changes. The setting in which a person's blood pressure is measured can also affect the results. Having one's blood pressure measured by a healthcare professional in a hospital or clinic can cause nervousness and may result in a temporarily elevated reading. Because blood pressure measurements taken in a clinical setting can vary considerably from those taken at home, a person's blood pressure should be measured not only occasionally in the doctor's office, but also on a regular basis at home. Also, if you find that your blood pressure is lower at home, this is not unusual. To accurately compare with your physician's reading, take your Panasonic blood pressure monitor to your doctor's office and compare readings in this setting.
-
People suffering from cardiac arrhythmia, vascular constriction, liver disorders or diabetes, people with cardiac pacemakers or a weak pulse, and women who are pregnant should consult their physician before measuring their blood pressure themselves. Different values may be obtained due to their condition.
-
Try to take your blood pressure measurements at the same time and under the same conditions every day.
- The ideal time to measure your blood pressure (to obtain your so-called "base blood pressure") is in the morning just after waking up, before having breakfast and before any major activity or exercise. If this is not possible, however, try to take measurements at a specified time prior to breakfast, and before you have become active. You should relax for about 5 minutes before taking the measurement.
- The following situations may cause substantial variations in blood pressure readings and should therefore be avoided at least 30 minutes prior to taking your blood pressure.
Blood pressure will be higher than usual:
- when you are excited or tense
- when you are taking a bath
- during exercising or soon after exercising
- when it is cold
- within one hour after eating
- after drinking coffee, tea or other beverages containing caffeine
- after smoking tobacco
- when your bladder is full
Blood pressure will be lower than usual:
- after taking a bath
- after drinking alcohol
- Measurements may be impaired if this unit is used near a television, microwave oven, X-ray equipment or other devices with strong electrical fields. To prevent such interference, use the unit at a sufficient distance from such devices or turn the devices off.
- This unit is designed for use by adults. Consult with your physician before using this unit on a child. Do not use on infants or toddlers.
- This unit is not suitable for continuous monitoring during medical emergencies or operations.
- Do not use the unit for any purpose other than measuring blood pressure. Do not use the unit together with other devices.
- Improper handling of batteries may result in battery rupture or in corrosion from battery leakage. Please observe the following to ensure proper use of batteries.
a. Be sure to turn off the power after use.
b. Do not mix different types or sizes of batteries.
c. Change all batteries at the same time. Do not mix old and new batteries.
d. Be sure to insert batteries with correct polarity, as instructed.
e. Remove batteries when they are worn out, and dispose of them properly according to all applicable environmental regulations.
f. Do not disassemble batteries or throw them into a fire.
g. Do not short-circuit batteries.
h. Do not attempt to recharge the batteries included with the unit.
Precautions to Ensure Safe, Reliable Operation
- Do not drop the unit. Protect it from sudden jars or shocks.
- Do not insert foreign objects into any openings.
- Do not attempt to disassemble the unit.
- If the unit has been stored at temperatures below 0^ C ( 32^ F), leave it in a warm place for about 15 minutes before using it. Otherwise, the cuff may not inflate properly.
- Do not store the unit in direct sunlight, high humidity or dust.
- When cleaning, unplug the AC adapter from the AC outlet before cleaning. Also, do not plug in or unplug the AC adapter with wet hands. Doing so may result in electric shock or fire.
- Do not spill water on the main body or AC adapter. Doing so may cause electric shock, short-circuiting, or product damage.
- Do not use the AC adapter if it is damaged or if it plugs into the AC outlet loosely. Doing so may result in electric shock or short-circuiting.
- If the product does not operate properly or seems strange, stop use and unplug the AC adapter immediately, and request inspection and service. Failure to do so could result in the risk of an accident, electric shock, or fire.
- When using the AC adapter, make sure it is fully inserted into the AC outlet. Failure to do so could result in electric shock or short-circuiting.
- When the product is not in use, unplug the AC adapter from the AC outlet. Failure to do so could result in deterioration of the insulation due to dust or moisture, causing a leakage electricity fire.
- When unplugging the AC adapter, do not pull on the cord. Always grasp the AC adapter body and unplug it. Failure to do so could result in the risk of electric shock, short-circuiting, or fire.
- Do not insert any object in the AC adapter or allow debris to collect on it. Doing so could result in the risk of electric shock, short-circuiting, or fire.
- Do not scratch, damage, modify, forcibly bend, pull, or twist the AC adapter cord. In addition, do not place heavy objects on top of the cord or pinch it with objects. Do not wrap the cord around the main body and the AC adapter. Doing any of these things may result in the risk of fire or electric shock.
- Do not step on the AC adapter. Doing so may cause an accident or injury.
- Do not use a voltage converter. Doing so may cause fire or electric shock.
- This AC adapter is designed for use only with Panasonic Blood Pressure Monitors, model EW3152. Use with other electrical devices may result in death or serious personal injury.
- ALWAYS unplug the AC adapter from the power outlet before performing maintenance.
- Do not let this product to be used by children.
- Do not let this product to be used by people who cannot express their feelings, or who cannot operate the product by themselves. Such use may result in an accident or injury.
- Use AC adapter only with electrical outlet of voltages marked on name plate. For use in the U.S.A., use AC adapter only with AC 120V electrical outlet. Use with electrical outlets at other voltages may results in the risk of fire, electric shock, or burns.
- Do not allow any material to drape over the AC adapter. Doing so could result in the risk of fire.
- Do not modify or attempt to repair the product or AC adapter by yourself. Doing so could result in the risk of fire, electric shock, or personal injury.
Easily Check Your Blood Pressure Readings Against the JNC 7\* Classification
Blood Pressure Categories
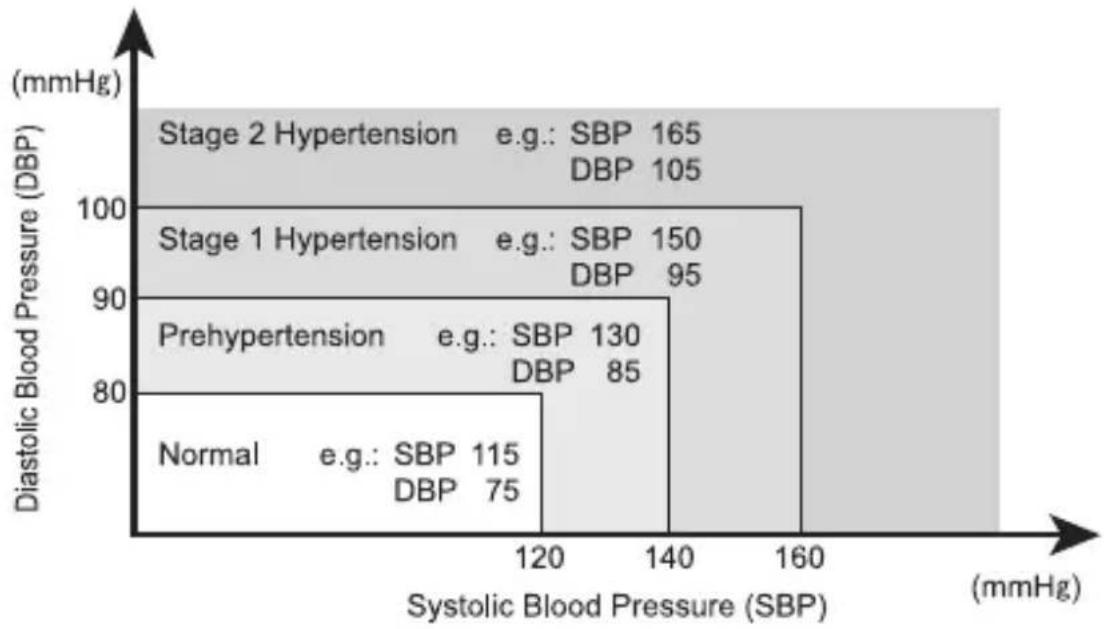
heatmap
| Stages | e.g. | SBP | DBP | |---------------------|-----|-----|-----| | Normal | e.g. | 115 | 75 | | Prehypertension | e.g. | 130 | 85 | | Stage 1 Hypertension| e.g. | 150 | 95 | | Stage 2 Hypertension| e.g. | 165 | 105 |If your systolic pressure falls in one category but your diastolic pressure in another, your level is classified in the higher of the two categories.
* JNC 7: The Seventh Report of the Joint National Committee on Prevention, Detection, Evaluation and Treatment of High Blood Pressure National Institute of Health (NIH) Publication; No. 03-5233, May 2003
IMPORTANT:
- Do not be alarmed by temporarily high or low readings because fluctuations in a person's blood pressure are not uncommon. If possible, measure and record your blood pressure at the same time every day, and consult your physician if you have questions or concerns.
- If abnormal variations in blood pressure are observed in measurement, please consult your physician.
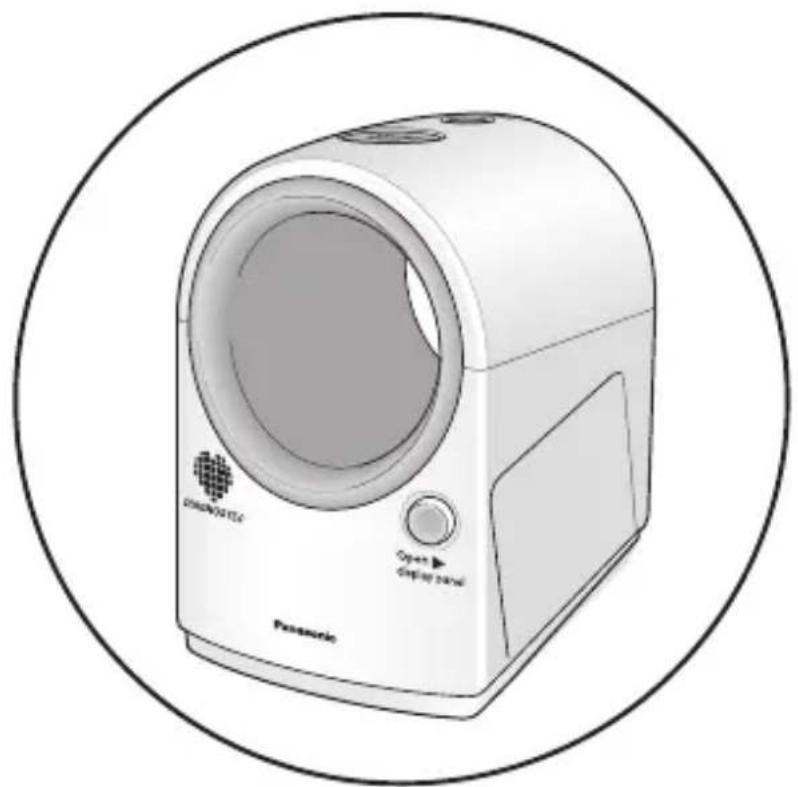
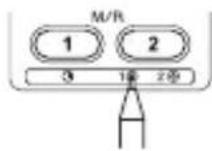
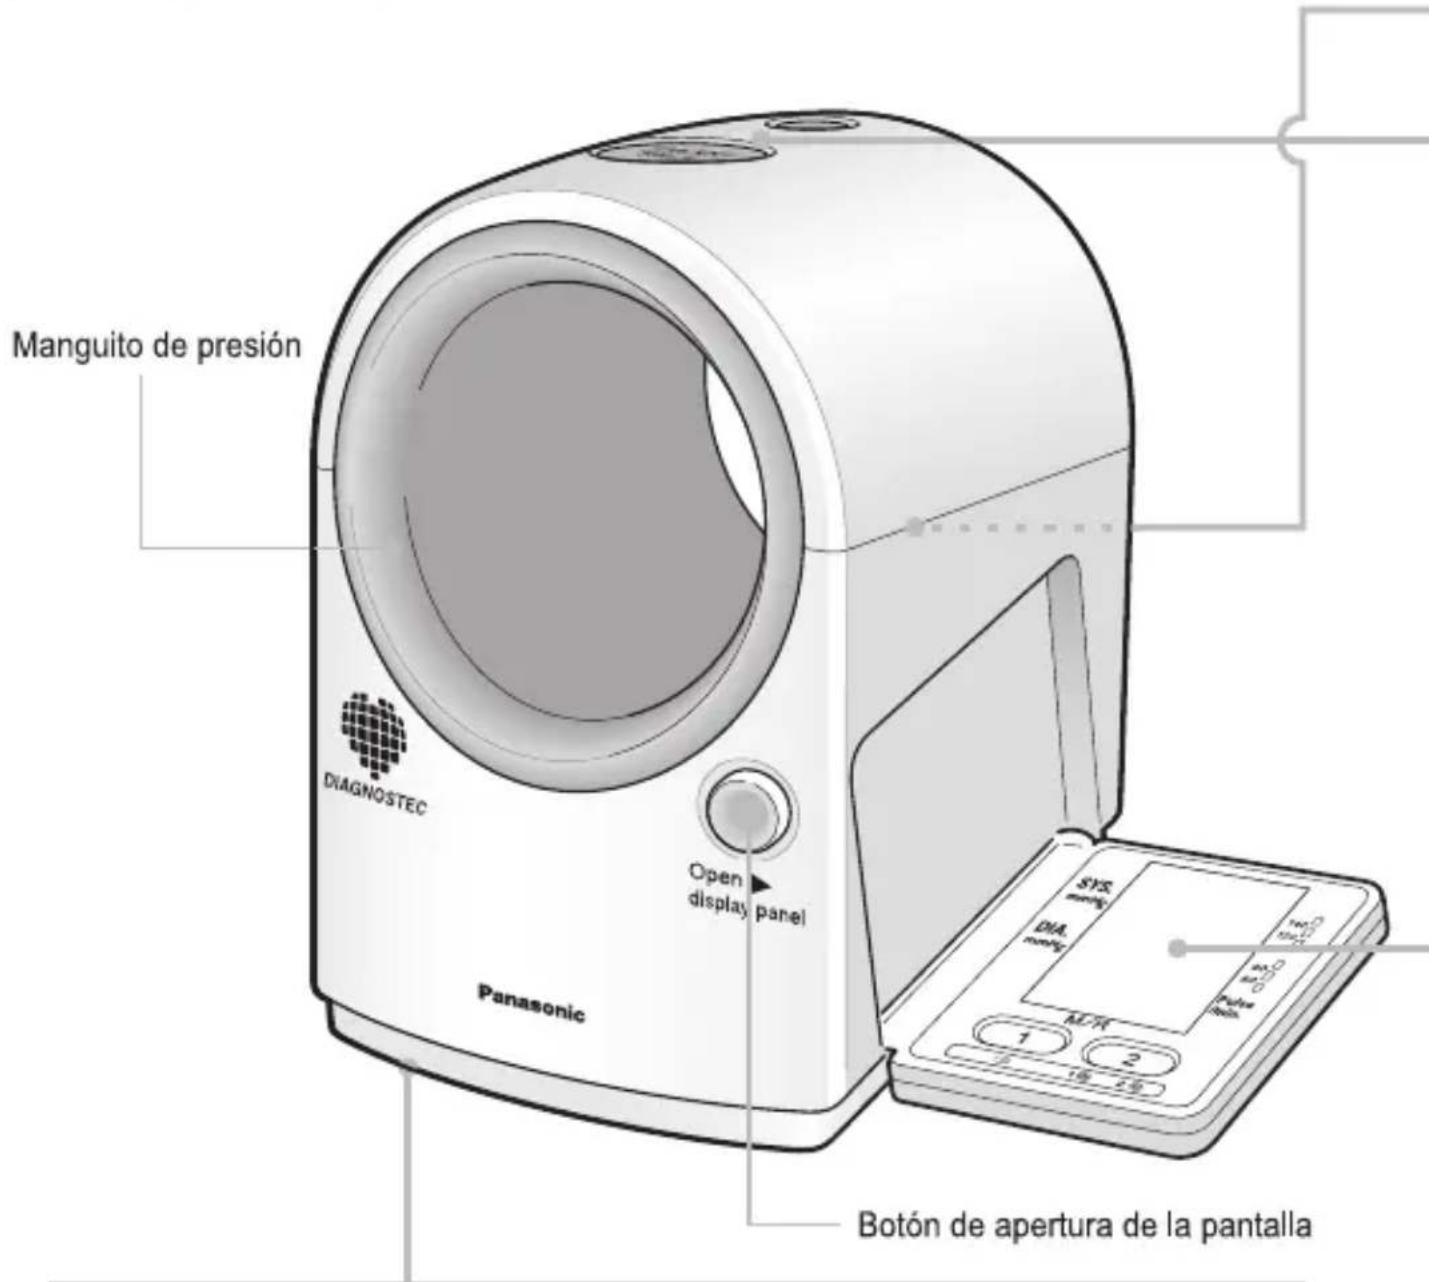
PARTS IDENTIFICATION
Please check the instrument.

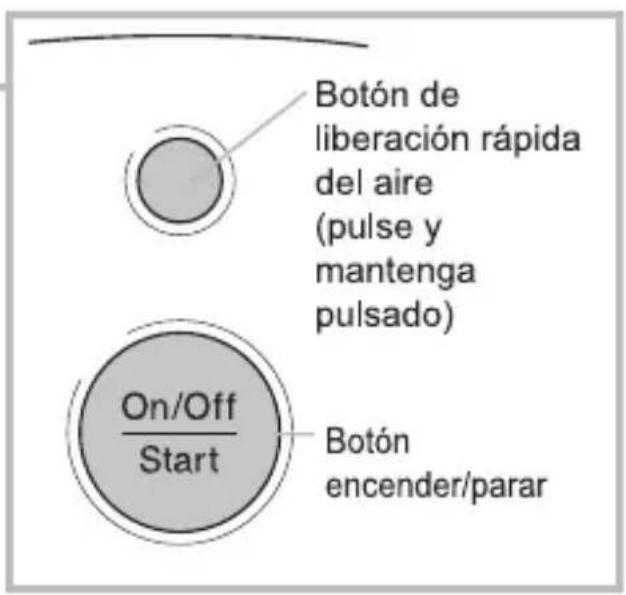
Quick air release button (Push and hold)
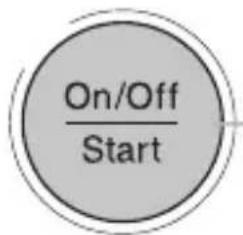
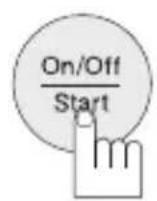
On/Off Start button
Back side of main body
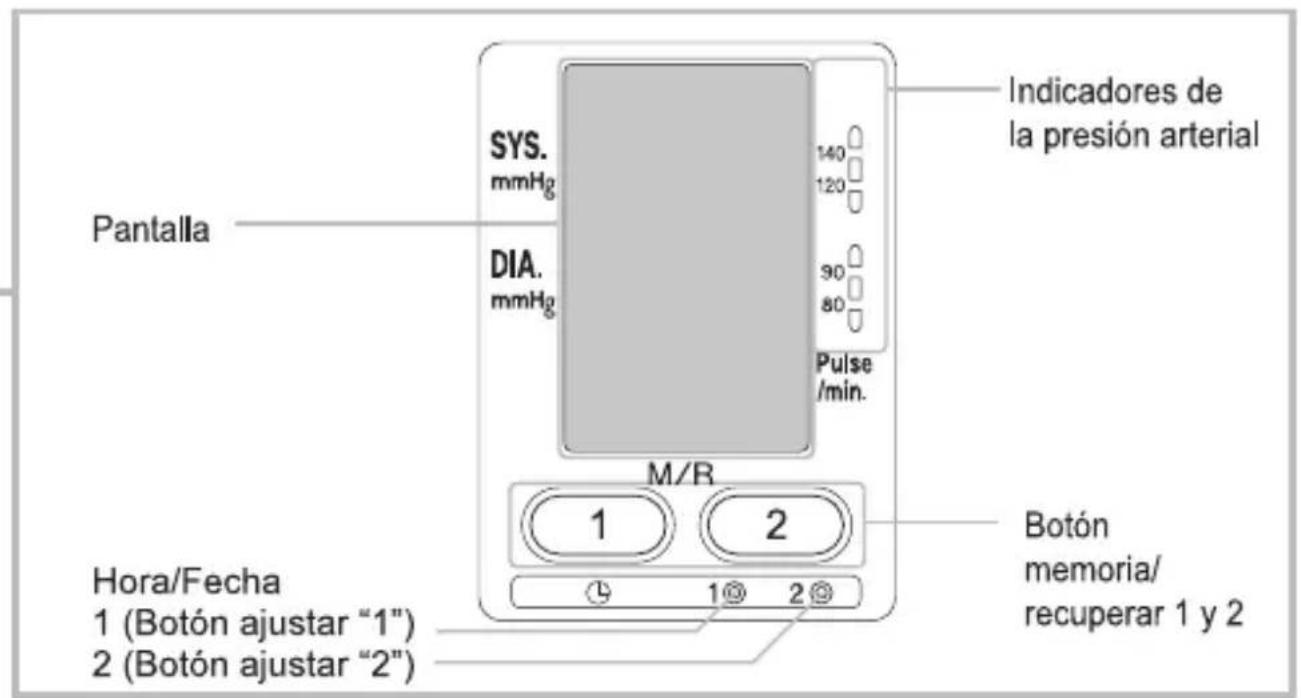
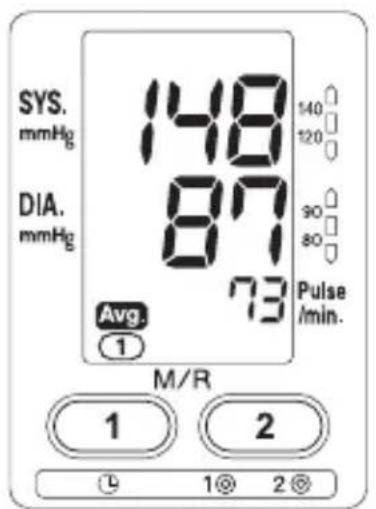
Display
SYS. mmHg
DIA. mmHg
①
1
2②
Blood pressure indicator lamp
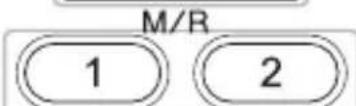
Memory/Recall buttons 1 and 2
Date/Time
1 (Set button)
2 (Adjust button)
Included accessory
AC adapter

natural_image
Line drawing of a plug connected to a cable and connector (no text or symbols)WHEN USING THE AC ADAPTER
* Use only the exclusive AC adapter (included accessory). (See p. 9.)
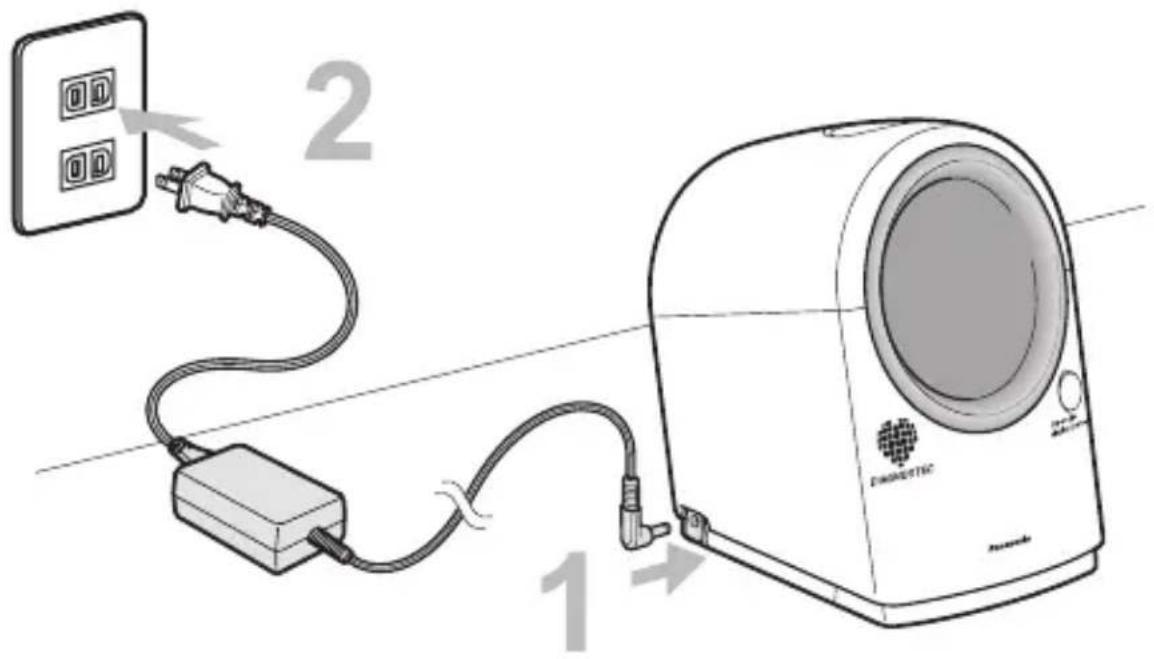
1 Insert the AC adapter plug into the connector on the side of the main unit.
2 Plug the AC adapter fully into the AC outlet. (An operating sound may be heard momentarily when the AC adapter is plugged into the outlet.)
Be sure to use only the exclusive AC adapter (included accessory).
Use of other AC adapters could cause an accident.
Caution when using only the AC adapter
When no batteries are installed in the main unit and the AC adapter is unplugged from the AC outlet or main unit, the set date and time will be reset and deleted. Because of this, even when using the AC adapter, it is recommended that batteries be installed in the main unit.
When the AC adapter is used, power is supplied from the AC adapter, so virtually no power from the batteries is used.
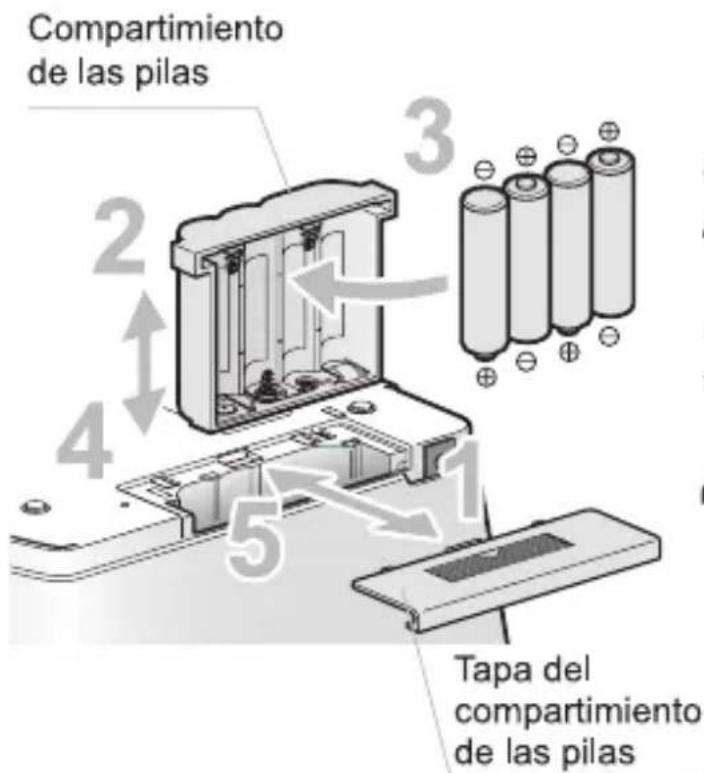
WHEN USING BATTERIES
* Always use alkaline batteries. (Four AA-size LR6 alkaline batteries) (Use only alkaline batteries. Do not use other types of batteries.)
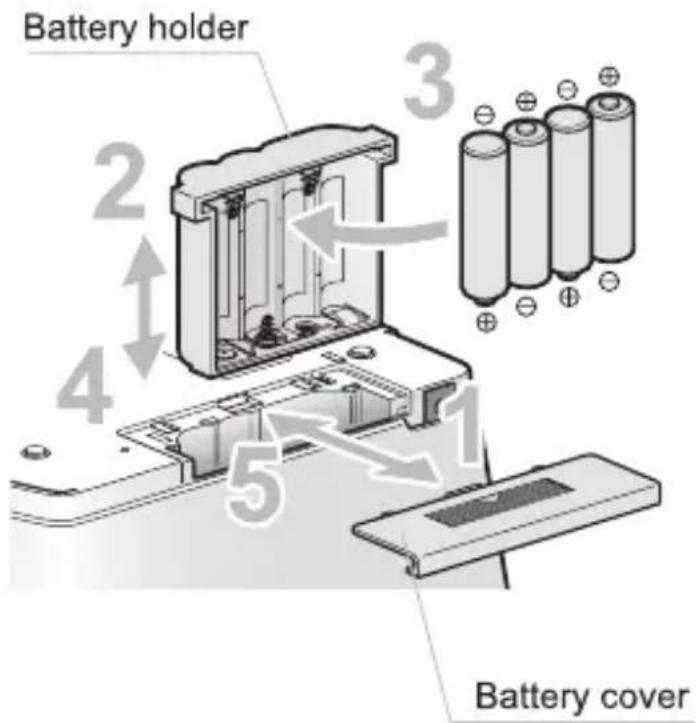
1 Turn the main body over, press lightly on the △ mark on the battery cover, and
remove the cover by sliding it in the direction of the arrow.
2 Slide the battery holder out in the direction of the arrow.
Slide the battery holder out in the direction of the arrow.
Check the polarities of the batteries and install them correctly.
3 Check the polarities of the batteries and install them correctly.
4 Slide the battery holder back in. (An operating sound may be heard momentarily when the battery holder is put back in.)
5 Replace the battery cover and slide it closed.
Replace batteries when:
• The mark shown at left appears during use.
- All displays are lit for a moment after the On/Off Start button is pressed, and then the display goes blank.
- No display appears even if the On/Off Start button is pressed.
- Approximately 200 measurements (approximately 2 months when measurements are taken 3 times per day) can be taken with a set of fresh Panasonic alkaline batteries (four AA-size LR6 batteries). (Measurement conditions: Room temperature 22^ (72^) ; Pressurized to 170mmHg ; Upper arm circumference: 30cm (11-51/64")) (The supplied batteries are included for trial purpose only. Accordingly, there is no guarantee regarding the length of their useful lives.)
- Even if the product is not used for a long time, be sure to replace batteries once a year. If battery replacement is delayed, damage due to battery leakage may occur.
- When replacing batteries, always use four fresh alkaline batteries of the same type from the same manufacturer.
- When room temperature is low, battery life may become shorter.
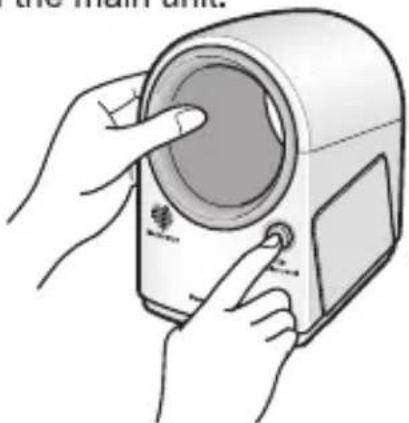
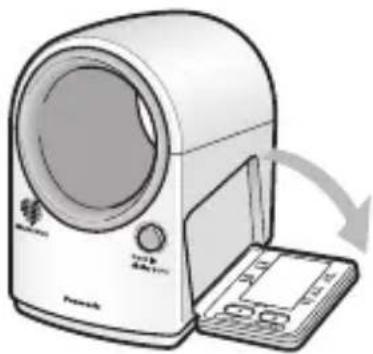
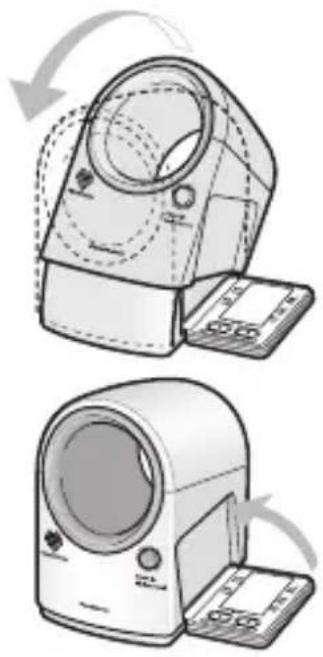
BEFORE STARTING MEASUREMENTS
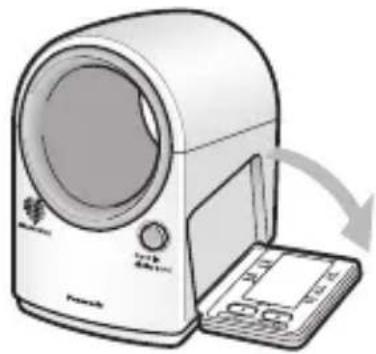
Open the display
Press the Open button for display on the front of the main unit.
natural_image
Illustration of hands inserting a device into a speaker into a microphone (no text or symbols visible)
natural_image
Illustration of a portable electronic device with a speaker and control panel, showing a curved arrow indicating rotation (no text or symbols present)* The display will only open partially by itself. Use your hand to open the display fully for use.
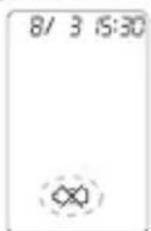
Setting the date and time
* Please be sure to set the date and time before taking the first measurement after purchasing the blood pressure monitor or after changing the batteries.
- If measurements are taken without setting the date and time, the date and time will not be stored.
- Please read the "Caution when using only the AC adapter" on p. 10.
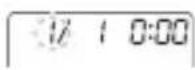
1 Press the Set button below the display. The month value will blink.
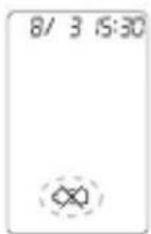
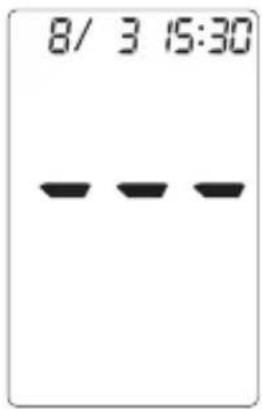
8/3 0:00
4 Set the hour.
① Press the Set button. The hour value will blink.
② Press the Adjust button to set the correct hour.
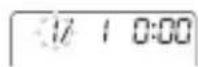
2 Set the month.
Press the Adjust button repeatedly to set the correct month.
8/3 15:00
5 Set the minute.
① Press the Set button. The minute value will blink.
② Press the Adjust button repeatedly to set the correct minute.
8/10:00
3 Set the day.
① Press the Set button. The day value will blink.
② Press the Adjust button repeatedly to set the correct day.
8/3 15:30
6 Press the Set button at the exact time the minute
changes to finalize the date/time setting.
7 Press the On/Off Start button to switch off the power.
When the date or time are blinking, the clock is stopped.
During leap years, 3/1 will be displayed on February 29. For this reason, reset the date to 2/29. Use the tip of a ballpoint pen or similar object to lightly press the Set and Adjust buttons. If you use a mechanical pencil, the lead may break, causing a malfunction.
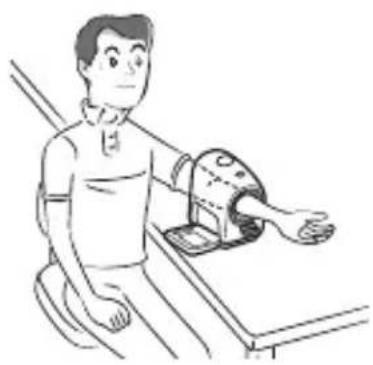
Getting into the measurement position
Either the left or right arm can be measured. However, when measurements are taken using the right arm, it may be difficult to see the display.
* Since there may be blood pressure differences of around 10mmHg between the left and right arm, be sure to use the same arm for all measurements.
* The product cannot be used while lying down. Please sit upright during use.
Place the main unit on a table or similar object so that the main unit is at the same height as your heart.
* Differences in height will cause differences in blood pressure values.
If the heights of the chair and table are not suitable, you may have to lean forward. In this case, form a stable stack of books or similar objects under the main unit to adjust the height of the main unit.

natural_image
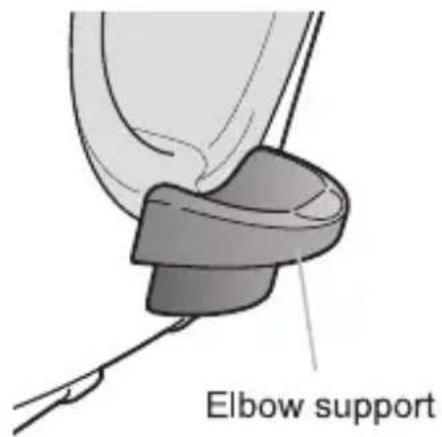
Simple line drawing of a computer monitor inside a car (no text or symbols)Elbow support
1 Sit next to the table as shown in the figure at left.
2 Slide your arm through the measuring section.
Pull the main unit close to you so that you do not have to lean to reach it.
- Remove your shirt or roll up your sleeve so that the measuring section will be on your bare skin.
- If rolling up your sleeve causes pressure on your arm or underarm, remove your shirt for measurements.
Be sure that the rolled-up sleeve does not get inside the measuring section when taking measurements.
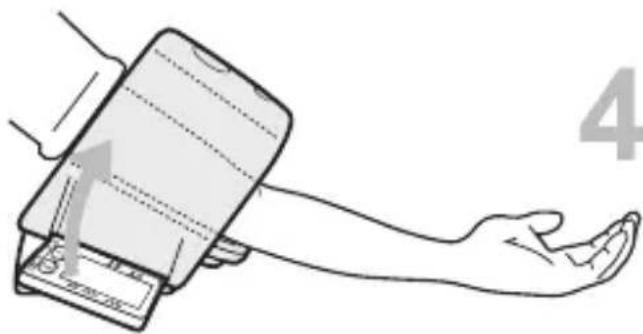
3 Place your elbow in the support.

natural_image
Illustration of a hand pressing a device on a forearm, with no text or symbols present- If it is difficult to find the elbow support, use your other hand to locate it.
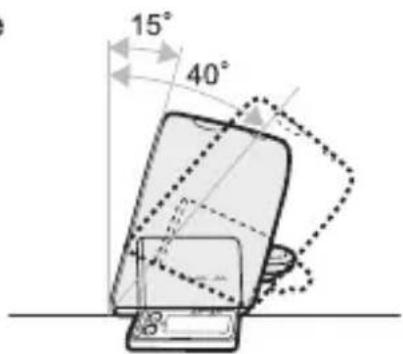
Stretch out your arm and sit straight. - The unit will naturally pivot upwards up to 15^ as you place your hand on the table in a relaxed position.
CAUTIONS DURING MEASUREMENTS
In the following situations, accurate measurements cannot be taken.
○Within 1 hour of eating or drinking alcohol
○Immediately after drinking coffee or tea, or smoking
○Immediately after exercising or taking a bath
-Wait at least 20 minutes and take a measurement while staying quiet.
○In a moving vehicle
○In cold places
-Take measurements at ambient temperatures of 10°C to 40°C (50°F to 104°F).
○When you need to urinate
-Wait several minutes after urinating before taking measurements.
TAKING A READING
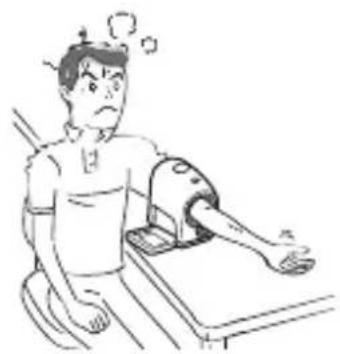
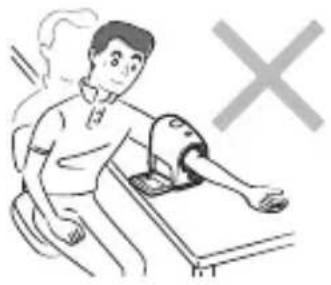
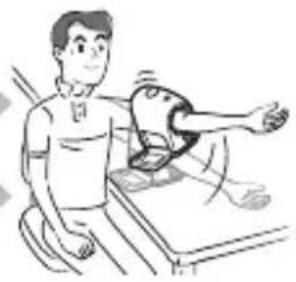
Cautions to obtain accurate measurements Sit quietly and relax while taking measurements.
Do not lean forward with your body at an angle during measurements.
Take measurements in the proper posture.

natural_image
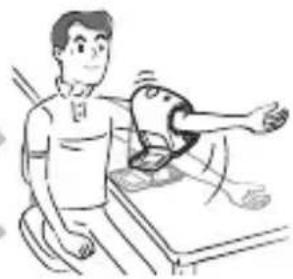
Illustration of a person using a handheld device to interact with another person (no text or symbols present)Do not take measurements at the elbow. Place your elbow in the elbow support.

natural_image
Line drawing of a person using a handheld device on a surface (no text or symbols)Do not lift the main unit off the table. Keep it on the table during measurements.
natural_image
Illustration of a person using a computer with a hand gesture (no text or symbols)Do not let your rolled-up sleeve be inside the measuring section. Roll your sleeve far up your arm.
natural_image
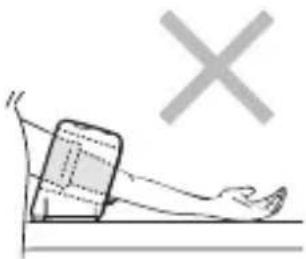
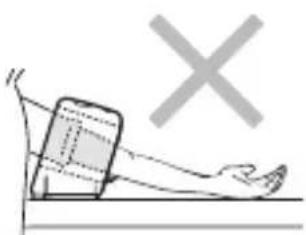
Illustration of a person lying on the ground with a smartphone and a cross symbol above (no text or labels)Do not lift your arm. Rest your hand on the table with your palm upwards.

natural_image
Illustration of a person using a handheld device to interact with another person (no text or symbols present)Be sure to obey the following points for accurate measurements:
- Do not move your body, arm, or fingertips.
- Do not touch the main unit.
- Do not talk.
- Do not use a cellular phone near the main unit.
Not following these points may make it impossible to obtain accurate measurements.
The angle of this product can be adjusted so that measurements can be taken without having to be in a forced posture.
- The angle can be adjusted only when the display is open.
• The angle is not locked.
Even if you sit still, the angle may change slightly during pressurization.
However, there is no effect on accuracy even if the angle changes during measurements.

TAKING A READING (CONTINUED)
Measurement
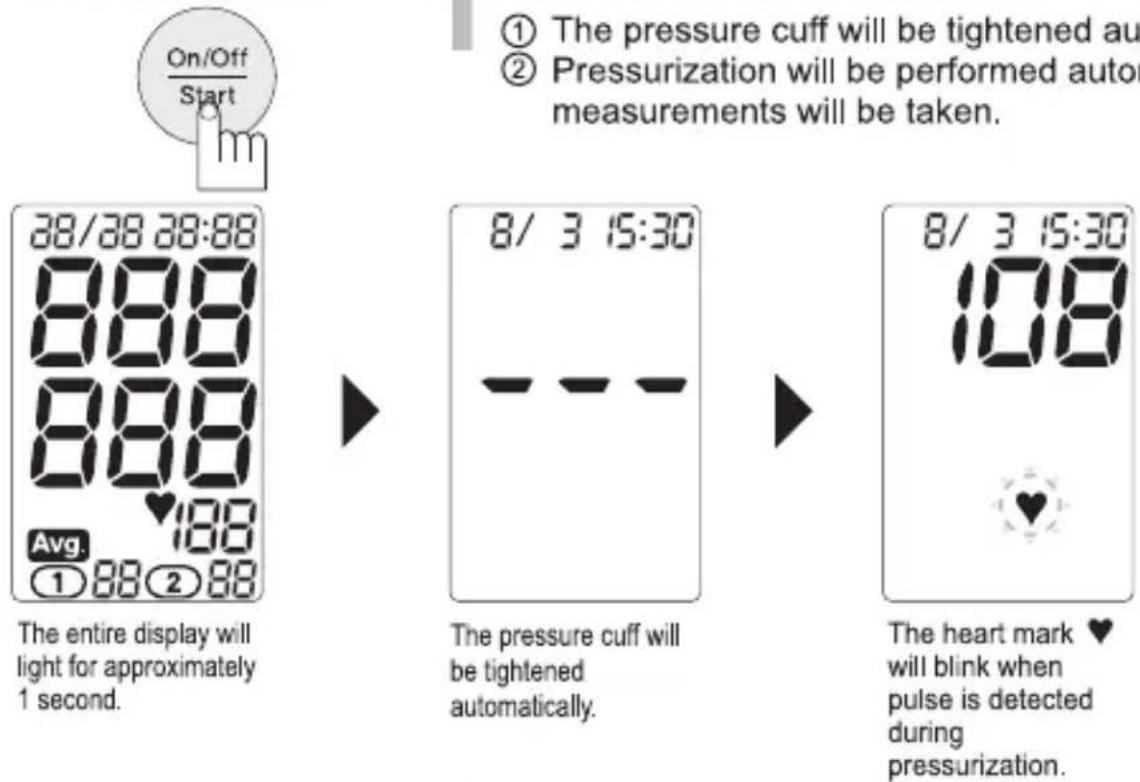
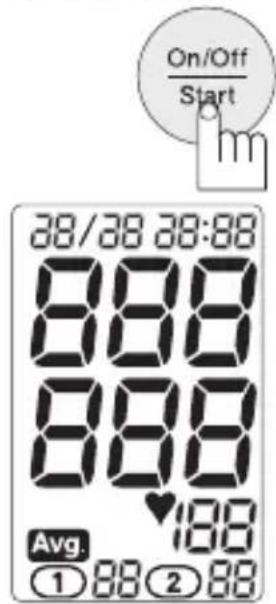
The entire display will light for approximately 1 second.
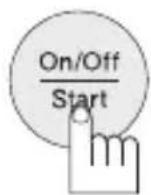
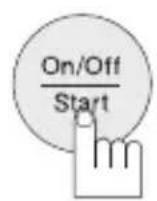
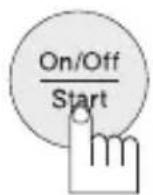
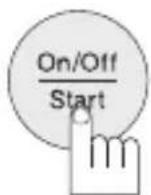
1 Press the On/Off Start button.
① The pressure cuff will be tightened automatically.
② Pressurization will be performed automatically and measurements will be taken.
The pressure cuff will be tightened automatically.
The heart mark ♥ will blink when pulse is detected during pressurization.
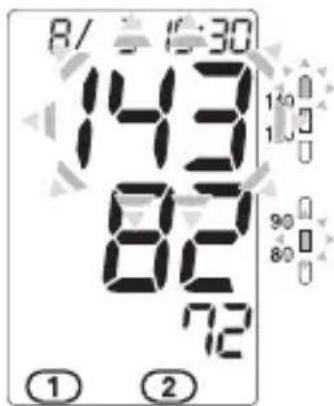
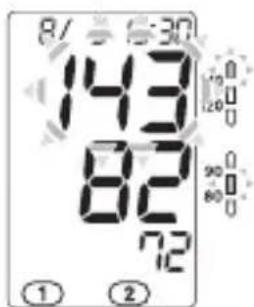
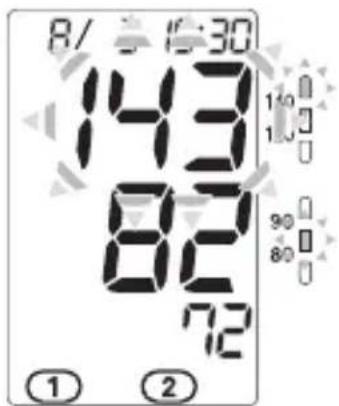
2 When measurement has been completed, the blood pressure and pulse values will be displayed.
After measurement values have been shown for approximately 5 seconds, the pressure cuff will be loose. (However, the time depends on the size of the arm.)
• The blood pressure indicator lamps will light (for approximately 12 seconds).
- If the measured value is in the high blood pressure region, the values will blink (for approximately 12 seconds). (For how to read the blood pressure display, see p. 17.)
• The ① ② marks will light. (For storing measurement values, see p.19.)
* The pulse rate value is the beats per minute calculated based on the pulse rate during measurement.
3 Remove your arm from the main unit.
4 To switch off the blood pressure monitor, press the On/Off Start button.
- If you forget to switch it off, the blood pressure monitor will switch off automatically after approximately 5 minutes.
Alarm function signals high blood pressure
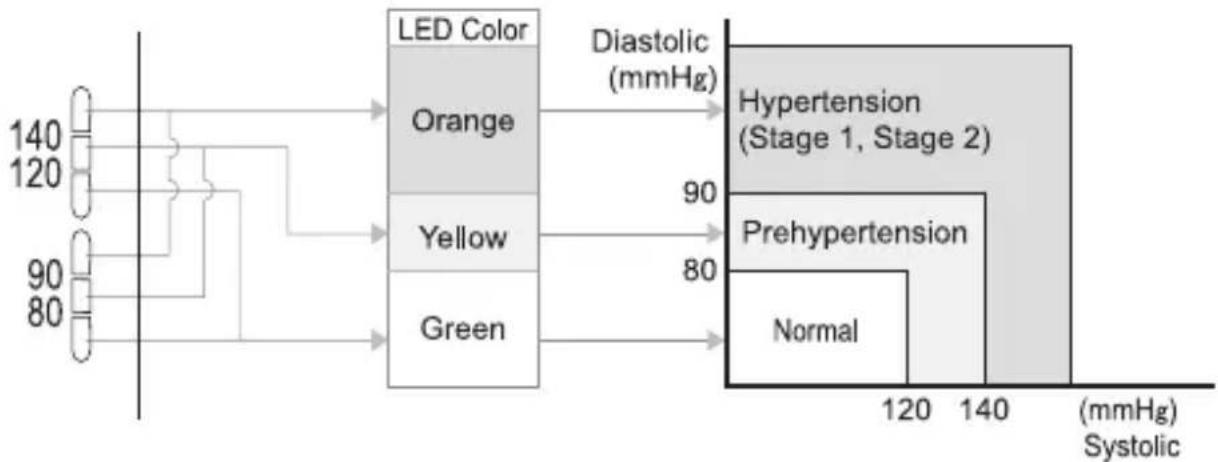
Blood pressure values for both systolic and diastolic readings are determined and indicated via a three-color LED system as being within normal or hypertensive ranges based on definitions and classification of blood pressure levels by the JNC 7.
Moreover, when blood pressure is in the high range, the reading displayed on screen flashes on and off to alert user.
According to JNC 7 Classification, values consistently in excess of 140 mmHg (Sys.) and/or 90 mmHg (Dia.) are considered to constitute high blood pressure.
flowchart
graph LR
    A["LED Color"] --> B["Orange"]
    A --> C["Yellow"]
    A --> D["Green"]
    B --> E["Hypertension (Stage 1, Stage 2)"]
    C --> F["Prehypertension"]
    D --> G["Normal"]
    H["Diastolic (mmHg)"] --> B
    I["(mmHg) Systolic"] --> J["120 140"]
- If the measured blood pressure value is in the high blood pressure region, the values will blink for approximately 12 seconds. (Only immediately after measurement)
- Systolic blood pressure: 140mmHg or higher - Diastolic blood pressure: 90mmHg or higher
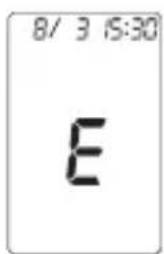
If measurements could not be taken properly

The remeasure mark E will be displayed.
When taking successive measurements, press the On/Off Start button to switch off the blood pressure monitor once and stay quiet for 4 to 5 minutes, and then take the next measurement.
Advice:
In general, blood pressure measurements are lower for the second measurement because you are less nervous and are more tranquil.
For people who easily get tense, measuring twice each time is very effective.
When two measurements are taken, normally the smaller measurement is stored.
When taking two measurements, always stay quiet for 4 to 5 minutes after the first measurement before taking the second measurement.
To interrupt measurements quickly
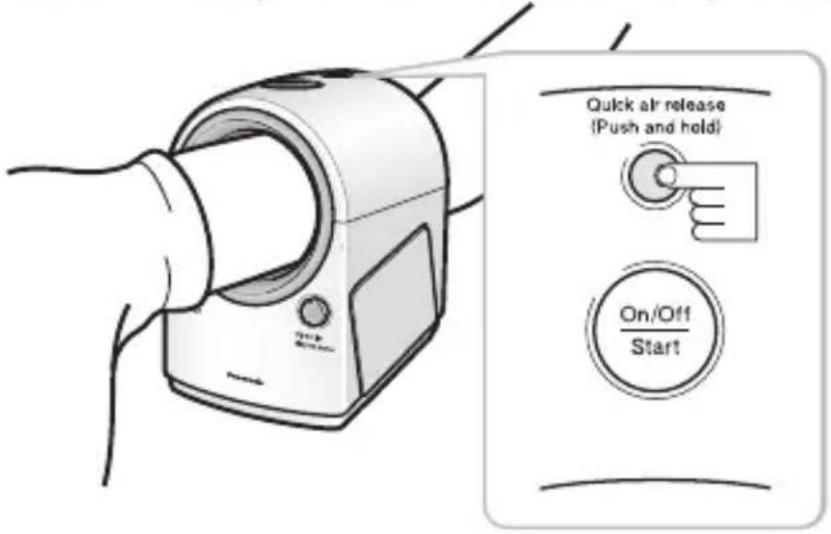
If the pressure cuff will not deflate even if the On/Off Start button is pressed, press the Quick air release button and hold it pressed. The air will be released in approximately 4 seconds.
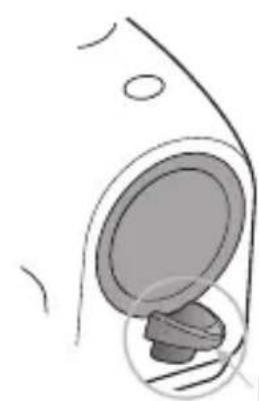
If the pressure cuff comes off:
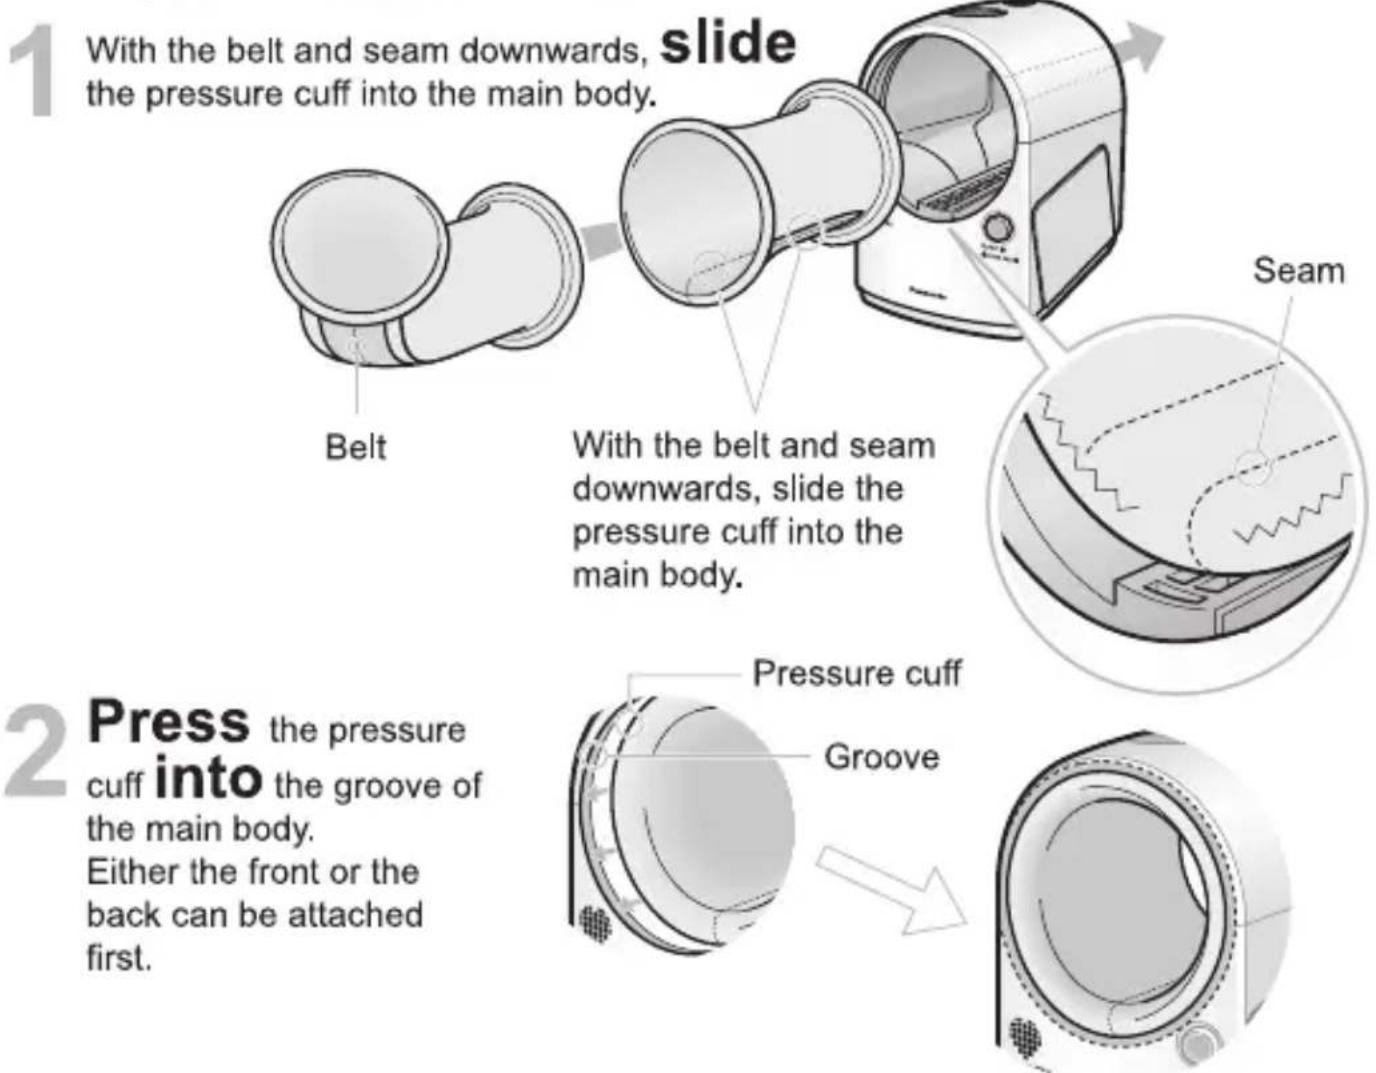
* When re-attaching, be sure not to touch the inside of the main body where the pressure cuff has been removed. Doing so may result in an accident or injury.
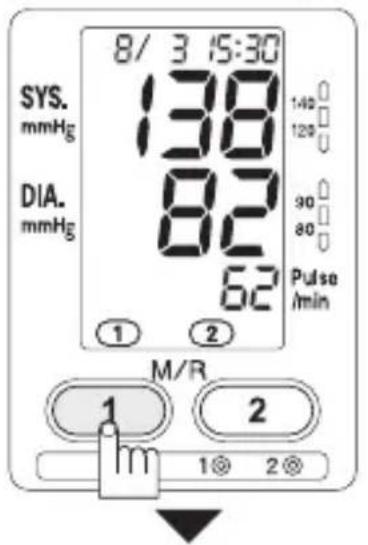
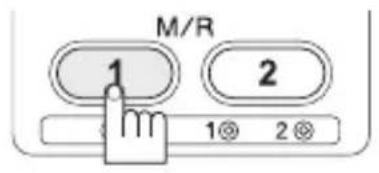
STORING MEASUREMENT VALUES
This product can separately store 90 measurements each for two persons.
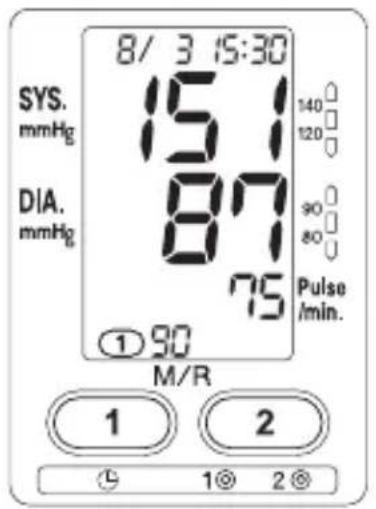
Number of stored data
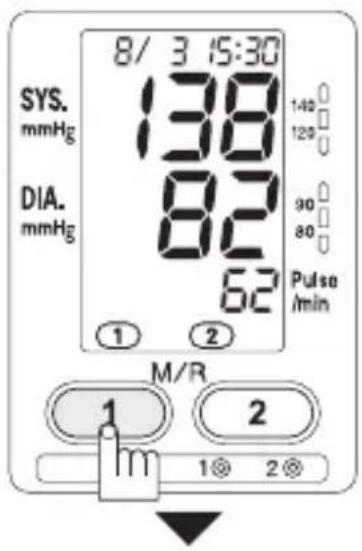
After measurement, the ①② will light.
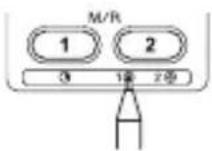
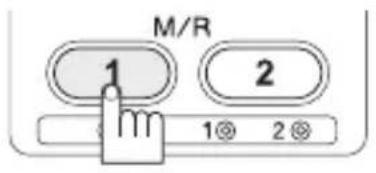
Press the M/R (memory/recall) button with the number corresponding to the person for which measurements should be stored.
Example: Person A: Press ①
Person B: Press ②
Storing is completed.
- Up to 90 measurement values can be stored. When the memory is full and additional values are stored, the oldest value in memory will be deleted and the new value will be stored.
- If measurements could not be taken properly (the E mark is shown instead of the blood pressure value), measurement values cannot be stored.
* However, if the E mark is displayed for only the pulse value, data can be stored.
To erase all measured values stored in memory:
- Recall the measurement value for the person whose data you want to delete by pressing that person's M/R (memory/recall) button.
- Press the same M/R (memory/recall) button again, and hold it pressed until the measurement values disappear (approximately 3 seconds or more).
* It is not possible to erase single measurement values.
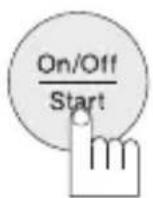
To switch off the blood pressure monitor,
press the On/Off Start button.
- If you forget to switch it off, the blood pressure monitor will switch off automatically after approximately 5 minutes.
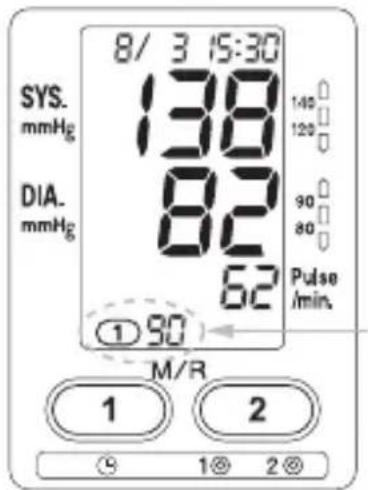
RECALLING STORED MEASUREMENT VALUES
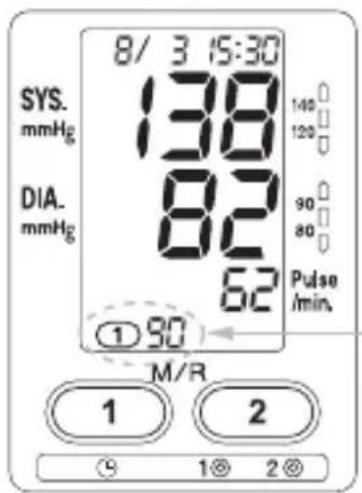
1 Press the M/R (memory/recall) button for the person whose data you want to recall.
The average of all measured values in memory will be shown.
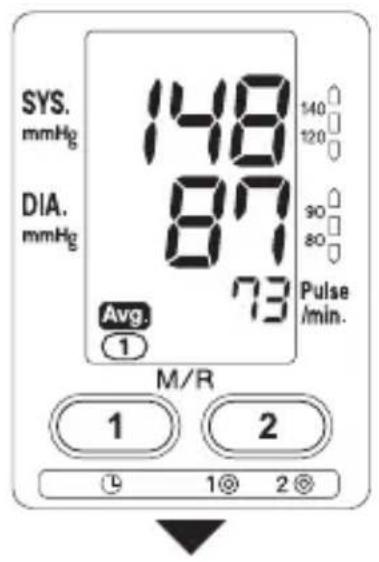
• Avg. mark will be shown at the bottom of the display.
- For example, if 90 measured values are stored, the average of the 90 measurements will be shown. (If only 1 measurement is stored, the Avg. mark will not be shown.)
- The blood pressure indicator lamps will light (for approximately 6 seconds).
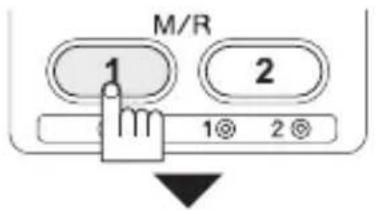
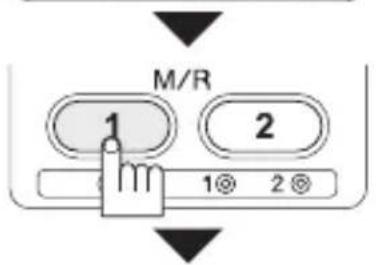
2 Press the M/R (memory/recall) button again.
Each time you press the M/R (memory/recall) button, the previously stored measurement values will be shown in order, starting with the newest data.
- The blood pressure indicator lamps will light (for approximately 6 seconds).
- If no measurement values are stored, no value will be shown.
Press the M/R (memory/recall) button lightly for only a short time. If you hold the button pressed for approximately 3 seconds or longer, all data in memory will be erased, so please be careful.
3 To cancel measurement value recall, press the On/Off Start button.
- If you forget to switch it off, the blood pressure monitor will switch off automatically after approximately 30 seconds.
AFTER USE/SPECIFICATIONS
natural_image
Illustration of a portable radio device with open lid and side panel, showing mechanical components and rotation arrows (no text or symbols)1 If the main body is set at an angle, return it to normal.
2 Fold the display up against the main body for storage.
- Fold it up until you can feel a click with your hand.
Specifications (Main body)
| Power source | DC 6V (4 LR6 AA-size alkaline batteries)AC 100-240V 50-60Hz (When using AC adapter) |
| Display | Digital LCD |
| Measurement method | Oscillometric system |
| Measurement range | Blood pressure: 0 to 280mmHgPulse rate: 30 to 160 beats per minute |
| Accuracy | Blood pressure: Within ±3mmHgPulse rate: Within ±5% |
| Operation temperature / humidity range | 10 to 40°C (50 to 104°F), 15 to 90% RH |
| Storage temperature/ humidity range | -20 to 60°C (-4 to 140°F), 10 to 95% RH |
| Measurable arm circumference | Approx. 20 to 34cm (7-3/4" to 13-1/4") |
| Weight | Approx. 4.9 lbs. (1200g) (not including batteries) |
| Dimensions | 22 × 15.5 × 21cm (8-21/32" × 6-3/32" × 8-1/4") |
Specifications (AC adapter)
| Input | AC 100-240V, 50-60Hz |
| Output | DC 6V 2A |
CAUTIONS DURING MEASUREMENTS
In the following situations, accurate measurements cannot be taken.
Within 1 hour of eating or drinking alcohol

natural_image
Illustration of a person sitting at a table with two bowls and a plate, no text or symbols presentImmediately after exercising or taking a bath

natural_image
Cartoon illustration of a person wearing a cap and holding a bag (no text or symbols)Wait at least 20 minutes and take a measurement while staying quiet.
Immediately after drinking coffee or tea, or smoking

natural_image
Illustration of a person sitting at a table with a steaming cup (no text or symbols)In a moving vehicle

natural_image
Line drawing of a person driving a car, showing steering wheel and headrest (no text or symbols)In cold places

natural_image
Illustration of a person wearing a beret and scarf, with snow falling in the background (no text or symbols)Take measurements at ambient temperatures of 10 to 40°C (50 to 104°F).
When you need to urinate

natural_image
Illustration of a person with thought bubble showing a stomach (no text or symbols)Wait several minutes after urinating before taking measurements.
Q & A
Q Why are the blood pressure values measured at home different from those measured at the doctor's office?
A Blood pressure varies 24 hours a day.
In addition, it can change greatly depending on the weather, your mental state, exercise, etc.
In particular, there is the phenomenon of "White uniform hypertension" at doctor's offices, where the blood pressure measured in a doctor's office is higher because of stress or worry.
In addition, if the blood pressure measured at home is sometimes higher and sometimes lower than the blood pressure measured at the doctor's office, the following can be considered. Please pay attention to these points when taking measurements.

natural_image
Line drawing of a person using a handheld device to interact (no text or symbols present)① Measuring posture was poor.
Did you take measurements while leaning forward with your body at an angle?

natural_image
Illustration of a person using a tool on a machine (no text or symbols)② Measurements were not taken at the upper arm.
Please take measurements with your elbow in the elbow support of the main body. (See p. 13.)
natural_image
Illustration of a person sitting on a treadmill with a mechanical device, no text or symbols present③ Were you worried or upset during measurements?
Before taking measurements, take 2 or 3 deep breaths and relax, so that your blood pressure stabilizes. In addition, it is recommended that you sit quietly for about 5 minutes before taking measurements.
Q Why are measured blood pressure values different each time I take a measurement?
A

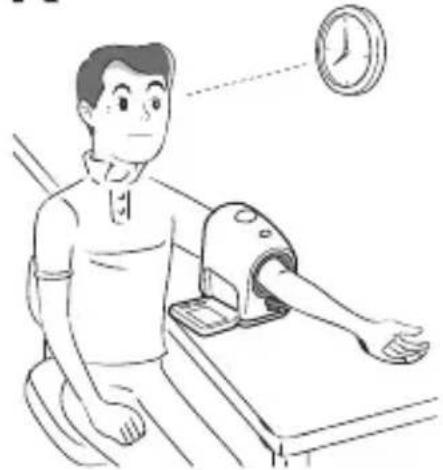
natural_image
Illustration of a person using a medical device with a wall clock above (no text or symbols)① Blood pressure changes even within a single day, and it is different depending on the measurement posture. Because of this, when taking measurements, be sure to always take measurements under the same conditions.
② For persons taking blood pressure medication, blood pressure may change greatly due to the effects of the medication.
③ When taking 2 measurements in succession, be sure to stay quiet for 4 to 5 minutes after the first measurement before taking the next measurement.
Q
Why are the measured values different for the left and right arm?
A

natural_image
Illustration of a person using a handheld device to interact with one arm raised (no text or symbols present)It is said that differences in blood pressure values between the left and right arms may be around 10mmHg. The blood pressure can be measured in either the left or right arm, but all measurements should be taken using the same arm for comparative consistency.
CARE AND MAINTENANCE
Do not apply excessive force to the instrument or drop the instrument.
- Doing so may cause damage.
If the instrument is stored at temperatures below the freezing point, do not use it immediately.
Leave it in a warm place for at least an hour before use.
- If the instrument is not allowed to warm up, it may not pressurize.
Do not insert dust or foreign objects into the instrument.
- Doing so may result in damage.
If the instrument becomes dirty, clean it with a soft cloth moistened with warm water or soapy water.
(Do not use alcohol, benzine, or paint thinner.)
- Use of such chemicals may result in cracking or discoloration.
For storage, avoid high temperatures, high humidity, and direct sunlight.
• Storage under such conditions may result in damage.
The pressure cuff cannot be washed.
TROUBLESHOOTING
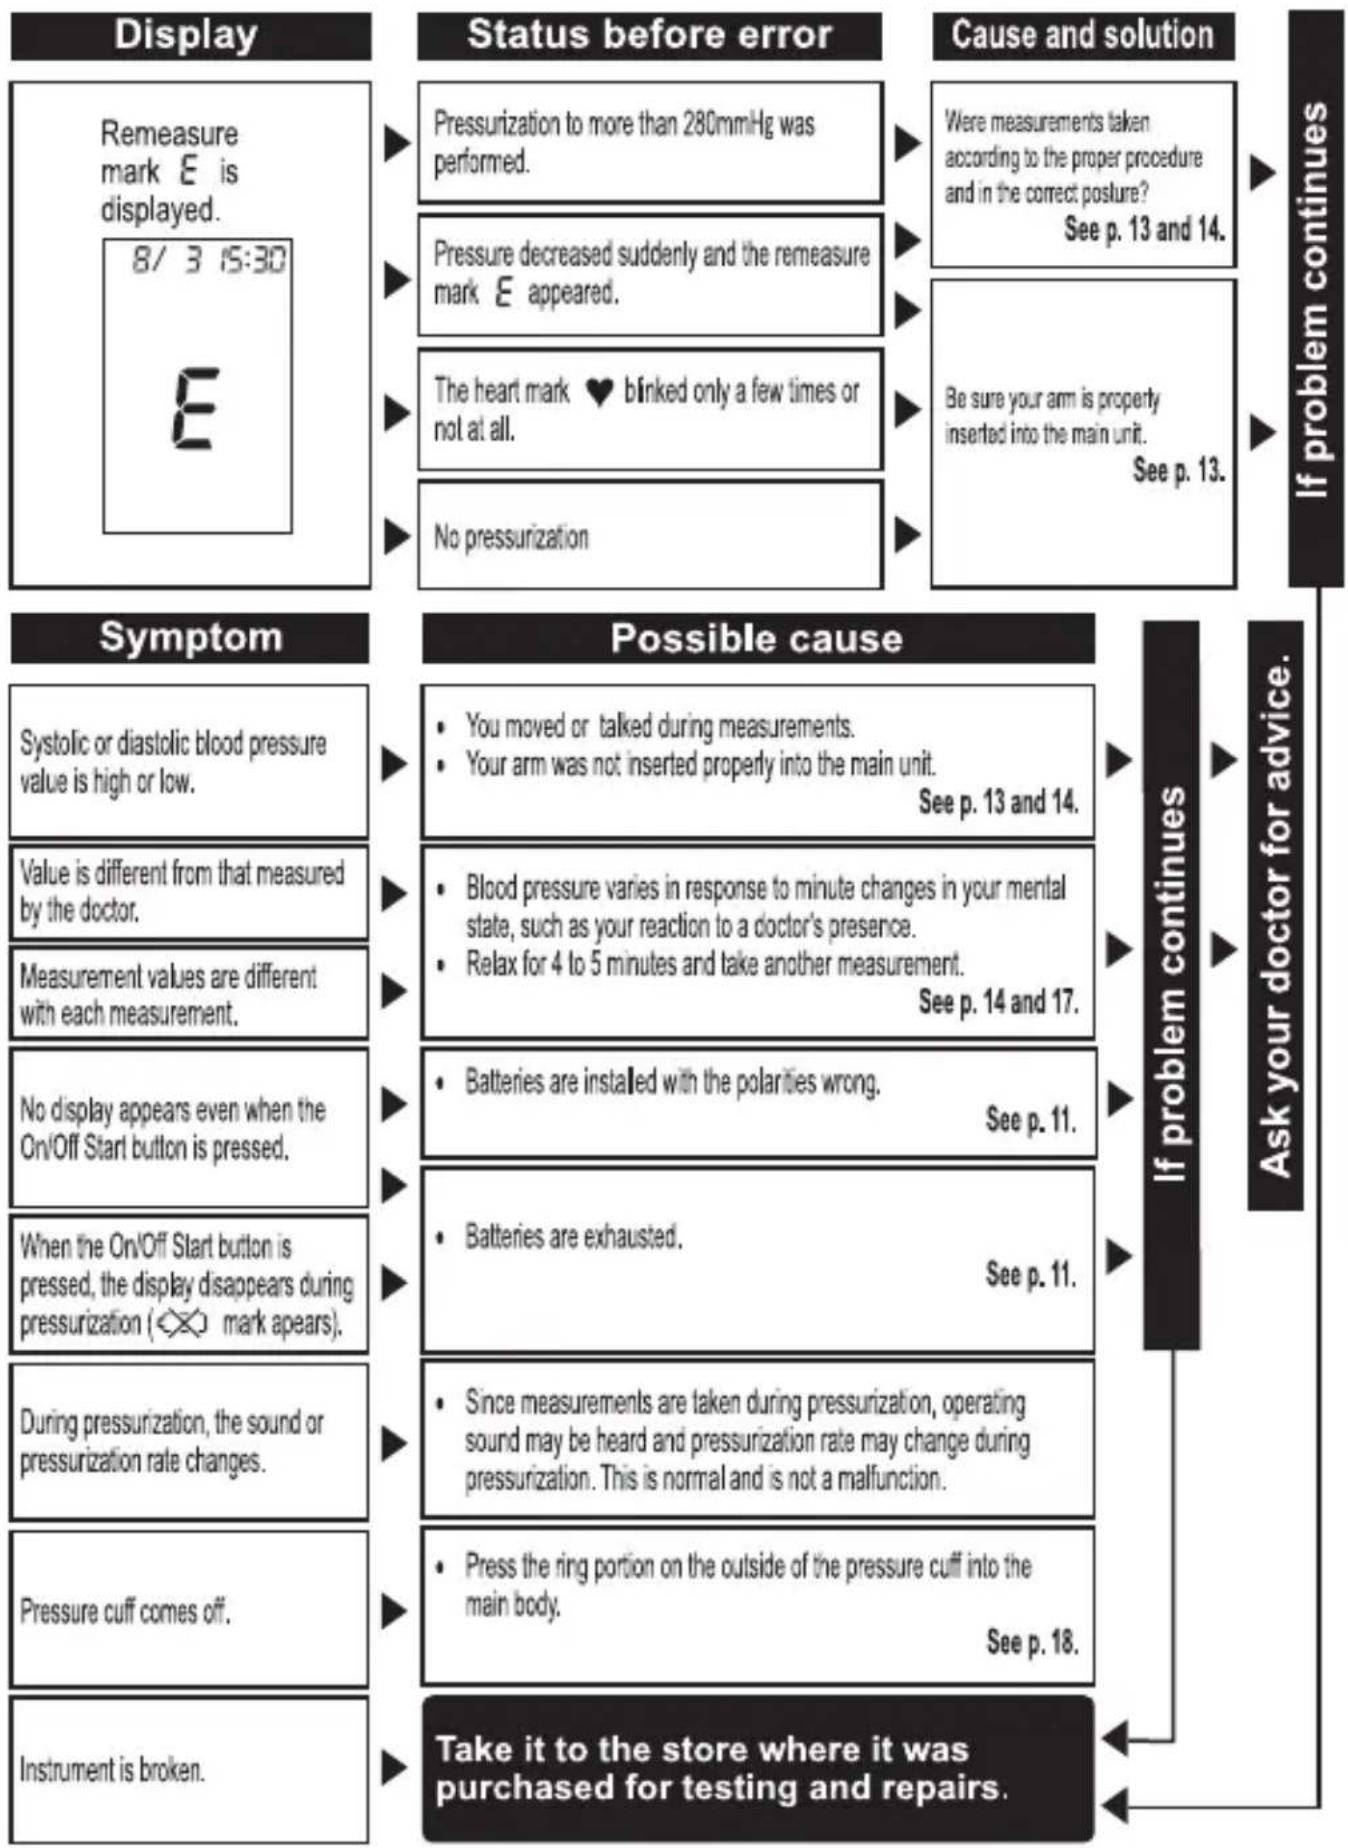
flowchart
graph TD
    A["Display"] --> B{Status before error}
    B --> C1["Pressure: 8/3 15:30 E"]
    B --> C2["Pressure: 280mmHg was performed"]
    B --> C3["Pressure: decreased suddenly and remeasure mark E appeared"]
    B --> C4["The heart mark ♥ blinked only a few times or not at all"]
    B --> C5["No pressurization"]
    C1 --> D1["Cause and solution"]
    C2 --> D2["Cause and solution"]
    C3 --> D3["Cause and solution"]
    C4 --> D4["Cause and solution"]
    C5 --> D5["Cause and solution"]
    D1 --> E1["If problem continues"]
    D2 --> E2["If problem continues"]
    D3 --> E3["If problem continues"]
    D4 --> E4["If problem continues"]
    D5 --> E5["If problem continues"]
    E1 --> F1["Symptom: Systolic or diastolic blood pressure value is high or low."]
    E2 --> F2["Value is different from that measured by the doctor."]
    E3 --> F3["Measurement values are different with each measurement."]
    E4 --> F4["No display appears even when the On/Off Start button is pressed."]
    E5 --> F5["When the On/Off Start button is pressed, the display disappears during pressurization (XXXX mark appears)."]
    E6["Symptom"] --> F6["Possible cause: You moved or talked during measurements.<br>Your arm was not inserted properly into the main unit.<br>See p. 13 and 14."]
    E7["Possible cause"] --> F7["• Blood pressure varies in response to minute changes in your mental state, such as your reaction to a doctor's presence.<br>Relax for 4 to 5 minutes and take another measurement.<br>See p. 14 and 17."]
    E8["Possible cause"] --> F8["• Batteries are installed with the polarities wrong.<br>See p. 11."]
    E9["Possible cause"] --> F9["• Batteries are exhausted.<br>See p. 11."]
    E10["Possible cause"] --> F10["• Since measurements are taken during pressurization, operating sound may be heard and pressurization rate may change during pressurization. This is normal and is not a malfunction."]
    E11["Possible cause"] --> F11["• Press the ring portion on the outside of the pressure cuff into the main body.<br>See p. 18."]
    E12["Possible cause"] --> F12["Take it to the store where it was purchased for testing and repairs."]
    style A fill:#f9f,stroke:#333
    style B fill:#ccf,stroke:#333
    style C1 fill:#cfc,stroke:#333
    style C2 fill:#cfc,stroke:#333
    style C3 fill:#cfc,stroke:#333
    style C4 fill:#cfc,stroke:#333
    style C5 fill:#cfc,stroke:#333
    style C6 fill:#cfc,stroke:#333
    style C7 fill:#cfc,stroke:#333
    style C8 fill:#cfc,stroke:#333
    style C9 fill:#cfc,stroke:#333
    style C10 fill:#cfc,stroke:#333
    style C11 fill:#cfc,stroke:#333
    style C12 fill:#cfc,stroke:#333
Índice
Introducción 29
Conceptos básicos relativos a la presión sanguínea 29
Instrucciones importantes previas al uso 30
Precauciones para garantizar un funcionamiento seguro y fiable ...... 32
Corrobore sin dificultad las lecturas de la presión sanguínea según la clasificación JNC 7* 33
Identificación de los componentes 34
Utilización del adaptador de CA 36
Utilización de pilas 37
Antes de empezar a tomarse la presión 38
Precauciones durante las mediciones 40
Hacer una lectura 40
La función de alarma señala la hipertensión sanguínea 43
Almacenar los resultados de las mediciones 45
Recuperar resultados de mediciones almacenados 46
Después del uso / especificaciones 47
Precauciones durante las mediciones 48
Preguntas y respuestas 49
Cuidado y mantenimiento 51
Resolución de problemas 52
Introducción
Gracias por haber adquirido el monitor de presión arterial de brazo Panasonic EW3152.
Tomarse la presión sanguínea es una buena forma de monitorear la salud. La alta presión sanguínea (hipertensión) constituye un grave problema para la salud, que se lo puede tratar con eficacia una vez que se lo detecta.
Medir la presión sanguínea en el intervalo entre una visita al médico y la siguiente, en forma frecuente y desde la comodidad de su hogar, y llevar un registro de las mediciones lo ayudarán a monitorear todo cambio significativo producido en la presión. Llevar un registro exacto de la presión sanguínea le permite al médico diagnosticar e incluso llegar a prevenir enfermedades futuras.
Conceptos básicos relativos a la presión sanguínea
El corazón funciona como una bomba, que envía la sangre a través de las venas con cada contracción. La presión sanguínea es la presión que ejerce la sangre bombeada desde el corazón contra las paredes de los vasos sanguíneos. La presión sistólica es la presión ejercida cuando el corazón se contrae y bombea sangre a las arterias. La presión diastólica es la presión ejercida cuando el corazón se expande o relaja. Cuando usted o el médico toman la presión sanguínea, se miden tanto la sistólica como la diastólica. Si la medición es 120 sobre 80 (120/80), por ejemplo, la presión sistólica es de 120 y la diastólica es de 80.
Instrucciones importantes previas al uso
- No ha de confundirse autocontrol con autodiagnóstico. Solamente un profesional familiarizado con su historia clínica debe interpretar las mediciones de la presión sanguínea.
- Si está tomando medicinas, consulte con su médico para determinar el momento más adecuado para tomar la presión. NO cambie un medicamento recetado sin haber consultado antes al médico.
-
La presión sanguínea puede variar según diversos factores, incluidos la edad, el sexo, el peso y el estado físico. En general, la presión sanguínea de una persona es menor cuando duerme y mayor cuando está en actividad. Puede cambiar con rapidez en respuesta a los cambios fisiológicos. El entorno en el cual se toma la presión también puede afectar los resultados. El hecho de que un profesional de la salud le tome a uno la presión en un hospital o en una clínica puede provocar nervios y traducirse en una lectura temporariamente elevada. Puesto que las mediciones de la presión arterial tomadas en un entorno clínico varían considerablemente respecto de las tomadas en casa, se debe tomar la presión no solo en el consultorio sino también en el hogar en forma frecuente. Asimismo, no debe sorprenderse si descubre que la presión es menor en casa. Para comparar con exactitud con la lectura del médico, lleve el tensiómetro Panasonic al consultorio y compare ambas lecturas en ese entorno.
-
Quienes padecen arritmia cardiaca, constricción vascular, trastornos del hígado o diabetes, quienes tienen colocado marcapasos o pulso débil, y las embarazadas deben consultar con el médico antes de tomarse ellos mismos la presión sanguínea. Es posible obtener distintos valores por su estado.
-
Tómese la presión todos los días a la misma hora y en las mismas condiciones.
- El momento ideal para tomar la presión (para obtener la denominada «presión sanguínea base») es por la mañana, justo después de levantarse, antes de desayunar y antes de hacer actividad o ejercicio algunos. De no ser posible, no obstante, pruebe efectuar las mediciones en un momento dado antes del desayuno y antes de entrar en actividad. Debe relajarse unos 5 minutos antes de efectuar la medición.
- Las siguientes situaciones pueden provocar variaciones considerables en las lecturas de la presión sanguínea y, por lo tanto, se las debe evitar al menos 30 minutos antes de tomar la presión.
La presión sanguínea es mayor que lo normal:
- en estado de excitación o tensión
- al tomar un baño
- durante el ejercicio o inmediatamente después
- cuando hace frío
- en un lapso de una hora después de haber comido
- después de tomar café, té u otras bebidas que contengan cafeína
- después de fumar tabaco
- con la vejiga llena
La presión sanguínea es menor que lo normal:
- después de tomar un baño
- después de beber alcohol
- Las mediciones pueden resultar afectadas si se utiliza esta unidad cerca del televisor, horno de microondas, equipo de rayos X u otros dispositivos con campos eléctricos fuertes. Para evitar esa interferencia, utilice la unidad a una distancia suficiente de esos dispositivos o apáguelos.
- El tensiómetro fue diseñado para que lo utilicen los adultos. Consulte al médico antes de usarlo para un niño. No lo utilice para criaturas ni bebés.
- La unidad no es apta para monitoreo continuo durante emergencias médicas ni operaciones.
- No la utilice para ningún otro fin que no sea medir la presión sanguínea. No la utilice junto con otros dispositivos.
- El manejo incorrecto de las pilas puede provocar la ruptura de la pila o corrosión causada por la fuga de las pilas. Tenga en cuenta lo siguiente para garantizar el uso correcto de las pilas.
a. Apague el tensiómetro después de utilizarlo.
b. No mezcle pilas de diferentes tipos ni tamaños.
c. Cambie todas las pilas al mismo tiempo. No mezcle pilas viejas con nuevas.
d. Inserte las pilas con la polaridad correcta, según las instrucciones.
e. Extraiga las pilas cuando estén agotadas y deséchelas según las disposiciones ambientales aplicables.
f. No desarme las pilas ni las arroje al fuego.
g. No les provoque un cortocircuito.
h. No intente recargar las pilas que vienen incluidas en la unidad.
Precauciones para garantizar un funcionamiento seguro y fiable
- No deje caer la unidad. Protéjala contra sacudidas o descargas repentinas.
- No inserte objetos extraños en las aberturas.
- No intente desarmar la unidad.
- Si guarda la unidad a temperaturas inferiores a los 0 °C (32 °F), déjela en un sitio cálido unos 15 minutos antes de utilizarla. De lo contrario, el manguito puede no inflarse correctamente.
- No guarde la unidad a la luz solar directa, en sitios con mucha humedad o polvo.
- Al limpiarlo, desconecte el adaptador de CA de la toma de corriente alterna antes de la limpieza. Además, no conecte ni desconecte el adaptador de CA con las manos húmedas. Hacer esto puede causar una descarga eléctrica o un incendio.
- No derrame agua sobre el cuerpo principal ni sobre el adaptador de CA. Hacer esto puede causar una descarga eléctrica, un cortocircuito o daño al producto.
- No use el adaptador de CA si el mismo está dañado o si queda flojo en la toma de corriente alterna. Hacer esto puede causar una descarga eléctrica o un cortocircuito.
- Si el producto no funciona correctamente o se comporta de forma extraña, deje de usarlo y desconecte inmediatamente el adaptador de CA, y solicite inspección y mantenimiento. No hacer esto podría causar riesgo de accidente, descarga eléctrica o incendio.
- Al usar el adaptador de CA, asegúrese de que esté introducido completamente en la toma de corriente alterna. No hacer esto podría causar una descarga eléctrica o un cortocircuito.
- Cuando el producto no esté usándose, desconecte el adaptador de CA de la toma de corriente alterna. No hacer esto podría causar deterioro del aislamiento debido a polvo o humedad, causando un incendio eléctrico debido a fuga.
- Al desconectar el adaptador de CA no tire del cable. Agarre siempre el cuerpo del adaptador de CA y desconéctelo. No hacer esto podría causar riesgo de descarga eléctrica, cortocircuito o incendio.
- No inserte ningún objeto en el adaptador de CA ni permita que en el mismo se acumulen desperdicios. Esto podría causar riesgo de descarga eléctrica, cortocircuito o incendio.
- No arañe, dañe, modifique, doble a la fuerza, tire o tuerza el cable del adaptador de CA. Además no coloque objetos pesados sobre el cable ni lo apriete con objetos. No enrolle el cable alrededor del cuerpo principal ni del adaptador de CA. Hacer cualquiera de esas cosas podría causar riesgo de incendio o descarga eléctrica.
- No se pare sobre el adaptador de CA. Hacer esto puede causar un accidente o lesión.
- No use un convertidor de voltaje. Hacer esto puede causar un incendio o descarga eléctrica.
- Este adaptador de CA está diseñado para ser utilizado solamente con monitores de presión sanguínea de Panasonic, modelo EW3152. El uso con otros aparatos eléctricos podría causar la muerte o lesiones graves.
- SIEMPRE desconecte el adaptador de CA de la toma de corriente antes de ejecutar mantenimiento.
- No permita que este producto sea usado por niños.
- No permita que este producto sea usado por personas que no pueden expresar sus sentimientos o que no pueden manipular el producto ellos solos. Ese tipo de uso podría causar un accidente o lesiones.
- Use el adaptador de CA solamente con tomas de corriente con los voltajes marcados en la chapilla del fabricante. Para uso en Estados Unidos, use el adaptador de CA solamente con una toma eléctrica de CA de 120V. El uso con tomas eléctricas de otros voltajes puede causar riesgo de incendio, descarga eléctrica o quemaduras.
- No permita que el adaptador de CA quede cubierto con ningún material. Hacer esto podría causar riesgo de incendio.
- No modifique ni intente reparar usted mismo el producto ni el adaptador de CA. Hacer esto podría causar riesgo de incendio, descarga eléctrica o lesiones personales.
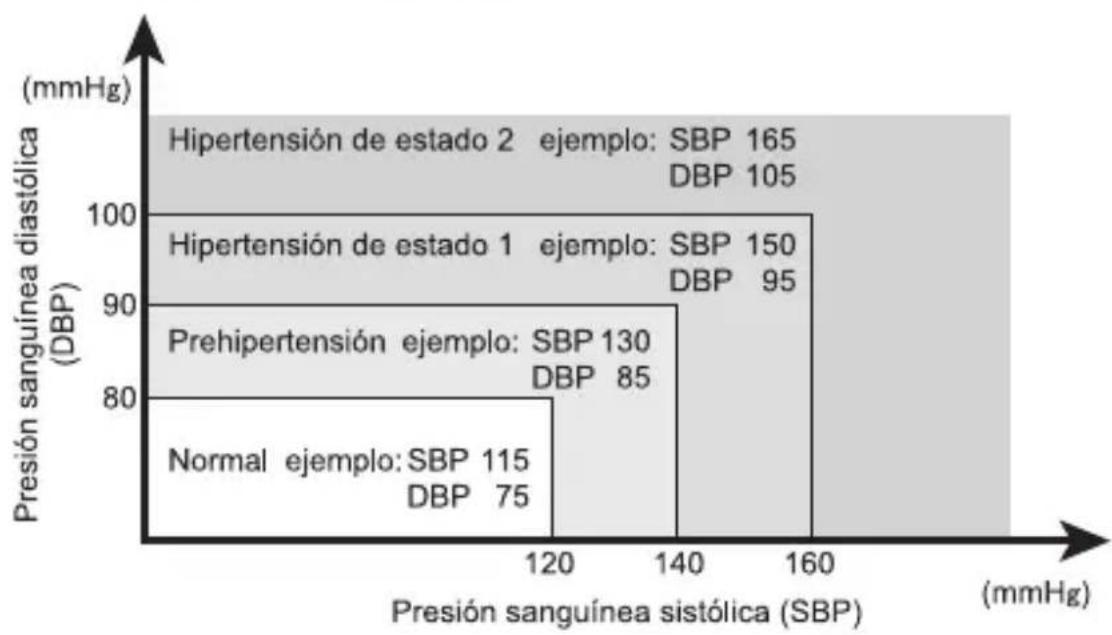
Corrobore sin dificultad las lecturas de la presión sanguínea según la clasificación JNC 7\*
Categorías de presión sanguínea
heatmap
| Scenario | Presión sanguínea sistólica (SBP) (mmHg) | Presión sanguínea diastólica (DBP) (mmHg) | | :--- | :--- | :--- | | Hipertensión de estado 2 | 165 | 105 | | Hipertensión de estado 1 | 150 | 95 | | Prehipertensión ejemplo | 130 | 85 | | Normal ejemplo | 115 | 75 |Si la presión sistólica queda comprendida en una categoría pero la diastólica en otra, se clasifica el nivel en la más alta de las dos categorías.
* JNC 7: El séptimo informe de la publicación conjunta del Comité nacional sobre prevención, detección, evaluación y tratamiento de la hipertensión arterial-Instituto nacional de salud (NIH); N°. 03-5233, de mayo de 2003
IMPORTANTE:
- No se alarme en caso de lecturas temporarias elevadas o bajas, porque las fluctuaciones de la presión sanguínea de las personas no son poco frecuentes. De ser posible, mida y registre la presión todos los días a la misma hora, y consulte al médico en caso de dudas o inquietudes.
- Si se observan variaciones anormales en la medición de la presión, consulte con el médico.
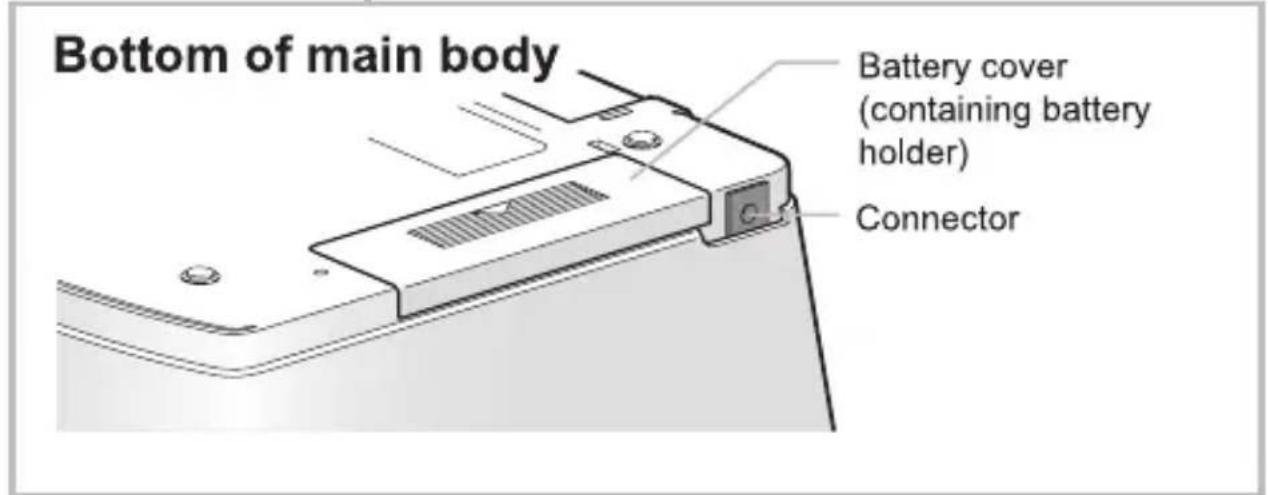
IDENTIFICACIÓN DE LOS COMPONENTES
Compruebe el instrumento y sus partes.
Parte de debajo de la unidad
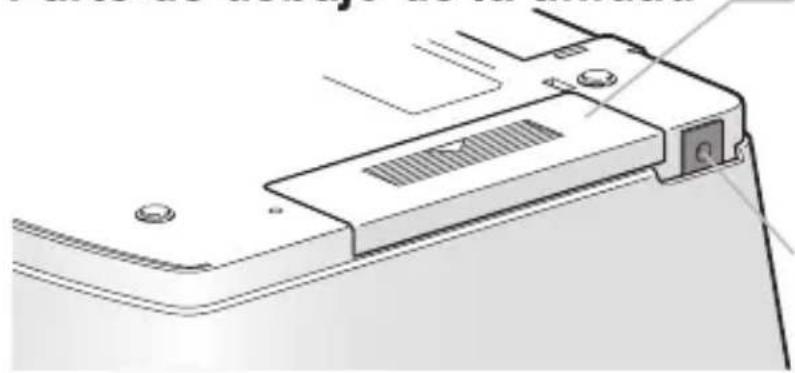
natural_image
Technical line drawing of a mechanical component with mounting holes and a slot (no text or symbols)Tapa del
compartimiento
de las pilas
(conteniendo el
compartimiento de
las pilas)
Conector

UTILIZACIÓN DEL ADAPTADOR DE CA
* Utilice solamente el adaptador de CA exclusivo (accesorio incluido). (Consulte la pág. 35.)

1 Introduzca la clavija del adaptador de CA en el conector situado en un lateral del dispositivo.
2 Enchufe el adaptador de CA en una toma de corriente alterna. (Al insertar el adaptador de CA en la toma puede escucharse momentáneamente un sonido de operación.)
PRECAUCIÓN:
Asegúrese de utilizar solamente el adaptador de CA exclusivo (accesorio incluido).
La utilización de otros adaptadores de CA podría provocar un accidente.
Precauciones al utilizar solamente el adaptador de CA
Si no hay pilas en el dispositivo y se desconecta el adaptador de CA de la toma de corriente o del dispositivo, la fecha y la hora ajustadas se borrarán y se pondrán a cero. Es por ello que, aún cuando utilice el adaptador de CA, le recomendamos que haya pilas en el interior del dispositivo.
Cuando se utiliza el adaptador de CA, la energía eléctrica proviene del adaptador, por lo que no se gasta virtualmente nada de energía de las pilas.
UTILIZACIÓN DE PILAS
* Utilice siempre pilas alcalinas. (Cuatro pilas alcalinas LR6 de tamaño AA) (Use solamente pilas alcalinas. No use otros tipos de pilas.)
1 Déle la vuelta a la unidad, apriete ligeramente en la marca △ de la tapa del compartimiento de las pilas y retire la tapa deslizándola en el sentido de la flecha.
2 Deslice hacia afuera el compartimiento de las pilas en la dirección de la flecha.
3 Compruebe la polaridad de las pilas e instálelas correctamente.
4 Deslice hacia adentro el compartimiento de las pilas en la dirección de la flecha. (Cuando el compartimiento de las pilas vuelve a su posición puede escucharse momentáneamente un sonido de operación.)
5 Vuelva a colocar la tapa y deslícela hasta cerrarla.
Cambie las pilas cuando:
- El indicador de la izquierda aparece durante el uso del dispositivo.
- Todos los indicadores permanecen encendidos durante un momento tras pulsar el botón encender/parar y, a continuación, la pantalla se queda en blanco.
-
No aparece ningún indicador, incluso después de pulsar el botón encender/parar.
-
Se pueden realizar aproximadamente 200 mediciones (aproximadamente 2 meses si se toma la presión 3 veces al día) con un paquete de pilas alcalinas Panasonic nuevas (cuatro pilas LR6 de tamaño AA). (Condiciones de medición: temperatura ambiente 22°C (72°F); presurizado a 170 mmHg; circunferencia del brazo: 30 cm. (11-51/64")) (Las pilas suministradas se incluyen solamente para propósitos de prueba. Por tanto, no hay garantías con respecto a la duración de sus vidas útiles.)
- Incluso en el caso de que no se hubiera utilizado el producto por mucho tiempo, cambie las pilas una vez al año. Si se demora más en cambiarlas, pueden producirse daños en el dispositivo por fugas del líquido que hay en el interior de las pilas.
- Cuando cambie las pilas, utilice siempre cuatro pilas alcalinas nuevas del mismo tipo y del mismo fabricante.
- Si la temperatura ambiente es baja, es posible que se reduzca la vida útil de las pilas.
ANTES DE EMPEZAR A TOMARSE LA PRESIÓN
Abra la pantalla
Pulse el botón Open en la parte
frontal de la unidad principal para abrir la pantalla.


natural_image
Illustration of a portable electronic device with a scroll wheel and control panel, showing a mechanical shift (no text or symbols)* La pantalla solamente se abrirá parcialmente por sí misma. Para usarla, ábrala completamente con su mano.
Ajuste de la fecha y la hora
* Ajuste la fecha y la hora antes de realizar la primera medición tras adquirir el tensiómetro o después de cambiar las pilas.
- Si se efectúan las mediciones sin configurar la fecha ni la hora, no se registran estos datos.
- Lea las "Precauciones al utilizar solamente el adaptador de CA", en la página 36.
1 Pulse el botón ajustar "1" debajo de la pantalla. Parpadea el valor perteneciente al mes.
8/3 0:00
Ajuste la hora.
① Pulse el botón ajuste "1". El valor de la hora parpadeará.
② Pulse el botón ajuste "2" para ajustar la hora correcta.

2 Ajuste el mes.
Para ajustar el mes correcto pulse repetidamente el botón ajustar "2".
8/315:00
5 Ajuste los minutos.
① Pulse el botón ajuste "1". El valor de los minutos parpadeará.
② Pulse repetidamente el botón ajuste "2" para ajustar los minutos correctos.
6 Pulse el botón ajuste "1" en el momento exacto en que
cambien los minutos para terminar el ajuste de la fecha y de la hora.
7 Pulse el botón encender/parar para apagar la unidad.
8/10:00
3 Ajuste el día.
① Pulse el botón ajuste "1". El valor del día parpadeará.
② Pulse repetidamente el botón ajuste "2" para ajustar el día correcto.
Cuando parpadean la fecha o la hora, el reloj está detenido.
En los años de traspaso, será necesario cambiar manualmente la fecha el día 29/2 (la unidad pasará por defecto al 1/3). Use la punta de un bolígrafo u objeto similar para pulsar ligeramente los botones ajuste "1" y "2". Si usa un lápiz, la mina puede romperse, causando mal funcionamiento.
Colocación en la posición para la medición
Puede medir lo mismo en el brazo izquierdo que en el derecho. Sin embargo, cuando las mediciones se realicen en el brazo derecho, puede ser difícil ver la pantalla.
* Debido a que puede haber una diferencia de aproximadamente 10mmHg en la presión sanguínea entre el brazo izquierdo y el derecho, asegúrese de usar siempre el mismo brazo para las mediciones.
* El producto no puede usarse estando acostado. Siéntese erguido durante el uso.
Coloque la unidad principal sobre una mesa u objeto similar de forma que quede a la misma altura de su corazón.
* Las diferencias de altura pueden causar diferencias en los valores de la presión sanguínea.
Si las alturas de la silla y de la mesa no son las apropiadas, puede ser que tenga que inclinarse hacia adelante. En este caso, haga una pila con libros u objetos similares debajo de la unidad principal para ajustar la altura de la misma.

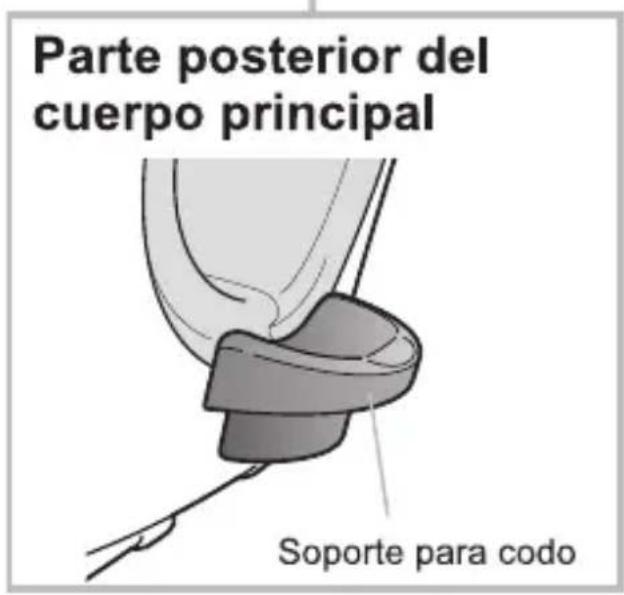
natural_image
Simple line drawing of a computer monitor with an ear (no text or symbols)Soporte para codo
1 Siéntese cerca de la mesa como se muestra en la ilustración de la derecha
2 Deslice su brazo por la sección de medición.
Acerque hacia usted la unidad principal para que no tenga que inclinarse para alcanzarla.
- Quítese la camisa o remánguesela de forma que la sección de medición quede en su piel desnuda.
- Si remangarse la camisa causa un aumento de presión en su brazo o antebrazo, quítese la camisa para las mediciones.
Asegúrese de que la manga remangada no quede dentro de la sección de medición al hacer las mediciones.
3 Coloque su codo en el soporte.
- Si fuera difícil encontrar el soporte para codo, use su otra mano para encontrarlo.
natural_image
Illustration of a hand pressing a device on a forearm, with no visible text or symbols4 Extienda su brazo y siéntese derecho.
- Cuando coloca su mano sobre la mesa en una posición relajada, la unidad se volteará de forma natural 15° hacia arriba.
PRECAUCIONES DURANTE LAS MEDICIONES
Resultará imposible realizar mediciones precisas en las situaciones siguientes:
○Menos de una hora después de comer o ingerir alcohol.
○Inmediatamente después de beber café o té o de fumar.
○Inmediatamente después de hacer ejercicio o de bañarse.
-Espere como mínimo 20 minutos y tómese la presión estando quieto/-a y en reposo.
○Dentro de un vehículo en movimiento.
○En lugares fríos
-Tómese la presión con una temperatura ambiente comprendida entre los 10 y los 40°C (50°F a 104°F).
○Cuando necesite orinar.
-Después de orinar, espere unos minutos antes de tomarse la presión.
HACER UNA LECTURA
Precauciones para obtener mediciones precisas Siéntese tranquilo y relajado mientras realiza las mediciones.
No incline su cuerpo hacia adelante en ángulo durante las mediciones.
Tome las mediciones con la postura apropiada.
natural_image
Illustration of a person using a handheld device with a cross symbol in the background (no text or symbols present)No tome las mediciones en el codo. Coloque su codo en el soporte para codo.

natural_image
Line drawing of a person using a handheld device on a platform (no text or symbols)No levante la unidad principal de la mesa.
Manténgala sobre la mesa durante las mediciones.
natural_image
Illustration of a person using a walking device on a treadmill (no text or symbols)No permita que su manga remangada quede dentro de la sección de medición.
Remangue la manga hasta bien arriba en su brazo.
natural_image
Illustration of a person lying on the ground with a smartphone and a 'X' symbol above, no text or symbols present.No levante su brazo.
Descanse su mano sobre la mesa con su palma hacia arriba.

natural_image
Illustration of a person using a handheld device to interact with another person (no text or symbols present)Para obtener mediciones precisas asegúrese de cumplir los siguientes puntos:
- No mueva su cuerpo, brazo, ni las yemas de los dedos.
- No toque la unidad principal.
- No hable.
- No use un teléfono móvil cerca de la unidad principal.
El no cumplimiento de estos aspectos puede imposibilitar la obtención de mediciones precisas.
El ángulo de este producto puede ajustarse de forma que las mediciones puedan tomarse sin tener que estar en una postura forzada.
- El ángulo puede ajustarse solamente cuando la pantalla está abierta.
- El ángulo no está bloqueado.
Incluso aunque esté sentado, el ángulo puede cambiar ligeramente durante la presurización.
Sin embargo, esto no afecta la precisión incluso si el ángulo cambia durante las mediciones.
HACER UNA LECTURA (CONTINUACIÓN)
Medición
Toda la pantalla se iluminará durante 1 segundo aproximadamente.
1 Pulse el botón encender/parar.
① El manguito de presión se apretará automáticamente.
② La presurización se ejecutará automáticamente y se tomarán las mediciones.
El manguito de presión se apretará automáticamente.

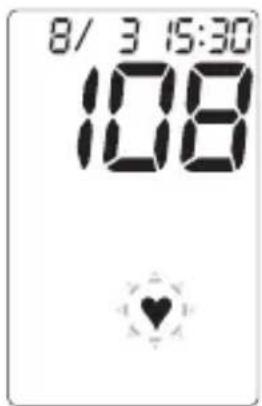
El indicador con forma de corazón ♥ parpadeará cuando se detecte el pulso durante el proceso de presurización.
2 Cuando se haya completado la medición, se visualizarán los valores de la presión sanguínea y del pulso.
Después de que los valores de medición hayan sido mostrados durante aproximadamente 5 segundos, el manguito de presión se aflojará. (Sin embargo, el tiempo depende del tamaño del brazo.)
- Los indicadores de la presión arterial se encenderán (durante unos 12 segundos).
- Si el valor obtenido se encuentra dentro de la región considerada de presión arterial alta, el número parpadeará (durante unos 12 segundos). (Para saber cómo leer los indicadores de la presión arterial, consulte la pág. 43.)
- Se encenderán los indicadores ① ② . (Para saber cómo almacenar los resultados de las mediciones, consulte la pág. 45.)
* El valor correspondiente a la frecuencia de pulso equivale a los latidos por minuto calculados en base a la frecuencia de pulso durante la medición.
3 Retire su brazo de la unidad principal.
4 Para apagar el monitor de presión arterial, pulse el botón encender/parar.
- Si se olvida de apagarlo, el dispositivo se apagará automáticamente transcurridos aproximadamente 5 minutos.
La función de alarma señala la hipertensión sanguínea
Los valores de la presión sanguínea correspondientes a las lecturas sistólica y diastólica se determinan e indican mediante un sistema de LED de tres colores comprendido entre la escala de normal a hipertenso, sobre la base de las definiciones y la clasificación de los niveles de presión sanguínea de JNC 7. Asimismo, cuando la presión es elevada, la lectura que aparece en pantalla destella para alertar al usuario.
Según la clasificación JNC 7, se considera que los valores que siempre superan los 140 mmHg (sistólica) y/o los 90 mmHg (diastólica) constituyen la hipertensión arterial.
flowchart
graph LR
    A["120"] --> B["Naranja"]
    C["140"] --> D["Amarillo"]
    E["80"] --> F["Verde"]
    B --> G["Diastólica (mmHg)"]
    D --> G
    F --> G
    G --> H["Hipertensión (etapa 1, etapa 2)"]
    G --> I["Prehipertensión"]
    I --> J["Normal"]
- Si el valor obtenido se encuentra dentro de la región considerada de presión arterial alta, el número parpadeará durante unos 12 segundos. (Sólo inmediatamente después de realizar la medición.)
- Presión sistólica: 140 mmHg y más
- Presión diastólica: 90 mmHg y más
Si las mediciones no se pudieron realizar adecuadamente
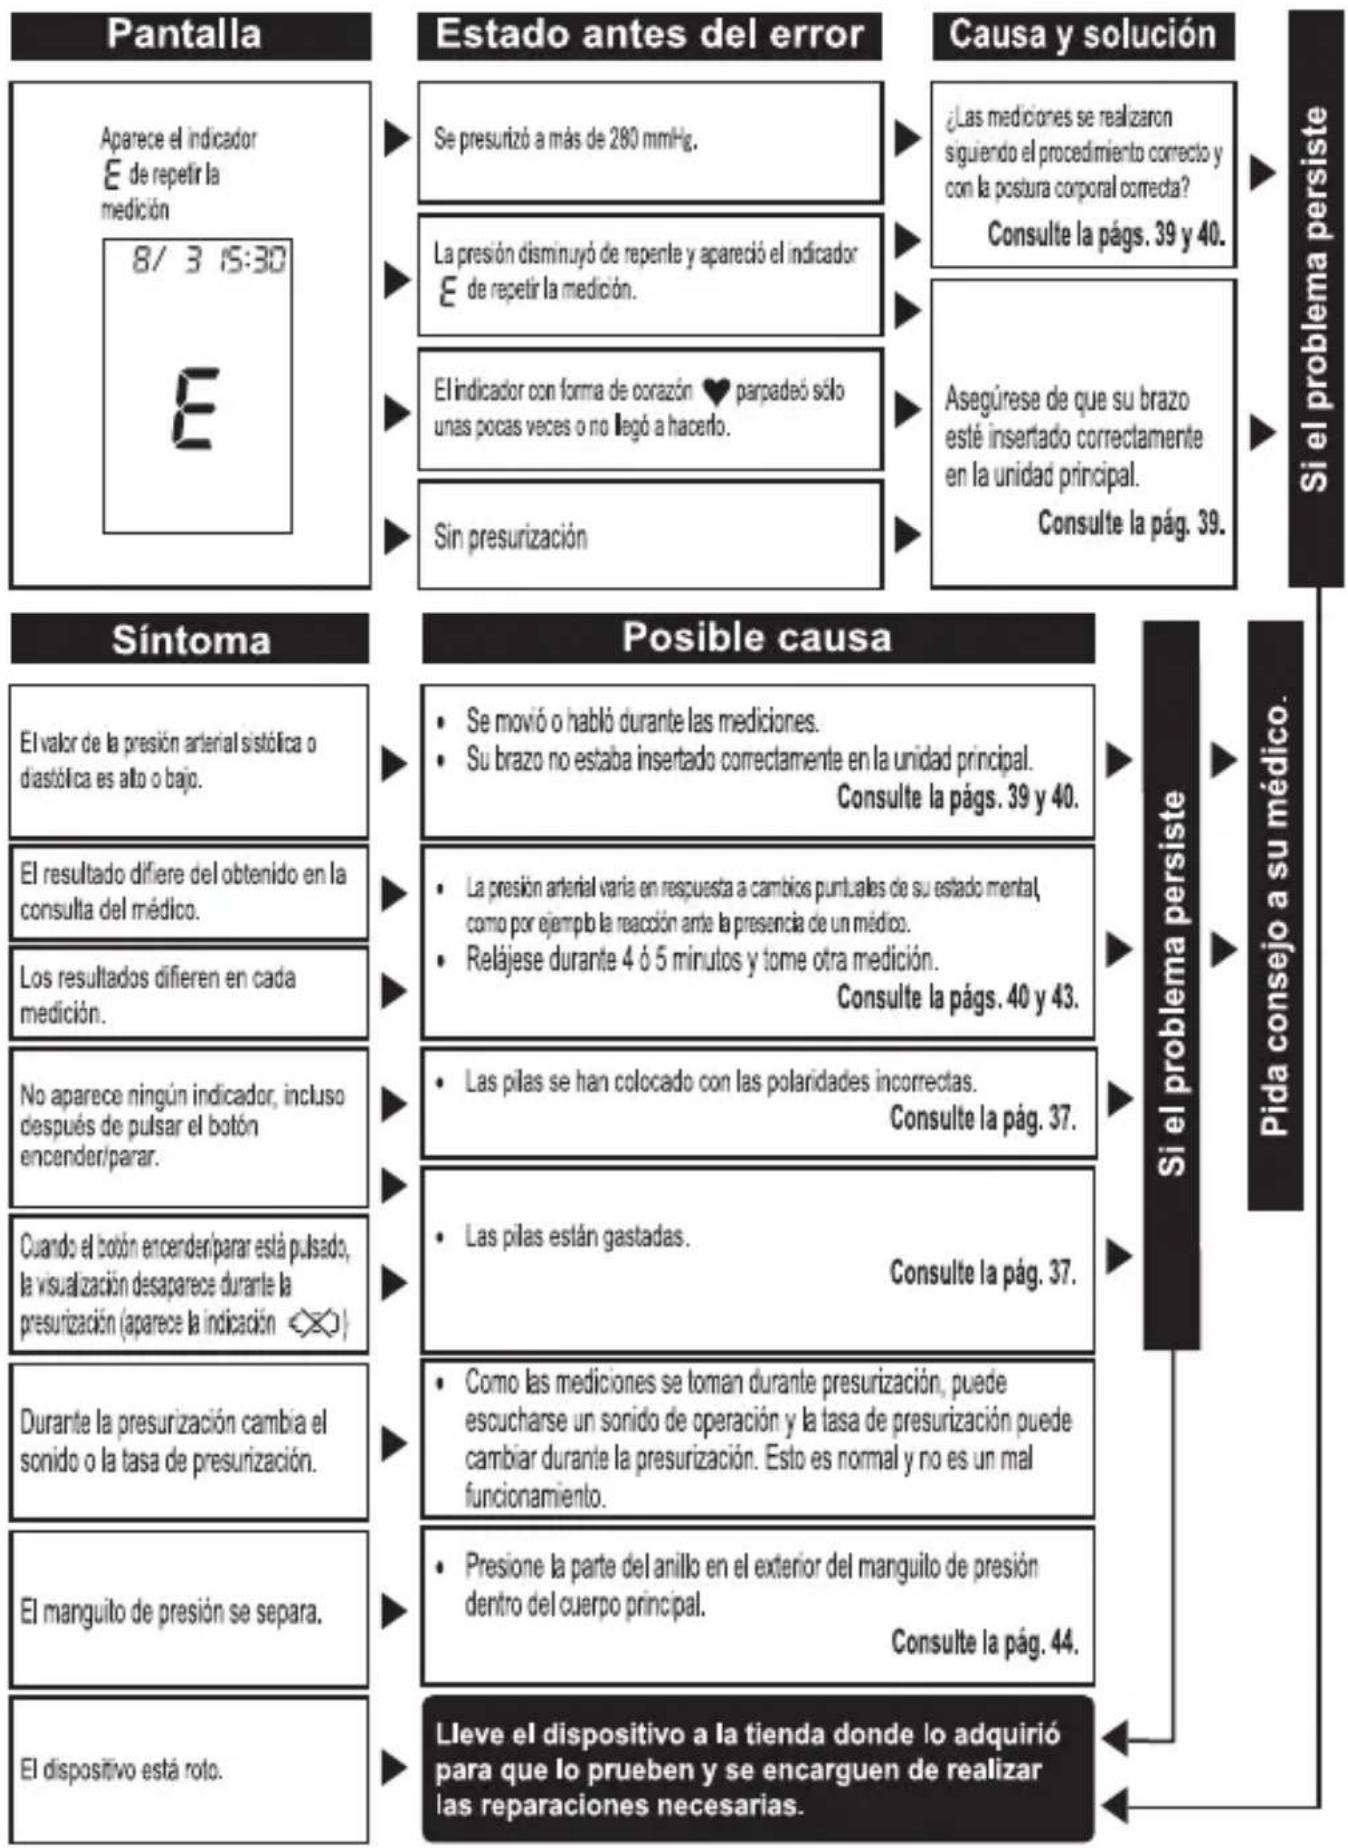
Aparecerá el indicador E de repetir la medición.
Cuando realice varias mediciones sucesivamente, pulse una vez el botón encender/parar para apagar el monitor de presión arterial, permanezca quieto/-a durante 4 ó 5 minutos y, a continuación, realice la siguiente medición.
Consejo:
En general, los valores de presión arterial que se obtienen en la segunda medición son inferiores, dado que se está menos nervioso y más relajado.
Para las personas que se ponen nerviosas con facilidad, resulta muy eficaz realizar dos mediciones cada vez que quieran tomarse la presión.
Cuando se realizan dos mediciones, generalmente se almacena el valor más pequeño. Cuando realice dos mediciones consecutivas, permanezca siempre quieto durante 4 ó 5 minutos entre la primera y la segunda medición.
Para interrumpir rápidamente las mediciones

Si el manguito de presión no se desinfla incluso cuando se pulsa el botón encender/parar, pulse y mantenga pulsado el botón de liberación rápida del aire. El aire se liberará en aproximadamente 4 segundos.
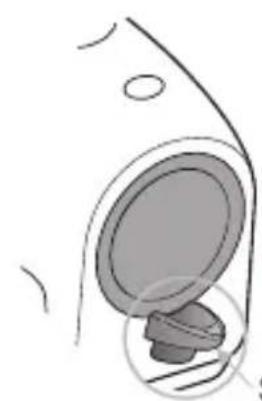
Si el manguito de presión se desconecta:
1 Con la cinta y la costura hacia abajo, deslice el manguito de presión en el cuerpo principal.
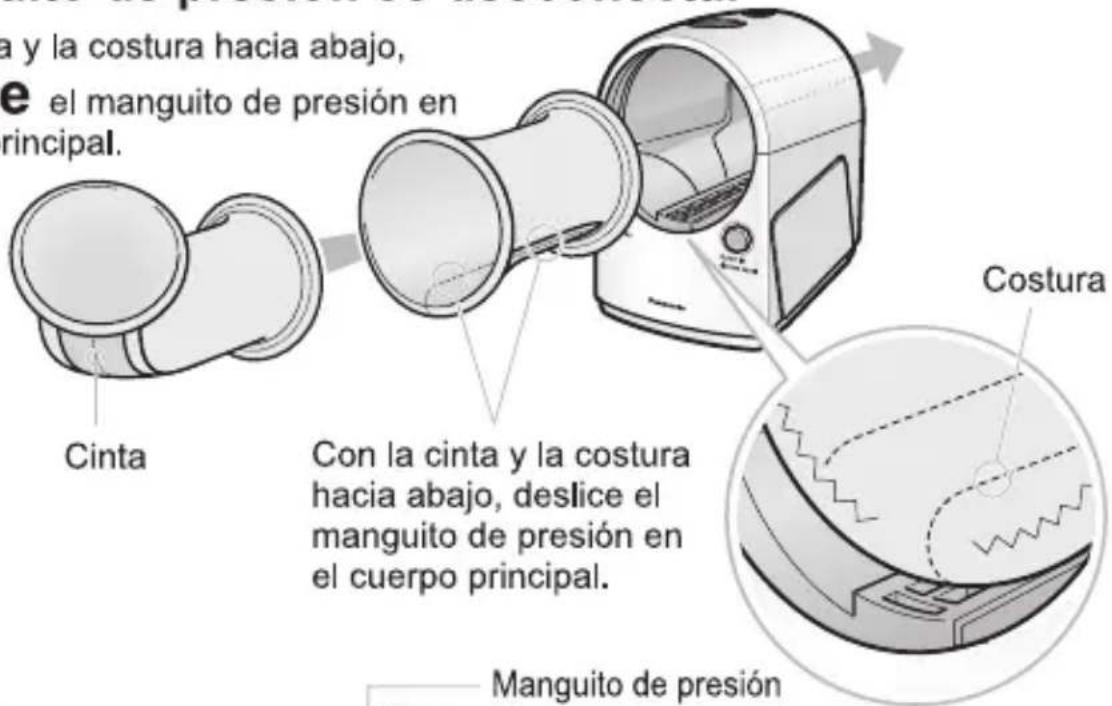
2 Presione el manguito de presión dentro de la ranura del cuerpo principal. Puede conectarse primero lo mismo la parte frontal que la posterior.

* Al volver a conectar, asegúrese de no tocar el interior del cuerpo principal en la parte de la que se ha salido el manguito de presión. Hacer esto puede causar un accidente o una lesión.
ALMACENAR LOS RESULTADOS DE LAS MEDICIONES
Este producto puede almacenar por separado los resultados correspondientes a 90 mediciones correspondientes a dos personas distintas.
Cantidad de datos almacenados
Después de realizar una medición, se encenderá
el indicador ① ②. Pulse el botón M/R (memoria/recuperar) con el número correspondiente a la persona a la que corresponda la medición en cuestión.
Ejemplo: Persona A: Pulse ①
Persona B: Pulse ②
- Es posible almacenar un máximo de 90 resultados de mediciones. Cuando la memoria está llena y se guardan más resultados, se borra automáticamente el resultado más antiguo guardado y se almacena el valor nuevo en su lugar.
- Si la medición no se pudo llevar a cabo adecuadamente (aparece el indicador E en vez del valor correspondiente a la presión arterial) no es posible almacenar los resultados.
* Sin embargo, si el indicador E se visualiza solamente para el valor del pulso, los datos podrán almacenarse.
Para borrar todos los resultados de mediciones almacenados en la memoria:
- Recupere el valor de medición para la persona cuyos datos desea borrar pulsando el botón M/R (memoria/recuperar) de esa persona.
- Vuelva a pulsar el mismo botón M/R (memoria/recordad) y manténgalo pulsado hasta que desaparezcan los resultados de la pantalla (aproximadamente 3 o más segundos).
* No es posible borrar resultados de mediciones de manera individual.
Para apagar el monitor de presión arterial, pulse el botón encender/parar.
- Si se olvida de apagarlo, el dispositivo se apagará automáticamente transcurridos aproximadamente 5 minutos.
RECUPERAR RESULTADOS DE MEDICIONES ALMACENADOS
1 Pulse el botón M/R (memoria/recuperar) correspondiente a la persona cuyos datos desee recuperar (1 ó 2).
Se mostrará el promedio de todos los resultados almacenados en la memoria.
- Aparecerá el indicador Avg. en la parte inferior de la pantalla.
- Por ejemplo, si se han almacenado 90 resultados, se mostrará el promedio de las 90 mediciones. (Si sólo hay almacenado el resultado de una medición, no aparecerá el indicador Avg.)
- Los indicadores de la presión arterial se encenderán (durante unos 6 segundos).
2 Vuelva a pulsar el botón M/R (memoria/recuperar).
Cada vez que pulse el botón memoria/recuperar, se mostrarán los resultados de mediciones previamente almacenados por orden, empezando por los datos más recientes.
- Los indicadores de la presión arterial se encenderán (durante unos 6 segundos).
- Si no se ha almacenado ningún resultado, no se mostrará nada.

Pulse breve y ligeramente el botón M/R (memoria/recuperar). Si mantiene pulsado el botón durante unos 3 o más segundos se borrarán todos los datos de la memoria, por lo que le recomendamos que vaya con cuidado.
3 Para cancelar el proceso de recuperación de un resultado, pulse el botón encender/parar.
- Si se olvida de apagarlo, el monitor de presión arterial se apagará automáticamente transcurridos aproximadamente 30 segundos.
DESPUÉS DEL USO / ESPECIFICACIONES

natural_image
Illustration of a portable electronic device with two views showing internal components and a scroll, no text or symbols present.1 Si el cuerpo principal está colocado en ángulo, regréselo a la posición normal.
2 Pliegue la pantalla hacia el cuerpo principal para guardarla.
- Pliéguela con la mano hasta que sienta un chasquido.
Especificaciones (Cuerpo principal)
| Alimentación eléctrica | CC de 6V (4 pilas alcalinas tamaño AA LR6)CA de 100-240V 50-60Hz (Cuando se usa adaptador de CA) |
| Pantalla | Digital LCD |
| Método de medición | Sistema oscilométrico |
| Límites de medición | Presión arterial: de 0 a 280 mmHgFrecuencia de pulso: de 30 a 160 latidos por minuto |
| Margen de error | Presión arterial: ±3mmHgFrecuencia de pulso: ±5% |
| Niveles de humedad / temperatura de funcionamiento | de 15 a 90% de humedad relativa, de 10 a 40°C (50°F a 104°F) |
| Niveles de humedad / temperatura de almacenamiento | de 10 a 95% de humedad relativa, de -20 a 60°C (-4°F a 140°F) |
| Circunferencia mínima y máxima del brazo | De 20 a 34 cm. (7-3/4" a 13-1/4") aproximadamente |
| Peso | 4,9 lbs. (1,200 g) aproximadamente (sin incluir las pilas) |
| Dimensiones | 22 × 15,5 × 21cm (8-21/32" × 6-3/32" × 8-1/4") |
Especificaciones (Adaptador de CA)
| Entrada | CA de 100-240V 50-60Hz |
| Salida | CC de 6V 2A |
PRECAUCIONES DURANTE LAS MEDICIONES
Resultará imposible realizar mediciones precisas en las situaciones siguientes.
Menos de una hora después de comer o ingerir alcohol.

natural_image
Illustration of a person sitting at a table with two bowls and a plate, no text or symbols presentInmediatamente después de hacer ejercicio o de bañarse.

natural_image
Cartoon illustration of a person wearing a cap and holding a bag (no text or symbols)Espere como mínimo 20 minutos y tómese la presión estando quieto/-a y en reposo.
En lugares fríos

natural_image
Illustration of a person wearing a cap and jacket, with snow falling around (no text or symbols)Tómese la presión con una temperatura ambiente comprendida entre los 10 y los 40°C. (50 a 104°F)
Inmediatamente después de beber café o té o de fumar.

natural_image
Illustration of a person sitting at a table with a steaming cup (no text or symbols)Dentro de un vehículo en movimiento.

natural_image
Line drawing of a person driving a car, showing steering wheel and headrest (no text or symbols)Cuando necesite orinar.

natural_image
Illustration of a person with thought bubble showing a stomach (no text or symbols)Después de orinar, espere unos minutos antes de tomarse la presión.
PREGUNTAS Y RESPUESTAS
P ¿Por qué difieren los resultados que obtengo al tomarme la presión en casa de los que obtengo cuando me la toma mi médico?
R La presión arterial varía las 24 horas del día.
Asimismo, puede variar mucho en función del tiempo, de su estado mental, del ejercicio realizado, etc.
Más particularmente, existe el fenómeno de la "hipertensión de bata blanca" cuando se toma la presión en la consulta de un médico: la presión arterial es mayor en la consulta debido a la preocupación o el nerviosismo del paciente.
Asimismo, si los valores de presión arterial obtenidos en casa son unas veces más altos y otras más bajos que los obtenidos en la consulta de su médico, tenga en cuenta lo siguiente. Tenga en cuenta estos detalles cuando se tome la presión.

natural_image
Line drawing of a person using a handheld device to interact with a surface (no text or symbols)① Postura incorrecta durante la medición.
¿Tomó las mediciones con su cuerpo inclinado en ángulo hacia adelante?

natural_image
Illustration of a person using a tool on a machine (no text or symbols visible)② Las mediciones no se tomaron en la parte superior del brazo.
Tome las mediciones con su codo en el soporte para codo del cuerpo principal. (Consulte la pág. 39.)

natural_image
Illustration of a person sitting on a treadmill with a mechanical device, no text or symbols present③ ¿Estaba preocupado o irritado durante las mediciones?
Antes de tomar las mediciones, respire profundamente 2 ó 3 veces y relájese, para así estabilizar la presión sanguínea. Asimismo, le recomendamos que se siente tranquilamente durante unos 5 minutos antes de tomarse la presión.
P ¿Por qué difieren los resultados cada vez que me tomo la presión?
R
natural_image
Illustration of a person using a medical device with a wall clock (no text or symbols)① La presión arterial cambia incluso dentro de un mismo día, y difiere según la postura adoptada en el momento de realizar la medición. Debido a esto, es muy importante que, cuando se tome la presión, lo haga siempre bajo las mismas condiciones.
② La presión de las personas que se estén medicando para regular la presión arterial puede variar mucho debido a los efectos de la medicación.
③ Cuando realice dos mediciones consecutivas, permanezca quieto durante 4 ó 5 minutos entre la primera y la segunda medición.
P ¿Por qué difieren los resultados de una medición hecha utilizando el brazo izquierdo de los obtenidos con el brazo derecho?
R

natural_image
Illustration of a person using a handheld device to interact with one arm (no text or symbols present)Se ha comprobado que la diferencia entre los valores de presión arterial de los brazos izquierdo y derecho puede estar alrededor de los 10 mmHg. La presión sanguínea se puede medir lo mismo en el brazo izquierdo que en el derecho, pero para propósitos de comparación, todas las mediciones deben hacerse usando el mismo brazo.
CUIDADO Y MANTENIMIENTO
No aplique fuerza excesiva sobre el instrumento ni lo deje caer.
- Hacer esto puede causar daño.
Si el instrumento se guarda a temperaturas por debajo del punto de congelación, no lo use inmediatamente.
Déjelo en un lugar cálido durante al menos una hora antes del uso.
- Si no se permite que el instrumento se caliente, puede que no presurice.
No introduzca polvo ni objetos dentro del instrumento.
- Hacer esto puede causar daño.
Si el instrumento se ensucia, límpielo con un paño suave humedecido con agua tibia o agua jabonosa.
(No use alcohol, benzina ni diluente de pinturas.)
- El uso de esas sustancias químicas puede causar agrietamiento o decoloración.
Para guardarlo, evite temperaturas altas, alta humedad y la luz solar directa.
- Si se guarda bajo esas condiciones puede dañarse.
El manguito de presión no puede lavarse.
RESOLUCIÓN DE PROBLEMAS
flowchart
graph TD
    A["Pantalla"] --> B["Estado antes del error"]
    B --> C["Causa y solución"]
    C --> D["Síntoma"]
    D --> E["Posible causa"]
    E --> F["Si el problema persiste"]
    F --> G["Pida consejo a su médico."]
    A --> H["Síntoma"]
    H --> I["Posible causa"]
    I --> J["Si el problema persiste"]
    J --> K["Pida consejo a su médico."]
For questions or assistance with your blood pressure monitor, call us at 1-800-338-0552.
Panasonic Consumer Electronics Company Division of Panasonic Corporation of North America
One Panasonic Way 1H-1
Secaucus, NJ 07094
- Panasonic®
- Operating Instructions Instrucciones de funcionamiento
- Table of Contents
- Introduction
- Basic of Blood Pressure
- Important Instructions Before Use
- Precautions to Ensure Safe, Reliable Operation
- Easily Check Your Blood Pressure Readings Against the JNC 7\* Classification
- IMPORTANT:
- PARTS IDENTIFICATION
- WHEN USING THE AC ADAPTER
- Caution when using only the AC adapter
- WHEN USING BATTERIES
- Replace batteries when:
- BEFORE STARTING MEASUREMENTS
- Open the display
- Setting the date and time
- Set the hour.
- Set the month.
- Set the minute.
- Set the day.
- Press the Set button at the exact time the minute
- When the date or time are blinking, the clock is stopped.
- Getting into the measurement position
- Either the left or right arm can be measured. However, when measurements are taken using the right arm, it may be difficult to see the display.
- Place the main unit on a table or similar object so that the main unit is at the same height as your heart.
- Pull the main unit close to you so that you do not have to lean to reach it.
- CAUTIONS DURING MEASUREMENTS
- TAKING A READING
- Be sure to obey the following points for accurate measurements:
- TAKING A READING (CONTINUED)
- Press the On/Off Start button.
- When measurement has been completed, the blood pressure and pulse values will be displayed.
- Remove your arm from the main unit.
- To switch off the blood pressure monitor, press the On/Off Start button.
- Alarm function signals high blood pressure
- If measurements could not be taken properly
- Advice:
- To interrupt measurements quickly
- If the pressure cuff comes off:
- STORING MEASUREMENT VALUES
- Storing is completed.
- To erase all measured values stored in memory:
- press the On/Off Start button.
- RECALLING STORED MEASUREMENT VALUES
- AFTER USE/SPECIFICATIONS
- Q & A
- Q Why are the blood pressure values measured at home different from those measured at the doctor's office?
- A Blood pressure varies 24 hours a day.
- Q Why are measured blood pressure values different each time I take a measurement?
- Why are the measured values different for the left and right arm?
- CARE AND MAINTENANCE
- TROUBLESHOOTING
- Índice
- Introducción
- Conceptos básicos relativos a la presión sanguínea
- Instrucciones importantes previas al uso
- Precauciones para garantizar un funcionamiento seguro y fiable
- Corrobore sin dificultad las lecturas de la presión sanguínea según la clasificación JNC 7\*
- IMPORTANTE:
- IDENTIFICACIÓN DE LOS COMPONENTES
- UTILIZACIÓN DEL ADAPTADOR DE CA
- PRECAUCIÓN:
- Precauciones al utilizar solamente el adaptador de CA
- UTILIZACIÓN DE PILAS
- Cambie las pilas cuando:
- ANTES DE EMPEZAR A TOMARSE LA PRESIÓN
- Abra la pantalla
- Ajuste de la fecha y la hora
- Ajuste la hora.
- Ajuste el mes.
- Ajuste los minutos.
- Ajuste el día.
- Colocación en la posición para la medición
- PRECAUCIONES DURANTE LAS MEDICIONES
- Resultará imposible realizar mediciones precisas en las situaciones siguientes:
- HACER UNA LECTURA
- Precauciones para obtener mediciones precisas Siéntese tranquilo y relajado mientras realiza las mediciones.
- Para obtener mediciones precisas asegúrese de cumplir los siguientes puntos:
- HACER UNA LECTURA (CONTINUACIÓN)
- Pulse el botón encender/parar.
- Cuando se haya completado la medición, se visualizarán los valores de la presión sanguínea y del pulso.
- Retire su brazo de la unidad principal.
- La función de alarma señala la hipertensión sanguínea
- Si las mediciones no se pudieron realizar adecuadamente
- Consejo:
- Para interrumpir rápidamente las mediciones
- Si el manguito de presión se desconecta:
- ALMACENAR LOS RESULTADOS DE LAS MEDICIONES
- Para borrar todos los resultados de mediciones almacenados en la memoria:
- RECUPERAR RESULTADOS DE MEDICIONES ALMACENADOS
- DESPUÉS DEL USO / ESPECIFICACIONES
- Resultará imposible realizar mediciones precisas en las situaciones siguientes.
- PREGUNTAS Y RESPUESTAS
- P ¿Por qué difieren los resultados cada vez que me tomo la presión?
- P ¿Por qué difieren los resultados de una medición hecha utilizando el brazo izquierdo de los obtenidos con el brazo derecho?
- CUIDADO Y MANTENIMIENTO
- For questions or assistance with your blood pressure monitor, call us at 1-800-338-0552.
Marke : PANASONIC
Modell : EW3152W
Kategorie : Blutdruckmessgerät