
CAL 9190 - Ur CITIZEN - Gratis brugsanvisning og manual
Find enhedens vejledning gratis CAL 9190 CITIZEN i PDF-format.


Brugerspørgsmål om CAL 9190 CITIZEN
0 spørgsmål om dette apparat. Besvar dem du kender, eller stil dit eget.
Stil et nyt spørgsmål om dette apparat
Download vejledningen til din Ur i PDF-format gratis! Find din vejledning CAL 9190 - CITIZEN og tag din elektroniske enhed tilbage i hånden. På denne side er alle dokumenter nødvendige for brugen af din enhed offentliggjort. CAL 9190 af mærket CITIZEN.
BRUGSANVISNING CAL 9190 CITIZEN
TECHNICAL INFORMATION
CITIZEN QUARTZ
Cal.No.919※※
§ 1. OUTLINE
This is a digital quartz crystal watch with LC display and equipped with a calculator. In response to the diversified requirements of the users, it features multiple functions including an alarm, stopwatch, illumination lamp as well as the time and calendar displays. As for the calculator incorporated, the push-buttons are collected at one corner area to better the operational performance as well as the overall design of the watch.
§2. MAIN FEATURES
1) In addition to the time display (hour, minute, second, AM/PM) and the calendar display (month, date, day), multiple functions are incorporate such as an alarm, stopwatch, illumination lamp, and furthermore a calculator.
2) The square push-buttons of the calculator are collected at a corner area, so the operation of the calculator is much facilitated with a betterment in terms of the watch design as a whole.
3) An illumination lamp is built into the watch to facilitate an easy reading of the display information even in a dark place.
4) The calendar can be set automatically except for the leap-year day (February 29).
5) A continuous and accurate operation of the watch and the calculator is ensured about 3 years by just one unit of the small-size silver oxide power cell in spite of the multiple functions incorporated. (5 sec. lamp lighting, 30 sec. alarm sounding and 20 min. calculator operation per day)
§ 3. SPECIFICATIONS
| Caliber No. | 9190A | |
| Movement | Diameter: 31.6mm × 31.8mm | |
| Thickness: 7.43mm | ||
| Oscillation | 32,768Hz | |
| Accuracy | ±10 sec./month (in normal temperatures) | |
| Display information | Time | "Hour", "minute", "second" and "AM/PM" |
| Calendar | "Month", "date" and "day" | |
| Alarm | "Hour", "minute" and "AM/PM" | |
| Stopwatch | "Minute", "second" and "1/100 sec." | |
| Correction of display | Independent correction of each digit by operation of push-buttons | |
| Effective temperature range | 0°C ~ +50°C (32°F ~ 122°F) | |
| Integrated circuit | C/MOS-LSI 3 units (1 for watch, 1 for calculator, 1 for common use) | |
| Additional mechanisms | ●Calculator●Alarm●Stopwatch●Illumination lamp●Automatic calendar setting device (excluding leap year) | |
| Power cell | Small-size silver oxide power cell (1 unit)Parts No.: 280-21Nominal voltage: 1.55VCapacity: 120mAhSize: 11.6mmφ × 4.2mmLife: About 3 years | |
§4. HANDLING INSTRUCTIONS
1 Push-buttons and their functions
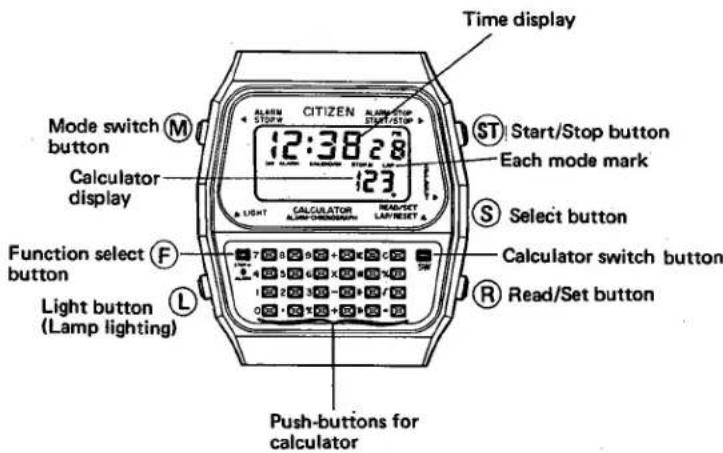
2 Function switch and how to read display
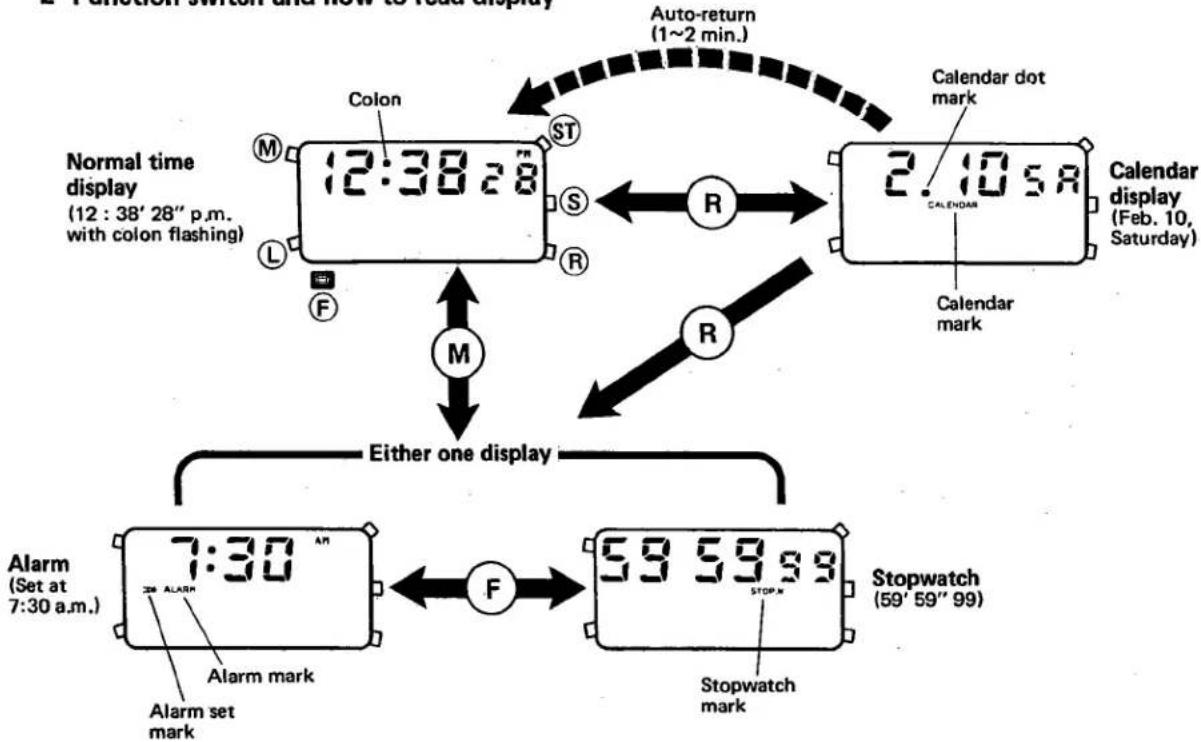
flowchart
graph TD
    A["Normal time display (12:38' 28" p.m. with colon flashing)"] --> B["Colon"]
    B --> C["12:38' 28""]
    C --> D["Calendar dot mark"]
    D --> E["Calendar display (Feb. 10, Saturday)"]
    E --> F["Calendar mark"]
    F --> G["Stopwatch mark"]
    G --> H["Stopwatch (59' 59'' 99)"]
    H --> I["Alarm set mark"]
    I --> J["7:30""]
    J --> K["Alarm mark"]
    K --> L["Either one display"]
    L --> M["Stopwatch mark"]
    M --> N["Stopwatch (59' 59'' 99)"]
    N --> O["F"]
    O --> P["R"]
    P --> Q["Calendar dot mark"]
    Q --> R["Auto-return (1~2 min.)"]
    R --> S["St"]
    S --> T["S"]
    T --> U["R"]
    U --> V["R"]
    V --> W["M"]
    W --> X["F"]
    X --> Y["M"]
*The both of the alarm and the stopwatch functions cannot be used Simultaneously.
Either one of the two functions must be selected in use.
(Normal time display Alarm or Normal time display Stopwatch)
The selection between the "Alarm" and "Stopwatch" is performed with push of Ⓕ button. The Ⓕ button is guarded around it, so it must be pushed with something thin at the tip and with good care not to injure the button.
3 How to set time and calendar
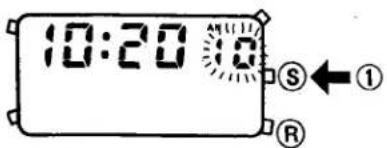
Second setting
① With push of Ⓐ button under the normal time display, the "second" begins to flash to be set.
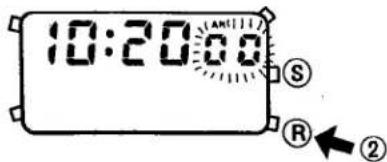
② With push of Ⓡ button, the "second" is reset to zero to start immediately. (One "minute" is carried when the "second" is within the range of 30\~59 seconds.)
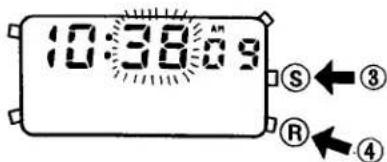
Minute setting
③ The "minute" begins to flash.
④ The "minute" is carried one by one with every push of Ⓡ button to be set correctly.
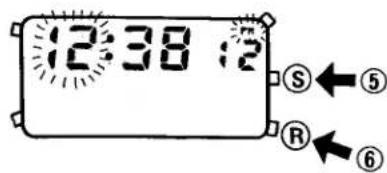
Hour setting
⑤ The "hour" plus "AM" or "PM" begin to flash.
⑥ The "hour" is set making sure "AM" or "PM".
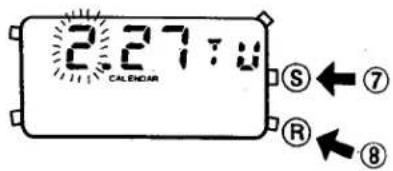
Month setting
⑦ The "month" begins to flash.
⑧ The "month" is set.
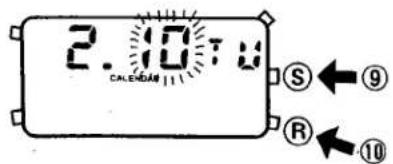
Date setting
⑨ The "date" begins to flash.
⑩ The "date" is set.
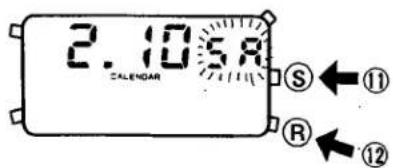
Day setting
⑪ The "day" begins to flash.
⑫ The "day" is set. (The "day" is displayed in English with the first two letters.)
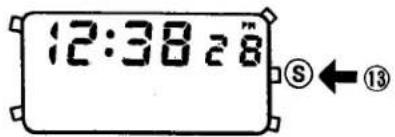
⑬ The normal time display is secured.
*The colon flashes in the case of ①\~⑥ plus ⑬
*The calendar is set automatically after it is once set correctly. The leap-year day (February 29), however, must be set through operation of the push-button.
*No switching is possible from the time and calendar setting mode to another function.
4 Operation of alarm
(1) Call-out of alarm display
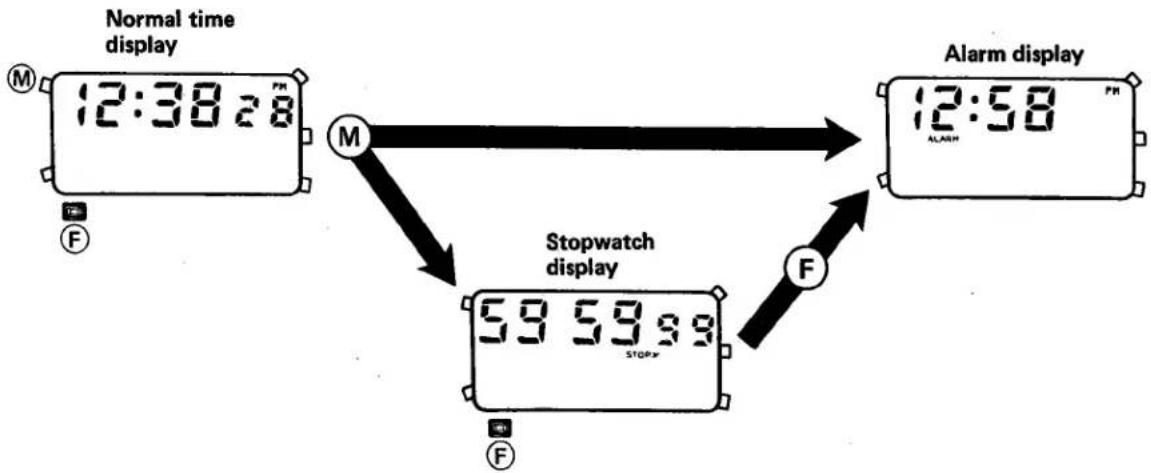
flowchart
graph TD
    A["Normal time display"] --> B["Stopwatch display"]
    B --> C["Alarm display"]
    A --> D["M"]
    D --> E["M"]
    E --> F["F"]
    F --> G["F"]
    style A fill:#f9f,stroke:#333
    style B fill:#ccf,stroke:#333
    style C fill:#cfc,stroke:#333
    style D fill:#fcc,stroke:#333
    style E fill:#cff,stroke:#333
    style F fill:#ffc,stroke:#333
    style G fill:#fcc,stroke:#333
(2) How to set alarm time
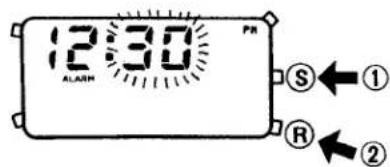
Minute setting
① With push of Ⓐ button under the alarm display, the "minute" begins to flash to be set.
② The "minute" is set.
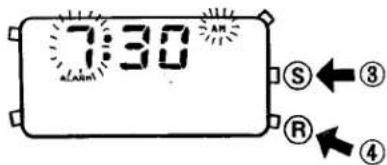
Hour setting
③ The "hour" plus "AM" or "PM" begin to flash.
④ The "hour" plus "AM" and "PM" is set.
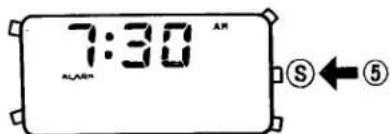
⑤ The normal alarm display is secured.
*No colon flashing is given under the alarm display.
(3) Alarm set/cancel

The alarm set mark ( ) appears and disappears with every push of Ⓗ button under the normal alarm display.
The alarm set mark ( ≥slant ) is displayed when the alarm display is switched to the normal time display in case the alarm is set previously.
*The alarm sound is stopped with push of Ⓙ button.
5 Operation of stopwatch
(1) Resetting
The following cases (①\~⑤) are presented when the stopwatch function is actuated.
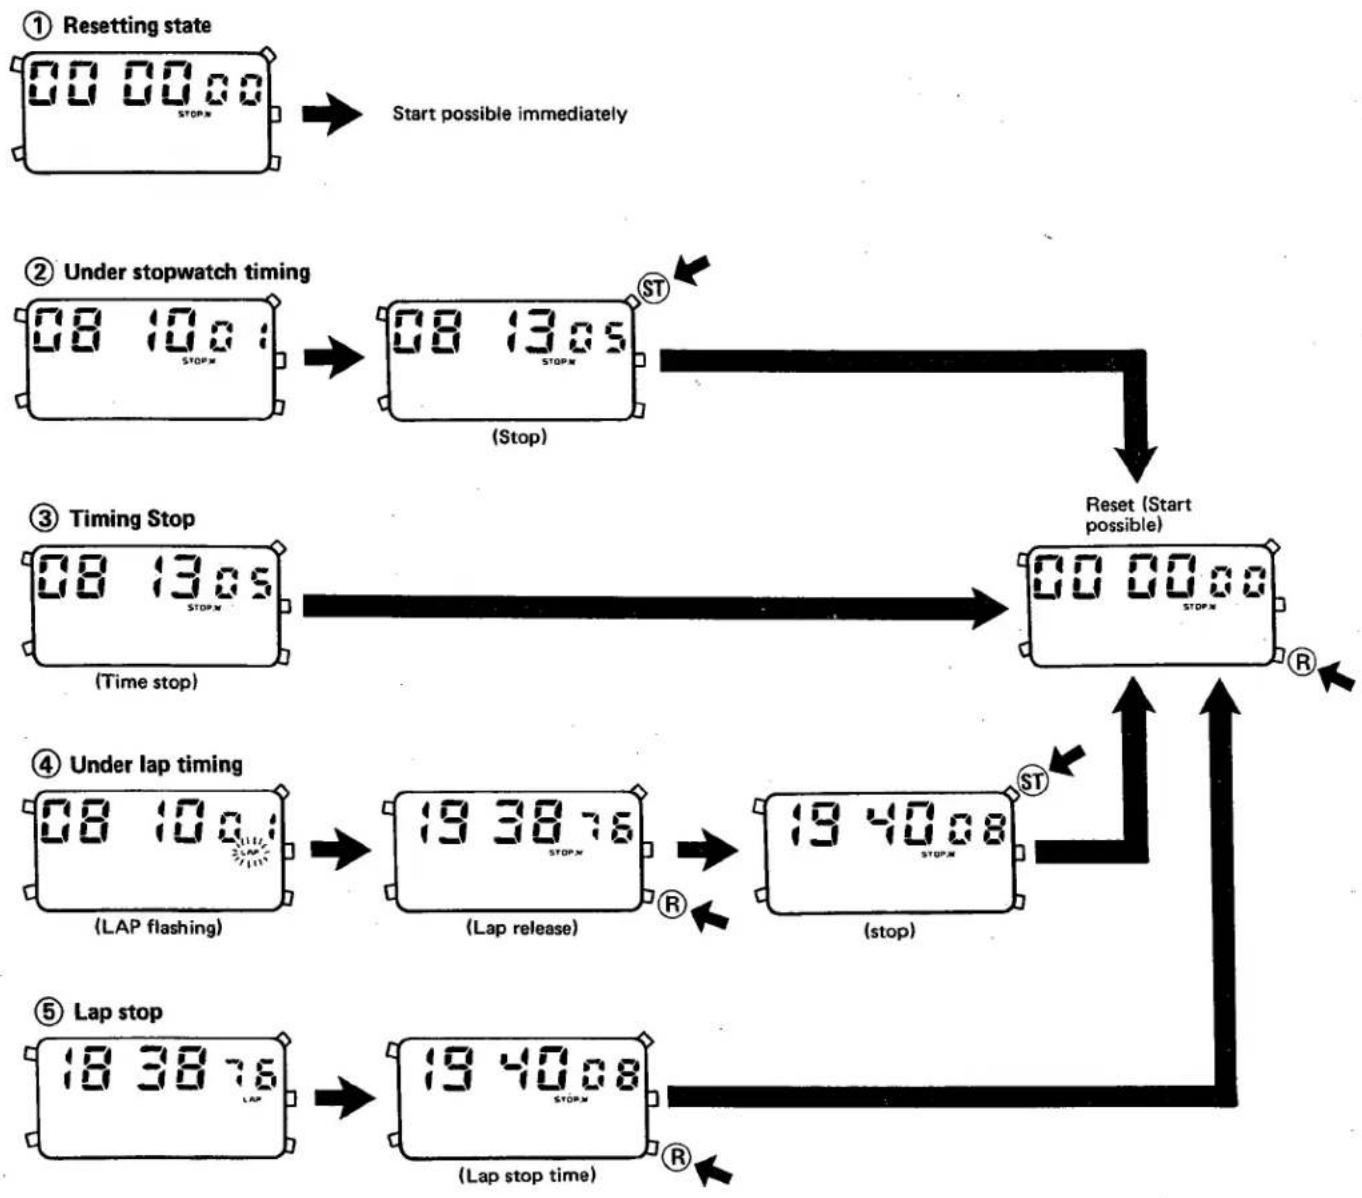
flowchart
graph TD
    A["① Resetting state\n00 00.00 STOP.M"] --> B["Start possible immediately"]
    C["② Under stopwatch timing\n08 10.0 STOP.M"] --> D["(Stop)\n08 13.05 STOP.M"]
    D --> E["Reset (Start possible)\n00 00.00 STOP.M"]
    F["③ Timing Stop\n08 13.05 STOP.M\n(Time stop)"] --> G["(Time stop)"]
    G --> H["(LAP flashing)\n08 10.0"]
    H --> I["(Lap release)\n19 38.76 STOP.M"]
    I --> J["(stop)\n19 40.08 STOP.M"]
    K["④ Under lap timing\n08 10.0 STOP.M\n(LAP flashing)"] --> L["(Lap release)"]
    L --> M["(stop)\n19 40.08 STOP.M"]
    N["⑤ Lap stop\n18 38.76 STOP.M"] --> O["(Lap stop time)"]
    O --> P["(Lap stop time)"]
    P --> Q["End"]
(2) Timing method
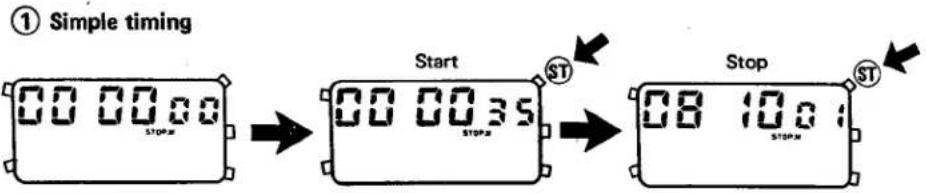
flowchart
graph LR
    A["Start"] --> B["Stop"]
    style A fill:#f9f,stroke:#333
    style B fill:#bbf,stroke:#333
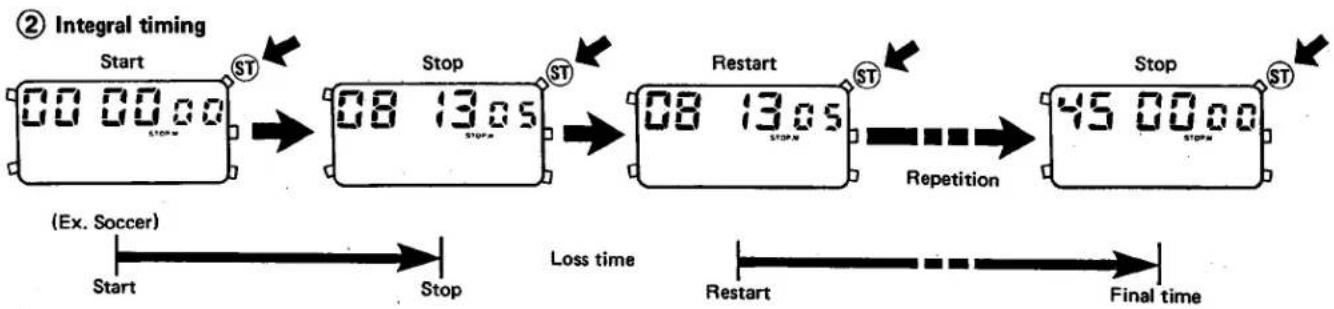
flowchart
graph LR
    A["Start: 00:00:00 STOP"] --> B["Stop: 08:13:05 STOP"]
    B --> C["Restart: 08:13:05 STOP"]
    C --> D["Repetition: 45:00:00 STOP"]
    D --> E["Final time"]

    subgraph Timeframe
        direction LR
        F["(Ex. Soccer)"]
        G["Start"]
        H["Stop"]
        I["Loss time"]
        J["Restart"]
        K["Final time"]
    end

    style A fill:#f9f,stroke:#333
    style B fill:#f9f,stroke:#333
    style C fill:#f9f,stroke:#333
    style D fill:#f9f,stroke:#333
    style E fill:#f9f,stroke:#333
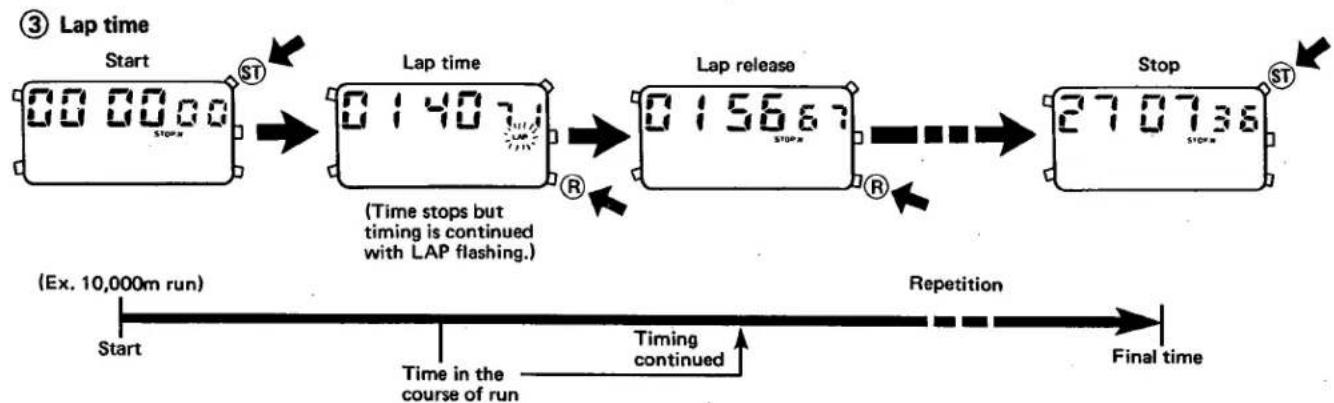
flowchart
graph LR
    A["Start: 00 00 00 STOP"] --> B["Lap time: 01407"]
    B --> C["Lap release: 015667 STOP"]
    C --> D["Stop: 270738 STOP"]
    D --> E["Final time"]

    subgraph Repetition
        F["Start: (Ex. 10,000m run)"]
        G["Time in the course of run"]
        H["Timing continued"]
    end

    I["ST: Start"] --> J["ST: Stop"]
    style I fill:#f9f,stroke:#333
④ Timing of 1st and 2nd ranks

flowchart
graph LR
    A["Start: 00 00 00 STOPW"] --> B["Finish of 1st rank: 00 10 09 (Lap flashing: 2nd rank under timing)"]
    B --> C["Finish of 2nd rank: 00 10 09 (Lap stop)"]
    C --> D["Time of 2nd rank: 00 10 3 STOPW"]
    D --> E["End: Time at lap stop"]
*When the timing exceeds 59':59":99, the 00':00":00 is displayed to continue the timing thereafter.
*The timing is continued even though the function is changed to the normal time display in the course of the stopwatch timing.
§ 5. HOW TO USE CALCULATOR
(1) Push-buttons and their functions
| SW | Switch button: | Power switch for calculator. |
| 0~9 | Ten keys Decimal-point button | For register of numerical value into calcula- tor. |
| C | (1-push) Clear entry button | For correction when register button is pushed by mistake. |
| (2-push) Clear button: | To clear calculation order as well as all nu- merical value except for memory contents. | |
| +/- | Sign change button: | To exchange plus (+) and minus (-) for nu- merical value displayed. |
| MC | Memory clear button: | To clear contents memorized. |
| MR | Memory recall button: | To recall numerical value memorized. |
| M+ | Memory plus button: | To add numerical value to memory. |
| M- | Memory minus buttor | To subtract numerical value or calculation result from memory. |
| √ | Root button: | To obtain square root. |
| % | Percent button: | To obtain percentage. |
| = | Equal button: | To obtain answer. |
| + - × ÷ | Buttons for 4 rules of arithmetic | To carry out 4 rules of arithmetic. |
| 123456.78 | Display window: | 8-digit display by floating decimal point system. |
| 26- | Minus sign | |
| 775" | Memory mark | |
| Error mark: | " E ." is displayed when operation result exceeds 8 digits (over decimal point) or cal- |
2) Notes on calculation
(1) The push-buttons must be pushed softly. If stronger force than necessary is applied to push the button, some fault may be caused to the calculator.
(2) The mispush of the buttons for 4 rules of arithmetic can be corrected with subsequent push of the correct buttons.
(3) When calculations are through, the SW button must be pushed to erase the display. (The display is also erased automatically in about 3 minutes after the push of the last button even if the SW button is not pushed.)
(4) It is convenient to use a mechanical pencil (with the lead pushed in) or the like when pushing the buttons. Avoid using a sharp metal substance since it may injure the buttons.
- TECHNICAL INFORMATION
- § 1. OUTLINE
- §2. MAIN FEATURES
- §4. HANDLING INSTRUCTIONS
- Push-buttons and their functions
- Function switch and how to read display
- How to set time and calendar
- Operation of alarm
- Call-out of alarm display
- How to set alarm time
- Alarm set/cancel
- Operation of stopwatch
- Resetting
- § 5. HOW TO USE CALCULATOR
- Push-buttons and their functions
- 2) Notes on calculation
Mærke : CITIZEN
Model : CAL 9190
Kategori : Ur