
CAL 9455M - Ur CITIZEN - Gratis brugsanvisning og manual
Find enhedens vejledning gratis CAL 9455M CITIZEN i PDF-format.


Brugerspørgsmål om CAL 9455M CITIZEN
0 spørgsmål om dette apparat. Besvar dem du kender, eller stil dit eget.
Stil et nyt spørgsmål om dette apparat
Download vejledningen til din Ur i PDF-format gratis! Find din vejledning CAL 9455M - CITIZEN og tag din elektroniske enhed tilbage i hånden. På denne side er alle dokumenter nødvendige for brugen af din enhed offentliggjort. CAL 9455M af mærket CITIZEN.
BRUGSANVISNING CAL 9455M CITIZEN
TECHNICAL INFORMATION INFORMACION TECNICA
CITIZEN QUARTZ
Cal. No. 945※M
natural_image
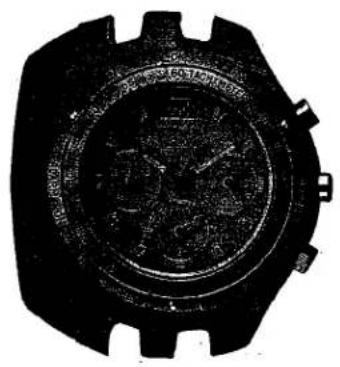
Close-up of a wristwatch with visible mechanical components and dials (no text or symbols)ENGLISH
Contents
§1. OUTLINE ...... 1
§2. SPECIFICATIONS ...... 1
§3. NAME OF PARTS ...... 2
§4. BEFORE USING ......3
(1) Radio Wave Reception....3
(2) Charge Function....4
§5. VARIOUS WARNING FUNCTIONS OF SOLAR POWERED WATCH .....5
§6. TIME REQUIRED FOR CHARGING ......7
§7. OPERATING THE WATCH 7
A. How to Change Modes....7
B. Setting the Time 8
C. Using the Chronograph (CHR (EUR/L-TM))......10
D. Using Local Time....11
E. Summertime Display Function....11
F. Using the Alarm....12
G. Confirmation of the Basic Position....13
§8. IN THESE CASES ...... 14
§9. INSTALLATION PROCEDURE FOR HANDS....15
§10. PRECAUTIONS FOR DISASSEMBLY AND ASSEMBLY .....16
§11. DISASSEMBLY AND ASSEMBLY OF MOVEMENT ..... 18
§12. TROUBLESHOOTING AND ADJUSTMENT ...... 22
ESPAÑOL
Índice
§1. DESCRIPCIÓN GENERAL ......23
§2. ESPECIFICACIONES ...... 23
§3. NOMENCLATURA DE LAS PARTES ......24
§4. ANTES DE LA UTILIZACIÓN ......25
(1) Recepción de ondas radioeléctricas....25
(2) Función de carga....26
§5. DIVERSAS FUNCIONES DE AVISO DEL RELOJ DE ENERGÍA SOLAR 27
§6. TIEMPO REQUERIDO PARA LA CARGA....29
§7. OPERACIÓN DEL RELOJ ......30
A. Forma de cambiar los modos....30
B. Ajuste de la hora....30
C. Utilización del cronómetro 32
D. Utilización de la hora local....33
E. Función de visualización de la hora de verano ....34
F. Utilización de la alarma ....34
G. Confirmación de la posición básica....35
§8. EN ESTOS CASOS ....37
§9. PROCEDIMIENTO DE INSTALACIÓN DE LAS MANECILLAS....38
§10. PRECAUCIONES PARA EL DESMONTAJE Y EL MONTAJE .....39
§11. DESMONTAJE Y MONTAJE DEL MECANISMO 41
§12. SOLUCIÓN DE PROBLEMAS Y AJUSTE 45
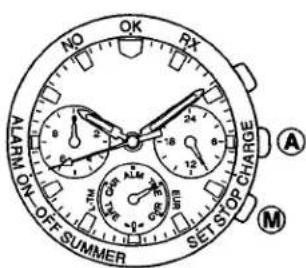
§3. NAME OF PARTS
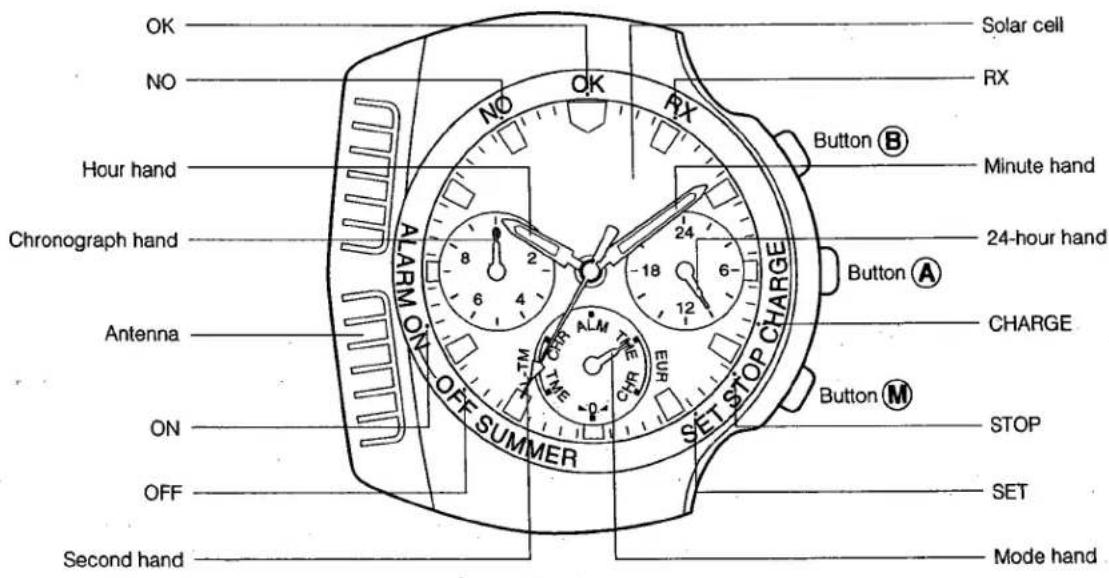
CHARGE: If the watch is insufficiently charged, the second hand stops at the point of CHARGE to indicate the active charge warning.
STOP: If the watch stops due to insufficient charging, the second hand points at the STOP position to indicate the active stop warning.
SET: If the watch is once stopped and resumes the operation (the time is wrong), then the second hand points at the SET position to indicate that the time setting warning is active.
RX: The second hand points at RX during reception.
OK: If the reception completed when the result is checked, the second hand points at OK.
NO: If the reception is not completed when the result is checked, the second hand points at NO.
ON: When the alarm is set ON in the alarm mode, or when the summer-time is set ON with the summer-time monitor, the second hand points at ON.
OFF: When the alarm is set OFF in the alarm mode, or when the summer-time is set OFF with the summer-time monitor, the second hand points at OFF.
Antenna: This antenna receives radio waves.
Solar cell: This solar cell generates electrical energy from light energy to operate the watch.
§1. OUTLINE
This watch has solar power function which runs it by converting solar energy to electrical energy with a solar cell and a function which receives Central European standard time radio waves to automatically correct the time.
It is an analog solar power watch.
§2. SPECIFICATIONS
| Caliber NO. | 9450M / 9455M | |
| Type | Analog solar power watch with radio wave reception | |
| Movement size (mm) | ø31.0 x 6.5 | |
| Accuracy (at normal temperature) | Within ± 15 sec/month (when radio wave is not received)(Normal temperature range of 5°C/41°F ~ 35°C/95°F) | |
| Operating temperature range | -10°C~+60°C (14°F~140°F) | |
| Time adjustment function | Not installed | |
| Measurement gate | 10 sec | |
| Indicating function | • Time : Hour, Minute, second, a.m./p.m.• Chronograph : 60 minutes measurement (1/20 second units)• Local time• Alarm | |
| Additional functions | • Radio wave reception• Light-power generating function• Alarm on 24-hour basis• Local time; with time difference correction by hours• Switchover to summertime | |
| Secondary battery | Part NO. | 295-31 |
| Remarks | *Secondary battery block (With welded lead plate at (-) side) | |
Difference between CAL. 9450 and CAL. 9455
CAL. 9455 is based on CAL. 9450, but the former has a titanium case. Since the radio wave receiving sensitivity is affected by the material of the case, the electronic circuits of these two models are designed differently from each other. The operation methods of these models are the same, however.
(2) Charge Function
This watch uses a secondary battery to store electrical energy. This secondary battery does not use noxious substances at all and therefore it is a clean battery. Once fully charged, the watch will continue to run for about 5 months without further charging. (This can vary according to the degree of radio wave reception, alarm and chronograph use.)
How to use this watch well
In order to use this watch well and utilize completely its radio wave receiving function, alarm function, etc., keeping an ample charge is important. However often this watch is charged, you need not worry about overcharging (the watch is provided with overcharge prevention).
Daily charging is recommended.
Care for long term use
It is advisable to charge the watch routinely.
If you wear long-sleeves, the cloth may cover the watch and prevent it from being exposed to light. Thus the charge is liable to be short, so take care. When the watch is removed, try to put it in a place as bright as possible. To do so makes the watch operate accurately at all times.
Caution
A secondary battery (titanium-lithium ion battery) is used in this watch.
Any other type of battery must used.
Even if another type of battery is installed in the watch, the watch structure does not permit operation. In case a different battery such as a silver battery is wrongly used and charged, overcharging may occur and eventually the battery will burst. There is a danger of watch breakdown or injury to human body. When the secondary battery is replaced, be sure to use the specified secondary battery.
Notes on charging
- Avoid charging at high temperature (over 60°C, 140°F), since it will cause malfunctioning.
Example) Charging by putting the watch close to a light source that may become hot, such as an incandescent lamp or a halogen lamp. Or charging by placing the watch on a dashboard where temperatures may become very high.
- Weak light hardly achieves the full charge, so be careful.
- When you charge the watch by an incandescent lamp, take a distance about 50cm from the light source to prevent extremely high temperature.
§4. BEFORE USING
When the watch does not operate according to the instruction manual, it is insufficiently charged. Charge the secondary battery of the watch for more than 10 hours, approximately 20cm away from the fluorescent lamp as light source.
When charging the secondary battery, do not put it too close to the light source.
*When charging the watch under direct rays of the sun, charge for more than an hour.
(1) Radio Wave Reception
For the purpose of good reception
- Radio waves may be hard to receive due to blockage by a metallic object. In a reinforced concrete building and so on, reception should be performed as close to a window as possible.
- To obtain stable reception, do not move the watch carelessly during reception.
- Preferably, you should find out an easy receivable position by moving the watch or changing the direction of the watch to ensure good reception.
Places where radio waves are hard to receive
It may be impossible to receive radio waves under the following environmental conditions:
① Inside a building or in the valley between tall building
② In a car, train and airplane
③ Near high tension wires or railroad overhead wires
④ Near household electric appliances such as TV sets, refrigerators, personal computers, fax machines etc.
A rough reference of the receivable area
The area where this watch can receive the radio wave of standard time is as shown in the table below.
This area may vary depending on time and the season etc..
| Receive mode | TME (EUR) |
| Standard time transmitter station | DCF77 |
| Place of transmitter station | Mainflingen, Germany (25 km to the southeast of Frankfurt) |
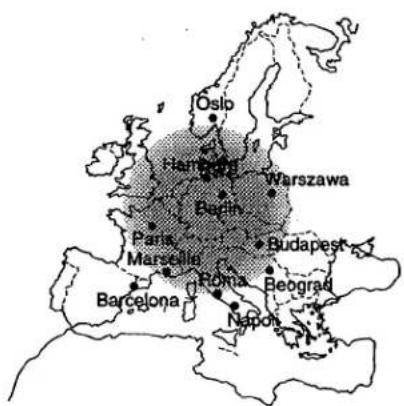
| Standard receivable area | Within a radius of approx. 900 km (But, it may be unre- ceivable in the vicinity of Lake Leman in Switzerland.) |
Standard Receivable Area
This map shows the standard receivable area. However, it may not apply in some particular locations.
② Stop Warning Function
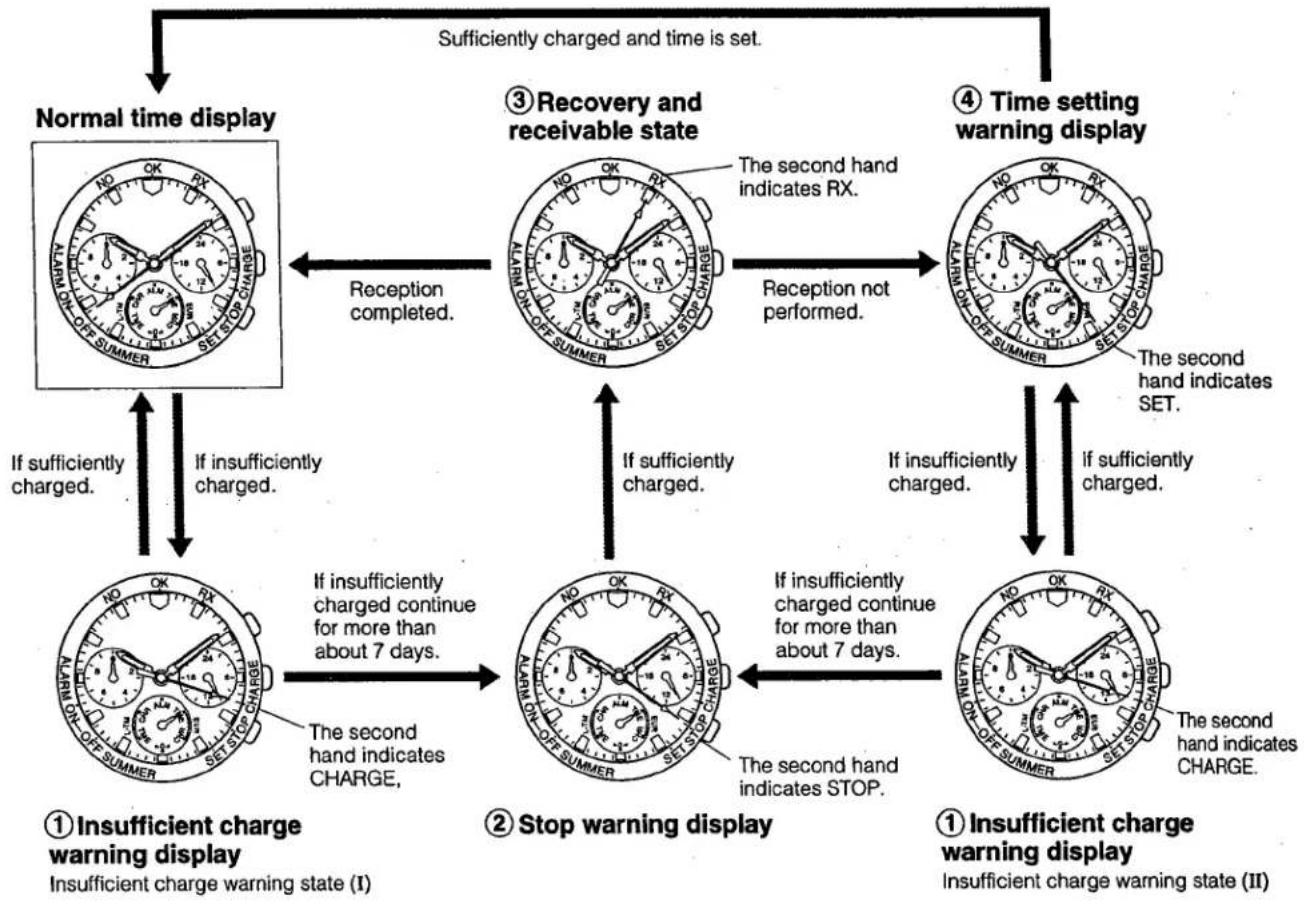
The second hand stops at the point of STOP (in the position that corresponds to 21 seconds) to indicate that the watch stopped due to an insufficient charge (Stop warning display). In this state, no functions are performed.
Expose the watch to light until it is charged enough to put it in the recovery and receivable state.
*(For charging times, see "§6. TIME REQUIRED FOR CHARGING".)
③ Recovery and reception function
As the watch is charged sufficiently after the stop warning display, the watch automatically begins to receive radio waves (the recovery and receivable state). However, note that this function of recovery to reception is disabled if button Ⓜ is pulled out.
• If the reception is completed:
The watch begins to run, keeping correct time. Then the watch can be used as it is.
• If the reception is not completed:
The watch gives the indication of time setting warning. In this case, set the watch with the right time by free reception or manual operation.
④ Time setting warning function
In case the reception does not work in the recovery and receivable state, the time remains incorrect. The second hand stops at the point of SET (in the position that corresponds to 24 seconds) to indicate that the time is wrong (time setting warning).
In this state, set the watch to the TME (EUR) mode and set to the correct time by free reception or manual operation. Then the normal time display recovers. If the watch becomes insufficiently charged, with the indication of time setting warning display, if will switch to insufficient charge warning state (II). To prevent this, make sure the watch is exposed to light for sufficient period.
§5 VARIOUS WARNING FUNCTIONS OF THE SOLAR POWERED WATCH
When this watch becomes insufficiently charged, one of these warning functions will activate and the second hand will indicate one of the specific warning states.
- For details of the warning functions and the actions that follow specific warning indications, see "Description of the Various Warning Functions".
flowchart
graph TD
    A["Normal time display"] -->|If sufficiently charged.| B["Reception completed."]
    B --> C["Recovery and receivable state"]
    C -->|If insufficiently charged.| D["Stop warning display"]
    D -->|If insufficiently charged continue for more than about 7 days.| E["Stop warning display"]
    E -->|If insufficiently charged continue for more than about 7 days.| F["Time setting warning display"]
    F -->|If insufficiently charged.| G["Insufficient charge warning display (I)"]
    G -->|If insufficiently charged indicates CHARGE.| H["Stop warning display"]
    H -->|If insufficiently charged indicates STOP.| I["Time setting warning display (II)"]
    I -->|If insufficiently charged indicates CHARGE.| J["Insufficient charge warning state (II)"]
    J -->|If insufficiently charged indicates SET.| K["Time setting warning display (4)"]
    K -->|If insufficiently charged indicates RX.| L["Reception not performed."]
    L -->|If insufficiently charged indicates SET.| M["Time setting warning display (3)"]
    M -->|If insufficiently charged indicates RX.| N["Reception not performed."]
    N -->|If insufficiently charged indicates RX.| O["Time setting warning display (3)"]
    O -->|If insufficiently charged indicates RX.| P["Time setting warning display (3)"]
    P -->|If insufficiently charged indicates RX.| Q["Time setting warning display (3)"]
    Q -->|If insufficiently charged indicates RX.| R["Time setting warning display (3)"]
    R -->|If insufficiently charged indicates RX.| S["Time setting warning display (3)"]
    S -->|If insufficiently charged indicates RX.| T["Time setting warning display (3)"]
    T -->|If insufficiently charged indicates RX.| U["Time setting warning display (3)"]
    U -->|If insufficiently charged indicates RX.| V["Time setting warning display (3)"]
    V -->|If insufficiently charged indicates RX.| W["Time setting warning display (3)"]
    W -->|If insufficiently charged indicates RX.| X["Time setting warning display (3)"]
    X -->|If insufficiently charged indicates RX.| Y["Time setting warning display (3)"]
    Y -->|If insufficiently charged indicates RX.| Z["Time setting warning display (3)"]
    Z -->|If insufficiently charged indicates RX.| AA["Time setting warning display (3)"]
    AA -->|If insufficiently charged indicates RX.| AB["Time setting warning display (3)"]
    AB -->|If insufficiently charged indicates RX.| AC["Time setting warning display (3)"]
    AC -->|If insufficiently charged indicates RX.| AD["Time setting warning display (3)"]
    AD -->|If insufficiently charged indicates RX.| AE["Time setting warning display (3)"]
    AE -->|If insufficiently charged indicates RX.| AF["Time setting warning display (3)"]
    AF -->|If insufficiently charged indicates RX.| AG["Time setting warning display (3)"]
    AG -->|If insufficiently charged indicates RX.| AH["Time setting warning display (3)"]
    AH -->|If insufficiently charged indicates RX.| AI["Time setting warning display (3)"]
    AI -->|If insufficiently charged indicates RX.| AJ["Time setting warning display (3)"]
    AJ -->|If insufficiently charged indicates RX.| AK["Time setting warning display (3)"]
    AK -->|If insufficiently charged indicates RX.| AL["Time setting warning display (3)"]
    AL -->|If insufficiently charged indicates RX.| AM["Time setting warning display (3)"]
    AM -->|If insufficiently charged indicates RX.| AN["Time setting warning display (3)"]
    AN -->|If insufficiently charged indicates RX.| AO["Time setting warning display (3)"]
    AO -->|If insufficiently charged indicates RX.| AP["Time setting warning display (3)"]
    AP -->|If insufficiently charged indicates RX.| AQ["Time setting warning display (3)"]
    AQ -->|If insufficiently charged indicates RX.| AR["Time setting warning display (3)"]
    AR -->|If insufficiently charged indicates RX.| AS["Time setting warning display (3)"]
    AS -->|If insufficiently charged indicates RX.| AT["Time setting warning display (3)"]
    AT -->|If insufficiently charged indicates RX.| AU["Time setting warning display (3)"]
    AU -->|If insufficiently charged indicates RX.| AV["Time setting warning display (3)"]
    AV -->|If insufficiently charged indicates RX.| AW["Time setting warning display (3)"]
    AW -->|If insufficiently charged indicates RX.| AX["Time setting warning display (3)"]
    AX -->|If insufficiently charged indicates RX.| AY["Time setting warning display (3)"]
    AY -->|If insufficiently charged indicates RX.| AZ["Time setting warning display (3)"]
    AZ -->|If insufficiently charged indicates RX.| BA["Time setting warning display (3)"]
    BA -->|If insufficiently charged indicates RX.| BB["Time setting warning display (3)"]
    BB -->|If insufficiently charged indicates RX.| BC["Time setting warning display (3)"]
Description of the Various Warning Functions
\~Actions that follow the specific warning indications\~ Read the following, referring to the illustration shown.
① Insufficient Charge Warning Function
Whichever the mode, the hour, minute and 24-hour hands switch to the time display of TME (EUR) mode and the second hand stops at the CHARGE position (at the 18 second position), to indicate that the watch is insufficiently charged. (Insufficient charge warning display I or II). The reception, chronograph and alarm functions do not work in this state.
Insufficient Charge warning state I:
The watch runs accurately, and thus the normal time display can recover by exposure to light for charging.
Insufficient Charge warning state II:
The time is incorrect. Expose the watch to light until it is charged sufficiently. Then set time by free reception or manual operation.
B. Setting the Time
To set the time of this watch, use either of the following two methods:
- Radio wave reception
- Manual operation
1. Setting the Time by Radio Wave Reception
There are 2 ways of setting the time by radio wave reception.
1) Automatic reception: The watch automatically receives time radio waves every day at 3:00 a.m. and corrects the time.
2) Free reception: Reception and time setting can be carried out at any time by button operation.
Notes on radio wave reception
1) Reception is carried out in TME (EUR) mode.
2) Time correction by radio wave reception is carried out only when reception has been completed.
If reception is not completed, the time display is not corrected.
3) In order to get stable reception, do not move the watch during reception.
4) It takes about 2 \~ 10 minutes to receive radio time waves. However if reception is not possible, the watch might return to the normal time display sooner
5) During the indication of any warning due to insufficient charge (when the second hand stops), radio wave reception cannot be carried out.
Carry out free reception again after the watch has been sufficiently charged..
Setting the Time by Radio Wave Reception
| Automatic reception | Free reception | Illustration | |
| 1 Select mode | Press button Ⓜ to set the mode hand to TME (EUR) mode. | 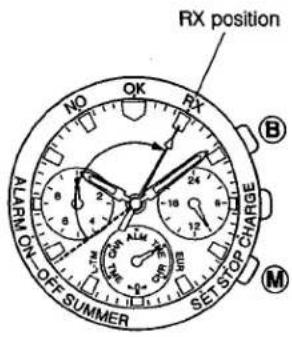 | |
| 2 Receiving method | At 3 a.m. everyday, the second hand points to RX position (points 5 seconds) and the watch begins automatic reception. | Depress button Ⓑ until a beep sound occurs once. The second hand stops in the RX position which corresponds to 5 seconds and reception begins. | |
| 3 Reception result indication | After reception is completed, the watch shows correct time. If the reception is not completed, the time is unchanged. | If the reception is completed, a beep sound occurs twice and the watch shows correct time. If the reception is not completed, a beep sound occurs once and the time display is unchanged. | |
§6 TIME REQUIRED FOR CHARGING
Time required for charging may vary according to the design (color of the dial, light receiving area etc.) and operating environment. The following table will serve as a rough reference.
* Charging time is a total time during light irradiates the watch continuously.
| Illuminance (lux) | Environment | Time required | ||
| Charge time of one day usage | Charge time from the stop state to recovery and automatic reception | Full charge time | ||
| 500 | Inside an ordinary office | 4 hours | 51 hours | 27 days |
| 1000 | 60-70cm under a fluorescent light (30W) | 1 hour 30 minutes | 22 hours | 12 days |
| 3000 | 20cm under a fluorescent light (30W) | 30 minutes | 7 hours 30 minutes | 86 hours |
| 10000 | Exterior, cloudy | 8 minutes | 2 hours 30 minutes | 24 hours |
| 100000 | Exterior, summer, sunny | 2 minutes | 1 hour | 6 hours |
Full charging time: Time for charging the watch from its stop state to the maximum charge. Charge time for one day usage: Charge time required to allow the watch to run 24 hours.
* Once charged fully, this watch continues to operate for about 5 months without further charging. However, once the watch stops (with the indication of stop warning), it takes a considerable time to charge the secondary battery enough to run the watch again as shown above. Daily charging is recommended.
§7. OPERATING THE WATCH
A. How to Change Modes
This watch has 6 basic functions. Each time button Ⓜ is pressed, the mode changes in the following order. The current mode can be checked by the mode hand position.
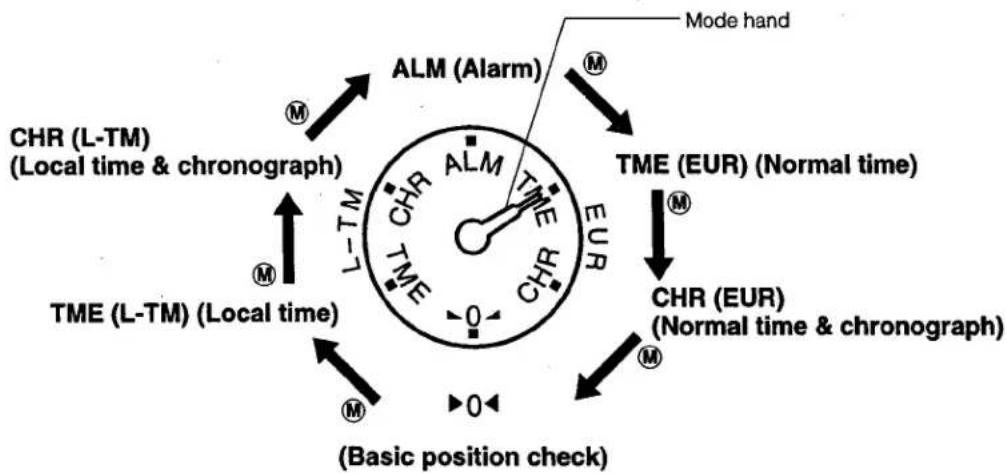
flowchart
graph TD
    A["Mode hand"] --> B["ALM (Alarm)"]
    B --> C["TME (EUR) (Normal time)"]
    C --> D["CHR (EUR) (Normal time & chronograph)"]
    D --> E["TME (L-TM) (Local time)"]
    E --> F["CHR (L-TM) (Local time & chronograph)"]
    F --> G["LM"]
    G --> H["0"]
    H --> I["0"]
    I --> J["0"]
    J --> K["0"]
    K --> L["0"]
    L --> M["0"]
    M --> N["0"]
    N --> O["0"]
    O --> P["0"]
    P --> Q["0"]
    Q --> R["0"]
    R --> S["0"]
    S --> T["0"]
    T --> U["0"]
    U --> V["0"]
    V --> W["0"]
    W --> X["0"]
    X --> Y["0"]
    Y --> Z["0"]
    Z --> AA["0"]
    AA --> AB["0"]
    AB --> AC["0"]
    AC --> AD["0"]
    AD --> AE["0"]
    AE --> AF["0"]
    AF --> AG["0"]
    AG --> AH["0"]
    AH --> AI["0"]
    AI --> AJ["0"]
    AJ --> AK["0"]
    AK --> AL["0"]
    AL --> AM["0"]
    AM --> AN["0"]
    AN --> AO["0"]
    AO --> AP["0"]
    AP --> AQ["0"]
    AQ --> AR["0"]
    AR --> AS["0"]
    AS --> AT["0"]
    AT --> AU["0"]
    AU --> AV["0"]
    AV --> AW["0"]
    AW --> AX["0"]
    AX --> AY["0"]
    AY --> AZ["0"]
    AZ --> BA["0"]
    BA --> BB["0"]
    BB --> BC["0"]
    BC --> BD["0"]
    BD --> BE["0"]
    BE --> BF["0"]
    BF --> BG["0"]
    BG --> BH["0"]
    BH --> BI["0"]
    BI --> BJ["0"]
    BJ --> BK["0"]
    BK --> BL["0"]
    BL --> BM["0"]
    BM --> BN["0"]
    BN --> BO["0"]
    BO --> BP["0"]
    BP --> BQ["0"]
    BQ --> BR["0"]
    BR --> BS["0"]
    BS --> BT["0"]
    BT --> BU["0"]
    BU --> BV["0"]
    BV --> BW["0"]
    BW --> BX["0"]
    BX --> BY["0"]
    BY --> BZ["0"]
C. Using the Chronograph (CHR (EUR/L-TM))
The operation methods in CHR (EUR) mode and CHR (L-TM) mode are the same except for hour, minute and 24-hour hand display.
The hour, minute and 24-hour hands show the TME (EUR) time in CHR (EUR) mode and the TME (L-TM) time in CHR (L-TM) mode.
The chronograph can measure up to a maximum of 60 minutes in units of 1/20 second. After that, it returns to the chronograph reset state.
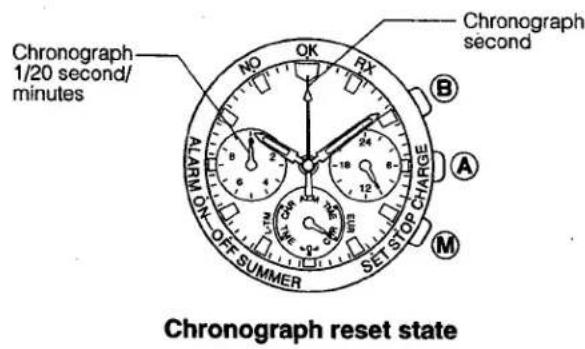
Reading the hands in chronograph mode
When measuring less than a minute
.... Second hand: chronograph seconds
.... Chronograph hand: chronograph, 1/20 second
When measuring a minute or more
.... Second hand: chronograph seconds
.... Chronograph hand: chronograph minutes
Chronograph measurement
flowchart
graph TD
    A["Reset"] -->|⑧| B["Measurement"]
    B -->|⑧| C["Stop"]
    C -->|⑧| A
    B -->|⑧| A
    style A fill:#f9f,stroke:#333
    style B fill:#ccf,stroke:#333
    style C fill:#cfc,stroke:#333
    note right of A "2 seconds or more"
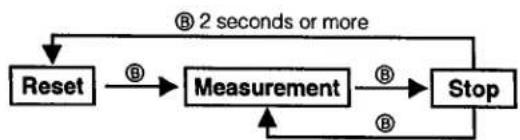
(1) Press button Ⓜ to set CHR (EUR) mode or CHR (L-TM) mode.
The seconds hand and the chronograph hand are reset to the 0 minute 00 second position.
(2) Each time you press button Ⓑ, there is a confirmation sound and the chronograph starts or stops.
(3) If you press button Ⓑ in for 2 seconds or more while the chronograph is stopped, the second hand and the chronograph hand are reset to the 0 minute 00 second positon.
☆ How to read 1/20 seconds when the measurement time is 1 minute or more after the chronograph is stopped.
The chronograph hand switches to chronograph 1/20 second display while button Ⓐ is pressed in.
When you release button Ⓐ, the chronograph hand displays chronograph minutes again.
| * Cancel reception | To cancel the receiving function during automatic or free reception, press button M to change the mode or depress any other button for 1 second or more and the reception is canceled. | 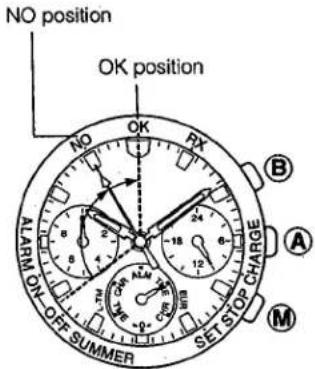 |
| * Reception result check function | Reception result check can be performed only in TME (EUR) mode.1.Press button M to set the mode hand to TME (EUR) mode.2.Press button B.The second hand indicates the reception result for 10 seconds.* If the second hand points at OK (0-second position), the reception is completed.* If the second hand points to NO (55-second position), the reception is not completed. |
2. Setting the Time by Manual Operation
The time can be set by manual operation as well.
Setting the time
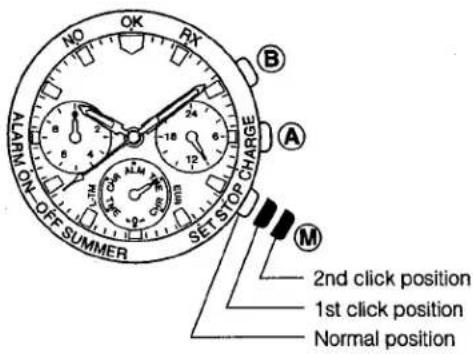
(1) Press button Ⓜ to set TME (EUR) mode.
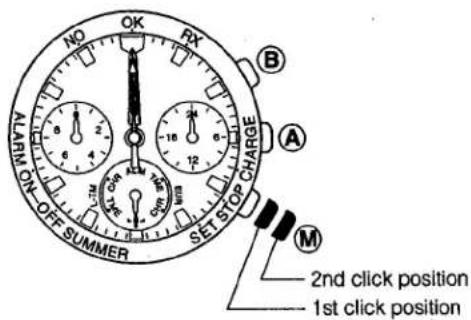
(2) Pull button Ⓜ out to the 1st click.
(3) The second hand can be reset with button Ⓐ. Pressing button Ⓐ starts the second hand from the 0 second position.
(4) Pull button Ⓜ out to the 2nd click. Press button Ⓐ or button Ⓑ to correct the minute, hour or 24-hour hands. pressing button Ⓐ allows you to move the hands in a counter clockwise direction. Pressing button Ⓑ allows you to move the hands in a clockwise direction.
(5) When setting is finished, press button Ⓜ back to its normal position.
F. Using the Alarm
Once the alarm is set, it will sound for about 15 seconds at the set time everyday. The alarm can be stopped by pressing either button Ⓐ or button Ⓑ.
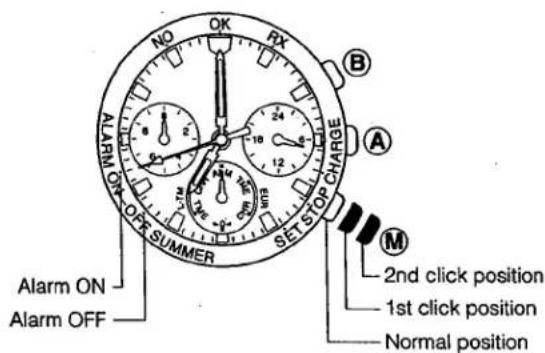
Setting the alarm
(1) Press button Ⓜ to set ALM mode.
(2) Pull button Ⓜ out to the 1st or 2nd click.
- The alarm automatically comes ON when button Ⓜ is pulled out.
(3) Pressing button Ⓐ allows you to adjust in a counterclockwise direction.
Pressing button Ⓑ allows you to adjust in a clockwise direction.
- Be aware of the 24-hour hand when setting the time.
(4) When setting is finished, press button Ⓜ back to its normal position.
Alarm ON/OFF
(1) Press button Ⓜ to set ALM Mode.
(2) Pressing button Ⓐ switches the alarm between ON and OFF with a confirmation beep.
- When the alarm is turned ON, there are 2 beeps and the second hand points to ON.
- When the alarm is turned OFF, there is 1 beep and the second hand points to OFF.
Alarm monitor
In Alarm mode, the alarm sounds while button Ⓑ is being pressed.
Using the alarm
After the alarm has been set, the alarm sounds at the set time in TME (EUR) mode and TME (L-TM) mode.
The alarm does not sound in other modes.
Example: Setting the alarm at 7:00 a.m.:
- The alarm will sound at 7:00 a.m. TME (EUR) time when the TME (EUR) mode is indicated, and at 7:00 a.m. TME (L-TM) time when the TME (L-TM) mode is indicated, regardless of the time difference between the modes.
D. Using Local Time
In the Local Time mode, a certain local time can be set with a time difference in units of 1 hour. Radio wave reception cannot be carried out in Local Time mode.
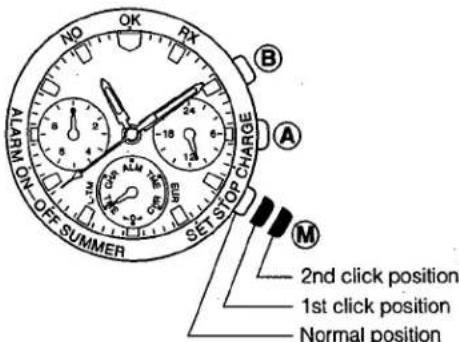
Setting the local time
(1) Press button Ⓜ to set the TME (L-TM) mode.
(2) Pull button Ⓜ out to the 1st or 2nd click.
(3) Pressing button Ⓐ allows you to adjust the time difference in a counter clockwise direction. Pressing button Ⓑ allows you to adjust the time difference in a counterclockwise direction.
(4) When setting is finished, press button M back to its normal position.
E. Summertime Display Function
Switching to Summertime display
This watch can be switched to Summertime display independently in TME (EUR) mode or in TME (L-TM) mode.
(1) Press button Ⓜ to set the TME (EUR) mode or the TME (L-TM) mode.
(2) You can set or cancel Summertime display by pressing in button Ⓐ for 2 seconds or more.
- When the second hand points to ON, the Summertime display is set.
- When the second hand points to OFF, the Summertime display is canceled.
Summertime monitor
This monitor function shows whether summertime or normal time is currently being displayed.
(1) Press button Ⓐ in TME (EUR) mode or in TME (L-TM) mode.
- When the second hand points to ON, summer time is being displayed.
- When the second hand points to OFF, standard time is being displayed.
G. Confirmation of the Basic Position
Always check the hand positions (basic position) if the watch receives a strong shock, etc.
Confirmation method
(1) Press button Ⓜ to set ▶ 0 ◀ mode.
Check that the hands are pointing to the following positions:
• Second hand → Zero-second position
• Minute, hour hands → 12 o'clock position
• 24-hour hand → 24-hour position
• Chronograph hand → 12 o'clock position
(2) If the hands are pointing to the normal position, set the time by radio wave reception or manual operation.
If the hands are in the wrong position, set them to the basic position by the following method.
Basic position setting method
(1) Press button Ⓜ to set ▶ 0 ◀ mode.
(2) Pull button Ⓜ out to the 1st click.
(3) Press button Ⓐ to set the second hand to the zero-second position.
Pressing button Ⓐ allows you to adjust the second hand in a clockwise direction.
(4) Press button Ⓑ to set the chronograph hand to the 12 o'clock position.
Pressing button Ⓢ moves the chronograph hand in a clockwise direction.
(5) Pull button Ⓜ out further to the 2nd click.
(6) Press button Ⓐ or button Ⓑ to set the hour, minute or 24-hour hands.
Pressing button Ⓐ allows you to adjust the hour, minute or 24-hour hands in a counterclockwise direction.
Pressing button Ⓑ allows you to adjust the hour, minute or 24-hour hands in a clockwise direction.
(7) Press button Ⓜ in to its normal position to complete operation.
(8) When the above settings have been completed, press button Ⓜ to switch to TME (EUR) mode and carry out free reception.
If the watch is in the receivable area, the current time will be displayed a few minutes later.
If the watch is not in the receivable area, set the time by manual operation.
§8. IN THESE CASES
| In this case | Check items | Treatment |
| The watch cannot be put in the receivable state. | Does the second hand stop in the following positions?Charge warning position (18 sec-ond position)Stop warning position (21 second position) | If the second hand stops at these positions, the secondary battery is insufficiently charged. Try reception again after charging the bat-tery sufficiently.See "Various Warning Functions of Solar Powered Watch". |
| The watch cannot receive radio wave | Is TME (EUR) mode selected?Is the watch outside the receiv-able area? | Press button to switch to TME (EUR) mode, and try reception again.See "Standard Receivable Area". |
| The watch cannot receive (even in the reception area). | Is there an object interfering with reception or generating a noise near the watch? | See "For the purpose of good reception" and "Places where radio waves are hard to receive".Check for changes in the reception environment due to changes in room arrangement, etc. |
| Radio wave reception is performed but the present time is not shown. | Are the hands in the correct posi-tion when the watch is in basic position check mode?Is there an object interfering with reception or generating a noise near the watch?Is the watch on the margin of the receivable area? | In basic position checking mode, set the hands exactly to the basic position.See "Places where radio waves are hand to receive" then try reception again.Alternatively, set the time manually. |
| The hands are not in the correct position. | Are the hands in the correct posi-tion when the watch is in basic position check mode? | In basic position checking mode, set the hands exactly to the basic position. |
- TECHNICAL INFORMATION INFORMACION TECNICA
- ENGLISH
- Contents
- ESPAÑOL
- Índice
- §3. NAME OF PARTS
- §1. OUTLINE
- Difference between CAL. 9450 and CAL. 9455
- Charge Function
- How to use this watch well
- Care for long term use
- It is advisable to charge the watch routinely.
- Caution
- A secondary battery (titanium-lithium ion battery) is used in this watch.
- Any other type of battery must used.
- Notes on charging
- §4. BEFORE USING
- Radio Wave Reception
- For the purpose of good reception
- Places where radio waves are hard to receive
- A rough reference of the receivable area
- Standard Receivable Area
- ② Stop Warning Function
- ③ Recovery and reception function
- ④ Time setting warning function
- §5 VARIOUS WARNING FUNCTIONS OF THE SOLAR POWERED WATCH
- Description of the Various Warning Functions
- ① Insufficient Charge Warning Function
- Setting the Time
- Setting the Time by Radio Wave Reception
- Notes on radio wave reception
- §6 TIME REQUIRED FOR CHARGING
- §7. OPERATING THE WATCH
- How to Change Modes
- Using the Chronograph (CHR (EUR/L-TM))
- Reading the hands in chronograph mode
- Setting the Time by Manual Operation
- Using the Alarm
- Setting the alarm
- Alarm ON/OFF
- Alarm monitor
- Using the alarm
- Using Local Time
- Setting the local time
- Summertime Display Function
- Switching to Summertime display
- Summertime monitor
- Confirmation of the Basic Position
- Confirmation method
- Basic position setting method
- §8. IN THESE CASES
Mærke : CITIZEN
Model : CAL 9455M
Kategori : Ur