
HTZ232DVD - Hjemmebiograf PIONEER - Gratis brugsanvisning og manual
Find enhedens vejledning gratis HTZ232DVD PIONEER i PDF-format.

Brugerspørgsmål om HTZ232DVD PIONEER
0 spørgsmål om dette apparat. Besvar dem du kender, eller stil dit eget.
Stil et nyt spørgsmål om dette apparat
Download vejledningen til din Hjemmebiograf i PDF-format gratis! Find din vejledning HTZ232DVD - PIONEER og tag din elektroniske enhed tilbage i hånden. På denne side er alle dokumenter nødvendige for brugen af din enhed offentliggjort. HTZ232DVD af mærket PIONEER.
BRUGSANVISNING HTZ232DVD PIONEER
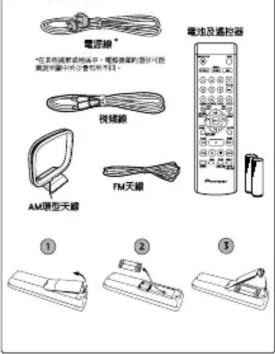
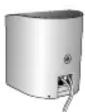
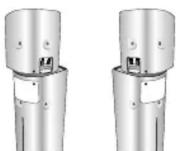
Setting up your DVD/CD Receiver

Caution When connecting this system or changing connections, be sure to switch the power off with the STANDBY/ON button, and disconnect the power cord from the AC outlet. Do not use these speakers with any other system or amplifier as this may result in damage or fire.

Check that you have all the accessories, then put the batteries in the remote control.
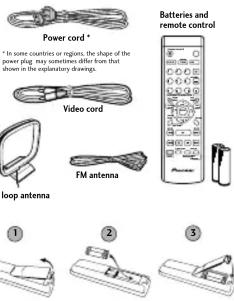

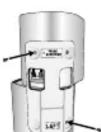
Connect the AM and FM antennas to the rear panel of the DVD/CD receiver.
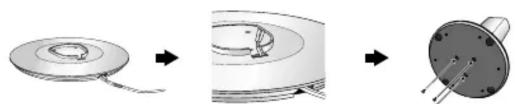
1 Pull off the protective shields of both AM and wires.
2 Push open the tabs, then insert
3 Release the tabs to secure the AM antenna wires.
4 Fix the AM loop antenna to the attached stand.
To fix the stand to the antenna, bend direction indicated by the arrow (fig. clip the loop onto the stand (fig. B).
Note: If you plan to mount the AM antenna to a wall or other surface, secure the stand with screws (fig. C) before clipping the loop to the stand. Make sure the reception is clear
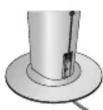
5 Place the AM antenna on a flat
surface and point in the direction
giving the best reception. Don't let it come into contact with metal objects and avoid placing near computers, television sets or other electrical appliances.
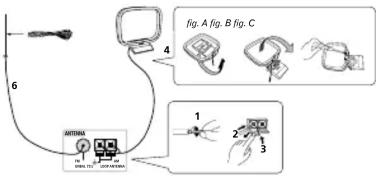

Connect the FM wire antenna to the FM UNBAL 75Ω antenna terminal. For best results, extend the FM antenna fully and fix to a wall or door frame. Don't drape loosely or leave coiled up.
Note: The signal earth ( ) is designed to reduce noise that occurs when an antenna is connected. It is not an electrical safety earth.
Using the remote control
The remote control can be used within a range of about 7 meters from the remote sensor on the front panel, and within a 30 degree angle.
• The remote control may not work if there is an obstacle between the remote control and the display unit, or if the remote control is not directed towards the remote sensor of the display unit at the correct angle.
- The remote control may not work properly if strong light such as direct sunlight or fluorescent light is shining onto the unit's remote sensor.
• The remote control may not work properly when this unit is used near devices emitting infrared rays, or when remote controls of other devices which use infrared rays are used. Also, the use of this remote control may cause other devices to work improperly.
- When the operating range of the remote becomes too short, replace the batteries.
Remote control battery caution
Incorrect use of batteries may cause leakage or rupture.
Always be sure to follow these guidelines: • Always insert batteries into the battery compartment correctly matching the positive ⊕ and negative ⊖ polarities, as shown by the display inside the
compartment. • Never mix new and used batteries.
- Batteries of the same size may have different voltages, depending on brand. Do not mix different brands of batteries.
- When disposing of used batteries, please comply with governmental regulations or environmental public
• In order to prevent battery inscers, comply the
- In order to prevent battery leakage, remove the batteries when not using the remote control for an extended period (one month or more). If leakage occurs, carefully wipe away any battery fluid inside the compartment, and replace the batteries with new ones.
- Do not allow books or other objects to rest on top of the remote control, since the buttons may be depressed, causing faster exhaustion of the batteries.
Additional notes on connecting antennas
- Keep antenna cables away from the main unit and other cables
- To assure optimum reception, pull the FM antenna so that it is fully extended and not called as bending at the rear of the unit.
If reception with the supplied antenna is poor, see the Other
connections section in the main operating instructions for details on connecting outdoor entrances.
details on connecting outdoor antennas.
Additional notes on speaker placement
If your listening room is of adequate size, place the speakers as shown in step 3 to achieve the optimum surround sound effect.
If you are listening in a fairly small room and a typical surround market setup is not possible, see How the ground set up in
speaker Setup is not possible, see Home Theater Stand Setup, the instruction manual and the Speaker Setup Guide for
information on the Front Surround 3-spot setup option. When using the standard surround speaker setup as show
step 3, please observe the following guidelines:
• Install the main front left and right speakers at an equal distance from the TV.
- For optimum effect
ear level. • Install the center speaker above or below the TV so that the
- Incan the center speaker above or below the TV so that the sound of the center channel is localized at the TV screen.
Precautions:
- When installing the center speaker on top of the TV, be sure to agree with these words.
to secure it with tape or some other suitable means. Otherwise, the speaker may fall from the TV due to externa
shocks such as earthquakes, endangering those nearby or damaging the snakes.
• Do not connect the supplied speakers with any other
amplifier. This may result in malfunction or fire.
- The front, center and surround speakers supplied with this system are magnetically shielded. However, depending on the
system are magnitatively infinite. However, depending on the installation location, color distortion may occur if the speaker
is installed extremely close to the screen of a television set. If this happens case, turn the power switch of the television set
OFF, and turn it ON after 15 to 30 minutes. If the problem
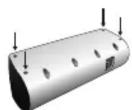
persists, place the speaker system away from the television set. The subwoofer is not magnetically shielded and so should
not be placed near a TV or monitor. Magnetic storage media
(such as floppy discs and tape or video cassettes) should also not be kept close to the subwoofer.
- Do not fix the front, center speakers and subwoofer to the

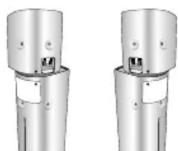
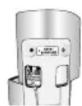
Connect each speaker using the color-coded speaker cords. Match them to the colored speaker terminals on the rear panel of the DVD/CD receiver.
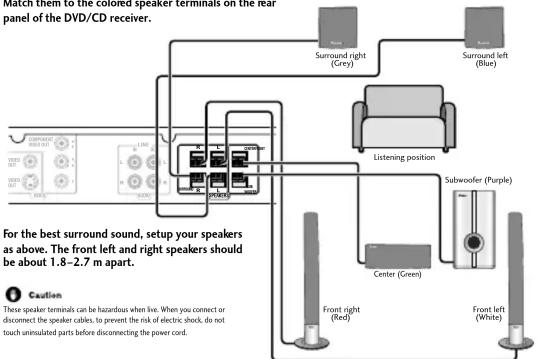
Connect each speaker as shown below. (Subwoofer conventions start from step 3)
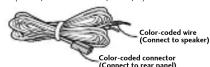
① Twist and pull off the protective shields on each wire.
② Connect the wires to the speaker. Match the colored wire with the color-coded label (above the tabs), then insert the colored wire into the red (+) tab and the other wire with the black (-) tab.
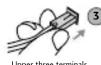

Lower three terminals

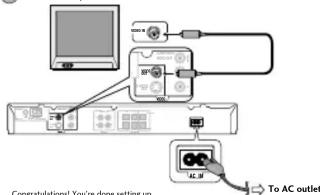
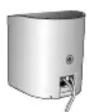
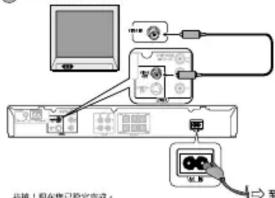
Connect the DVD/CD receiver to your TV, then connect the supplied power cord.
1 Connect one end to a video input on your TV.
Use the supplied video cord.
2 Connect the other end to the video output of the DVD/CD receiver. This player is equipped with copy protection technology. Do not connect this player to your TV via a VCR using AV cables, as the picture from this player will not appear properly on your TV.
3 Connect the power cord to the AC inlet.
Printed in
Speaker Setup Guide
What's in the box
- Front speakers x 2
- Speaker cords:
• Center speaker x 1 Red/White (Front speakers) 4m x 2 - Surround speakers x 2 Green (Center speaker) 4m x 1
- Subwoofer x
• Non-skid pads (small) x 4
• Non-skid pads (large) × 4
- Front speaker stand bases x 2
- Screws (for bases) x 6 - Bracket x 2
- Brackets x 2 - Screws (for brackets) x 4
- Mounting brackets x 2*
- Screws (for mounting brackets) x 2*
*Please refer to Wall-mounting the front and surround speaker system
in the operating instructions for installation.
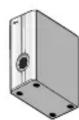
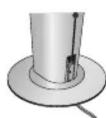
Assembling the speaker stands and securing your front speakers
Attach the speaker stand bases to the stems using the screws provided.
Before securing the base to the stand, thread the speaker wire through the holes provided on the base as shown below. Then, once you have aligned the stem and base, secure with the small screws at the points shown at right.

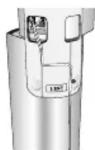
natural_image
Diagram showing three stages of a mechanical component: ring opening, internal cavity, and final pin (no text or symbols)Safety precautions when setting up
When assembling the speakers, lay them down flat on their side to avoid accidents or injury. Make sure to use a stable surface when assembling, setting up, and placing the speakers.
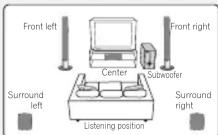
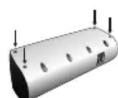
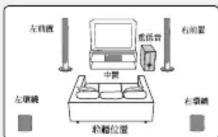
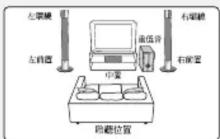
Standard surround 5-spot setup
This is a standard multichannel surround sound speaker setup for optimal 5.1 channel home theatre sound.
1 Attach the smaller non-skid pads to the base of the center speaker. The four large non-skid pads are for the subwoofer (as shown).
Use the supplied adhesive to attach 4 pads to the base of center speaker and subwoofer.

Center speaker
Subwoofer
2 Connect the speaker system.
Refer to the Setting up your DVD/CD Receiver (the other part of this setup guide) to connect the speakers properly. Place them as shown in the diagram at far left optimal surround sound.

3 Switch Front Surround MODE OFF for 5-spot s
up. See the operating instructions for more on using Front Surround.
Caution
- Please don't use the any attachments with the front speakers other than the brackets provided.
Front surround 3-spot setup
This setup is ideal when rear surround speaker placement isn't possible or you want to avoid running long speaker cables in your listening area.

1 Attach the smaller non-skid pads to the base of the center speaker. The four large non-skid pads are for the subwoofer (as shown). Use the supplied adhesive to attach 4 pads to the base of center speaker and subwoofer.
Center speaker
Subwoofer
2 Place the surround speakers on top of the front speakers, turn the surround speakers towards the closest wall, lining the arrows up for optimal Front Surround.
Turn each surround speaker so that the ▼ arrow at the base is lined up with the ▲ (FRONT SURROUND) arrow on the front speaker. This is only necessary when you are using the Front Surround mode (MODE ON). See the operating instructions for more on using Front Surround.
Front Surround MODE ON
3 Secure in position with the brackets provided.
Line up the holes in the bracket with the holes in the speakers then secure with two screws at the points shown below. Make sure you've matched the right and left brackets with the speakers (as shown).
4 Connect the speaker system.
Refer to the Setting up your DVD/CD Receiver (the other part of this setup guide) to connect the speakers properly.

5 Secure the speaker wire.
When you're finished, thread the surround speaker cords through the outlet on the back of the speaker stand and through the base of the brackets as shown below.
Caution
- Please don't use the any attachments with the front speakers other than the brackets provided.
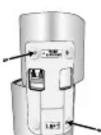
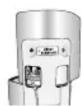
設定您的DVD/CD接收機

注意 連接本系統或變更接線方式時,請確實利用STANDBY/ON按键先將電源關閉,並將電源線自AC電源插座上脫離。切勿將這些揚聲器搭配其他的系統或擴大機使用,此種作法可能會導致損壞或引起火災。

檢查所有配件並無短缺,接著再將電池裝入遙控器內。

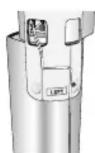
將AM及FM天線裝設至DVD/CD接收機的背面板。
① 扯下AM天線用條導線上的保養外皮。
② 涵凸耳推開,接著將每條導線完全的插入每個單子內。
③ 將凸耳放周以固定AM天驟導線。
4 將AM環型天線固定在安裝底座上。
欲將底座固定在天線上,則請對著箭頭所指的方向折彎(圖A),接著將羽靈夾緊於窗座上(畫B)。
附註:若您打算將AB天線裝於牆上或其他的表面上,則請在將環圈夾緊於腳座之前,先利用螺絲將腳座上緊(圖C)。完成安裝後請確定取聽情形清晰良好。
5 將AM天線置於平坦的表面上,並對準收屬狀況最佳的方向。切勿讓天線腳及金屬物價,同時應迷靠電腦,電視機或其他電氣設備的美測攤散。
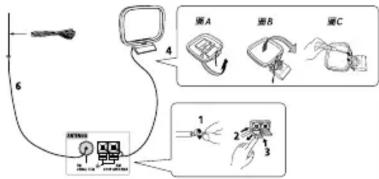

將FM線型天線裝股到FM UNBAL 75Ω天線端子上。 為得到最佳的收聽效果,請將FX天線完全展開直定於器上或門框上。切勿放鬆垂下或撞成圈狀。
附註:信號接地線(表)在設計上,主要是減少天線在裝設後所產生的諒訊。此線不作電氣安全地線用途。
应用监控器
湯盤器所可使用的範圍是與前面面板上的整體器相差7公尺的距離,角度其在30度以內。 安全注意事項:
· 雷选择器和展示装置之间存在短暂损害,或选择器并非以正确的角度。直接判断展示装置上的选择器是选择器使偶法操作。
- 當有日光或閃光燈等強光對單本機上的基控感應器直接對射,基控器便無法正常的操作。 - 當本機在有發射紅外線的表面附近使用,或有其他裝置的基控器為以紅外線在操作,基控器便會無法正常操作。同樣,本基控器在使用時亦會造或其他設備無法正常操作。
• 宣發現滙控器的操作範圍縮小,屬立即更換電准
⑥ 连控器电动使用注意事项
電池不當能用易造成電池反外漏或電池發裝
副通時導出下列規定: • 電時按照電流站內的指示,對照正⊕、⊖負極 以正直方式將電流裝入電流室內。
- 不得新音電相契合使用。 - 规格相同的電池,品牌不同電壓可能亦不盡相同,切勿強合使用不同品牌的電池。
• 動手廢棄使用過的電池時,讓屬和個人所在國家或地區的政府法規或環境公共事務的規定處理。為了避免電池被外漏,長時間(乙卯月以上)不使用溫控器時,請時電池取出。發生機器時,壓小心的將電池室內的電池被體試乾淨,同時更換新的電池。
- 切削將普本或其他重物價放在遮挡器上,如此易合披露下壓而加超耗盡電池電力。
装股天醇之其旅注意事项
- 美役天線聯繫塑可能遠離主機及其他震線。 - 為確保最佳的整收能力,請約30天線完全展開,切勿接或覆形成應拼於本機的背面。
- 若期附的天線接收能力不良。則理參閱主要操作手冊盒中「其他接線」乙號,以求詳細了解如何的連接室外天線。
□ 接警器佈置之其餘注意事項
若您的房间屬於大小過中的規格,則請念按照步驟3歲中的方式來佈置揚聲器,便能享受到最佳的戰績整效果。
如果物是身在相當狹小的房間內,那麼便不可能採用典型的壇總揚聲幕設置方式,有關前壇總聲點式設置的背訳,請參閱操作手冊內的「家庭
在採用步驟3中所述之振學項總接警函設置時限凍測下列指示:
· 論將左前置及右前置主攝警示,與電視機相離同等的新難來安裝。
· 需求產生最佳的效果,安裝時留置於較耳朵高度棉滿的位置。
· 論將中壢幕聲彎蓋於電視機的上方或下方,可讓加感受有如足電視股幕直接發出中聲道的音效一樣。
安全注意事项
,將中置攝聲器置於電視機上方時,請確實以膠布或其他適當的方式來固定攝聲器。否則,攝聲器會因地震等外力製造而從電視機上排高,危及周邊的人們或造成攝聲器損壞。
• 切勿將隨附的聲聲器接用其他的擴大機。此框作法會導致功能被障或起火。
· 隨本機附上之前置、中置及環鏡機器通常的已經速防磁處理。然而,需視所安裝的位置,色彩失真,在抽擊器如果安裝待太適靠近電機機變基時,則有可能會發生。如果發生,讓「關閉」電機電報,然後15到30分鐘後再打開。如來問題仍在,現能換算器系統接開度相應交。
·重低音並未經過防癒處理,亦因此攤設時不得
靠近電視機或顯示器。
通信器材提醒(東部教諦·新青年授成影像特等)所放放置不可太過靠近重低音。 · 背勿將前置·中雷禍聲器及重低音安裝在牆上或天花板上,以免萬一掉落使人受傷。

使用標示顏色的揚聲器插頭接至每只揚聲器上。將這些插頭對照DVD/CD接收機後面板上的顏色端子接上。
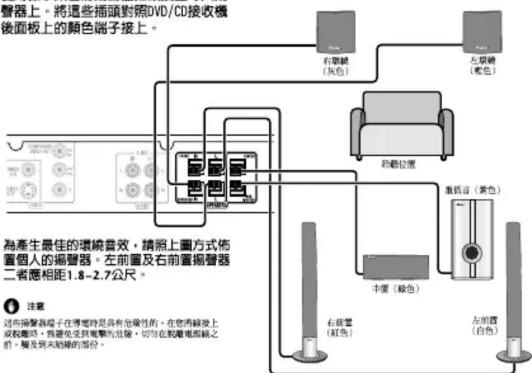
請依照下列步驟連接每只揚聲器。
① 將每條導線上的保護外皮扭轉後扯下。

上方三個端子 將另一端連接至DVD/CD接收機後賣板上的顏色端子(如左翼所示)。請鑑實完全插入。在編置器插頭線線處的小型接頭應視其為連接上方或下方三個管中的層子,再行決定應正圓朝上或朝下。請鑑實正確接上。

將DVD/CD接收機接至個人電視機上,然後接上隨附的電源線。
① 將接收機一端接至個人電視機上的視頻輸入,連接將利用電動的視和線。
2 將接收機另一號接至DVD/CD接收機的視頻鍵出上。 本機為採用防盜術技術,切勿使用AV轉輸線將本機透過FCB的方式接至個人的電視機。如此一來,經由本機所備註的畫面便有可能無法正常的在電視上顯示。
③ 將電源線接上AC電源插座
揚聲器設定指南
請滿點所有揚聲器配件
- 自置撮影器 x2 - 中置撮影器 x1 - 现绕撮影器 x2 - 重低音 x1
- 描琴器 紅線/白線(前置揚警器)4公尺×2 線線(中置揚警器)4公尺×1 藍線/灰線(單線揚警器)10公尺×2
- 防滑垫(小)×4
- 的重量(大)×4 - 依据图象及关系=
- 螺纹(开声皿)×5
· 托架 x
- 螺丝(托架用)×4
· 安装比例 × 2
- 盖掘(受委托使用)×2
* 隱於圖壁安裝前置及環繞攜聲器系統的安裝
設置時之安全注意事項
在組裝揚聲器時,請側放在平坦的表面上以免發生意外或受傷。組裝、設置及擺設揚聲器時,請確實利用平穩的表面。
組裝揚聲器支架及固定您的前置揚聲器
使用隨機附贈的螺絲將揭聲器基座安裝到支柱上
在將基座固定到支柱上時,掩起揚聲器線穿過基座上的孔(如下圖)。接著,在您將支柱對基座後,將小的螺絲鎖上右圖所示的位置。
natural_image
Three-step diagram showing a mechanical component with a circular base, wire, and a cylindrical housing (no text or symbols)標準環繞立體暨5點設置
採用此標準方式放置多聲道環繞立體聲操聲器,可享受理想的5.1聲道家居影院音響效果。
① 將小的防滑墊貼到中置撮聲器的基座上。四片重低音專用的大型防滑墊(如圖所示)。
使用隨機附贈的黏著劑將四片防滑墊貼到中置揭聲器和重低音的基座上。
中置表器

重低音
② 連接揚聲器系統
請參閱設置您的DVD/CD接收機的內容(其他設置指南的部份),以正確連接揚聲器。請按照最左翼中所示方式攤置,以獲得最佳的環繞聲效果。
③ 開閉環繞聲模式以進行5
點設置。 關於更多的使用前置彎繞聲,請參閱操作手指。
⑥ 注意
· 請勿使用非隨托架附上的安裝配件來安裝前置揚聲器。
前置式環繞立體暨3點設置
如果無法將項統立體聲揚聲器放置在收聽位置後方,或避免在收聽範圍內請設太長的揚聲器電纜,這種設置方式就最適合。
① 將小的防滑墊貼到中圖揚聲器的基座上,四片重低音專用的大型防滑墊(如圖所示)。
使用隨機附屬的黏著焦將四片防滑墊貼到中置撮聲器和重低音的基座上。
中書場登記
重匠骨
② 將環繞揚聲器放前置揚聲器上,將環繞揚聲器轉向最近一面牆壁,對齊箭頭標示,以產生最佳前置環繞音效。
轉動每只環繞揚聲器使基座上的▼箭頭標示對齊前置揚聲器上的▲FRONT SURROUND箭頭標示。這作法只有在使用前置環繞聲模式(MODE ON)時才有必要。請參閱操作手冊以了更多驅於Front Surround模式的資訊。
Front Surround MODE ON
③ 利用所附的托架固定於位置上。
將托架上的孔對齊揚聲器上的孔,然後利用兩顆螺絲鎖上下圖所示的位置。請確實將右和左托架對準揚聲器接上(如圖示)。
4 連接揚聲器系統
請參閱設置您的DVD/CD接收機的內容(其他設置指南的部份),以正確連接撮聲器。
5 固定揚聲器線
在您完成時,捲起環繞揚聲器穿過揚聲器支架背面上的出口,並穿過托架底部(如圖示)。
⑥ 注意
· 謲勿使用非隨托架附上的安裝配件來安裝前置揚聲器。