
XV-DV131 - Hjemmebiograf PIONEER - Gratis brugsanvisning og manual
Find enhedens vejledning gratis XV-DV131 PIONEER i PDF-format.

Brugerspørgsmål om XV-DV131 PIONEER
0 spørgsmål om dette apparat. Besvar dem du kender, eller stil dit eget.
Stil et nyt spørgsmål om dette apparat
Download vejledningen til din Hjemmebiograf i PDF-format gratis! Find din vejledning XV-DV131 - PIONEER og tag din elektroniske enhed tilbage i hånden. På denne side er alle dokumenter nødvendige for brugen af din enhed offentliggjort. XV-DV131 af mærket PIONEER.
BRUGSANVISNING XV-DV131 PIONEER
Setting up your DVD/CD Receiver

Caution
When connecting this system or changing connections, be sure to switch the power off with the STANDBY/ON button, and disconnect the power cord from the AC outlet. Do not use these speakers with any other system or amplifier as this may result in damage or fire.

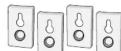
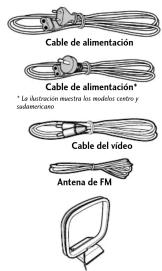
Check that you have all the accessories, then put the batteries in the remote control.
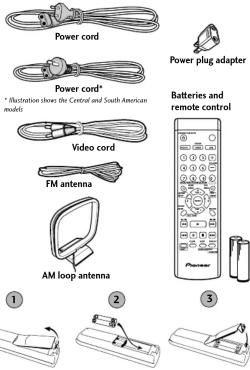

Connect the AM and FM antennas to the rear panel of the DVD/CD receiver.
① Pull off the protective
shields of both AM antenna
[Non-Text]
2 Push open the tabs, then insert
one wire fully into each terminal.
3 Release the tabs to secure the AM antenna wires.
4 Fix the AM loop antenna to the attached stand.
To fix the stand to the antenna, bend in the direction indicated by the arrow (fig. A) then clip the loop onto the stand (fig. B).
Note: If you plan to mount the AM antenna to a wall or other surface, secure the stand with screws (fig. C) before clipping the loop to the stand. Make sure the reception is clear
5 Place the AM antenna on a flat
surface and point in the direction giving the best reception. Don't let it come into contact with metal objects and avoid placing near computers, television sets or other electrical appliances
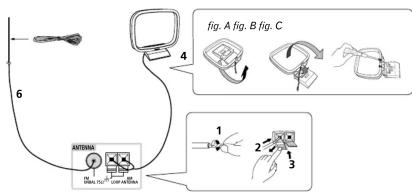

Connect the FM wire antenna to the FM UNBAL 75Ω antenna terminal. For best results, extend the FM antenna fully and fix to a wall or door frame. Don't drape loosely or leave coiled up.
Note: The signal earth (r_H) is designed to reduce noise that occurs when an antenna is connected. It is not an electrical safety earth.
Using the remote control
The remote control can be used within a range of about 7 meters from the remote sensor on the front panel, and within a 30
degree angle.
Precautions:
- The remote control may not work if there is an obstacle between the remote control and the display unit, or if the remote control is not directed towards the remote sensor of the display unit at the correct angle.
- The remote control may not work properly if strong light such as direct sunlight or fluorescent light is shining onto the unit's remote sensor.
- The remote control may not work properly when this unit is used near devices emitting infrared rays, or when remote controls of other devices which use infrared rays are used. Also, the use of this remote control may cause other devices to work improperly.
- When the operating range of the remote becomes too short, replace the batteries.
•
Remote control battery caution Incorrect use of batteries may cause leakage or rupture
Incorrect use of batteries may cause ice. Always be sure to follow these guidelines:
- Always insert batteries into the battery compartment correctly matching the positive and negative polarities, as shown by the display inside the compartment.
- Always mix new and used batteries
- Never mix new and used batteries.
- Batteries of the same size may have different voltages, depending on brand. Do not mix different brands of batteries.
- When disposing of used batteries, please comply with governmental regulations or environmental public instruction's rules that apply in your country or area.
- In order to prevent battery leakage, remove the batteries when not using the remote control for an extended period (one month or more). If leakage occurs, carefully wipe away any battery fluid inside the compartment, and replace the batteries with new ones.
- Do not allow books or other objects to rest on top of the remote control, since the buttons may be depressed, causing faster exhaustion of the batteries.
Additional notes on connecting antennas
- Keep antenna cables away from the main unit and other cables. - To assure optimum reception, pull the FM antenna so that it is fully extended and not coiled or hanging at the rear of the unit.
- If reception with the supplied antenna is poor, see the Other connections section in the main operating instructions for details on connecting outdoor antennas.
Additional notes on speaker placement
If your listening room is of adequate size, place the speakers as shown in step 3 to achieve the optimum surround sound effect. If you are listening in a fairly small room and a typical surround speaker setup is not possible, see Home theater sound setup in the instruction manual and the Speaker Setup Guide for information on the Front Surround 3-spot setup option.
When using the standard surround speaker setup as shown in step 3, please observe the following guidelines:
• Install the main front left and right speakers at an equal distance
from the TV.
- For optimum effect, install the rear speakers slightly above ear level
• Install the center speaker above or below the TV so that the sound of the center channel is localized at the TV screen.
- When installing the center speaker on top of the TV, be sure to secure it with tape or some other suitable means. Otherwise, the speaker may fall from the TV due to external shocks such as earthquakes, endangering those nearby or damaging the speaker.
- Do not connect the supplied speakers with any other amplifier. This may result in malfunction or fire.
- The front, center and surround speakers supplied with this system are magnetically shielded. However, depending on the installation location, color distortion may occur if the speaker is installed extremely close to the screen of a television set. If this happens case, turn the power switch of the television set OFF, and turn it ON after 15 to 30 minutes. If the problem persists, place the speaker system away from the television set.
- The subwoofer is not magnetically shielded and so should not be placed near a TV or monitor. Magnetic storage media (such as floppy discs and tape or video cassettes) should also not be kept close to the subwoofer.
- Do not fix the subwoofer to the wall or ceiling; they could cause injury if they fell.

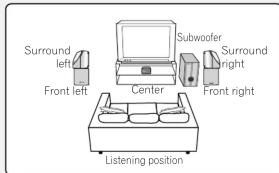
Connect each speaker using the color-coded speaker plugs. Match them to the colored speaker terminals on the rear panel of the DVD/CD receiver.
flowchart
graph TD
    A["on the rear panel of the DVD/CD receiver."] --> B["Surround right (Cry9)"]
    A --> C["Surround left (Blue)"]
    B --> D["Listening position"]
    C --> D
    D --> E["Subwoofer (Purple)"]
    E --> F["Front right (Red)"]
    E --> G["Center (Green)"]
    E --> H["Front left (White)"]
    D --> I["For the best surround sound, setup"]
Connect each speaker as shown below.

Upper three terminals

Lower three terminals
Match the color-coded speaker plugs to the colored speaker terminals on the rear of the DVD/CD receiver (as shown at left). Make sure to insert completely.
The small lug at the wire-end of the speaker plug should face up or down depending on whether it's being plugged into one of the upper or lower three speaker terminals. Please make sure to connect correctly.

Caution
These speaker terminals can be hazardous when live. When you connect or disconnect the speaker cables, to prevent the risk of electric shock, do not touch uninsulated parts before disconnecting the power cord.

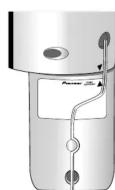
Connect the DVD/CD receiver to your TV, then connect the supplied power cord.
1 Connect one end to a video input on your TV. Use the supplied video card
2 Connect the other end to the video output of the DVD/CD receiver. This player is equipped with copy protection technology. Do not connect this player to your TV via a VCR using AV cables, as the picture from this player will not appear properly on your TV.
3 Connect the power cord to the AC inlet.

Printed in
Speaker Setup Guide
Check that you have all the speaker accessories.
- Front speakers x 2
- Center speaker x 1
• Non-skid pads (large) x 4


• Non-skid pads (small) x 12

- Surround speakers x 2
- Mounting brackets x 4
Please refer to Wall-mounting the front and surround speaker system in the operating instructions for installation.
- Subwoofer x 1
- Screws (for mounting brackets) x 4
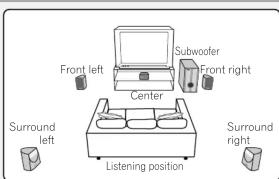
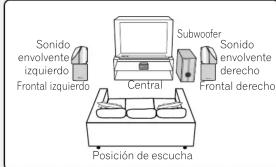
Standard surround 5-spot setup
This is a standard multichannel surround sound speaker setup for optimal 5.1 channel home theater sound.

Attach the smaller non-skid pads to the base of each of the front speakers and the center speaker. The four large non-skid pads are for the subwoofer (as shown).
Use the supplied adhesive to attach 4 pads to the base (flat surface) of each speaker
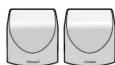
Front speakers
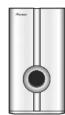
Center speaker
Subwoofer

Connect the speaker system.
Refer to the Setting up your DVD/CD Receiver (the other part of this setup guide) to connect the speakers properly. Place them as shown in the diagram above for optimal surround sound.

Switch Front Surround MODE OFF for 5-spot set up.
See the operating instructions f more on using Front Surround.
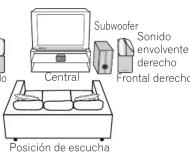
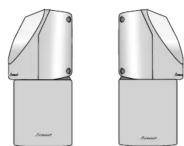
Front surround 3-spot setup
This setup is ideal when rear surround speaker placement isn't possible or you want to avoid running long speaker cables in your listening area.

Attach the smaller non-skid pads to the base of each of the front speakers and the center speaker. The four large non-skid pads are for the subwoofer (as shown).
Use the supplied adhesive to attach 4 pads to the base (flat surface) of each speaker.

Front speakers

Center speaker
Subwoofer

Connect the speaker system.
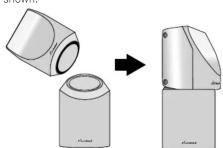
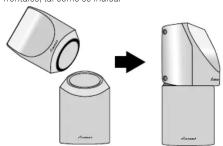
Refer to the Setting up your DVD/CD Receiver (the other part of this setup guide) to connect the speakers properly. Place them as shown in the diagram above for optimal surround sound. The base of each surround speaker fits into the circular groove on the top of the front speakers as shown.

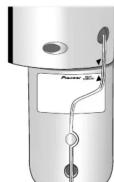
Secure the speaker wire.
After testing for the slack necessary to turn the speaker (see the following step), use the groove provided to secure the speaker wire.

Turn the speakers towards the closest wall, lining the arrows up for optimal Front Surround.
Turn each surround speaker so that the ▼ arrow at the base is lined up with the ▲ (FRONT SURROUND) arrow on the front speaker. This is only necessary when you are using the Front Surround mode (MODE ON). See the operating instructions for more on using Front Surround.

Front Surround MODE ON
Caution
• To prevent accidents, make sure the surround speaker is placed securely on top of the front speaker.
- Please don't the attach speakers to the wall or speaker stands for Front surround 3-spot setup.
Configuración de su receptor de DVD/CD

Precaución Cuando conecte este sistema o cambie las conexiones, asegúrese de apagar la unidad con el botón STANDBY/ON y de desconectar el cable de alimentación de la toma de CA. No utilice estos altavoces con otro sistema o amplificador, ya que podría ocasionar daños o un incendio.

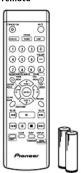
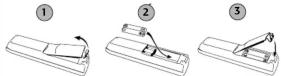
Compruebe que tiene todos los accesorios, y a
continuación, inserte las pilas en el control remoto.

Pilas y control

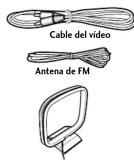
Conecte las antenas de AM y FM al panel posterior del receptor de DVD/CD.

Tire de las protecciones de los cables de
la antena de AM.

Empuje para abrir las lengüetas
y, a continuación, inserte el cable
totalmente en cada terminal.

Suelte las lengüetas para asegurar los
cables de la antena de AM.

Monte la antena de cuadro AM
al soporte que se adjunta.
Para montar el soporte con la antena, gírela
en la dirección de la flecha (fig. A) y, a
continuación, ajuste al huelo el aspecto (fig. B).
continuación, ajuste el bucle al soporte (fig. 6).
Nota: Si tiene intención de montar la antena de
AM en una pared u otra superficie, fije el
soporte con tornillos (Fig. C) antes de sujetar el
Bucie al so
es clara

Coloque la antena de AM sobre una
superficie plana y dirijala hacia la
direción en que obtenga una mejor
recepción.
No deje que entre en contacto con objetos
metálicos y evite ponerla cerca de ordenadores,
aparatos u
eléctricos.
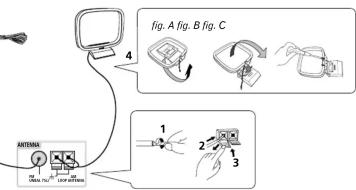

Conecte la antena de cable FM al terminal de la antena FM UNBAL 792.
Para obtener un mejor resultado, extienda la antena de FM completamente y fijela
en la pared o en el marco de la puerta. No la deje suelta ni la enrolle
Nota: La señal de tierra (+) se ha diseñado para reducir el ruido que se produce
cuando se conecta una antena. No se trata de una toma de tierra eléctrica de
seguridad.
Utilización del mando a distancia
El mando a distancia puede utilizarse a una distancia que esté
aproximadamente a 7 metros del sensor remoto del panel frontal,
y dentro de un ángulo de 30 grados
Precauciones:
- Puede que el mando a distancia no funcione si hay un obstaculo entre el mando a distancia y la pantalla de la unidad, o si no se
apunta directamente con el mando a distancia al sensor remoto
de la pantalla de la unidad desde un ángulo correcto.
- Puede que el mando a distancia no funcione correctamente si
hay una luz intensa como luz solar directa o una luz fluorescente iluminando el sensor remoto de la unidad.
- Puede que el mando a distancia no funcione correctamente si
se utiliza esta unidad cerca de aparatos que emiten rayos
infrarrojos, o si se utilizan mandos a distancia de otros aparatos
que utilizan rayos infrarrojos. Además, el uso de este mando a distancia puede provocar un malfuncionamiento de otros aparatos
- Cuando el alcance del mando a distancia se reduzca, sustituya
las pila
① Precaución sobre las pilas del mando a distancia
Un uso incorrecto de la pilas puede provocar que revienten o
que haya fugas.
Asegúrese siempre de seguir estas pautas:
- inserte siempre las plas correctamente en el compartimento haciendo corresponder las polaridades positiva ⊕ y negativa ⊖
tal y como se muestra en la ilustración que hay dentro del
compartimento.
- Nunca mezcle pilas nuevas y usadas - Huy pilas con el mismo tamaño que t
- May plus con el mismo tamaño que tienen diferentes voltaje, dependiendo de la marca. No mezcle diferentes marcas de pilas.
- Cuando tire las pilas usadas, respete la legislación oficial que rige
su país o región.
- Para evitar fugas en las pilas, quitelas cuando no vaya a utilizar el mando a distancia durante un periodo largo (un mes o már). Si se
manado a distancia durante un período largo (un mes 0 mars). Si se produce una fuga, retire cuidadosamente el fluido de la pila que se
haya derramado dentro del compartimento, y sustituya las pilas por
unas nuevas.
- No deposite libros u objetos sobre el mando a distancia, ya que podrían precionarse los botanas provocando un rápido decaste de
podium presional se los botanes provocando un rápido desgina de las pilas.
Notas adicionales sobre la conexión de antenas
- Mantenga los cables de la antena lejos de la unidad principal y de
otros cables. - Por accretiva una movación fátima, actir la entura de PM de
- Fata garantizar una recepción optima, estire la antena de FM de tal manera que quede totalmente extendida y no enroscada o
conmencia que quede totalmente extenidas y no enrosada o colgando por la parte posterior de la unidad.
- Si la recepción con la antena suministrada es pobre, consulte la
sección Obras colecciones, del principal manual de instrucciones, para obtener detalles sobre la conexión de antenas exteriores.
2017年1月1日
Notas adicionales sobre la ubicación de los altavoces
Si la sala en la que va a instalar el sistema tiene un tamaño adecuado, sitúa los altavores tal como se indica en el paco. T para obtenes un
síbe los altavoces tal como se indica en el paso 5 para obtener un efecto de sonido surround óntimo. Si va a utilizar el equipo en una
habitación pequeña en la que no es posible utilizar la disposición
estándar de los altavoces de sonido envolvente, consulte Distribución del sonido del envío como siempre en el manual de instrucciones y lo
del somio del equipo nove cinema en el manual de instrucciones, y la Gua de distribución de los altavoces, para obtener información sobre la
opción de Disposición frontal de sonido envolvente de
3 puntos.
Al usar la disposición de altavoces de sonido envolvente estándar que se muestra en el pase 7, cine los siguientes pautos.
- Instale los altavoces frontales izquierdo y derecho p
misma distancia del televisor.
- Para obtener un efecto óptimo, instale los
- Instale el altavoz central encima o debajo de televisor de tal
manera que el sonido del canal central quede localizado en la
pantalla del t
Precauciones:
- Cuando instale el altavoz central sobre el televisor, asegúrese de
sujetarlo con cinta o de cualquier otro modo que sea seguro. Si no lo biriera, el altawz podría caerse del televisor debido a causas externas
como terremotos, dañando el altavoz o a aquellos que estuvieran
próximos a
- No conecte los altavoces que suministrados con ningún otro amplificado. Esta podría pasinos un mel funcionamiento o incondir
• Los altavoces frontales, central y de sonido envolvente
suministrados con este sistema incorporan una protección magnética
Sin embargo, en función del lugar de la instalación, se pueden producir distintaciones de salerno si sitúo el alteve demasiado para
producir distorsiones de color si se situa el alcavoz demasiado cerca de la pantalla de un televisor. Si éste fuera el caso, apague el televisor
y vuelva a encenderlo 15 o 30 minutos después. Si el problema
persiste, situé los altavoces lejos del televisor.
- El subwoofer no incorpora protección magnética y, por lo tant
no se debe colocar cerca de un televisor o mor Puesto que no insornera una protección many
Puesto que no incorpora una protección magnética, no coloque pinnin soporte de almacenamiento magnético de almacenamiento
(tal como disquetes, cintas o videocasetes) cerca del subwoofer.
- No fije los subwoofer a la pared o al techo; podían provocar darón si en 2017.
danlos si se caeri

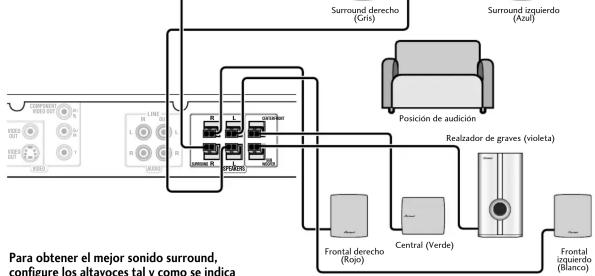
Conecte los altavoces según la codificación de colores de los conectores. Haga coincidor el color de los conectores con el de los terminale situados en el panel posterior del receptor de DVD/CD.
flowchart
graph TD
    A["Surround derecho (Gris)"] --> B["Posición de audición"]
    C["Surround izquierdo (Azul)"] --> B
    D["Realizador de graves (violeta)"] --> B
    E["Frontal derecho (Repo)"] --> F["Central (Verde)"]
    G["Frontal izquierdo (Blanco)"] --> F
    H["Para obtener el mejor sonido surround, configure los altavoces tal y como se indica"] --> A
    H --> C
    H --> D
    H --> E
    H --> F
    H --> G
Conecte cada altavoz tal y como se muestra a continuación.

Tres terminales superiores
HES terminales supenores

Tres terminales inferiores

Precaución
Estos bornes de altavoz pueden estar sometidos a una tensión peligrosa. Cuando conecte o desconecte los cables de los altavoces, para prevenir el peligro de choque eléctrico, no toque las partes no aisladas antes de desconectar el cable de la corriente.

Conecte el receptor de DVD/CD al televisor, y a continuación
conecte el cable de alimentación suministrado.

Conecte un extremo a una entrada de vídeo del televisor. Utilice el cable de vídeo suministrado.

Conecte el otro extremo a la salida de vídeo del receptor de DVD/CD. Este reproductor está equipado con tecnología de protección contra copias. No conecte este reproductor a su TV a través de un VCR mediante cables AV, ya que la imagen de este reproductor no se reproducirá correctamente en su TV.

Conecte el cable de alimentación a la toma de la pared.

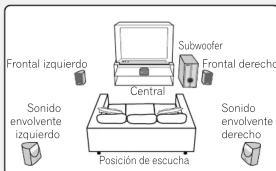
Guía de distribución de los altavoces
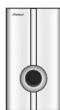
Compruebe que no le falte ninguno de los accesorios de los altavoces. • Subwoofer x 1
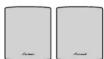
- Altavoces frontales x 2
- Altavoz central x 1
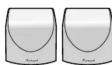
- Altavoces de sonido envolvente x 2
- Almohadillas antideslizantes (grandes) x 4

- Almohadillas antideslizantes (pequeñas) x 12
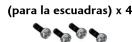
- Escuadras para montaje x 4
- Tornillos
Para obtener información acerca de la instalación, consulte Colocar el sistema de altavoz frontal y surround en la pared en las instrucciones de funcionamiento.


Disposición estándar de sonido envolvente de 5 puntos
Disposición estándar multicanal de sonido envolvente para un sonido de cine en casa óptimo de 5.1 canales.

Fije las almohadillas antideslizantes a la base del altavoz central y los altavoces frontales. Las cuatro almohadillas antideslizantes son para el subwoofer (tal como se muestra).
Ottice la cinta adnesiva suministrada para hijar las cada la base (superficie plana) de cada uno de los altavoces.
Altavoces frontales

Altavoz central
Subwoofer

Conecte el sistema de altavoces.
Para conectar correctamente los antavoces, consulte la Configuración de su receptor de DVD/CD (la otra parte de esta guía de configuración). Para obtener un sonido envolvente óptimo, sitúelos tal como se muestra en el diagrama.

Cambia Sonido envolvente frontal MODE
ON para la instalación de la disposición
de sonido envolvente de 3 puntos. Consulte el manual de instrucciones para obtener más información sobre los modos de sonido envolvente front
Disposición frontal de sonido envolvente de 3 puntos
Esta disposición es ideal cuando no existe espacio para colocar altavoces traseros o se quiere evitar la utilización de cables largos en el área de escucha.

Fije las almohadillas antideslizantes más pequeñas a la base del altavoz central y los altavoces
frontales. Las cuatro almonadinas antidesizantes son para el subwoofer (tal como se muestra). Utilía lo cinto adhesivo auministrodo para fijer las austre almohedillas o la base (superficie plano) de sede una de las
Ottrice la cuenta adresiva suministrada para hajar las cuatro almonasillas a la base (superficie plana) de cada año de los altavoces.
altavoces.

Altavoces frontales

Altavoz central
Subwoofer

Conecte el sistema de altavoces.
Para conectar correctamente los altavoces, consulte la Configuración de su receptor de DVD/CD (la otra parte de esta guía de configuración). Para obtener un sonido envolvente óptimo, sitúelos tal como se muestra en el diagrama. La base de cada uno de los altavoces de sonido envolvente encaja en la ranura circular de la parte alta de los altavoces frontales, tal como se indica.

Asegure el cable del altavoz.
Después de hacer pruebas hasta encontrar el largo necesario para girar el altavoz (vea el siguiente paso), utilice la ranura suministrada para asegurar el cable del altavoz.

Gire los altavoces hacia la pared más cercana, alineando las flechas hacia arriba para obtener un sonido envolvente óptimo.
Gire cada uno de los altavoces de sonido envolvente de forma que la fiecha ▼ situada en la base quede allineada con la fiecha ▲ (FRONT SURROUND) del altavoz frontal. Esto sólo es necesario si va a utilizar el modo de sonido envolvente frontal (Front Surround) (MODE ON). Consulte el manual de instrucciones para obtener más información sobre los modos de sonido envolvente frontal.
Sonido envolvente frontal MODE ON

Advertencia
- Para evitar accidentes, asegúrese de que el altavoz de sonido envolvente está correctamente acoplado al altavoz frontal.
- No sujete los altavoces a la pared o a los soportes para altavoces para la instalación de la disposición frontal de sonido envolvente de 3 puntos.