
HW-09LN13 - Aircondition HAIER - Gratis brugsanvisning og manual
Find enhedens vejledning gratis HW-09LN13 HAIER i PDF-format.


Brugerspørgsmål om HW-09LN13 HAIER
0 spørgsmål om dette apparat. Besvar dem du kender, eller stil dit eget.
Stil et nyt spørgsmål om dette apparat
Download vejledningen til din Aircondition i PDF-format gratis! Find din vejledning HW-09LN13 - HAIER og tag din elektroniske enhed tilbage i hånden. På denne side er alle dokumenter nødvendige for brugen af din enhed offentliggjort. HW-09LN13 af mærket HAIER.
BRUGSANVISNING HW-09LN13 HAIER
Haier
ROOM AIR CONDITIONER
OPERATION MANUAL
HW-07LN03 HW-09LN03 HW-12LN03
HW-09C2 HW-12C1 HW-09LNA03
HW-12LNA03 HW-09LN13 HW-12LN13
HW-09CA2 HW-12CA2

natural_image
Front view of a Haier air conditioner unit with ventilation grilles and control panel (no visible text or symbols)Please read this operation manual before using the air conditioner Please keep it attentively
0010515219
CONTENTS

Safety precautions....1
● Air conditioner operation .....2
Care and Maintenance ....5
● Air conditioner installation......6
● Troubleshooting......8
1 SAFETY PRECAUTION

CAUTION
- Do not install, remove and reinstall the unit yourself. Improper installation may cause leakage, electric shock or fire. Please engage an authorized dealer or specialist for the installation work.
- The room air conditioner must be earthed.
- Do not touch or operate with wet hands.
- Do not turn on the unit by inserting the power plug. Do not switch off the unit by pulling out the power plug.
- Do not insert sticks, fingers or other objects into the unit.
- If the supply cord is damaged, it must be replaced by the manufacturer or its service agent or a similar qualified person.
• After installation, the power plug should be easily reached. - The wiring method should be in line with the local wiring standard.
OPERATION CONDITIONS
Applicable ambient temperature range:
| Cooling | T1 | T4 | ||||||
| Indoor | Outdoor | Indoor | Outdoor | |||||
| D.B | W.B | D.B | W.B | D.B | W.B | D.B | W.B | |
| Max.Temperature: | 32°C | 23°C | 43°C | 26°C | 32°C | 23°C | 43°C | 28°C |
| Min.Temperature: | 18°C | 14°C | 18°C | / | 18°C | 14°C | 18°C | / |
D.B :Dry Bulb Temperature W.B :Wet Bulb Temperature
2 AIR CONDITIONER OPERATION
PART INDENTIFICATION

2 Air filter cleaning

CAUTION
When dirt accumulates on air filter, air circulation will be blocked, which causes poor cooling. It is advisable to clean air filter every two weeks for longer operation.
Take out the air filter
-
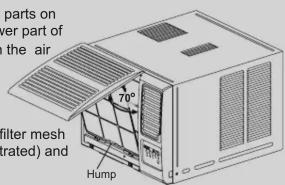
Press the concave parts on both sides at the lower part of air inlet grille to open the air inlet grille.
-
Hold the hump of filter mesh with fingers (as illustrated) and take it out.
Clean the filter
- Gently flap the dirt off the air filter.
- Carefully wash air filter in warm water (below 40irc C). To obtain better cleaning effect, soap water or neutral detergent may be used.
- Flush air filter carefully with clean water after removing dirt. Let it dry completely.
Before cleaning, turn off the power Do not raise the front panel any higher than 70irc to the unit or damage to the tabs may occur.
3 Airflow Direction
Airflow Direction Vane The Vertical Airflow Direction Vane is manually controlled by positioning the vane to discharge the air upward, downward or straight out.
Vertical airflow direction

The horizontal air direction is adjusted by setting the AUTO SWING on.
Remote controller

Remote controller's operation
- When in use, put the signal transmission head directly to the receiver hole on the indoor unit.
- Don't throw the controller, prevent it from being damaged.
- When electronic-started type fluorescent lamp or change-over type fluorescent lamp or wireless telephone is installed in the room, the receiver is apt to be disturbed in receiving the signals so the distance to the indoor unit should be shorter.
Cooling operation
- Press MODE button. For each press, operation mode changes as follows:

When the COOL display light bright, A/C will be working under the cooling function.
- Select temp. setting, by using "▲" or "▼" button.
“◆” Each press will increase temp. setting by 1. “◆” Each press will decrease temp. setting by 1. 3. If you choose the FAN SPEED mode you can run the fan in one of the 2 speeds: HI or LO.
Change air flow direction if necessary.
ENERGY SAVER operation
-
Select operation mode Press MODE button. Then select COOL operation Saving energy function only can be used when A/C working on cooling condition.
-
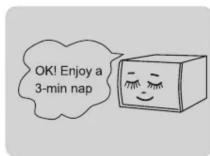
ENERGY SAVER selection When this feature is “On”, the fan will shut off three minutes after the compressor cycles off. This will reduce energy consumption and noise. When the compressor turns back on, the fan will turn on at the same time. In the “Off” position, the fan will not shut off when the compressor cycles off.
DEHUMID mode
If you need to only remove the moisture press the Dehumind button.
- Press MODE button.
When the DEHUM display light bright, A/C will be working under the dehumidify function.
- Select temp. setting, by using “▲” or “▼” button. “▲” Each press will increase temp. setting by 1°C.
“▼” Each press will decrease temp. setting by 1°C 3. If you choose the FAN SPEED mode you can run the fan in one of the 2 speeds: HI or LO.
Air conditioner is running under displayed fan speed.
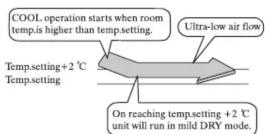
In DRY mode, when room temperature becomes lower than temp. setting +2°C, unit will intermittently at LOW speed regardless of FAN setting.
Change air folw direction if necessary.
Controll panel

- POWER
Press it to start unit and press it again to stop. 2.MODE:
Used to select operation mode: FAN COOL DEHUM 3.FANSPEED:
Used to select desired fan speed :HIGH or LOW. 4.TIMER
Used for TIMER start or stop.
5.TEMP.or TIME set
Used to set TIME or TEMP. setting. 6.E-S
ENERGY SAVER
7.SWING
Used to activate the vertical louver. This will give you an even airflow throughout the room.
- ENERGY SAVER
9.TEMP./TIME display

CAUTION
To protect unit system, don't restart until 3 minutes have elapsed.
If the unit has been running under large humidity for a long time, dew might occur at outlet grille.
Fan operation
In some days you may want to run the "Fan" function.
- Press MODE button.
When the FAN display light bright, A/C will be working under the fan function.
2.Fan speed selection:
Here the fan runs only at Hi or Lo speed.
Change air flow direction if necessary
HINTS
Compressor won't start in FAN mode, only fan motor will run at selected speed.
Timer operation
With this function, unit will start or stop at the time you want.
- Start unit and select desired operation mode.
- Select Timer function
Timer On or Off stop mode is used to preset or shut off your unit in advance.
You can program this up to 24 hours in advance. You can use the Timer in 3 function i.e Cool Dehumid or Fan only. Selected desired mode. (TIMER On or Off stop)
Timer On
Unit must be on to set the timer. Unit will shut down automatically after it accepts the setting in 5 seconds. Use this mode to preset the start time of the unit 24 hours in advance.
a) Press "On" of remote controller or "TIMER" of control panel, LED display will show "01". (Electrify for the first time)
b) Set desired number by pressing the
( ▲ ) pad of the Temp/Time buttons. One for each hour . If you passed the desired time use the ( ▼ ) pad key to lower the selection.
Timer Off
Unit must be running to set the timer off. Use this to preset the time you would like the unit to shut off.
a) Press "off" of remote controller or "TIMER" of control panel, LED display will show "01". (Electrify for the first time)
b) Set desired number by pressing the
(▲) pad of the Temp/Time buttons. One for each hour. If you passed the desired time use the (▼) pad key to lower the selection.
When using the timer the unit will use/revert to the last A/C, fan settings when activated. The timer must be reset every time you choose to use it.

CAUTION
- The compressor may cycle for 10 minutes on and 6 minutes off in Dehumid mode. - Air blown out will be very cold at relatively low room temp..

CAUTION
- It is advisable not to keep vertical flap at downward position for a long time in COOL mode, otherwise, condensate water might occur.
- Don't move the horizontal flap with hand in order to avoid the vertical flap abnormal, using the remote controller to adjust the move of vertical flap.

Always turn off the air conditioner and the main power supply before clean the unit. Switch off the power supply if the unit is not going to be used for a long period of time.
1 Air filter cleaning
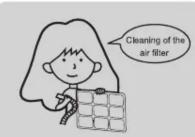
It is advisable to clean air filter every two weeks for longer operation. (You will find how to clean the filter on page 2.)
2 Notes
- Avoid opening doors and windows unless necessary.

- Don't be exposed to cold air for a long time.

- Set temp. a little bit higher before going to bed.

- Use curtain or blind Direct sunlight may reduce cooling effect, always use window curtain.

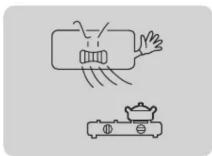
- Keep heat source away from air conditioner.
● After unit stops, don't restart it until 3 min. have elapsed.
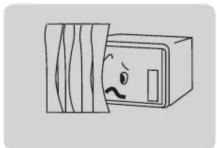
- Don't hang clothes in the vicinity of air inlet. This will decrease cooling effect and cause abnormal operation.
- Temperature should be set properly when there are infant, child, the aged or disabled in the room.
- Before operating mode selection switch, check that if the air inlet or outlet have been blocked.


- Power failure resume: If sudden power failure occurs, the unit will resume original operation when power is supplied again. NOTE: When sudden power failure happens during unit operation in power failure mode, if the air conditioner is not desired for use in a long period, please shut off the power supply in case that the unit automatically resume operation when power is re-supplied.
4 AIR CONDITIONER INSTALLATION (ONLY FOR REFERENCE)
SELECTION OF THE INSTALLATION POSITION
1, The air-conditioner is better installed in shadow or in a place with short period of sunshine. In case the air-conditioner is installed at the point exposed directly to the sunshine, it should be protected from the direct sunlight as possible in order to avoid the long time of direct sunlight otherwise its performance will be lowered. (As illustrated in Fig. 1).
- For the convenience of operation, it is recommended that air-conditioner be installed at least at the height of 760-1300 mm above the floor and no obstacles before it for a free airflow.
- The shutters at both sides and the top of air-conditioner should be protruded outdoors free from being blocked by wall, window, ect.
-
The back of air-conditioner should be kept over 500mm from the obstacles (for example, wall, etc.) (As illustrated in Fig. 2).
-
To have an efficient drainage, the back part of the air-conditioner should be inclined downward by 15-25 mm (As illustrated in Fig. 3).

fig.1
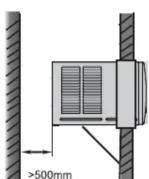
fig.2

fig.3
NOTES:
For longer and trouble-free operation of the unit, pay special attention to the following:

● Install air-con at a place strong enough to support the unit.
● Leave enough space around air inlet and outlet for better circulation.
● Avoid places where flammable gas leaks.
● Problems may occur if unit is installed in the following places: Place where oil exists in the air including engine oil or seaside with salt breeze blows and hot spring area with sulphurous gas in the air.
THE ENCLOSED ACCESSORIES OF THE CONDITIONER
| Name | Rubber lid | Outlet pipe fitting | Manual | Remote controller | Sealed gasket | Battery (R-03 dry battery) | Screw |
| Figure | |||||||
| Quantity | 1 | 1 | 1 | 1 | 1 | 2 | 3 |
PREPARATIONS BEFORE INSTALLATION
Make the wall hole or window hole (see Fig.1)
| MODEL | A | B | |
| HW-09LN03HW-09C2 HW-09LNA03 HW-09LN13HW-09CA2 | 370mm | 485mm | |
| HW-12LN03 HW-12C1 HW-12LNA03 HW-12LN13 HW-12CA2 | 395mm | 615mm | |

Fig. 1
Prepare unit for installation:
- Take out the conditioner and accessories from the package
- Choose one way from below two options on disposal of the condensed water.
Generally there are two methods available on disposal of the condensed water:
Method 1
Block the bottom plate hole of the conditioner with rubber lid, install outlet pipe fitting on the back hole and let the condensing water flow from the back hole of the conditioner. (See Fig. 1) In this method, the accumulated condensed water in the bottom plate is hit by the fan onto the heat exchanger, and evaporated and blown out from the machine. It can cool the heat exchanger adiator more quickly, and improve the energy efficiency of the conditioner. But the hitting noise by the fan at the outdoor side is relatively large.

Fig.1
Method 2
If the surrounding humidity is high: Block the back hole of the conditioner with rubber lid and install outlet pipe fitting to the bottom hole, which can make the condensed water flow out from the bottom plate. (See Fig.2)
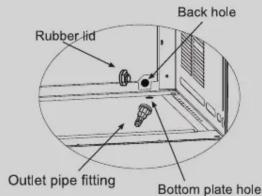
Fig.2
If necessary the above two methods can both have extra pipe added on the outlet pipe fitting (available on the market).
INSTALLATION PROCEDURES
-
Fix the prefabricated iron frame to stable position by expansible screws.
-
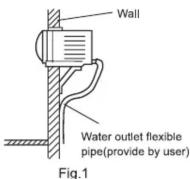
Put the whole machine with all the accessories installed, on the iron frame. If there's water outlet flexible pipe, lead the to needed position(see Fig.1).
-
Fill any distance between the wall hole and the machine body with flexible sponge rubber strip to prevent the entering of outer noise and the leaking of the coolness.
-
After installation of the conditioner, insert the power plug into the outlet and perform test-run.
Cautions

● Power cord: Be sure to use the exclusive power cord.
- Change installation place: If air-con need to be changed to another place please contact the dealer, who sold you the unit.
5 TROUBLESHOOTING

Before calling for service. Check the following points before calling for repairs or service.
| Phenomenon | Cause or check points | Solution |
| Switch on the machine but it does not work immediately. | If the machine is started after stop, it will need about 3 minutes to re-start so as to prevent the fuse from break. | |
Switch on the machine but it does not work. | Is plug firmly inserted?Is there power failure? | Readjust power supply |
| Does fuse get burned? | Replace fuse. | |
The cooling effect is not good. | Is thermostat switch wrongly adjusted? | Readjust the thermostat. |
| Is there any direct sunlight in the room? | Use curtain or blind. | |
| Are doors or windows left open? | Shut doors and windows. | |
| Are there any obstacles blocking air inlet and outlet? | Remove the obstacles. | |
| Is air filter clogged? | Clean it. | |
| Is there too much heat source in the room? | Remove the heat source | |
If problems can not be solved please pull out power plug and contact your dealer.


- Haier
- ROOM AIR CONDITIONER
- OPERATION MANUAL
- CONTENTS
- SAFETY PRECAUTION
- CAUTION
- OPERATION CONDITIONS
- AIR CONDITIONER OPERATION
- PART INDENTIFICATION
- Air filter cleaning
- Airflow Direction
- Remote controller
- Remote controller's operation
- Cooling operation
- ENERGY SAVER operation
- DEHUMID mode
- Controll panel
- Fan operation
- HINTS
- Timer operation
- Air filter cleaning
- Notes
- AIR CONDITIONER INSTALLATION (ONLY FOR REFERENCE)
- SELECTION OF THE INSTALLATION POSITION
- NOTES:
- THE ENCLOSED ACCESSORIES OF THE CONDITIONER
- PREPARATIONS BEFORE INSTALLATION
- Prepare unit for installation:
- Method 1
- Method 2
- INSTALLATION PROCEDURES
- Cautions
- TROUBLESHOOTING
Mærke : HAIER
Model : HW-09LN13
Kategori : Aircondition