
Vertis 1820 Easy - Telefon Overmax - Bezplatný návod k obsluze
Najděte návod k zařízení zdarma Vertis 1820 Easy Overmax ve formátu PDF.

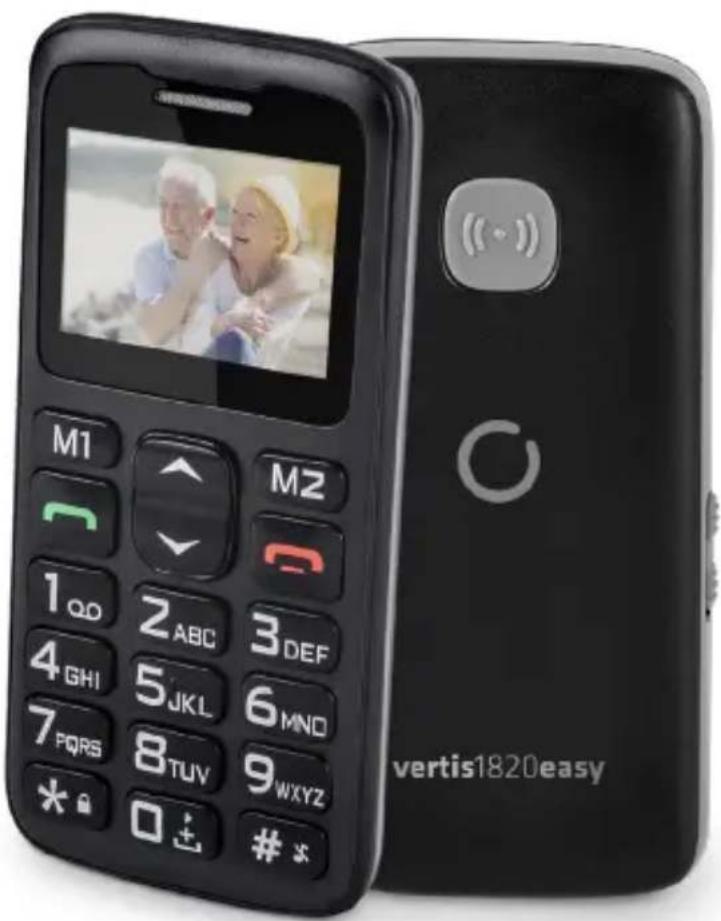
| Typ produktu | Základní mobilní telefon |
| Značka | Overmax |
| Model | Vertis 1820 Easy |
| Displej | Barevný TFT displej |
| Napájení | Lithium-iontová dobíjecí baterie |
| Pohotovostní doba | Až 200 hodin (odhad) |
| Doba hovoru | Až 4 hodiny (odhad) |
| Typ SIM karty | Jedna standardní SIM karta |
| Rozšiřitelná paměť | Ano, pomocí microSD karty |
| Konektivita | Bluetooth, USB port, FM rádio |
| Hlavní funkce | Volání, SMS, kontakty, budík, kalendář, kalkulačka, LED svítilna, tlačítko SOS, FM rádio, hlasový záznamník |
| Tlačítko SOS | Ano, odesílá SMS a volá na naprogramovaná nouzová čísla |
| Klávesnice | Numerická klávesnice s multifunkčními tlačítky M1 a M2 |
| Údržba a čištění | Čistěte jemným suchým hadříkem. Nepoužívejte chemické prostředky. |
| Bezpečnost | Nevystavujte vodě. Používejte pouze originální příslušenství. Dodržujte pokyny k použití (letadlo, nemocnice atd.). |
| Náhradní díly a opravitelnost | Opravy musí provádět autorizovaný servis. Používejte originální díly. |
| Obecné informace | SAR: 0,482 W/kg. Záruka: 24 měsíců (spotřebitel). |
Často kladené otázky - Vertis 1820 Easy Overmax
Dotazy uživatelů ohledně Vertis 1820 Easy Overmax
0 otázka o tomto zařízení. Odpovězte na ty, které znáte, nebo položte vlastní.
Položte novou otázku o tomto zařízení
Stáhněte si návod pro váš Telefon ve formátu PDF zdarma! Najděte svůj návod Vertis 1820 Easy - Overmax a vezměte svůj elektronický přístroj zpět do rukou. Na této stránce jsou zveřejněny všechny dokumenty potřebné k používání vašeho zařízení. Vertis 1820 Easy značky Overmax.
NÁVOD K OBSLUZE Vertis 1820 Easy Overmax
Vertis1820easy
User Manual Instrukcja obstugi
OVERMAX
You·unlimited
WPROWADZENIE
PL
Drogi Kliencie!
Dziekujemy za obdarzenie nas zaufaniem i wybranie marki Overmax.
Dzieki wykorzystaniu wysokiej jakosci materiały i nowoczesnych rozwiazan technologicznych oddajemy w Twoje rce produkt idealny do codziennego uzytkowania
Jesteśmy pewni, ze danecki ogromnej starannosci wykonania spegni on Twoje wymagania.
Jesli masz jakiekolwiek uwagi lub pytania do zakupionego produktu, skontaktuj sie z nami:
pomoctechniczna@overmax.pl
WAZNEINFORMACJE
Prosimy o przyeczytanie tej instrukcji przystapieniem do obstugi urzadzenia, aby zapoznać są z seinen funkcjami i wykorztȩ je zgodnia z przyeznaczeniem.
- Nie nalezy naprawiać oraz dokonywać modyfikacje urzadzenia. Czynnosci teMZe dokonać tylko autoryzOWany serwis.
- Nie uruchamiaj urzadzenia, gezeli zauwamy系数 jakiekolwiek uszkodzenia. Nie uzywaj urzadzenia, gdy zaczyna wadliwie dziatc, zostato upuszczone lub zamoczone, nadmiemie nagrzewa sie, pojawia sie odbarwienia, wybrzuszenia lub wycleki z baterii oraz gdy wystapiä inni nietypowe zjawiska. Skontaktuj sie z autoryzowanym serwisem producenta.
PL
- Nigdy nie zestawiaj urzadzenia podzaczonego do gniazda zasilania bez nadzoru.
- To urzadzenie nie jest jabawka. Trzymaj Telefon oraz了我的 akcesoria w miajcu niedostepnym dla daneci.
- Urzadzenia powinno pracstaw c w pokojowej temperaturze. Nie uzywaj urzadzenia w niskiej lub wysokiej temperaturze. Przed uruchomieniem, urzadzenia powinno byc pozostawione w temperaturze pokojowej przyez minimum 30 minut.
- Uzywaj urzadzenia z dala od zródet ciepta, wysokich temperatur, goracych powierzchni, bezposredniego swiatf sstonecznego, zródet iskrzenia, otwartego ognia, olei oraz ostrych krawedzi.
- Nie uzywaj urzadzenia w otoczeniu zawierajacego latwopalne, wybuchowe lub tokszcne substantcj.
- Nie uzywaj substancji chemicznych do czyszczenia urzadzenia.
- Nie uzywaj urzadzenia do innych celow, niz do ktorych zostato ono zaprojectowane.
- Przeestrzejag wzystkich przyañanych z uzywaniem Telefonu. Dotyczy to szczególnie staci benzynowych, szpitali, lotnisk, samolotów, prowadzenia pojazdów itp.
- Uzywaj tylko oryginalnych baterii i akcesoriow.
- Zuzyte baterie nalezy utylizowac zgodnie z lokalnymi przypepisami, w przyznaczonych do tegojejscach.
- Nie taduj Telefonu bez baterii. Przed wyjeciem baterii wyacz Telefon.
- Telefon nie jest wodoodpornym, pozostaw go suchym przy caly czas.
- Nie nalezy uderzać, rzuć ani upuszczac Telefonu.
- Dopuszczalne wartosci promieniowania pochfanianego przyez organizm cztowieka okreslane są przyez wspóćczynnik SAR. Jego dopuszczalna wartosc, wedtug norm międzynarodowych, nieMZe przyzekracza 2,0 W/kg. Maksymalna wartosc SAR dla niniejszego urzadzenia winosi 0,482 W/kg i jest ono zgodne z norma GB 21288-2007.
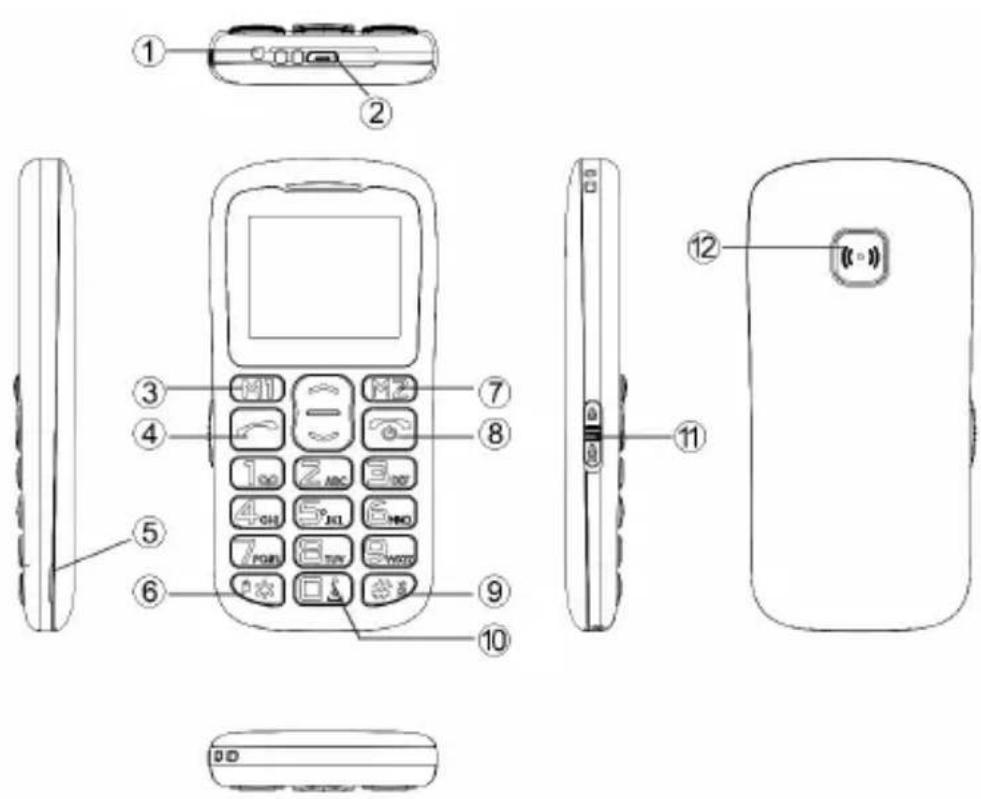
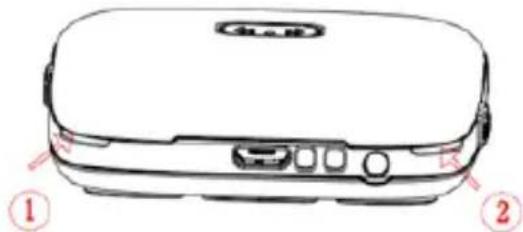
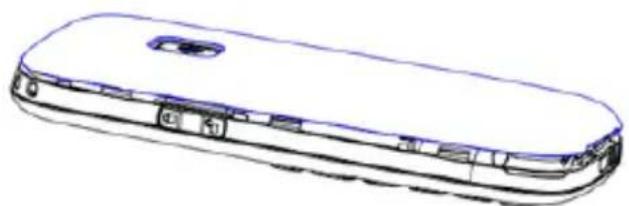
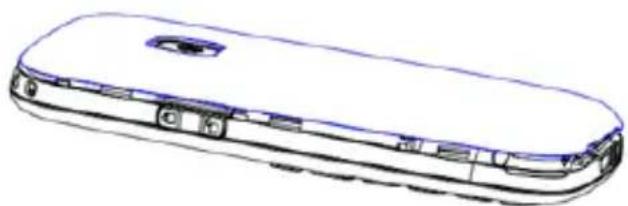
OPIS URZADZENIA
PL
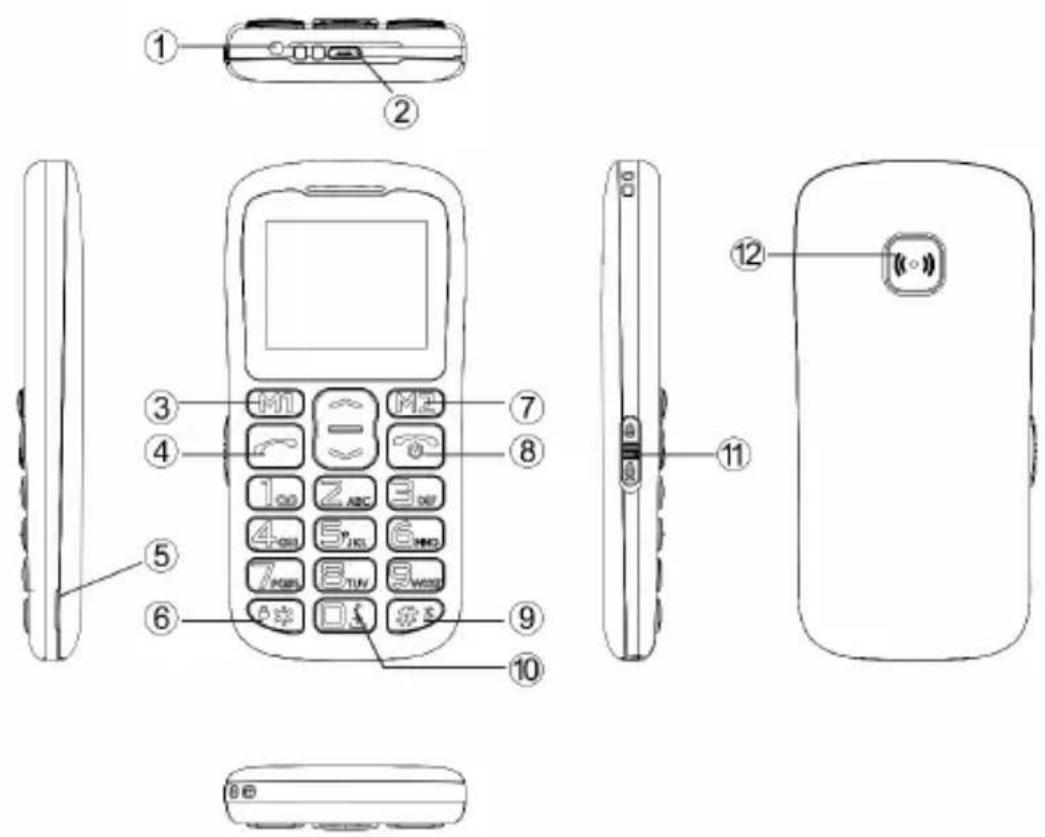
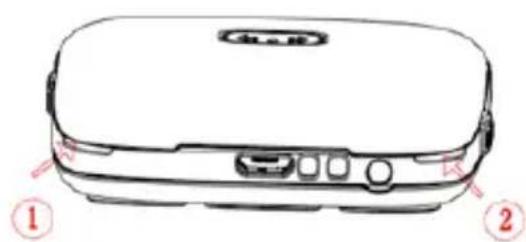
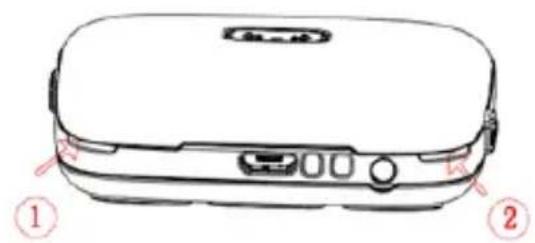
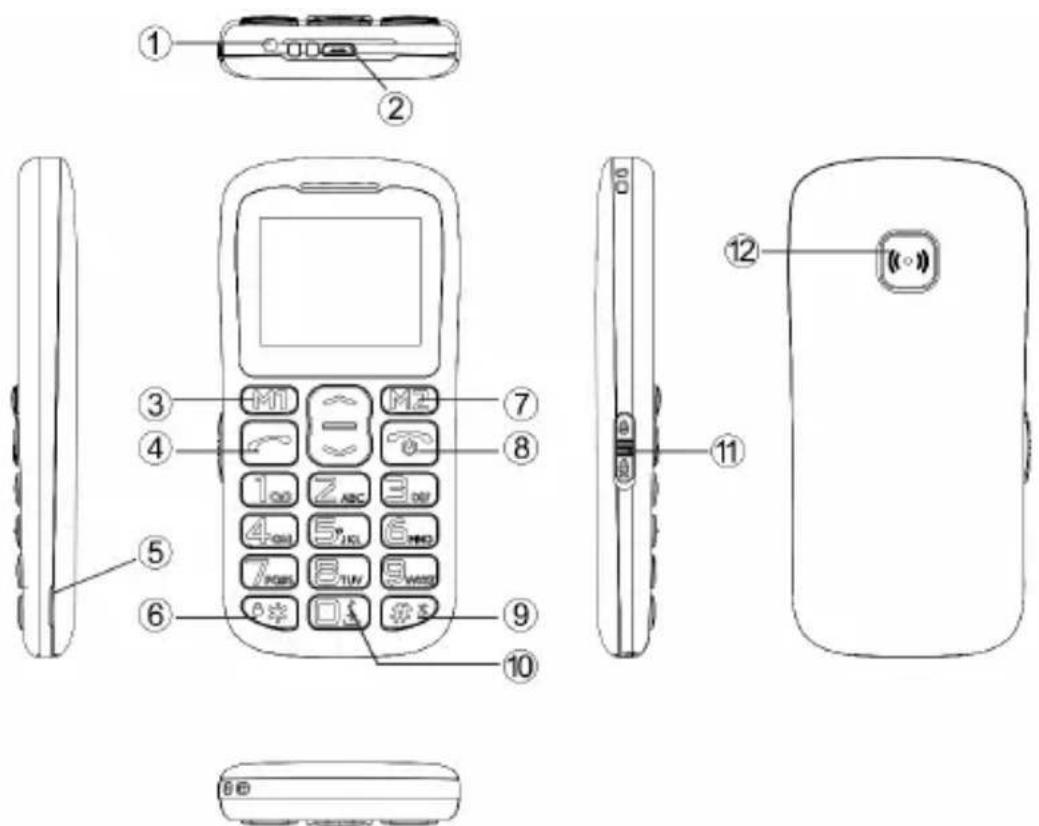
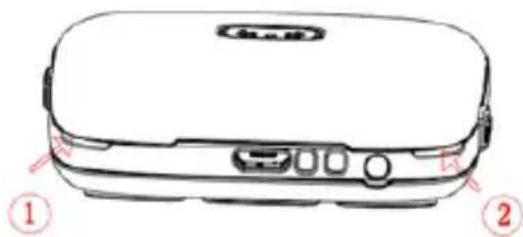
- Dioda LED.
- Port USB.
- Przycisk wiełofunkcyjny M1. Jego funkcja jest opisana na ekranie nad przyciskiem i jest rożna w zaleźnosci od aktualnégo wyboru menu.
- Przycisk dzwonienia.
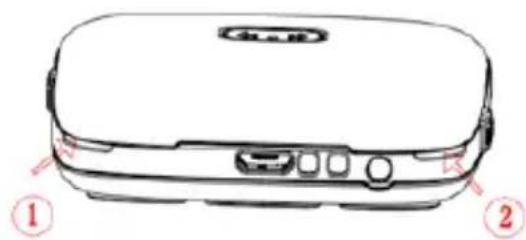
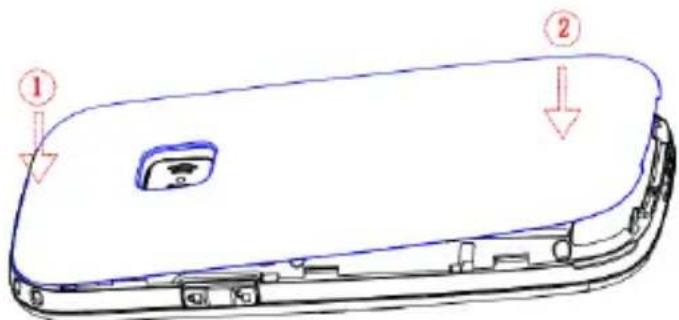
- Otwór do zdejmowania tylnejPokrywy Telefonu.
- Przycisk gwiazdki (*) - nacijsnij i przytrzymaj, aby odblokowa/c/zablokowa' klawiature. W edytorze wiadomyosci nacijsnij, aby wstawic symbol.
- Przycisk wiełofunkcyjny M2. Jego funkcja jest opisana na ekranie nad przyciskiem i jest rożna w zaleźnosci od aktualnégo wyboru menu.
- Przycisk konczy rozmowę/zasilania - naciśnij i przytrzymaj, aby wączy lub wyȩczyć telefon.
- Przycisk krzyzyka (#) - naciśnij i przytrzymaj, aby wączyc „tryb cichy". W edytorze wiadomycki naciśnij, aby zmienić tryb klawiatury.
PL
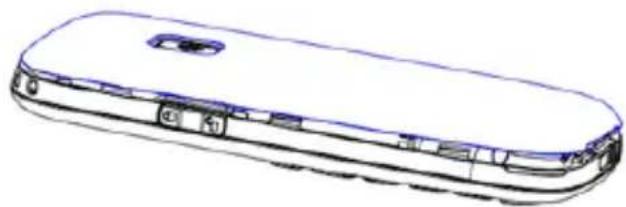
- Przycisk zero (0) - nacijsnij i przytrzymaj, aby wybrać znak „+”, w Radio FM oraz odtwarzaczu nacijsnij, aby spauzowej lub odtwarzac dzwiek.
- Przejęcznik LED - przesun, aby uruchomic latarke LED.
- Przycisk SOS.
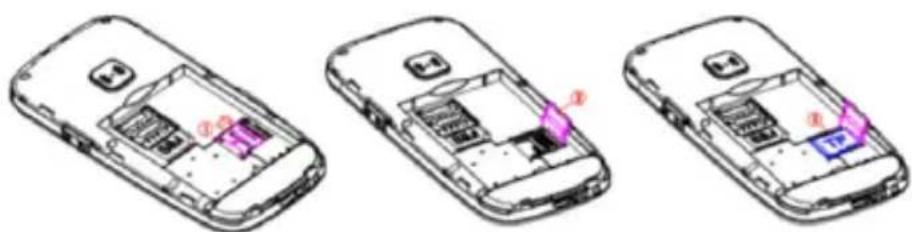
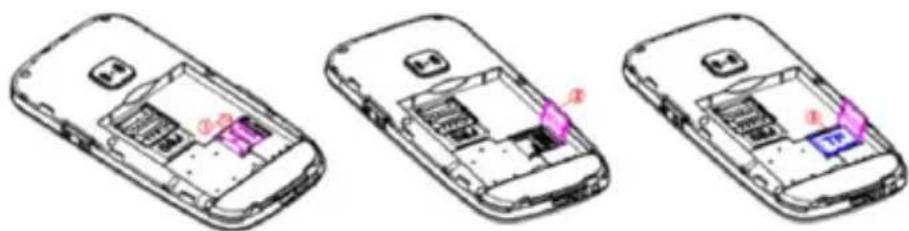
Montañ karty papiéci, karty SIM oraz baterii
- ZdejmijPokrywębaterii.

- Wsuñ karte pamieci do gniazda kart micro SD.

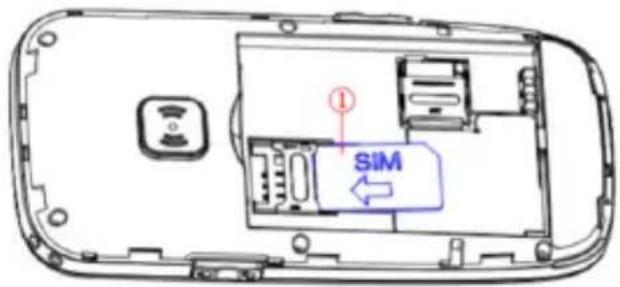
- Wsun kartę SIM do gniażda kart SIM. Zwróć uwage na poprawne ułozenia karty.
PL
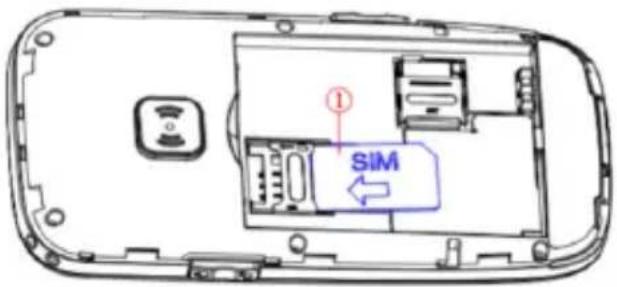
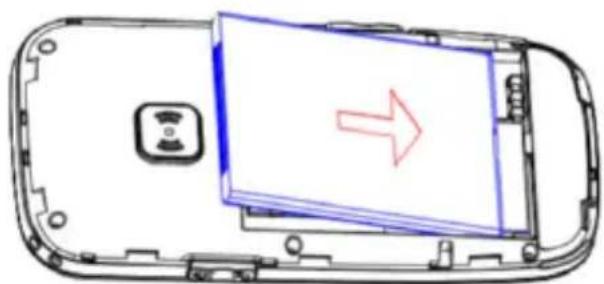
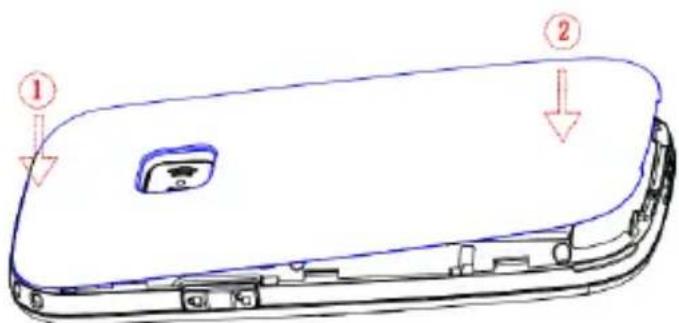
- Umiesz baterie w komorze baterii.

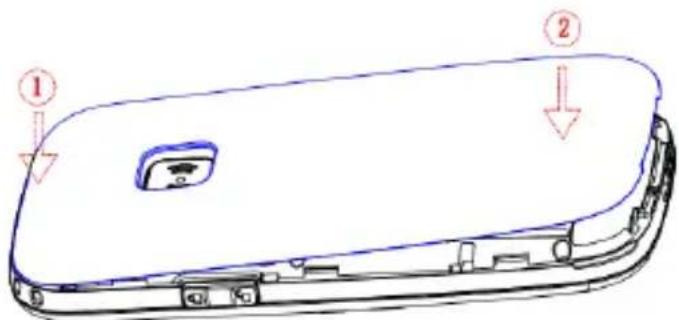
- ZałóźPokrywębaterii.
PL
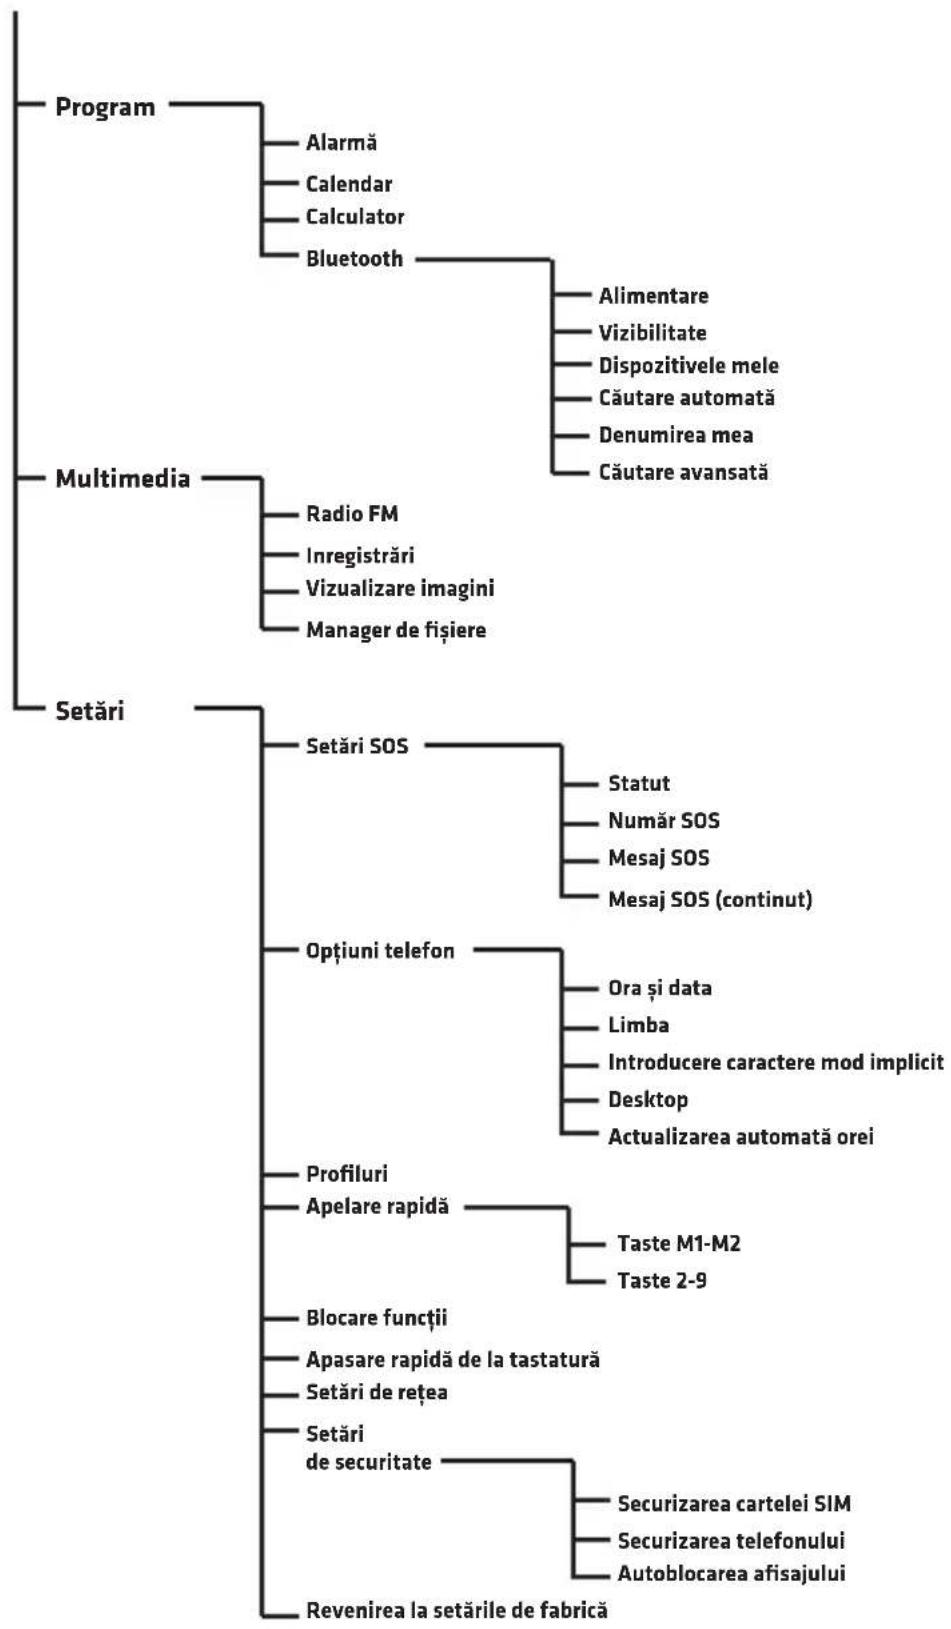
Menu Telefonu
PL
PL
PODSTAWOWE FUNKCJE TELEFONU
Kontaky i połaczenia
Dodawanie kontaktów
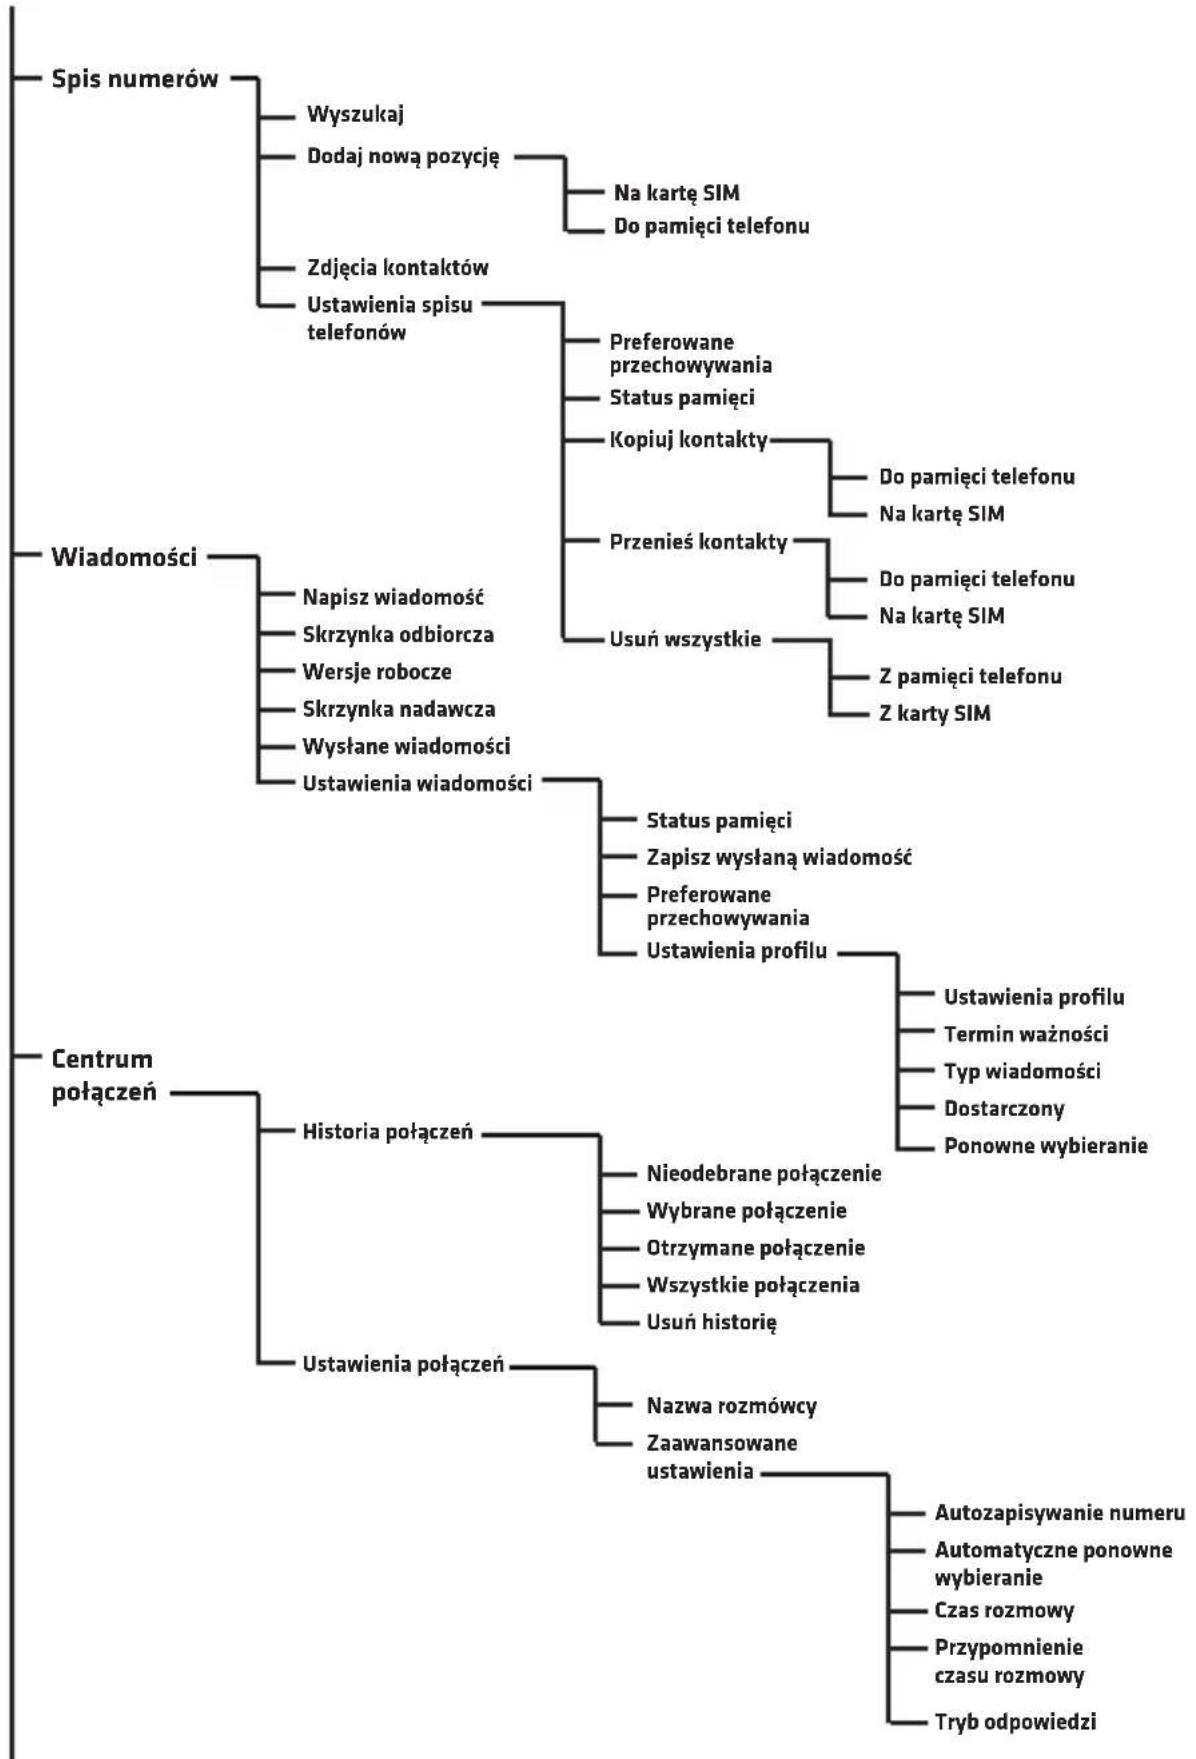
- Wejdź do menu, wybierz pozycje Spis numerów iwcisznej OK.
- Zaznacz Dodaj nowa pozycje iwcisnij OK.
- Wybierzczykontakt ma byc zapisany w pamięci Telefonu czy na karcie SIM.
- Wprowadź nazwg kontaktu oraz numer Telefonu. Abyzmieni tryb klawiatury, wcijsnij przycisk krzyzyka
- Możesz rownież ustawic zdjecie kontaktu oraz dzwiek dzwonka. Wybierz dana opcjā korzystajac z przycisków gwiazdki i krzyźka # # # # # # # # # # # # # # # # # # # # # # # # # # # # # # # # # # # # # # # # # # # # # # # # # # # # # # # # # # # # # # # # # # # # # # # # # # # # # # #
- Wybierz Opcje oraz Zapisz albo Anuluj w celu zapamiętania lub anulowania kontaktu.
- Wcisnij przycisk czerwonej stuchawki , aby powróci do glównego ekranu
Uwaga: Aby dodać prefix „+” przytrzymaj przycisk.
PoIaczenie
- W ekranie glównym skorzystaj z klawiatury numerycznej, aby wprovadzić numer Telefonu. Nieprawidławo wprovadzoną cyfremozna usunac przyciskiem Kasuj.
- Wcisnij,aby nawizać połaczenia zwpisanych numerem.
- Wcisnij Przerwij lub ,aby przerwac pojaczenia.
Wybieranie numeru z listy kontaktów
- Na ekranie glownym wcijsnij ksiąźte telefoniczną.

(Kontaky),abyotworzyc

PL
- Aby wybrać kontakt z ksiąźki, korzystaj z przycisków wybierz pierwsza literę poszukiwanego kontaktu.
lub
- Po wybraniu kontaktu wciśnij, aby nawiȩzać połącenie.
Wiadomosci
Pisanie i wysyfanie wiadomosci
- Wejdź do Menu, następnie wybierz Wiadomosci.
- Wybierz Napisz wiadomosc.
- Napisz wiadomosc. Wcisnij,aby wybrac symbol.Wcisniepie powoduje zmiany trybu wrowadzania.
- Wcisnij Opcje, nastepnie Wyslij do, aby wysłac wiadomosc.
Skrzynka odbiorcza
- Wejdź do Menu, nastepnie wybierz Wiadomosci i Skrzynka odbiorcza.
- Wybierz Opcje i Podgliad, aby wyświetlic wiadomosć.
Mozna rownikę wybrać opcje:
Odpowiedz - wybierz, aby odpowiedziec na wiadomosc nadawcy
Zadzwon do nadawcy - wybierz, aby nawiązać połaczenia z nadawca wiadomosci.
Przekieruj - wybierz, aby przybekazinga dane wiadomość do innych kontaktów.
Skasuj - wybierz, aby usunac wiadomosc.
Usun wszystko - wybierz, aby usunanc wszystkie wiadomosci.
Zapisz do spisu numerów - wybierz, aby zapisać numer nadawcy wiadomosci w ksiąźce Telefonicznej
PL
Centrum połaczen
Wszystkie połaczenia przychodźace, wychodźace iNieodebrane są zapisywane w historii połaczenia.
Historia potęczne
- Wejdź do Menu, nastepnie wybierz Centrum połaczenia i Historia połaczenia.
- Tutaj mozesz podejrzech potaczenia:nieodebrane, wybrane, otrzymane, wzystkie oraz usunac historie.
Terminarz
Alarm
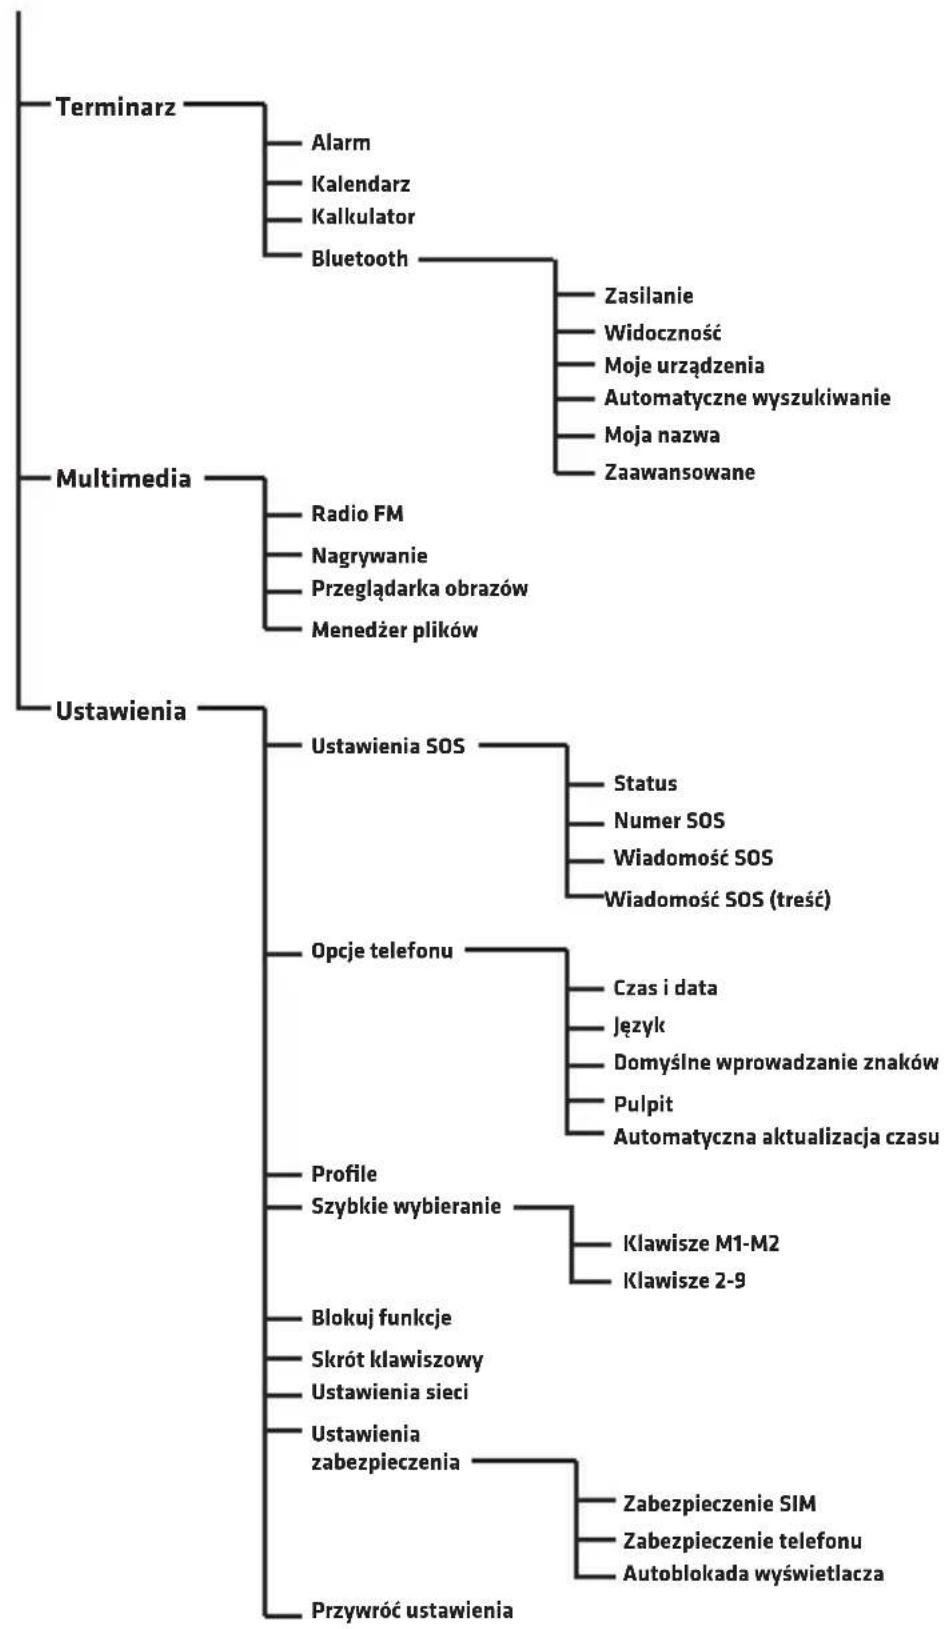
- Wejdź do Menu, nastepnie wybierz Terminarz i Alarm.
- Wcisnij Edytuj.
- Korzystaj z przyciskowy oraz klawiatury numerycznej, aby ustawic: Status, Godzine, Drzemke (w minutach), Powtorzenie, Ton alarmu i Typ alarmu.
Kalendarz
-
Wejdź do Menu, nastepnie wybierz Terminarz i Kalendarz. Aktualna data jest wyświetlana na samej gorze.
-
Nawiguj strzałkami oraz#,aby wybrać date.
-
Wcisnij Opcje, aby wybrać nastepujuce: Podglad - wyświetla wydarzenia zapisane w wybranych dniu. Zobacz wszystkie - wyświetla wszystkie zapisane wydarzenia. Dodaj wydarzenia - wybierz, aby dodac wydarzenia iustawic和他的 opcje. Usń wydarzenia -/uswa dane wydarzenia z Kalendarza. Przeskocz do daty - wpopadź date i nacisnij Ok, aby przyść
do konkretnej daty w kalendarzu.
Dzisiaj - przechodzi do aktualnej daty w kalendarzu.
Tydzien - wyświetla wydarzenia wpisany w aktualny tydzien.
Kalkulator
-
Wejdź do Menu, nastepnie wybierz Terminarz i Kalkulator.
-
Wprowadz liczby klawiatura numeryczna, klawiszem mozesz wstawić przycecinek.

- Strzałkami wybierz dziatanie (dodawanie, odejmownikie, wnik, mnożenie i Dzielenie) i wropyadź licze.
- Wcisnij Ok,aby uzyskacwynik.
Bluetooth
- Wejdź do Menu, nastepnie wybierz Terminarz i Bluetooth.
- Zasilanie - węcza lub wyȩcza Bluetooth w urzadzeniu.
- Widocznosc - ustawia widocznosc urzadzenia.
- Moje urzadzenia -Pokazuje zapisane urzadzenia i pozwala dodac nowe do listy.
- Automatyczne wyszukwanie - wyszukuje urzadzenia Bluetooth.
- Moja nazwa - wyświetla i pozwala edytowej nazwo telefonu w Bluetooth.
Multimedia
Radio FM
- Wejdź do Menu, nastepnie wybierz Multimedia i Radio FM.
- Wcisnij Opcje i wybierz nastepujuce:
Lista kanatów - wyswietla listę zapisanych kanatów i pozwala zapisć nowe.
Reçnzewyszukiwanie - pozwala wpwadzić czestotliwość radia
PL
Automatyczne wyszukiwanie - automatycznie wyszukuje stacje radiowe i zapisuje je.
Ustawenia - węcza lub wyȩcza dziatanie radia w tle.
Nagrywanie
Wejdź do Menu, nastepnie wybierz Multimedia i Nagrywanie. Wybierz Opcje, aby stworzyć nowy zapis, wyświetlic liste zapisanych nagran oraz wejsć wustawenia.
Przeglądarka obrazów
Wejdź do Menu, nastepnie wybierz Multimedia i Przeglądarka obrazów. Narȩźtie pozwala na przyglądanie wzystkich zapisanychDDD w urzędzeniu.
Menedzer plikow
Wejdź do Menu, nastepnie wybierz Multimedia i Menedź plików. Narȩdzie pozwala na przyegradsanie wzystkich plików zapisanych wAMIJIci Telefonu lub na włozonej karcie pAMIJIci.
Ustawenia
Ustawenia SOS
Funkcja SOS pozwala na wystanie wiadomosci oraz połączenia z zapisanych kontaktami, gdy zostanie wcińskipty przycisk SOS.
- Wejdź do Menu, następnie wybierz Ustawenia i Ustawenia SOS.
- Status - węcza lub wyȩcza opcie SOS.
- Numer SOS - pozwala wprovadzić numery Telefonów, do ktorych zostanie wystaña informacja SOS. Można wprovadzić do 5 numerów.
- Wiadomosc SOS Wlacz/Wylacz - wlcza lub wylacza powiadomienie SOS
-
Wiadomosc SOS -tresc wiadomosci SOS
-
Dzwiek ostrzejagczy - wącza lub wyȩczda dzwiek syreny po uaktywnieniu SOS.
- Kiedy przytrzymasz przycisk SOS, Telefon automatycznie wysole wiadomySci SMS do wpisanych numerów, a nastepnie;będzie dzwonić po kolei do kaźdego z nich.
Opcje telefonu
W opcjach Telefonu mozesz ustawic aktualnă date i godzine,发展格局, domyślny tryb w prowadzania znaków oraz tapete.
Profile
Pozwala wybrać aktualny profil (ogólny, milczący itd.) oraz dostosowej opcję do kazdego z nich.
Szybkie wybieranie
Pozwala ustawic szybkie wybieranie kontaku przy przytrzymaniu przycisku M1, M2 lub klawisz y 2-9.
Blokuj funkcje
Pozwala zablokowa wybrane opcje w telefonie.
Skróty klawiszowe
Pozwala ustawic skroty dla klawiszcy

Ustawienia sieci
Pozwala ustawic opcje sieci.
Ustawenia zabezpieczenia
Pozwala ustawic opcje zabezmieczenia karty SIM, Telefonu oraz autoblokady.
Przywroc ustawienia fabryczne
Przywraca ustawienia fabryczna. Wymagane haslo: 1234.
OVERMAX
You·unlimited
Vertis 1820 easy
INTRODUCTION
EN
Dear customer!
Thank you for placing trust in us and choosing Overmax.
Thanks to the use of high-quality materials and modern solutions, we provide you with a product perfect for every day use.
We are convinced that it will satisfy your requirements as it has been designed with utmost care.
Should you have any remarks or questions concerning the product, please do not hesitate to contact us:
pomoctechniczna@overmax.pl
IMPORTANT
Please read this manual before you start using the product to see all its functions and use them in accordance with intended use.
EN
- Do not repair or modify the device. Only an authorized service technician is allowed to perform these operations.
- Do not switch the device on if you have noticed any damage. Do not use the device if it acts up, has been dropped or wetted, overheats extensively, is discolored, deformed or its battery leaks, or when other atypical circumstances occur. Contact the manufacturer's service center.
- Never leave the plugged device unattended.
- This device is not a toy. Keep a mobile phone and its accessories out of reach of children.
- The device must operate at room temperature. Do not use the device at low or high temperatures. Before you switch it on, leave the device at room temperature for at least 30 minutes.
- Use the device away from sources of heat, high temperatures, hot surfaces, direct sunlight, sources of ignition, naked flame, oils and sharp edges.
- Do not use the device in the inflammable, explosive or toxic atmosphere.
- Do not use chemicals to clean the device.
- Do not use the device for other purposes than designed.
- Follow all rules related to using the mobile phone, in particular at petrol stations, hospitals, airports, airplanes, vehicles, etc.
- Use original batteries and accessories only.
- Dispose worn-out batteries in accordance with local regulations in designated venues.
- Do not charge the mobile phone without a battery. Before you take the battery out, switch the phone off.
- The mobile phone is not waterproof and must be dry at all times.
- Do not hit, throw or drop the mobile phone.
- Permissible values of radiation absorbed by human organism are specified by SAR factor. According to international standards, its permissible value must be 2.0W / kg at the most. The maximum SAR value for this device is 0,482 W/kg and complies with standard GB 21288-2007.
DEVICE DESCRIPTION
EN
- LED light.
- USB port.
- Multifunctional key M1. Its function has been described in the screen above the key, and varies depending on the menu selection.
- Call key.
- Rear cover removal hole.
- Asterisk key (*) - Press and hold to unlock/lock the keypad. Press the key to enter a symbol in the message editor.
- Multifunctional key M2. Its function has been described in the screen above the key, and varies depending on the menu selection.
- Call end/power key - press and hold to switch the mobile on or off.
- Hash key (#) - press and hold to activate „silent mode". Press to change keypad mode in the message editor.
EN
- Zero key (0) - press and hold to choose _n + ^n ,in Radio FM and player press to pause or play sound.
- LED switch - move to activate LED flashlight.
- SOS key.
Installation of memory card, SIM card and battery
- Remove battery cover.
- Insert memory card to micro SD card port.
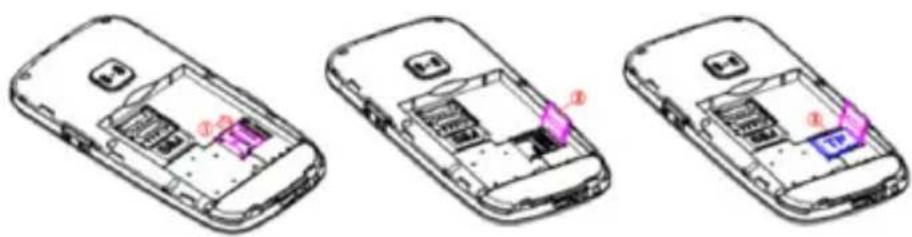
- Insert SIM card to SIM card port. Make sure the card has been properly positioned.
EN
- Place battery in the battery compartment.
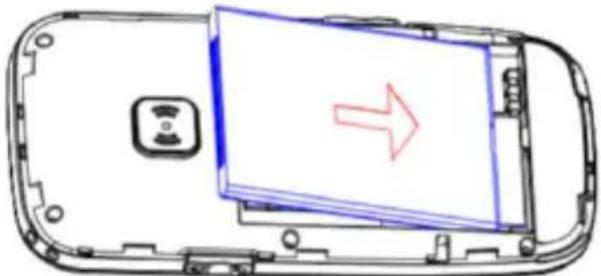
- Put battery cover back on.

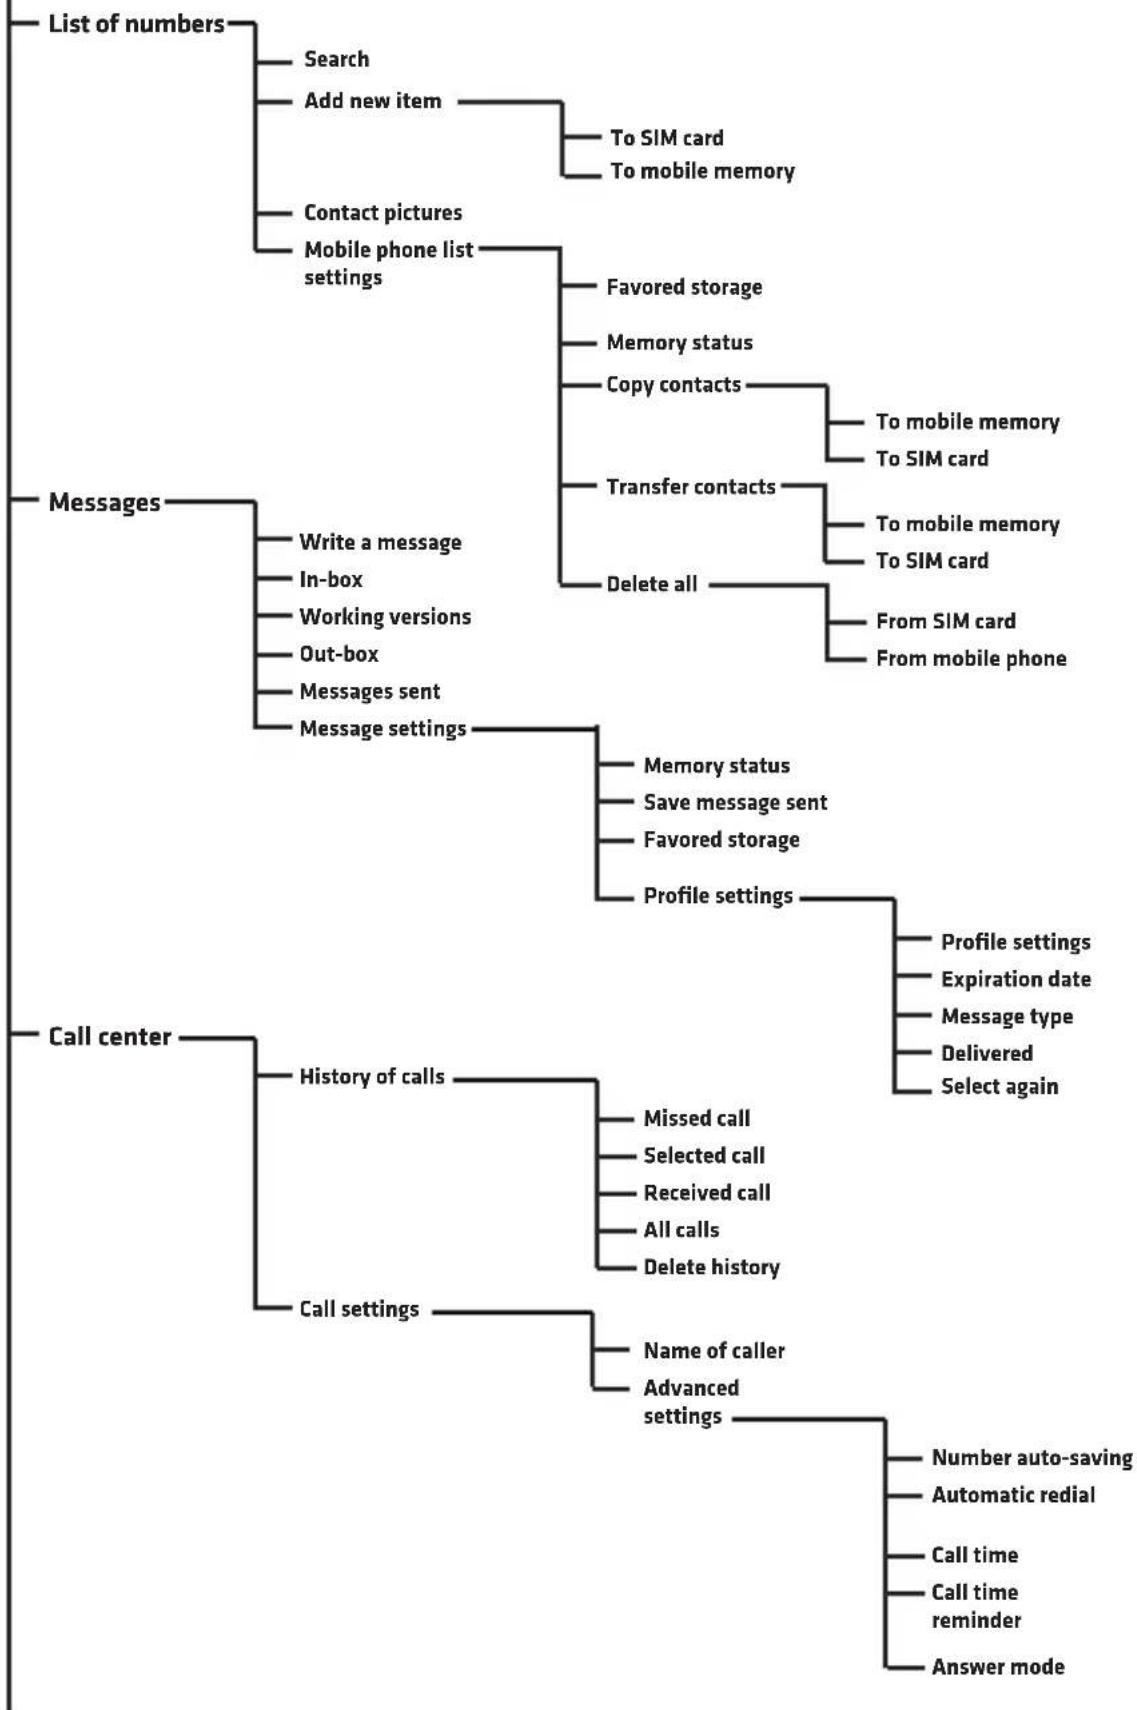
MOBILE PHONE MENU
EN
EN
BASICPHONEFUNCTIONS
EN
Contacts and call
Adding contacts
- Enter menu, select List of numbers and press OK.
- Select Add new item and press OK.
- Decide if you wish to save the contact in the mobile memory or on SIM card.
- Enter name of contact and phone number. To change keypad mode, press hash key #x
-
- You can also set contact picture and ring sound. Choose option by using asterisk keys and hash , and enter Options.
- Select Options and Save or Cancel to save or cancel contact.
- Press red receiver key, to return to main menu.
Note: To add prefix + before the phone number, press and hold
Call
- In the main screen use numerical keypad to enter phone number. If a digit you have entered is incorrect, remove it with Delete key.
- Press, to dial the number you have entered.
- Press Abort or , to cancel the call.
Select number from the list of contacts
-
In the main screen press MZ (Contacts) to open a phone book.
-
To select contact from the book, use keys or choose letter to
go to contacts which begin with a specific letter.
- Once you have chosen the contact, press , to make a call.
Messages
EN
Writing and sending messages.
-
Enter Menu and choose Messages.
-
Select Save message.
-
Write a message. Press , to choose a symbol. Press to change entering mode.
-
Press Options, then Send to to send a message.

In-box
- Enter Menu, next select Messages and In-box.
- Select Options and Preview to display a message.
You can also choose the following options:
Answer - choose to respond to sender's message
Call sender - choose to call message sender
Redirect - choose to send the message to other contacts.
Delete - choose to delete the message.
Delete all - choose to delete all messages.
Save in list of numbers - choose to save message sender's number in the phone book.
Call center
All incoming, outgoing and missed calls are saved in the history of calls.
EN
History of calls
- Enter Menu, next select Call center and History and calls.
- Here you can see missed, dialed, received, all calls and delete history.
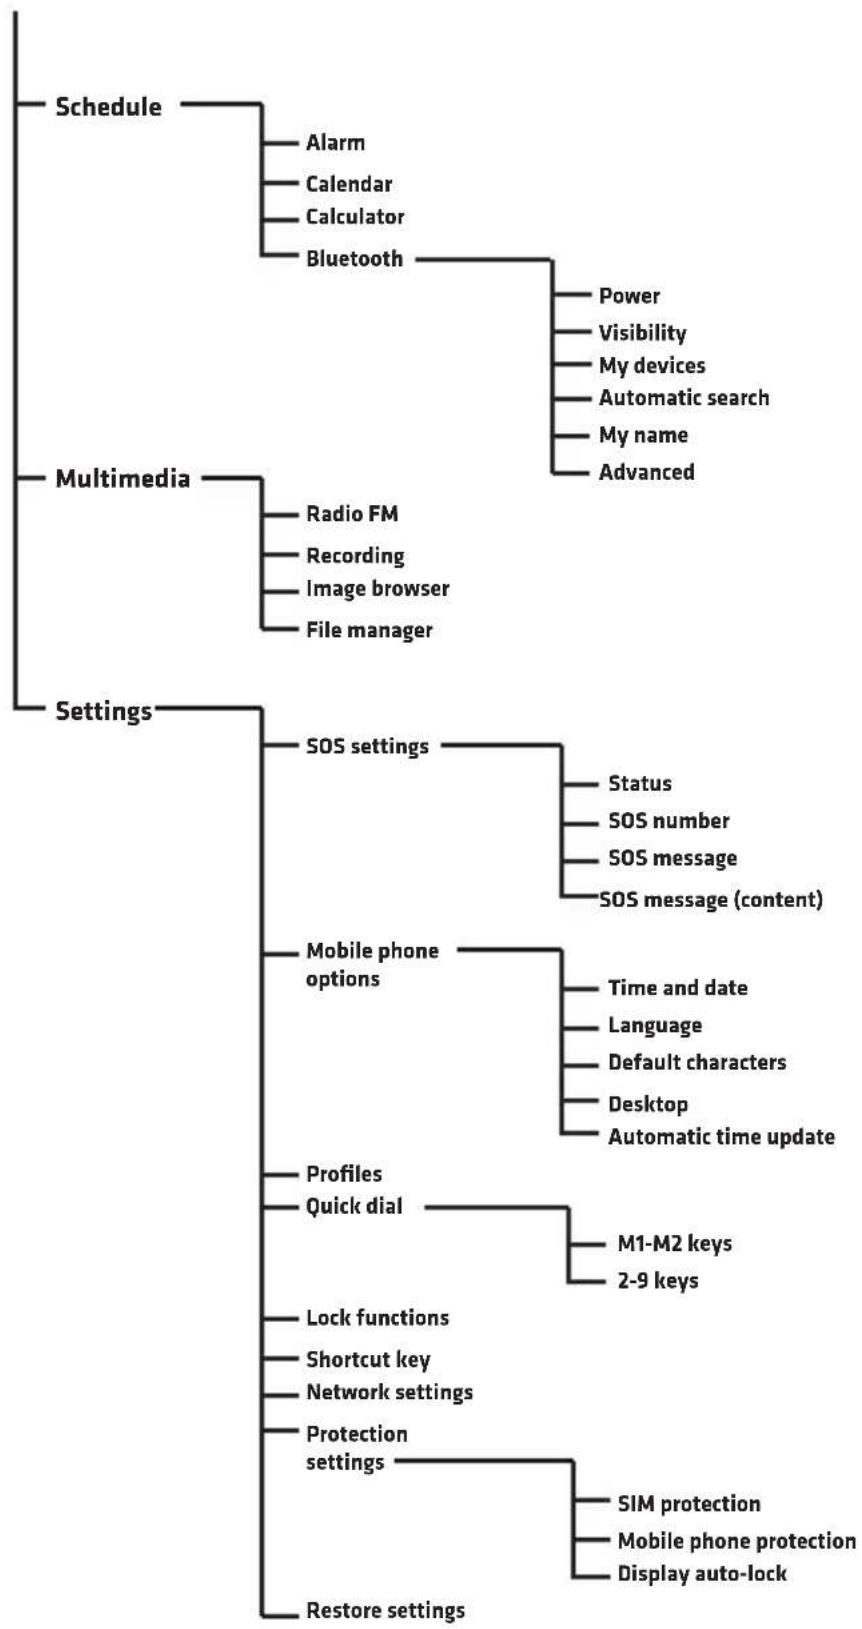
Schedule
Alarm
- Enter Menu, next choose Schedule and Alarm.
- Press Edit.
- Use and keys and numerical keypad to set: Status, hour, nap (in minutes), repetition, alarm tone and alarm type.
Calendar
- Enter Menu and select Schedule and Calendar.
Current date is displayed at the top.
- Use arrows

and

and

, to choose date.
- Press Options to select the following items:
Preview - displays events recorded on a specific day.
See all - displays all recorded events.
Add event - select to add event and set options.
Delete event - deletes event from the Calendar.
Go to date - enter date and press OK to go to specific date in the calendar.
Today - goes to current date in the calendar.
Week - displays events entered into the current week.
Calculator
- Enter Menu, next choose Schedule and Calculator.
- Enter numbers via numerical keypad, press a key to enter comma.
- Use arrows to select action (adding, subcontracting, result, multiplying and dividing) and enter number.
- Press OK to get result.
Bluetooth
- Enter Menu, next select Schedule and Bluetooth.
- Power - activates or deactivates Bluetooth in the device.
- Visibility - sets device visibility.
- My devices - shows saved devices and lets you add new items to the list.
- Automatic search - searches Bluetooth devices.
- My name - displays and lets you edit phone name in Bluetooth.
Multimedia
Radio FM
- Enter Menu, next select Multimedia and Radio FM.
- Press Options and select the following:
List of channels - displays a list of saved channels and lets you save new items.
Manual search - lets you enter radio frequency
Automatic search - searches radio stations and saves them automatically.
Settings - activates or deactivates radio in the background.
EN
Recording
Enter Menu and select Multimedia and Recording. Select Options to create a new record, display a list of saved recordings and enter settings.
Image browser
Enter Menu, next select Multimedia and Image Browser. The tool lets you browse all images saved in the device.
File manager
Enter Menu and select Multimedia and File manager. The tool lets you browse all files saved in the phone memory or memory card.
Settings
SOS settings
SOS feature lets you send messages and call saved contacts when you press SOS key.
- Enter Menu, next select Settings and SOS Settings.
- Status - activates or deactivates SOS feature.
- SOS number - lets you enter phone numbers which will receive SOS message. You can enter max. 5 numbers.
- SOS message activate/deactivate - activates or deactivates SOS notification
- SOS message - SOS message content
- Warning sound - activates or deactivates alarm sound after SOS has been activated.
- When you hold SOS key, your mobile phone will automatically send SMS to saved numbers and then call them one after another.
Mobile phone options
In the mobile phone options you can set current date and hour, language,
default characters mode and wallpaper.
Profiles
It lets you choose a current profile (general, silent, etc.) as well as adapt option to each of them.
Quick dial
It lets you dial a contact quickly if you hold M1, M2 or keys 2-9.
Lock functions
It serves to lock specific options in the mobile phone.
Shortcut keys
It lets you set shortcuts for keys

Network settings
It serves to set network options.
Protection settings
It lets you set protection options for SIM card, mobile phone and auto-lock.
Restore default settings
It restores factory settings. Required password: 1234.
EN
OVERMAX
You·unlimited
Vertis 1820 easy
INTRODUCERE
Stimate Client!
Vã multṭumim pentru conferirea increderii in alegerea brandului Overmax. Prin Utilizarea de materiale de inaltã calitate Şi soluti tehnologice moderne va acordam in mainile dumneavoastră un produs ideal pentru utilizes area de zi cu zi.
Suntem siguri că, datorită manoperei enorme vă vom satisface nevoile dumneavoastră.
Dacă aveți orice intrebări sau comentarii la produsul achizitionat, va rugâm să ne contactati:
pomoctechniczna@overmax.pl
INFORMATIIMPORANTE
Vá rugám sá citi ci cu atentie acest manual inainte de a utilizes aparatul pentru a va familiariza cu functiile sale si sa le utilizes conform destinatiei.
- Nu reparati aparatul si nu efectuatai modificari. Aceste activitatei pot fi realizate doar la un service autorizat.
- Nu utilizati dispositivul, dacă ați observat nici un prejudiceiu. Nu utilizati aparatul atunci cand incepe defecțiune, a fost scâpat pe jos sau expuse la apă, se incâlzește prea puternic, vizibile modificări de culoare sau scurgeri de la baterie, toate aceste sunt fenomene neobisnuite. Vă rugăm sa contactăti service autorizat al
RO
RO
producatorului.
- Nu lasa'i aparatul conectat la priza de alimentare, fara supraveghere.
- Acest dispositiv nu este o jucarie. Nu lasaţi Telefonul Şi accesoriile sale la indemânca copilor.
- Aparatul trebuie sa functioneze la temperatura camerei. Nu utilizati aparatul la temperaturi ridicate sau scazute. Inainte de a incepe, aparatul trebuie lasat la temperatura camerei tamp de cel pu tin 30 minute.
- Utilizați dispositivul departe de sursele de caldură, temperaturi ridicate ale suprafetelor fierbinti, lumina directa a soarelui, scantei, flacari descrise, uleuriși marginini ascuțite.
- Nu folosi aparatul intr-un mediu care contine substanste inflamabile, explozive sau toxice.
- Nuutilizati substanctechimicepentruacurataunitatea.
- Nu folosi aparatul in alte scopuri decat cele pentru care a fost conceput.
- Respectaţi toate dispositiile referitoare la utilizarea Telefonului, acest lucru este deosebit de statii de benzina, spitale, aeroporturi, avioane, de conducere, etc.
- Folosi numai baterii si accesori originale.
- Vâ rugam sã aruncaṭi bateriile uzate in conformitate cu reglementarile locale, in locuri desemnate.
- Nu incarca ti Telefonul fara baterie, inainte de inlaturarea bateriei, varrugam sa deconnectati Telefonul.
- Telefonul nu este impermeabil si ar trebui sã fie uscat pe parcursul utilizarii.
- Nu loviţi, aruncați sau scăpati Telefonul, deoarece toate aceste actiuni ar putea duce la deterioararea produsului.
- Valorile limită de radiții absorbite de organismul uman sunt determinate de SAR. Valoarea sa este permis de standardele internațione nu trebuie să depășească 2,0 W / kg. Valoarea maximă SAR pentru aparatul este 0,482 W / kgși este in concordanță cu standardul GB 21288-2007.
DESCRIEREADISPOZITIVULUI

RO
- LED-uri.
- Portul USB.
- Butonul multifunctional M1. Functia sa este descrisă pe ecran deasupratahei, si variază in functie de selectarea meniului curent.
- Buton de apelare.
- Orificiu de indepartare a capacului posterior al Telefonului.
- Butonul stele (*) - tinei apasat pentru a debloca / bloca tastatura. In editorul de mesaje, apasati pentru a introduce un simbol.
- Butonul multifunctional M2. Funcția sa este descrișă pe ecran deasupra tastei,și variază in functie de selectarea meniului curent.
-
Butonul incheierea unui apel / deconnectare - tinei apasat pentru a porni sau opri Telefonul.
-
Butonul (#) - tinei apasat pentru a porni „modul silentios". In editorul de mesaje, apasati pentru a schimba modul de tastatură.
- Butonul zero (0) - tinei apasat pentru a selecta semnul „+“ in player si radio FM, apasati pentru a intrerupe sau a reda un sunet.
- Comutatorul LED - miscare pentru a porni lanterna LED-uri.
- Butonul SOS.
RO
Instalarea cardului de memorie, cartela SIM si bateria
- Scoateti capacul bateriei.
- Introduci cartela de memorie in slotul micro SD pentru card.
- Glisaţi cartela SIM in slotul cartelei SIM. Acordaţi atentie la poziţionarea corectă a cardului (a vedea imaginea de mai sus).

- Poi t i b a t i o n a t i b a t i o n i n compa r t i m e n t u l penta ntru b a t i e.
- Puneti la loc capacul bateriei.
RO
RO
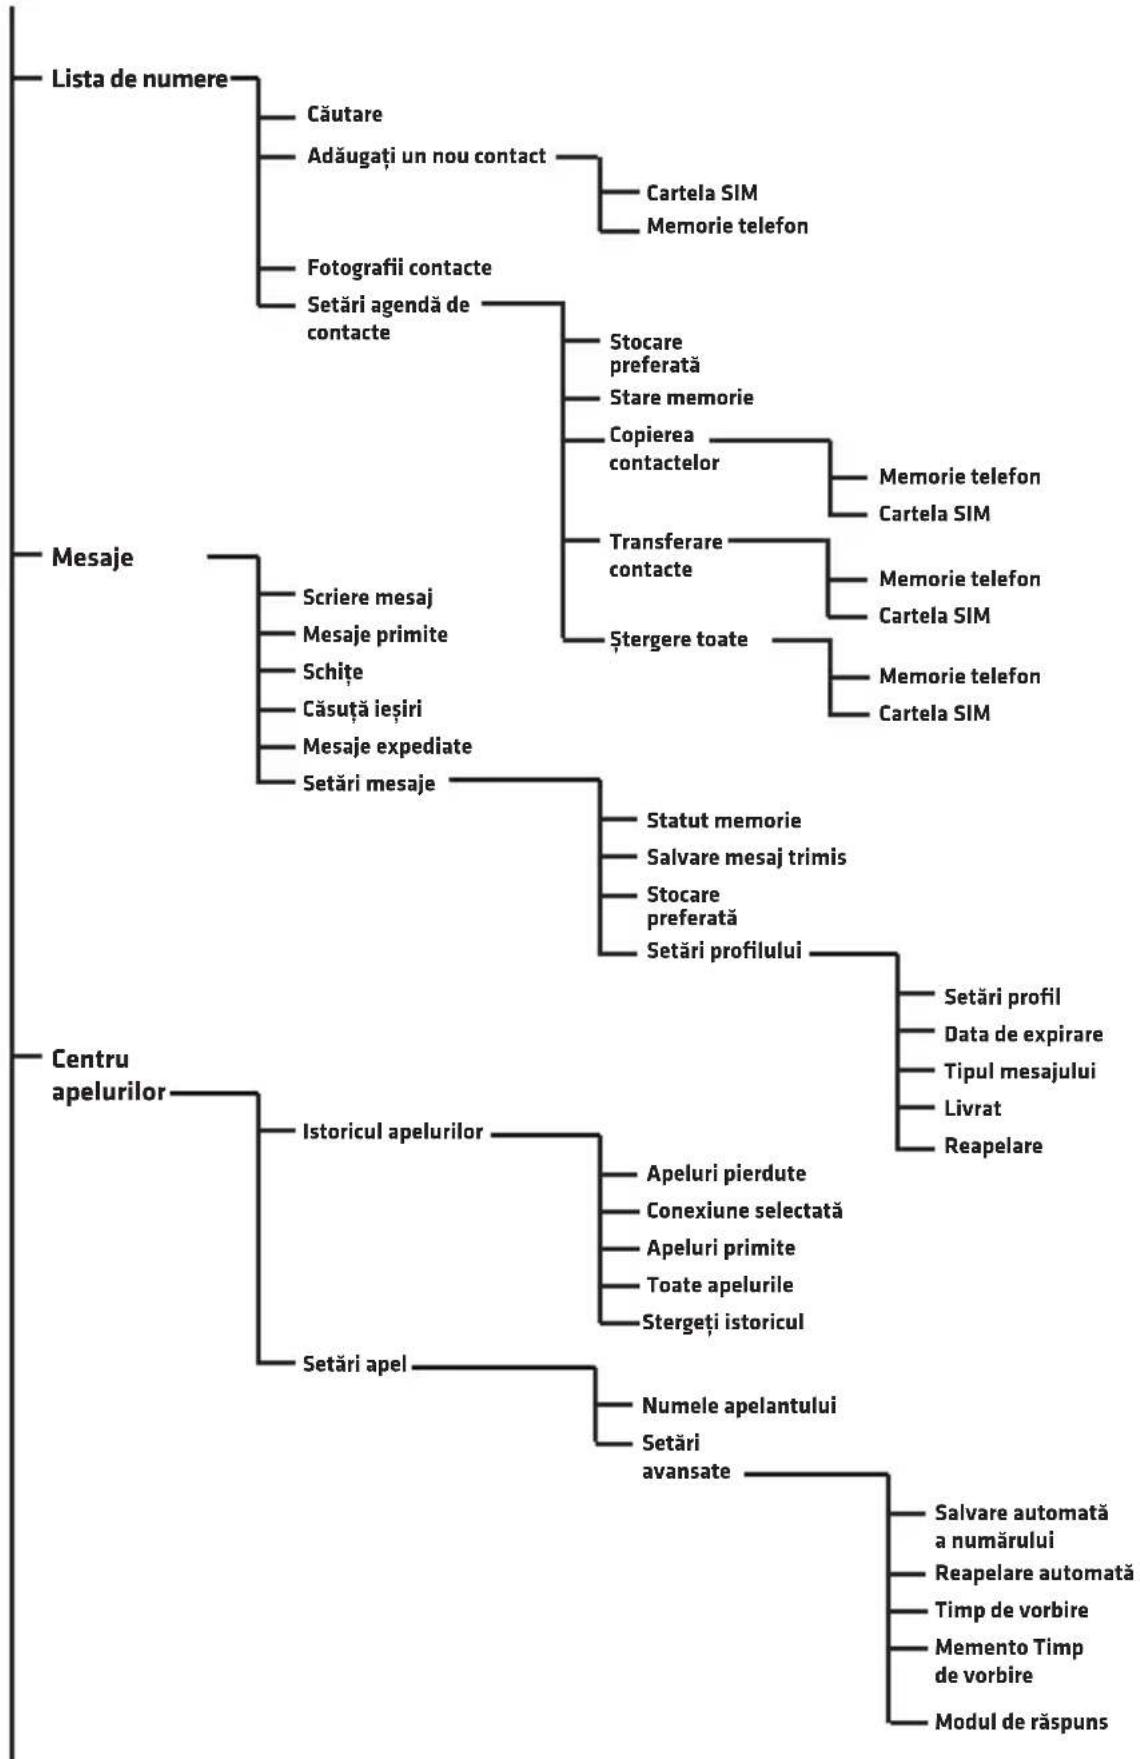
MENIU TELEFON
FUNCTII DE BAZA ALE TELEFONULUI
Contacte si apelare
RO
Adauga contactelor
- Accesati Meniu, selecanti Ista de numere si apasa tIK
- SelectaTi Adaugati un element nou si apasati OK.
- Selecta contactul pentru a fi salvat in memoria Telefonului sau pe cartela SIM.
- ntruceti numele contactului si numarul de Telefon. Pentru a schimba modul de tastatura, apasati
- Putei seta, de asemenea, imaginea de contact si tonul de apel. Selecta optiunea dorita cu ajutorul butoanelor 串 si si mergeti la Optiuni.
- Selectati Optiuni 山 Salvare sau Anulare pentru a salva sau a anula contactul.
- Apasati pe telefonul rosu , pentru a reveni la ecranul principal
Atentie: Pouru a adauga un prefix inainte de numarul + Telefon, tinei apasat butonul.
Apelare
- Pe ecranul principal, folosiţi tastatura numerica pentru a introduce un numar de Telefon. Cifre introduse incorrect pot fi eliminate prin apăsarea Stergere.
- Apasati pe , pentru a apela numarul introdus.
- Apasati Anulare sau , pentru a deconecta.
Apelarea unui numar din lista de contacte
- Pe ecranul initiaI, apasaI (Contacte), pentru a descide agenda Telefonica.
- Pentru a selecta o persona de contact din agenda,utilizati butoanele sau selecta o litera pentru a merge la contactele care incep cu litera selectata.
- Dupa ce selecta o persona de contact, apasa , pentru a efectua un apel.
Mesaje
Scrierea 山 trimiterea mesajelor.
- Accesati Menui, iar apoit selectati Mesaje.
- Selectati Scriere mesaj.
- Scrie ti un mesaj. Apasati pe , apentru a selecta un simbol. Apasarea #s cauzeazschimbari in modul de introducere.
- Apasati pe Optiuni, apoi Expediere pentru a trimite mesajul.
Mesaje primite
- Accesati Menu, selecati Mesaje si Mesajele primite.
- Selectați Optiuniși Previzualizare pentru a vedea mesajul. Puteti selecta, de asemenea următoarele optiuni: Răspunde - Selectați pentru a răspunde expoctorului mesajului Apelati expoctorul - Selectați pentru a apela expoctorul mesajului. Redirectionează - selectați pentru a transmite mesajul către alte contacte. Stergere - Alegeți pentru a sterge mesajul. Sterge toate - Alegeți pentru a sterge toate mesajele. Salvați numerele in agenda Telefonica - alege pentru a salva numărul expoctorului în agenda Telefonica
Centru de apel
Toate apelurile primite, efectuate, pierdute sunt stocate in istoricul apelurilor.
Istoricul apelurilor
- Accesati Meniu, apoi selectati Centru de Apel si Istoric apeluri.
- Aici avei posibilitatea sa examines un apel: ratat, selectat, de a primi si a sterge tot istoricul.
RO
Program
Alarma
- Accesati Meniu, apoi selectati Program si Alarma.
- Apasati pe Editare.
- Utilizati butoanele si si tastatura numerica pentru a seta: Stare, tamp, Temporizator oprire (in minute), repetarea, alarma tonul si tipul de alarmă.
Calendar
- Accesati Meniu, selecanti Program si Calendar.
Data curenta este afisata in partea de sus.
- Navigati prin utilizarea sagetilor sau si ,pentru a selecta data.
- Apasati pe Optiuni pentru a selecta urmatoarele:
Previzualizare - afisează evenimentele inregistrate la data selectata.
Vezi toate - afisaje toate evenimentele inregistrate.
Adauga un eveniment - selectați pentru a adăuga un eveniment si setati optiunile sale.
Sterge Eveniment - sterge un eveniment din calendar.
Accesaṭi pānă la data - introduci data Şi apāsati OK pentru a merge la o anumită data in calendar.
Astazi - mergeti la data curenta in calendar.
Sáptámána - afíseaza evenimentele enumerate in sáptámána curenta.
Calculator
- Accesati Menu, selecati Planificare si Calculator.
- Introduceți numărul適用and tastatura numerica, apasați aveți posibilitatea sa inserati o virgula.
- Prin intermediul sagetilor avei posibilitatea sa selectaigi functia (adunare, scadere, inmulire si impartire), si introducei numar.
- Apasati OK pentru a obtine rezultatul.

Bluetooth
- Accesati Meniu, selecanti Planificare si Bluetooth.
- Alimentare - activeaza saudezactiveaza dispositivul Bluetooth.
- Vizibilitatea - stabileste vizibilitatea dispositivului.
- Dispositivile mele - prezinta dispositive salvate si va permite sa adaugati altele nei in lista.
- Căutare automata - caută dispositive Bluetooth.
- Noua denomire - afiseazăși vă permite să edități numele telefonului in Bluetooth.
Multimedia
Radio FM
- Accesati Menue, apoi selecati Multimedia si Radio FM.
- Apasati Optiuni si selecanti urmatoarele:
Lista de canale - afisează lista de canale salvateși va permite să salvați noul.
Căutare manuală - acesta va permite sa introduciți frecventa radio Căutare automată - caută automat posturile de radioși le salvează.
Setári - activeaza sau deactiveaza radioul in fundal.
Inregistrare
Accesati Menue, apoi selectati Multimedia si Inregistrare. Selectati Optiuni pentru a crea un nou record, se va afisa lista de inregistrari Salvate si introduci setarile.
RO
Vizualizarea imaginilor
Accesati Menue, apoi selectati Multimedia 山 Vizualizarea imaginilor.
Aceasta va permite sa vizualizaati toate fotografiaile stocate pe dispositiv.
Manager de fişiere
Accesati Menue, apoi selectati Multimedia si Manager de fiiere. Acesta va permite sa vizualizaati toate fiierele stocate in memoria Telefonului Sau pe un card de memorie.
Setári
Setari SOS
Funcția SOS va permite sa trimiteți mesajeși apeluri din contactele salvate atunci cand este apâsat butonul SOS.
-
Accesati Menue, apoi selectati Setari si Setari SOS.
-
Statut - activeazā saudezactivezā SOS.
-
Numár SOS - acesta va permite sa introduciţi numere de Telefon la care informatiile vor fi trimise un SOS. Puteti introduce până la 5 numere.
-
Mesaj SOS Activare/Dezactivare - activeazã saudezactiveazãnotificarile SOS.
-
Mesaj SOS - continutul mesajului SOS
-
Sunet de avertizare - activeazã saudezactiveazã sirena atunci cand este activat SOS.
-
Când tîneṭi apāsat butonul SOS, Telefonul va trimite automat mesaje SMS la numerele introduse, ulterior va apela la rändul sau, pe fiecare dentre ele.
Optiuni telefon
In optiunile Telefonului aveți posibilitatea de setare datași ora curentă, limba, modul implicit intrarii de caractereși imagine de fundal.
Profile
Vă permite să selectați profilul current (silentios etc), precumși posibilitatea de a personaliza fiecare+dentre ele.
Apelare rapida
Vã permite sã setaṭi apelare rapida a unui contact din agenda tänând apãsata M1, M2 sau tastele 2-9.
Blocare functii
Acesta va permite sa blocati optiunile selectate in Telefon
Comenzi rapide
Vã permite sã setaṭi tastele de comenzi rapide

Setari de retea
Vã permite sa vizualizati o lista de retele disponible in zona curenta.
Setáride securitate
Vã permite sã setaṭi optiunile de securitate pentru SIM.si Telefon AUTOLOCK.
Revenirea la setarile din fabrica / Resetare Telefon
Restabileste setarile din fabrica. Parola necessities: 1234.
OVERMAX
You·unlimited
Vertis 1820 easy
BEVEZETÉS
Kedves Ügyfelünk!
Koszönjukbizalmat, hogy az Overmax markat valasztotta.
A kézebe adunk egy mindennapi használatra ideális terméket, a magas minõsegü anyagok és modern technologiaj megoldásoknak kõszönhetöen Biztosak vagyunk abban, hogy a gondos kivitelezésnek kõszönhetöenteljesiti az Ün elvarásait.
HU
Ha barmilyen eszrevetele vagy kerdese van a vasarolt termekrol,lepjen kapcsolatba velunk:
pomoctechniczna@overmax.pl
FONTOS INFORMÁCIÖK
Kerjuk, olvassa el ezt az utasitast a keszulek hasznalatbavetele elott, hogymegismerkedjen annak fungciooval es rendeltetesszeru hasznalatalval.
- Ne javitsa és ne Hajtson vegr modositásokat a keszüléken. Ezeket a tevekenységet csak szakserviz végeheti el.
- Ne üzemeltesse a keszüléket, ha ésrevesz barmilyen rajta barmilyen sérülést. Ne használja a keszüléket, ha az elkezd hibásan mücködni vagy viz érte, tulzottan felmelegszik, elszínezódes jelenik meg felpúposodik vagy szivárog az akkumulátora, valamint ha mas szokatlan jelensegek lépnek fel. Lepjen kapcsolatba a gyártó hivatalos markaszervizével.
HU
- Soha ne hagyja felügyelet nélkül a konnektorhoz csatlakoztatott keszüléket.
- Ez a keszülek nem jaték. Tartsa a teleportvalint annak tartozékait, gyermekek altal nem hozzaférheto helyen.
- A keszüléknek szobahomér sékleton kell muködnie. Ne használja a keszüléket alacsonyabb vagy magasabb hörmer sékleton. A keszüléket annak üzembehelyezese elott minimum 30 percig szobahomér sékleton kell tartani.
- Használja a keszüléket távol a hófforásoktól, magas hörmséklettól, forró felületektól, kozvetlen napsugárzástól, szikraforásoktól, nyílt lángtól, olajoktól valamint éles sarkoktól.
- Ne használja a készüléket gyulékony robbanásveszelyes vagy mergező anyagok környezetében.
- Ne hasznaljon vegyianyagokat a keszulek tisztitasahoz.
- A keszüléket ne használja mas célokra, mint amire azt tervezték.
- Tartson be a Telefon hasznalataval kapcsolaton minded eloirast, ezek kulönosen fontosak benzinkutakon, körházakban, repulóteren, repulogépen, jarmüvezetés kozben stb.
- Kizarolag eredeti, akkumulatorokat es tartozekokat hasznaljon.
- A hasznalt akkumulatorokat artalmatlanitani kell a helyi elorasoknak megfeleloen az erre kijelolt helyeken.
- Ne toltse a teleportfont alkumulator nelkul. Az akkumulator kivetele elott kapcsolja ki a teleportfont.
- A Telefon nem vizallo, szarazon kell azt tartani egész idő alatt.
- Ne üsse, ne dobja vagy ne ejtse el a teleportfont.
- Az emberi szervezet szamara megengedett sugarzaselnyelesi ertekeket a SAR tenyezo hatarozza meg. Ennek a megengedett erteke a nemzetakz i normaknak megfeleloen nem haladhatja meg a 2, W/kg-ot. A SAR maximalis erteke az alabbi keszulekre 0,482 W/kg es az megfelela GB 21288-2007szabvanynak.
A KÉSZÜLEK LEÍRÁSA

- LED.
- USB Port.
- M1 többfunckciós nyomógomb. Ennek funkciója a képernyón kerül kijelzésre a gomb folött és ez fugg az aktuális menukivalasztástól.
- Hivas nyomogomb.
- Nyilas a telegram hatlapjanak levetelhez.
- Csillag nyomógomb (®) - nyomja meg és tartsa nyomva a billentyüzet kinyitásahoz/lezárásahoz. Az üzenet szerkesztöben nyomja meg, a szimbólumok beszürásahoz.
- M2 tobbfunckcios nyomogomb. Ennek funkciója a képernyón kerül kijelzésre a gomb folott és ez fugg az aktuális menukivalasztástól.
- Hívas befejezes / kikapcsolás nyomógomb - nyomja meg és tartsa nyomva a Telefon be-vagy kikapcsolásához.
- Kettos kereszt nyomogomb (#) - nyomja meg és tartsa nyomva a
"nema üemmod" bekapcsolásához. Az üzenet szerkesztöben nyomja meg a billentyüzet mod megvaltoztatásához.
- Nulla nyomógomb (0) - nyomja meg és tartsa nyomva a „+“ jel kivalasztásahoz, FM rádio és lejátszásnál nyomja meg a szünethez vagy a zene lejátszáshoz.
- LED kapcsoló - tolja at a LED zseblampa bekapcsoláshoz.
- SOS nyomogomb.
HU
A membránikártya, a SIM kártya és az akkumulátor telepítésé
- Vegye le az akkumulator fedelét.
- Helyezze be a membrakiartyat a micro SD aljzatba.
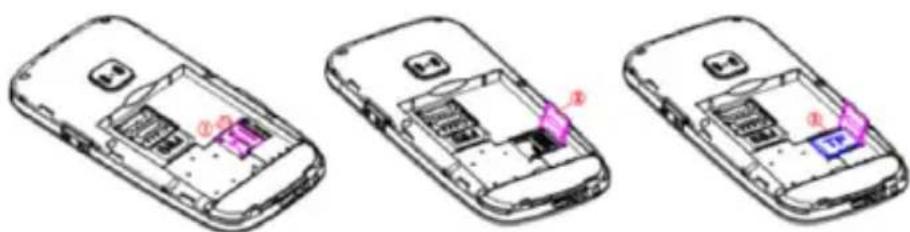
- Helyezze be a memóriakártyát a micro SD aljzatba.

- Tegye az akkumulatort az akkumulator kamraba.

- Tegye vissza az akkumulátor fedelet.
HU
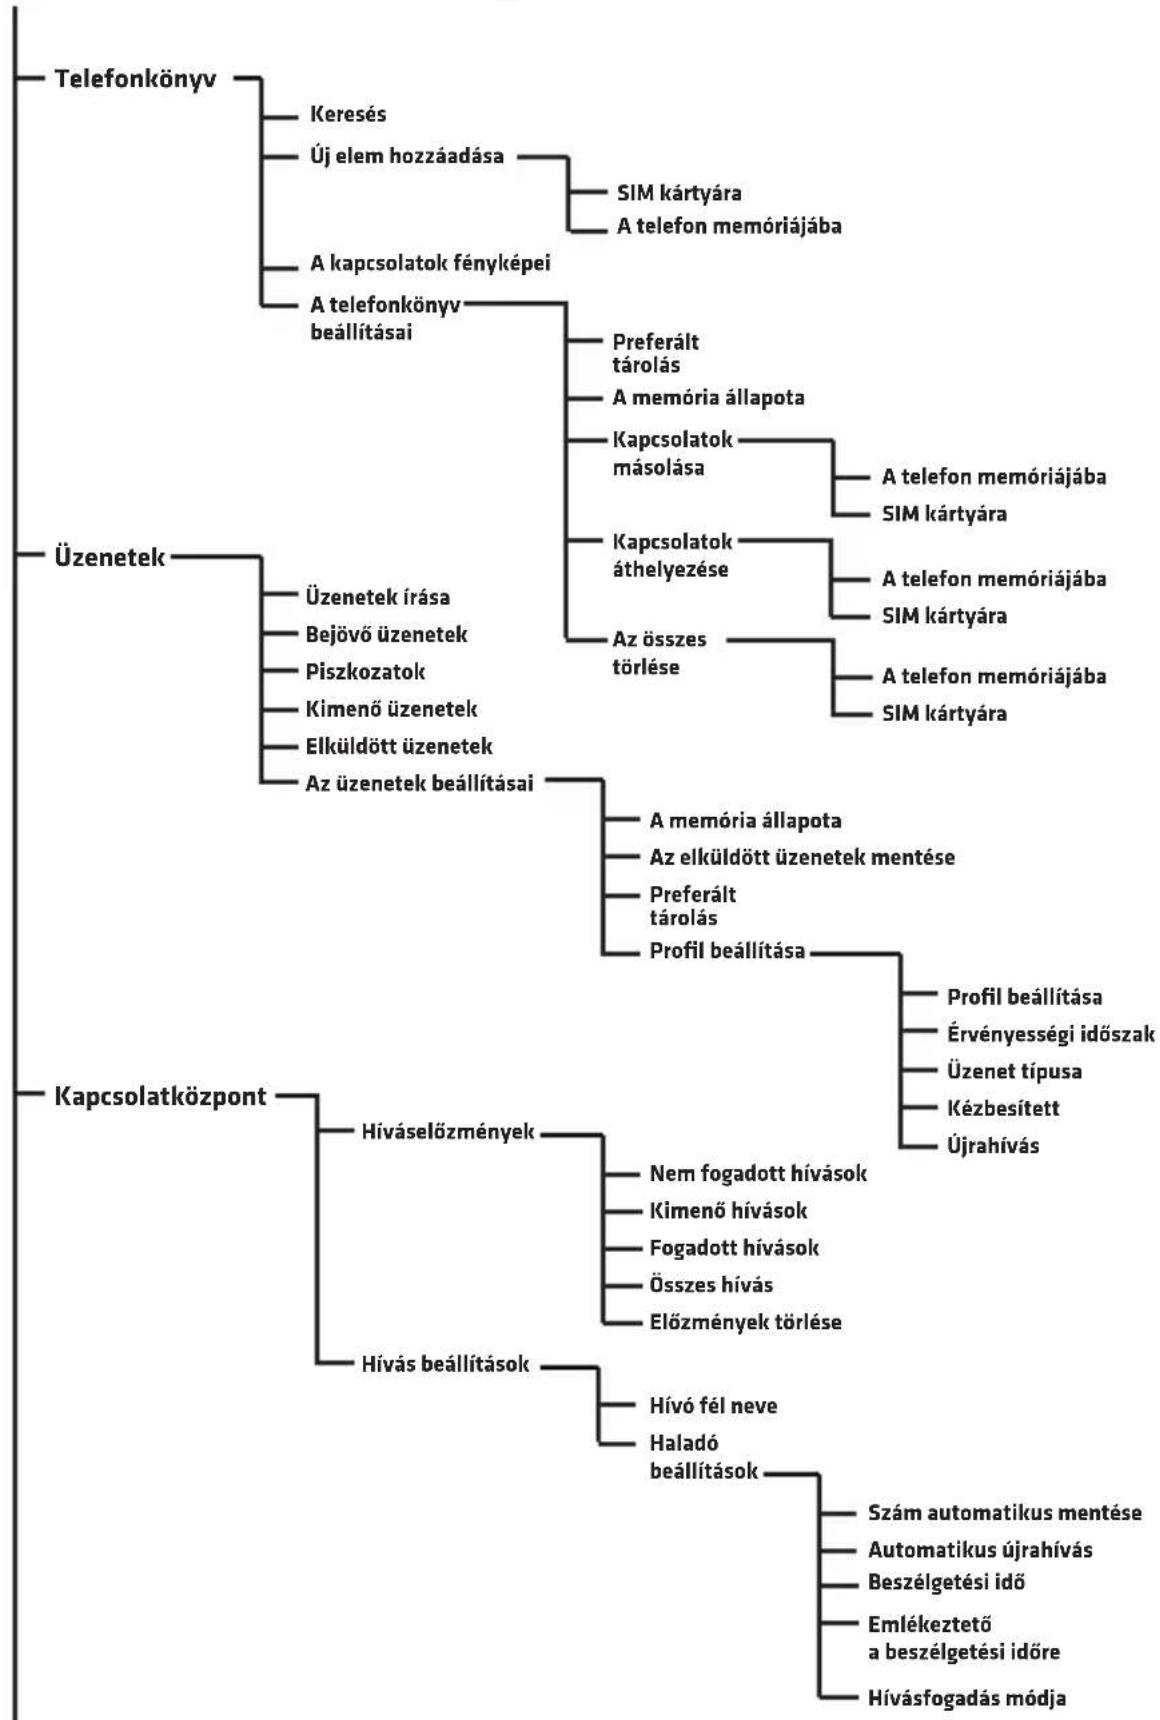
A TELEFON MENÜJE
A TELEFON ALAPVETÖ FUNKCIÖI
Kapcsolatok és hivások
Kapcsolatok hozzaadasa
- Lépjen be a Menu-be, valassza ki a Telefonkonyv poziciot es nyomja meg az OK-t.
- Jelolje ki az Uj elem hozzáadása -t és nyomja meg az OK-t.
- Valassza ki, hogy a kapcsolatot a Telefon memóriájába, vagy a SIM kártyára kell menteni.
- Irja be a kapcsolat nevét és telefonszámát. A billentyüzet modjának megvaltoztatasához nyomja meg a kettős keresztet
- Beallithat fenyképet is es csengohangot is a kapcsolathoz. Valasszaki az adott opció a csillag gomb és a kettós kereszt gomb segitségével belépve az Opciok-ba.
- Valassza ki az Opciok-at es Mentse vagy Törölje a kapcsolat megtartasa vagy törlese celjából.
- Nyomja meg a piros kagyló gombot , a foképernyohoz való yisszatéréshez
Figyelem: A + jel hozzaadásához a telefonszámné, tartsa nyomva a gombot.
Hivas
- A foképernyon hasznalja a numerikus billentyüzet et a telefonszám beirásához. A rosszul beirt számot törölheti a Törlés gombbal.
- Nyomja meg a , hogy letrejoojön a kapcsolat a beirt szammal.
- Nyomja meg a Megerszakit vagy a , gombot a kapcsolat megszakitásához.
HU
Telefonszám kivalasztása a kapcsolati listáról
- A foképernyön nyomja meg a M2 (kapcsolatok), a telefonkonyv megnyitáshoz.
- A kapcsolat kivalasztásahoz használja a gombokat vagy valassza ki a kezdöbetüt, hogy az azzal a betüvel kezdödkapcsolatokhoz lépjen.
- A kapcsolat kivalasztasa utan nyomja meg a , a kapcsolodas letrehozasahoz.
Uzenetek
Uzenetek kuldese es fogadasa.
- Lepjen be a Menübe, majd valassza ki az Üzenetek-et.
- Valassza ki az Üzenetek irasa-t.
- Irja meg az üzenetet. Nyomja meg a, a szimbólumok kivalasztásához. A megnyomása a bevitel mod megvaltoztatását eredményezi.
- Nyomja meg az Opciok-at, majd a Kuldes-t, az uzenet elkuldesehez.
Bejovuzenetek
- Lépjen be a Menuü-be, majd valassza ki az Üzenetek-et és a Beérkező üzenetek-et.
- Valassza ki az Opciok es Megtekintes-t az uzenet megtekintesehez. Lehetoseg van opciok kivalasztasara:
Válasz - valassza ki, ha valaszolni akar az üzenet feladójának
A feladó hivásá - valassza ki, ha fel akarja hivni az uzenet feladóját.
Továbbītas - valassza ki, ha továbbitani akarja az üzenetet mas kapcsolatoknak.
Törles - valassza ki, ha törölni akarja az uzenetet.
Összes törlése - valassza ki, ha az össze üzenetet törölni akarja.
Mentés a Telefonkönyvbe - valassza ki, ha az üzenet feladójának telefonszámát menteni akarja a Telefonkönyvbe
HU
Kapcsolatkozpont
Minden bejov, kimeno, es nem fogadott hivas elmentesre kerul a hivaselozmenyekben.
HivaseIozmenyek
- Lépjen be a Menu-be, majd valassza ki a Kapcsolatközpoint-ot és a Hiváselőzmény-t.
- Itt tutja megnezni hivasait: a nem fogadottakat, kimenoket, fogadottakat, mindet valamint torolni az elozmenyeket.
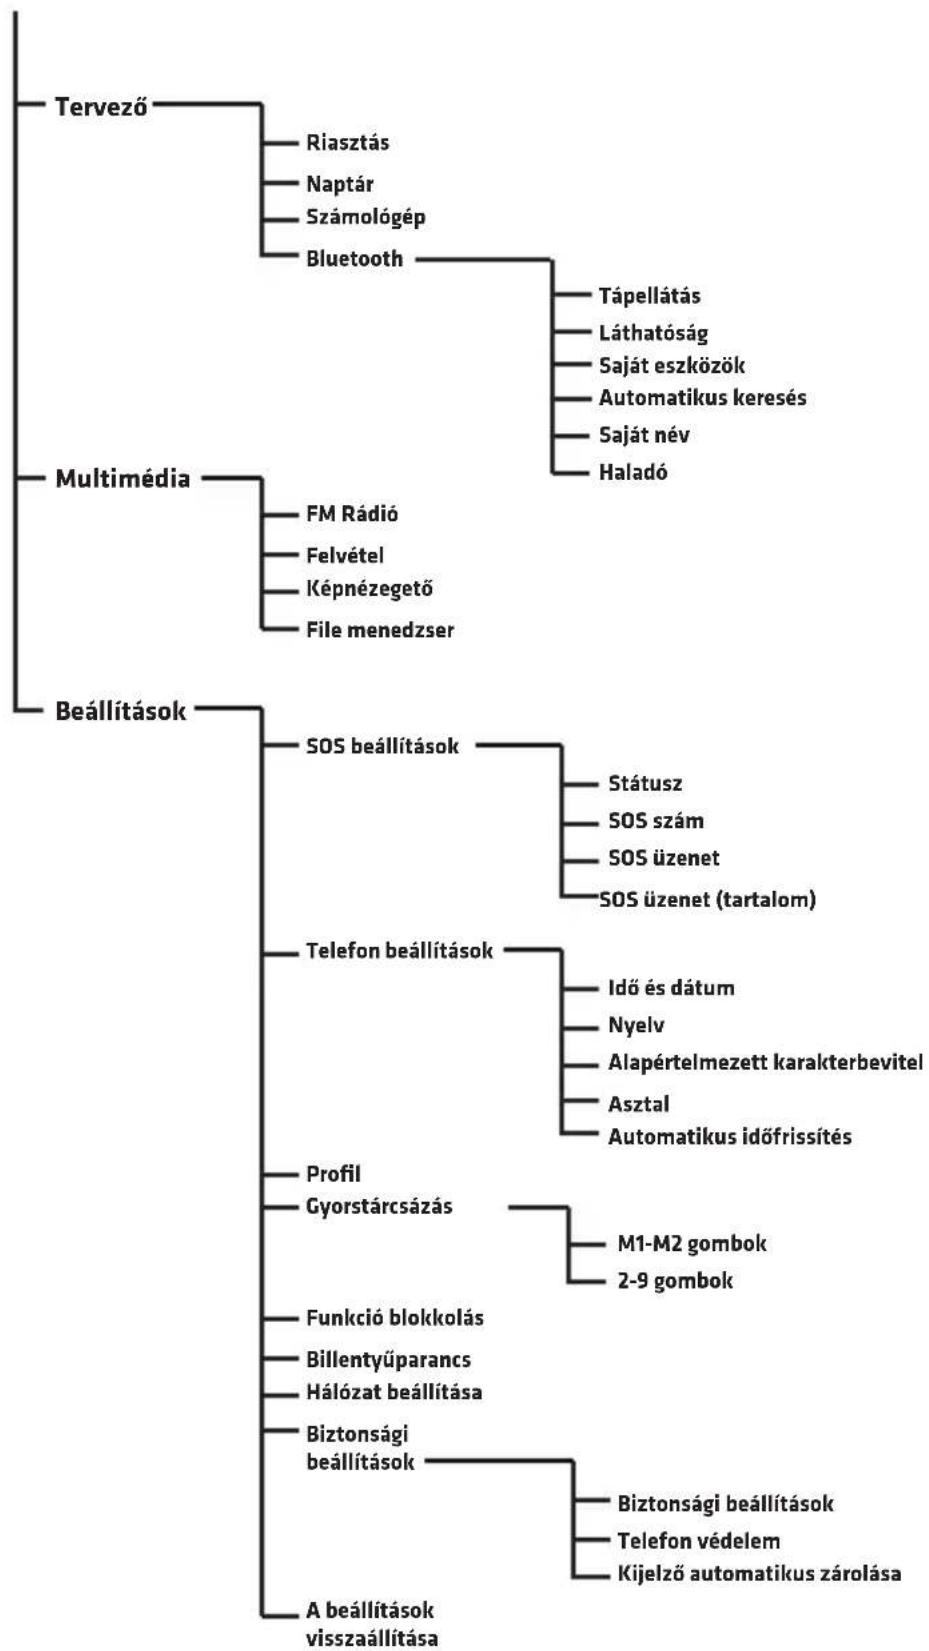
Tervezö
Riasztás
- Lépjen be a Menu-be, majd valassza ki a Tervezö-t és a Riasztás-t.
- Nyomja meg a Szerkesztés-t.
- Használja a és a gombokat valamint a numerikus billentyüzet et a beallitásokhoz: Statusz, idó, Szundi (percekben), Ismetlés, A riasztás hangja és típusa.
Naptár
-
Lépjen be a Menu-be, majd valassza ki a Tervező-t és a Naptár-t. Az aktuális datum legfelül jelenik meg.
-
Navigáljon a nyilakkal kivalasztásához.

valamint

es a

, a dátum
- Nyomja meg az Opciok gombot, a kovetkezok kivalasztasahoz:
Megtekintes - megjeleniti a kivalasztott napra mentett esemenyeket.
Mutasd mindet - megjeleniti az összes mentett esemenyt.
Esemeny hozzaadasa - valassza esemeny hozzaadasahoz es opcioinak beallitasahoz.
Esemeny trolse -turli az adott esemenyta Naptarbol.
Datumhoz ugras - irja be a datumot es nyomja meg az OK-t, hogy atmenjen a naptárban a konkrét datumhoz.
Ma - atmegy a naptárban az aktualis datumhoz.
Hét - megjeleniti az aktuális hétre mentett eseményeket.
Szamologep
- Lépjen be a Menu-be, majd valassza ki a Tervezö-t és a Számológep-et.
- irja be a szamokat a numerikus billentyuzettel, gombbal szurhat be vesszot.
- A nyilakkal valassza ki a muveletet (osszeadas, kivonas, eredmeny, szorzás és osztás) és irja be a számot.
- Nyomja meg az Ok-t az eredmenyhez.
Bluetooth
- Lépjen be a Menu-be, majd valassza ki a Tervezö-t és a Bluetooth-t.
- Tapellatas - be- vagy kikapcsolja a Bluetooth-t a keszüléken.
- Lathatosag - beallitja a keszulek lathatosagat.
- Sajat eszkozok - megmutatja a mentett eszkozoket es lehetovetezzi az ujak hozaadasat a listahoz.
- Automatikus kereses - megkeresi a Bluetooth-os eszkoczket.
- Sajat nev - megjeleniti és lehetővé teszi a Telefon nevenek szerkesztését a Bluetooth-on.
Multimédia
FM Rádio
- Lépjen be a Menu-be, majd valassza ki a Multimédia-t és az FM radió-t.
- Nyomja meg az Opciok-at, hovy kivalassza a kovetkezoket: Csatornalista - kijelzi a mentett csatornakat es lehetove teszi ujak hozzáadását.
Kézi keresés - lehetöve teszi a radió frekvencia beirását
Automaticus kereses - automatikusan megkeresi a radioallomasokat es elmenti azokat.
Beallitasok - be- vagy kikapcsolja a radió hattébeli muködesét.
HU
Felvétel
Lépjen be a Menu-be, majd valassza ki a Multimédia-t és a Fevétel-t. Valassza ki az Opciok-at, uy felvétel letrehozasához, a mentett felvetelek listajanak megjelenítéséhez és a beallitásokhoz.
Képnézegeto
Lépjen be a Menuü-be, majd valassza ki a Multimédia-t és a Képnézegetö-t. Az eszköz lehetöve teszi a készüléken levö összes kép megtekintését.
File menedzser
Lepjen be a Menu-be, majd valassza ki a Multimédia-tés a File menedzser-t. Az eszköz lehetöve teszi a Telefon memóriájába vagy a behelyezett memóriakártyára mentett összes file megtekintését.
Beallitasok
SOS beallitas
Az SOS funkció lehetové teszi üzenet kuldését valamint a kivalasztott kapcsolat hivasat, ha az SOS gomb megnyomára kerül.
- Lépjen be a Menu-be, majd valassza a Beallitások-at és az SOS beallitások-at.
- Statusz - be-vagy kikapcsolja az SOS funkciot.
- SOS szám – lehetővéteszi a telefonszám beirását, ahová el lesz küldve az SOS informácio. Be lehet irni 5 telefonszámot.
- SOS üzenet Be-/Kikapcsolás - be- vagy kikapcsolja SOS értesítés
- SOS Üzenet - az SOS üzenet szövege
- Figyelmeztetohang - be- vagy kikapcsolja a szirenahangot az SOS aktivalasa utan.
- Amikor nyomva tartja az SOS gombot, a Telefon automatikusan elküldi az SMS üzeneteket a beirt számokra, majd sorban felhivja mindet ezek kozül.
Telefon beallitasok
A Telefon beallitásokban beallithatja az aktuális datumot és idöt, a nyelvet, az alapértelmezett karakter beviteli modot és a hattárköpet
Profil
Kivalaszthatja az aktualis profilt (altalanos, csendes stb.) valamint alkalmazhat opciot mindegyikhez.
Gyorshivas
Beallithat gyors kapcsolat kivalasztast az M1, M2 vagy a 2-9 nyomogombok nyomvatartasaval.
Funkcioblokolas
Blokkolhatja a Telefon kivalasztott funkcioit
Billentyuparancsok
Beallithatja a billentyuparancsokat

Hálozati beallitások
Beallithatja halozati opciokat.
Biztonsagi beallitasok
Beállithatja a SIM kártya, a Telefon védelmet valamint az automatikus zárolás.
Cyari beallitasok visszaallitasa
Visszaallnak a gyari beallitasok. Szukseges jelszo: 1234.
OVERMAX
You·unlimited
Vertis 1820 easy
EINLEITUNG
Sehr geehrte Kunden!
Wir bedanken uns für Ihr Vertrauen und Auswahl der Marke Overmax.
Wir geben zu ihren Handen ein Produkt über, das dank hochwertigen Materialien und innovativen technologischen Lösungen perfect für den täglichen Gebrauch ist.
Wir sind sicher, dass dank einer sehr sorgfältigen Ausführung unser Produkt ihre Anforderungen erfüllt.
Falls Bemerkungen oder Fragen zum gekauften Produkt, erhmen Sie mit uns Kontakt auf:
pomoctechniczna@overmax.pl
WICHTIGE INFORMATIONEN
Bitte, die vorliegende Bedienungsanleitung vor dem Gebrauch des Gerätes durchzulesen, um seine Funktionen kennen zu lernen und es bestimmungsgemäß zu verwenden.
- Das Gerätarf nicht repariert oder modifiziert werden. Diese Tätigkeiten dürfen nur durch ein autorisiertes Service durchgeführt werden.
- Betätigten Sie das Gerät nicht, wenn Sie die Beschädigungen bemerkten. Das Gerät soll nicht verwendet werden, wenn es mangelhaft funktioniert, fallen gelassen oder eingeweicht wurde, wenn es sich übermög erwartt es Verfärbungen, Wölbungen oder Batterie-Leckagen erschinen, wenn es die unnatürlichen Gerausche macht, unnatürliche Gerüche hat oder, wenn
DE
andere ungewöhnlichen Erscheinungen vorkommen. Nehmen Sie Kontakt mit dem autorisierten Service des Herstellers auf.
- Lassen Sie das Gerät nie unbeaufsichtigt, wenn es an die Stromversorgung angeschlossen ist.
- Dieses Gerät ist kein Spielzeug. Bewahren Sie das Handy und die Accessoires außerhalb der Reichweite von Kindern auf.
- Das Gerät soll bei einer Raumtemperatur arbeiten. Es darf nicht bei einer niedrigen oder hohen Temperatur betätigter werden. Vor der Betätigung soll es in Raumtemperatur für mindestens 30 Minuten gelassen werden.
- Das Gerät soll welt von den Wärmequellen, hohen Temperaturen,heiten Flächen, direkter Sonnenstrahlung, Funkenquellen, offenem Feuer, Ölen und scharfen Kanten aufbewährt werden.
- Benutzen Sie das Gerät nicht in der Nähe von brennbaren, explosiven oder toxischen Stoffen.
- Verwenden Sie keine Chemikalien zur Reinigung des Gerätes.
- Das Gerätarf nicht für die anderen Zwecke als die bestimmungsgemäß Verwendung benutzt werden.
- Beachten Sie alle mit der Verwendung des Handys verbundenen Vorschriften. Dies betriffyersbesondere die Tankstellen, Krankenhauser, Flughäfen, Flugzeuge, Führer der Fahrzeuge usw.
- Benutzen Sie nur die originellen Batterien und Accessoires.
- Die Altbatterien sollen gemäßörtlich geltenden Richtlinien, an den darauf vorgesehenen Stellen entsorgt werden.
- Laden Sie das Handy nicht ohne Batterien. Vor dem Herausnahmen der Batterie soll das Handy ausgeschlossen werden.
- Das Handy ist nicht wasserbeständig, es soll ganze Zeit trocken sein.
- Das Handyarf nicht gestoßen, geworfen oder gelassen werden.
- Die zulässigen Werte für Strahlungsbelastung des menschlichen Körpers werden mit einem SAR-Wert bestimmt. Der zulässige Wert darf nicht nach den internationalen Normen 2,0 W/kg überschreiben. Der maximale SAR-Wert für vorliegenden Gerät beträgt 0,482 W/kg und entspricht der Norm GB 21288-2007.
BESCHREIBUNG DES GERÄTES
DE
-
LED-Diode.
-
USB-Port
-
Multifunktionstaste M1. Ihr Funktion wird auf dem Bildschirm über die Taste beschreiben. Sie ist entsprechlich und hangt von der aktuellen Menuauswahl ab.
-
Anrufen-Taste.
-
Öffnung für Abnehmen des hinteren Deckels vom Handy.
-
Star-Taste (N) - drücken und halten Sie die Taste, um die Tastatur zusperren/entsperren. Im Nachrichten-Editor drücken Sie diese Taste, um ein Symbol einzufugen.
-
Multifunktionstaste M2. Ihr Funktion wird auf dem Bildschirm über die Taste beschreiben. Sie ist entsprechlich und hangt von der aktuellen Menüauswahl ab.
-
Taste für die Beendigung eines Geschäfts/Power-Taste - drücken und halten Sie die Taste, um das Handy einzuschalten oder auszuschalten.
-
Rauter-Taste (#) - drücken und halten Sie die Taste, um einen „leisen Modus" einzuschalten. Im Nachrichten-Editor drücken Sie die Taste, um einen Tastatur-Modus zuändern.
- Null-Taste (0) - drücken und halten Sie die Taste, um ein Zeichen „+” zu wahren. Im FM-Radio und Player drücken Sie diese Taste, um den Klang zu pausieren oder wiederzugeben.
- LED-Schalter - schieben Sie den Schalter, um die LED-Taschenlampe zu aktivieren.
- SOS-Taste.
DE
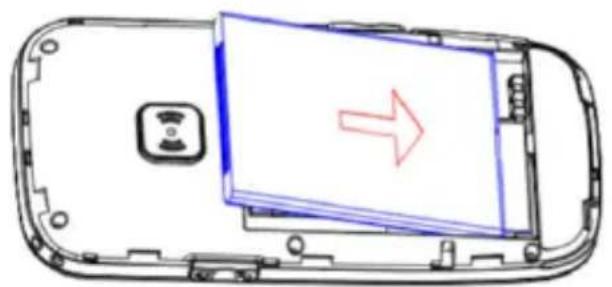
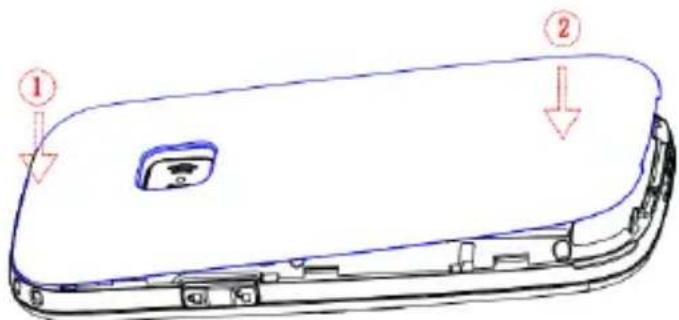
Installieren der Speicherkarte, SIM-Karte und Batterie
- Nehmen Sie den Deckel der Batterie ab
- Stecken Sie die Speicherkarte in das microSD-Kartenträgerauswurfloch.
- Stecken Sie die SIM-Karte in das SIM-Kartentragerauswurfloch. Beachten Sie ein richtiges Platzieren der Karte.

- Legen Sie die Batterie in das Batteriefach ein.
DE
- Bringen Sie den Deckel des Batteriefachs an.
DE
HANDY-MENU
DE
HANDY-GRUNDFUNKTIONEN
Kontakte und Anruf
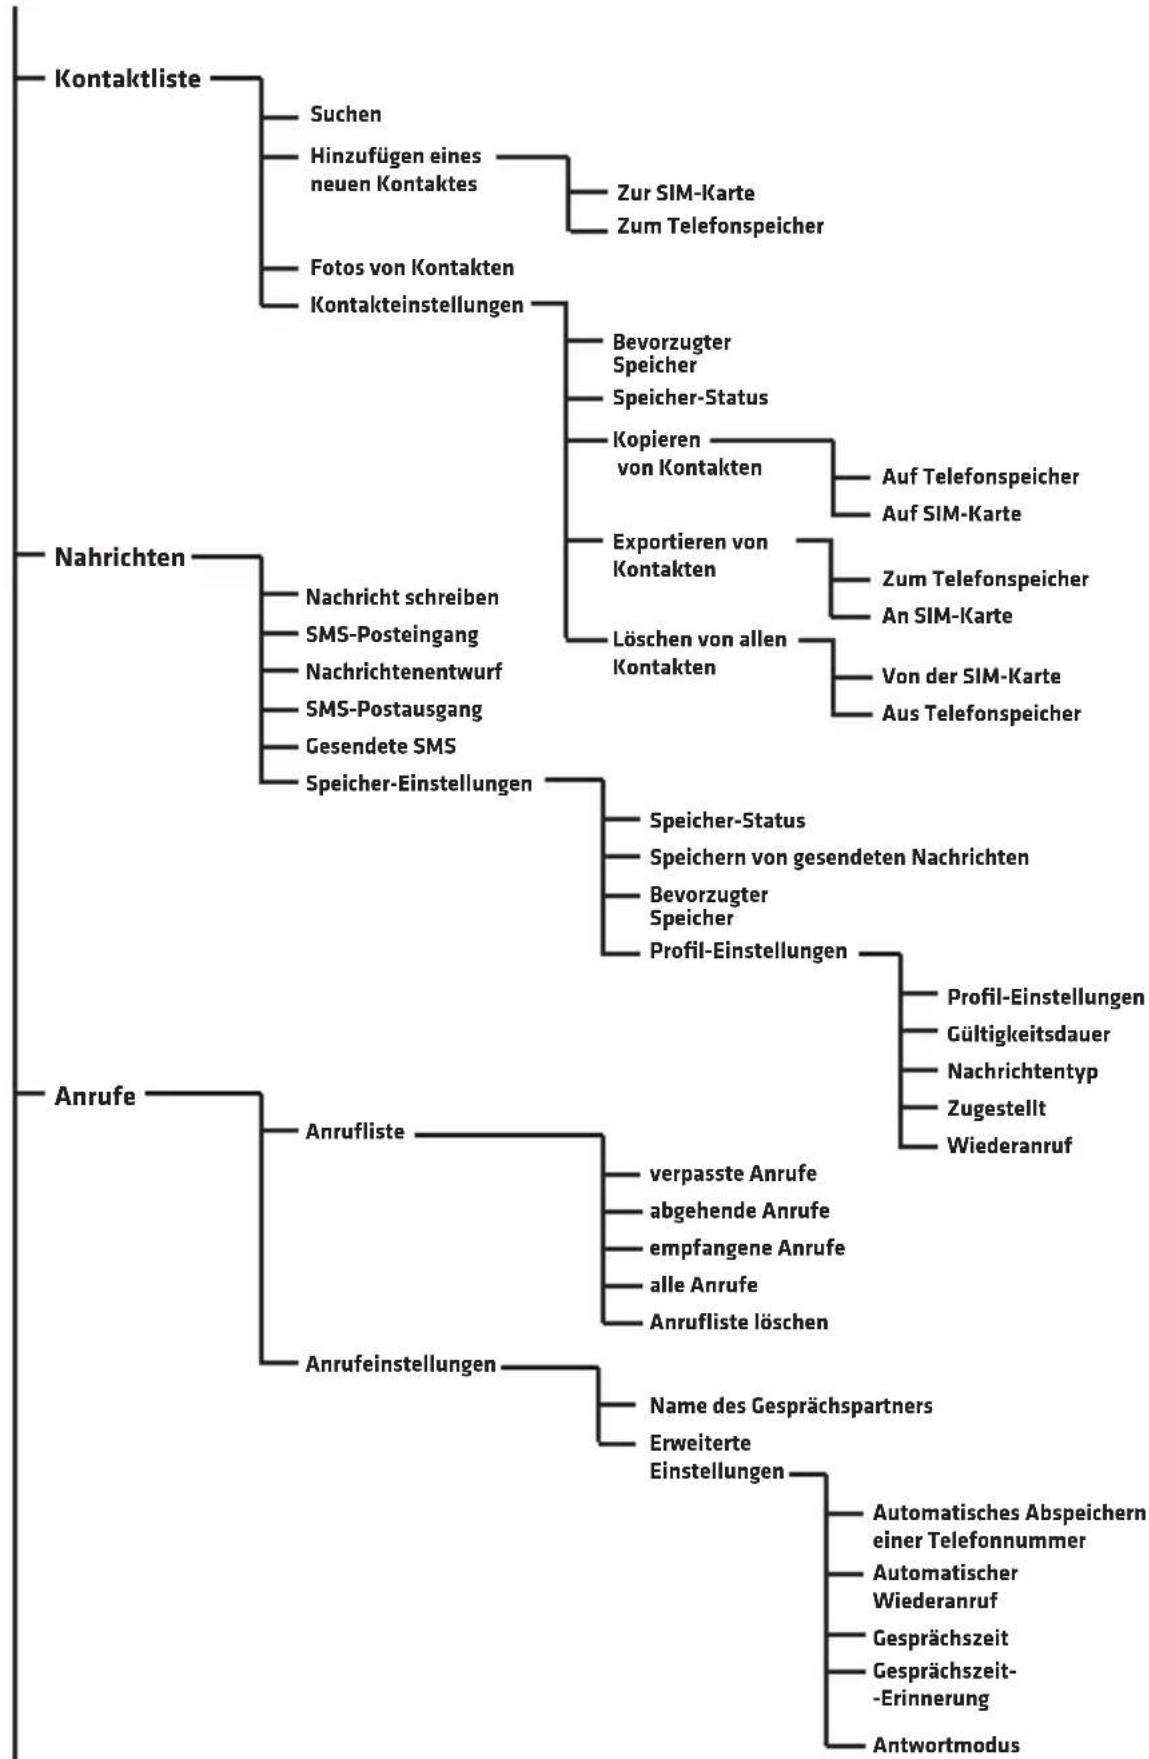
Hinzufugen von Kontakten
- Wahlen Sie das Menu und Kontaktliste aus dann drucken Sie auf OK.
- Wahlen Sie Neuen Kontakt hinzufugen aus und drucken Sie auf OK.
- Wahlen Sie, ob den Kontakt auf SIM-Karte oder im Telefonspeicher gespeichert werden soll.
- Geben Sie die Kontakname und Telefonnummer ein. Um den Tastatur-Modus zuändern, drücken Sie auf
- Sie können auch ein Foto des Kontaktes und Klingelton auswahlen. Wahlen Sie eine bestimmte Option mithilfe der Stern- und Rauter-Taste aus und drücken Sie auf Optionen.
- Wahlen Sie Optionen und Speichern oder Annullieren aus, um einen Kontakt zu speichern oder zu annullieren.
- Tippen Sie auf die Taste des roten Hörers , um zum Hauptmenü des Bildschirms zurückzukehren.
Achtung: Um eine Vorwahl + vor der Telefonnummer hinzufugen, halten Sie die Taste
Anruf
- Benutzen Sie die Zifferntastatur auf dem Hauptbildschirm, um die Telefonnummer einzugeben. Eine falsch eingegebene Ziffer kann mithilfe der Taste Löschen gelöscht werden.
- Tippen Sie auf, um die eingebene Telefonnummer anzurufen.
- Tippen Sie auf Unterbrechen oder , um einen Anruf zu beenden.
DE
Auswahl der Telefonnummer aus der Kontaktliste
- Auf dem Hauptbildschirm drücken Sie M2 (Kontakte), um ein Telefonbuch zu öffnen.
- Um einen Kontakt aus der Kontaktliste auszuwahlen, benutzen Sie die Tasten oder wahren Sie einen ersten Buchstabe der Name, um zu den gewündsten Kontakten zu gehen.
- Nach der Auswahl eines Kontakts drücken Sie auf, für einen Anruf.
Nachrichten
Schreiben und Senden von Nachrichten.
-
Wahlen Sie das Menu und Nachrichten aus.
-
Wahlen Sie Schreiben einer Nachricht aus.
-
Schreiben Sie eine Nachricht. Drücken Sie auf Symbol auszuwahlen. Das Drucken auf Änderung des Eingabemodus.

verursacht eine
- Drücken Sie auf Optionen, dann Senden an, um eine Nachricht zu senden.
Posteingang
- Wahlen Sie das Menu, dann Nachrichten und Posteingang aus.
- Wahlen Sie Optionen und Ansicht, um die Nachricht anzuzeigen.
Sie konnen auch folgende Optionen auswahlen:
Antwerten - wahlen Sie diese Option aus, um auf die Nachricht des Absenders zu Antwerten
Anruf an Absender der Nachricht - wahlen Sie diese Option aus, um den Absender der Nachricht anzurufen.
Weiterleiten – wahlen Sie diese Option aus, um die bestimmte Nachricht an andere Kontakte weiterzuleiten.
Löschen - wahlen Sie diese Option aus, um eine Nachricht zu Löschen.
Alles loschen - wahlen Sie diese Option aus, um eine Nachrichten zu loschen.
Zu den Kontakten hinzufugen - wahlen Sie diese Option aus, um die Telefonnummer von Absender einer Nachricht im Telefonbuch zu speichem.
Anrufe
Alle empfangenen, angehenden und verpassten Anrufe werden in der Anrufliste gespeichert.
Anrufiste
- Wahlen Sie das Menu, dann Anrufe und Anrufliste aus
- Hier konnen Sie die Anrufe durchsehen: verpasste, angehende, empfangene, alle und die Anrufliste loschen.
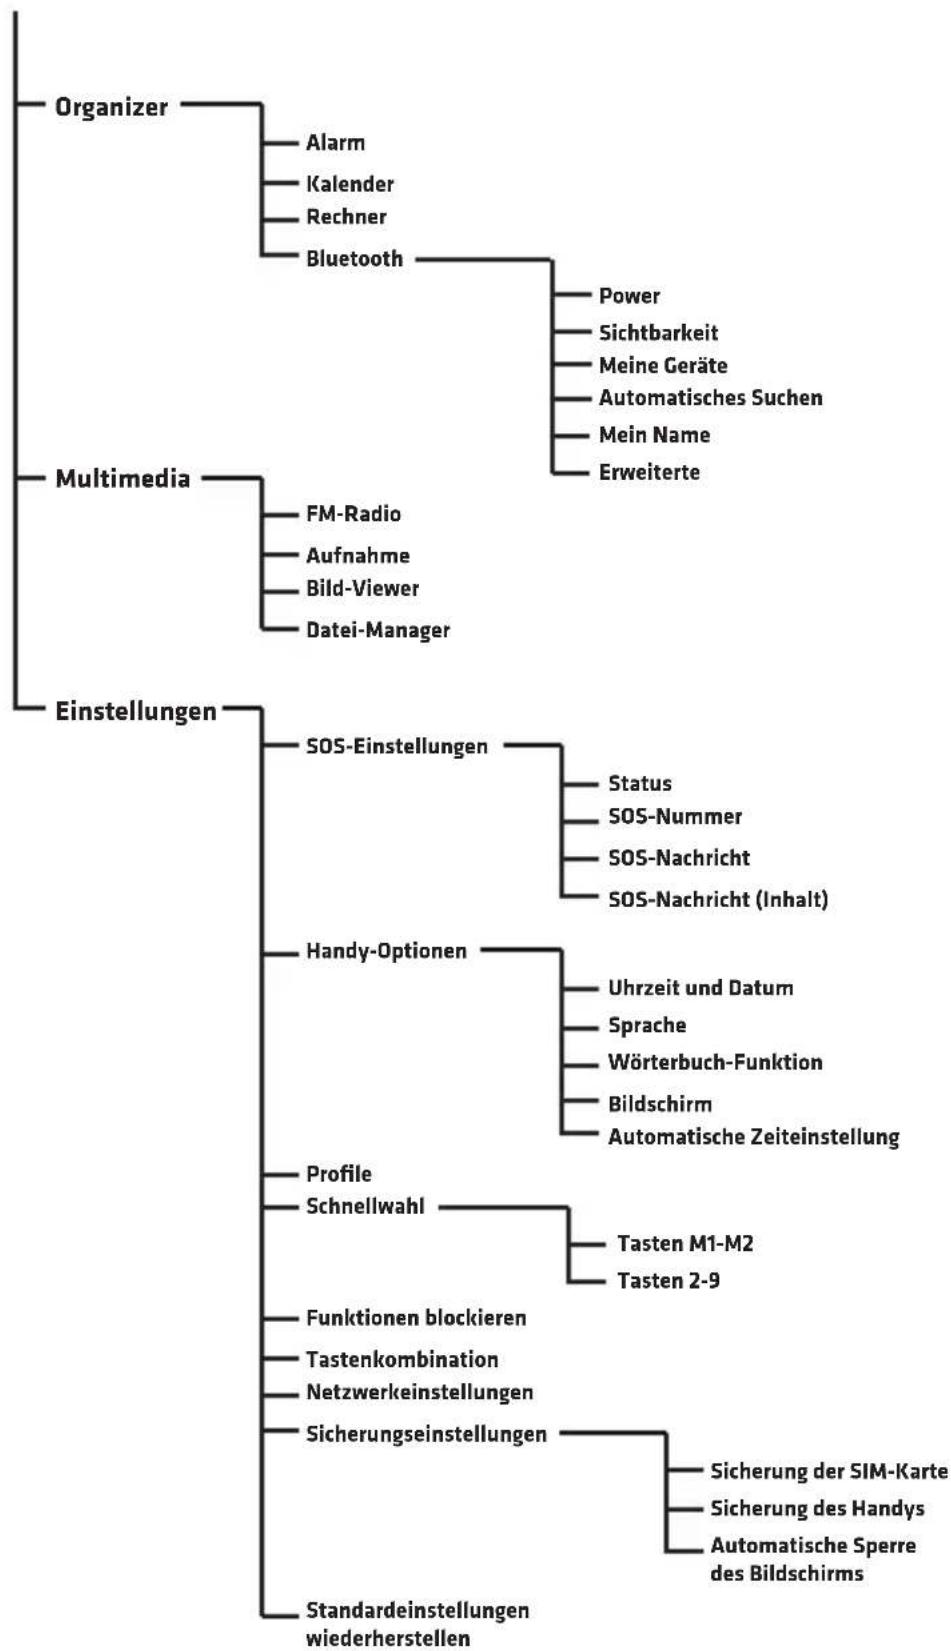
Organizer
Alarm
- Wahlen Sie das Menu, dann Organizer und Alarm aus.
- Drucken Sie auf Bearbeiten.
- Benutzen Sie die Tasten und und die Zifferntastatur, um einzustellen: Status, Uhrzeit, Schlafchen-Timer (in Minutes), Wiederholung, Alarmton und Alarmtyp.
Kalender
- Wahlen Sie das Menu, dann Organizer und Kalender aus. Aktuelles Datum wird ganz oben angezeigt.
- Navigieren Sie mithilfe der Pfeile und ,pum das Datum auszuwahlen..
- Apasati pe Optiuni pentru a selecta urmatoarele: Ansicht - zeigt die Ereignisse, die an dem gewünschten Tag gespeichert werden.
Sehe alles -Zeigt alle gespeicherten Ereignisse.
Ereignis hinzufugen – wahlen Sie diese Option aus, um ein Ereignis hinzufugen und seine Optionen einzustellen.
Ereignis loschen - entfernt ein ausgewähltes Ereignis aus dem Kalender. Zum Datum - geben Sie das Datum ein und drücken Sie auf Ok, um zu einem bestimmten Datum im Kalender zu gehen.
Heute -geht zu einem aktuellen Datum im Kalender.
Woche - zeigt die an dem bestimmten Tag gespeicherten Ereignisse an.
DE
Rechner
- Wahlen Sie das Menu, dann Organizer und Rechner aus.
- Geben Sie die Ziffern mithilfe der Zifferntastatur. Mithilfe der Taste konnen Sie ein Komma eintragen.
- Mithilfe der Pfeile wahren Sie die Tätigkeit (Zusammenzahlen, Subtraktion, Ergebnis, Vervielfachung und Teilung) und geben Sie die Ziffer an.
- Drucken Sie auf Ok, um das Ergebnis zu erhalten.
Bluetooth
- Wahlen Sie das Menu, dann Organizer und Bluetooth aus.
- Power - schaltet Bluetooth im Gerät ein oder aus.
- Sichtbarkeit - stellt die Sichtbarkeit des Gerätes ein.
- Meine Geräte - zeigt die gespeicherten Geräte und ermöglicht, die neuen Geräte zur Listehinzufugen.
- Automatisches Suchen -sucht nach Bluetooth-Geräten.
- Meine Name - anzeigt und ermöglicht die Name des Handy in Bluetooth zu bearbeiten.
Multimedia
FM-Radio
- Wahlen Sie das Menu, dann Multimedia und FM-Radio aus.
- Drucken Sie auf Optionen, wahlen Sie folgende aus:
Kanalliste - zeigt die Liste von gespeicherten Kanälen und erhögt neue Kanäle zu speichern.
Manuelles Suchen - erfolglicht eine Funkfrequenz einzustellen
Automatisches Suchen - sicht automatisch und speichert die Rundfunkstationen.
Einstellungen - Ein-/Ausschalten vom Radio im Hintergrund.
Aufnehmen
Wahlen Sie das Menu, dann Multimedia und Aufnahmen aus. Wahlen Sie Optionen aus, um eine neue Aufzeichnung zu speichern, eine Liste der gespeicherten Aufnahmen anzuzeigen und die Einstellungen auszuwahlen.
Bild-Viewer
Wahlen Sie das Menu, dann Multimedia und Bild-Viewer aus. Das Werkzeug ermöglich, alle gespeicherten Fotos durchzuschauen.
Dateimanager
Wahlen Sie das Menu, dann Multimedia und Dateimanager aus. Das Werkzeug erhögt, alle Dateien durchzusehen, die im Telefonspeicher oder auf der SIM-Karte gespeichert werden.
Einstellungen
SOS-Einstellungen
Die SOS-Funktion erhögt, die Nachrichten zu senden und die gespeicherten Kontakte anzurufen, wenn die SOS-Taste gedrückt wird.
- Wahlen Sie das Menu, dann Einstellungen und SOS-Einstellungen aus
- Status - Ein-/Ausschalten der SOS-Funktion.
- SOS-Nummer - erfolgt die Telefonnummer einzuspeichern, an die eine SOS-Nachricht gesendet wird. Man kann bis zu 5 Kontakten speichern.
- Ein-/Ausschalten von SOS-Nachrichten-Ein-/oder Ausschalten von SOS-Nachrichten.
- SOS-Nachricht - Inhalt von SOS-Nachricht
- Warnsignal - Ein-/ oder Ausschalten eines Sirentons nach der Aktivierung eines Notrufs.
- Wenn Sie die SOS-Taste halten, sendet das Handy automatisch einen SMS an die gespeicherten Kontakte und ruft der Reihe nach jedem Kontakt an.
DE
Handy-Funktionen
Die Handyfunktionen erfolgslichkeiten aktuelles Datum, Uhrzeit, Sprache, voreingestellt den Zeicheneingabe-Modus und Hintergrundbild einzustellen.
Profile
Ermöglicht, ein aktuelles Profil (allgemeines, leises Profil usw.) auszuwahlen und eine Option an jeder Profil anzupassen.
Schnellwahltasten
Ermöglicht eine Schnellwahl von Kontakten durch Halten einer Taste M1, M2 oder Tasten 2-9 einzustellen.
Sperre der Funktionen
Ermöglicht, die ausgewählten Funktionen im Handy zu sperren.
Tastaturkurzbefehle
Ermöglicht die Kurzbefehle für die Tasten

einzustellen.
Netzwerkeinstellungen
Ermöglicht, die Netzwerk Funktionen einzustellen.
Sicherheitsinstellungen
Ermöglicht die Sicherheitsoptionen für SIM-Karte, Handy und automatische Blockade einzustellen.
Standardstellungen wiederherstellen
Stellt die Standardeinstellungen wieder her: erforderliches Password: 1234.
BLG
BRANDLINE GROUP
BrandLine Group Sp. zo.o.
ul. Adama Kreglewskiego 1
61-248 Poznan
www.overmax.eu
WARRANTY CARD
KARTAGWARANCYINA
图:
SMT
Warranty conditions:
- The Overmax brand with its registered office at A.Kreglewskiego 1, 61-248 Poznan, Poland guarantees that the equipment is operational in accordance with the technical-operating conditions described in the manual.
- The warranty is granted for a 24 months period from the date of sale. If the Buyer is a company (VAT invoice), the warranty is granted for a 12-month period.
- The warranty is valid in the country of purchase.
- Revealed manufacturing defects shall be removed during the warranty period free of charge by the Authorised Manufacturer Service.
- Any defects or damages discovered and reported within the warranty period will be removed free of charge within 21 working days, but in justifiable cases (for instance, spare parts must be brought from abroad) this period may be extended by another 30 days.
- Any defects or damages to the equipment should be reported and delivered to the service site immediately after being revealed.
- Warranty for LCD displays, touch screens, and batteries is 6 months from the date of purchase. In case of displays of a diagonal ranging from 2.5" to 10.1", the presence of up to 3 incorrect pixels (white, black, green, red or blue) is acceptable.
-
- Accessories included with the devices (e.g. Chargers, remote controls, keyboards, mice, earphones, cables) are under 3 month warranty from the date of purchase.
- In case of an unjustified complaint (complaint of efficient equipment or the mechanically damaged one), the person who reports the complaint will be charged for transportation cost.
- The customer is entitled to replacement of the equipment to another with the same or similar specifications if the service determines that the removal of defects is not possible.
- The service is not responsible for any loss of data.
- The warranty will be respected only if the customer attaches (to the faulty device) a damage description, all of the accessories received at the moment of the equipment purchase, and proof of purchase containing the date of sale.
- The warranty does not cover: mechanical, electrical, thermal or intentional damages and defects caused by them, as well as any defects and disadvantages arising from the use of the device that do not affect its proper operation, damages resulted from improper usage or non-compliance of the instructions described in the manual. This also applies to signal fading due to the distance from the transmitter, poor antenna installation and damages of the equipment, due to fact, that it has not been delivered to the service in a safe container.
- The Service may refuse to repair products in case of damage to the warranty seal or any traces of unauthorised repair.
- If the fault is not covered by the manufacturer's warranty, paid repair may be offered by the Service.
- All reclaimed items are checked by the Authorised Service for correct operation.
- Neither BrandLine Group Sp. z o. o. nor the Authorised Service is responsible for any damages or losses arising from the inability to use the device being repaired.
- The equipment that has not been collected from the service site within 3 months can be charged with storage cost appropriate to the storage time.
- Delivery of the equipment which is incomplete or lacks of proper packaging, is equivalent to the failure of the warranty conditions by the Buyer, and it can provide a basis to refusal of the repair or extension of the repair period.
- In case of sending a product for repair, when no defect is found, the expenses for the expert assessment shall be fully borne by the consumer.
- If a product (sent for repair) works properly, and the reason of its invalid operation is a low battery, the consumer shall bear the cost of the expert assessment.
- The product warranty shall not exclude, limit or suspend the Customer rights resulting from the guarantee.
Warunki gwarancji:
- Marka Overmax z siedzibw Poznaniu przy ul.A.Kreglewskiego 1, gwarantuje sprawne dziafanie sprzetu zgodnie z warunkami techniczno-eksplatoacyjmyi opisanymi winstrukci obstugi.
- Gwarancja jest udzielana na okres 24 miesiecy, liczac od daty sprezedazy. W przypadku zakupu urzadzenia na fime (faktura VAT) gwarancja udzielana jest na okres 12 miesiecy.
- Gwarancja obwiuzjuew kraju, wktorym dokanano zakupu.
- Ujawnione wady beda usuniete bezpatisfnie wokresie gwarancji przyez Autoryzowany Serwis Producenta.
- W przypadku zakupu towardo przez Internet, Klienr (reldamujacy) jest zobowiagany do zgloszenia reklamacji przez strone internetowa www.overmax.eu i dostarczenia uszkodzonego sprzetu do Autoryzowanego Serwisu Producenta na wlasny koszt. W innym przypadku dokonje zgloszenia i dostarcza produkt do punktu sprzedazy, w ktorym dokonat zakupu. Informacja na temat naprawy jest udzielana w miejscu zfozenia reklamacji.
- Ewertualne wady lub uzzkodzenia sprzetu ujawnione i zgloszone w okresie gwarancji beda usuniete bezpatisfnie w terminie do 21 dni roboczych, lecz w uzasdnionych przypadkach (sprowadzenia czeci zamiennych z zagranicy) terminen moze ulec przyzheniu o kolejne 30 dni.
- Wady lub uszkodzenia sprzetu powinny byc zgloszone, a wadliwy sprzet dostarczony do serwisu, niedzwocnie po ujawnieniu sie ich.
- Gwarancja dla wyświetlaczy LCD, ekranów dotykowych oraz akumulatorów wynosi 6 miesiecy od daty zakupu. W wyświetlaczach od 2,5" do 10,1" dopuszczalne jest wystepowanie do 3 będnych pikseli (biały, czärene, zielone, czerwone, niedbieskie).
- Gwarancja dla akcesiorow dozaczonych do urzadzen (np. tadowarki, piloty, klawiatury, myszki, stuchawki, przywody) wynosi 3 miesiace od daty zakupu.
- W przypadku niedrasdnionej reklamacji (reklamacja sprzegtu sprawnego lub uszkodzonego mechaniznie) zgfaszajacy reklamacje zostanie obciazony kosztami transportu.
- Klientow przyszugaje praw do wymiany sprzetu na inny, posiadajcy te same lub zblzone parametry technicne w przypadku, gdy serwis uzna, ze usuniecie wady nie jest moziwe.
- Serwis nie ponosi odpwiedzialnosci za utrate danych.
- Gwarancja bedzie respektowana Jedynie w przypadku dofaczenia do reklamowanego urzadzenia opisu uszkodzenia, wsztkich akcesoriow, ktore klien toryma podczas kopna urzadzenia oraz dowodu zakupu zawierajacego dat sprzedazy.
- Gwarancja nie sa objete: uzskodzenia mechaniczne, elektryczne, termiczne i ingerencje cieczy lub celowe uzskodzenia sprzetu i wywoIane nimi wady, usterki oraz wady wizualne powstaI wskutek uzytkowania, uzskodzenia powstaI wyniku niewfasciwoI niezgodnego z instrukcja obslugu uzytkowania, usterki niemajace wpywu na prawidlowa pracr urzadzenia, zariki sygnaI spowodowane odlegoŚcI od nadajnika lub zle wykonana instalacj antenowa oraz uzskodzenia sprzetu, ktoy Nie zostal dostarczony do serwisu w bezpiecznym opakowaniu.
- Serwis moze nie wykonac naprawy usterek w przypadku uszkodzen plomby gwarancjnej i sladowNieautoryzowanej naprawy.
- W przypadku gdy uterka nie jest objeta gwarancja producenta, serwis moze zaproponowac wykonanie uslug odpatnej.
- Kaźdy reklamowy sprzeg Autoryzowany Serwis sprawdza pod względekem poprawnosci dziarść.
- BrandLine Group Sp. z o. o. i Autoryzowany Serwis nie odpwiadaj za szkody i straty powstate w Wyniku niemożnosci korzystania z urzadzenia bedacego w naprawie.
- Nieodebranie spreztu z serwisu wciagu 3 miesiocy moze skutkowac naliczeniem kosztow magazynowania urzadzenia do czasu odbioru.
- Dostarczenia spręt u w stanie niedrak odpowiedniego opakowania jest rwoznacny z niewypeñieniem przy泄漏 kupujucego warunków gwarancji moze stanowic podstawe do odmowy naprawenia spręt u lub przytużenia okresu naprawy.
- W przypadku odesfania produktu na naprawe serwisowa, gdzie nie stwierdzono usterki, konsument bedzie obciązony kosztem ekspertyzy (stawka godzinowa 70 zf netto).
- W sytuacji, gdy produkt odesfany na serwis jest sprawny, a powodem zhego dziafania urzadzenia bya rozfadowana bateria, serwis obciagy konsumenta koszem usfugi ekspertyzy w kwocie 25 z netto.
- Gwarancja na produkt nie wyfjacza, nie ogranica ani nie zawiesza uprawnien kupujacego wynikajacych rekojmi.
Croatia
Uvoznik:Viva-net d.o.o.
A.7Mimara 8
10090Zagreb
Tel:01/56 01 715.Fax:01/56 01 945
01B:73608440692
Product details
For the following
Product : Mobile phone
Model(s): OV-Vertis 1820 easy
Date of issue: 05.2017
Declaration & Applicable standards
We, BrandLine Group Sp. z o. o., hereby declare under our sole responsibility that the of the above referenced product complies the following diredives:
EMC: 2004/108/EC
LVD: 2006/95/EC
R&TTE: 1999/5/EC
ROHS: 2011/65/EU
WE:1275/2008
EMC: EN 301489-1
EN301498-17
LVD: EN 60950-1
R&TTE: EN300328
EN62311
BrandLine Group Sp. zo.o.
ul. Adama Kreglewskiego 1
61-248 Poznan
BRANDLINE GROUP
SPOKAZOGRANZONAOPOWIEDZIALNOSCA
ul. Dzadostanska 10,61-248 Poznan
NIR782.257-98-40.Regon361233546
(1)

OVERMAX
You • unlimited