TX-25MD1L - Tivi PANASONIC - Hướng dẫn sử dụng miễn phí
Tìm hướng dẫn sử dụng thiết bị miễn phí TX-25MD1L PANASONIC ở định dạng PDF.

Câu hỏi của người dùng về TX-25MD1L PANASONIC
0 câu hỏi về thiết bị này. Trả lời những câu bạn biết hoặc đặt câu hỏi riêng.
Đặt câu hỏi mới về thiết bị này
Tải xuống hướng dẫn cho thiết bị của bạn Tivi ở định dạng PDF miễn phí! Tìm hướng dẫn của bạn TX-25MD1L - PANASONIC và lấy lại thiết bị điện tử của bạn. Trên trang này được đăng tải tất cả các tài liệu cần thiết để sử dụng thiết bị của bạn. TX-25MD1L thương hiệu PANASONIC.
HƯỚNG DẪN NGƯỜI DÙNG TX-25MD1L PANASONIC
Panasonic
Operating Instructions
Colour Television
TX-25MD1L

natural_image
Front view of a vintage CRT television with blank screen (no visible text or symbols)CONTENTS
Warnings and Precautions....2
Accessories. 3
Battery Installation....3
Quick Start Guide.... 4
Basic Controls....6
On Screen Display Menus....7
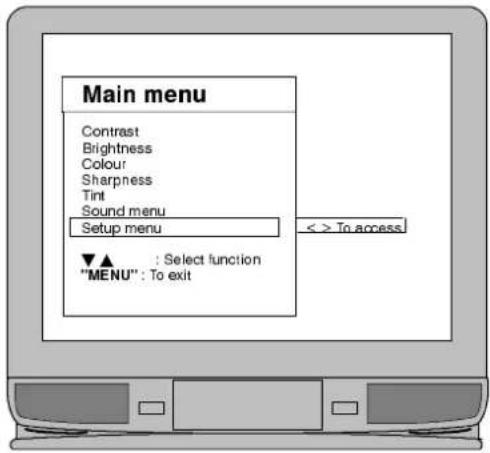
Main Menu 9
Sound Menu....10
Setup Menu .....11
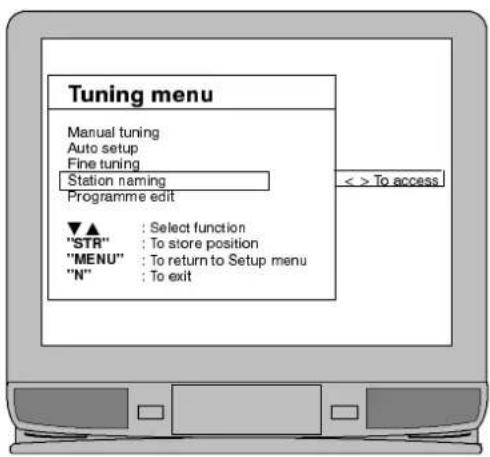
Tuning Menu....12
Manual Tuning .....13
Auto Setup Menu....14
Station Naming.....15
Programme Edit....16
AV Select and Setup....18
Teletext Operation 19
VCR and Satellite Receiver Guidance ... 22
VCR Operation 23
Audio / Video (AV) Connections..... 24
Via the front AV3 Video and Audio (RCA). 24
Connection of Stereo Headphones ..... 24
SCART Terminal Information .....24
Via the Rear AV1 / AV2 21 Pin (SCART) and
RCA Audio Out....25
Trouble-shooting....26
For your guidance....27
Specifications....27
- This TV is designed to operate on A.C. 220 – 240V, 50Hz.
- This TV is capable of receiving the following transmission standard, PAL I.
- To prevent damage which might result in electric shock or fire, do not expose this TV set to rain or excessive moisture.
• WARNING : HIGH VOLTAGE !!!
Do not remove the rear cover as live parts are accessible when it is removed. There are no user serviceable parts inside. - Avoid exposing the TV set to direct sunlight and other sources of heat.
- Remove the mains plug from the wall socket when the TV set is not used for a prolonged period of time.
• CABINET AND PICTURE TUBE CARE
Remove the mains plug from the wall socket. The cabinet and picture tube can be cleaned with a soft cloth moistened with mild detergent and water. Do not use solutions containing benzol or petroleum. TV sets can produce static electricity, care must be taken whenever touching the TV screen.
- Adequate ventilation is essential to prevent failure of electrical components. We recommend that a gap of at least 5cm is left all around this TV even when it is placed inside a cabinet or between shelves.
FOR YOUR SAFETY PLEASE READ THE FOLLOWING TEXT CAREFULLY
This appliance is supplied with a fitted three pin mains plug for your safety and convenience. A 5 amp fuse is fitted in this plug. If the fuse is replaced then the replacement fuse must be 5 amp rated and should be approved by ASTA or BSI to BS1362.
Check for the ASTA mark ATA or the BSI mark S on the body of the fuse.
If the fitted plug has a removable fuse cover you must ensure that it is refitted when the fuse is replaced. If you lose the fuse cover the plug must not be used until a replacement cover is obtained. Replacement fuse covers can be purchased through your local Panasonic dealer.
The plug fitted to this appliance incorporates a mains filter circuit. If this is removed or replaced with a non-filtered plug this television will no longer meet the European standards for Electromagnetic Compatibility (EMC). If the fitted plug is unsuitable for the socket outlet in your home an appropriate adapter should be used.
Nonetheless, if the fitted plug is replaced, the fuse should be taken out and the cut-off plug disposed of safely. There is danger of severe electrical shock if the cut off plug is inserted into any 13 amp socket.
If a new plug is to be fitted please observe the wiring code as shown below. If in any doubt please consult a qualified electrician.
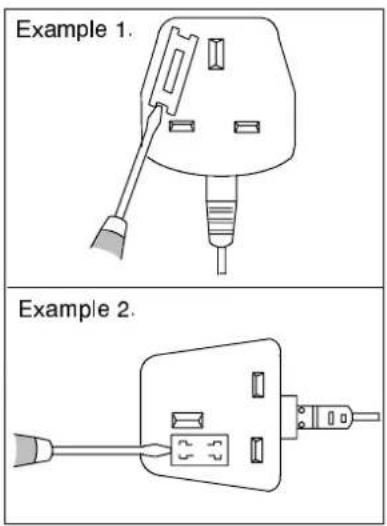
How to replace the fuse (for plug type shown in example 1):
Lift out the removable fuse compartment with a screwdriver and replace the fuse, then refit securely into the mains plug (See example 1).
How to replace the fuse (for plug type shown in example 2):
Lift open the fuse compartment, in the mains plug, with a screwdriver, and replace the fuse, then press the fuse cover down securely. (See example 2).
IMPORTANT :— The wires in the mains lead of this appliance are coloured in accordance with the following code :— BLUE : NEUTRAL BROWN : LIVE
As the colours of the wires in the mains lead of this appliance may not correspond to the markings identifying the terminals in your plug, proceed as follows:—
- The BLUE wire must be connected to the terminal marked 'N' or coloured black.
- The BROWN wire must be connected to the terminal marked 'L' or coloured red.
IMPORTANT NOTE: Under no circumstances should either of these wires be connected to the Earth terminal of the three pin plug, marked with the letter 'E' or the earth symbol.
Check that you have the accessories translated this shown

TV Guarantee
Operating Instruction book
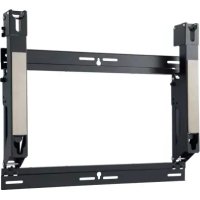
natural_image
3D rendered image of a mechanical component with a flat base and two protruding arms (no text or symbols)TV. Stand TS 2800
(Assembly Instructions are included in stand packaging)
natural_image
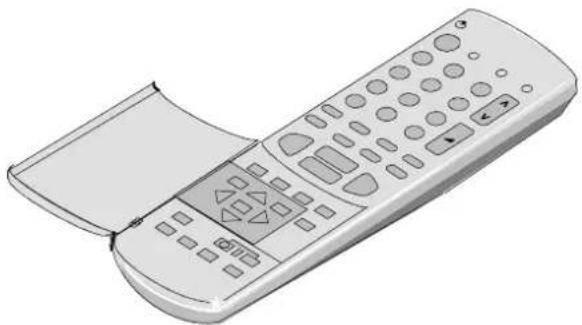
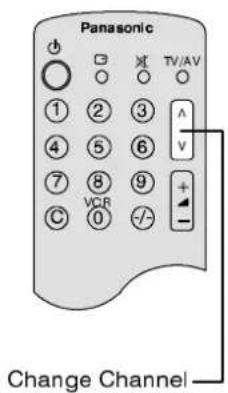
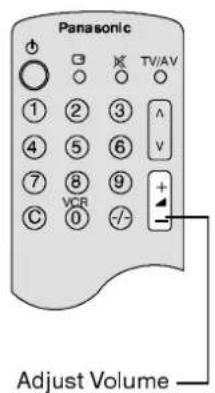
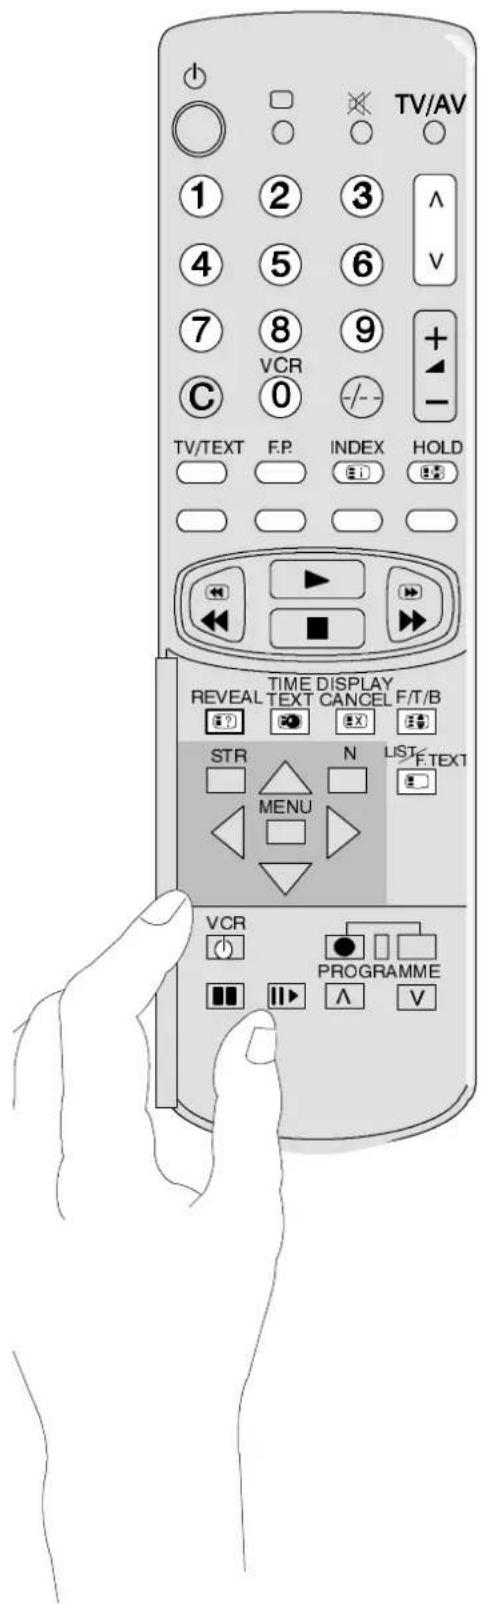
Illustration of a remote control with open lid and buttons (no text or symbols)Remote Control Transmitter EUR51920


Batteries for the Remote Control Transmitter. (2 x R6 (UM3) size)
FITTINGREMOTECOINRBOBABATERBSES
123

natural_image
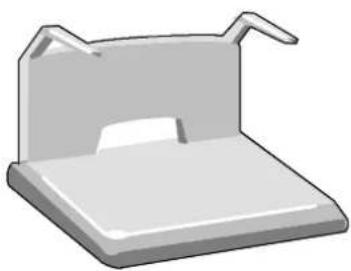
Line drawing of a hand holding a smartphone with a small object on the screen (no text or symbols)Slide off the battery cover
natural_image
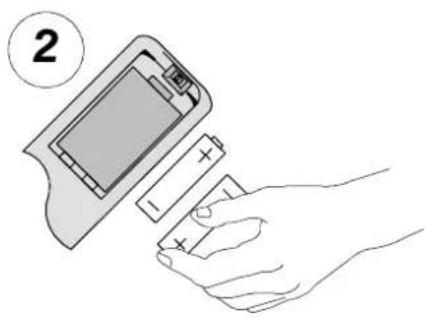
Illustration of a hand inserting a battery into a housing (no text or symbols)Insert batteries - note correct polarity
natural_image
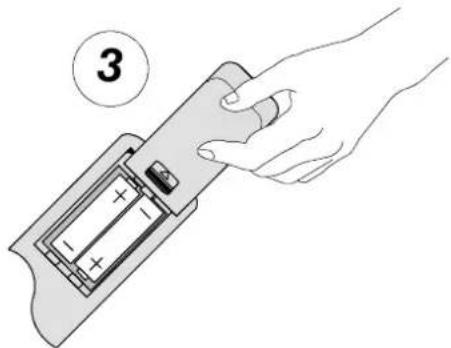
Hand inserting a battery into a device, showing internal charge distribution (no text or symbols)Replace the cover
Note:
- Make sure that the batteries are fitted the correct way round.
- Do not mix old batteries with new batteries. Remove old, exhausted batteries immediately.
- Do not mix different battery types, i.e. Alkaline and Manganese. Do not use rechargeable (Ni-Cad) batteries.
1.2.3.....
1
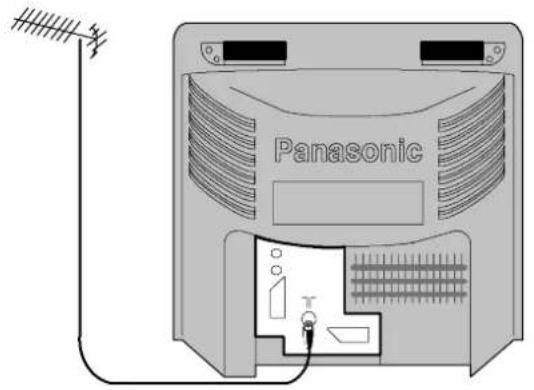
TV only
Connect Aerial co-axial cable direct to TV RF IN socket.
OR
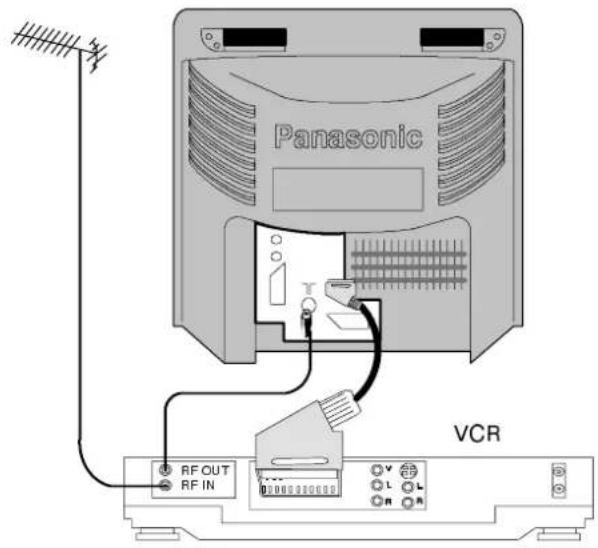
USING A VCR
Connect Aerial co-axial cable to RF Input socket of VCR and a RF coaxial cable from VCR RF Out socket to TV RF IN socket.
The VCR can also be connected to the TV using a SCART to SCART lead if you are using a stereo VCR. Use the AV1 21 pin terminal for a VCR. To connect an S-Video VCR use the AV2S 21 pin terminal.
Further information for VCR and Satellite Receiver installation with this TV can be found on page 22.
OR
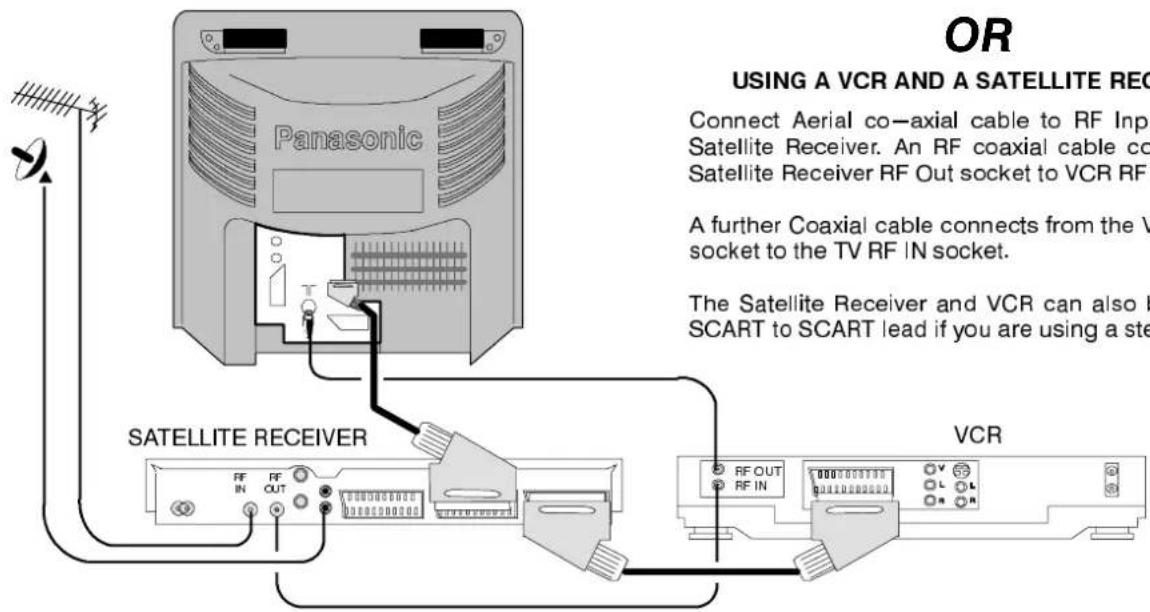
USING A VCR AND A SATELLITE RECEIVER
Connect Aerial co-axial cable to RF Input socket of Satellite Receiver. An RF coaxial cable connects from Satellite Receiver RF Out socket to VCR RF IN socket
A further Coaxial cable connects from the VCR RF OUT socket to the TV RF IN socket.
The Satellite Receiver and VCR can also be linked by SCART to SCART lead if you are using a stereo VCR.
Ancillary equipment and leads are not supplied.

natural_image
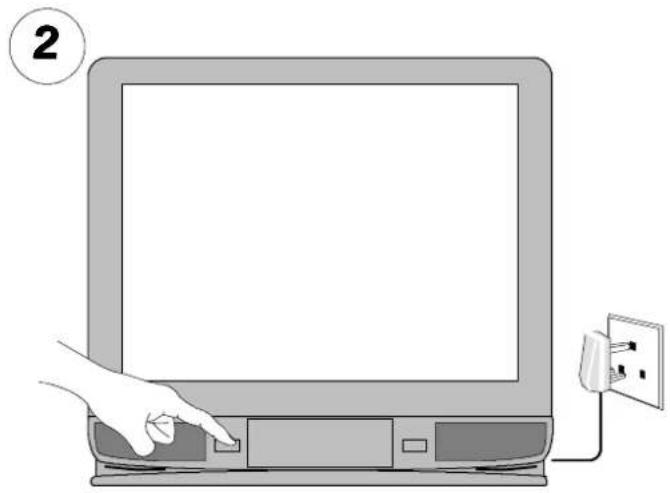
Illustration of a hand inserting a power outlet into a computer monitor (no text or symbols)Switch ON your VCR *1. Switch ON your Satellite Receiver*2. Plug the TV into mains socket and switch on.
Programmes will appear immediately if your dealer has programmed the TV for you.
If the TV has not been programmed for you then Auto setup will begin. TV stations will be located, sorted into order and stored ready for use ^4 .
Switch the VCR Test Signal 'off'*4.
...READYTOGO!
*1 We recommend that you have the VCR's test signal switched 'on' – refer to your VCR instruction book to locate the VCR Test Signal switch (usually on the rear of the VCR).
*2 We recommend that your Satellite Receiver is set to either SKY ONE or SKY NEWS to ensure reliable tuning.
^*3 The sorting order depends upon the TV signal, the broadcasting system, and reception conditions. If the order is not to your preference it can be rearranged. Refer to the Programme Edit menu — see page 16 for details.
*4 If your VCR Test Signal appears as a programme position it can be deleted using the Programme Edit menu.
IT IS IMPORTANT THAT you use only programme position '0' for your VCR. If your VCR does not appear to operate on programme position '0' (the VCR position), refer to page 22 for guidance.
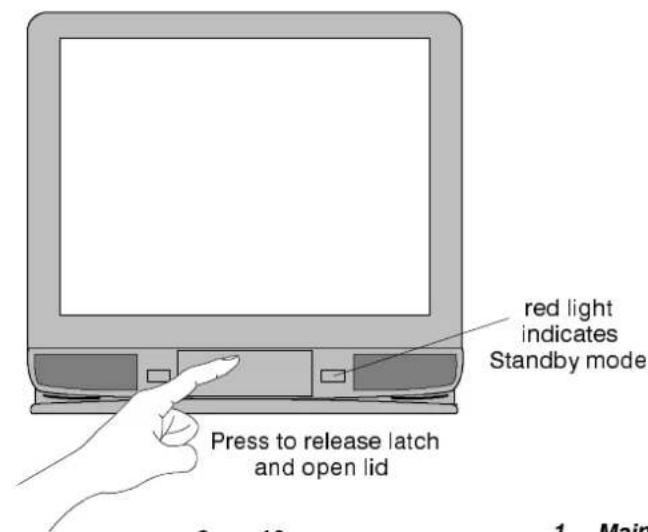
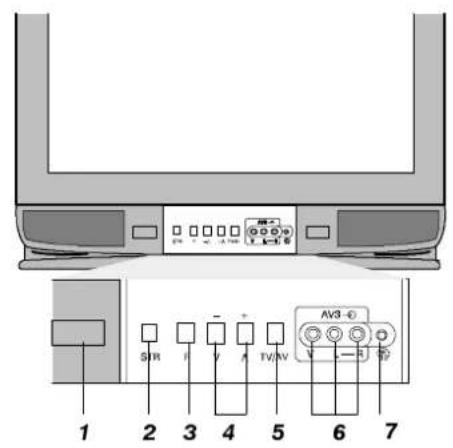
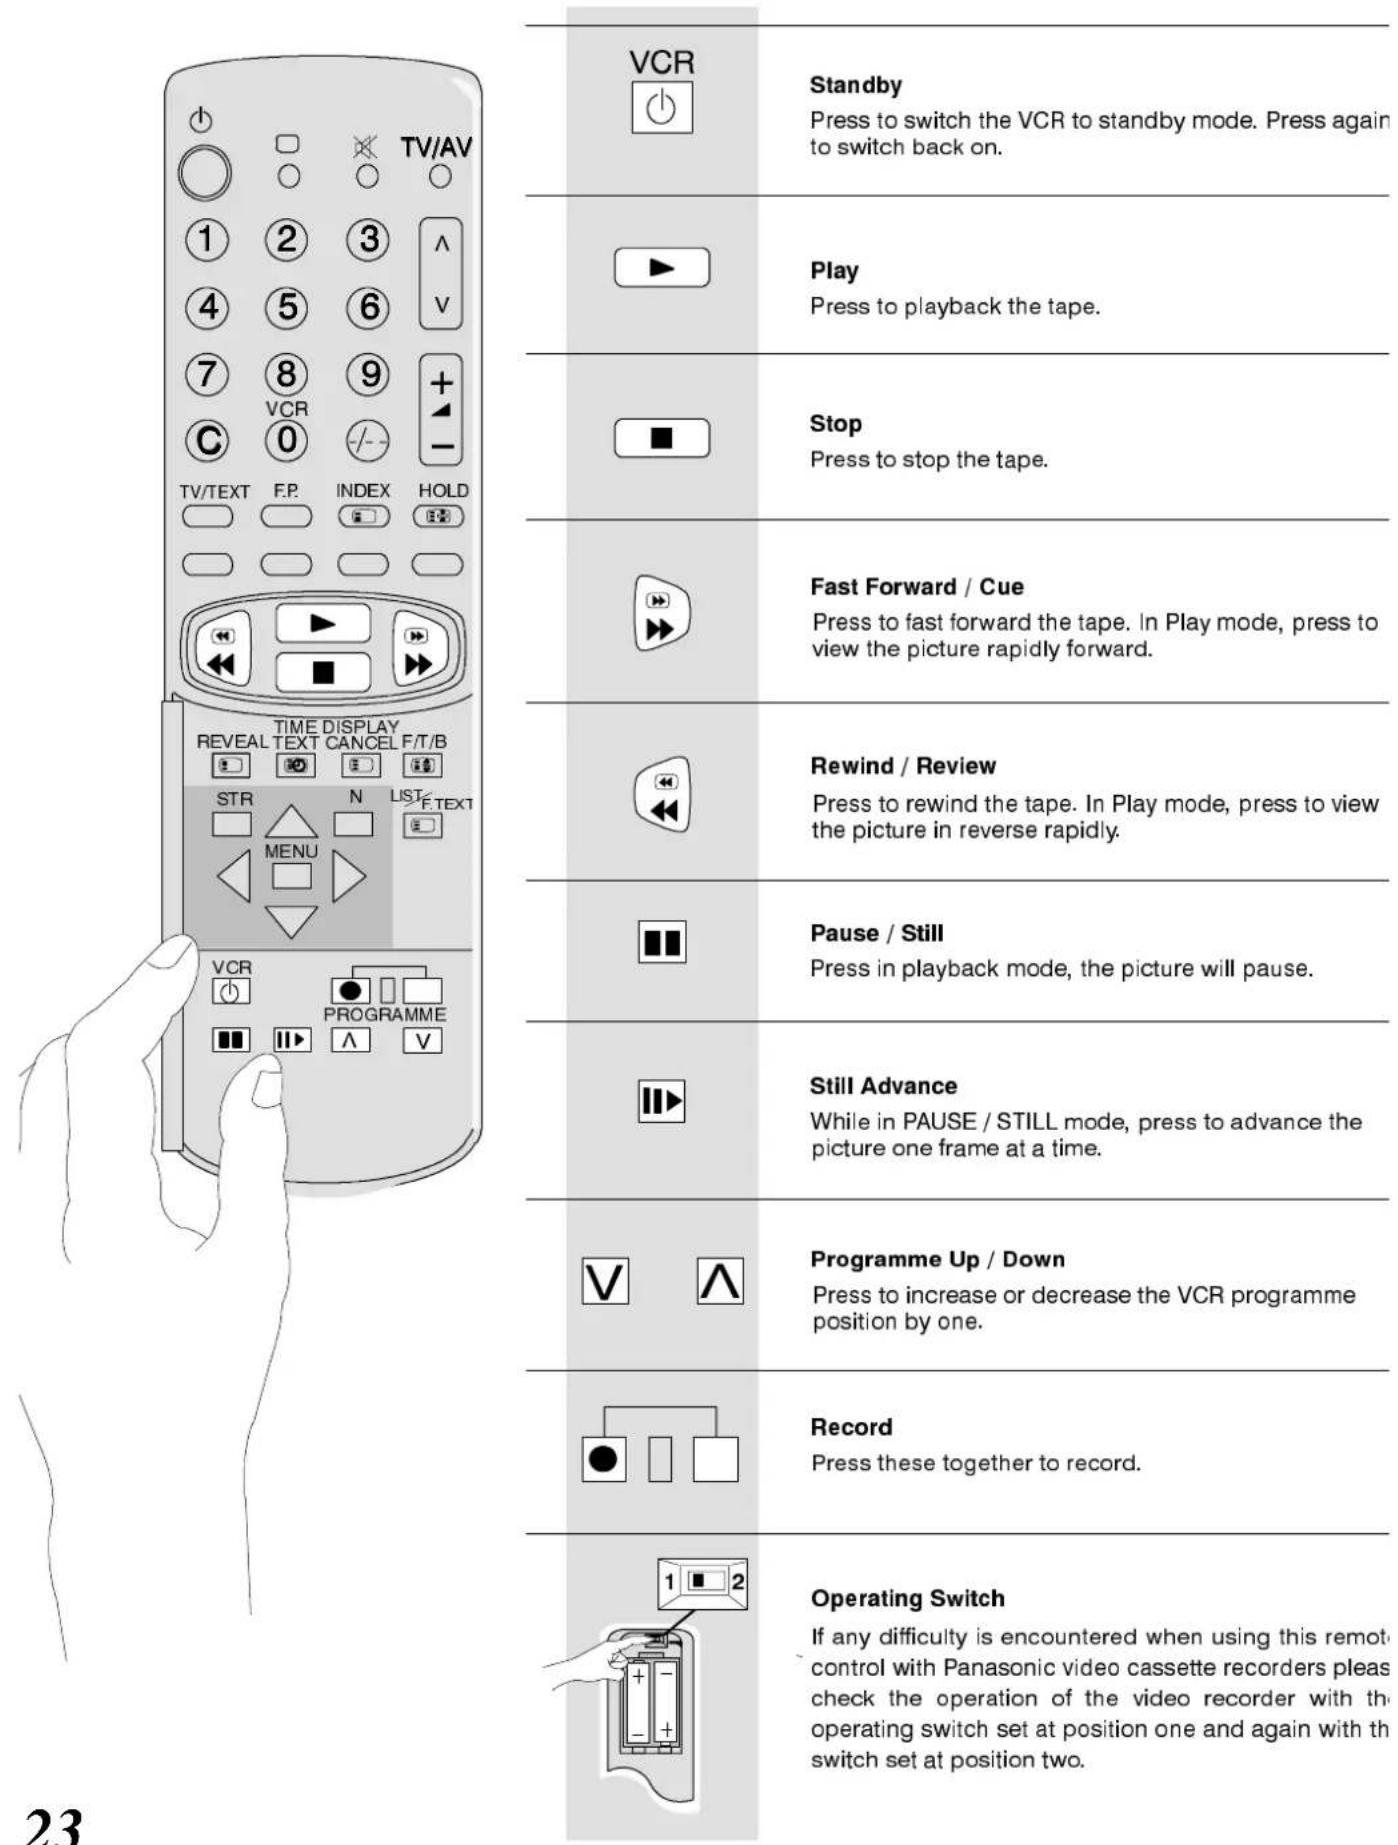
1 Mains On/Off switch
2 Normalisation Store (STR) Pressing STR (whilst in either the Main or Sound menus) after adjusting the Volume, Bass, Treble, Balance, Colour, Brightness, or Sharpness, (also Tint in M.NTSC / NTSC), will store these adjustments in memory as your normal settings (see note 16 below).
3 Function select (F) Displays the on screen functions. Press repeatedly to select from the available functions of Volume, Brightness, Contrast, Colour, Sharpness, Bass, Treble and Tuning Mode (see note below).
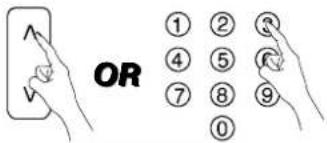
4 - / + / ∧ / ∨ Increase or decrease the channel settings. If a function is displayed you can adjust the level.
5 TV/AV switches between TV and Audio/Video operations.
6 RCA Audio/Video sockets for the connection of Audio/Video equipment, e.g. VCR.
7 Headphone socket for connection of stereo headphones with 3.5mm plug.
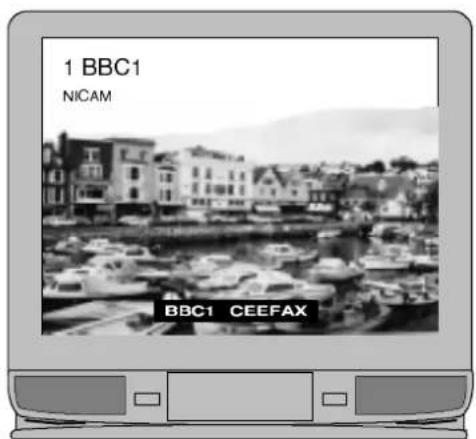
8 Standby to switch TV on or off Standby mode. Set can also be switched on from Standby by pressing a 0-9 programme button or by pressing - / + /ʌ /V on the front control panel. NOTE: TV cannot be switched on using the Mains On/Off switch if it is in Standby mode.
9 Status displays the Programme position, name and channel number also the time and Teletext system (if available) and Audio Systems. Whilst in Status mode press ◀ to display Programme / Channel table 1 to 31 plus VCR, 32 to 63, 64 to 95 and again for 96 to 99.
10 Sound Mute to instantly mute or restore sound. Screen will display 'Mute' if in use.
11 Programme Up/Down to increase or decrease programme position.
12 + / - Increases or decreases the Volume.
13 Programme position to select programme positions from 10–99.
14 Direct channel access allows direct access to local channels via the 0–9 keys.
15 0-9 to select programme numbers or Teletext pages.
16 Normalisation (N) to recall the levels previously set with the store (STR) key.
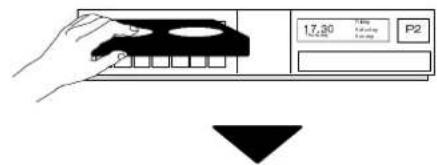
Although you will normally use tuning methods provided by the tuning menus that appear later in this book, it is possible to operate basic tuning control by repeatedly pressing the 'F' key on the front panel until the Tuning mode is reached. Pressing the front panel - or + keys will lead to the Tuning procedure menu. Following the on screen instructions will allow you to tune and save any programme positions.
| Tuning procedure (Front panel) | |
| - + | : To start search |
| "TV/AV" | : Select programme position |
| "STR" | : To store position |
| "F" | : To exit |
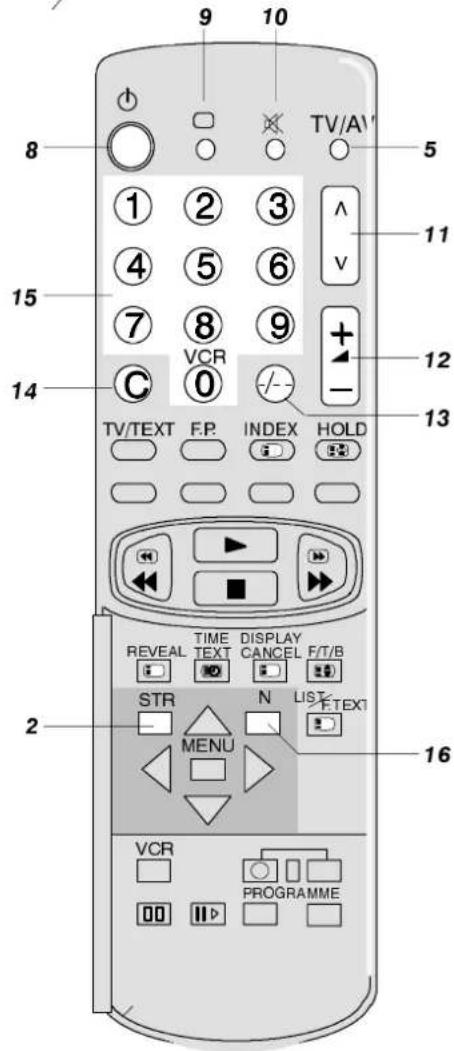
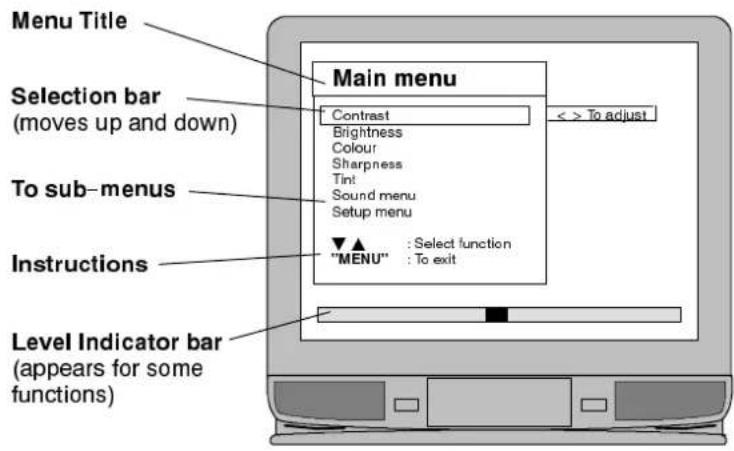
ON SCREEN DISPLAY MENUS
The advanced features of this television are set up using on-screen menus, which are contained in the menu structure starting from the Main menu as shown below.
flowchart
graph TD
A["Main menu"] --> B["Sound menu"]
B --> C["Setup menu"]
C --> D["Tuning procedure"]
D --> E["Auto setup"]
E --> F["Station naming"]
F --> G["Programme edit"]
G --> H["Accessed by front panel only"]
subgraph In_TV_operation
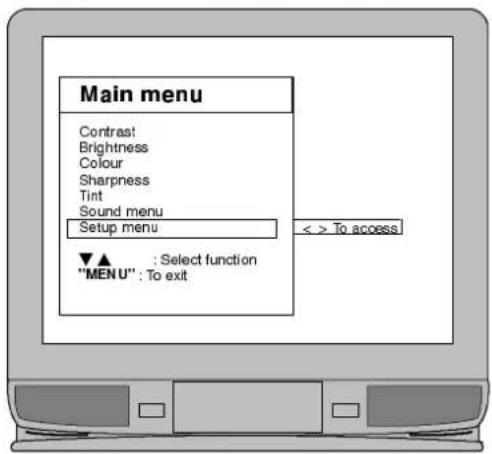
I1["Main menu: Contrast: Brightness Colour Sharpness Sound menu Setup menu ▼▲ : Select function "MENU" : To exit"]
I2["Setup menu: AI : off Noise=R : off Aspect : 4:3 Off timer : off Tuning menu ▼▲ : Select function "MENU" : To return to Main menu "N" : To exit"]
end
subgraph In_AV_operation
I3["AV select: AV1 AV2 AV3 ▼▲ : Select AV source"]
I4["Main menu: Contrast: Brightness Colour Sharpness Sound menu Setup menu ▼▲ : Select function "MENU" : To exit"]
I5["Setup menu: AI : off Noise=R : off Aspect : 4:3 Off timer : off ▼▲ : Select function "MENU" : To return to Main menu "N" : To exit"]
end
subgraph AccessedByFrontPanel
G1["Tuning procedure (Front panel) : + : To start search "TV / AV" : Select programme position "STR" : To store position "F" : To exit"]
end
I1 --> I2
I2 --> I3
I3 --> I4
I4 --> I5
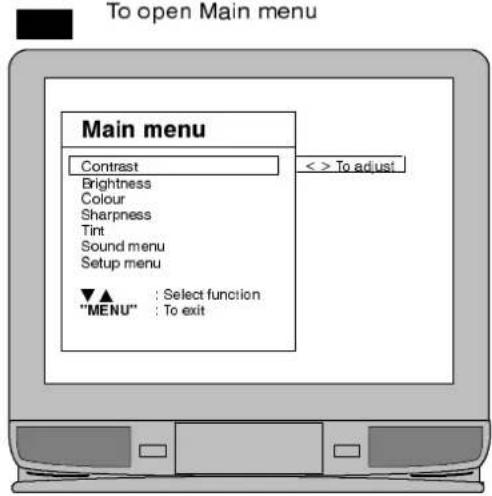
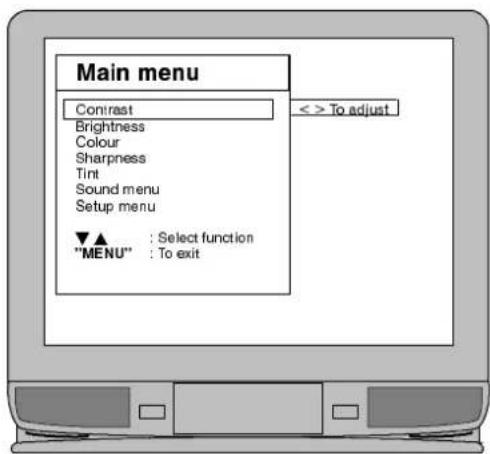
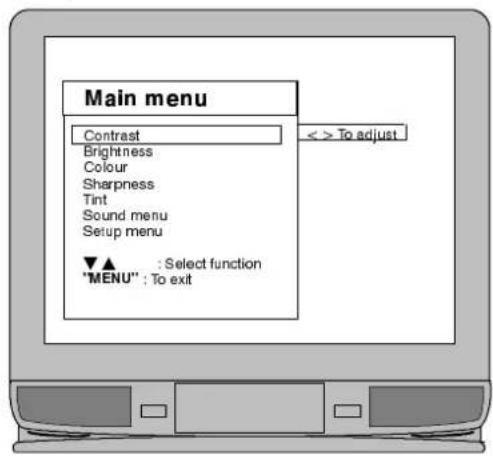
This TV has a comprehensive system of On Screen Display menus to access adjustments and options.
All menus (except AV select) start from the Main menu. If you follow the on screen instructions you will be able to move to further menus. The menu structure is shown on the previous page.

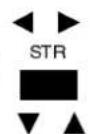
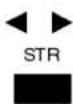
The following remote control keys can be used to access and adjust settings from the On Screen Display menus.
Some selections, for example, Contrast, Brightness, Colour and Sharpness will display a coloured adjustment bar.
Some selections, for example, Mode, allow a choice to be made.
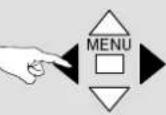
 | The ‘MENU’ key is used to open the Main menu and also to return to either the Main menu or a previous menu. |
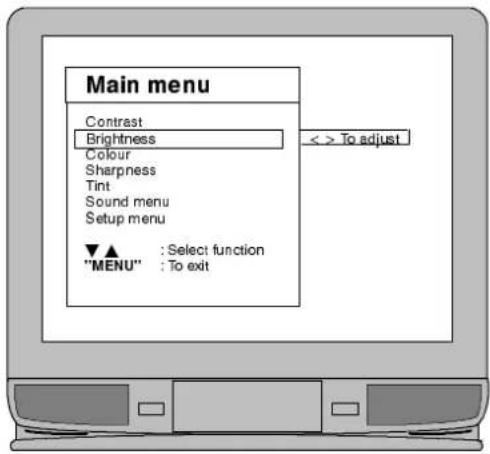
 | The ▲▼ keys are used to move the selector up and down the menu. |
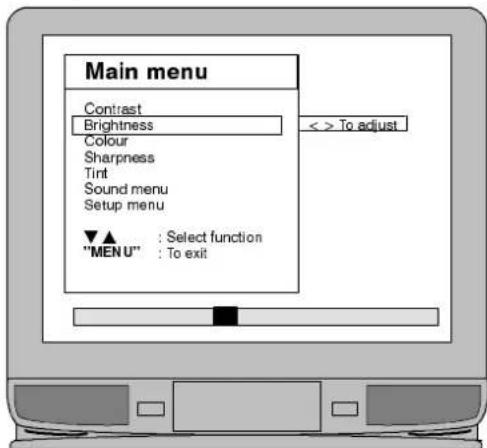
 | The ◀▶ keys are used to access your selected function and either adjust levels or to make a choice. |
 | The ‘STR’ key is used to store settings after your adjustment or choice has been made. |
 | The ‘N’ key is used to leave the menu system and return to the normal viewing screen. |
Notes :
The levels of Contrast, Brightness, Colour, Sharpness and Tint are adjusted by using the coloured bar, that will appear on selection, as a guide.
Pressing STR (whilst in either the Main or Sound menus) after making adjustments to the Contrast, Brightness, Colour, Sharpness, (Tint in M.NTSC / NTSC), Volume, Bass and/or Treble will store these adjustments in memory as your normal settings. Pressing the N button at any time will restore the TV to these settings.
Tint function will only appear on the Main menu if M.NTSC or NTSC inputs are connected.
The coloured adjuster bars will disappear after a short time if no adjustment is made.
If Sound or Setup menus are selected then they will lead to further menus as detailed on pages 10 and 11.
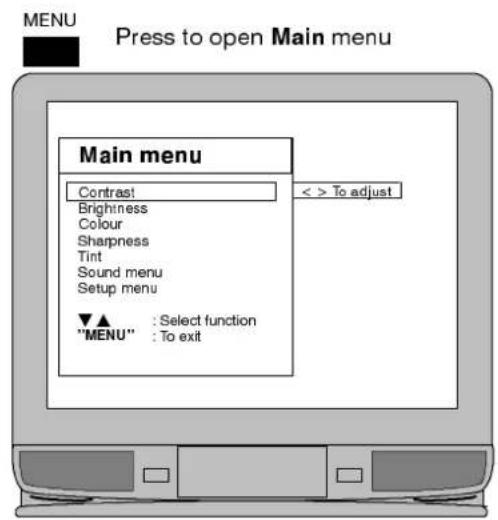
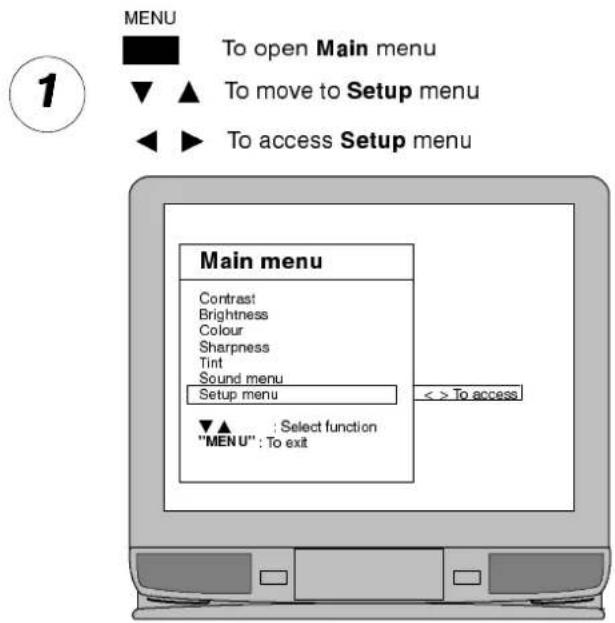
1
MENU
2

To move selector up or down to the function that you wish to access

To access your choice
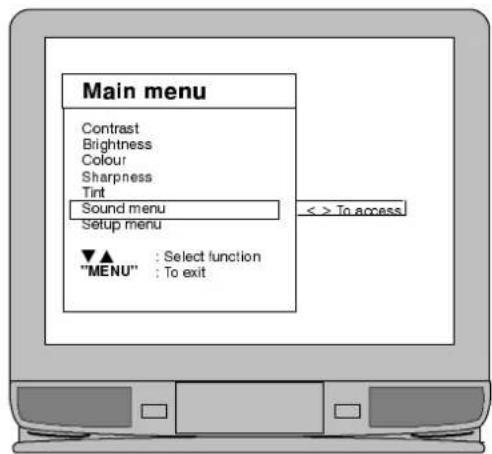
3
◀ ▶ To increase or decrease level using colour bar as guide or to access Sound or Setup menus
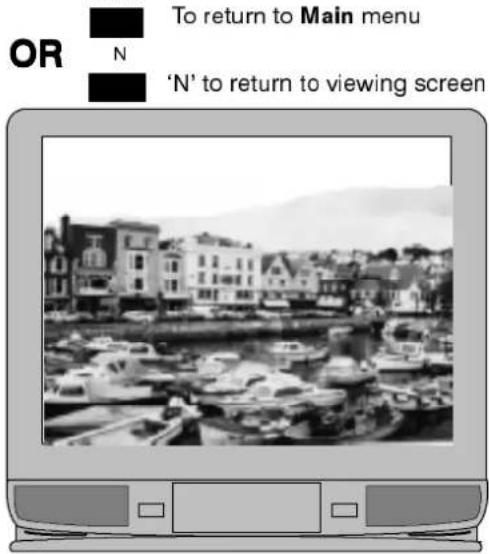
4
MENU

To return to viewing screen

natural_image
Black-and-white photo of a harbor scene with boats and buildings, no visible text or symbolsNotes :
Bass - adjusts the bass response.
Treble - adjusts the treble response.
Balance - adjusts the sound output levels between the left and right channels.
Volume Correction - (in AV mode only) allows different volume levels to be set for TV and AV signals.
NICAM - Select either NICAM : on for stereo sound reproduction
or NICAM : off for FM Mono sound output.
If NICAM Mono is being transmitted select either FM Mono, NICAM Mono I (M1) or NICAM Mono II (M2). The outputs depend upon the signal being transmitted. It is advisable to switch to FM Mono if reception deteriorates. When NICAM transmissions are not being received the sound will be FM Mono only.
Mode – the sound quality can be set to Music or Speech, as required, by selecting the appropriate choice.
Ambience - a dynamic sound enhancer that gives a feeling of greater acoustic presence.
Pressing STR (whilst in either the Main or Sound menus) after making adjustments to the Volume, Bass, Treble, Contrast, Brightness, Colour, Sharpness and/or (Tint in M.NTSC / NTSC), will store these adjustments in memory as your normal settings. Pressing the N button at any time will restore the TV to these settings.
1
2

3
4
Notes :
A.I. (Artificial Intelligence) allows the TV to automatically analyze the incoming picture and process it to give the best contrast, optimum field of depth and vivid colour tones.
Noise-R (Picture Noise Reduction) automatically reduces unwanted picture interference.
Aspect (Picture Format) select 16:9 if receiving a 16:9 format signal through the AV1 21 pin terminal. Select 4:3 for normal picture format.
Off Timer allows you to select either 30,60 or 90 minutes time before TV switches off to Standby mode.
Tuning menu allows access to the tuning menu detailed on next page.
1
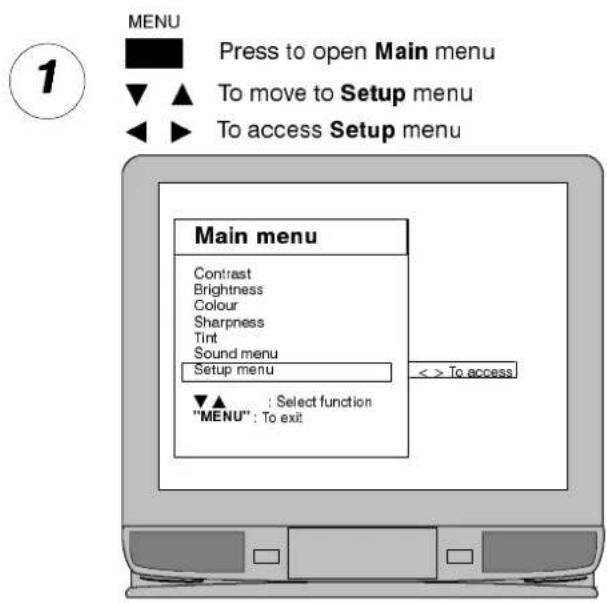
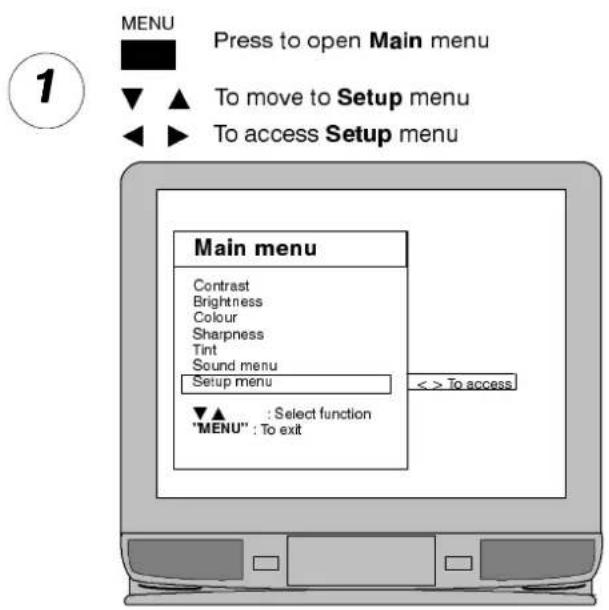
MENU

Press to open Main menu
2

▲

To move to Setup menu
To access Setup menu
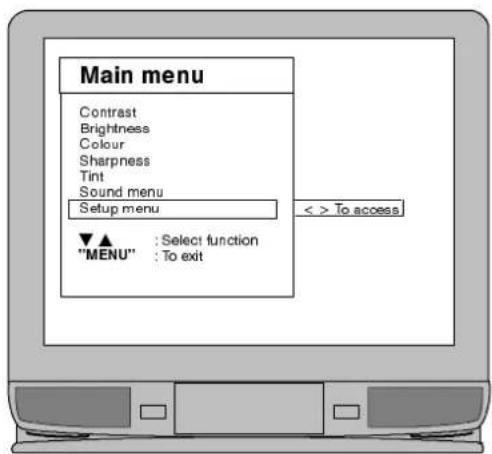
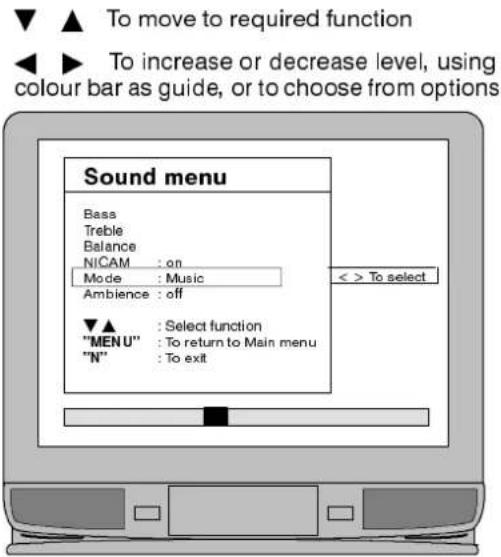
3

To move to required function

To access options
4
MENU
OR

To return to Main menu
N

'N' to return to viewing screen

natural_image
Black-and-white photo of a harbor scene with boats and buildings, no visible text or symbolsNotes :
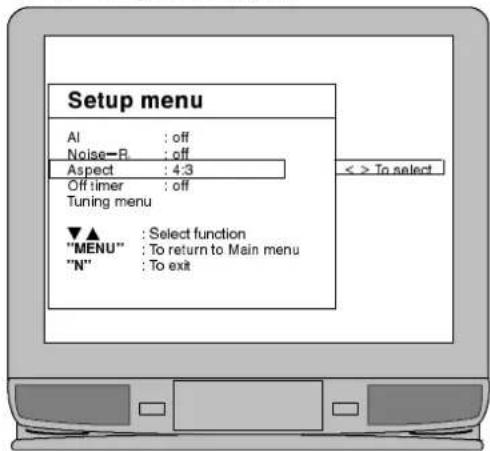
This TV will either have been programmed by your dealer ready for use or it will have automatically tuned itself to your local stations when it was installed.
However, there may be circumstances when you want to either re-initialise the auto tuning or to tune in known stations manually.
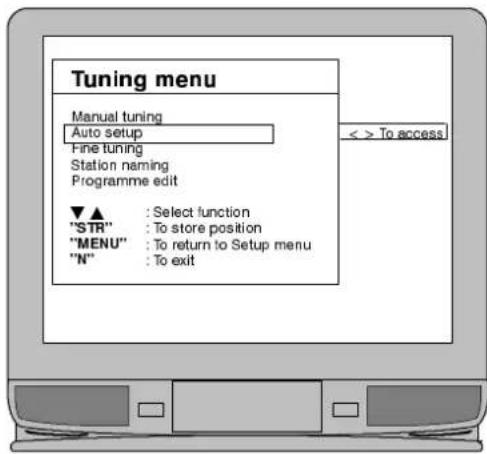
Both methods, Auto setup and Manual Tuning, as well as Station naming and Programme edit are accessed through the Tuning menu.

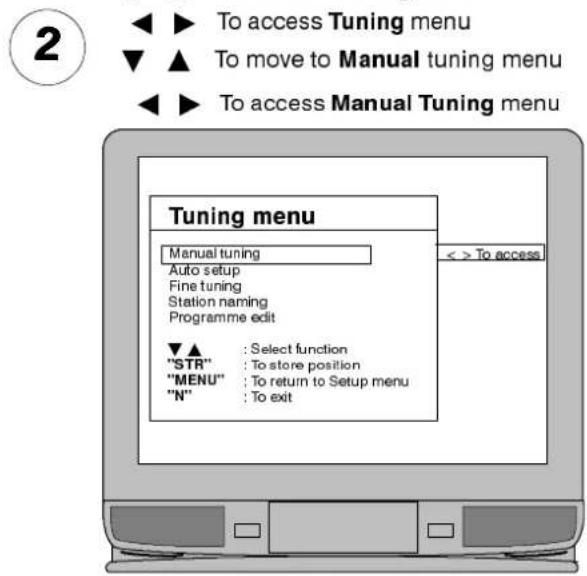
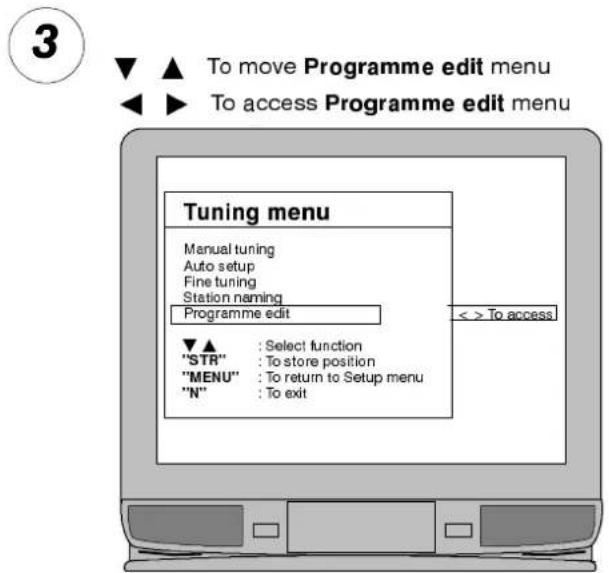
MENU
Press to open Main menu
2
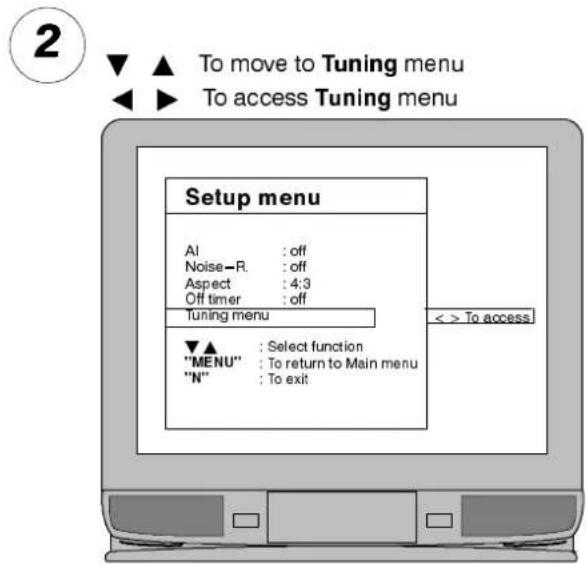
▼ ▲ To move to Setup menu
◀ ▶ To access Setup menu
▼ ▲ To move to Tuning menu

▼ ▲ To select function
◀ ▶ To access the required function
4
Proceed to your choice ;
Manual Tuning is described on page 13.
Auto Setup is described on page 14.
Fine Tuning allows the station to be tuned to its optimum.
Station Naming is described on page 15.
Programme Edit menu is described on page 16.

Notes :
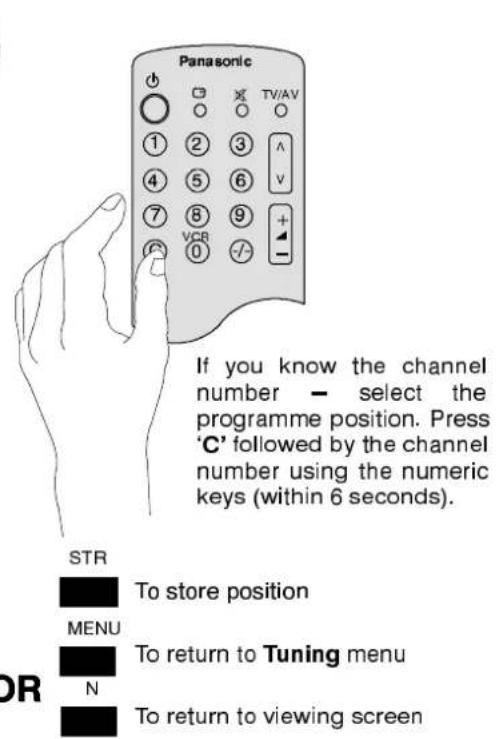
The required channels can be manually stored by either searching for the required channel using the on screen display or by keying in the channel number if known.
If your VCR does not operate on programme position '0' then it is probable that your VCR is not tuned to channel 36. This can be corrected by selecting programme position '0' and adjusting the RF output channel of your VCR, further details appear on page 22. IT IS IMPORTANT that you use only programme position '0' for your VCR'. Programme positions other than '0' are not suitable for use with your VCR.
It is possible that, in some areas, you may suffer interference patterning on screen when using your VCR with the RF output set to channel 36. This can be corrected by adjusting the RF output channel of your VCR to a different setting, further details appear on page 22.
Notes :
Your dealer may have programmed the TV ready for use. If this has not been done then the Auto setup menu will have run automatically the first time that you switched the TV on. Under normal circumstances there will be no need to access this menu. However, if for example, you move to a different area then you will probably want the TV to tune itself to your new local stations by running through the Auto setup menu.
It is possible, especially in areas where you are able to receive more than one transmitter, that you may prefer to rearrange the order of the selection of stations. This can be achieved through the Programme edit menu, as detailed on pages 16 and 17.

MENU

Press to open Main menu

To move to Setup menu

To access Setup menu

2
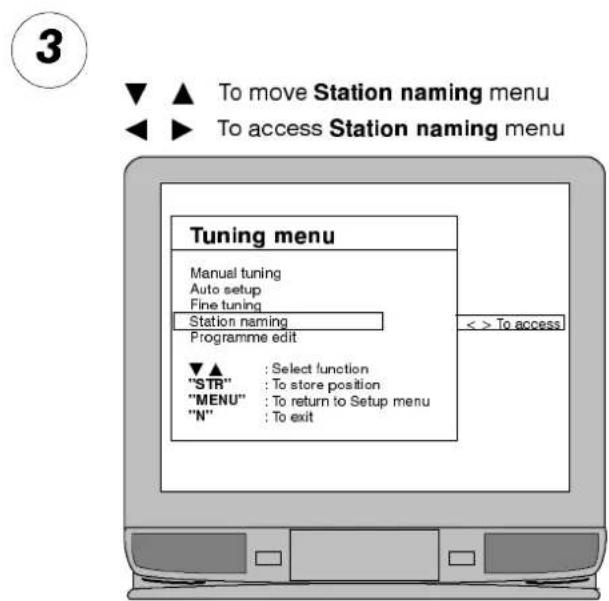
▼ ▲ To move to Tuning menu
◀ ▶ To access Tuning menu
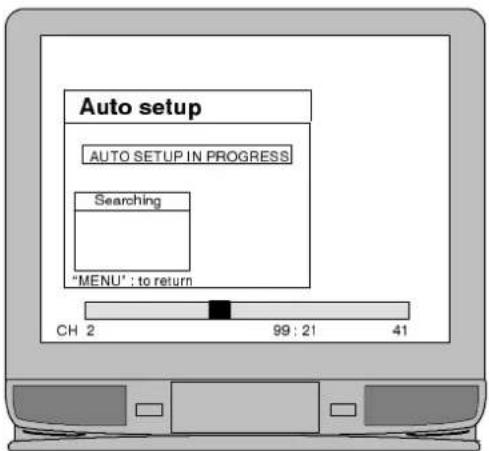
▼ ▲ To move to Auto setup menu
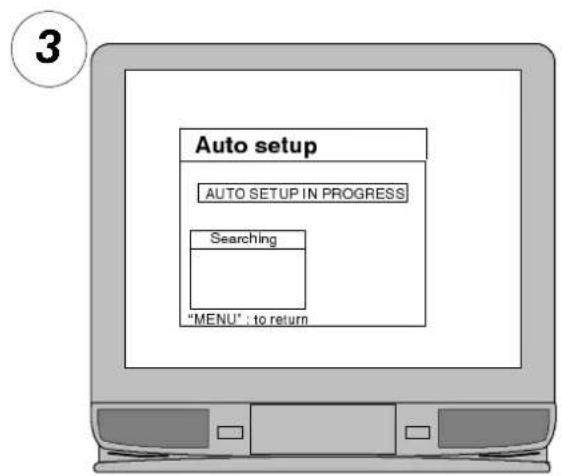
◀ ▶ To start Auto setup
3
Auto setup tuning will begin, stations will be located, sorted and stored ready for use
4
natural_image
Black-and-white photo of a harbor scene with boats and buildings, no visible text or symbolsMENU

To stop Auto Setup at any time
Notes :
Each channel may be given an individual name so that you can remember the channels by name as well as programme number. For example you could rename 'BBC-1' to 'ONE' if you wished.

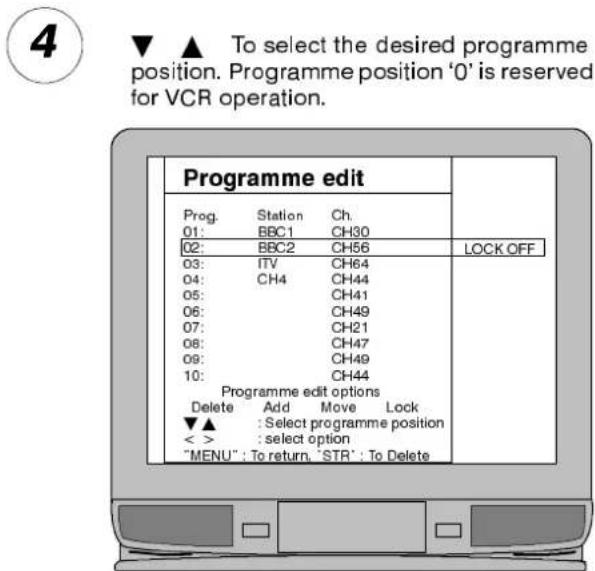
Notes :
The named programme positions can be moved to another place in the programme order or deleted from the order. New programmes can be added to the order. Programmes positions can also be locked to prevent access.
Access to programme position '0'–VCR is prevented in this menu.

Continue to options 5,6,7 or 8

Notes :
Option 5 allows station names and channels to be deleted
Option 6 allows new programmes and channels to be added
Option 7 allows programme positions to be moved
Option 8 allows programme positions to be locked

To select Delete
Press twice to delete selected station and channel
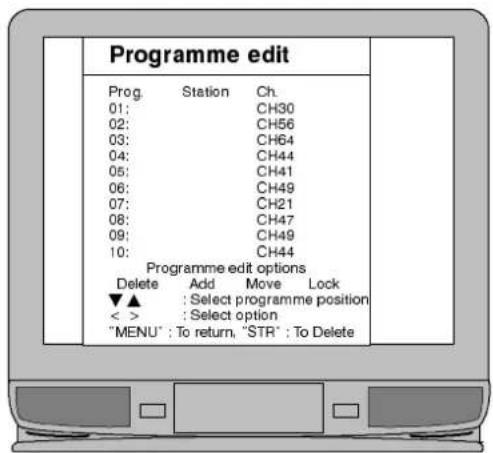

To return to normal TV operation.

To select Move
To move
To select the new programme position for the current channel
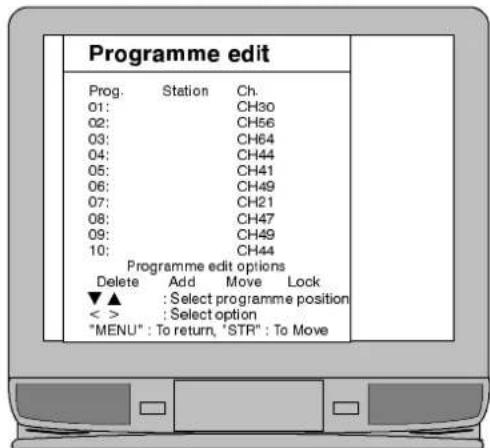

To end move operation.
To return to normal TV operation.


To select Add
Press twice to insert a blank channel in the current programme position.
The channel can then be tuned as described under Tuning menu


To return to normal TV operation.

To select Lock
To lock or unlock the current programme position.


To return to normal TV operation.
Notes :
Some items of Audio/Visual equipment will automatically switch AV1 and AV2 into AV mode – the screen will display EC1 or EC2.
AV2S is suitable for S-Video cassette recorders or camcorders.
NTSC is the United States colour broadcast system (also used in some other countries). If you are using the AV function to replay an NTSC recording from a VCR the TV will automatically recognise the signal.
Examples of AV connections are shown on pages 24 and 25.
1
Press 'TV / AV' to switch to Audio/Video mode

2
▼ ▲ To select the desired AV source AV1, AV2 or AV3. ◀ ▶ If you wish to select AV2S
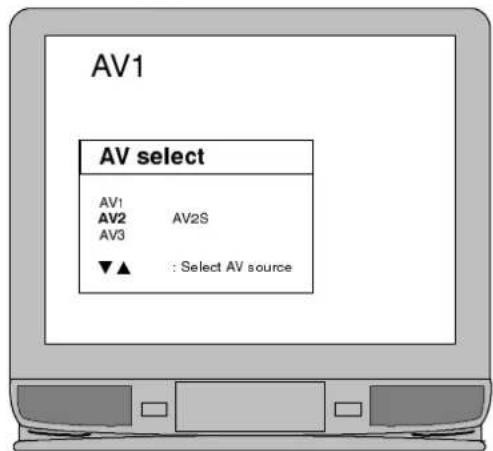
The menu will clear within a few seconds Press 'TV / AV' if you wish to return to TV mode
3
You may wish to make adjustments within the Sound and Setup menus.
MENU

Press to open Main menu

To move to Setup or Sound menus
4
By accessing the Sound menu and adjusting the Volume correction you can set a different volume level for the AV inputs
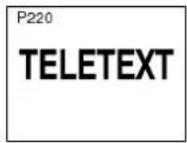
Teletext features may vary depending on the Broadcasting Companies and are only available if the channel selected is transmitting Teletext. This TV set is capable of receiving German TOP Teletext transmissions, it will automatically switch to them if a German broadcast is being received, for example, from Satellite channels.
Pressing the 'MENU' key whilst in Teletext operation will allow the Contrast setting to be adjusted.
| TV/TEXTPress the TV/TEXT key.The screen will display the Teletext page.Press again when you wish to return to TV. mode. | |
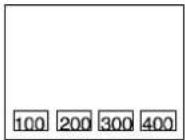
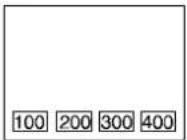
| Page SelectionThe Teletext pages can be selected either by using the Up / Down keys or by entering the page number using the 0-9 keys | |
| List / FASTEXTSee following pages | |
| IndexReturns to main index page if in FASTEXT mode. | |
| F/T/BExpands page for easier reading. | |
| RevealReveals hidden words and clues for quiz pages. | |
| Display CancelSee following pages | |
| F.P.Favourite PageStores a favourite page in memory for instant recall. | |
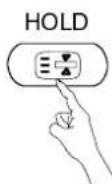
| HoldPress to hold the current page | |
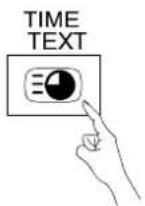
| Time TextSee following pages | |
| Red / Green / Yellow / Blue KeysSee following pages |
 |  |  | TV/Teletextmode |
| TV | Teletext | ||
 |  |  | Page Selection |
 |  |  | FASTEXT and LLSTTIn FASTEXT mode the four differently coloured buttons Red / Green / Yellow / Blue are situated at the bottom of the display showing different subjects. |
| FASTEXT | |||
 |  | In LIST mode the four differently coloured buttons Red / Green / Yellow / Blue are situated at the bottom of the display showing different page numbers. Each of these page numbers can be altered and stored. | |
| LIST | |||
 | 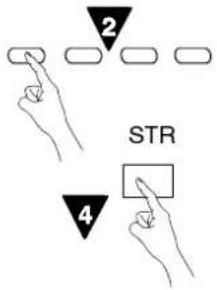 | 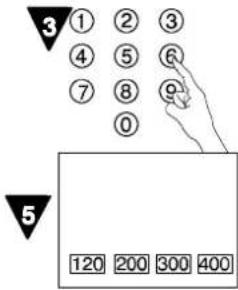 | ListStoneIn LIST mode the four page numbers can be altered (for channel positions 1 - 25 only).To do this, press one of the coloured keys and enter the new page number.Press and hold STR, the page numbers will change colour. |
 | 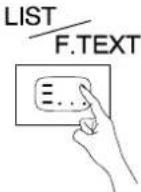 |  | List/FTextPress to change from FASTEXT mode to LIST mode and vice versa. |
| FASTEXT | LIST | ||
 | 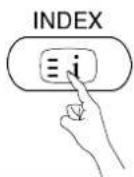 |  | IndexWhen in FASTEXT operation.Press INDEX to return to the main index page. Depending on the way information is transmitted, this may have to be pressed more than once to return to the main index page. |
| FASTEXT | |||
 |  |  | Full/Top BottomPress to expand the TOP half of the page. Press again to expand the BOTTOM half. Press again to return to normal (FULL) size. |
| Full page | |||
 | HOLD |  | HoldTo hold the Teletext page when viewing multipage information.Press again to return to automatic page update. |
FASTEXTandLLSST
ListStone
List/FReext
Index
Full//ToppB@bottom
Hold


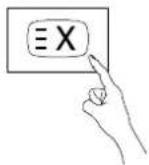
DisplayCancell
News Flash
When a news flash page has been selected, press DISPLAY CANCEL to view the TV picture, when an update is received, it will be displayed or screen.
Press DISPLAY CANCEL to remove updated news.
Press TV / TEXT to return to normal TV.
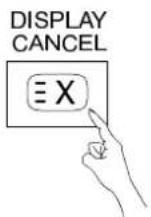
Press DISPLAY CANCEL to view the TV picture whilst searching for a Teletext page.
When found, the screen will display the page number at the top left.
Press DISPLAY CANCEL to view the page.
Press TV / TEXT to return to normal TV.
Update
Press DISPLAY CANCEL to see the update of information on certain pages.
When an update is received, the page number will be displayed at the top left of the screen.
Press DISPLAY CANCEL to view the page.
Press TV / TEXT to return to normal TV.


Favourite Page(FH)
Stores a favourite page in memory for instant recall. To store such a page, the TV must be in LIST mode, and the programme position must be from 1 – 25. Press the BLUE key, select the page number, then press STR. The page number is now stored.
Press F.P. to recall this page.
Note: Depending on the transmission sequence when the F.P. key is pressed, the contents of the favourite page may take some time to appear. Only the page number is stored, not it's contents


DISPLAY
CANCEL


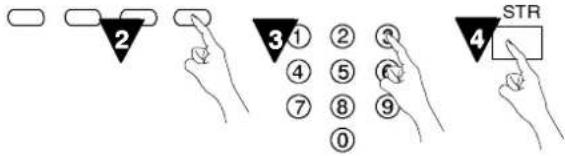
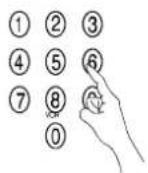
SubCodedPageAccess
When teletext information exceeds more than one page, it may take some time for the automatic changing of the sub pages to reach the sub page you require. It is possible to enter your required sub page and continue watching the normal programme until the correct sub page is found. Select the required page number using keys 0 - 9.
Press TIME TEXT, **** will be displayed (top right of the screen).
Enter desired sub page number before the **** disappears.
To select page 6 enter 0, 0, 0 and 6.
If in LIST mode, a 'T' will appear in the current box at the bottom.
Press DISPLAY CANCEL to view a normal TV programme.
When the page is available, press DISPLAY CANCEL to view the page.
To clear the page perform one of the following :
- Select a new page number.
- Press TV/TEXT to return to normal TV operation.
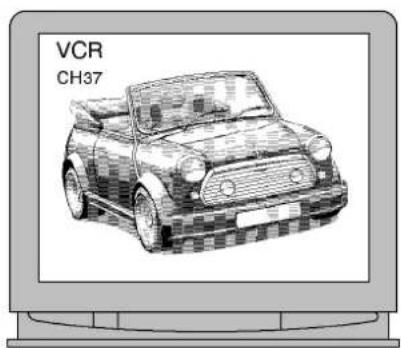
Your new TV is supplied with programme position '0' tuned to receive channel 36 of your VCR. Usually VCRs are also supplied tuned ready to output their signal on channel 36 and under these circumstances your VCR will work immediately through the TV without further adjustment.
However, if for some reason your VCR is tuned to a different channel then you will not receive any picture or sound from your VCR on programme position '0' of the TV. It will be necessary to either set the RF tuning of your VCR to channel 36, or to adjust the tuning of the TV's programme position '0' until it receives the RF output channel of your VCR.
To connect a VHS VCR use the AV1 socket. To connect an S-Video VCR use the AV2 socket.
It is intended that this advice is used in conjunction with the instruction books for your ancillary equipment.
TOTUNEYOOBRORCTOTGIEHE TV
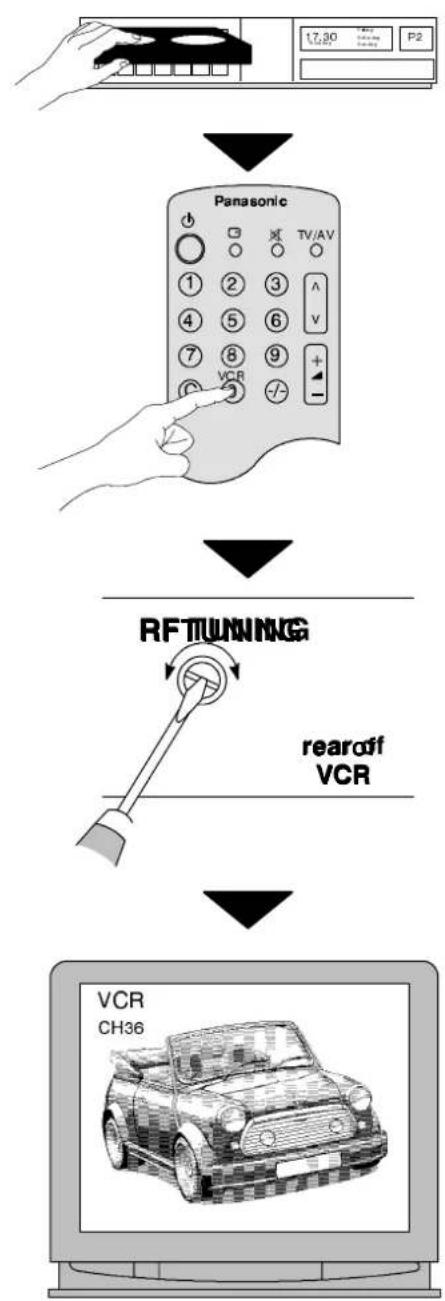
flowchart
graph TD
    A["Hand Holding Panel"] --> B["Panasonic Controller"]
    B --> C["RFT TUNNING"]
    C --> D["rearoff VCR"]
    D --> E["VCR CH36"]
Insert recorded tape and select playback
SetTMdo programme position'0' VCR
Adjust tuning
Operation completed
Seelbowdor installation of VCPR and Satellite RReceiver
TOTIUNNEYCOURTVVOTHENERCR
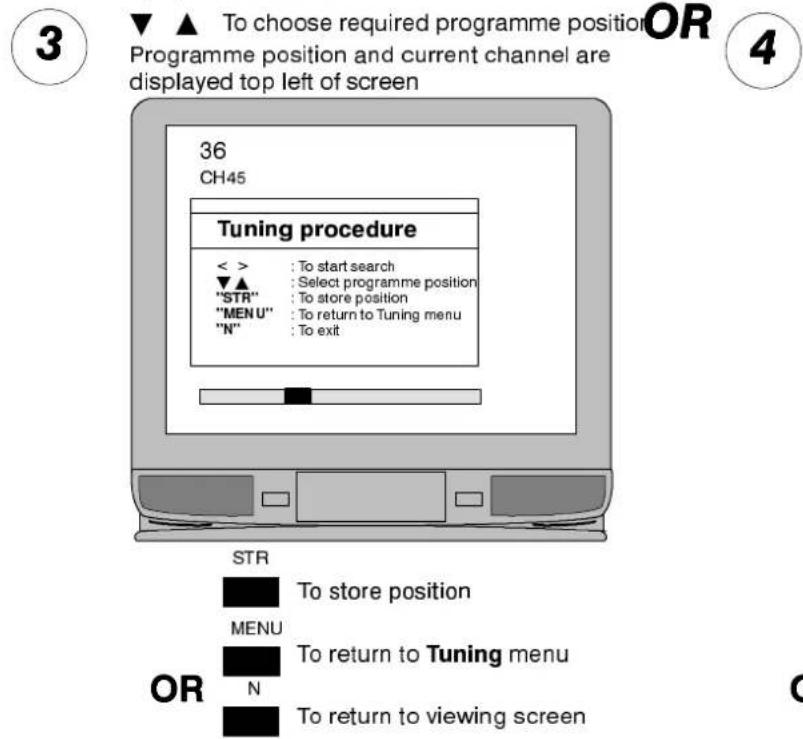
Access the Manual tuning menu as detailed on page 13
▼ ▲ To select programme position '0' ◀ ▶ To start search for VCR playback Programme position and current channel are displayed top left of screen
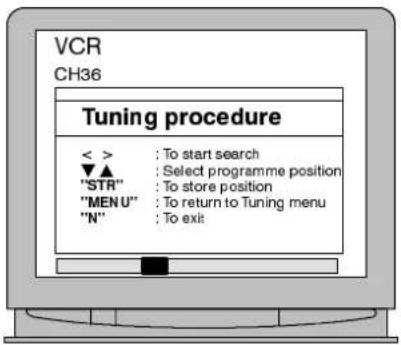
STR

To store position

To return to viewing screen

If you are going to use a Satellite Receiver and a VCR it is important, to avoid tuning problems, that they are both tuned to output their signals on differing channels. For example, if your VCR is tuned to output channel 36, your Satellite Receiver could be set to output channel 38. Refer to your instruction books for precise tuning information.
The Remote Control is capable of operating some functions of selected Panasonic VCRs, please consult your dealer for details. Some VCRs have different functions, so to ensure compatibility, please refer to the VCR's instruction book.
■FrordAVSRCAAudio/VideoandHeadphoneSockets
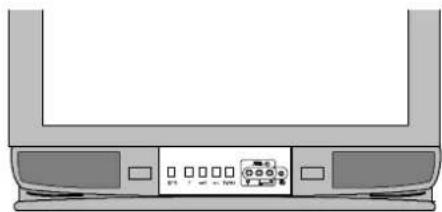
natural_image
Front view of a computer monitor with control panel and indicator lights (no visible text or symbols)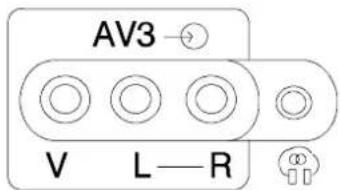
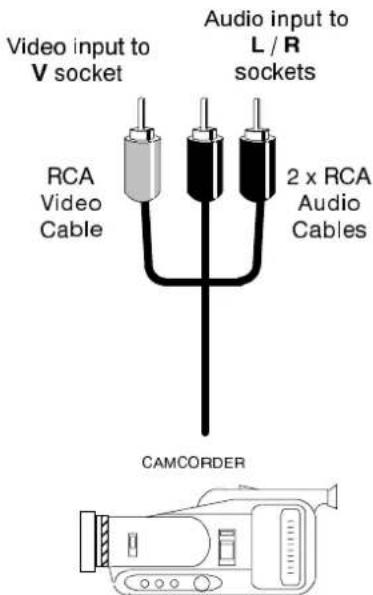

Notes :
Ancillary equipment and cables shown are not supplied with this TV set.
■SCARTTerminalInflationation
AV1 21 pin SCART terminal
| Socket Earth | 21- | -20 | CVBS in (video) | |
| CVBS out (video) | 19- | -18 | RGB status earth | |
| CVBS earth | 17- | -16 | Status RGB | |
| Red in | 15- | -14 | Earth | |
| Red earth | 13- | -12 | -- | |
| Green in | 11- | -10 | -- | |
| Green earth | 9- | -8 | Status CVBS | |
| Blue in | 7- | -6 | Audio in (L) | |
| Blue earth | 5- | -4 | Audio earth | |
| Audio out (L) | 3- | -2 | Audio in (R) | |
| Audio out (R) | 1- |
Suitable inputs for AV1 include RGB (Red/Green/Blue).
AV2 21 pin SCART terminal
| Socket Earth | 21- | □ | □ | - 20 | CVBS in (video) |
| CVBS out (video) | 19- | □ | □ | - 18 | Earth |
| CVBS earth | 17- | □ | □ | - 16 | -- |
| S.C. - In | 15- | □ | □ | - 14 | Earth |
| Earth | 13- | □ | □ | - 12 | -- |
| -- | 11- | □ | □ | - 10 | -- |
| Earth | 9- | □ | □ | - 8 | Status CVBS |
| -- | 7- | □ | □ | - 6 | Audio in (L) |
| Earth | 5- | □ | □ | - 4 | Audio earth |
| Audio out (L) | 3- | □ | □ | - 2 | Audio in (R) |
| Audio out (R) | 1- | □ | □ |
Pins 15 and 20 are dependent on AV2 S-VIDEO / VIDEO switching.
■ Rear AV1 / AV2 (S) 21 Pin SCART and RCA Audio Out Terminals
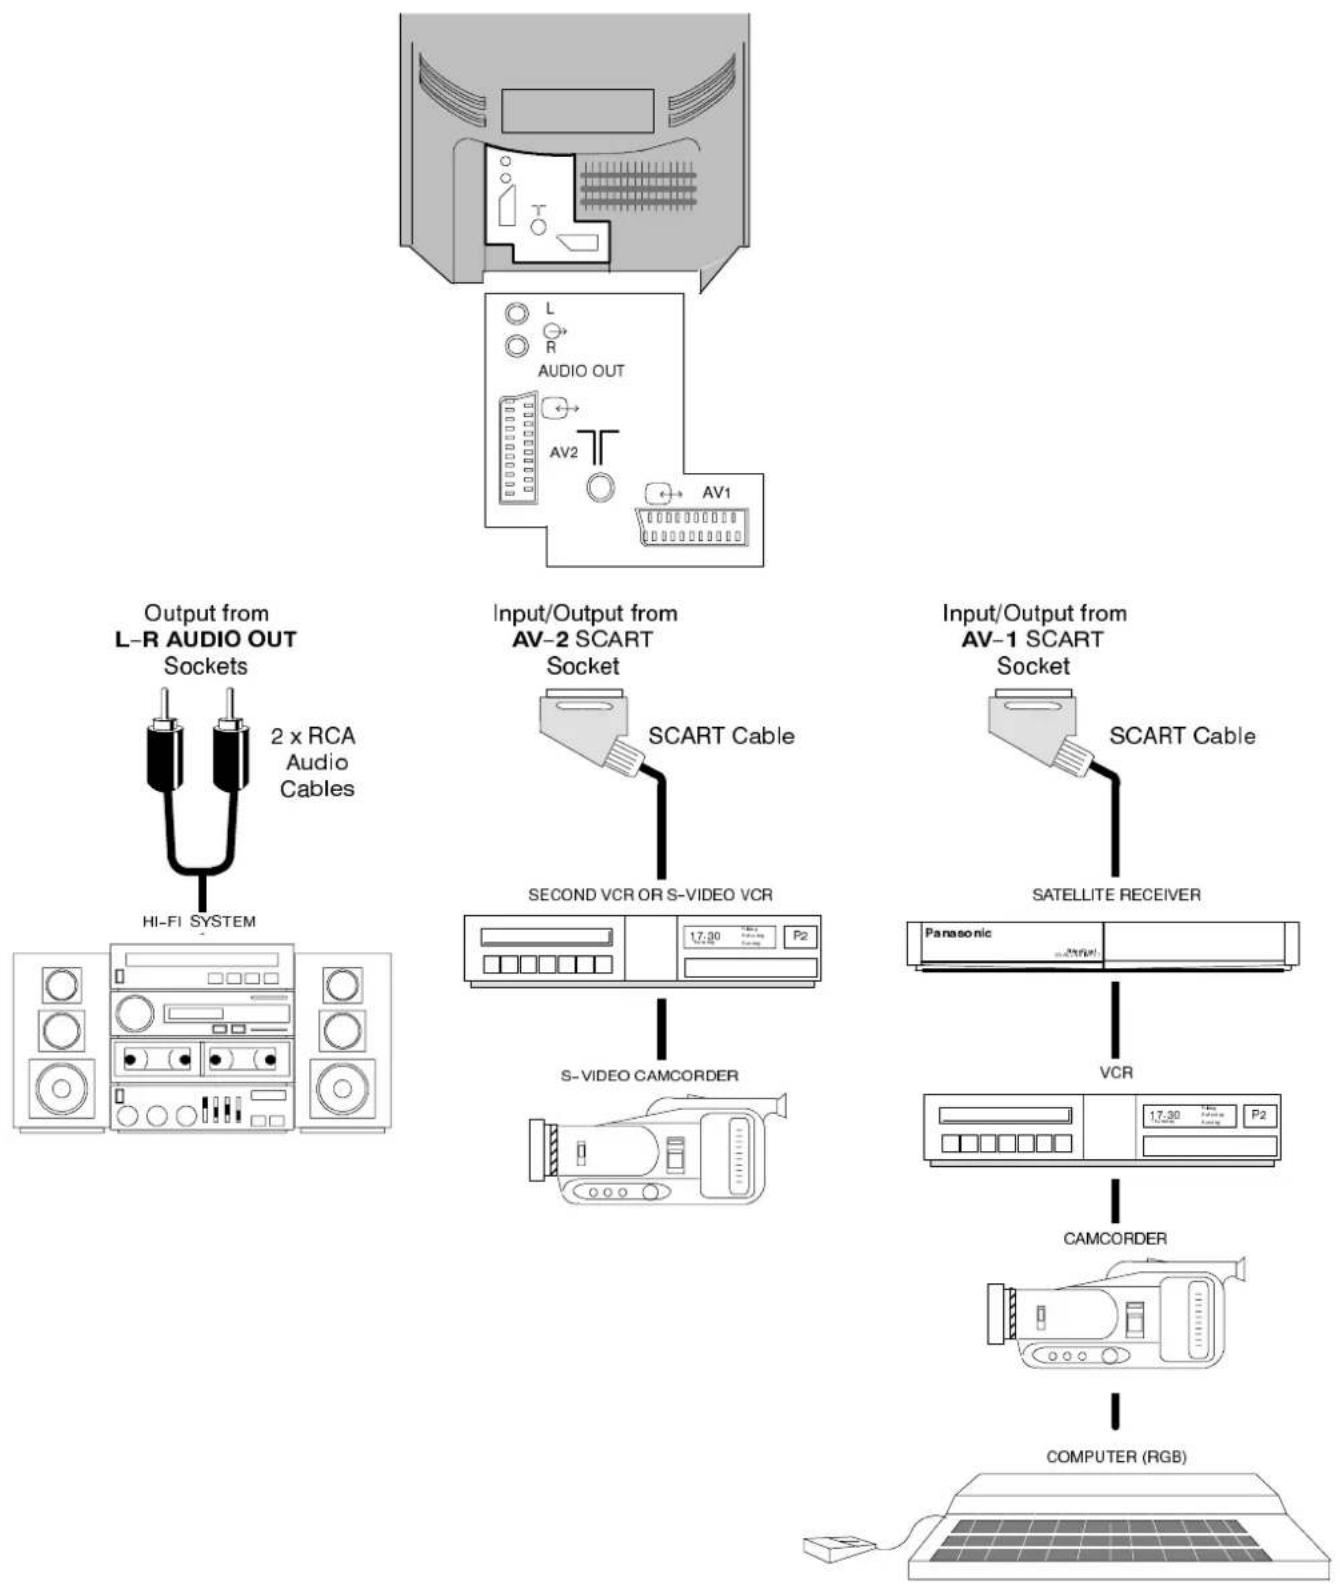
flowchart
graph TD
    A["Audio OUT"] --> B["Output from L-R AUDIO OUT Sockets"]
    A --> C["Input/Output from AV-2 SCART Socket"]
    A --> D["Input/Output from AV-1 SCART Socket"]

    subgraph Audio Out
        E["2 x RCA Audio Cables"] --> F["HI-FI SYSTEM"]
    end

    subgraph AV-2 SCART
        G["SCART Cable"] --> H["SECOND VCR OR S-VIDEO VCR"]
    end

    subgraph AV-1 SCART
        I["SCART Cable"] --> J["SATELLITE RECEIVER"]
    end

    K["SATELLITE RECEIVER"] --> L["VCR"]
    L --> M["CAMCORDER"]
    M --> N["COMPUTER (RGB)"]
NOTES:
Ancillary equipment and cables shown are not supplied with this TV set.
Do not connect a computer with TTL output (5V) to this set.
| Symptoms | Checks | ||
| Picture | Sound | ||
 |  | Aerial location, direction or connection | |
| Snowy Picture | Noisy Sound | ||
 |  | Aerial location, direction or connection | |
| Multiple Images | Normal Sound | ||
 |  | Electrical appliancesCars / MotorcyclesFluorescent lightsSwitch on Noise-R in Setup menu to reduce picture noiseSwitch NICAM to Mono to improve sound. | |
| Interference | Noisy Sound | ||
 |  | Volume levelSound mute switched on | |
| Normal Picture | No Sound | ||
 |  | TV set to AV modeNot plugged into A.C. outletNot switched onPicture / Sound controls set at minimum levelsCheck if in standby mode | |
| No Picture | No Sound | ||
 |  | Colour controls set at minimum levels | |
| No Colour | Normal Sound | ||
 |  | Retune Channel(s) | |
| Poor or Distorted Picture | Weak or No Sound | ||
 |  | Magnetic Interference from unshielded equipmentReceiver moved while switched ON, switch TV off for 30 minutes. | |
| Coloured Patches | Normal Sound | ||
■Service
Before requesting service, please refer to the trouble-shooting guide on previous page to determine the symptoms. To obtain service please contact your local Panasonic dealer quoting the model number and serial number (both are located at the rear of the TV).
■TTVCGames/Hchoe@compensers
Extended use of TV games or home computers with any television set can cause a permanent 'shadow' on the screen. This type of irreversible picture tube damage, can be limited by observing the following points:
- Reduce the brightness and contrast levels to a minimum viewing level.
- Do not operate the television set for a continuous period of time while using TV games or home computers.
- This type of picture tube damage, is not an operating defect, and as such is not covered by the Panasonic warranty.
■ LastPositionMemory
Certain functions have a last position memory, i.e. the setting at the time of switch-off will be the setting used when the receiver is switched on again:—
| Programme | Tint (M.NTSC / NTSC only) |
| AV Position | Contrast |
| Volume | Sharpness |
| NICAM On/Off | Aspect |
| Bass | Standby |
| Treble | Artificial Intelligence (AI) |
| Colour | Brightness |
| Status | Balance |
Music/speech mode
■ SleepFeature
If the set is not switched off when the TV station stops transmitting, it will automatically go to standby mode after 30 minutes. This function will not operate when the TV is in AV mode.
SPECIFICATIONS
| TX-25MD1L/M | ||
| Power Source | 220 - 240V 50Hz A.C. | |
| Power Consumption | 92W | |
| Picture Tube | 59cm visible diagonal | |
| Audio Output | 15W x 2 (MPO) | |
| Dimensions | HWD | 531 mm601.4 mm439.7 mm |
| Weight (Kg) | 25 | |
| Receiving Systems / Band name | PAL I - UHF E21-69, VHF A1-S20, S21-41 (Hyperband)PAL 525/60 Playback NTSC tape from PAL Video recorders (VCR) with NTSC playback facilityM.NTSC Playback from M.NTSC Video recorders (VCR)NTSC (AV input only) Playback from NTSC Videorecorders (VCR) | |
| Aerial - rear | UHF/VHF | |
| Headphones - Front | 3,5mm | |
| AV - Rear | AV1 - 21 pin terminal - Audio / Video in / out, RGB in.AV2 - 21 pin terminal - Audio / Video in / out, S-Video in.2 x RCA Audio Monitor Out | |
| AV - Front | AV-3 2 x RCA Audio in, 1 x RCA Video in | |
- Specifications are subject to change without notice. Weight and dimensions shown are approximate.
PanasonicIrelandLtd.
BurtonHallRoad,
SandyfordIndustrialEstate,
Dublin18.