
TX-25CK1F - Televizor PANASONIC - Manual falas për përdoruesin
Gjeni manualet e pajisjes falas TX-25CK1F PANASONIC në format PDF.

Pyetjet e përdoruesve rreth TX-25CK1F PANASONIC
0 pyetje rreth kësaj pajisjeje. Përgjigjuni atyre që njihni ose bëni tuajin.
Bëni një pyetje të re rreth kësaj pajisjeje
Shkarko udhëzimet për tuajin Televizor në format PDF falas! Gjeni manualin tuaj TX-25CK1F - PANASONIC dhe merrni pajisjen tuaj elektronike sërish në duar. Në këtë faqe janë publikuar të gjitha dokumentet e nevojshme për përdorimin e pajisjes suaj. TX-25CK1F e markës PANASONIC.
MANUAL I PËRDORUESIT TX-25CK1F PANASONIC
Panasonic

natural_image
Front view of a Panasonic TV CRT monitor with ventilation grilles and control buttons (no visible text or symbols on screen)Colour Television
TX - 2 8 CK1F TX - 2 5 CK1F TX - 2 1 CK1F


Operating Instructions
TQB8E2767---eng
English
Please read these instructions before operating your set and retain them for future reference.
(unapproved issue --- for information only)
WELCOME
Dear Panasonic Customer
Welcome to the Panasonic family of customers. We hope that you will have many years of enjoyment from television set. Technically your set is more advanced than the previous models, however the “Quick Start—Up Guide” will help you operate your set easily. Later you may read this Manual and use it for further reference.
TABLE OF CONTENTS
-Warnings and Precautions 2.
- Quick Start 3
• Main Controls 4 - Main Menu Flow Chart 5
-
On-Screen Menu Indications 5
-
Main menu 6
• Sound menu 7 - Setup menu 8
- Tuning menu 9
- Tuning – Automatic Tuning Process (ATP) ..... 10
- Tuning – Manual Tuning 11
- Swap – Programme swapping .... 12
- On-Screen Display Language 12
- Special Functions
Q-Link 13
Data Copying In VCR - Q-Link 14
- AV selection – AV Mode 14
• VCR Controls 15
- Teletext Function 16
- Autosort 17
• External audio/video connections ..... 18
- Troubleshooting 19
- User Information 20
- Specifications 20
WARNINGS AND PRECAUTIONS
This television set is designed to be connected to an A© 220---240 V, 50 Hz power source.
To avoid damage that may result in an electric shock or fire do not expose the unit to rain or excessive moisture.
○WARNING: HIGH VOLTAGE!!!
Do not remove the rear cover as live parts and high---vo components are accessible. No components need any technical maintenance by the user.
The power switch does not totally disconnect the set from the power source. If you are not going to use the unit for an extended period, unplug the power plug from the socket.
CLEANING THE UNIT AND SCREEN
Unplug the power plug from the socket. To clean the uni the screen use a soft cloth slightly soaked in a soap sol Do not use solutions containing benzene or other petroleum products. The unit may generate static electricity, so be careful when touching the screen.
Do not expose the unit to direct sunlight or other sources of direct heat.
Adequate ventilation is essential to prevent failure of electrical components; we recommend that a gap of at least 5 cm is left around the unit even when it is placed inside a cabinet or between shelves.
OWASTE DISPOSAL
The used packaging and batteries should be disposed of in special containers intended for this purpose.
Check you have all the components shown here:

Panasonic Ultra Power
Panasonic Ultra Power
remote control unit batteries 2 x R 6 ( U M 3 )
EUR511310 remote control unit
operation manual


Te l e v is ion guarantee
Remote control unit batteries

- Insert the batteries ensuring correct polarity.
- Do not use old and new batteries at the same time. Used batteries should be removed at once.
- Do not mix battery types. not use Ni---Cd batteries.
How To Start Up Quickly
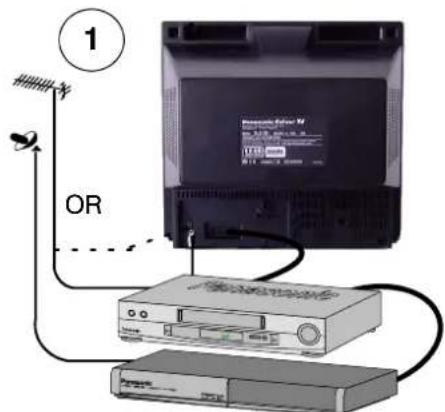

Connect the aerial and the additional devices. Switch on the unit and the connected devices.
3
Select your language.

Press TV/AV button.

Select your country.

Press TV/AV button.

Automatic tuning will turn on, your transmitting stations will be found, saved in memory, and organised.
Press button "F" if you want to stop; press button "N" if you want to cancel the ATP sequence.

If the AV connector is connected to compatible VCR the programmed data will be transmitted to the VCR via Q-Link. See page 13.


4


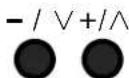
Channel selection
Volume adjustment
- If the VCR has failed to receive the data transmitted from the television unit you will probably have to find a way to transmit the data from the VCR menu.
- If Q-Link does not work properly, check if the SCART cable is connected to AV1 connector on the unit and has all the 21 pins, and if the VCR is compatible with Q-Link, NEXTVIEWLINK and similar techniques.
- You will find Information regarding Q-Link and connection on pages 13 and 18. Should you need more detailed information, contact your dealer.
If you install a new Q-Link compatible VCR, you may switch it on. The transmitted tuning data will match the data in the unit. If you use a new NEXTVIEWLINK-compatible VCR, the data will have to be transmitted manually. See details in the VCR operating manual.
Front Panel

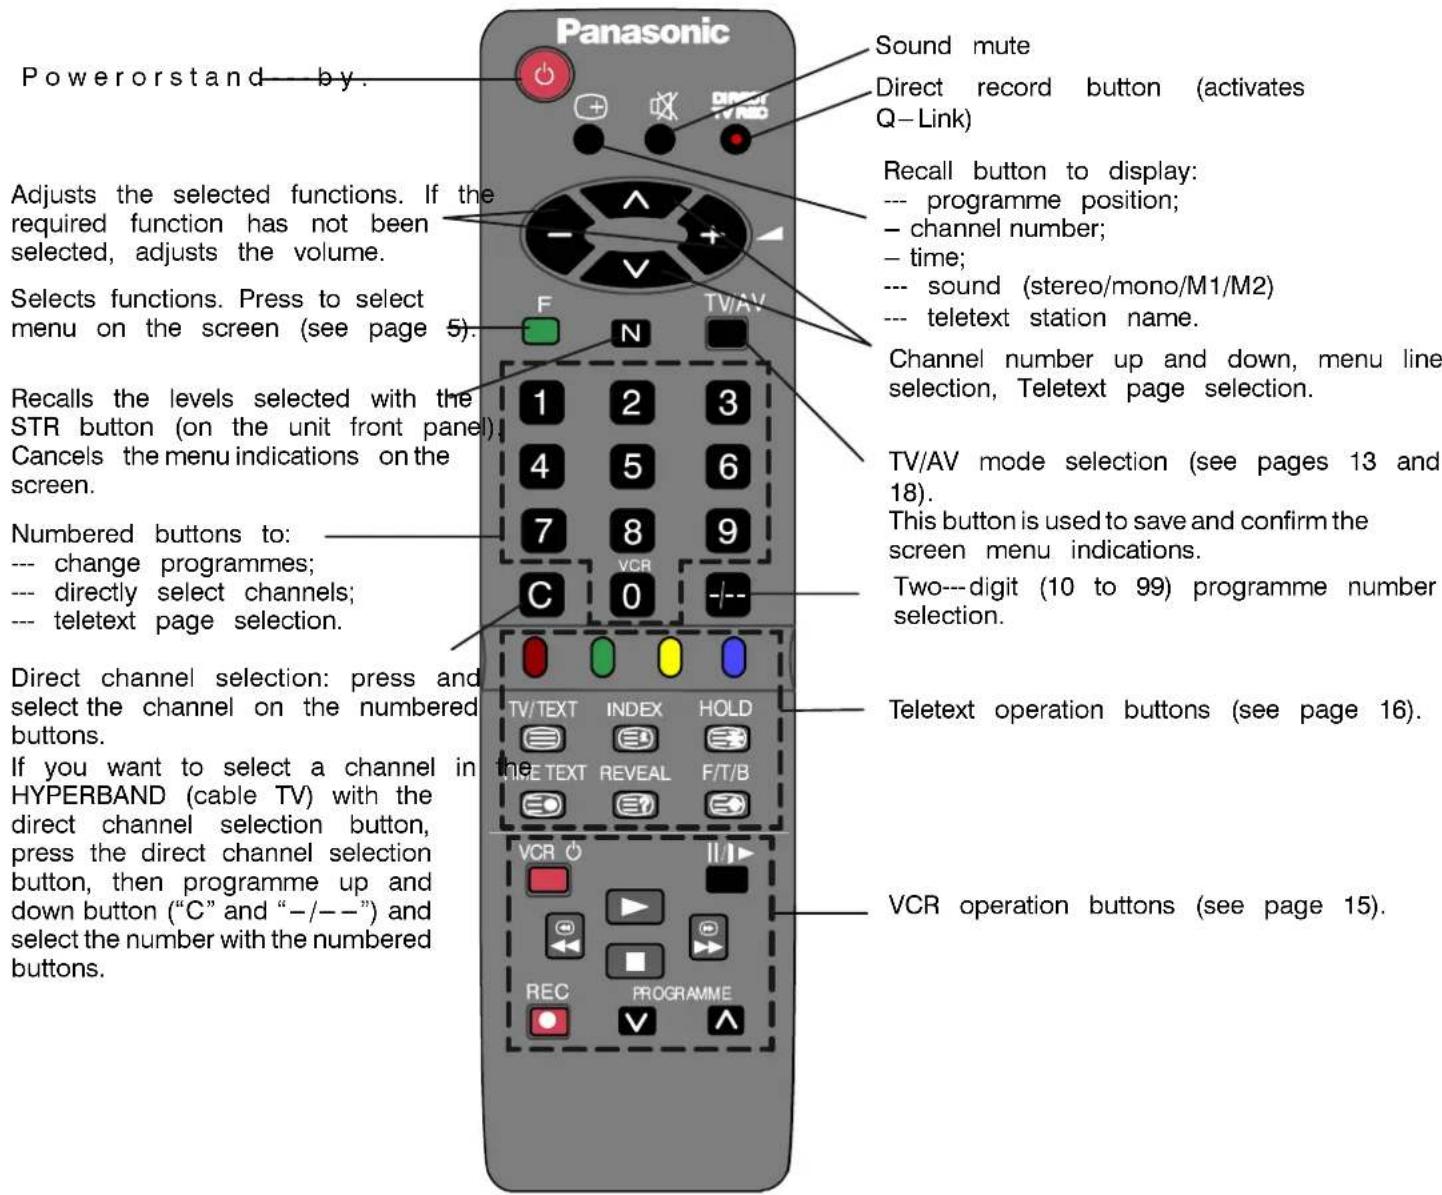
Remote Control Unit

flowchart
graph TD
    A["Main Menu"] --> B["Sound Menu"]
    A --> C["Setup Menu"]
    A --> D["OSD Language"]
    B --> E["Stereo / Mono / M1 / M2"]
    B --> F["Music / Speech"]
    B --> G["Off / On"]
    C --> H["Text Language Aspect C-A-T-S Colour System (AV only) Q-Link Tuning Menu OSD Language"]
    C --> I["Auto / 4:3 / 16:9"]
    C --> J["AUTO / PAL / SECAM / NTSC / M.NTSC"]
    C --> K["Off / On"]
    D --> L["Tuning Menu"]
    L --> M["Auto setup warning"]
    L --> N["Manual tuning"]
    L --> O["SC1 / F"]
    L --> P["Swap"]
    L --> Q["Auto / PAL / SECAM"]
    L --> R["Off / On"]
    L --> S["TV → VCR"]
    L --> T["Off / On"]
    M --> U["Country"]
    N --> U
    O --> U
    P --> U
    Q --> U
    R --> U
    S --> U
    T --> U
    U --> V["Auto setup searching"]
ON—SCREEN MENUINDICATIONS
Your televisions set equipped with more comprehensive system systems for being each selection of and selection of pa
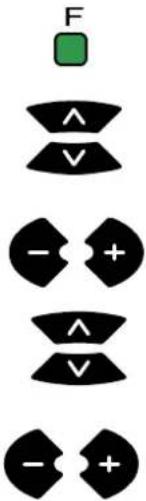
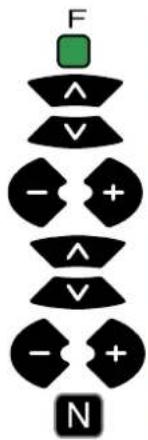
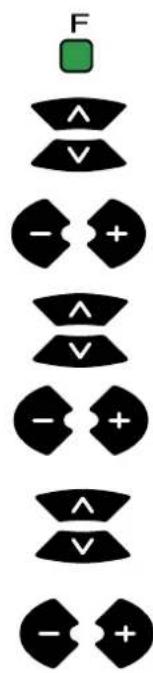
Press button "F" to eate enter the menu.
Buttons to be tested from moving across the menu and to select target parameters.

Some parameters such as Contrast, Brightness, Colour and Sharpness may be increased or decreased at your wish.
Selected lines allow to select certain functions such as Off Timer.
Other selected lines such as Setup menu allow you to go to another menu.
By pressing button "F" you either enter the on-screen indications menu or go back to another menu.
By pressing button "N" you close either the on-screen menu or the selected parameter.
Button "TV/AV" is normally used to confirm the selection.
This section shows among others how to adjust the picture quality.
Press button k)l
Select the required parameter
Increase or decrease the level.
Press button k11 to leave the menu.


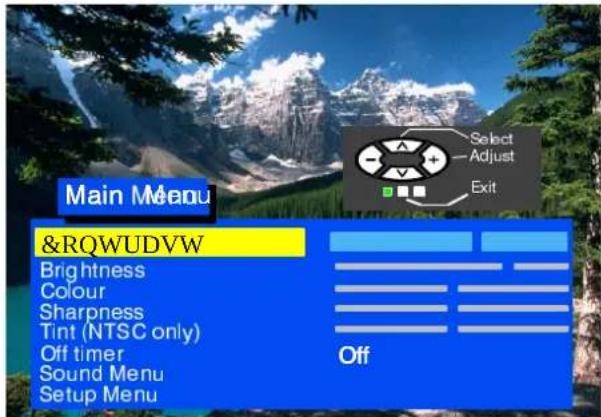
&RQWUDVW
%ULJKWQH
&RORXU
6KDUSQHVV
The level of contrast, brightness, colour and sharpness may be adjusted so as to meet the requirements of your sight. You may go back to the level set by the manufacturer at any time by pressing button k11.
7LQ
The line "Tint" will appear as a menu line only when a NTSC signal is connected to the unit via the AV input thus allowing the tints to be adjusted.

2II WLPHU
Switches off your television at the time you set from 0 to 90 minutes with 15-minute intervals.
S###m##X
The Sound menu allows you to adjust the sound as youth wish.
Sletup smehoX
The Satupx menu provides access to various advanced features and also to the Tuning menu.
This section shows how to adjust the sound as you wish.
Press button "F".
Select Sound menu
Enter Sound menu
Select the required parameter
Adjust the level and confirm the selection


Leave the menu by pressing button "N"


Volume
Parameter Volume adjusts the level of input sound
Bass
Parameter Bass adjusts lower frequencies to enhance or diminish them.
Treble
Parameter Treble adjusts higher frequencies to enhance or diminish them.
Balance
Balance adjusts the sound level between the left and right speakers. The sound may be adjusted to the viewers satisfaction.
MPX

MPX is set in position "Stereo" (in case of stereo transmission) thus ensuring the best sound reproduction. However if transmission deteriorates you are recommended to switch over to "Mono". Mono (M1) and (M2) may also be selected if a bilingual transmission is broadcast by the station. The signal is adjusted automatically.
Mode

The sound quality may be changed by selecting the Music or Speech modes.
AI

The AI - device automatically analyses the incoming sound signal to muffle the noise and get the best sound.
This section gives access to other functions and the setup menu.
Press button "F".
Select Setup menu.
Enter Setup menu.
Select the required parameter.
Adjust the parameter.

Leave the menu by pressing button "N".
Text Language


Switches between western and eastern character set in Teletext.
The Aspect function will allow you to view wide---screen programs with the correct side dimensions (16:9).
Contrast AutomaticTuFiningySystem
Automatically adjusts the ordomant to match any changes in the room fighting.
To get the best results first set contrast at maximum and then select any of the threesipositions:
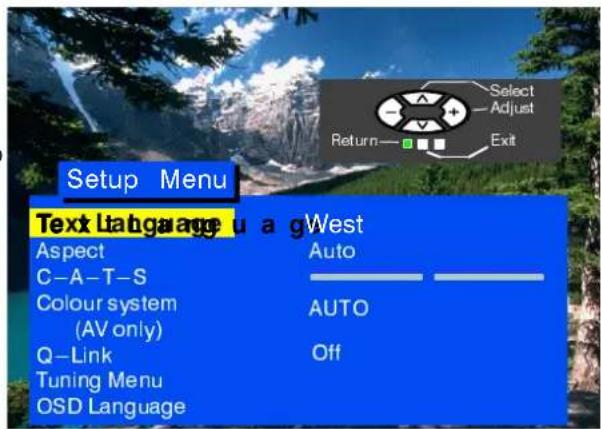

Colour system

Selects the colour decoding system for the programme.

Allows data to be transmitted from your television to a compatible VCR. See page 13.

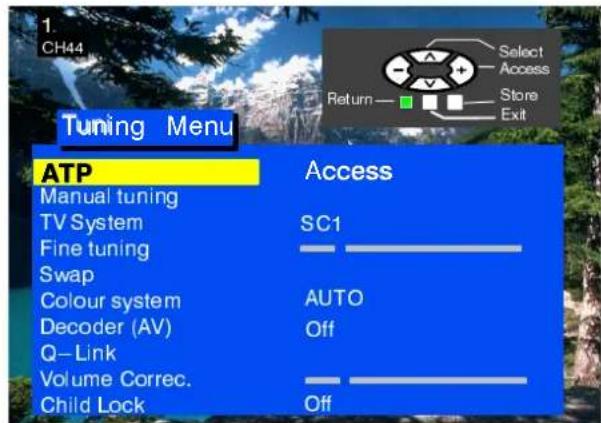
Tuning Menu
Provides access to many functions including the ATP function, fine tuning and volume tuning. See page 9
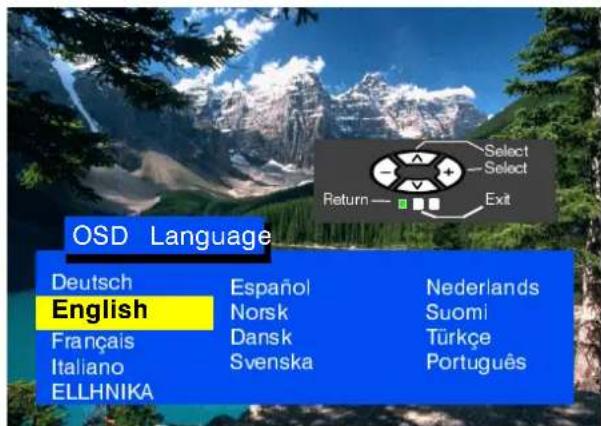
OSD Language
Allows selection of the language to be used in all the menus. See page 12.
This section provides access to the manual and automatic tuning menu.
Press button "F".
Select Setup menu.
Enter Setup menu.
Select Tuning menu.
Enter Tuning menu.
Enter the required parameter.
Adjust the level.
Leave the menu pressing by button "N".


ATP
Provides the automatic pre---tuning of television. See page 10.
Manual tuning
Allows manual tuning of the selected channels. See page 11.
TV SSystem
Selects soundstandard.
Fine tuning
The broadcasting stations may be finely tuned to with the Fine tuning function.
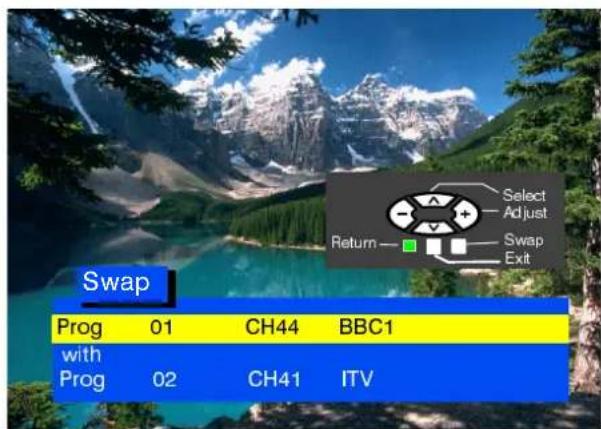
Swap
Swaps the programmes as you prefer. See page 12.
Colour system
Selects the colour decoding system for the programme.

To be used when the decoder is connected via AV. Select "On" if the decoder is to process the coded sig Select "Off" when finished.
Decoder (AV)

Q---Link function is used to download data to a compatible VCR. See page
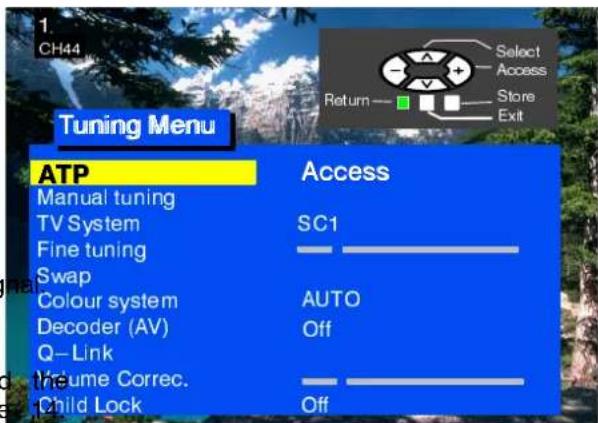
Volume correctio
Allowsthevolumetobesetfordifferent broadcasting stations with different sound levels.
Child Lock
Locks the programme position against undesirable intrusion.
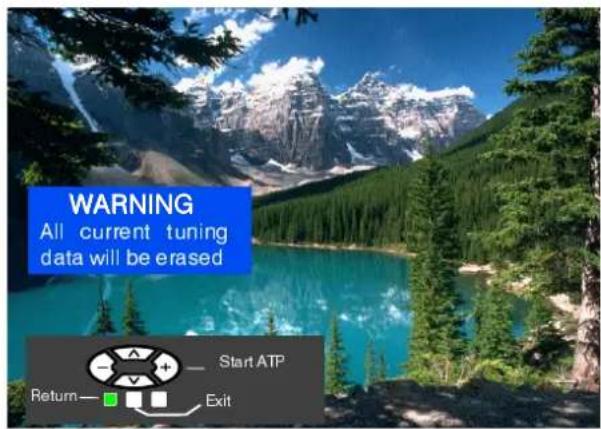
TUNING --- AUTOMATIC TUNING PROCESS (ATP)
Automatic tuning will allow you to tune your television automatically to the local broadcasti. It is a convenient function when you move your TV set to another location.

The television will find, tune in to and sort the local broadcasting stations. If a compatible VCR is connected via the AV jack, the programmed data will be transmitted via the Q-Link to the VCR (see page 14).
As soon as this operation is completed programme position 1 will be displayed on the screen.
Press button "F" to interrupt and "N" to finish the ATP sequence.


TUNING --- MANUAL TUNING
The programme positions may be tuned manually either with the on---screen menu or with on the front panel.
Press button "F".
Select Setup menu.
Enter Setup menu.
Select Tuning menu.
Enter Tuning menu.
Select Manual tuning.
Enter Manual tuning.
Select the programme position you need.
Start tuning.
When the required programme is found TV/AV STR save it by pressing either button TV/AV STR (on the front panel).
Leave the menu by pressing button "N".
Manual tuning (front panel)
Keep pressing button "F" until "Manual tuning" is displayed.
By pressing buttons "+" or "-" enter "Manual tuning".
By pressing button "TV/AV" move between "TV System", "Prog" or "Search".
By pressing buttons "+" or "-" change the programme position to start the search or change the TV system.
When the required station is found press button "STR" to save the changes.
To tune in to other programmes, repeat the above procedure or finish the tuning by pressing button "F".


Notes:
If you know the channel numbers of your broadcasting stations you may use direct channel selection by using button "C" on the remote control unit to save the channels quickly:
--- enter Manual menu;
- pre-set the programme number;
- press button "C";
--- set the channel number with the numbered buttons;
--- save with button TV/AV;
- leave the menu by pressing button "N".
If you want to use direct channel selection in the "Hyperband" (cable TV), press the direct channel selection button and programme position button ("C" and "--") one after the other and set the number with the numbered buttons. "CH--" will first appear in the left top corner of the screen, a then "H:--". For saving see above.
SWAP
The Swap option allows you to swap between two programme positions.
Press button "F".
Select Setup menu.
Enter Setup menu.
Select Tuning menu.
Enter Tuning menu.
Select Swap.
Enter Swap.
Select first programme position.
Select second programme position.
Confirm with button "TV/AV".
Leave menu by pressing button "N".

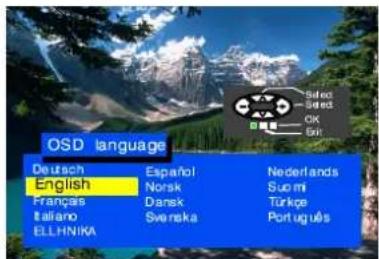
OSD LANGUAGE
When first setting your television, the OSD the OSD language to match your country sele want to use another language you may select the language from the language menu.
Press button "F".
Select Setup menu.
Enter Setup menu.
Select OSD language.
Enter OSD language.
Select the language.
Save and leave the menu by pressing button "N".

Q-LINK
The Q---Link function transmits the data from the television to the VCR.
Press button "F".
Select Setup menu.
Enter Setup menu.
Select Q - Link.
Make sure Q - Link is On.
Leave the menu by pressing button "N".
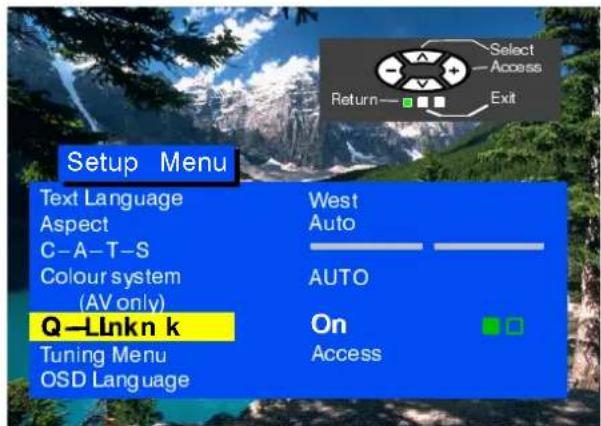
The VCR must be connected with a (full) SCART cable to the AV1 jack and the appropriate jack on the VCR. See the VCR Operation Manual for more detailed information. The Q-Link, NEXTVIEWLINK and other techniques allow the television to transmit to a compatible VCR the indication of the current programme irrespective of what programme is set on the VCR which greatly facilitates the programme recording process.
Recording the currently viewed programme
Press "Direct TV Record" on the remote control unit
DIRECT TV RECORD
If the VCR is turned off, it will turn on after the Direct TV Record button is pressed.
The VCR information will appear on the screening indicator whether or not the programme can be recorded
VCR records set programme
VCR records tuner signal
The VCR records its tuner signal. You may switch off the television and the VCR will record in an ordinary way
VCR records TV signal
The VCR records the signal from the televisionan You can neither change programmess nor wiswitch off the television; if you do so switch the VCR will automatically stop the recording and turn off.
Not recording. Tape protected from recording
The protection tab was removed from the back side of the video cas: Examples of other indications:
Not recording. No tape.
Not recording. Playing back.
Recording from external source.
Not recording. Already in recording mode
Not recording. Tape may be damaged.
Not recording. No source signal.
Setup Indications Transmission
To ensure adequate recording the television and the VCR must have identical setup information --- see page
- Each time the ATP function is used, the setup data are transmitted to the VCR.
Automatic Power-On/Power-Off Function
Panasonic Q-Link VCRs provide you with the following functions:
- If you insert the tape in the VCR and press the Play button the television will automatically turn on selecting the AV2 input, so you may view the recording.
- If you turn off the television when the VCR is in the Stop mode, Fast Forward Mode or Rewind Mode, the VCR will automatically turn off.
Turning Off Q-Link Function
If you do not want to use the Q---Link function enter Setup Menu and set Q---Link to Off.
Important Note:
Not all VCRs support this type of the data transmission system. Some VCRs may support certain functions, others support no functions at all. For more details see the VCR Operation Manual.
If the Q-Link function is not operable first make sure the SCART cable is fully functional. See your dealer for details.
Q-LINK
By selecting the Q-Link function the TV setup data may be downloaded from the television to the VCR memory.
Press button "F".
Select Setup menu.
Enter Setup menu.
Select Tuning menu.
Enter Tuning menu.
Select Q - Link.
Activate Q - Link.

AV SELECTION --- AV MODE
To select the AV mode press button "TV/AV". If another receiver is connected to the AV connectors (VCR, satellite receiver, camera, etc. see page 18) and if it is in operation, its signal will be displayed and AV will appear in the top left corner of the TV screen regardless of the selected programme position. (TV tuner is ignored).
This television may automatically switch over to the AV mode if the connected device sends a switch signal to the SCART cable connector. The picture received will remain the same when the TV programme is changed.
You may switch back to the television by pressing button "TV/AV" or by disconnecting the AV device.
Two AV devices may not be connected to the television simultaneously, as their signals would overlap.
If an NTSC signal is connected via the AV input the television will automatically detect the signal and switch over to the NTSC standard. The Main Menu OSD indications will be enhanced in the AV mode as another selection is added: Tint, which may be adjusted with buttons “+” and “-”.
VCR CONTROLS
The remote control unit may perform certain functions of the advanced Panasonic VCRs. So have different functions so, to ensure compatibility, follow the instructions in the VCR operat manual or consult your dealer.
| [VCR] | Standby ModeBy pressing this button you will switch on the VCR putting it in standby mode. Another press will switch the VCR off. |
| PlayPress this button to start playing the VCR cassette. | |
| StopPress this button to stop playing. | |
| Fast Forward/CueBy pressing this button the tape will move fast forward. In the Play mode you may view the picture at double speed. | |
| Rewind/ReviewBy pressing this button the tape will rewind. In the Play mode you may view the picture in the backward direction at double speed. | |
| Pause/StillPress this button in the Play mode to stop the pict Press again to continue viewing. | |
| Programme Number Up And DownBy pressing these buttons the programme number will be increased or decreased by one position. | |
| REC | RecordPress this button to start recording. |
| DIRECT TV REC | Direct TV RecordPress this button to start recording directly from the television. See page 13. |
TELETEXT FUNCTION
- Teletext functions may vary depending on the broadcasting companies and are only available if the selected channel is transmitting Teletext.
- If button "F" is pressed in the Teletext mode the blue contrast scale will appear; press buttons "+" and "-" to change the settings.
- When in Teletext mode, the volume may still be adjusted by pressing buttons “+” or “−”.
What is FLOF (FASTEXT)?
In the FASTEXT mode four differently coloured subjects are shown at the bottom of the screen matching the buttons on your remote control unit. To access more information about one of these subjects, press the app or coloured button. This function allows quick access to information on the subject shown.
| TV/TEXT | TV/Teletext ModePress button TV/TEXT. The Teletext title page will be displayed on the screen. Press again to return to | |
| INDEX | IndexPress this button to return to the main index page. Depending on the status you may have to press to return to the main index page. | |
| HOLD | HoldPress to hold the current page. Press again to cancel the hold. | |
| TIME TEXT | Time/TextWhen Teletext information exceeds more than one page, it may take some time for the automatic changing of the sub pages to reach the sub page you require. | |
| 1 2 34 5 67 8 90 | Press the TIME TEXT button; **** will be displayed at the top left of the screen. Enter the desired sub-page number. To select sub-page 5, enter 0, 0, 0 and 5. The TV is now searching for the correct sub page.You can continue watching the TV programme by pressing the TV/TEXT button. If you switch back to Teletext and if the entered page is already available, the sub page will be displayed until a new page or programn is entered. | |
| TV/TEXT | To clear the sub page perform one of the following:○Press the INDEX button.○Select a new page number.○Change the programme position. | |
| REVEAL | RevealPress to reveal hidden words, e.g. crossword or quiz-- page answers, can also display VPS/PDC codes. | |
| F/T/B | Full/Top/BottomTeletext information viewing on the screen. | Press to expand the top half of the page.Press again to expand the bottom half.Press again to return to normal (full) size. |
| Page SelectionPages can be selected in two ways:a) press the Up/Down buttons to increase or decrease the page number by one;b) enter the page number using 0 --- 9 on the remote control unit. | ||
| Red/Green/Yellow/Blue ButtonsIn the FASTEXT mode, these correspond to the differently coloured subjects. | ||
| NormalisationPress button “N'to return to the TV mode. | ||
AUTOSORT
The sorted programme order depends upon the TV signal, the broadcasting system, and reception conditions. First the TV stations are stored in the increasing order of programme positions:
- all the TV stations with names located according to the bellow table, then:
- TV stations with names which are not listed in the table, in the increasing order of programme positions, then:
● TV stations where the TV receiver has not identified the name, in the increasing order of programme positions.
| ORDER | FRANCE SPAIN | ||
| 1 | TF1 TVE | ||
| 2 | FR2 TV3 | ||
| 3 | FR3 | ||
| 4 | LA5 | ||
For other European countries the programme positions are sorted and stored in the order of tuning.
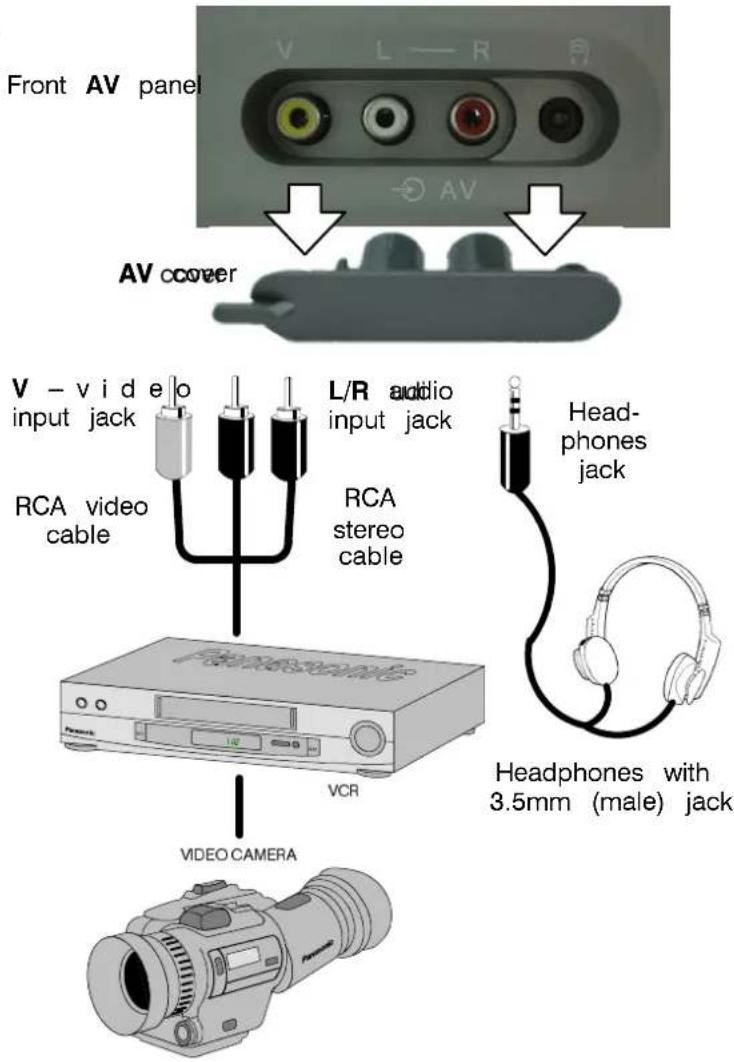
Rear AAVSCART 21---pin connector and front RCA connector
Audio/video (AAV) nipoputure aresiglesignedortoecton VCR, as VCR, a satellite receiver and other compatible audio/video equipment.
Rear input/output of AV1 SCART connector

flowchart
graph TD
    A["SCART cable"] --> B["VCR"]
    B --> C["SATELLITE RECIEVER"]
    C --> D["CAMERA"]
    D --> E["PLAYSTATION"]
■SCART connector information
21-pinSCART-AV1

AV1 inputs in which finding GBGBd(gee/green/blue)
Notes
The equipment and cables shown above are not supplied with the television.
Do not connect computers with TTL (5V) output to this television.
When the headphones are connected, the speakers will be automatically disconnected.
Do not connect AV inputs on the front and rear panels simultaneously as the sound and video signals will overlap.
| Symptoms | Check | |
| Picture Sound | ||
 Snowy picture Snowy picture |  Noisy sound Noisy sound | Aerial location, direction or connection |
 Multiple images Multiple images |  Normal sound Normal sound | Aerial location, direction or connection |
 Interference Interference |  Noisy sound Noisy sound | --- electrical appliances--- cars/motorcycles--- fluorescent lights |
 Normal picture Normal picture |  No sound No sound | Volume levelcheck whether the mute function has been activated on Remote Control and volume is selected correctly in Tuning Menu |
 No picture No picture |  Noisy sound Noisy sound | Check:--- If AV mode is activated--- if plugged into AC outlet--- if switched on--- picture/volume settings--- if in standby mode |
 No colour No colour |  Normal sound Normal sound | Colour control |
 Scrambled Scrambled |  Normal or weak sound Normal or weak sound | Retune channels |
 Coloured patches Coloured patches |  Normal sound Normal sound | Magnetic interference (e.g. loudspeaker --- remove)TV set moved while On --- turn TV set off for 30 min. |
 Normal picture Normal picture |  Noisy sound Noisy sound | Receiving conditions are bad (e.g. atmospheric conditions)Switch MPX (Sound menu) to Mono and wait for better conditions |
■Service
Before requesting service look through the Troubleshooting obtain service get in touch with your dealer and tell them television model type and serial number (to be found on panel).
■TV games/Home computers
Frequent use of the games console or computer may cause "shadows" on the screen. This can be avoided if you meet following requirements:
○Reduce brightness and contrast to minimum;
Do not use your television continuously with the game Last viewed programme console and computer
Remember that this type of screen damage is not an operation defect and is not covered by the Panasonic warranty.
■Last settings saved
Some functions allow the last settings to save, i.e. the following settings will be activated when you turn on the television ago
the rear Programme positions Tint
Q - Link C - A - T - S
Volume correction (+AV) Contrast
Volume
Sound type: music/speech
Bass
Treble
Standby mode
Country
Last viewed programme
Sharpness
Brightness
Colour
L/R balance
Status
OSD language
Sound AI
■ Automatic switch-off (Sleep Function)
If the television remains switched on when the station ends transmission, the television will automatically be put in standby mode after 30 minutes. This function does not operate in the mode.
SPECIFICATIONS
| Model | TX-28CK1F | TX-25CK1F | TX-21CK1F | |
| Power source | 220 - 240 V, 50Hz AC power source | |||
| Power consumption | 76W | 76W | 60W | |
| Power used in Standmode | 0,9W | 0,9W | 1W | |
| Screen51 cm diagonal | 66 cmQuintrix | 59 cmQuintrix | 51 cm | |
| Sound(music) | 2 x 5W RMS (2 x 10W MPO), impedance 8Ω | |||
| Dimensions | HWD | 580 mm646 mm471 mm | 538 mm580 mm442,5 mm | 476 mm512 mm470 mm |
| Weight (kg) | 33 kg | 27 kg | 20,6 kg | |
| TV systems/zones | PAL B/G, PAL H, PAL-60, SECAM B/G, SEICAM L/VHF E2 - E12VHF H1 - H2 (ITALY)VHF A - H (ITALY)UHF E21 - E69CATV (S01 U S05CATV S11 - S20 (U1 - U10)CATV S21 - S41 (Hyperband)M.NTSC playback from VCR NTSC 4.43 MHzNTSC playback (via AV input) from VCR NTSC | |||
| Number of programme positions | 99 + VCR | |||
| Aerial input -- rear | UHF / VHF | |||
| Headphones output - front | 3.5 mm, impedance 8Ω | |||
| AV connector - rear | AV1 - 21-pin connector - AV input/output, RGB input, Q-Link | |||
| AV connector - front | Front AV - RCA stereo sound signal input, 1 x RCA video signal input | |||
The specifications may be subject to change without notice. Weight and dimensions are approximate.
- Panasonic
- WELCOME
- Dear Panasonic Customer
- TABLE OF CONTENTS
- WARNINGS AND PRECAUTIONS
- Check you have all the components shown here:
- Remote control unit batteries
- How To Start Up Quickly
- 3
- 4
- Front Panel
- Remote Control Unit
- ON—SCREEN MENUINDICATIONS
- &RQWUDVW
- S###m##X
- Sletup smehoX
- Volume
- Bass
- Treble
- Balance
- MPX
- Mode
- AI
- Text Language
- Contrast AutomaticTuFiningySystem
- Colour system
- Tuning Menu
- OSD Language
- ATP
- Manual tuning
- TV SSystem
- Fine tuning
- Swap
- Decoder (AV)
- Volume correctio
- Child Lock
- TUNING --- AUTOMATIC TUNING PROCESS (ATP)
- TUNING --- MANUAL TUNING
- Manual tuning (front panel)
- Notes:
- Q-LINK
- Recording the currently viewed programme
- Setup Indications Transmission
- Automatic Power-On/Power-Off Function
- Turning Off Q-Link Function
- Important Note:
- AV SELECTION --- AV MODE
- VCR CONTROLS
- TELETEXT FUNCTION
- What is FLOF (FASTEXT)?
- AUTOSORT
- Rear AAVSCART 21---pin connector and front RCA connector
- ■SCART connector information
- 21-pinSCART-AV1
- Notes
- ■Service
- ■TV games/Home computers
- ■Last settings saved
- ■ Automatic switch-off (Sleep Function)
Marka : PANASONIC
Modeli : TX-25CK1F
Kategori : Televizor