.
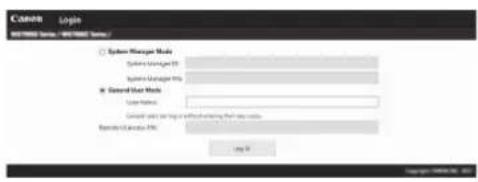
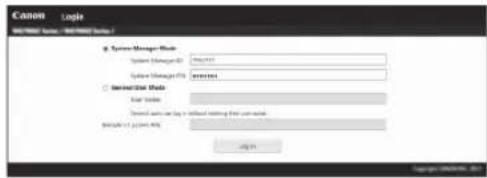
- When the login screen is displayed, enter the system manager ID and security code.
- Contact the network administrator for the system manager ID and security code (set to "7654321" by default).
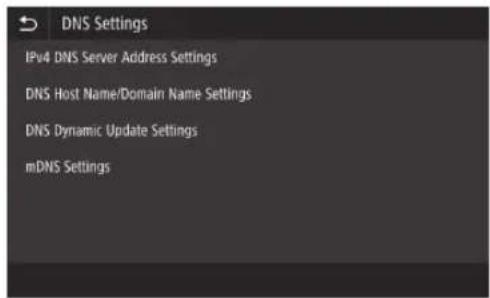
2 Press .
3 Press .
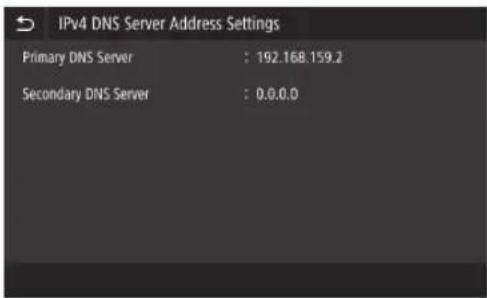
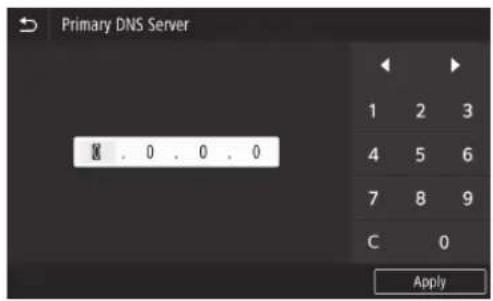
4 Enter the IP address for the primary DNS server, and then press .
- Press to return to the previous screen.
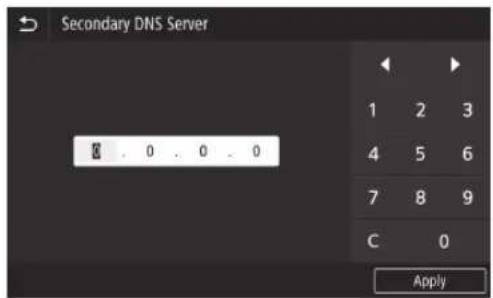
5 If required, select and enter the IP address for the secondary DNS server.
6 Set remaining items as required. For details on setting information
- For details on setting information, refer to the online manual.
- The online manual describes how to complete settings with the remote UI. Complete settings either from the control panel or the remote UI.
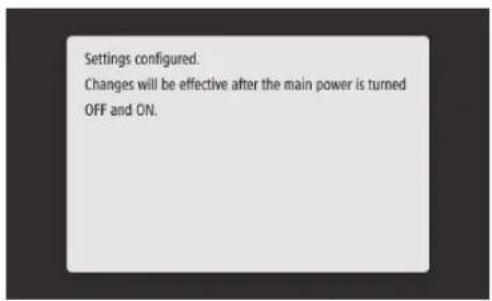
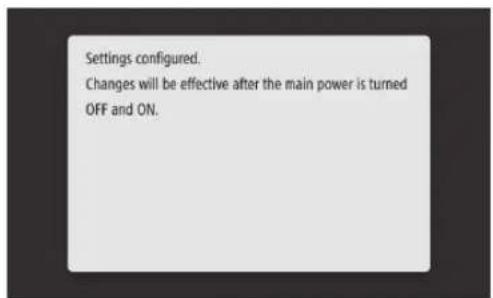
7 Restart the machine.
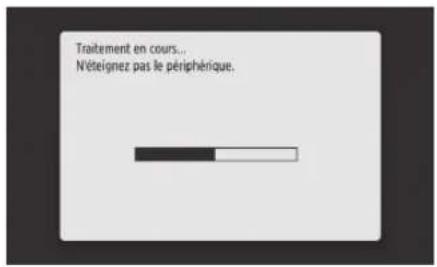
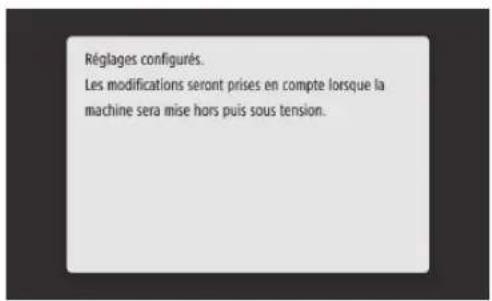
- The screen shown at right is displayed any time that settings are entered. If you are making settings several times, restart the machine after completing all settings.
Network & Remote Monitoring Service Connection
Connecting to a Network with a Fixed IP Address
Step 4 Check the connection
Checking that the machine has connected correctly
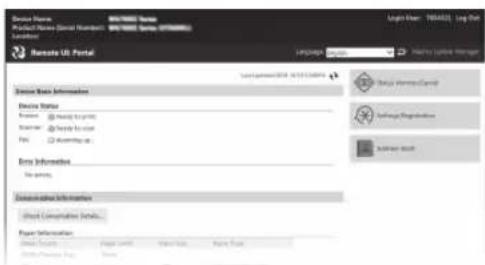
Entering the IP address directly on a PC on the same network as the machine displays the remote UI screen. The machine has connected to the network correctly if the remote UI screen is displayed.
1 Start up the web browser.
2 In the address entry bar, enter "http:///", and then press [ENTER] on the keyboard.
3 The remote UI screen is displayed. If the screen shown at right is displayed
- If the screen shown at right is displayed, the machine has connected correctly.
- If the remote UI screen is not displayed, refer to the online manual and check the network connection.

To use a remote monitoring service
Proceed to connecting to a remote monitoring service and complete settings. →39
If not using a remote monitoring service
Continue with settings from "Installing the Software".
→ P.14
Connecting to a Remote Monitoring Service
Procedures before using a service
Before using a service, procedures for checking the network connection and communication test with the monitoring server are required.
- Check the network connection
Check that the machine is connected to the network. 1234 "Step 3 Set a fixed IP address"
Before you can use a remote monitoring service, check that an Internet connection is available.
To use a proxy server
1 Start up the remote UI, and then use administrator mode when logging in.
2 In the portal page, click [Settings/Registration].
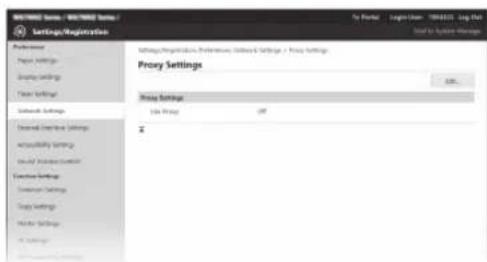
3 Select [Network Settings] ▶ [Proxy Settings], and then click [Edit].
Network & Remote Monitoring Service Connection
Connecting to a Remote Monitoring Service
4
Checkmark [Use Proxy], and then enter required information.

[Use Proxy]
Checkmarking this option allows the specified proxy server to be used when the machine initiates HTTP communication.
[HTTP Proxy Server Address]
Enter the proxy server address to be used. Set an IP address, host name, etc. according to your environment.
[HTTP Proxy Server Port Number]
Enter the port number of the proxy server to be used.
[Use Proxy within Same Domain]
Checkmarking this option allows the specified proxy server to be used also when the machine initiates communication with a device in the same domain.
[Use Proxy Authentication]
To use authentication by a proxy server, checkmark this option, and then enter the username to be authenticated in [User Name].
[Set/Change Password]
To set or change the password when using proxy authentication, checkmark this option, and then enter the new password in [Password].
5
Click [OK].
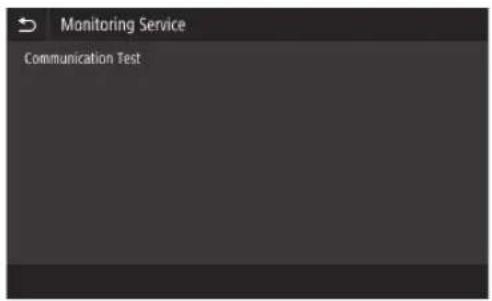
- Communication test with the monitoring server
Carry out a communication test with the monitoring server. By carrying out the communication test, the remote monitoring service starts.
Communication test with the monitoring server
1
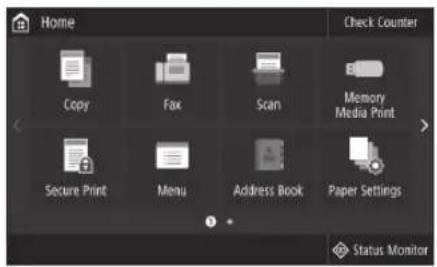
In the Home screen, press .
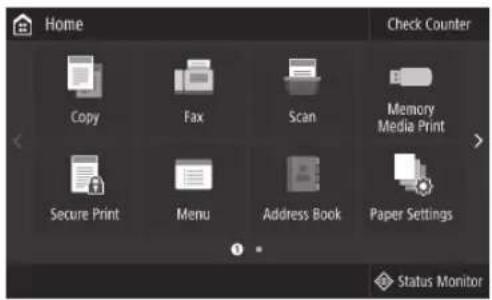
2
Press .
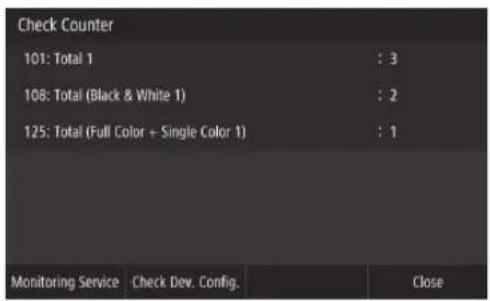
3
Press .
Network & Remote Monitoring Service Connection
Connecting to a Remote Monitoring Service
4 When the screen shown at right is displayed, press .
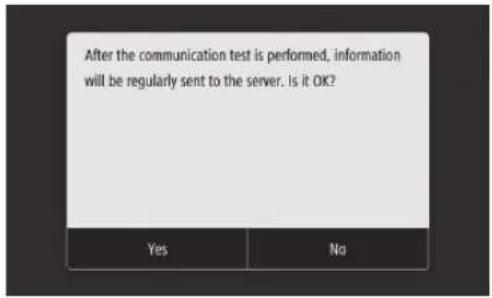
5 is displayed.
Setting is complete.
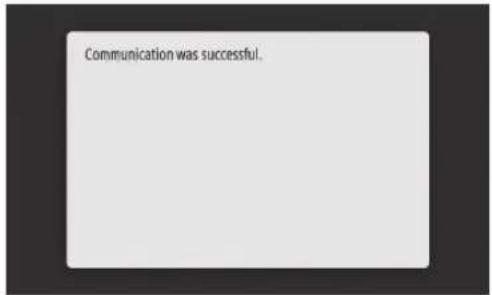
- If an error message is displayed, refer to P.43 "Errors that can occur and troubleshooting" and check settings.
- Once settings are complete, it is recommended that you print out an administrator data list and keep it together with this manual. Note that the printed out report will be about 10 pages.
Select
Once connected
Continue with settings from "Installing the Software".
Errors that can occur and troubleshooting
If an error message is displayed
The error screen displays an error code. Check details and remedies for error codes in the table below to troubleshoot issues.

If an error occurs and its code is not listed, or the given solution does not resolve the issue, visit the location where you purchased the machine or inquire via the support page on the Canon website.
Proxy server settings
| Error code Cause Solution | | |
| 8000 200A Error connecting to remote monitoring service:• TCP/IP communication failure• IP address for this device not set | To use a proxy server, make proxy settings and check the status of the proxy server. | |
| 8000 200B Failed resolving address for remote monitoring server | Check that the network the machine is connected to is an environment that can connect to the Internet. | |
| 8000 2014 The set address is not valid and the machine cannot connect to the proxy server | Check and reset the IP address/port number for the proxy server. | |
| 8000 2015 The proxy server address is registered with the host name, but connection to the designated server is not possible with the name resolution | • Check the host name of the proxy server and the DNS setting.• Set the proxy server with an IP address. | |
| 8000 201E Failed authenticating to proxy server | Check and reset the username and password for logging in to the proxy server. | |
Network & Remote Monitoring Service Connection
Connecting to a Remote Monitoring Service
Setting The Date/Time & Firmware Update
| Error code Cause Solution | | |
| 8000 2028 Server certificate error:Date/time on the device are not correctRoot certificate to server is not registered in the deviceThe user is using a different certificate, and the official certificate file is not registered | Set the accurate date/time in the device.If the date/time in the device were correct,update to the latest firmware. |
| 8000 2029 Server certificate URL check error |
| 8000 2046 Server certificate expired:Date in device is past expiry on certificateRoot certificate registered in the device is expiredThe root certificate first registered by the user is being used, and the official certificate file is not registered |
Carrying out a communication test
| Error code Cause Solution | | |
| 0000 0003 No schedule/communication test not completed | Run and complete the communication test. |
| 8000 0101 Remote monitoring server reply error |
| 8000 0207 8000 0208 | Internal schedule invalid | |
| 8000 2000 Other communication error | |
| 8000 0304 Signal consumption error during communication test | Wait and run the communication test again. |
| 8000 2004 | Succeeded in communicating with the remote monitoring server, but an error occurred | |
| 8000 2047 Reply from remote monitoring server timed out | |
| 8000 2003 Communication test was run while network connection was still not ready immediately after turning the device's main power off/on | After turning the device on, wait about 60 seconds before running the communication test. |
Appendix
Important Safety Instructions
This chapter describes important safety instructions for the prevention of injury to users of this machine and others, and damage to property. Read this chapter before using the machine, and follow the instructions to use the machine properly. Do not perform any operations not described in this manual. Canon will not be responsible for any damages resulting from operations not described in this manual, improper use, or repair or changes not performed by Canon or a third party authorized by Canon. Improper operation or use of this machine could result in personal injury and/or damage requiring extensive repair that may not be covered under your Limited Warranty.
WARNING
Indicates a warning concerning operations that may lead to death or injury to persons if not performed correctly. To use the machine safely, always pay attention to these warnings.
CAUTION
Indicates a caution concerning operations that may lead to injury to persons if not performed correctly. To use the machine safely, always pay attention to these cautions.
IMPORTANT
Indicates operational requirements and restrictions. Be sure to read these items carefully to operate the machine correctly and avoid damage to the machine or property.
Installation
To use this machine safely and in a trouble-free way, carefully read the following precautions and install the machine in an appropriate location.
WARNING
Do not install in a location that may result in a fire or electrical shock
- A location where the ventilation slots are blocked (too close to walls, beds, sofas, rugs, or similar objects)
• A damp or dusty location
- A location exposed to direct sunlight or outdoors
• A location subject to high temperatures
• A location exposed to open flames
- Near alcohol, paint thinners or other flammable substances
Other warnings
- Do not connect unapproved cables to this machine. Doing so may result in a fire or electrical shock.
- Do not place necklaces and other metal objects or containers filled with liquid on the machine. If foreign substances come in contact with electrical parts inside the machine, it may result in a fire or electrical shock.
- When installing and removing the optional accessories, be sure to turn OFF the power, unplug the power plug, and then disconnect all the interface cables and power cord from the machine. Otherwise, the power cord or interface cables may be damaged, resulting in a fire or electrical shock.
- If any foreign substance falls into this machine, unplug the power plug from the AC power outlet and contact a dealer or service center.
Do not install in the following locations
The machine may drop or fall, resulting in injury.
• An unstable location
• A location exposed to vibrations
CAUTION
Do not install in the following locations Doing so may result in damage to the machine.
• A location subject to temperature and humidity extremes, whether low or high
• A location subject to dramatic changes in temperature or humidity
• A location near equipment that generates magnetic or electromagnetic waves
• A laboratory or location where chemical reactions occur
• A location exposed to corrosive or toxic gases
- A location that may warp from the weight of the machine or where the machine is liable to sink (a carpet, etc.)
Supports (only for products with supports)
Do not remove the machine's supports after the machine has been installed, as this may cause the machine to fall or tip over, resulting in personal injury.
When using wireless LAN (only for products with a wireless LAN function)
• Install the machine at a distance of 50 meters or less from the wireless LAN router.
- As far as possible, install in a location where communication is not blocked by intervening objects. The signal may be degraded when passing through walls or floors.
- Keep the machine as far as possible from digital cordless phones, microwave ovens, or other equipment that emits radio waves.
CAUTION
When using a cassette feeding unit with the Canon WG7000 Series printer, follow the instructions in the manual to securely attach the printer to the cassette feeding unit. Always use the following combinations of printer and cassette feeding unit.
Canon WG7000 Series: Use Canon Cassette Feeding Unit CF10.
Using a different combination of printer and cassette feeding unit than shown above, using a cassette feeding unit not listed above, or not attaching the printer securely to the cassette feeding unit may be unstable and may result in injury.
Power Supply
WARNING
- Use only a power supply that meets the specified voltage requirements. Failure to do so may result in a fire or electrical shock.
- Do not use power cords other than the one provided, as this may result in a fire or electrical shock.
- The provided power cord is intended for use with this machine. Do not connect the power cord to other devices.
- Do not modify, pull, forcibly bend, or perform any other act that may damage the power cord. Do not place heavy objects on the power cord. Damaging the power cord may result in a fire or electrical shock.
-
Do not plug in or unplug the power plug with wet hands, as this may result in an electrical shock.
-
Do not use extension cords or multi-plug power strips with the machine. Doing so may result in a fire or electrical shock.
- Do not wrap the power cord or tie it in a knot, as this may result in a fire or electrical shock.
- Insert the power plug completely into the AC power outlet. Failure to do so may result in a fire or electrical shock.
- Remove the power plug completely from the AC power outlet during a thunder storm. Failure to do so may result in a fire, electrical shock, or damage to the machine.
• Make sure that the power supply for the machine is safe, and has a steady voltage.
- Keep the power cord away from a heat source; failure to do this may cause the power cord coating to melt, resulting in a fire or electrical shock.
- If excessive stress is applied to the connection part of the power cord, it may damage the power cord or the wires inside the machine may disconnect. This could result in a fire. Avoid the following situations:
- Connecting and disconnecting the power cord frequently.
- Tripping over the power cord.
- The power cord is bent near the connection part, and continuous stress is being applied to the power outlet or the connection part.
- Applying excessive force on the power plug.
CAUTION
• Install this machine near the power outlet and leave sufficient space around the power plug so that it can be unplugged easily in an emergency.
IMPORTANT
When connecting power
- Do not connect the power cord to an uninterruptible power source. Doing so may result in malfunction of or damage to the machine at power failure.
- If you plug this machine into an AC power outlet with multiple sockets, do not use the remaining sockets to connect other devices.
- Do not connect the power cord to the auxiliary AC power outlet on a computer.
Other precautions
Electrical noise may cause this machine to malfunction or lose data.
Handling
WARNING
- Immediately unplug the power plug from the AC power outlet and contact a dealer or service center if the machine makes an unusual noise, emits an unusual smell, or emits smoke or excessive heat. Continued use
may result in a fire or electrical shock.
- Do not disassemble or modify this machine. There are high-voltage and high-temperature components inside the machine. Disassembly or modification may result in a fire or electrical shock.
- Place the machine where children will not come in contact with the power cord and other cables or gears and electrical parts inside the machine. Failure to do so may result in unexpected accidents.
- Do not use flammable sprays near this machine. If flammable substances come into contact with electrical parts inside this machine, it may result in a fire or electrical shock.
- When moving this machine, be sure to turn OFF the power of this machine, and then unplug the power plug and interface cables. Failure to do so may damage the power cord or interface cables, resulting in a fire or electrical shock.
- When plugging or unplugging a USB cable when the power plug is plugged into an AC power outlet, do not touch the metal part of the connector, as this may result in an electrical shock.
If you are using a cardiac pacemaker
This machine generates a low level magnetic flux. If you use a cardiac pacemaker and feel abnormalities, please move away from this machine and consult your physician immediately.
CAUTION
- Do not place heavy objects on this machine as they may fall, resulting in injury.
- For safety, unplug the power plug if the machine will not be used for a long period of time.
- Use caution when opening and closing covers to avoid injury to your hands.
- Keep hands and clothing away from the rollers in the output area. If the rollers catch your hands or clothing, this may result in personal injury.
- Be careful not to drop a heavy object, such as a dictionary, on the platen glass. Doing so may damage the platen glass and result in injury.
- Do not carry the machine with the optional cassette feeding unit installed. Otherwise, the cassette feeding unit may fall and result in injury.

natural_image
Line drawing of three people assembling or inspecting a stacked electronic device (no text or symbols visible)
Feeder
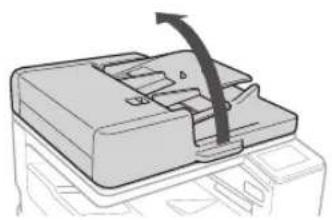
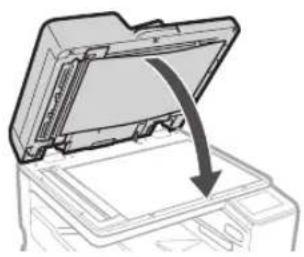
- Do not press down hard on the feeder when using the platen glass to make copies of thick books. Doing so may damage the platen glass and result in personal injury.
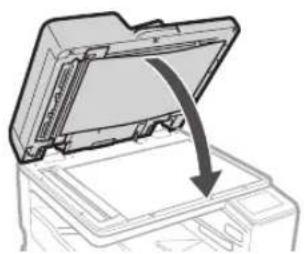
- Close the feeder gently to avoid catching your hands, as this may result in personal injury.
- Close the feeder gently to avoid catching your hands in the back of the feeder, as this may result in personal injury.
Paper drawer
- Do not insert your hand into the machine while the paper drawer is pulled open, as this may result in personal injury.
Energy Saver key (only for products with an Energy Saver key)
- Press © (Energy Saver) for safety when the machine will not be used for a long period of time, such as overnight. Also, turn OFF the main power switch, and disconnect the power cord for safety when the machine will not be used for an extended period of time, such as during consecutive holidays.
Other precautions
- Follow the instructions on the caution label attached to this machine.
- Do not subject the machine to strong shocks or vibration.
- Do not forcibly open and close doors, covers, and other parts. Doing so may result in damage to the machine.
- Do not turn OFF the main power switch or open the covers while the machine is in operation. This may result in paper jams or print head trouble.
- Use a modular cable that is shorter than 3 meters.
- Use a USB cable that is shorter than 3 meters.
If the operating noise concerns you
Depending on the use environment and operating mode, if the operating noise is of concern, it is recommended that the machine be installed in a place other than the office.
Maintenance and Inspections
Clean this machine periodically. If dust accumulates, the machine may not operate properly. When cleaning, be sure to observe the following. If a problem occurs during operation, see Frequently Asked Questions in the online manual. If the problem cannot be resolved or you feel the machine requires an inspection, contact a dealer or service center.
WARNING
- Before cleaning, turn OFF the power and unplug the power plug from the AC power outlet. Failure to do so may result in a fire or electrical shock.
- Unplug the power plug periodically and clean with a dry cloth to remove dust and grime. Accumulated dust may absorb humidity in the air and may result in a fire if it comes into contact with electricity.
- Use a damp, well wrung-out cloth to clean the machine. Dampen cleaning cloths with water only. Do not use alcohol, benzenes, paint thinners, or other flammable substances. Do not use tissue paper or paper towels. If these substances come into contact with electrical parts inside the machine, they may generate static electricity or result in a fire or electrical shock.
- Check the power cord and plug periodically for rust, bent prongs, fraying, cracks, or excessive heat generation. Use of poorly-maintained power cord or plug may result in a fire or electrical shock.
CAUTION
• The inside of the machine has high-temperature and high-voltage components. Touching these components may result in injury or burns. Do not touch any part of the machine that is not indicated in the manual.
- When loading paper or removing jammed paper, be careful not to cut your hands with the edges of the paper.
Legal Limitations on the Usage of Your Product and the Use of Images
Using your product to scan, print or otherwise reproduce certain documents, and the use of such images as scanned, printed or otherwise reproduced by your product, may be prohibited by law and may result in criminal and/or civil liability. A non-exhaustive list of these documents is set forth below. This list is intended to be a guide only. If you are uncertain about the legality of using your product to scan, print or otherwise reproduce any particular
document, and/or of the use of the images scanned, printed or otherwise reproduced, you should consult in advance with your legal advisor for guidance.
- Paper Money
- Travelers Checks
- Money Orders
- Food Stamps
• Certificates of Deposit
- Passports
- Postage Stamps (canceled or uncanceled)
- Immigration Papers
• Identifying Badges or Insignias
- Internal Revenue Stamps (canceled or uncanceled)
- Selective Service or Draft Papers
• Bonds or Other Certificates of Indebtedness
- Checks or Drafts Issued by Governmental Agencies
• Stock Certificates
• Motor Vehicle Licenses and Certificates of Title
• Copyrighted Works/Works of Art without Permission of Copyright Owner
Repairing, Lending, or Disposing of the machine
If you have entered personal data, passwords and/or other sensitive information on the machine, such information may be stored in the machine. When sending the machine for repair, lending or transferring the machine to another person, or disposing of the printer, reset the machine to factory defaults to delete this information and prevent third parties from accessing it. Refer to Online Manual for details.
Print Heads/Ink Tanks/ Maintenance Cartridges
WARNING
- Do not throw print heads, ink tanks and maintenance cartridges into fire. This may cause an ignition, and result in burns or fire.
CAUTION
- Keep ink tanks out of the reach of children. In case ink is accidentally licked or swallowed, rinse out mouth or give one or two glasses of water to drink. If irritation or discomfort
occurs, obtain medical advice immediately.
- Do not attempt to disassemble or modify the print head, ink tanks, and maintenance cartridges.
• In case ink gets in contact with eyes, rinse with water immediately. In case ink gets in contact with skin, wash with soap and water immediately. If irritation to eyes or skin
persists, obtain medical advice immediately.
- Never touch the electrical contacts on a print head after printing. The metal parts may be very hot and could cause burns.
- Avoid dropping or shaking print head, ink tanks, and maintenance cartridges.
Ink
When you use the Canon printer for the first time after you install the bundled ink tanks, the printer consumes a small amount of ink to enable printing by filling the nozzles of the Print Head with ink. For this reason, the number of sheets that can be printed with the first ink tanks is fewer than the succeeding ink tanks. To prevent clogging of the ink nozzles and maintain good printing results, the machine performs
cleaning automatically. To do this, the machine occasionally draws ink from the nozzles, and thus may use a minute amount of ink.
- Even with black and white printing, ink colors other than black may be used depending on the type of paper being printed on or on settings in the printer driver.
Other Precautions
- Do not remove the print head unnecessarily.
- Not printing for a long period of time may cause the print head to dry out and clog. It is recommended that the machine be used for printing at least once a month.
Notice
Caution for each safety standard mark and declaration
Each safety standard mark and declaration is valid only for the voltage and frequency of the respective country or region where it applies.

Protective earthing terminal

CAUTION: Hot surface. Do not touch.

Moving parts: Keep body parts away from moving parts. Keep body parts out of the motion path.
* This mark may not appear on your model.
Product Name
Safety regulations require the product's name to be registered.
In some regions where this product is sold, the following name(s) in parentheses () may be registered instead.
RMC(Regulatory Model Code)
WG7550Z (K10479)
WG7550F (K10478)
WG7550 (K10477)
WG7540 (K10476)
Precaution for Using This Product in Countries or Regions other than where It was Purchased
This product, which is made for countries or regions where it was purchased, may not be used in other countries or regions due to their local laws and regulations. Please note that Canon should not be liable for penalties which will be caused by using this product in such countries or regions.
About Radio Waves
Do not use this product near medical equipment or electronic equipment. Radio wave interference can affect the operation or performance of the equipment.
For models containing lithium battery
- Dispose of used batteries according to the local regulations.
- Risk of explosion if battery is replaced by an incorrect type.
Disclaimers
• CANON INC. MAKES NO WARRANTY OF ANY KIND WITH REGARD TO THIS MATERIAL, EITHER EXPRESS OR IMPLIED, EXCEPT AS PROVIDED HEREIN, INCLUDING WITHOUT LIMITATION, THEREOF, WARRANTIES AS TO MARKETABILITY, MERCHANTABILITY, FITNESS FOR A PARTICULAR PURPOSE OF USE, OR NON-INFRINGEMENT, CANON INC. SHALL NOT BE LIABLE FOR ANY DIRECT, INCIDENTAL, OR CONSEQUENTIAL DAMAGES OF ANY NATURE, OR LOSSES OR EXPENSES RESULTING FROM THE USE OF THIS MATERIAL.
Reducing your environmental impact
Environmental Duplex printing
The duplex printing automatically and therefore helps to reduce the use of valuable resource's by reducing your paper consumption. The duplex function has been auto enabled, during the set up and driver installation and Canon strongly recommend that you do not disable this function. You should continue to use the duplex function to reduce the environmental impact of your work with this product at all times.
Power Consumption and Operational Modes
The amount of electricity a device consumes depends on the way the device is used. This product is designed and set in a way to allow you to reduce the power consumption. After the last print it switches to Ready Mode. In this mode it can print again immediately if required. If the product is not used for a time, the device switches to its Sleep Mode. The devices consume less power (Watt) in these modes.
Energy Star®
The Energy Star® programme is a voluntary scheme to promote the development and purchase of energy efficient models, which help to minimise environmental impact.
Paper types
This product can be used to print on both recycled and virgin paper (certified to an environmental stewardship scheme), which complies with EN12281 or a similar quality standard. In addition it can support printing on media down to a weight of 64g/m2, lighter paper means less resources used and a lower environmental footprint for your printing needs.
About This Manual
Illustrations and Displays Used in This Manual
Illustrations and displays used in this manual are of WG7550F unless specified.
natural_image
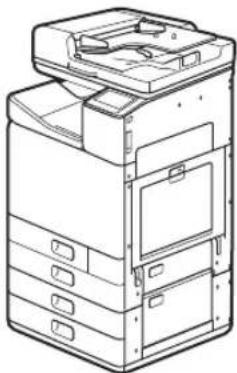
Line drawing of a multi-tiered office machine with multiple drawers and a top cover (no text or symbols)
Cassette Feeding Unit (optional) attached
Trademarks
• Windows is a trademark or registered trademark of Microsoft Corporation in the U.S. and/or other countries.
- Internet Explorer is a trademark or registered trademark of Microsoft Corporation in the U.S. and/or other countries.
• Apple, Bonjour, iPad, iPhone, iPod touch, Safari, Mac, macOS and OS X are trademarks of Apple Inc., registered in the U.S. and other countries.
- IOS is a trademark or registered trademark of Cisco in the U.S. and other countries and is used under license.
- Google Chrome, Android are either registered trademarks or trademarks of Google Inc.
Third Party Software
This Canon product (the "PRODUCT") includes third-party software modules. Use and distribution of these software modules, including any updates of such software modules (collectively, the "SOFTWARE") are subject to license conditions below.
(1) You agree that you will comply with any applicable export control laws, restrictions or regulations of the countries involved in the event that the PRODUCT including the SOFTWARE is shipped, transferred or exported into any country.
(2) Rights holders of the SOFTWARE retain in all respects the title, ownership and intellectual property rights in and to the SOFTWARE. Except as expressly provided herein, no license or right, expressed or implied, is hereby conveyed or granted by rights holders of the SOFTWARE to you for any intellectual property of rights holders of the SOFTWARE.
(3) You may use the SOFTWARE solely for use with the PRODUCT.
(4) You may not assign, sublicense, market, distribute, or transfer the SOFTWARE to any third party without prior written consent of rights holders of the SOFTWARE.
(5) Notwithstanding the foregoing, you may transfer the SOFTWARE only when (a) you assign to a transferee all of your rights to the PRODUCT and all rights and obligations under the conditions governing the SOFTWARE and PRODUCT and (b) such transferee agrees in writing to be bound by all these conditions.
(6) You may not decrypt, decompile, reverse engineer, disassemble or otherwise reduce the code of the SOFTWARE to human readable form.
(7) You may not modify, adapt, translate, rent, lease or loan the SOFTWARE or create derivative works based on the SOFTWARE.
(8) You are not entitled to remove or make separate copies of the SOFTWARE from the PRODUCT.
(9) The human-readable portion (the source code) of the SOFTWARE is not licensed to you.
Notwithstanding (1) through (9) above, the PRODUCT includes third-party software modules accompanying the other license conditions, and these software modules are subject to the other license conditions. Please refer to the other license conditions of third-party software modules described in Appendix of Manual for the corresponding the PRODUCT. This Manual is available at http://jj.start.canon.
By using the PRODUCT, you shall be deemed to have agreed to all applicable license conditions. If you do not agree to these license conditions, please contact your service representative.
ACCEPTANCE
THE TERMS OF THIS THIRD PARTY SOFTWARE STATED HERE OR IN RELATED WARRANTY PROVISIONS SHALL BE DEEMED ACCEPTED UPON YOUR USE OF THE PRODUCT FOR ONE OR MORE OF ITS NORMAL PURPOSES, IF THERE HAS BEEN NO OTHER PRIOR EXPRESS ACCEPTANCE.
THE TERMS OF THIS THIRD PARTY SOFTWARE GOVERN THE THIRD PARTY SOFTWARE AS DELIVERED WITH THE PRODUCT AND ALL UPDATED VERSIONS OF THE THIRD PARTY SOFTWARE PROVIDED UNDER MAINTENANCE AGREEMENTS OR OTHER SERVICE ARRANGEMENTS FOR THE PRODUCT WITH CANON USA OR CANON CANADA OR THEIR RESPECTIVE AUTHORIZED SERVICE ORGANIZATIONS.
Canon
Business Inkjet WG7000 Series
Démarrage
FR
Installation de l'appareil 📞.2
Utilisation de base P.16
En cas de problème Ⓧ.20
Connexion au réseau et au service de suivi distant P. 26
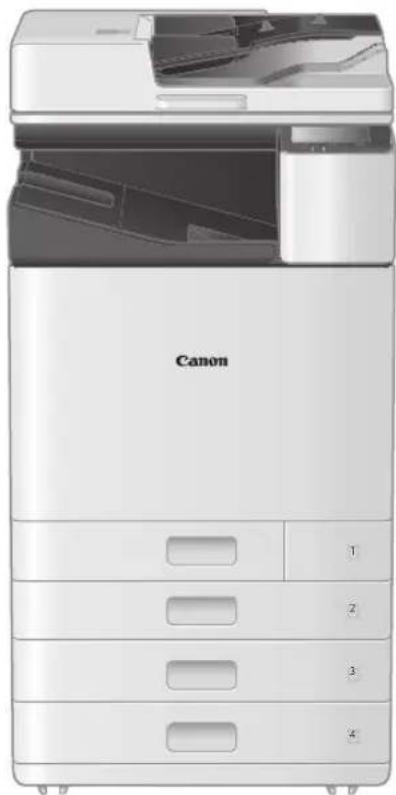
natural_image
Front view of a Canon printer with open lid and internal compartments (no visible text or symbols on main body)
Prenez connaissance des "Consignes de sécurité importantes" avant toute utilisation de ce produit. P.45 Une fois la lecture de ce guide terminée, rangez-le dans un endroit sûr afin de pouvoir le consulter ultérieurement. Les informations contenues dans ce document peuvent être modifiées sans avis préalable.

Le Manuel en ligne contenant des informations sur toutes les fonctions de cet appareil se trouve à l'adresse suivante : http://ij.start.canon.
Installation de l'appareil

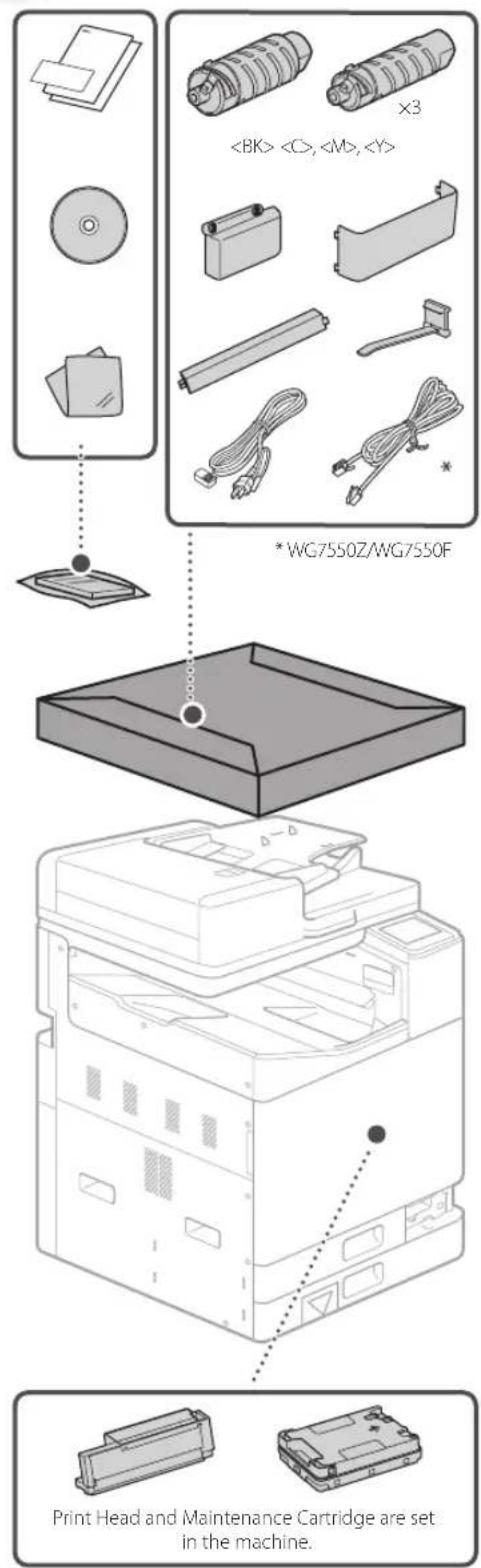
Eléments fournis avec l'appareil
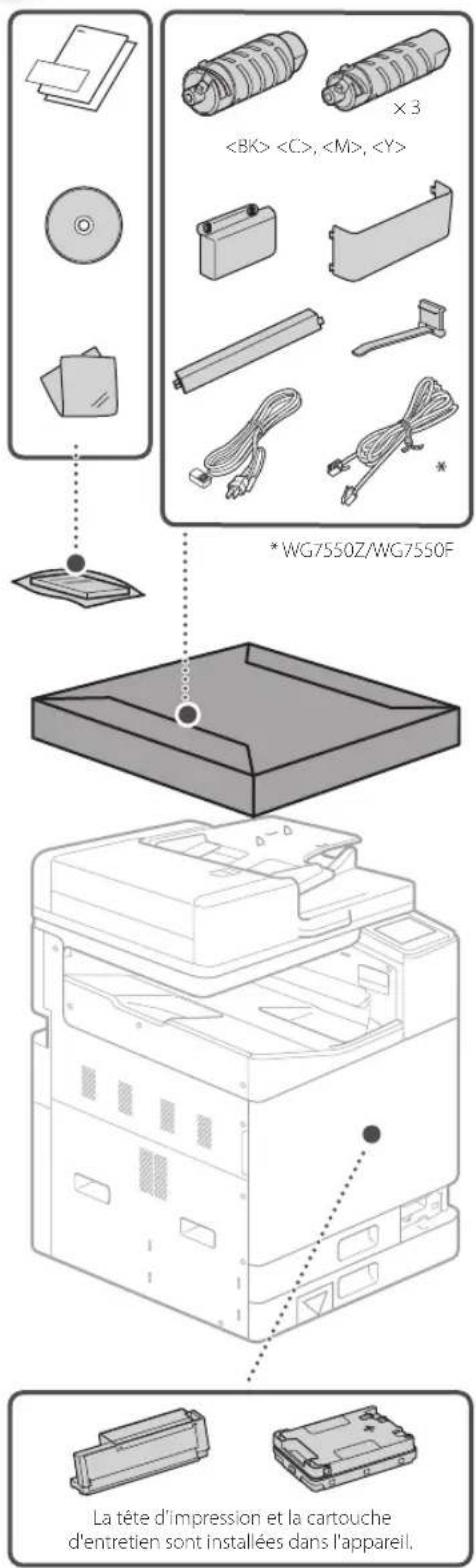
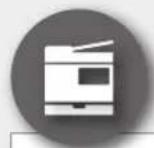
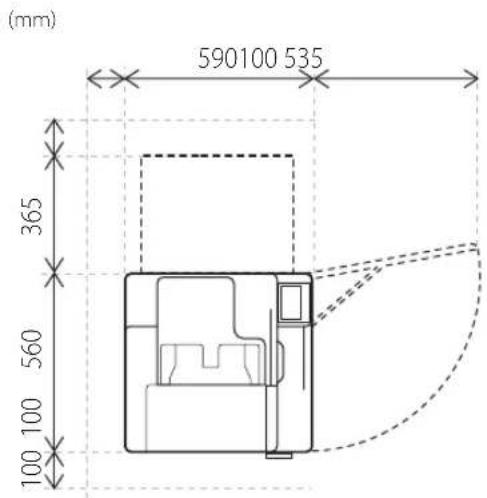
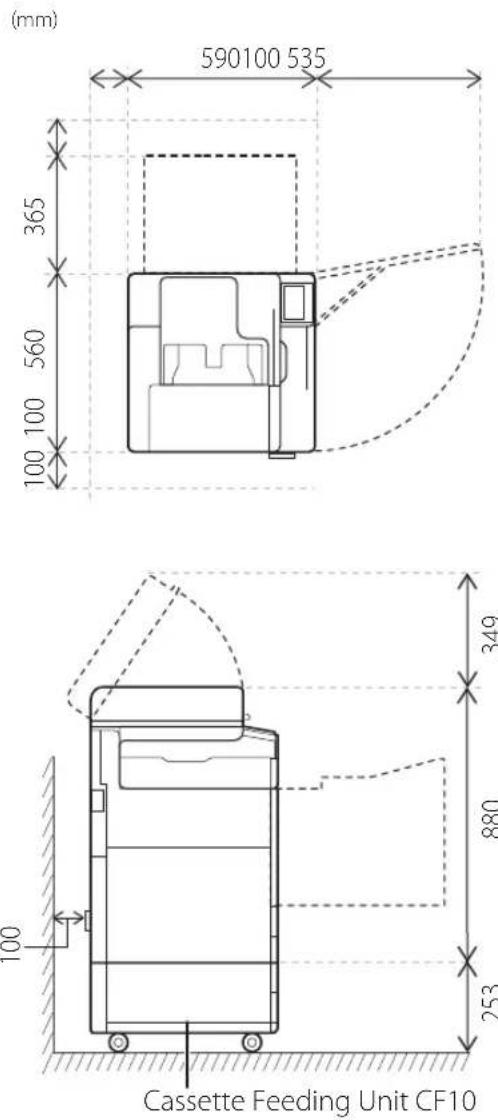
Exigences d'installation
Installez l'appareil sur une surface plane en laissant au moins 100 mm d'espace autour lui.
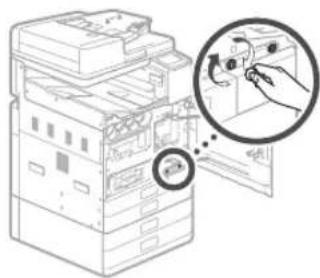
ATTENTION!
Le capot avant est verrouillé. Ne pas forcer pour l'ouvrir.
Si vous avez acheté un socle double cassette facultatif
Commencez par installer le socle double cassette (facultatif). Reportez-vous au manuel fourni avec le socle double cassette pour en savoir plus sur les étapes d'installation.
ATTENTION
- Ne tenez pas l'appareil par sa base, vous risqueriez de vous coincer les doigts lors de sa mise en place.
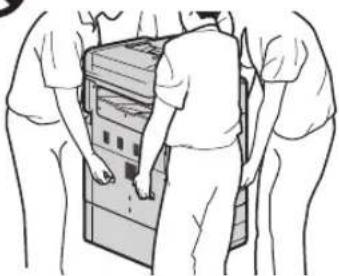
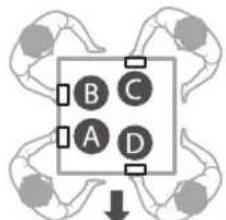
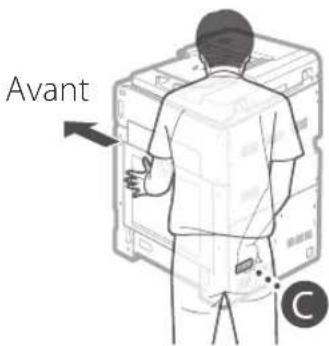
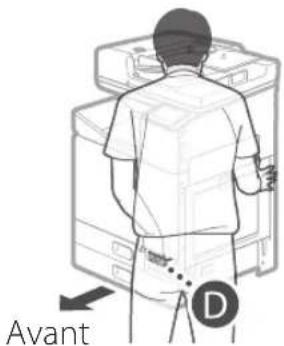
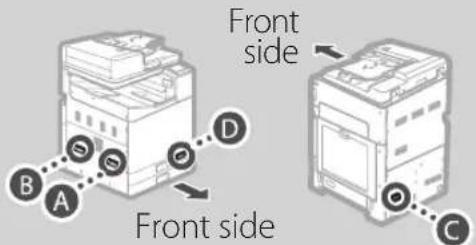
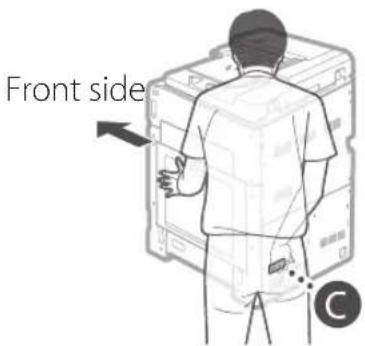
⚠ Transport de l'appareil
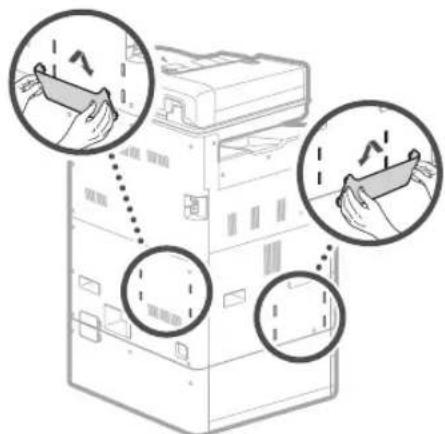
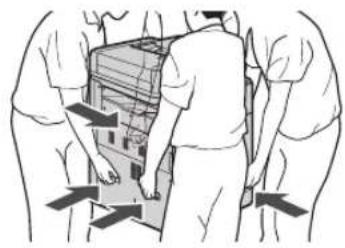
- Quatre personnes sont nécessaires pour le déplacer. L'appareil présente quatre emplacements de poignée. Chaque personne doit placer une main dans une poignée et utiliser l'autre main pour stabiliser l'appareil pendant qu'il est soulevé. Pour éviter de vous blesser au dos, ne vous penchez pas lorsque vous le soulevez. Consultez le schéma ci-dessous pour connaître les emplacements des poignées.
- Ne tenez jamais l'appareil par le chargeur (chargeur automatique de documents), les cassettes, etc. L'appareil risque de tomber et de causer des blessures.
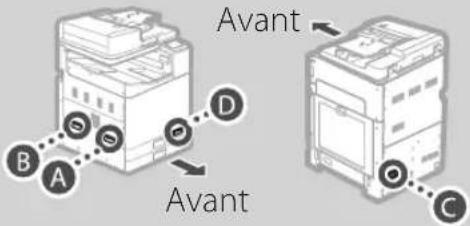
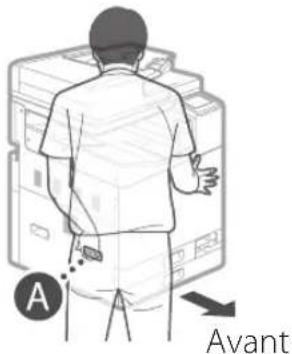
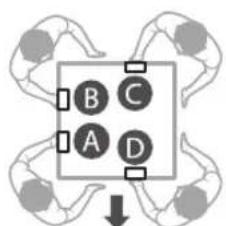
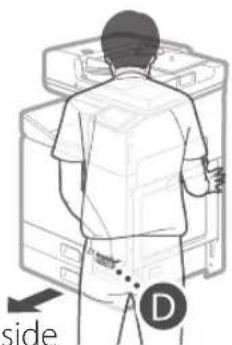
1 Lorsque chaque personne se trouve à un coin de l'appareil avec une main dans l'une des poignées ainsi qu'il est illustré de A à D, soulevez l'appareil en pliant les genoux.
flowchart
graph TD
    A["Node A"] --> C["Node C"]
    B["Node B"] --> C["Node C"]
    D["Node D"] --> C["Node C"]
    E["Node E"] --> C["Node C"]
    F["Node F"] --> C["Node C"]
    G["Node G"] --> C["Node C"]
    H["Node H"] --> C["Node C"]
    I["Node I"] --> C["Node C"]
    J["Node J"] --> C["Node C"]
    K["Node K"] --> C["Node C"]
    L["Node L"] --> C["Node C"]
    M["Node M"] --> C["Node C"]
    N["Node N"] --> C["Node C"]
    O["Node O"] --> C["Node C"]
    P["Node P"] --> C["Node C"]
    Q["Node Q"] --> C["Node C"]
    R["Node R"] --> C["Node C"]
    S["Node S"] --> C["Node C"]
    T["Node T"] --> C["Node C"]
    U["Node U"] --> C["Node C"]
    V["Node V"] --> C["Node C"]
    W["Node W"] --> C["Node C"]
    X["Node X"] --> C["Node C"]
    Y["Node Y"] --> C["Node C"]
    Z["Node Z"] --> C["Node C"]
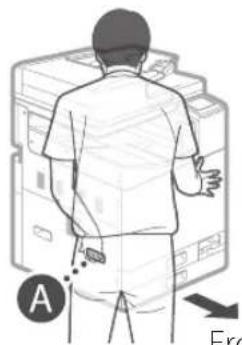
Avant
natural_image
Illustration of a person standing beside a server rack, with an arrow labeled 'Avant' pointing to the side (no other text or symbols)
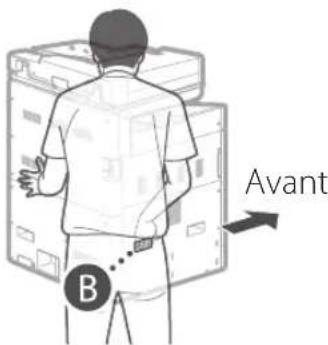
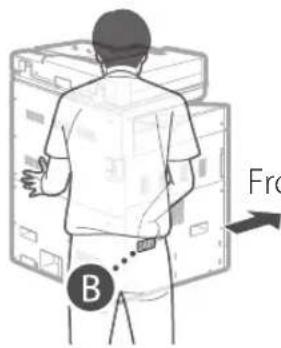
2 Mettez l'appareil en place.

natural_image
Illustration of a person carrying a large box with arrows indicating direction (no text or symbols)
3

natural_image
Technical line drawing of a printer with a magnified inset showing internal components (no text or symbols)
• Retirez les 4 autocollants.
Après avoir installé le socle double cassette facultatif, poursuivez l'installation à partir de l'étape 4.
4
natural_image
Diagram of a mechanical component with an arrow indicating direction (no text or symbols present)
- Enlevez l'ensemble du ruban.

5
natural_image
Line drawing of an open printer with arrows indicating rotation or movement (no text or symbols)
6
natural_image
Diagram of a printer's open lid with an arrow indicating rotation (no text or symbols)
• Enlevez l'ensemble du ruban.

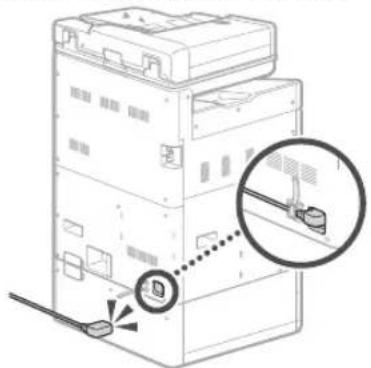
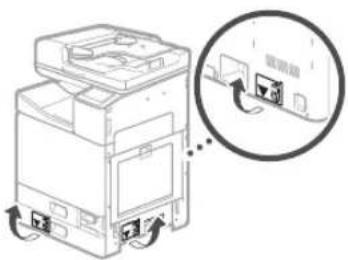
7 Fixez la pince et le câble d'alimentation, puis fixez le câble d'alimentation avec la pince.
- La forme du câble d'alimentation dépend de votre pays ou de votre région.
- Selon la forme du câble d'alimentation fourni, il est possible que vous ne puissiez pas fixer de pince. Si tel est le cas, ne la fixez pas et passez à l'étape suivante.
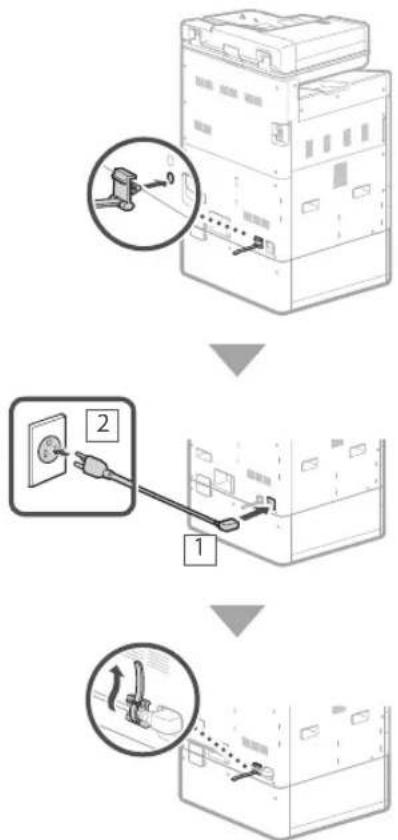
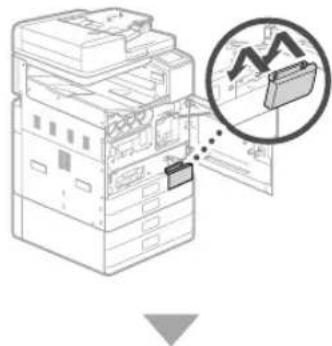
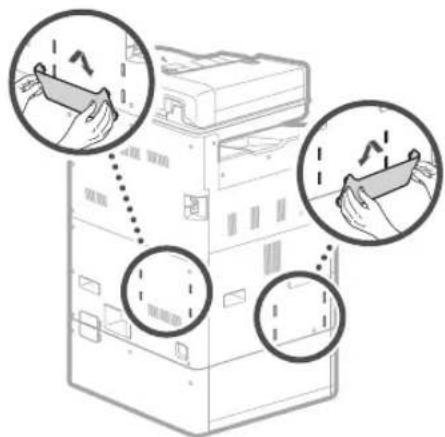
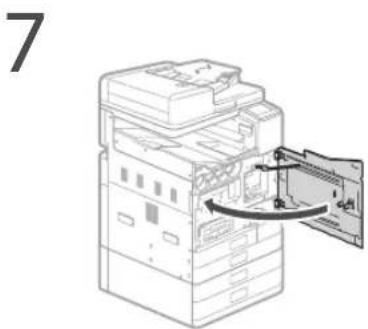
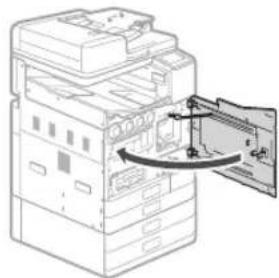
8 Fixez le capot de protection en bas à droite de l'appareil.
Socle double cassette (facultatif) fixé
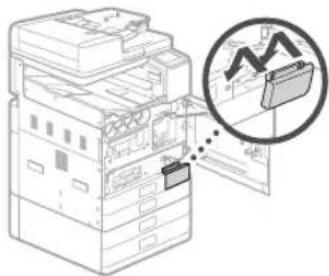
9 Fixez le compartiment à livre sur le côté gauche ou à l'arrière de l'appareil.
- Rangez-y ce guide.
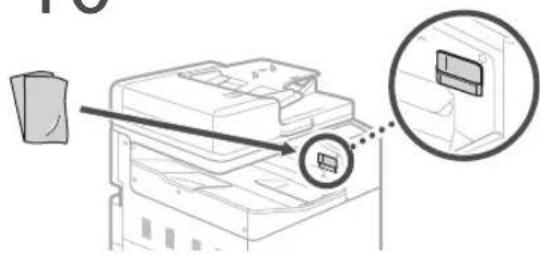
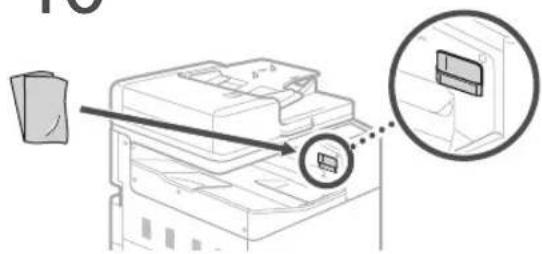
10 Rangez la feuille de nettoyage de la vitre.
Fixez le capot de la poignée après avoir mis l'appareil sous tension.

Réglages initiaux
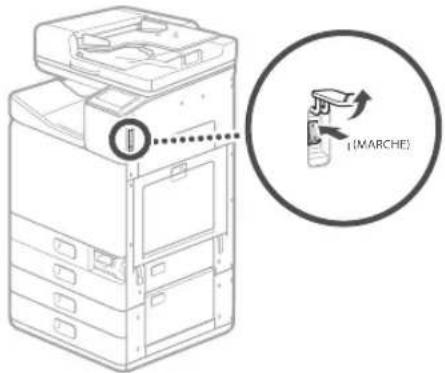
1 Mettez l'appareil sous tension.
REMARQUE
Lorsque l'appareil est mis sous tension pour la première fois, un guide de configuration comportant une série d'écrans apparaît pour vous aider à le configurer.
Si le guide de configuration n'apparaît pas, reportez-vous au Manuel en ligne.
Pour en savoir davantage
Section "Configuration à l'aide du guide de configuration" du manuel en ligne
2 Spécifiez la langue et le pays/la région.

- Suivez les instructions affichées à l'écran.
3 Définissez le fuseau horaire et réglez la date et l'heure.
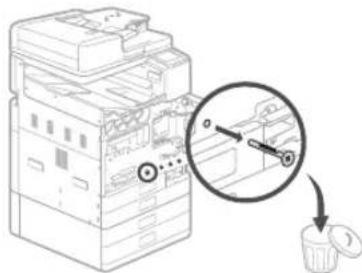
Retrait du matériel d'emballage de l'intérieur de l'appareil
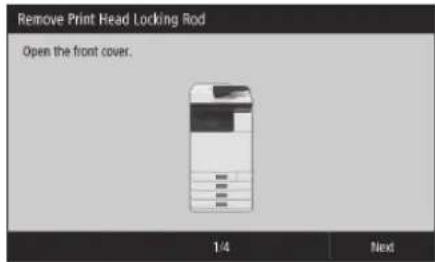
1 Appuyez sur sur l'écran.
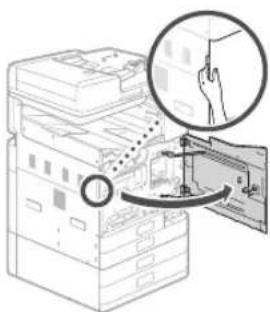
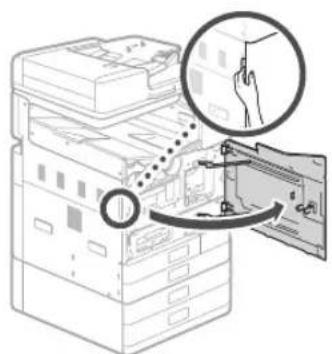
- N'ouvrez le capot avant avant que l'écran n'apparaisse.
2
natural_image
Illustration of a printer with a magnified view showing the printer's screen and paper (no text or symbols present)
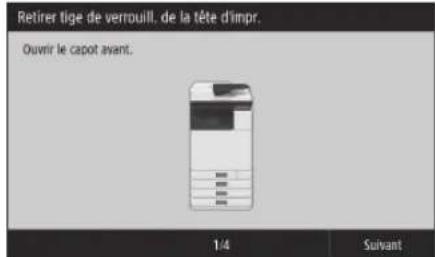
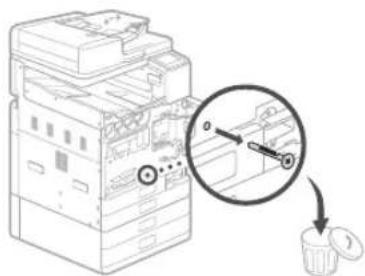
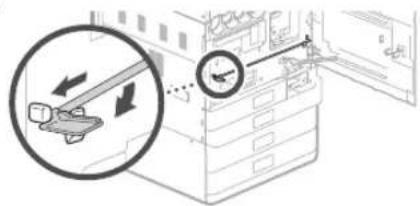
3 Retirez la goupille de verrouillage d'expédition.
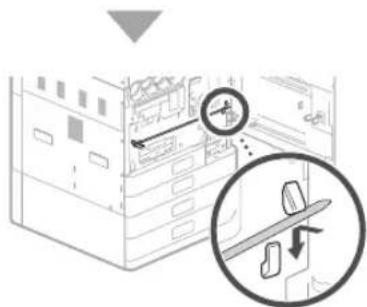
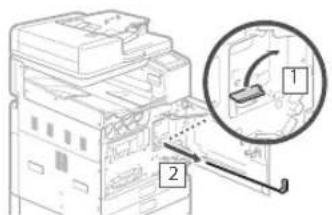
4 Retirez la tige de verrouillage de la tête d'impression.

Soulevez le levier (bleu) représenté en ,10 puis sortez complètement la tige dans le sens indiqué en 2. Ne pliez pas la tige.
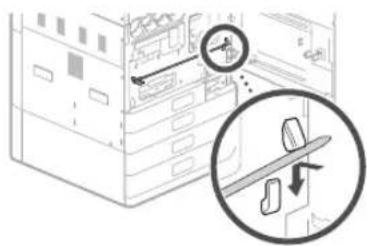
5 Rangez la tige de verrouillage de la tête d'impression.

- Placez la partie bleue du levier face à vous, puis appuyez sur la tige vers la gauche et attachez-la.
- Placez l'extrémité droite sur le crochet.
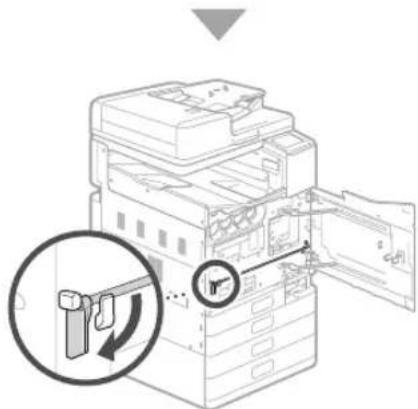
- Après avoir mis les deux extrémités en place, tournez le levier bleu vers le bas pour le verrouiller.
La tige de verrouillage de la tête d'impression est nécessaire durant le transport. Ne la jetez pas.
6 Fixez le capot de la poignée.
natural_image
Illustration of a server rack with a magnified inset showing a rising trend graph (no text or symbols)
Utilisez une pièce pour serrer les vis.
natural_image
Diagram of a printer's internal structure with an inset showing a hand interacting with the printer (no text or symbols present)

natural_image
Line drawing of a printer or printer with an open lid and a magnified view showing internal components (no text or symbols)
Ensuite, installez les cartouches d'encre.
Installation de l'appareil
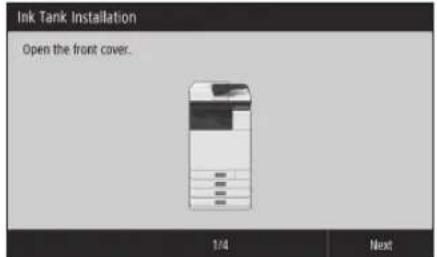
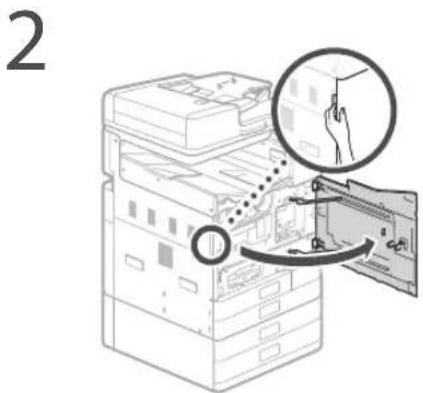
Installation des cartouches d'encre
1 Appuyez sur sur l'écran.
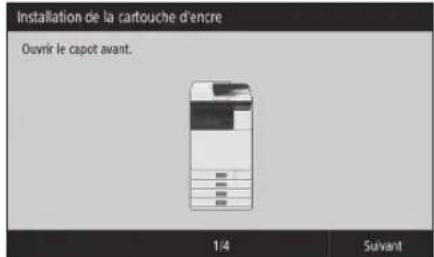
• N'ouvrez le capot avant avant que l'écran n'apparaisse.
2
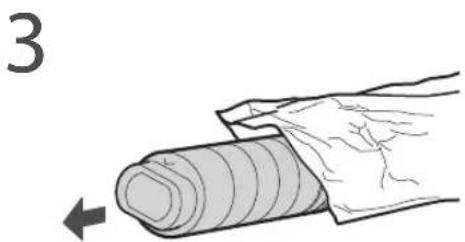
3
natural_image
Illustration of a hand holding a rolled cylindrical object with a directional arrow (no text or symbols)
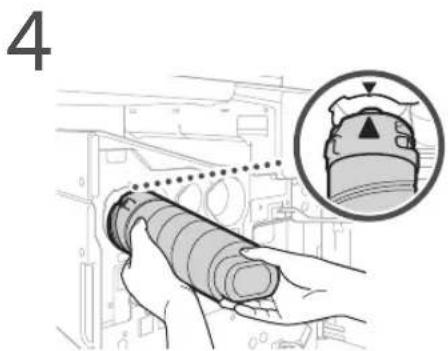
4
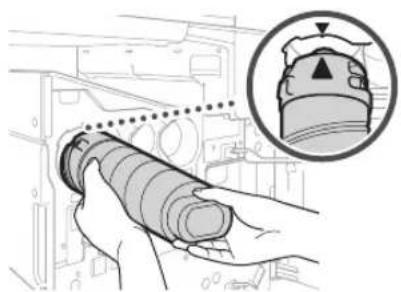
natural_image
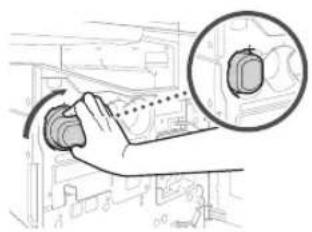
Illustration of a hand holding a cylindrical mechanical component with a magnified inset showing a knob (no text or symbols)

natural_image
Hand operating a mechanical switch with a magnified inset showing the internal components (no text or symbols visible)
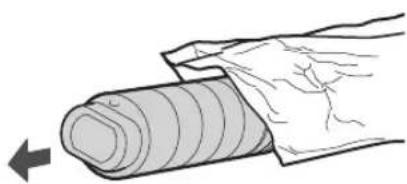
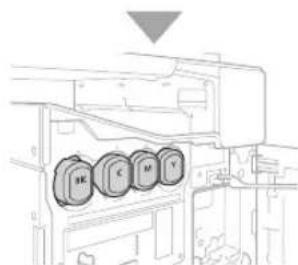
- Tournez la cartouche d'encre jusqu'à entendre un "clic".
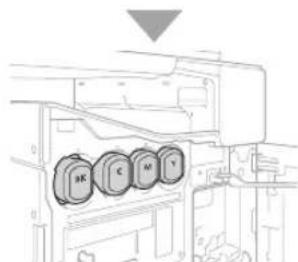
- Installez les quatre cartouches d'encre dans les fentes correspondantes.
5

natural_image
Diagram of a printer stacker with an open door, showing internal components and a hand inserting a cable (no text or labels present)
REMARQUE
- Le remplissage commence et prend environ 40 à 70 minutes.
- La durée nécessaire au remplissage dépend de votre environnement.
- Ne mettez pas l'appareil hors tension pendant le remplissage de l'encre.
- Si le remplissage est interrompu par la mise hors tension de l'appareil, etc., des cartouches d'encre supplémentaires peuvent être nécessaires.
- Pendant le remplissage de l'encre, vous pouvez configurer les réglages jusqu'à "Ajustement des marges du socle double cassette (facultatif)" (P.12).
Ensuite, configurez l'appareil pour envoyer des données et le PIN accès IU distante.
Configuration de l'appareil pour envoyer des données et le PIN accès IU distante
1 Lisez les messages et suivez les instructions affichées à l'écran.
Envoi de données à Canon
Pour développer et commercialiser des produits, mais aussi proposer des offres spéciales et des services qui répondent toujours mieux aux attentes de ses clients, Canon a besoin que des informations telles que celles ci-dessous, relatives à votre produit Canon, soient envoyées via Internet à Canon (ou, si vous utilisez votre produit Canon en Chine, à un organisme de recherche détenant une licence légale).
Informations relatives à votre imprimante/scanner/télécopieur/périphérique d'information
- Informations de base telles que le numéro d'identification de l'imprimante, date et heure de l'installation, les paramètres de pays, etc.
- Historique d'utilisation tel que le type d'encre installée, les informations sur la consommation d'encre, le nombre de feuilles imprimées, la fréquence de numérisation, les informations sur l'entretien, etc.
- Informations sur l'utilisation du papier, environnement/conditions d'impression, configuration de travail de numérisation et résultats du questionnaire
- Informations de base sur le périphérique telles que le nom du modèle, la version du SE, la langue et les paramètres d'affichage, etc.
- Versions du driver de l'imprimante et du logiciel, historique d'utilisation
(Certaines des informations ci-dessus peuvent ne pas être envoyées selon le modèle de votre imprimante et/ou du logiciel d'application.)
Si l'utilisation de votre produit Canon est partagée, les informations ci-dessus enregistrées sur le produit partagé seront envoyées. Si vous acceptez, informez les utilisateurs qui partagent ce produit et obtenez leur consentement au préalable.
Au cours de cette enquête, aucune donnée personnelle ne sera envoyée. Ainsi, nous ne pouvons pas identifier un client donné à partir des informations que nous recevons.
Nous ne sommes donc pas en mesure de répondre à des demandes de divulgation d'informations recueillies.
Une fois les demandes acceptées, les informations ci-dessus seront envoyées à Canon (ou, si vous utilisez votre produit Canon en Chine, à un organisme de recherche détenant une licence légale) via Internet. Les frais de connexion Internet sont à votre charge.
Les informations envoyées peuvent être communiquées aux sociétés du groupe Canon.
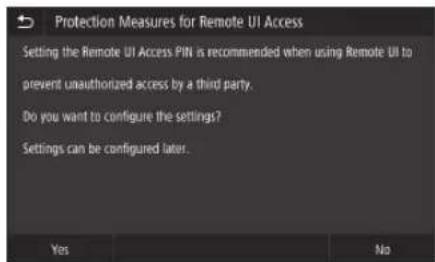
2 Configurez le PIN accès IU distante.
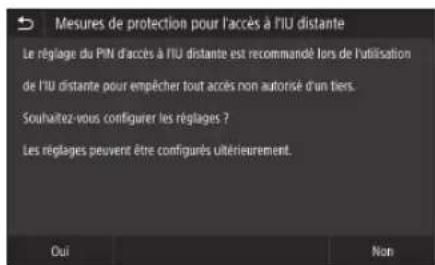
IU distante
L'IU distante vous permet d'accéder à l'appareil via un réseau à partir d'un navigateur Internet pour effectuer des tâches comme la vérification de l'état de l'appareil, la gestion des tâches et la configuration des réglages. Définissez un PIN pour l'IU distante afin de protéger vos informations.
Connexion à un ordinateur
Avant de commencer la configuration
- Des informations personnelles pourraient être divulguées si l'appareil est connecté à un réseau non sécurisé. Veillez à sécuriser votre réseau pour le protéger des tiers inconnus.
- L'appareil n'est pas fourni avec un routeur ou des câbles de réseau. Vous devez vous en procurer.
- Cet appareil ne peut pas être connecté simultanément à des réseaux sans fil et filaire.
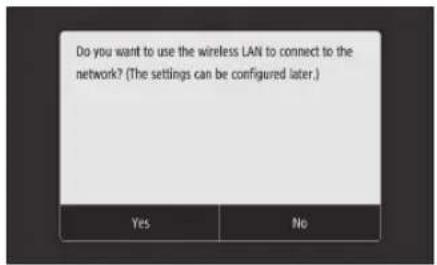
Si vous utilisez le guide de configuration, la connexion s'effectue par DHCP où l'adresse IP est automatiquement affectée.
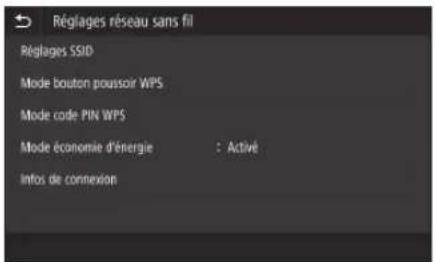
Pour utiliser une adresse IP autre que DHCP, comme une adresse IP fixe, sélectionnez dans l'écran de connexion au réseau sans fil et quittez le guide de configuration sans vous connecter au réseau.
Une fois l'écran Accueil affiché, reportez-vous à "Connexion à un réseau avec une adresse IP fixe"

P.28 et configurez les réglages.
Choix d'une méthode de connexion
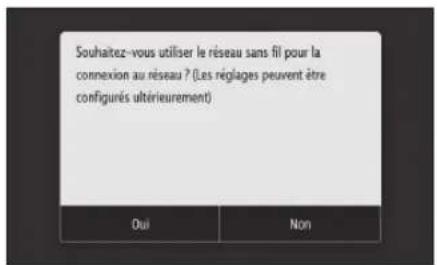
- Connexion par réseau sans fil : P.10
• Connexion par réseau filaire : P.11
• Connexion par USB : P.12
L'écran ci-dessus n'apparaît pas sur le modèle WG7540. Procédez à la connexion via un réseau filaire ou via USB.

Même dans un environnement sans réseau sans fil, vous pouvez utiliser le mode de point d'accès pour établir directement une connexion sans fil entre l'appareil et votre périphérique mobile (connexion directe) Quittez le guide de configuration avant de lancer la connexion directe (WG7550Z/WG7550F/WG7550).

Manuel en ligne
Connexion par réseau sans fil
- Avec une adresse IP fixe : sélectionnez et ajustez les marges. P.12
- Par DHCP : exécutez les étapes suivantes.
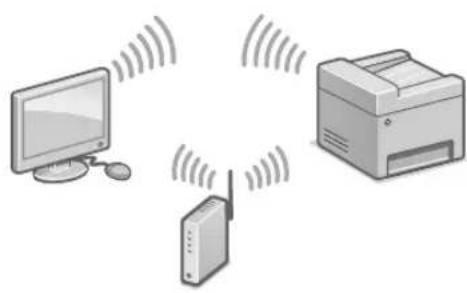
1 Appuyez sur sur l'écran de la méthode de connexion.

natural_image
Illustration of three devices: a monitor, a printer with wireless signal lines, and a server with antenna (no text or symbols)
2 Vérifiez que votre ordinateur et votre routeur sans fil sont correctement connectés.
3 Vérifiez les réglages réseau sur l'ordinateur.
4 Notez le nom de réseau (SSID) et le mot de passe (clé réseau).
- Vérifiez ces informations sur l'étiquette se trouvant sur le routeur. ➞ Manuel en ligne
- La configuration peut également être effectuée via WPS sur les routeurs compatibles.

Manuel en ligne
5 Appuyez sur .
- A partir de l'écran ci-dessous, suivez ces instructions pour saisir votre nom de réseau (SSID) et mot de passe (clé réseau).
6 Appuyez sur .
7 Appuyez sur .
8 Sélectionnez le nom de réseau (SSID) et appuyez sur .
- Saisissez un mot de passe (clé réseau), puis appuyez sur .
- Appuyez sur .
• L'adresse IP est automatiquement affectée.
- apparaît.
Ensuite, ajustez les marges de la cassette Socle double (facultatif). P.12
Connexion par réseau filaire
- Avec une adresse IP fixe : sélectionnez et ajustez les marges. P.12
• Par DHCP : exécutez les étapes suivantes.
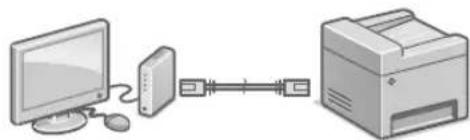
1 Appuyez sur sur l'écran de la méthode de connexion.
natural_image
Illustration of a desktop computer connected to a printer via a serial link (no text or symbols)
L'appareil n'est pas fourni avec un câble de réseau. Vous devez vous en procurer un.
2 Vérifiez que votre ordinateur et votre routeur sont correctement connectés.
3 Vérifiez les réglages réseau sur l'ordinateur.
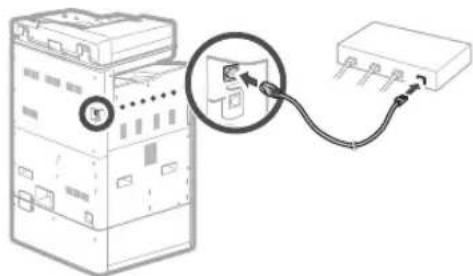
4 Connectez le câble réseau.

natural_image
Diagram of an electrical switch connected to a terminal block via cable (no text or symbols present)
- Après la connexion du câble, patientez quelques minutes (jusqu'à ce que l'adresse IP soit automatiquement configurée).
Ensuite, ajustez les marges de la cassette Socle double (facultatif). P.12
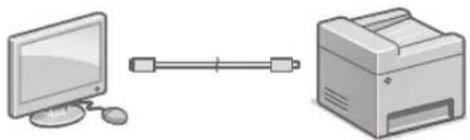
Connexion par USB
1 Appuyez sur sur l'écran de la méthode de connexion.

natural_image
Illustration of a computer monitor connected to a printer via a cable (no text or symbols)
- L'appareil n'est pas fourni avec un câble USB. Vous devez vous en procurer un.
- Assurez-vous que le câble USB que vous utilisez est compatible avec ces caractéristiques.
- Ne branchez pas le câble USB avant d'installer le logiciel. Si le câble est déjà branché, débranchez-le de l'ordinateur, fermez la boîte de dialogue, puis exécutez la procédure suivante depuis l'étape 1 de la section "Installation du logiciel".
→
P.14

Ensuite, ajustez les marges de la cassette Socle double (facultatif).
Ajustement des marges du socle double cassette (facultatif)
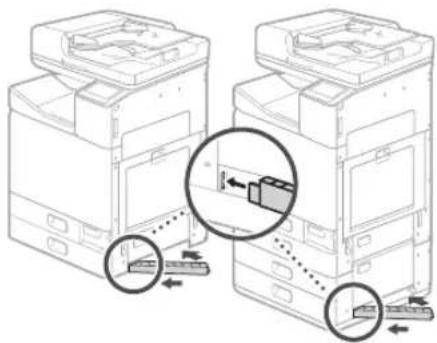
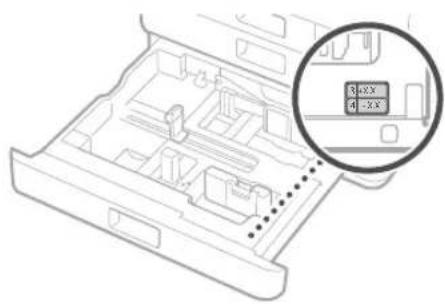
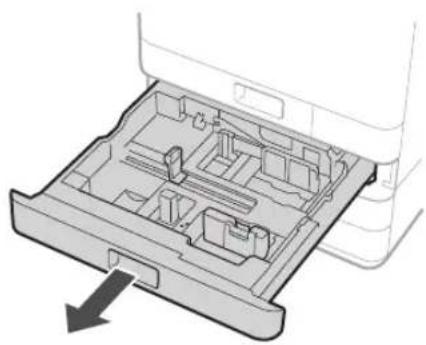
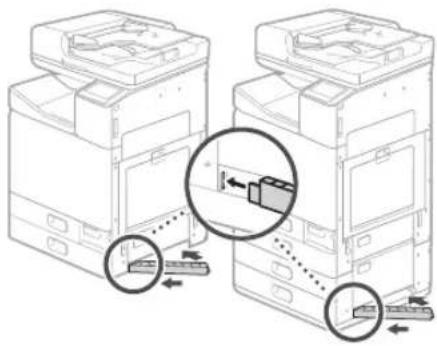
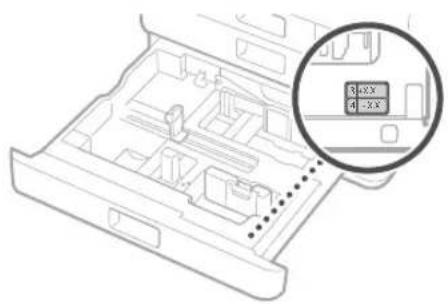
1 Retirez la cassette 3 et vérifiez les valeurs d'ajustement de la marge.
natural_image
Technical line drawing of a mechanical device with an inset magnified view showing internal components (no text or symbols)
←
Ajustement de la marge
natural_image
Interior view of a file drawer with visible page layout and storage areas (no text or symbols)
Démarrez l'ajustement de la marge pour la Cassette 3 et Cassette 4. Vérifiez les valeurs d'ajustement indiquées sur l'étiquette apposée sur la Cassette 3 à l'endroit indiqué à gauche, puis saisissez les valeurs sur l'écran suivant.
Démarrer
2 Saisissez les valeurs pour et que vous avez vérifiées à l'étape 1 sur l'écran.
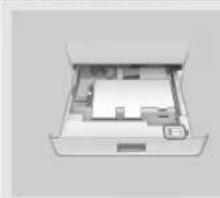
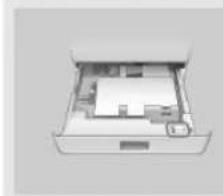
3 Replacez la cassette dans l'appareil.
ATTENTION
Veillez à ne pas vous coincer les doigts lorsque vous insérez la cassette.
Ensuite, imprimez et vérifiez un motif de vérification des buses.
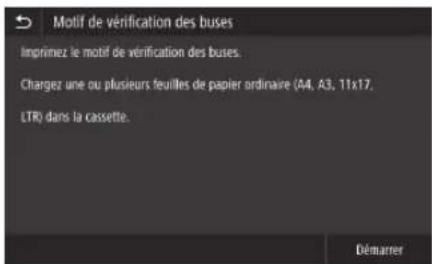
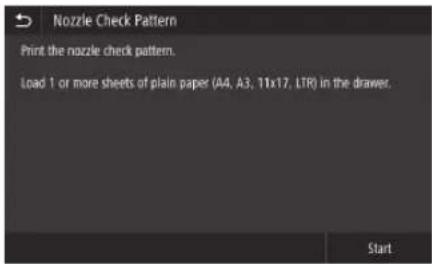
Impression et vérification d'un motif de vérification des buses
Imprimez et vérifiez un motif de vérification des buses pour vérifier l'état de la tête d'impression. Si des bandes ou des irrégularités apparaissent dans le résultat imprimé, procédez au nettoyage.
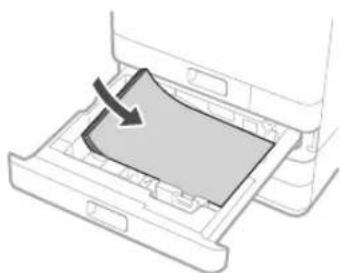
Chargez du papier ordinaire format A3, 11x17, LTR ou A4 dans la cassette. Le chargement d'au moins 10 feuilles de papier A3 ou 11x17 est recommandé.
- Avant de poursuivre, le remplissage de l'encre doit être terminé.
- Une barre de progression s'affiche jusqu'à la fin du remplissage de l'encre.
1

natural_image
Diagram of a device's internal structure showing a tray with internal compartments and an arrow indicating direction (no text or symbols)
2
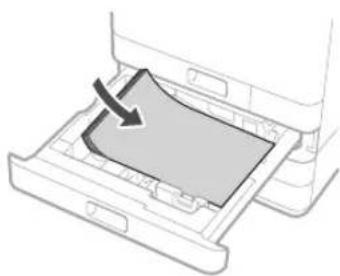
natural_image
Diagram of a printer drawer with a paper clip being inserted, showing no text or symbols
Chargez du papier par le côté dans le sens des guides papier.
3 Appuyez sur et imprimez un motif.
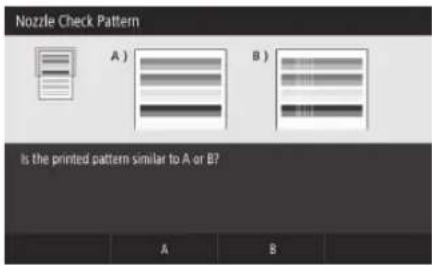
4
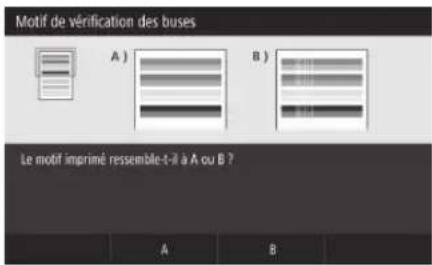
Si le résultat imprimé semble correct, appuyez sur pour terminer la vérification des buses. Si des bandes ou des irrégularités apparaissent dans le résultat imprimé, appuyez sur pour procéder au nettoyage.
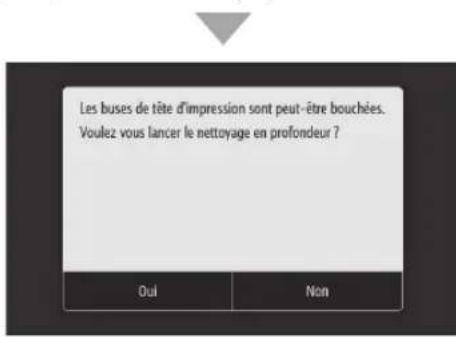
- Selon l'état des buses, il est possible qu'il soit nécessaire de les vérifier et de procéder au nettoyage plusieurs fois.
- Les réglages sont terminés lorsque l'écran Accueil apparaît.
Ensuite, passez aux réglages de connexion au réseau et au service de suivi distant.
Réglages de connexion au réseau et au service de suivi distant
Après avoir quitté le guide de configuration, poursuivez en effectuant les réglages permettant la connexion au réseau et à un service de suivi distant. Les éléments à régler dépendent de la connexion et de l'utilisation du service. Vérifiez les réglages qui s'appliquent aux conditions suivantes.
Si vous utilisez une adresse IP fixe
Passez à la section "Connexion à un réseau avec une adresse IP fixe ( P.28)".
Si vous utilisez un service de suivi distant
Qu'est-ce qu'un service de suivi distant ?
C'est un service qui surveille l'état de l'appareil et vous permet de bénéficier de différents services comme une assistance de récupération.
Passez à la section "Connexion à un service de suivi distant ( P.39)".
Autres
Vous n'êtes pas obligé d'effectuer des réglages dans les cas suivants.
Passez à la section "Installation du logiciel
(→P.14)".
- Obtenez une adresse IP automatiquement avec DHCP.
- Etant donné que seule une connexion USB sera utilisée, aucune adresse IP n'est réglée.
- Aucun service de suivi distant ne sera pas utilisé.
Installation du logiciel
- Les procédures décrites ici concernent Windows. Pour en savoir davantage sur la procédure d'installation du logiciel, consultez le manuel du pilote.
- En cas de connexion par USB, ne branchez pas le câble avant l'apparition des instructions vous invitant à le faire sur l'écran d'installation. Si le câble est déjà branché, débranchez-le de l'ordinateur, fermez la boîte de dialogue, puis exécutez la procédure suivante depuis l'étape1.
- Les pilotes macOS ne sont pas fournis avec votre appareil. Les pilotes les plus récents peuvent être téléchargés à partir du site Web Canon.
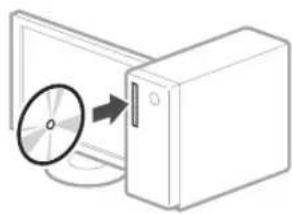
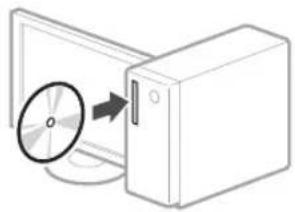
1
natural_image
Diagram showing a CD or DVD disc being inserted into a computer tower (no text or symbols present)
2

Si l'écran ne s'affiche pas correctement, réinsérez le DVD-ROM ou recherchez "D:\MInst.exe" sur la plateforme Windows. (Cette description suppose que "D:" est le nom du lecteur de DVD-ROM.)
Ensuite, configurez les réglages du fax
(WG7550Z/WG7550F)

P.15
Configuration des réglages du fax (WG7550Z/WG7550F)
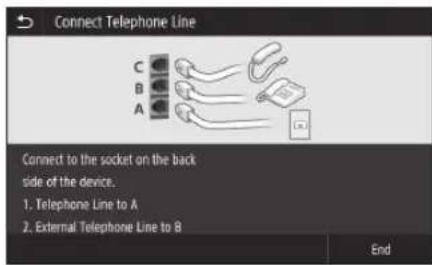
Si l'appareil n'est pas livré avec un câble téléphonique, procurez-en un.
Configurez les réglages du fax ainsi qu'il est indiqué ci-dessous.
1 Appuyez sur .
2 Appuyez sur .
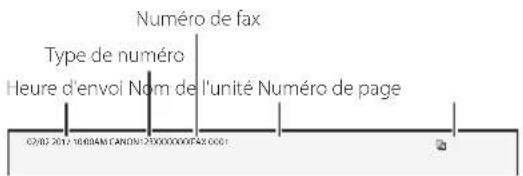
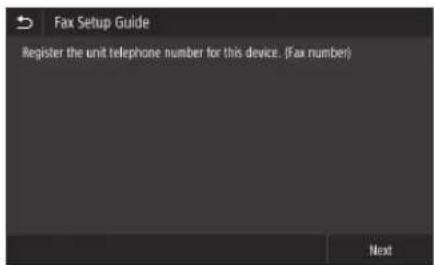
3 Enregistrez le numéro de téléphone de l'appareil (numéro de fax) et le nom d'utilisateur abrégé (nom de l'unité).
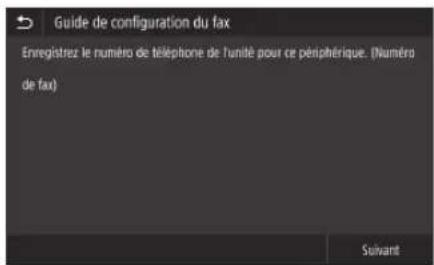
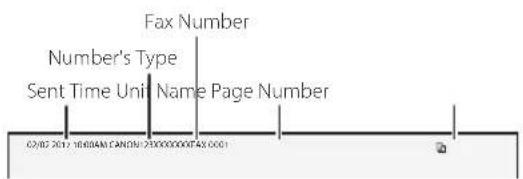
- Les informations ci-dessous figureront en tant que renseignements sur l'expéditeur sur la partie supérieure de la sortie papier de l'appareil de destination.
4 Réglez le mode de réception.
Répondez aux questions concernant la façon dont vous utiliserez la fonction fax pour sélectionner les meilleurs réglages.
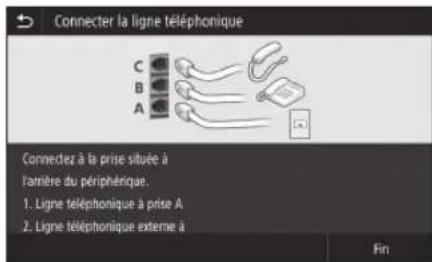
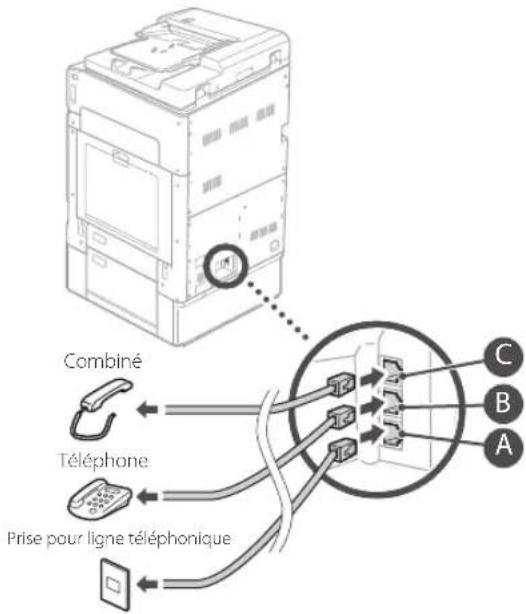
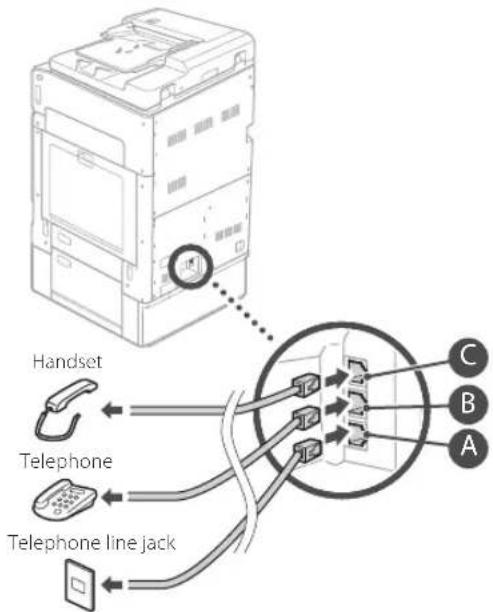
5 Branchez l'appareil à une prise pour ligne téléphonique.
6 Appuyez sur .
7 Appuyez sur .
La configuration est terminée.
Votre appareil est désormais prêt à être
utilisé.
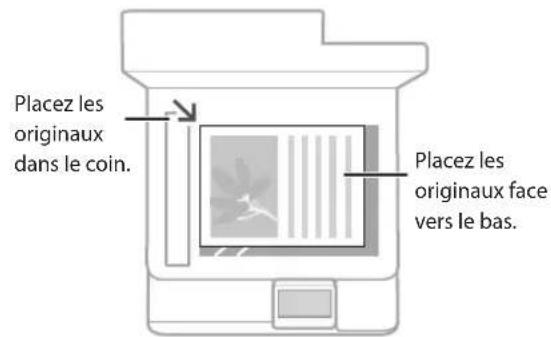
Positionnement des originaux
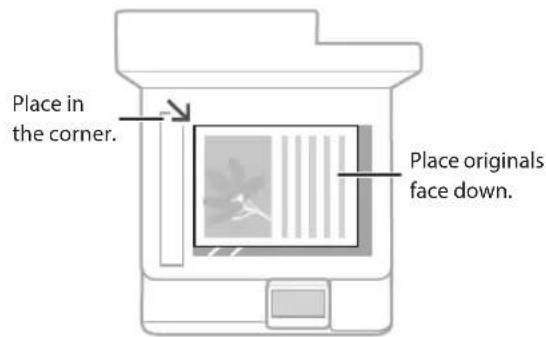
Sur la vitre


Adapté à la lecture de livres, de magazines et de coupures de journaux.
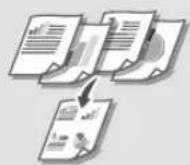
Dans le chargeur
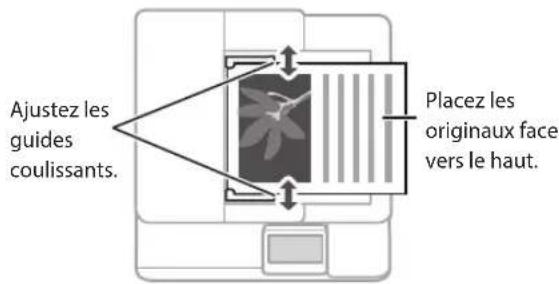


Adapté à la lecture de documents comportant plusieurs pages.
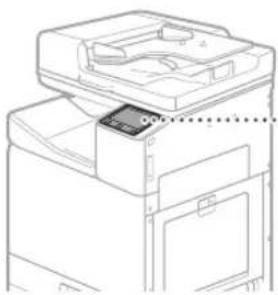
Démarrage à partir du panneau de commande
Panneau de commande
![Appareil (Touche [Economie d'énergie]) (Touche [Arrêt]) (Touche [Accueil]) Affichage (écran)](/content/2026/04/685967/images/b893578909f1d99c175b88c0d81d8e86d8a22765e4b9cb4194df441c371506a7.jpg)

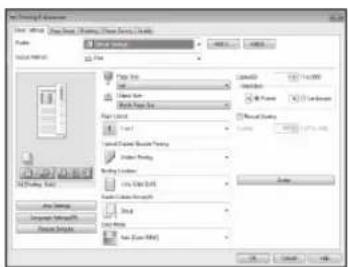
Impression
- Ouvrez le document à imprimer et sélectionnez la fonction d'impression de l'application.
- Sélectionnez le pilote d'imprimante de l'appareil, puis [Préférences] ou [Propriétés].
- Spécifiez le format du papier.
- Spécifiez la source et le type de papier.
- Si nécessaire, ajustez les paramètres d'impression.
- Sélectionnez [OK].
- Sélectionnez [Imprimer] ou [OK].
![Settings Settings Form 10.1.1 (Form 1) Settings: [ ] [ ] [ ] [ ] [ ] File Edit View Insert Modify View Help Format settings Format settings Format settings Format settings Format settings Format settings Format settings Format settings Format settings Format settings Format settings Format settings Format settings Format settings Format settings Format settings Format settings Format settings Format settings Format settings Format settings Format settings Format settings Format settings Format settings Format settings Format settings Format settings Format settings Format settings Format settings Format settings Format settings Format settings](/content/2026/04/685967/images/233e83ba8b76e87f6c837ea79d09ac1f61617218e26f13c7bbf3bf9badc5e2f4.jpg)
Pour en savoir davantage

Section "Impression" du manuel en ligne

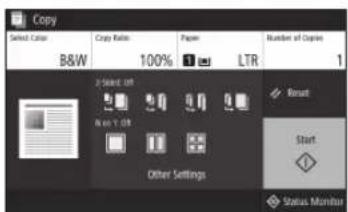
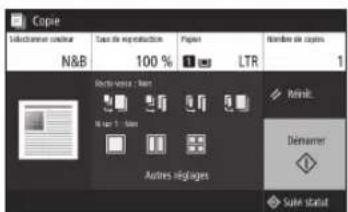
Copie
- Placez l'original.
- Appuyez sur 📄, puis sélectionnez .
- Si nécessaire, ajustez les paramètres de copie.
- Saisissez le nombre souhaité de copies.
- Sélectionnez .
Paramètres de copie utiles
sur 1
Recto verso ou Recto
Agrandissement ou réduction
Copie de cartes d'identité
Pour en savoir davantage
Section "Copie" du manuel en ligne

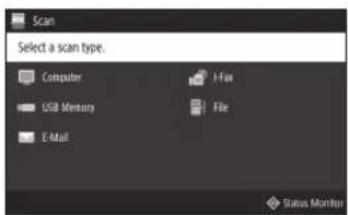
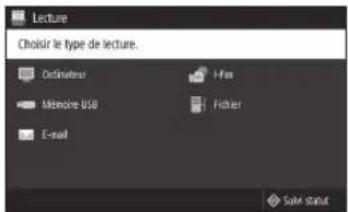
Lecture
- Placez l'original.
- Appuyez sur 📄, puis sélectionnez .
- Sélectionnez le type de lecture et saisissez les informations nécessaires.
- Appuyez sur ou .
Types de lecture
stockage sur un
périphérique USB
Envoi par e-mail
Envoi vers un serveur de fichier
Lecture depuis un ordinateur
WG Scan Utility
Pour en savoir davantage
Section "Lecture" du manuel en ligne

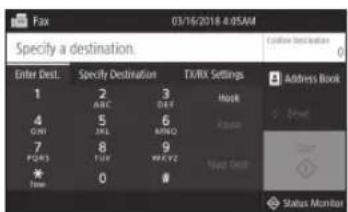
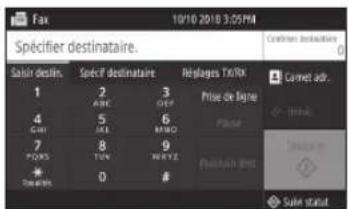
Envoi d'un fax (WG7550Z/WG7550F)
- Placez l'original.
- Appuyez sur 📄, puis sélectionnez .
- Saisissez les informations de destination.
- Si nécessaire, ajustez les réglages du fax.
- Sélectionnez .
Fonctions de fax utiles
Diffusion séquentielle
Réception en mémoire
Fax PC
Pour en savoir davantage
Section "Envoi d'un fax" du manuel en ligne
Chargement du papier dans la cassette
Les opérations communes aux cassettes 1 et 2 sont décrites ci-dessous. La cassette 2 est utilisée comme exemple.
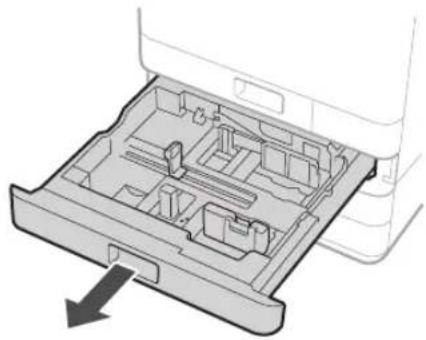
1
natural_image
Diagram of a device's internal structure showing a tray with internal compartments and an arrow indicating direction (no text or symbols)
2 Faites glisser la butée bleu clair pour régler la position des guides papier.
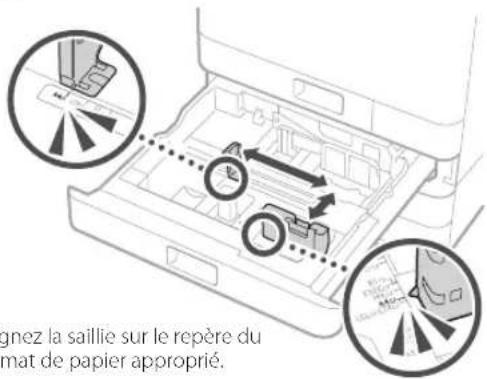
Alignez la saillie sur le repère du format de papier approprié.
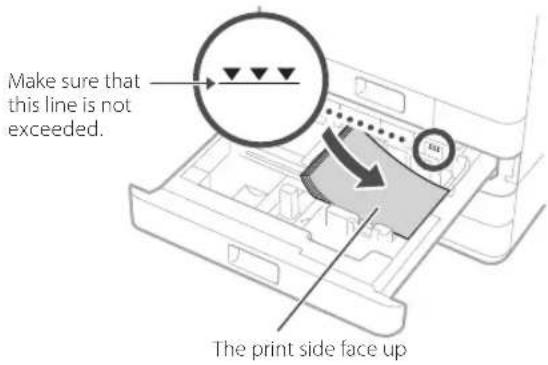
3 Séparez bien les feuilles, puis chargez-les.
La face d'impression est orientée vers le haut
Chargez le papier par le côté dans le sens des guides papier.
4 Replacez la cassette dans l'appareil.
ATTENTION
Veillez à ne pas vous coincer les doigts lorsque vous insérez la cassette.
Si vous avez changé le type de papier, assurez-vous que vous avez modifié les réglages papier.
1 Appuyez sur 📄 sélectionnez .
2 Spécifiez le format et le type de papier en fonction de l'écran.
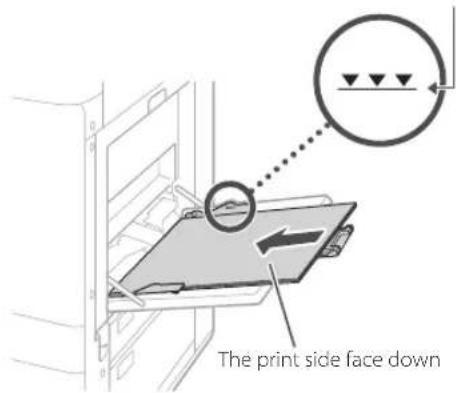
Chargement du papier dans le bac multifonctions
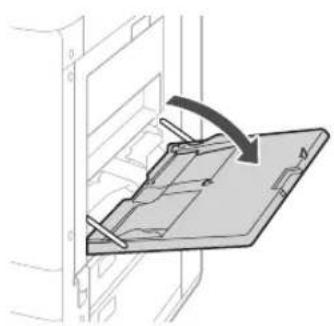
1
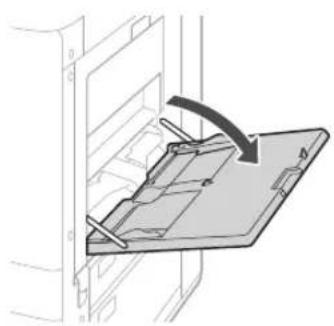
natural_image
Diagram of a mechanical assembly with a slide and lever mechanism, no text or symbols present
2
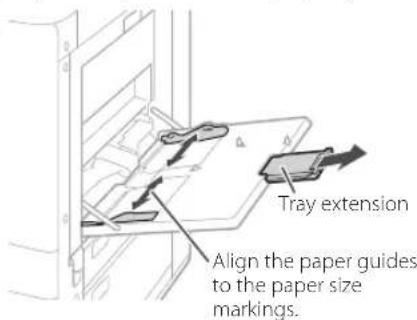
Ajustez la position des guides papier.
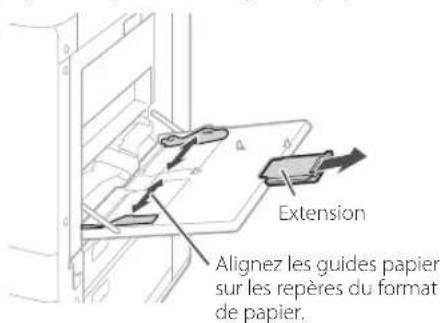
REMARQUE
Lors du chargement de feuilles de grande taille, déployez l'extension.
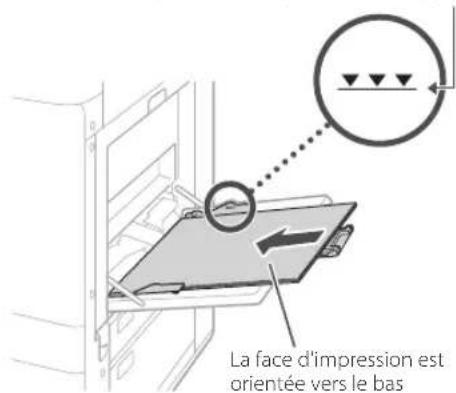
3
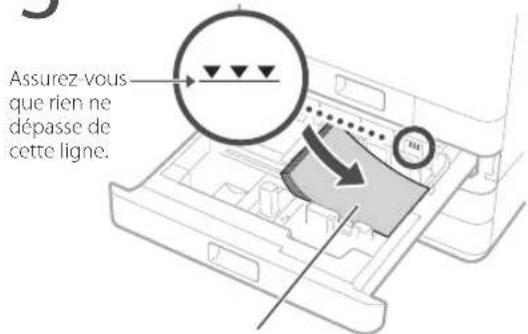
Séparez bien les feuilles, alignez les bords sur une surface plane, puis chargez-les.
Assurez-vous que rien ne dépasse de cette ligne.
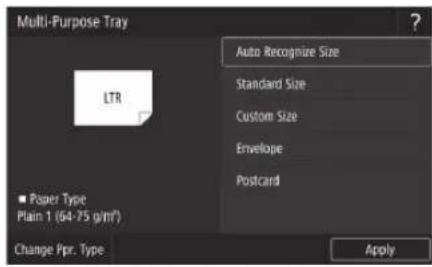
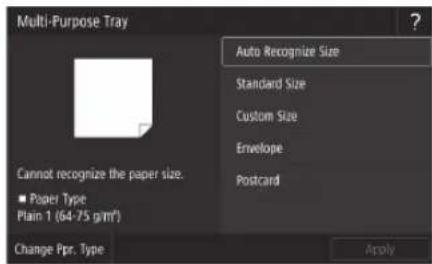
4
Vérifiez le format et le type de papier, puis appuyez sur sur l'écran.
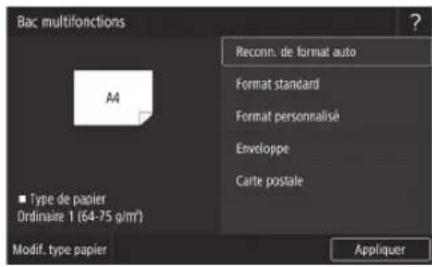
Si les réglages de taille/type de papier affichés à l'écran (étape 4) ne correspondent pas aux feuilles que vous avez chargées, modifiez-les manuellement.
1
Appuyez sur .


Spécifiez le format du papier.
2
Appuyez sur .

Spécifiez le type de papier.
3
Appuyez sur .
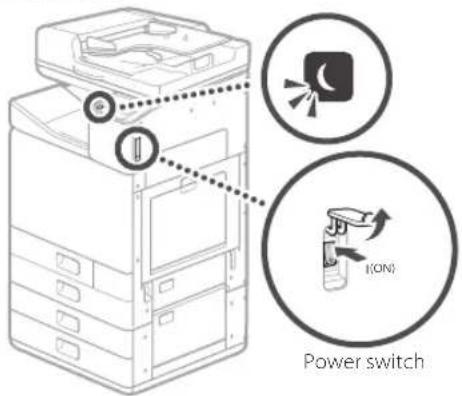
L'appareil ne répond pas
Vérifiez les points suivants.
• L'appareil est-il sous-tension ?
• L'appareil est-il en mode veille ?
Si l'écran et le témoin ne s'allument pas, appuyez sur l'interrupteur d'alimentation.
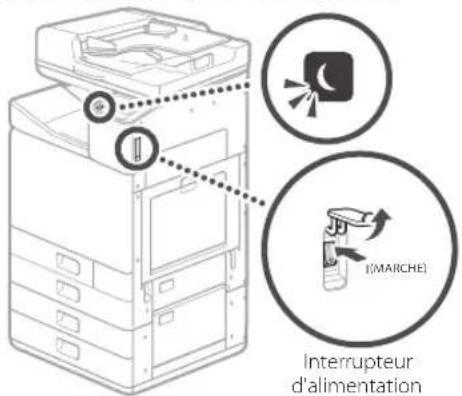
- Le câble d'alimentation est-il correctement branché ?
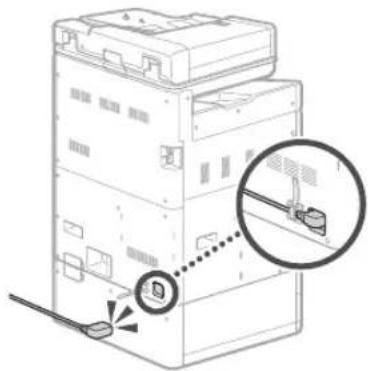
natural_image
Diagram of a server rack with a magnified inset showing a device attachment (no text or symbols present)
Si le problème persiste, consultez le manuel en ligne.
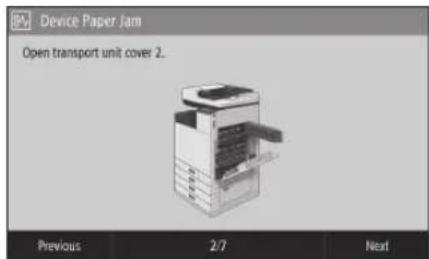
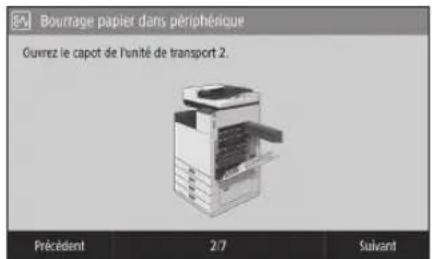
Des bourrages de papier se sont produits
Lors d'un bourrage de papier, un écran similaire à celui ci-dessous apparaît.
Eliminez les bourrages de papier conformément aux instructions affichées à l'écran.
Remplacement des consommables
Cartouches d'encre

Véritables cartouches d'encre Canon
Standard
• Noir PGI-7500
• Cyan PGI-7500
• Magenta PGI-7500
• Jaune PGI-7500
Grand format
- Noir PGI-7500XL
• Cyan PGI-7500XL
• Magenta PGI-7500XL
• Jaune PGI-7500XL
Cartouche d'entretien

• Maintenance Cartridge MC50
Résultats d'impression insatisfaisants
Vérification préalable
Avez-vous vérifié le papier et la qualité d'impression ?
Vérifiez que les réglages du panneau de commande de l'appareil ou du pilote d'imprimante correspondent au format de papier et au type de papier ainsi qu'à la qualité d'impression souhaités.
P.18 "Chargement du papier dans la cassette"
P.16 "Impression"
Si c'est le cas, augmentez les réglages de la qualité d'impression "résolution" et imprimez de nouveau. L'augmentation des réglages de qualité d'impression "résolution" dans le panneau de commande de l'appareil ou le pilote de l'imprimante peut améliorer les résultats d'impression.
REMARQUE
Selon les réglages choisis pour les paramètres , et <Économies d'encre>, il est possible que les couleurs soient claires.
Couleurs d'impression pâles/Couleurs différentes/Présence de bandes (lignes) blanches
Vérification 1
Avez-vous vérifié si la tête d'impression n'est pas obstruée ?
Imprimez un motif de vérification des buses, puis effectuez le nettoyage des têtes d'impression, etc. le cas échéant.
P.22 "Impression/Examen d'un motif de vérification des buses"
Vérification 2
Avez-vous effectué une correction des couleurs (Tous les types de papier) ?
Effectuez une correction des couleurs (Tous les types de papier).
P.23 "Réalisation d'une correction des couleurs (Tous les types de papier)"
Vérification 3
Si les procédures ci-dessus ne résolvent pas le problème, effectuez une correction des couleurs (Type de papier unique).
P.23 "Réalisation d'une correction des couleurs (Type de papier unique)"
Irrégularité des couleurs ou présence de bandes de couleurs
Vérification 1
Avez-vous vérifié l'état de la tête d'impression ?
Exécutez un diagnostic de la tête d'impression.
P.24 "Exécution d'un diagnostic de la tête d'impression"
Vérification 2
Si les procédures ci-dessus ne résolvent pas le problème, effectuez une correction des couleurs (Type de papier unique).
P.23 "Réalisation d'une correction des couleurs (Type de papier unique)"
Couleurs mal alignées
Vérification 1
Avez-vous effectué l'alignement de la position de la tête d'impression ?
Vérifiez la position de la tête d'impression pour corriger les couleurs mal alignées, etc.
P.24 "Alignement de la tête d'impression"
Résultats de copie insatisfaisants
Vérification 1
L'original est-il placé correctement sur la
vitre ?
Placez l'original de sorte à ce que la face à lire soit orientée vers le bas.
P.16 "Positionnement des originaux"
Vérification 2
Faites-vous une copie d'un original imprimé sur l'appareil ?
Si vous réalisez une copie d'un original imprimé sur l'appareil, l'impression peut ne pas avoir le rendu attendu selon la qualité de la photo ou du document d'origine.
Imprimez directement depuis l'appareil ou, si vous le pouvez, directement depuis un ordinateur.
Vérification 3
La zone de lecture des documents chargés est-elle sale ?
Nettoyez la zone de lecture des documents chargés.
P.25 "Nettoyage de la zone de lecture des documents chargés"
Impression/Examen d'un motif de vérification des buses
Vous pouvez imprimer un motif de vérification des buses afin de vérifier l'obstruction de la tête d'impression et le décalage des couleurs.
Préparez le papier suivant.
Pour le motif de vérification des buses :
du papier pour lequel vous souhaitez vérifier
les bandes et les irrégularités (du papier fin, du
papier ordinaire, du papier épais (carton), du
papier recyclé, du papier photo mat)
Format : A3, 11x17, LTR ou A4
Nombre de feuilles : 5 ou plus
Pour l'alignement de la position de la tête d'impression :
du papier ordinaire (vous pouvez également utiliser du papier recyclé)
Format : A3, 11x17, LTR ou A4
Nombre de feuilles : 1
- Format A3 ou 11x17 recommandé.
-
Placez une feuille "pour motif de vérification des buses" et une feuille "pour ajuster la position de la tête d'impression" dans les différentes cassettes ou le bac multifonctions. Reportez-vous à la P.18 et effectuez également les réglages papier.
-
Appuyez sur 📄, puis sur
-
Appuyez sur ▶
▶ ▶ sélectionnez un type de papier ▶
▶ .
-
Examinez le motif de vérification des buses.
- Suivez les instructions affichées à l'écran pour nettoyer la tête d'impression et l'aligner, le cas échéant.
Réalisation d'une correction des couleurs (Tous les types de papier)
Réalisez la correction des couleurs.
Préparez le papier suivant.
Papier ordinaire (vous pouvez également utiliser du papier recyclé)
Format : A3, 11x17, LTR ou A4
Nombre de feuilles : 2
- Format A3 ou 11x17 recommandé.
- Placez du papier dans une cassette ou le bac multifonctions.
Reportez-vous à la P.18 et effectuez également les réglages papier.
-
Appuyez sur 📋, puis sur
-
Appuyez sur
▶ ▶ ▶ .
- Effectuez une correction des couleurs (Tous les types de papier).
- Suivez les instructions affichées à l'écran.
- Si la zone de lecture des documents chargés est sale, la correction peut ne pas être effectuée correctement.
P.25 "Nettoyage de la zone de lecture des documents chargés"
Réalisation d'une correction des couleurs (Type de papier unique)
Effectuez une correction optimale des couleurs pour chaque type de papier.
Préparez le papier suivant.
Le papier pour lequel vous souhaitez corriger les couleurs (du papier fin, du papier ordinaire, du papier épais (carton), du papier recyclé, du papier photo mat)
Format: A3, 11x17, LTR ou A4
Nombre de feuilles : 2
- Format A3 ou 11x17 recommandé.
- Placez du papier dans une cassette ou le bac multifonctions.
Reportez-vous à la P.18 et effectuez également les réglages papier.
-
Appuyez sur 📄, puis sur
-
Appuyez sur
▶ ▶ ▶ .
- Réalisez une correction des couleurs (Type de papier unique).
- Sélectionnez le type de papier et suivez les instructions affichées à l'écran.
- Si la zone de lecture des documents chargés est sale, la correction peut ne pas être effectuée correctement.
P.25 "Nettoyage de la zone de lecture des documents chargés"
Exécution d'un diagnostic de la tête d'impression
Effectuez un diagnostic de la tête d'impression, un diagnostic des couleurs et un diagnostic de l'alignement des couleurs, puis résolvez les éventuels problèmes.
Préparez le papier suivant,
Papier ordinaire (vous pouvez également utiliser du papier recyclé)
Format : A3, 11x17, LTR ou A4
Nombre de feuilles : 5
Reportez-vous à la P.18 et effectuez également les réglages papier.
-
Appuyez sur 📄, puis sur
-
Appuyez sur ▶
▶ ▶ .
-
Suivez les instructions affichées à l'écran.
- Si la zone de lecture des documents chargés est sale, la correction peut ne pas être effectuée correctement.
P.25 "Nettoyage de la zone de lecture des documents chargés"
Alignement de la tête d'impression
Vérifiez la position de la tête d'impression pour corriger les couleurs mal alignées, etc.
Préparez le papier suivant.
Papier ordinaire (vous pouvez également utiliser du papier recyclé)
Format : A3, 11x17, LTR ou A4
Nombre de feuilles : 1
Reportez-vous à la P.18 et effectuez également les réglages papier.
-
Appuyez sur 📄, puis sur
-
Appuyez sur ▶
▶ .
-
Suivez les instructions affichées à l'écran.
- Si la zone de lecture des documents chargés est sale, la correction peut ne pas être effectuée correctement.
P.25 "Nettoyage de la zone de lecture des documents chargés"
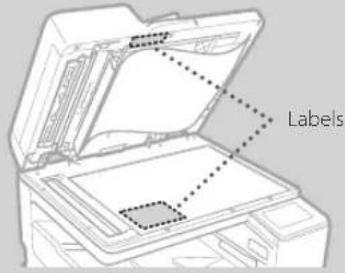
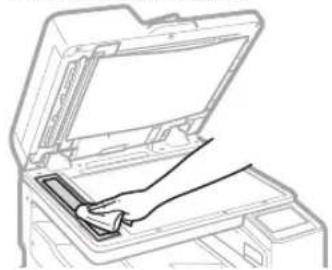
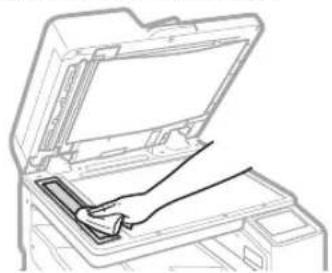
Nettoyage de la zone de lecture des documents chargés
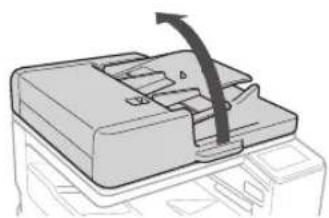
Effectuez le nettoyage conformément aux étapes indiquées sur les étiquettes situées sur le chargeur et dans la vitre.

Utilisez la feuille de nettoyage de la vitre fournie pour nettoyer les zones de lecture des documents chargés. Nettoyez-les uniquement avec celle-ci.
- Ouvrez le chargeur et essuyez la zone de lecture des documents chargés (longue bande de verre) à côté de la vitre à l'aide de la feuille de nettoyage de la vitre incluse.
ATTENTION
N'utilisez pas de nettoyant pour vitres, de solvant à base d'alcool, etc., car cela peut éliminer le revêtement antitache.
natural_image
Line drawing of a printer's open lid with a hand inserting a clip (no text or symbols)
-
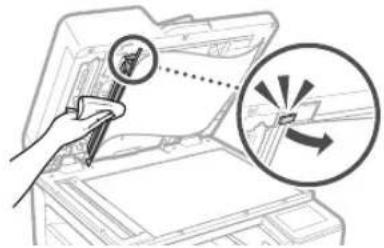
Essuyez la zone de lecture des documents chargés (longue bande de verre) sur le chargeur.
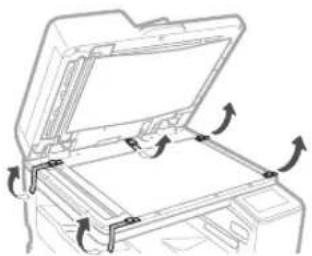
-
Ouvrez le capot de balayage de document et essuyez la zone de lecture des documents chargés (longue bande de verre) et la zone qui lui fait face.

-
Refermez le capot de balayage de document jusqu'à entendre un "clic".
-
Fermez doucement le chargeur.
Si des bandes apparaissent encore
Procédez au nettoyage du chargeur.
- Appuyez sur 📄, puis sélectionnez
Appuyez sur
▶ ▶ Nettoyage
automatique du chargeur>
.
Connexion au réseau et au service de suivi distant
Glossaire
| Adresse IP Avec une connexion TCP/IP, numéro affecté aux périphériques d'un réseau permettant leur identification. Les adresses IP existent aux formats IPv4 et IPv6. |
| Masque de sous-réseau Nombre subdivisant un réseau lors de l'utilisation d'une adresse IP IPv4.La plage d'adresses IP affectée aux périphériques peut être limitée par l'utilisateur. |
| Adresse de passerelle Adresse d'un périphérique servant de passerelle pour la communication entre différents périphériques. En général, un routeur est une passerelle par défaut. |
| DNS(Système de noms de domaine)Service fournissant une résolution de noms pour les noms d'hôtes correspondants (noms de domaine) avec des adresses IP via un serveur. |
| Port Passerelle où une adresse IP est similaire à une adresse postale.L'affectation des numéros de port offre une sécurité accrue. |
| Proxy Ordinateur, logiciel, etc. qui traite la communication HTTP avec les périphériques situés en dehors du réseau en tant que proxy, la plupart du temps pour naviguer sur les sites Web, etc. Au lieu de communiquer directement avec l'extérieur du réseau, la connexion est relayée via un serveur proxy. |
| Routeur Périphérique de communication permettant de connecter un réseau et des périphériques. Il existe des routeurs filaires et sans fil. |
| SSID (nom de réseau) Identificateur des points d'accès lors de l'utilisation d'un réseau sans fil. |
| Mot de passe (clé réseau) Clé de chiffrement utilisée pour se connecter à un réseau sans fil. La configuration d'une clé de chiffrement correspondant à un SSID permet de se connecter à un point d'accès. |
| Pare-feu Système qui bloque tout accès non autorisé depuis l'extérieur d'un réseau et empêche toute attaque et intrusion dans un réseau dans une zone locale. |
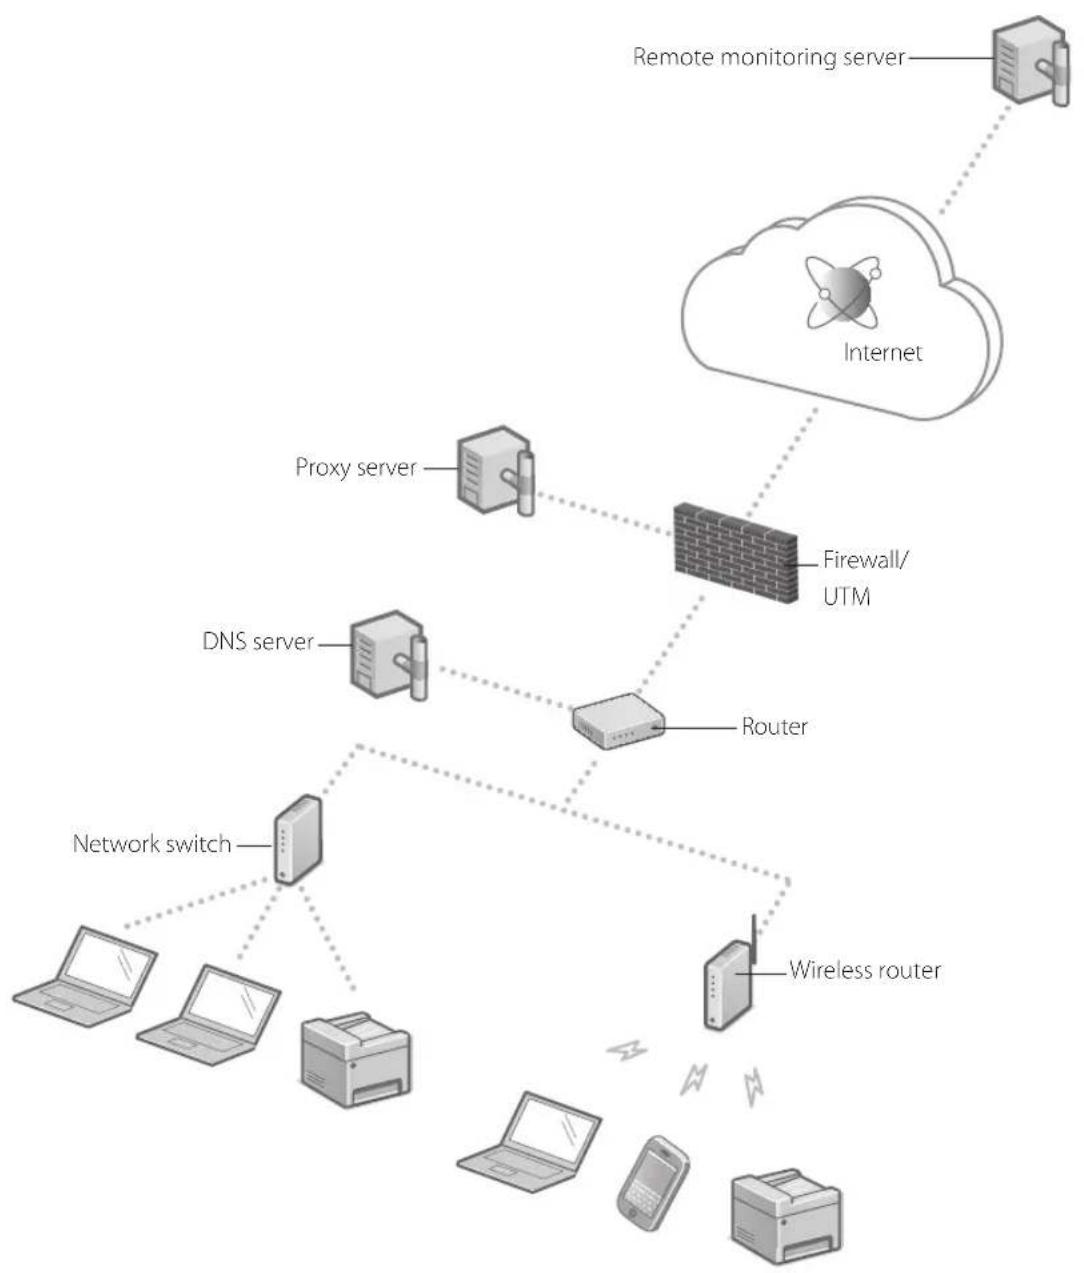
Exemple de connexion réseau
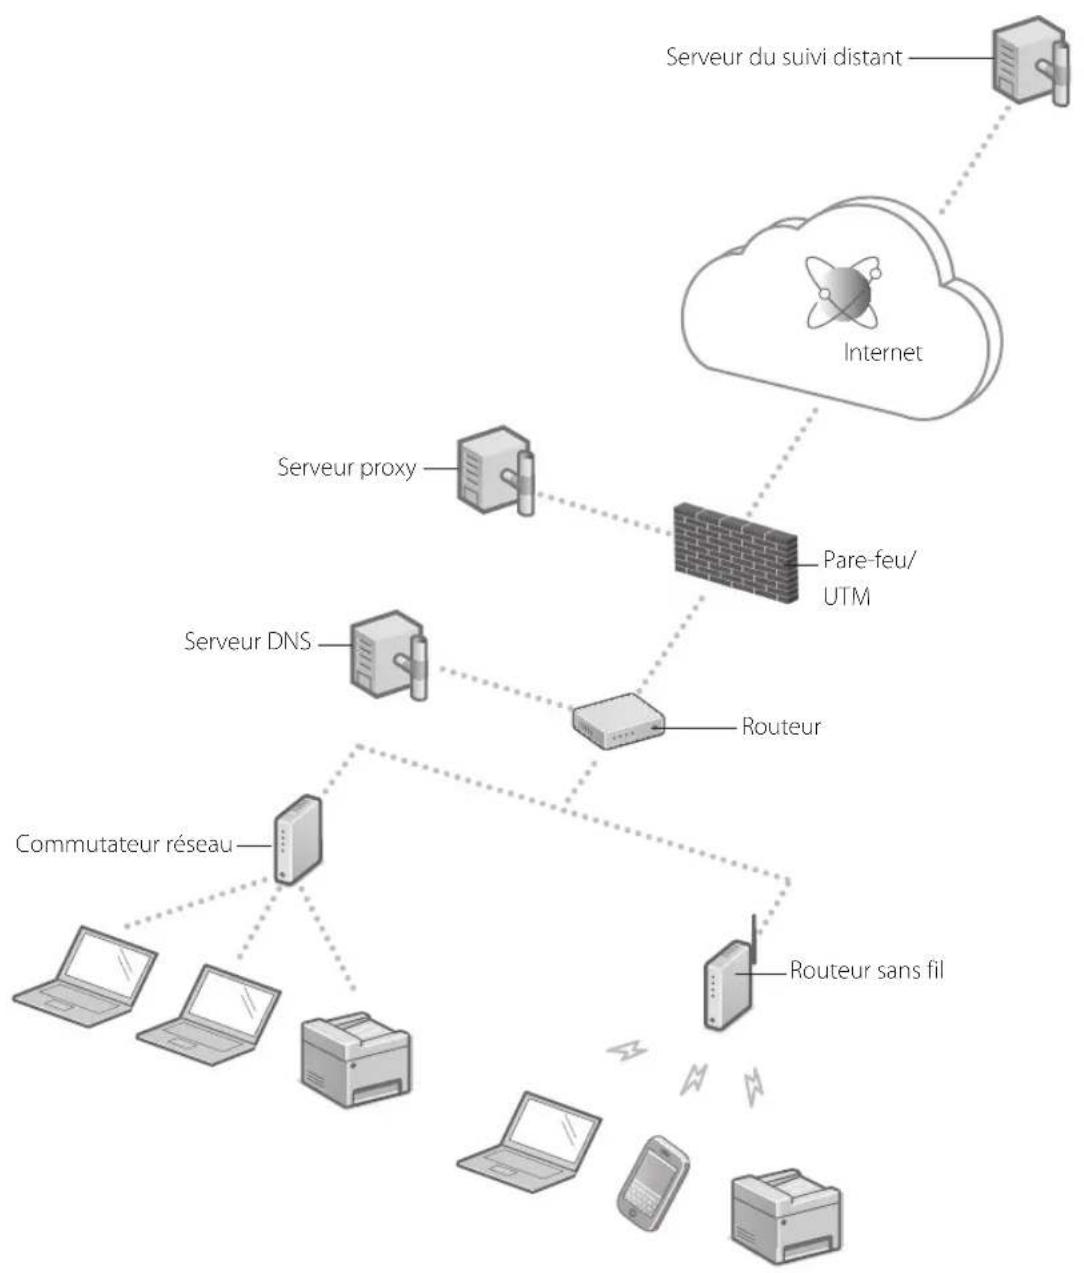
flowchart
graph TD
    A["Internet"] --> B["Serveur du suivi distant"]
    B --> C["Serveur proxy"]
    C --> D["Pare-feu/UTM"]
    D --> E["Routeur"]
    E --> F["Commutateur réseau"]
    F --> G["Computer"]
    F --> H["Laptop"]
    F --> I["Printer"]
    F --> J["Laptop"]
    F --> K["Printer"]
    F --> L["Printer"]
    F --> M["Router sans fil"]
Connexion au réseau et au service de suivi distant
Connexion à un réseau avec une adresse IP fixe
Etape 1 Vérification de l'environnement réseau
Avant vous connecter à un réseau avec une adresse IP fixe, vous devez vérifier l'environnement réseau. Reportez-vous à la liste suivante et vérifiez préalablement les informations requises.
| Éléments requis Notes | |
| En cas de connexion à un réseau avec une adresse IP (IPv4) fixe |
| Adresse IP (adresse IP de l'appareil) | |
| Masque de sous-réseau | |
| Adresse de passerelle | |
| En cas de connexion par un réseau sans fil |
| SSID pour routeur sans fil | |
| Clé réseau | |
| Réglage DNS* |
| Adresse du serveur DNS primaire | |
| Adresse du serveur DNS secondaire | |
| Réglage du proxy |
| Adresse du serveur proxy HTTP | |
| Numéro de port du serveur proxy HTTP | |
| Nom d'utilisateur d'authentification du proxy | |
| Mot de passe d'authentification du proxy | |
* Information requise lors de l'utilisation de réglages DNS ou de réglages du proxy.
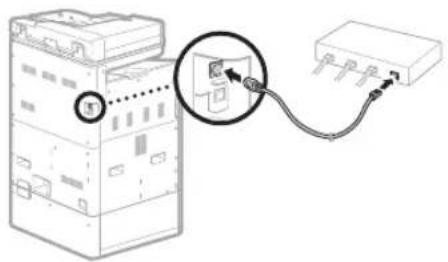
Etape 2 Connexion à un réseau filaire/sans fil Connexion par réseau filaire
L'appareil n'est pas fourni avec un câble de réseau. Vous devez vous en procurer un.
1 Dans l'écran Accueil, appuyez sur
- Utilisez le câble réseau pour connecter l'appareil au routeur.
- Appuyez vers l'intérieur jusqu'à ce que le connecteur soit entièrement enfoncé dans la fente et jusqu'à entendre un "clic".
natural_image
Diagram of an electrical switch connected to a terminal block via cable (no text or symbols present)
Une fois la connexion effectuée, poursuivez en définissant une adresse IP fixe. P.34 "Etape 3 Définition d'une adresse IP fixe"
Connexion au réseau et au service de suivi distant
Connexion à un réseau avec une adresse IP fixe
Connexion par réseau câblé
Ne connectez pas le câble réseau à l'appareil.
Connexion à un réseau sans fil manuellement en sélectionnant un point d'accès
Le "SSID (nom de réseau)" et la "clé réseau (mot de passe)" sont requis. Les informations requises peuvent être vérifiées préalablement avec la liste P.28 ou en contactant l'administrateur réseau.
1 Dans l'écran Accueil, appuyez sur
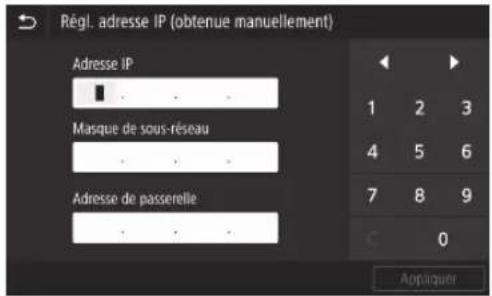
- Lors de la définition d'une adresse IP fixe, une "adresse IP", un "masque de sous-réseau" et une "adresse de passerelle" sont requis. Selon la configuration de votre réseau, des informations autres que l'adresse IP, le masque de sous-réseau et l'adresse de passerelle peuvent être requises. Contactez l'administrateur réseau pour connaître les informations requises.
- Pour définir une adresse IPv6, reportez-vous au Manuel en ligne.
1 Dans l'écran Accueil, appuyez sur
- Lorsque l'écran de connexion apparaît, saisissez l'ID de l'administrateur système et le code de sécurité.
- Contactez l'administrateur réseau pour connaître l'ID de l'administrateur système et le code de sécurité (défini sur "7654321" par défaut).
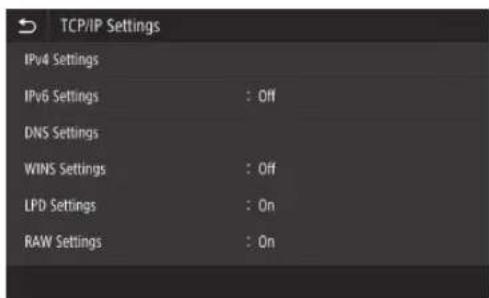
3 Sélectionnez ▶ ▶.
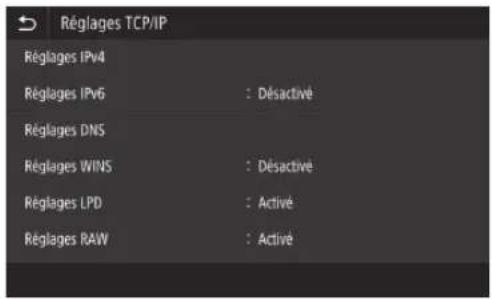
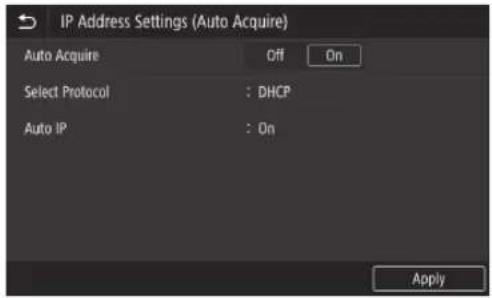
4 Dans l'écran , appuyez sur , puis dans , appuyez sur ▶.

Pour utiliser une connexion DHCP, réglez sur et sur .
5 Appuyez sur .
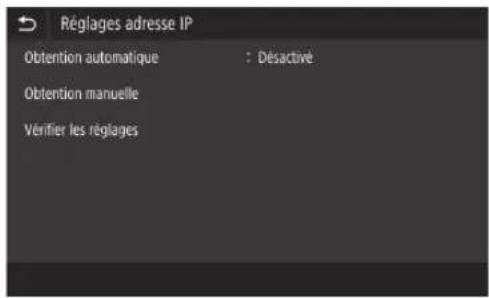
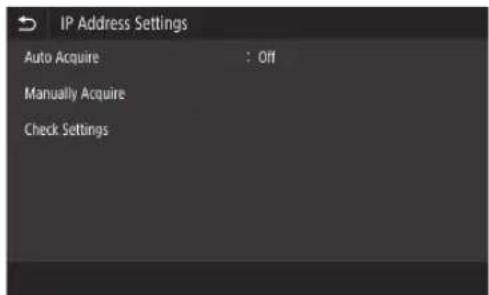
Vous devez d'abord régler sur dans l'étape 4 avant d'appuyer sur .
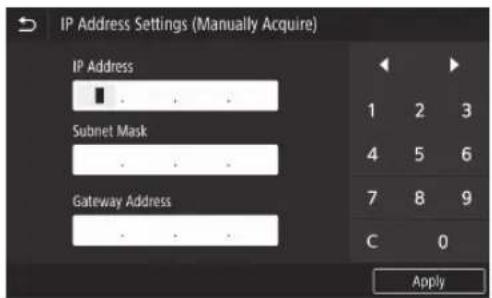
6 Saisissez , , , puis appuyez sur .
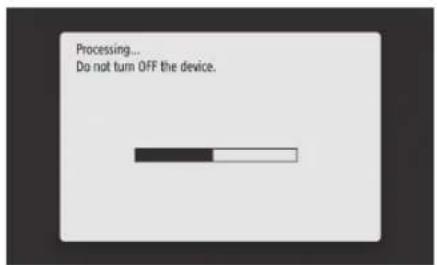
7 Redémarrez l'appareil.
• Mettez l'appareil hors tension, attendez 10 secondes, puis remettez l'appareil sous tension.
Connexion au réseau et au service de suivi distant
Connexion à un réseau avec une adresse IP fixe
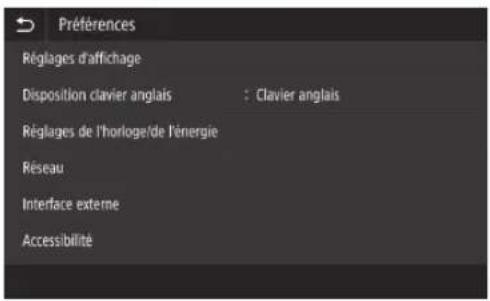
Réglage du DNS
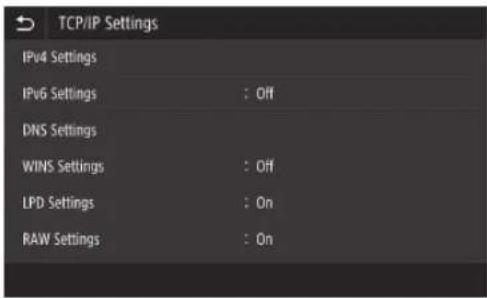
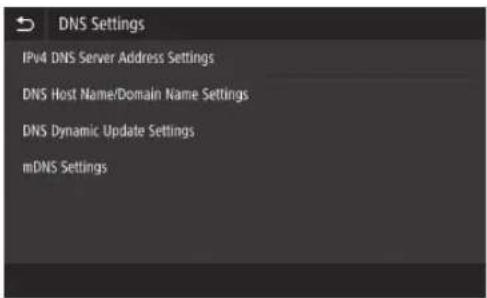
Le DNS (Système de noms de domaine) est l'information permettant de faire correspondre les noms d'hôtes et les adresses IP. Si l'adresse IP est obtenue automatiquement, l'information DNS requise est définie automatiquement. Si vous saisissez l'adresse IP manuellement, vous devez également saisir l'information du DNS manuellement.
Le réglage du DNS dépend de la configuration du réseau. Contactez l'administrateur réseau pour vérifier la nécessité du réglage DNS dans votre environnement et les informations de réglage requises.
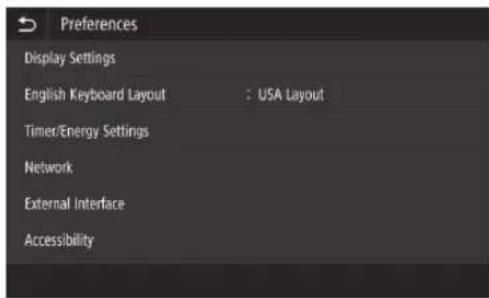
1 Sélectionnez


![Display (screen) ([Energy Saver] key) ([Stop] key) ([Home] key)](/content/2026/04/685967/images/ad7b011654decdc5103082e7e35a9478ac4c0a2bf64b2f96ba4b44150324e7c8.jpg)