SL-PG380A - System Hi-Fi PANASONIC - Bezpłatna instrukcja obsługi
Znajdź bezpłatnie instrukcję urządzenia SL-PG380A PANASONIC w formacie PDF.

Pytania użytkowników dotyczące SL-PG380A PANASONIC
0 pytanie dotyczące tego urządzenia. Odpowiedz na te, które znasz, lub zadaj własne.
Zadaj nowe pytanie dotyczące tego urządzenia
Pobierz instrukcję dla swojego System Hi-Fi w formacie PDF za darmo! Znajdź swoją instrukcję SL-PG380A - PANASONIC i weź swoje urządzenie elektroniczne z powrotem w ręce. Na tej stronie opublikowane są wszystkie dokumenty niezbędne do korzystania z urządzenia. SL-PG380A marki PANASONIC.
INSTRUKCJA OBSŁUGI SL-PG380A PANASONIC
Technics
Compact Disc Player
SL-PG580A
SL-PG480A
SL-PG380A
Operating Instructions
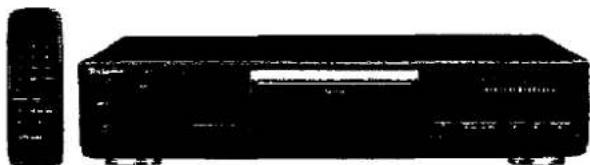
natural_image
Black electronic device with front panel and control panel (no visible text or symbols)COMPACT disc DIGITAL AUDIO
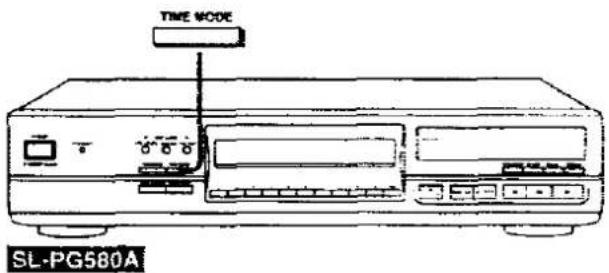
The photograph shows model SL-PG580A.
Note:
The "EB" indication shown on the packing case indicates United Kingdom.
Before connecting, operating or adjusting this product, please read these instructions completely.
EB
RQT3479-B
Dear Customer
Thank you for purchasing this product.
For optimum performance and safety, please read these operating instructions carefully.
These operating instructions are applicable to the SL-PG580A. SL-PG480A and SL-PG380A models.
These operating instructions, however, fundamentally explain the operation of SL-PG580A model.
The functions of SL-PG680A, SL-PG480A and SL-PG380A are different to each other. For this reason, the following symbols are used to indicate functions provided only the models concerned.
SL-PG580A: SL-PG580A
SL-PG480A: SL-PG480A
SL-PG380A: SL-PG380A
If a function is not marked with a symbol, it is common to all three models.
| SL-PG580A | SL-PG480A | SL-PG380A | |
| Tape length button | Provided | Not provided | Not provided |
| Tape side select button | Provided | Not provided | Not provided |
| Time fade button | Provided | Not provided | Not provided |
| Numeric buttons | Provided | Provided (Remote control only) | Not provided |
| Remote Control | Provided | Provided | Not provided |
CAUTION!
THIS PRODUCT UTILIZES A LASER.
USE OF CONTROLS OR ADJUSTMENTS OR PERFORMANCE OF PROCEDURES OTHER THAN THOSE SPECIFIED HEREIN MAY RESULT IN HAZARDOUS RADIATION EXPOSURE.
DO NOT OPEN COVERS AND DO NOT REPAIR YOURSELF. REFER SERVICING TO QUALIFIED PERSONNEL.
Table of Contents
Before Use
Caution for AC Mains Lead 3
Front Panel Controls 4
Connections 5
Concerning the Remote Control
SL-PG580A SL-PG480A 6
Operations
Sequential Play Basic Play 7
Skip Function 8
Search Function 8
Direct Access Play SL PG580A 9
Random Play 9
Program Play 10
Convenient Functions
Repeat Function 12
Auto Cue Function 13
Output Level Control SL-PGS80A SL-PG480A 14
Time Mode Selection 14
Time Fade Function SL-PG580A 15
CD Edit Recording
CD Edit Recording SL-PG580A 15
Auto Edit SL-PG580A 16
Program Edit SL-PG580A 18
Records a CD using the Peak Search Function 19
General Information
Remote Control Operations — quick reference — SL-PG580A SL-PG480A 20
Suggestions for Safety 21
Concerning Compact Discs 22
Technical Specifications 22
Troubleshooting Guide 23
Maintenance 23
| CAVAGER | PRAIRLE, LEEF PARATHA, WOOD NOK ANDO CABBRE EXPORE 2014 |
| ADWARSEL | S. M. M. M. M. M. M. M. M. M. M. M. M. M. M. M. M. M. M. M. M. M. M. M. M. M. M. M. M. M. M. M. M. M. M. M. M. M. M. M. M. M. M. M. M. M. M. M. M. M. M. |
| VARO | M. M. M. M. M. M. M. M. M. M. M. M. M. M. M. M. M. M. M. M. M. M. M. M. M. M. M. M. M. M. M. M. M. M. M. M. M. M. M. M. M. M. M. M. M. M. M. M. M. M. N. |
| VAPNING | DOWA GUSTAVES, W. W. W. W. W. W. W. W. W. W. W. W. W. W. W. W. W. W. W. W. W. W. W. W. W. W. W. W. W. W. W. W. W. W. W. W. W. W. W. W. W. W. W. W. W. W. W. W. W. W. W |
| ADVERSE | S. M. M. M. M. M. M. M. M. M. M. M. M. M. M. M. M. M. M. M. M. M. M. M. M. M. M. M. M. M. M. M. M. M. M. M. M. M. M. M. M. M. M. M. M. M. M. M. M. |
(Inside of product)
(Indersiden at apparalet)
(Tuoreen sis#s)
(Apparators inside)
(Products - crosside)
(Im incanen des Gerates)
Caution for AC Mains Lead
(For United Kingdom)
("EB" area code model only)
For your safety, please read the following text carefully.
This appliance is supplied with a moulded three pin mains plug for your safety and convenience.
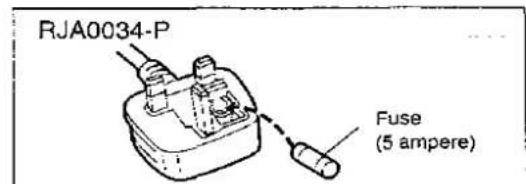
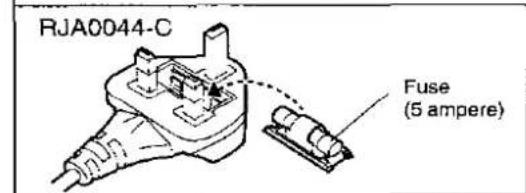
A 5-ampere fuse is fitted in this plug.
Should the fuse need to be replaced please ensure that the replacement fuse has a rating of 5-ampere and that it is approved by ASTA or BSI to BS1362.
Check for the ASTA mark 📄 or the BSI mark 🌐 on the body of the fuse.
If the plug contains a removable fuse cover you must ensure that it is refitted when the fuse is replaced.
If you lose the fuse cover the plug must not be used until a replacement cover is obtained.
A replacement fuse cover can be purchased from your local dealer.
CAUTION!
IF THE FITTED MOULDED PLUG IS UNSUITABLE FOR THE SOCKET OUTLET IN YOUR HOME THEN THE FUSE SHOULD BE REMOVED AND THE PLUG CUT OFF AND DISPOSED OF SAFELY.
THERE IS A DANGER OF SEVERE ELECTRICAL SHOCK IF THE CUT OFF PLUG IS INSERTED INTO ANY 13-AMPERE SOCKET.
If a new plug is to be fitted please observe the wiring code as shown below.
If in any doubt please consult a qualified electrician.
IMPORTANT
If the socket outlets in the home are not suitable for the plug supplied with this appliance it should be cut off and an appropriate three pin plug fitted.
The wires in this mains lead are coloured in accordance with the following code:
Blue: Neutral
Brown: Live
Do not connect either wire to the earth terminal in the plug which is marked by the letter "E" or by the safety earth symbol ± or coloured green or green-and-yellow.
As the colours of the wires in the mains lead of this apparatus may not correspond with the coloured markings identifying the terminals in your plug proceed as follows. The wire which is coloured BLUE must be connected to the terminal which is marked with the letter N or coloured BLACK.
The wire which is coloured BROWN must be connected to the terminal which is marked with the letter L or coloured RED.
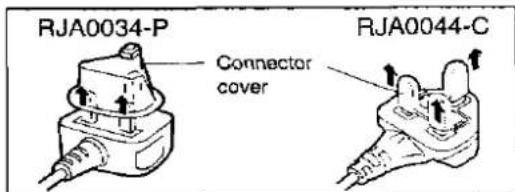
Before use
Remove the connector cover as follows.
How to replace the fuse
- Open the fuse cover with a screwdriver.
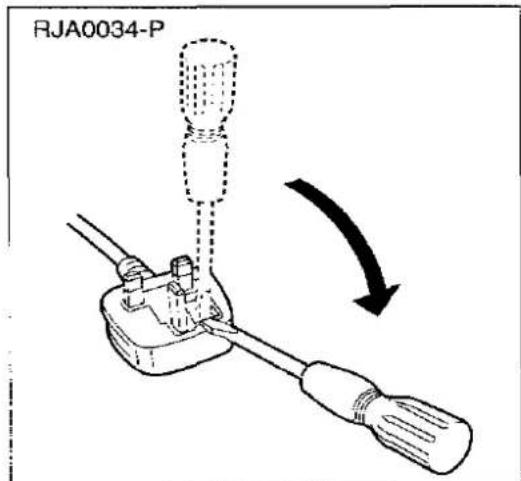
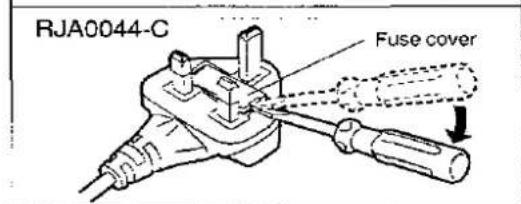
- Replace the fuse and close or attach the fuse cover.
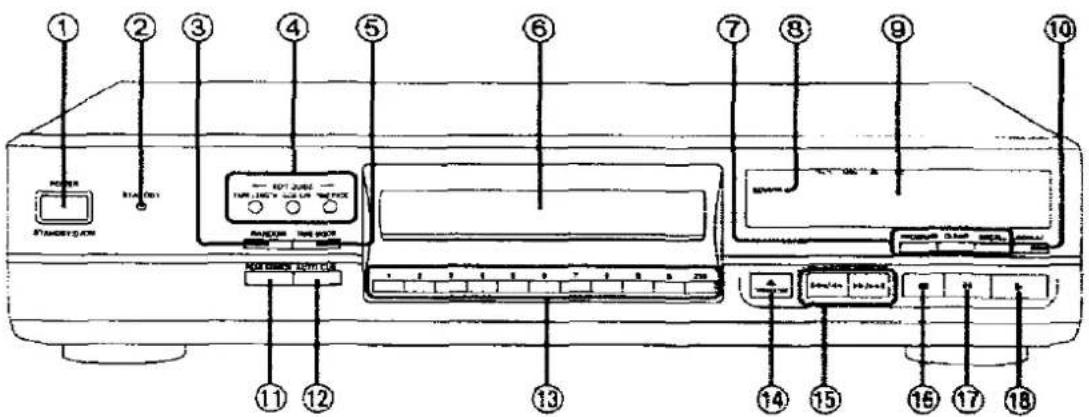
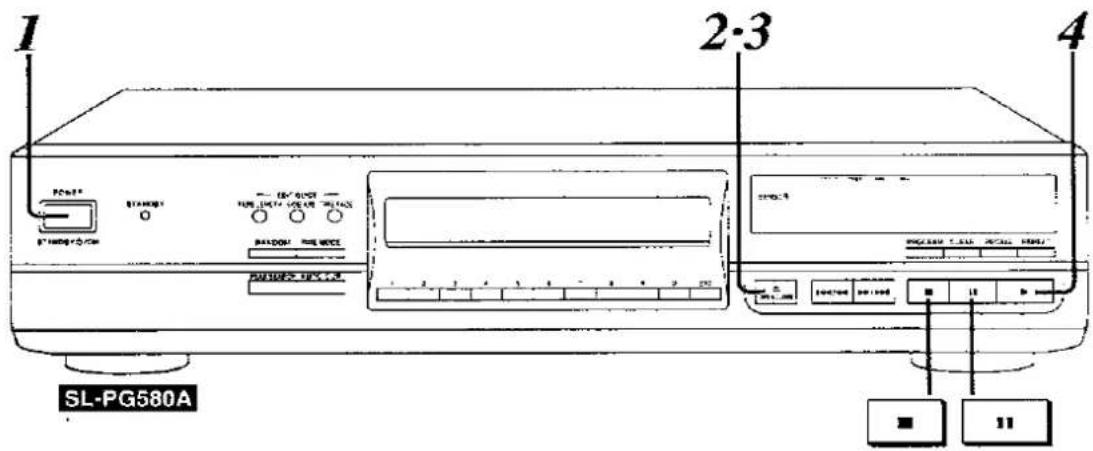
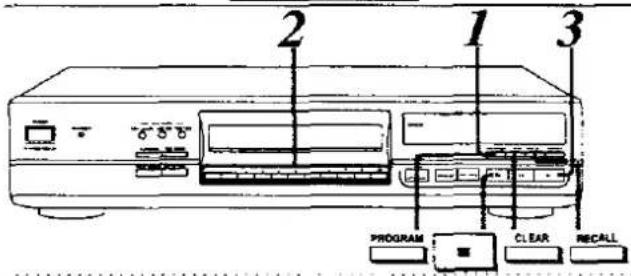
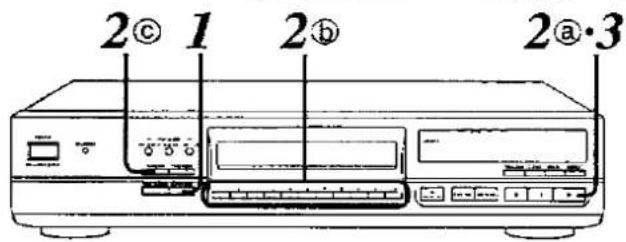
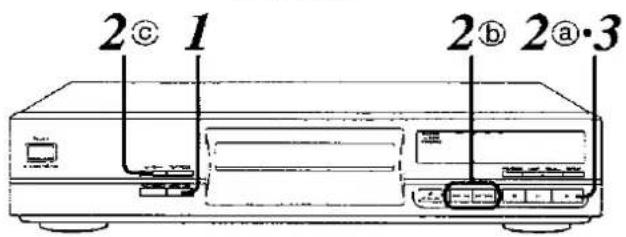
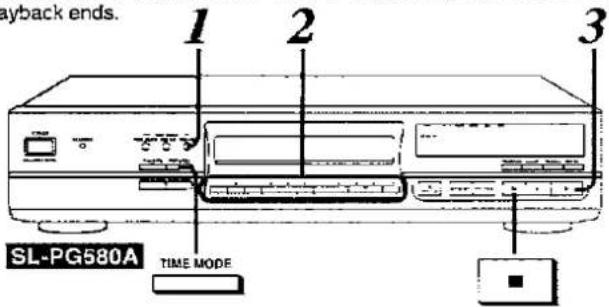
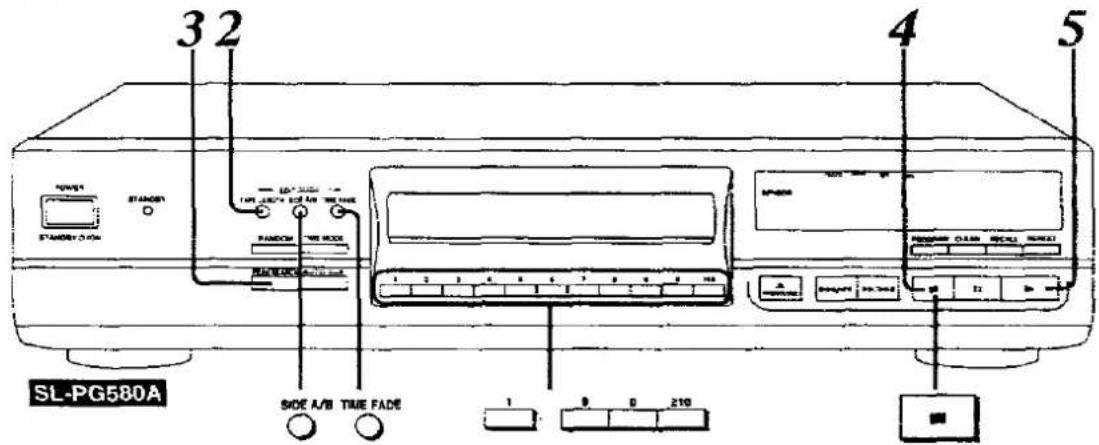
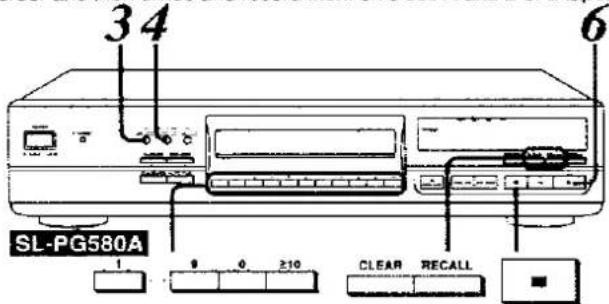
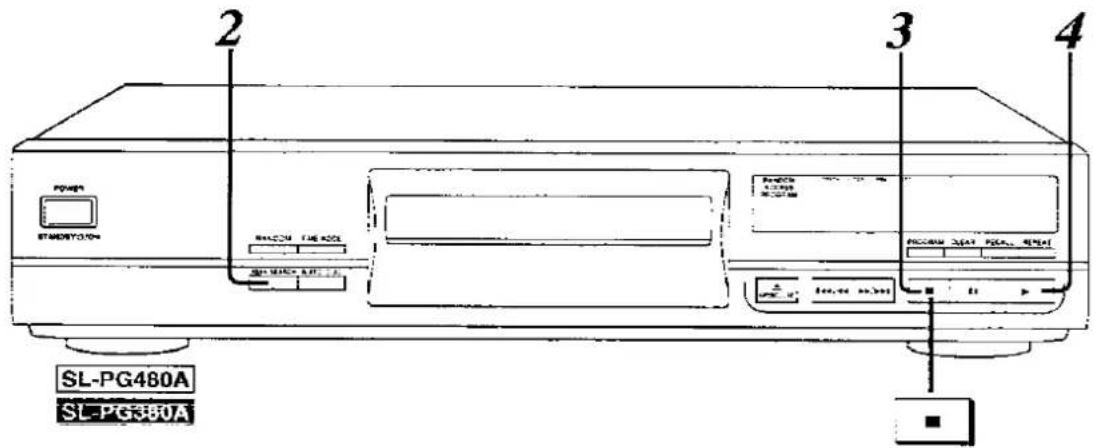
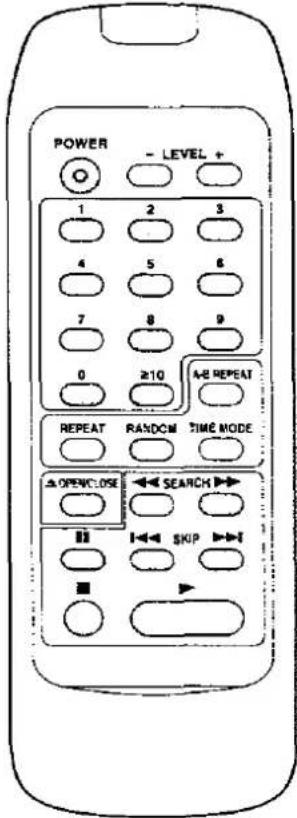
Front Panel Controls
| No. | Name | Ref. page |
| 1 | Power “STANDBY ⏻/ON” switch(POWER, STANDBY ⏻/ON)Press to switch the unit from on to standby mode or vice versa.In standby mode, the unit is still consuming a small amount of power. | 7 |
| 2 | Standby indicator (STANDBY)When the unit is connected to the AC mains supply, this indicator lights up in standby mode and goes out when the unit is turned on. | |
| 3 | Random play button (RANDOM) | 9 |
| 4 | CD edit record buttons (EDIT GUIDE)SL-PG580A | |
| •Tape length button (TAPE LENGTH)SL-PG580A | 16, 18 | |
| •Tape side select button (SIDE A/B)SL-PG580A | 16, 18 | |
| •Time fade button (TIME FADE)SL-PG580A | 15, 17 | |
| 5 | Time mode select button (TIME MODE) | 14 |
| 6 | Disc tray | 7 |
| 7 | Program play buttons | |
| •Program button (PROGRAM) | 10 | |
| •Clear button (CLEAR) | 11 | |
| •Recall button (RECALL) | 11 |
| No. | Name | Ref. page |
| 8 | Remote control signal sensor (SENSOR)There is no “SENSOR” indication on SL-PG380A.SL-PG380A can be operated by using the remote control provided with a Technics amplifier or receiver. | 6 |
| 9 | Display panel | |
| 10 | Repeat button (REPEAT) | 12 |
| 11 | Peak search button (PEAK SEARCH) | 16, 19 |
| 12 | Auto cue button (AUTO CUE) | 13 |
| 13 | Numeric buttons (1-9, 0, ≥10)SL-PG580A | 9, 10 |
| 14 | Disc tray open/close button(▲ OPEN/CLOSE) | 7 |
| 15 | Skip/Search buttons(I◄◄/◄◄, ►►/►►I) | 8 |
| 16 | Stop button (■) | 7 |
| 17 | Pause button (11) | 7 |
| 18 | Play button (►) | 7 |
Supplied accessories

Please check and identify the supplied accessories.
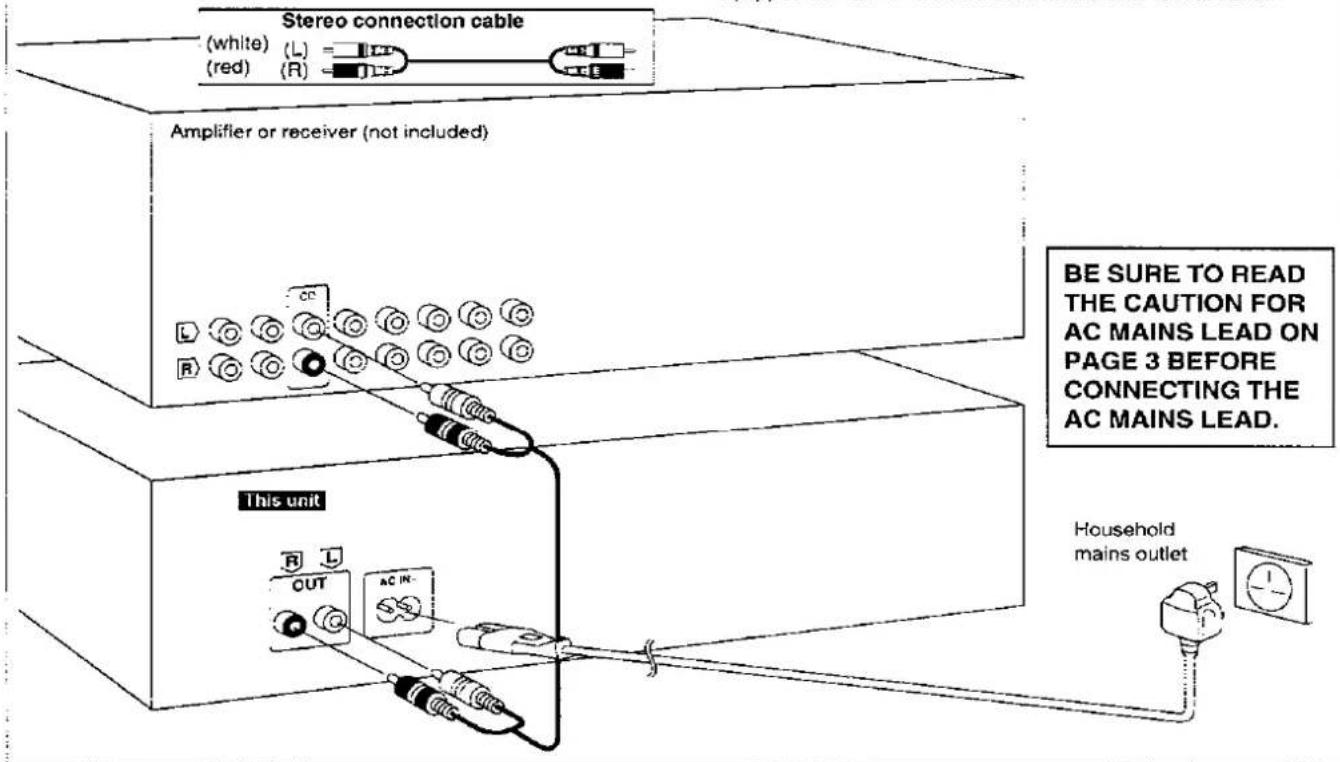
☐ AC mains lead .... 1 pc. (RJA0034-P or RJA0044-C)


□ Stereo connection cable .... 1 pc. (SJP2249-6)

Remote control SL-PG580A SL-PG480A 1 pc. (EUR643900)
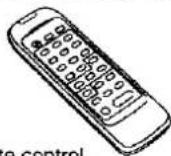
□ Batteries for remote control SL-PG580A SL-PG480A .... 2 pcs. (UM-4, AAA, R03)
Before making connections, be sure that the power of this unit and all other system components is first turned off.
Note
Although the figure below shows the AC mains lead being connected to a household mains outlet, if the amplifier (or receiver) is equipped with a mains outlet, connect the lead to that outlet.
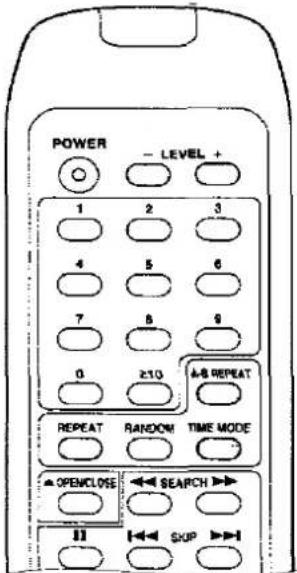
Concerning the Remote Control
SL-PG580A SL-PG480A
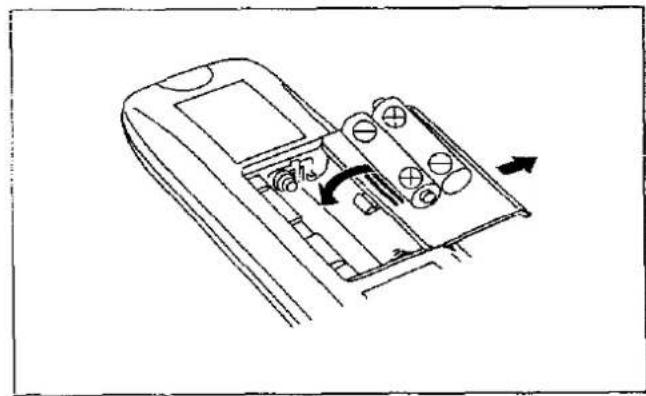
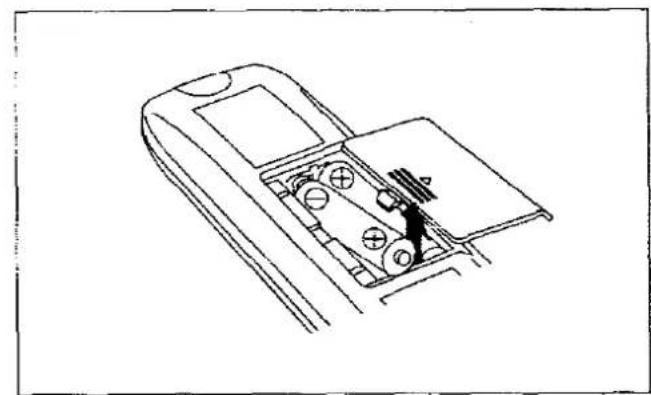
Battery installation
Insert the batteries in the correct polarities (⊕, ⊖).
natural_image
Line drawing of a mobile phone case with internal components and directional arrows indicating movement (no text or symbols)To remove the batteries, pull out the ⊕ side.
natural_image
Line drawing of a mobile phone casing with a person inserted, showing internal compartments and buttons (no text or symbols)Use of batteries
- Do not mix old and new batteries, or batteries of different types (carbon and alkaline, etc.).
- Never subject batteries to excessive heat or flame; do not attempt to disassemble them; and be sure they are not short-circuited.
- If the remote control is not to be used for a long period of time, remove the batteries and store them in a cool, dark place.
- Do not attempt to recharge alkaline or carbon batteries.
- Do not use rechargeable type batteries.
Battery life
The battery life is about one year.
The batteries should be replaced if commands from the remote control transmitter do not operate the unit even when the transmitter is held close to the front panel.
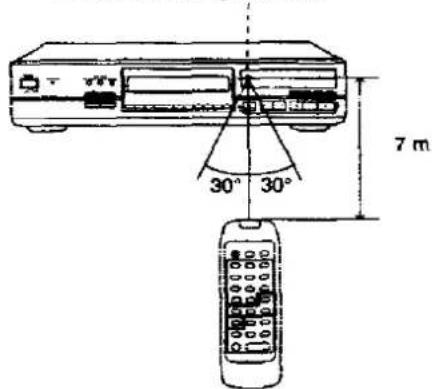
Correct method of use
Remote control signal sensor
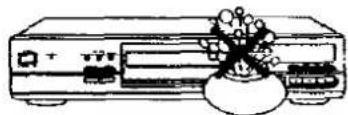
Operation notes
natural_image
Line drawing of a vintage electronic device with a decorative floral arrangement around it (no text or symbols)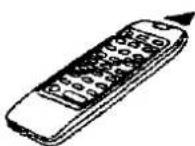
- Aim the remote control's transmission window toward the unit's sensor. Avoid any obstacles.
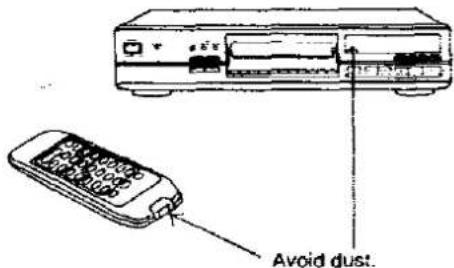
- Be sure the transmission window and the unit's sensor are free from dust. Excessive dust might affect its performance.
- The operation may not be correct if direct sunlight or other strong light source strikes the receiving sensor of this unit. If there is a problem, place the unit away from the light source.
- If the unit is installed in a rack with glass doors, the glass doors' thickness or colour might make it necessary to use the remote control transmitter a shorter distance from the unit.
●Never place heavy items. - Do not disassemble or reconstruct.
- Do not spill water or other liquids.
1
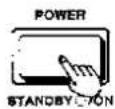
Press POWER (Power goes on).
SL-PG580A

SL-PG480A SL-PG380A

- This indicates that a CD has not been installed.
- If a CD is already in the disc tray, it automatically begins playing from the first track.
2

Press ▲ OPEN/CLOSE to open the tray and insert a disc.

3

Press ▲ OPEN/CLOSE to close the tray.
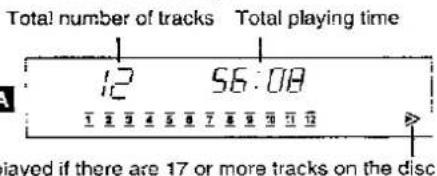
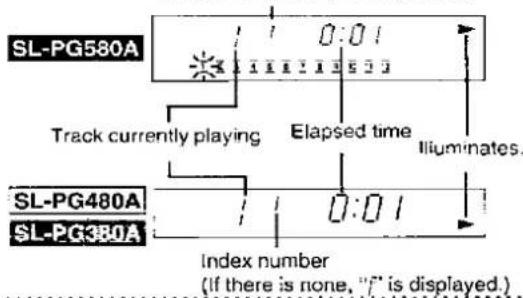
Total number of tracks Total playing time

4
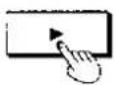
Press ▶ (Play begins).
Play stops automatically after all tracks have been played. Index number
(If there is none, "f" is displayed.)
To stop the disc play:

Press ■.
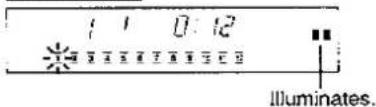
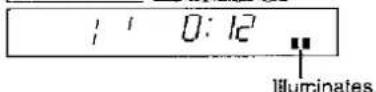
To temporarily stop the disc play:

Press II.
SL-PG580A
SL-PG480A SL-PG380A
To continue playback, press ▶.
Notes
- The displayed total playing time includes the time between tracks. For this reason, the time may be several seconds longer than that which appears on song cards and the like.
- When you use the timer with other unit, be sure to turn this unit on. For your reference:
- If you skip step 3 and press ▶, the tray automatically closes and play begins from the first track.
Skip Function
This function allows you to jump to the beginning of tracks.
Search Function
This function allows you to search for a desired location while viewing the time display.
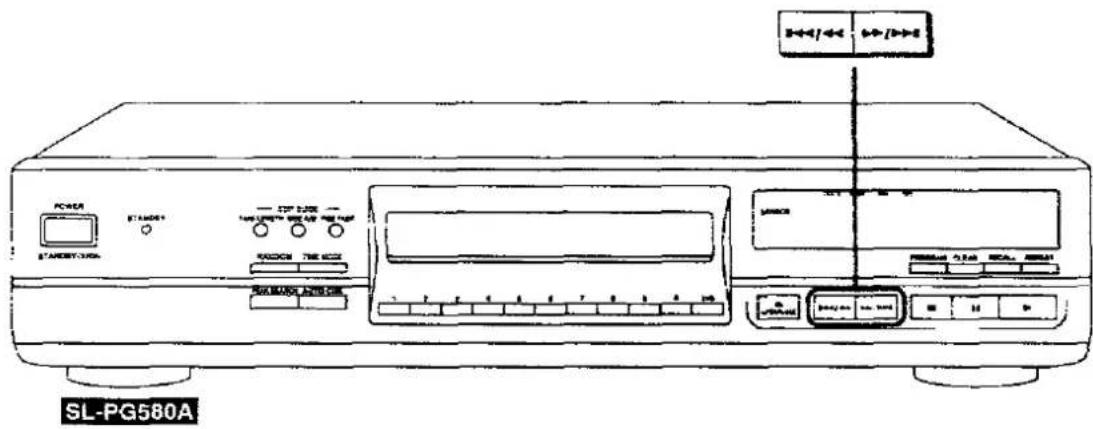
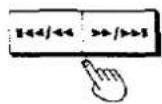
Press either ◀◀◀/◀◀ or ▶▶/▶▶I.
▶▶/▶▶: To skip forward
You can skip as many tracks as the number of times you press the button.
1◄◄/◄◄: To skip backward
You can skip to the beginning of the track being played. If you press the button again quickly, you can skip to the beginning of the previous track.
While the disc is being played or paused:
Press and hold either I◄◄/◄◄ or ►►/►►.
Release the button when you have reached the desired point.
▶▶/▶▶: To search forward
: To search backward
Searching proceeds slowly at first and
then speeds up if the button is held down.
For your reference:
•During random play (see page 9):
If ▶▶/▶▶▶ is pressed, skipping is performed in random order.
If ↔ is pressed, disc play skips to the beginning of the track being played, but skipping to previous tracks is not possible.
• During program play (see page 10):
Forward and backward skipping is performed in the programmed track order.
For your reference:
- During random play (see page 9) and program play (see page 10):
Searching can be performed only within the track being played.
- During A-B repeat SL-PG580A SL-PG480A (see page 12):
Searching can be performed beyond the A-B segment (A-B repeat will not be cancelled.)

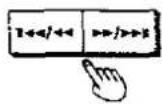
With this function, a disc is played from a desired track to the last track and then stops automatically.
SL-PG480A can only use this function by means of the remote control.
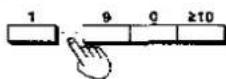
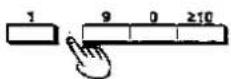
Press the numeric buttons.
Play will begin from the selected track number.
To specify a track number:
1 to 9:
10 or higher:

For example:
Specifying track no. 25

Specifying track no. 30


With this function, all tracks on a disc are played one time each in random order, and then play stops automatically.
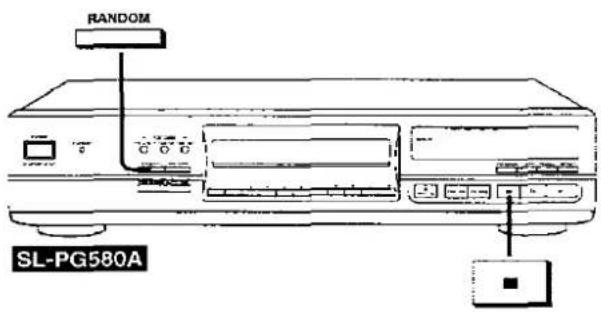

Press RANDOM.
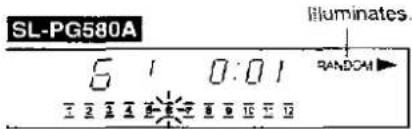
Random play is cancelled when play is stopped.
To switch back to playback in the original track order:

While the disc is playing:
Press RANDOM.
The disc will be played from that point until the end and then stop automatically.
To cancel random play:

Press ■.
For your reference:
During program play (see page 10):
The programmed tracks alone will be played in a random order.
Program Play
With this function, you can program up to 20 tracks in any order you like.
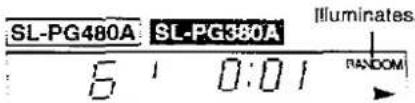
SL-PG580A
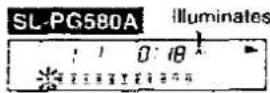
1

While the disc is stopped: Press PROGRAM.
Illuminates.
2
Press the numeric buttons to specify the desired track numbers in order.
If you make a mistake when pressing a track number, press CLEAR.
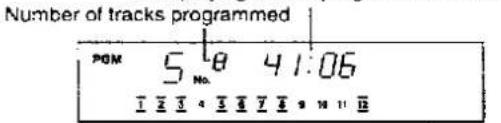
For example, if you specify tracks 5, 3 and 2 in that order:
Number of tracks programmed
3
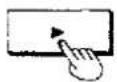
Press ▶.
Tracks are played in the programmed order, and then play stops automatically. Program contents are stored even after playback ends.
To play the same program contents again, press ▶.
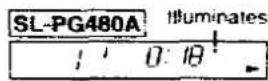
SL-PG480A SL-PGS60A

1

While the disc is stopped: Press PROGRAM.
Illuminates.

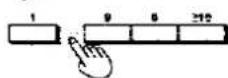
2
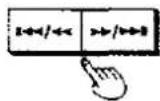
Press 1◄◄/◄◄ or ►►/►►► to specify the desired track number.
For example:
To specify track no. 3, press ▶▶/▶▶▶
3 times.
3

Press PROGRAM.
4
Repeat steps 2 and 3 until you have completed the desired entry.
If you make a mistake when pressing a track number, press CLEAR.
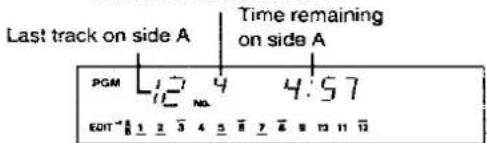
For example, if you specify tracks 5, 3 and 2 in that order.
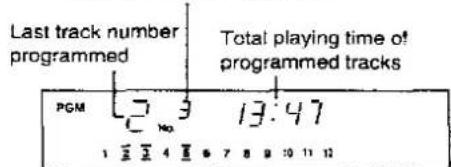
Last track number programmed Total playing time of programmed tracks
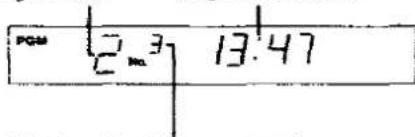
Number of tracks programmed
5

Press ▶.
Tracks are played in the programmed order, and then play stops automatically. Program contents are stored even after playback ends.
To play the same program contents again, press ▶.
To switch back to playback in the original track order:

While the disc is playing:
Press PROGRAM.
The program contents will also be erased.
The disc is played from that point until the end and then stops automatically
To cancel program mode:

While the disc is stopped.
Press ■.
If the disc is playing, press the button twice.
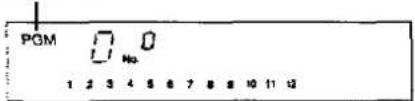
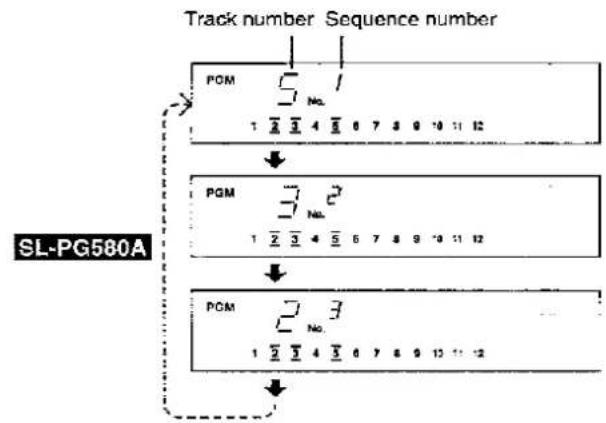
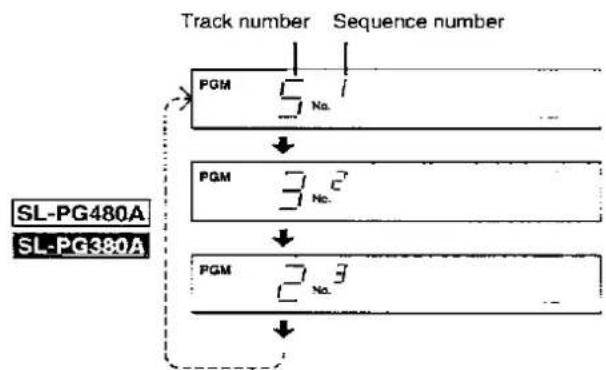
Checking program contents

Press RECALL.
Each time the button is pressed, a track number and sequence number are displayed.
You can also check the program contents during play.
For example, if you specify tracks 5, 3 and 2 in that order:
flowchart
graph TD
    A["Track number"] --> B["Sequence number"]
    B --> C["SL-PG580A"]
    C --> D["POM 1/2 3/4 5/6 7 8 9 10 11 12"]
    D --> E["PGM 1/2 3/4 5/6 7 8 9 10 11 12"]
    E --> F["POM 1/2 3/4 5/6 7 8 9 12 13 14"]
    F --> G["Downward arrow"]
flowchart
graph TD
    A["SL-PG480A"] --> B["Track number"]
    B --> C["Sequence number"]
    C --> D["PGM 5 No."]
    D --> E["PGM 3 No."]
    E --> F["PGM 2 No."]
    F --> G["..."]
After about four seconds, the original display appears again
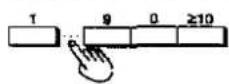
To program additional tracks

flowchart
graph TD
    A["SL-PG580A\n1 9 0 ≥10"] --> B["SL-PG480A\nSL-PG380A\n<</<< >>/>>"]
    B --> C["PROGRAM"]
While the disc is playing or stopped: Press the numeric buttons.
While the disc is stopped: Press 1◄◄/◄◄ or ►►/►►I and then press PROGRAM.
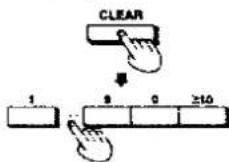
To erase programmed tracks
To erase the last programmed track:

While the disc is stopped:
Press CLEAR
One track is erased each time the button is pressed.
To erase a track within the program:

While the disc is playing or stopped:
Press RECALL to display the track to be erased, and then press CLEAR to erase the displayed track.
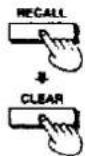
To erase all tracks and re-program:

While the disc is stopped:
SL-PG580A
Press PROGRAM twice and return to step 2 on page 10.
SL-PG480A SL-PG380A :
Press PROGRAM twice and return to step 2-4 on page 10.
For your reference:
“-” appears on the display:
When 21 tracks have been specified (no further programming possible)
“—:—” appears on the display:
- When the total playing time of the programmed tracks exceeds 99 minutes and 59 seconds
- When the track number 21 or higher has been specified
In these instances, the total: playing time will not be displayed, but up to 20 tracks can be programmed.
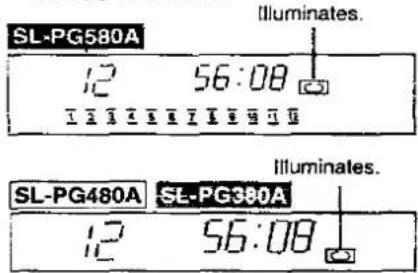
Repeat Function
Playback of all tracks or desired tracks will be repeated in the same fashion.

To repeat all tracks

Press REPEAT.
Repeating a desired segment
(A-B repeat) SL-PG580A SL-PG480A
(Avaliable only from the remote control)
While a disc is playing, if you specify a start point (point A) and an end point (point B), that segment will be repeated.
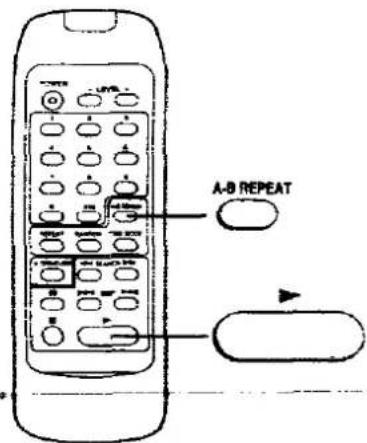
1

While the disc is playing:
Press A-B REPEAT at the desired start point (point A).
2

Press A-B REPEAT at the desired end point (point B).
The segment between A and B is played repeatedly.
To cancel A-B repeat:

Press A-B REPEAT.
To repeat only one track or to repeat desired tracks
1
Specify the desired track numbers.
SL-PG580A
Perform steps 1 and 2 on page 10
SL-PG480A SL-PG380A
Perform steps 1–3 on page 10.
2

Press REPEAT.
3

Press ▶ to start playback.
To cancel repeat:

Press REPEAT.
Note
A-B repeat is not possible during random play (see page 9) and program play (see page 10).
For your reference:
- If you press ▶ during A-B repeat, playback returns to point A.
- If you only specify point A, playback will still return to point A if you press ▶ at any point
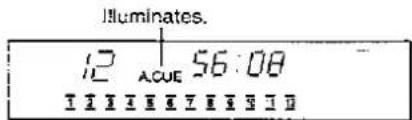
Auto Cue Function
With this function, playback is paused at the beginning (where sound can be heard) of all tracks, one track at a time.
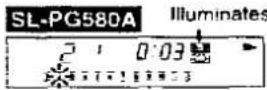
SL-PG580A
1

Press AUTO CUE.
If the disc was playing, playback is paused at the beginning of the next track.
2
Select the track to be played.
① To play from the first track

Press ▶.
You can also play the disc in any order you like. (Program play, see page 10.)
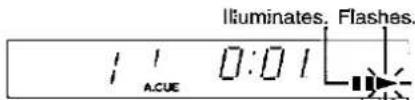
Illuminates. Flashes.
⑥ To play from a desired track
Press the numeric buttons.
(See page 9.)
© To play in random order

Press RANDOM.
(See page 9.)
The unit switches to the play standby mode.
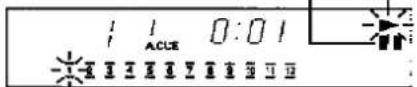
3

Press ▶ to start playback.
Sound can be heard immediately.
To play tracks successively, press ▶ for each track.
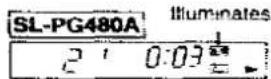
SL-PG480A/SL-PG380A
1

Press AUTO CUE.
Illuminates.

If the disc was playing, playback is paused at the beginning of the next track.
2
Select the track to be played.
Ⓐ To play from the first track

Press ▶.
You can also play the disc in any order you like. (Program play, see page 10.)
⑥ To play from a desired track
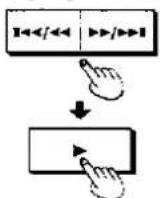
Press ◀◀◀/◀◀ or ▶▶/▶▶◀ and then press ▶.
© To play in random order

Press RANDOM.
(See page 9.)
The unit switches to the play standby mode.
3

Press ▶ to start playback.
Sound can be heard immediately.
To play tracks successively, press ▶ for each track.
To cancel auto cue:

While the disc is playing:
Press AUTO CUE.
If AUTO CUE is pressed during play standby mode, the unit switches to pause mode.
Note
This function may not work properly on tracks which have soft sounds at the beginning, tracks which have large amounts of noise, etc.
Output Level Control SL-PG580A SL-PG480A
Time Mode Selection
(Available only from the remote control)
Rather than adjusting the volume level of the amplifier, you can temporarily make the sound lower by decreasing the output of the CD player.
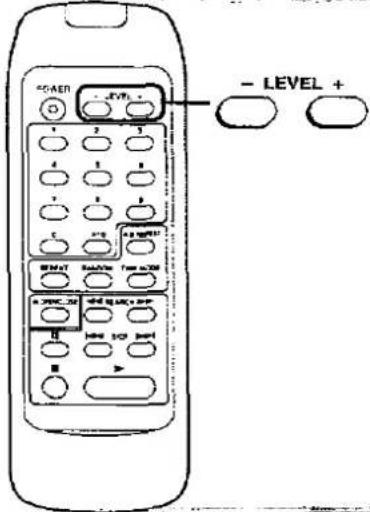

Press - LEVEL.
Decrease the output level in 2 dB intervals from 0 dB (normal sound level) to -12 dB.
Displays that output level illuminates. has been decreased by 2 dB

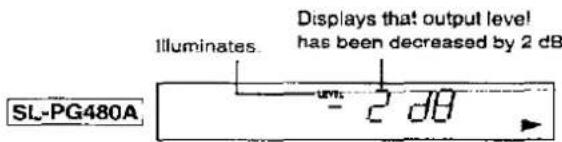
After about two seconds, the original display appears again.
To increase the output after it has been decreased:
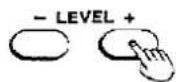
Press LEVEL +.
Note SL-PG580A
During CD edit recording (see pages 16 to 18), in order to maintain a constant recording level, the output level cannot be adjusted.
For your reference:
- If the unit is turned off and then turned on again, the output level returns to 0 dB (normal sound level).

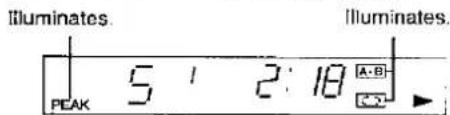
While the disc is playing or paused: Press TIME MODE.
Each time the button is pressed, the display switches in the following order.
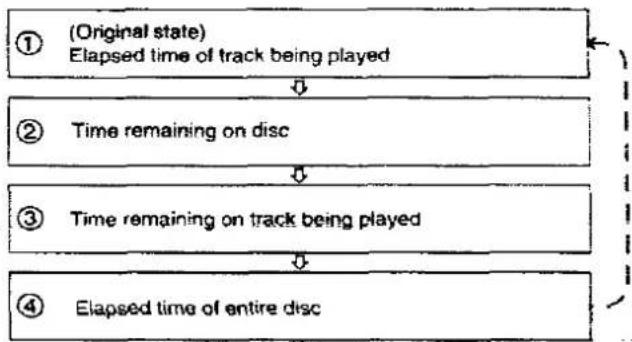
flowchart
graph TD
    A["① (Original state)<br>Elapsed time of track being played"] --> B["② Time remaining on disc"]
    B --> C["③ Time remaining on track being played"]
    C --> D["④ Elapsed time of entire disc"]
If playback is stopped and then started again, the display returns to its original state.
For your reference:
The following exceptions exist:
• During playback of track numbers above 20;
Display ③ appears as ----:---.
• During program play (see page 10);
Time for programmed tracks only appears for displays ② and ④
When playing track number above 20, displays ② and ③ appear as
• During random play (see page 9);
Display ② appears as ----, and display ④ as ----.
- During CD edit recording SL-PG580A (see pages 16 to 18);
Display ② shows the time remaining on the specified tape.
●During time fade SL-PG580A (see page 15);
The time remaining until fade out is displayed between displays ③ and ④.

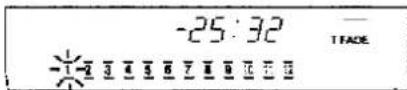
With this function you specify a desired time, and when that time is reached during playback, the volume is gradually decreased and playback ends.
1

While the disc is stopped or paused: Press TIME FADE.
The "---:" indication will be shown on the display panel.
2
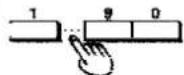
Press the numeric buttons to specify the playback time.
(5 seconds through 99 minutes and 59 seconds)
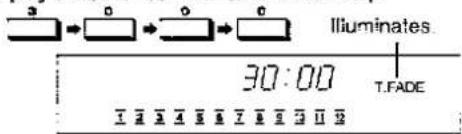
For example, to play a disc for 30 minutes and then stop:
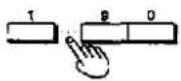
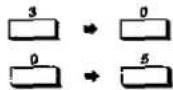
To select 9 minutes or less:
First press "0", and then press the numeric button to specify the playback time.
For example, to play a disc for 5 minutes and then stop

If you make a mistake when specifying the time, press CLEAR and specify it again.
3
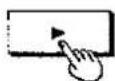
Press ▶ to begin playback.
"T.FADE" flashes and the volume is gradually decreased starting five seconds before the specified time, and the disc is paused.
Time fade is cancelled simultaneously.
To cancel time fade:

Press ■.
To check the time remaining until fade out:
Press TIME MODE three times during playback. (See page 14.)

Note
This function may not work properly if the disc is scratched or soiled.

What is CD edit recording?
CD edit recording is a function which allows you to specify a tape length and then automatically performs editing such that no tracks get cut off at the end of the tape.
Use this procedure
- You don't want to change the order of the tracks on the disc.
- You want to keep editing simple.
Editing in the original track order (Auto Edit) See page 16.
- You want to change the order of the tracks.
- You only want to record certain tracks.
Editing with only desired tracks (Program Edit) See page 18.

■ Auto Edit
Example:
Recording a disc with nine tracks in their original order on a C-46 tape
| Track 1 | 2 | 3 | 4 | 5 | blank |

| Side B(23 min.) | 6 | 7 | 8 | 9 | blank |
Program Edit
Example:
Programming a disc with nine tracks in the desired order and recording them on a C-46 tape
| Track 2 | 4 | 6 | 8 | 7 | blank |

| Side B(23 min.) | 1 | 3 | 5 | 9 | 7 | blank |
Auto Edit SL-PG580A
This function divides the tracks on a disc between the two sides of a tape in their original order in accordance with the length of the tape.
1
Prepare the cassette deck.
-
Wind the leader and insert the tape.
-
Select noise reduction.
-
(Double-side playback deck only) Set a reverse mode to single side playback (→), and set the running direction of the tape to ▶.
-
Set the cassette deck to recording standby mode.
(For details, refer to the operating instructions for the cassette deck.)
2

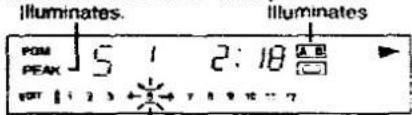
Press TAPE LENGTH to specify the tape length and divide the tracks.
Each time the button is pressed, the tape length changes as follows.

• To select an arbitrary recording length, see next page A.
• To add tracks in the extra space on the tape, see next page B. Number of tracks on side A

- To check the edit contents for side B or make changes, press SIDE A/B.
3

Press PEAK SEARCH to search for the peak level on the disc, and adjust the recording level on the cassette deck.
Searching for the peak level takes about 2 minutes and 30 seconds for a 60 minute CD. When the peak level is found, the unit repeatedly produces the sound for about 6 seconds around the peak level.
Regarding the recording level adjustment procedure, refer to the operating instructions for the cassette deck.
4

Press ■.
5

Press ▶ at the same time you begin recording on the cassette deck.
- When the tracks allotted to side A have been recorded:
The CD player pauses at the beginning of the first track on side B. The cassette deck continues recording and then stops at the end of side A.
•To record side B:
- Remove the tape to wind the leader.
- (For double-side playback deck) Insert the tape and set the running direction to (For single-side playback deck) Turn the tape around and re-insert it
- Begin recording on the cassette deck while simultaneously beginning playback on the CD player
To cancel CD edit mode:

Press ■.
During recording, press the button twice.
A To select an arbitrary recording length
Select "C----" and enter the total time for both sides of the tape (1 to 99 minutes) as a two-digit value.
For example:
To select 30 minutes:
To select 5 minutes:
If you make a mistake when entering this value, select "C---" again.
B To add tracks in the extra space on the tape
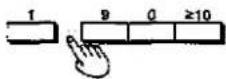
After step 2, press the numeric buttons to specify the desired track number. (See page 9.)
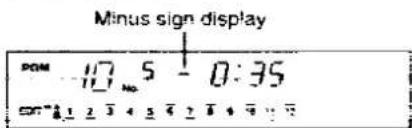
When minus sign appears on the display, it indicates that the time remaining on the tape is insufficient.
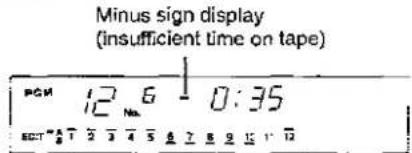
To fade out at the end of the tape during minus sign display:

Press TIME FADE.
At the end of the tape the sound will gradually decrease and recording will end.
If you want to fade out at the end of side B, press SIDE A/B, then repeat the same procedure described as above.
Note
Track numbers and numbers of tracks which cannot be edited: Editing cannot be performed on more than 20 tracks or on track numbers above 20.
In such instances, forgo use of the edit recording function, and simply perform recording in normal playback mode.
For your reference:
• Displayed time remaining on the tape:
The remaining tape time represents the length of time minus the unrecorded blanks lasting about 4 seconds provided at the start of each track for automatic searching.
- Peak level:
Since multiple peaks exist on compact discs, even for the same disc a different peak level may be found each time a peak search is performed.
Program Edit SL-PG580A
This function allows you to program the desired tracks in the desired order and then divide and record them on sides A and B of a tape.
1
Prepare the cassette deck.
Perform step 1 on page 16
2
Specify the desired tracks in order.
Perform steps 1 and 2 on page 10.
Total playing time of programmed tracks
Program tracks such that the total playing time is less than the length of the tape. When CD edit mode is entered, about four seconds will be added at the beginning of each track (auto-space function).
3

Press TAPE LENGTH and specify the length of the tape.
Perform step 2 on page 16.
Divide the tracks between sides A and B in accordance with the specified time.
Number of tracks on side A
4

Press SIDE A/B to check the time remaining on side B.
The time remaining on side B is displayed.
5
Adjust the recording level.
Perform steps 3 and 4 on page 16
6

Press ▶ at the same time you begin recording on the cassette deck.
- When the tracks allotted to side A have been recorded:
The CD player pauses at the beginning of the first track on side B.
The cassette deck continues recording and then stops at the end of side A.
•To record side B:
- Remove the tape to wind the leader.
- (For double-side playback deck) Insert the tape and set the running direction to ◀. (For single-side playback deck) Turn the tape around and re-insert it.
- Begin recording on the cassette deck while simultaneously beginning playback on the CD player.
To cancel CD edit mode:

Press ■.
To change the program contents
To change the side A contents in steps 3 and 4, first press SIDE A'B to switch to the display for side A.
To add tracks at the end of sides A and B of the tape:
Press the numeric buttons. (See page 9)
To erase the last track at the end of sides A and B of the tape:
Press CLEAR

To change the last track at the end of sides A and B of the tape:
Press CLEAR and
press the numeric buttons to re-specify the track.
To erase a track within the program:
Press RECALL to display the track to be erased and then
press CLEAR.
Notes
If the following display appears:
The total playing time of the programmed tracks exceeds the length of the tape.
Erase or change tracks such that the minus sign display disappears, or specify fade out. (See page 17.)
Track numbers and numbers of tracks which cannot be edited:
Editing cannot be performed on more than 20 tracks or on track numbers above 20.
In such instances, forgo use of the edit recording function, and simply perform recording in normal playback mode.
This function search the peak level on the disc.
This is convenient to adjust the recording level on the cassette deck when recording.
For those who own a SL-PG580A, we recommend combined use with CD Edit. (See page 16 to 18.)
1
Prepare the cassette deck.
-
Wind the leader and insert the tape.
-
Select noise reduction.
-
(Double-side playback deck only) Set a reverse mode to single side playback (→), and set the running direction of the tape to ▶.
-
Set the cassette deck to recording standby mode.
(For details, refer to the operating instructions for the cassette deck.)
2

Press PEAK SEARCH to search for the peak level on the disc, and adjust the recording level on the cassette deck.
Searching for the peak level takes about 2 minutes and 30 seconds for a 60 minute CD. When the peak level is found, the unit repeatedly produces the sound for about 6 seconds around the peak level.
Regarding the recording level adjustment procedure, refer to the operating instructions for the cassette deck.
3

Press ■.
4

Press ▶ at the same time you begin recording on the cassette deck.
The first song recorded on side B and the recording of the cassette deck start at the same time when recording side B.
To stop recording:

Press ■.
For your reference:
Peak level:
Since multiple peaks exist on compact discs, even for the same disc a different peak level may be found each time a peak search is performed.
To operate the PEAK SEARCH function during program recording:
-
Perform step 1 described above.
-
SL-PG580A : Perform steps 1 and 2 on page 10,
SL-PG480A SL-PG480A : Perform steps 1-4 on page 10.
- Perform steps 2–4 described above.
Remote Control Operations
—quick reference— SL-PG580A SL-PG480A
 | Operations | |
| Switch the unit on and power standby mode(See page 7.) | POWER | |
| Open/close tray (See page 7.) | ||
| Start play (See page 7.) | ||
| Pause play (See page 7.) | ||
| Stop play (See page 7.) | ||
| Search forward or backward (See page 8.) | ||
| Skip tracks (See page 8.) | ||
| Play from a desired track (See page 9.) | ||
| Play in random order (See page 9.) | ||
 | Convenient functions | |
| Repeat all tracks or programmed tracks(See page 12.) | ||
| Repeat a specified segment (See page 12.) | ||
| Decrease/increase output level (See page 14.) | ||
| Switch the time display (See page 14.) | ||
Suggestions for Safety
Placement
Avoid placing the unit in areas of:
direct sunlight
•high temperature
•high humidity
•excessive vibration
●uneven surfaces (Place the unit on a flat level surface.)
Such conditions might damage the cabinet and/or other component parts and thereby shorten the unit's service life.
Ventilation
Place the unit in a well ventilated position at least 10 cms away from wall surfaces etc.
Stacking
Never place heavy items on top of the unit or the mains lead.
Voltage
- It is very dangerous to use an AC power source of high voltage such as for an air conditioner.
A fire might be caused by such a connection.
• A DC power source can not be used.
Be sure to check the power source carefully, especially on a ship or other place where DC is used.
Mains lead protection
- Avoid cuts, scratches or poor connection of the AC mains lead, as this may result in fire or electric shock hazard.
Excessive bending, pulling or slicing of the lead should also be avolded. - Do not pull on the lead when you are disconnecting the power, as this could cause an electric shock. Grasp the plug firmly when you disconnect the mains.
●Never touch the plug with wet hands or a serious electric shock could result.
Foreign materials
- Ensure that no foreign objects, such as needles, coins, screwdrivers etc, accidentally fall into the unit.
Otherwise, a serious electric shock or malfunction could occur. - Be extremely careful about spilling water or liquid on/into the unit, as a fire or electric shock could occur.
(Disconnect the power plug and contact your dealer immediately if this occurs.) - Avoid spraying insecticides onto the unit as they contain flammable gases which can be ignited.
- Insecticides, alcohol, paint thinner and similar chemicals should never be used to clean the unit as they can cause flaking or cloudiness to the cabinet finish.
Maintenance
Clean the cabinet, panel and controls with a soft cloth lightly moistened with mild detergent solution.
Do not use any type of abrasive pad, scouring powder or solvent such as alcohol or benzine.
Service
- Never attempt to repair, disassemble or reconstruct the unit if there seems to be a problem.
A serious electric shock could result if you ignore this precautionary measure. - If a problem occurs during operation (the sound is interrupted, indicators fail to illuminate, smoke is detected, etc.) contact your dealer or Authorized Service Center immediately.
- Disconnect the mains if the unit will not be used for a long time. Otherwise the operation life could be shortened.
Only compact discs having this mark can be used with this unit.

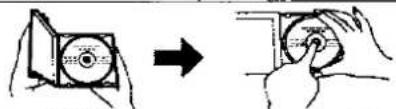
To remove a disc from its case
Press the center holder and lift the disc holding by the edges.
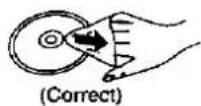
To hold the disc
Hold the disc by the edges so the surface is not soiled with fingerprints.
Fingerprints, dirt and scratches can cause skipping and distortion.


To store a disc in its case
Insert the disc with label facing upwards and press downward at the center.

If the surface is soiled
Wipe gently with a soft. damp (water only) cloth.

If the disc is brought from a cold to a warm environment, moisture may form on the disc
Wipe this moisture off with a soft, dry, lint-free cloth before using the disc.
Improper disc storage:
You can damage discs if you store them in the following places:
• Areas exposed to direct sunlight
• Humid or dusty areas
- Areas directly exposed to a heat outlet or heating appliance
Handling precautions:
- Do not write on the label side with a ball-point pen or other writing utensils.
- Do not use record cleaning sprays, benzine, thinner, static electricity prevention liquids or any other solvent.
- Do not soil with fingerprints
Technical Specifications
Audio
| No. of channels | 2 (left and right, stereo) |
Frequency response
| SL-PG580A |
| SL-PG480A SL-PG380A |
Output voltage
| Dynamic range | |
| SL-PG580A | 96 dB |
| SL-PG480A SL-PG380A | 92 dB |
SN
Harmonic distortion
| SL-PG580A | |
| SL-PG480A | SL-PG380A |
Total harmonic distortion
| SL-PG580A | |
| SL-PG480A | SL-PG389A |
Wow and flutter
| DA converter | MASH (1 bit) |
| Output Impedance | 1 kΩ |
| Load impedance | More than 10 kΩ |
Pickup
| Wavelength | 780 nm |
| Laser Power | No hazardous radiation is emitted(with safety protection) |
General
| Power consumption | 13 W | |
| Power supply | AC 50/60 Hz, 230-240 V | |
| Dimensions (W×H×D) | ||
| SL-PG480A | 430×103×283 mm | |
| SL-PG480A | SL-PG480A | 430×92×283 mm |
Weight
| SL-PG580A | 3.5 kg |
| SL-PG430A SL-PG380A | 3.1 kg |
Note:
Specifications are subject to change without notice.
Weight and dimensions are approximate.
MASH is a trademark of NTT.
Before requesting service for this unit, check the chart below for a possible cause of the problem you are experiencing. Some simple checks or a minor adjustment on your part may eliminate the problem and restore proper operation. If you are in doubt about some of the check points, or if the remedies indicated in the chart do not solve the problem, refer to the directory of Authorized Service Centers (enclosed with this unit) to locate a convenient service center, or consult your dealer for instructions.
| Problem | Probable cause(s) | Suggested remedy |
| After inserting a disc, the tray will not close even after pressing ▲ OPEN/ CLOSE. | Is the disc inserted properly? | Re-insert the disc. |
| Even after inserting a disc, the total number of tracks and other indicators do not appear on the display. Even after pressing ▶, disc playback does not begin. | Is the disc inserted upside-down? | Re-insert the disc. |
| Is the disc dirty? | Wipe with a soft cloth. | |
| Is the disc scratched? | Use another disc. | |
| Is the disc extremely warped? | ||
| Are you using a non-standard disc? | ||
| Has moisture condensation occurred? | Turn the unit on and wait an hour before using. | |
| Specify areas do not play properly. | Is the disc dirty? | Wipe with a soft cloth. |
| There is noise from the tuner or disturbance on the TV screen. | Caused by high-frequency signals of this unit. | ●Use the unit farther away from the tuner or TV. ●If the tuner's or TV's antenna is the Indoor type, use an outdoor one. |
| The remote control does not work. | Are the batteries inserted with the ⊕ and ≌ ends reversed? | Insert with the ≌ and ≌ oriented correctly. |
| Are the batteries worn out? | Replace batteries. |
Maintenance
Wipe this unit with a soft cloth.
If the surfaces are extremely dirty, wipe clean with a cloth which has been dipped in a weak soap-and-water solution and wrung out thoroughly, and then wipe again with a dry cloth.
- Do not use alcohol, thinners, etc.
- When using chemically treated cloths, refer to the explanations provided with them.
About moisture
Moisture may form on the lens in the following cases...
- Immediately after a heater has been turned on.
• In a steamy or very humid room. - When the unit is suddenly moved from a cold environment to a warm one.
If moisture forms inside this unit, it may not work properly. In this case, turn the unit on and wait about one hour for the moisture to evaporate.
564
Umweltfreundlich gedruckt auf chlorfreigebleichtem Papier.
Environment friendly printed on chlorine free bleached paper.
Matsushita Electric Industrial Co., Ltd.
Central P.O. Box 288, Osaka 530-91, Japan
