
LF-TBWHD - Casque audio SAMSUNG - Notice d'utilisation et mode d'emploi gratuit
Retrouvez gratuitement la notice de l'appareil LF-TBWHD SAMSUNG au format PDF.

| Type de produit | Poste de travail client léger (moniteur-support intégré) |
| Marque | Samsung |
| Modèle | LF-TBWHD (TB-WH / TB-CH) |
| Dimensions (L x P x H) | 244,0 x 340,0 x 227,0 mm |
| Poids | 2,3 kg |
| Alimentation | 100-240 V CA, adaptateur DC 14 V |
| Consommation électrique (typique) | 11 W (normal), 35 W (max) |
| Connecteurs vidéo | RGB OUT (D-SUB), DVI OUT |
| Connecteurs audio | AUDIO OUT (casque), MIC (microphone), haut-parleurs intégrés 1 W x 2 |
| Connecteurs réseau | LAN (RJ45) 10/100 Mbps |
| Connecteurs USB | USB 2.0 x 6 (aval) |
| Système d'exploitation | TB-WH : Windows Embedded Standard 7 ; TB-CH : Linux (Zero Client) |
| Fonctions client léger | Citrix XenDesktop/XenApp, VMWare View, Microsoft RDP |
| Hauteur réglable | Oui, avec système de verrouillage |
| Norme VESA | 75 x 75 mm, 100 x 100 mm |
| Verrou antivol | Emplacement pour cadenas Kensington |
| Contenu de l'emballage | Support, base, câble d'alimentation, adaptateur, guide de démarrage rapide, manuel utilisateur, carte de garantie |
| Entretien et nettoyage | Débrancher l'appareil, essuyer avec un chiffon doux et sec. Ne pas utiliser de produits chimiques. |
| Pièces détachées et réparabilité | Câbles D-SUB, DVI, LAN et USB vendus séparément. Pour toute réparation, contacter le service client Samsung. |
| Informations générales | Garantie constructeur (selon pays). Service client disponible sur www.samsung.com. |
FOIRE AUX QUESTIONS - LF-TBWHD SAMSUNG
Questions des utilisateurs sur LF-TBWHD SAMSUNG
0 question sur cet appareil. Repondez a celles que vous connaissez ou posez la votre.
Poser une nouvelle question sur cet appareil
Téléchargez la notice de votre Casque audio au format PDF gratuitement ! Retrouvez votre notice LF-TBWHD - SAMSUNG et reprennez votre appareil électronique en main. Sur cette page sont publiés tous les documents nécessaires à l'utilisation de votre appareil LF-TBWHD de la marque SAMSUNG.
MODE D'EMPLOI LF-TBWHD SAMSUNG
User Manual
TB-WH
TB-CH
The color and the appearance may differ depending on the product, and the specifications are subject to change without prior notice to improve the performance.
Table Of Contents
BEFORE USING THE 5 PRODUCT 5
Copyright
Icons used in this manual
Symbols for safety precautions
6
Safety Precautions
6
Electricity and Safety
7
Installation and Safety
9
Operation and Safety
PREPARATIONS 13
Checking the Contents
13
Removing the Packaging
14
Checking the Components
15
Parts
15
Button
16
Reverse Side
17
Right Side View
18
Installation
18
Reassembly
20
Adjusting the Product Height
21
Anti-theft Lock
USING "WINDOWS 22 EMBEDDED STANDARD 7" (TB-WH) 23
What is "Windows Embedded Standard 7" Client?
Connection to Use "Windows Embedded Standard 7"
23
Before Connecting
24
Connection Using the D-SUB Cable (Analogue Type)
24
Connection Using the DVI Cable
25
Connecting a Microphone
25
Connecting to Headphones or Speakers
26
LAN Connection
26
Connecting USB Devices
27
Connecting the Power
Table Of Contents
28 28 28 29 36 37 38 38 39 40 40 41 41 42 42 43 44 45 45 45 46 69 69 70 71 72
Using "Windows Embedded Standard 7"
Logon
"Windows Embedded Standard 7" Desktop
Programs
Configuring Utilities
Recover the System
MagicRMS Pro
About MagicRMS Pro
About "Zero Client"
Connection to Use the "Zero Client"
Before Connecting
Connection Using the D-SUB Cable (Analogue Type)
Connection Using the DVI Cable
Connecting a Microphone
Connecting to Headphones or Speakers
Connecting to a Server (LAN/USB Connection)
Connecting the Power
Using the "Zero Client"
Login
Message Box
Toolbar
Requirements Before Contacting
Samsung Customer Service Center
Check the following.
General
Power consumption
Contact SAMSUNG WORLDWIDE
Table Of Contents
77
Correct Disposal
77
Correct Disposal of This Product (Waste
Electrical & Electronic Equipment)
77
Correct disposal of batteries in this product
INDEX
Before Using the Product
Copyright
The contents of this manual are subject to change without notice to improve quality.
© 2012 Samsung Electronics
Samsung Electronics owns the copyright for this manual.
Use or reproduction of this manual in parts or entirety without the authorization of Samsung Electronics is prohibited.
The SAMSUNG logo is a registered trademark of Samsung Electronics.
Microsoft and Windows are registered trademarks of Microsoft Corporation.
VESA, DPM and DDC are registered trademarks of the Video Electronics Standards Association.
• An administration fee may be charged if either
☐ (a) an engineer is called out at your request and there is no defect in the product (i.e. where you have failed to read this user manual).
(b) you bring the unit to a repair centre and there is no defect in the product (i.e. where you have failed to read this user manual).
- The amount of such administration charge will be advised to you before any work or home visit is carried out.
Icons used in this manual
| The following images are for reference only. Real-life situations may differ from what is shown in the images. |
Symbols for safety precautions
| Warning | A serious or fatal injury may result if instructions are not followed. |
| Caution | Personal injury or damage to properties may result if instructions are not followed. |
| Activities marked by this symbol are prohibited. | |
| Instructions marked by this symbol must be followed. |
Before Using the Product
Safety Precautions

The monitor images in this manual are for reference only. Monitor is sold separately.
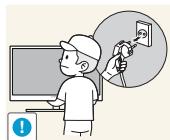
Electricity and Safety

Warning

Do not use a damaged power cable or plug, or a loose power socket.
• An electric shock or fire may result.
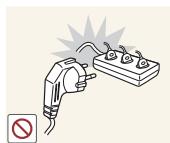
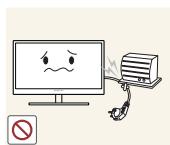
Do not plug many products into the same power socket.
• Otherwise, the socket may overheat and cause a fire.
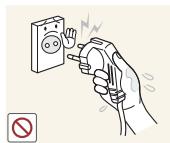
Do not touch the power cable with wet hands.
• Otherwise, an electric shock may result.
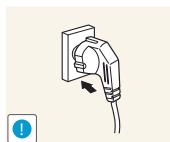
Insert the power cable all the way in so it is not loose.
• An unstable connection may cause a fire.
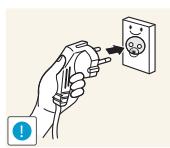
Ensure you connect the power cable to a grounded power socket. (type 1 insulated devices only).
• An electric shock or injury may result.
Do not bend or pull the power cable with force. Do not weigh the power cable down with a heavy object.
• A damaged power cord may cause an electric shock or fire.

Do not place the power cable or product near heat sources.
• An electric shock or fire may result.
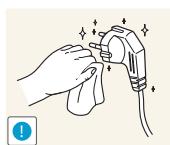
If the power cable pins or power outlet is covered with a foreign substance (dust, etc.), wipe it off using a dry cloth.
• Otherwise, a fire may result.
Before Using the Product

Caution
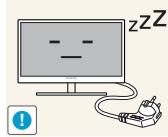
Do not unplug the power cable when the product is in use.
• The product may become damaged by an electric shock.
Do not use the power cable for products other than authorized products supplied by Samsung.
• An electric shock or fire may result.

Keep the power socket where the power cable is connected unobstructed.
- If any problem occurs in the product, unplug the power cable to completely cut the power to the product.
Power to the product cannot be completely cut off with the power switch.
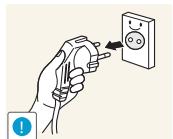
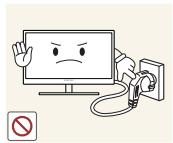
Hold the plug when disconnecting the power cable from the power socket.
• An electric shock or fire may result.
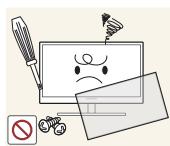
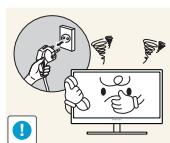
Installation and Safety

Warning
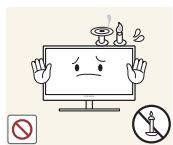
DO NOT PLACE CANDLES, INSECT REPELLANTS OR CIGARETTES ON TOP OF THE PRODUCT. DO NOT INSTALL THE PRODUCT NEAR HEAT SOURCES.
• Otherwise, a fire may result.
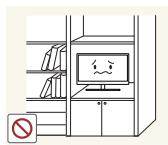
Avoid installing the product in a narrow space with bad ventilation, such as a bookshelf or wall closet.
• Otherwise, a fire may result due to an increased internal temperature.
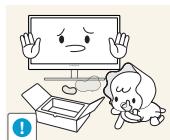
Keep the plastic packaging bag for the product in a place that cannot be reached by children.
• Children may suffocate.
Before Using the Product

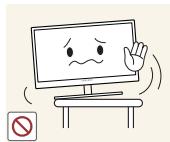
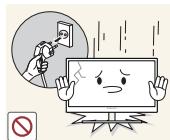
Do not install the product on an unstable or vibrating surface (insecure shelf, sloped surface, etc.).
• The product may fall and break or cause a personal injury.
- Using the product in an area with excess vibration may damage the product or cause a fire.
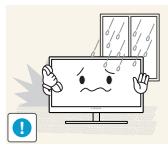
Do not install the product in a vehicle or a place exposed to dust, moisture (water drips, etc.), oil, or smoke.
• An electric shock or fire may result.
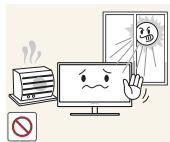
Do not expose the product to direct sunlight, heat, or a hot object such as a stove.
• Otherwise, the product lifespan may be reduced, or a fire may result.

Do not install the product within the reach of young children.
• The product may fall and injure children.

Edible oil, such as soybean oil, can damage or deform the product. Do not install the product in a kitchen or near a kitchen counter.

Caution
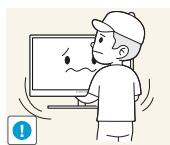
Take care not to drop the product when moving it.
• Otherwise, product failure or personal injury may result.
When installing the product on a cabinet or shelf, make sure that the bottom edge of the front of the product is not protruding.
• The product may fall and break or cause a personal injury.
• Install the product only on cabinets or shelves of the right size.
Before Using the Product

Put down the product carefully.
• The product may fall and break or cause a personal injury.

Installing the product in an unusual place (a place exposed to a lot of fine particles, chemical substances or extreme temperatures, or an airport or train station where the product should operate continuously for an extended period of time) may seriously affect its performance.
- Be sure to consult Samsung Customer Service Center (page 72) before installation if you want to install the product at such a place.
Operation and Safety

Warning
High voltage runs through the product. Do not attempt to disassemble, repair, or modify the product on your own.
• An electric shock or fire may result.
- Contact Samsung Customer Service Center (page 72) for repair.
Before moving the product, turn off the power switch and disconnect the power cable and all other connected cables.
- Otherwise, the power cord may be damaged and a fire or electric shock may result.
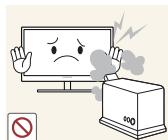
If the product generates a strange noise, a burning smell, or smoke, remove the power cable immediately and contact Samsung Customer Service Center (page 72).
• An electric shock or fire may result.

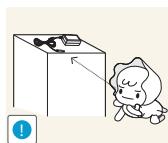
Do not let children hang from the product or climb on top of it.
- The product may fall, and your child may become injured or seriously harmed.
If the product falls or the exterior is damaged, power off the product, remove the power cable, and contact Samsung Customer Service Center (page 72).
• Otherwise, an electric shock or fire may result.

Do not put a heavy object, toy, or sweets on top of the product.
- The product or heavy objects may fall as children try to reach for the toy or sweets resulting in a serious injury.
Before Using the Product

Do not drop objects on the product or apply impact.
• An electric shock or fire may result.
Do not move the product by pulling the power cable or any cable.
- Otherwise, the cable may be damaged and product failure, an electric shock or fire may result.
If a gas leakage is found, do not touch the product or power cable. Also, ventilate the area immediately.
• Sparks can cause an explosion or fire.
Do not lift or move the product by pulling the power cable or any cable.
- Otherwise, the cable may be damaged and product failure, an electric shock or fire may result.

Do not use or keep combustible spray or an inflammable substance near the product.
• An explosion or fire may result.
Ensure the vents are not blocked by tablecloths or curtains.
• Otherwise, a fire may result from an increased internal temperature.

Do not insert a metallic object (a chopstick, coin, hair pin, etc.) or inflammable object (paper, match, etc.) into the vent or ports of the product.
- If water or any foreign substance enters the product, be sure to power off the product, remove the power cable, and contact Samsung Customer Service Center (page 72).
• Product failure, an electric shock or fire may result.

Do not place objects containing liquid (vases, pots, bottles, etc) or metallic objects on top of the product.
- If water or any foreign substance enters the product, be sure to power off the product, remove the power cable, and contact Samsung Customer Service Center (page 72).
• Product failure, an electric shock or fire may result.
Before Using the Product

Caution
Disconnect the power cable from the power socket if you do not plan on using the product for an extended period of time (vacation, etc.).
- Otherwise, a fire may result from accumulated dust, overheating, an electric shock, or electric leakage.

Do not put DC power adapters together.
• Otherwise, a fire may result.
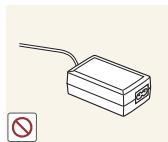
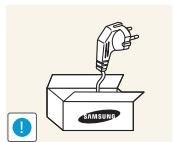
Remove the plastic bag from the DC power adapter before you use it.
• Otherwise, a fire may result.
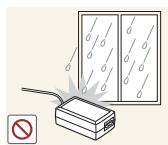
Do not let water enter the DC power adapter or get the adapter wet.
• An electric shock or fire may result.
- Avoid using the product outdoors where it can be exposed to rain or snow.
- Be careful not to get the DC power adapter wet when you wash the floor.
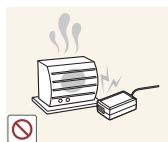
Do not put the DC power adapter near to any heating apparatus.
• Otherwise, a fire may result.
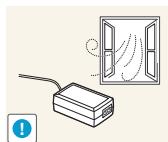
Keep the DC power adapter in a well-ventilated area.
Do not use humidifiers or stoves around the product.
• An electric shock or fire may result.
Store the small accessories used with the product out of reach of children.
Before Using the Product

Do not place heavy objects on the product.
• Product failure or personal injury may result.
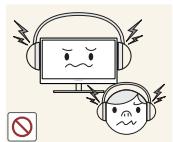
Do not increase the volume too high when using headphones (earphones).
- Sound particularly at a higher volume could potentially affect long-term hearing.
1.1 Checking the Contents
1.1.1 Removing the Packaging
1 Open the packaging box. Be careful not to damage the product when you open the packaging with a sharp instrument.
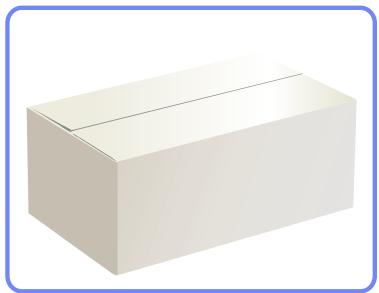
natural_image
Simple 3D illustration of a white rectangular box with a horizontal line inside (no text or symbols)2 Remove the styrofoam from the product.

natural_image
Illustration of an open box containing a simple diagram with internal compartments (no text or symbols)3 Check the components and remove the styrofoam and plastic bag.

• The appearance of actual components may differ from the image shown.
• This image is for reference only.
4 Store the box in a dry area so that it can be used when moving the product in the future.
1.1.2 Checking the Components

- Contact the dealer from whom you purchased the product if any item is missing.
• The appearance of the components and items sold separately may differ from the image shown.
Components
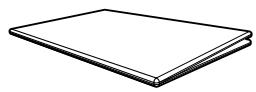
Quick setup guide
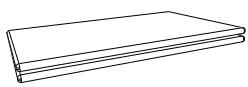
Warranty card
(Not available in some locations)

User manual
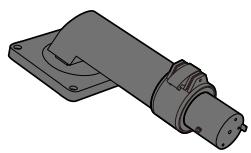
Stand connector
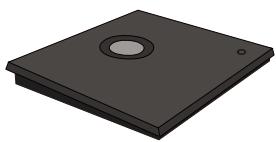
natural_image
3D rendering of a black square electronic component with a circular top and mounting holes (no text or symbols)Stand base

Power cable
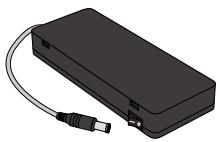
DC power adapter

Components may vary depending on the country.
- The stand base supplied with this product contains a circuit board. Care should be taken when handling the base.
Items sold separately

The following items can be purchased at your nearest retailer.
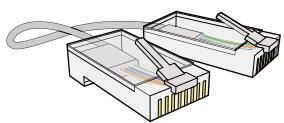
LAN cable
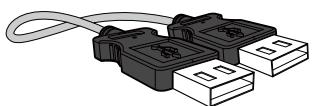
USB cable
HDMI-DVI cable
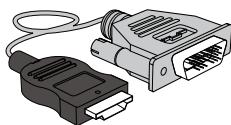
D-SUB cable

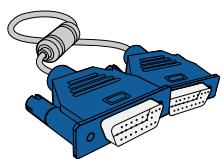
DVI cable
1.2 Parts
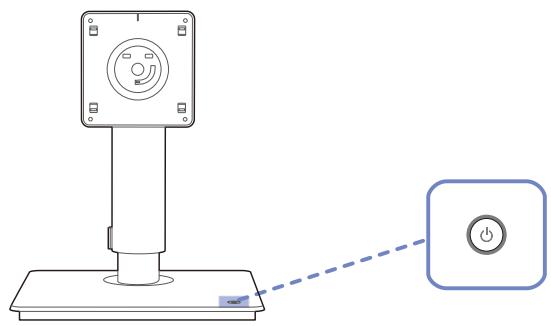
1.2.1 Button

The color and shape of parts may differ from what is shown. Specifications are subject to change without notice to improve quality.
natural_image
Diagram of a device with a power button connected to a control panel (no text or symbols present)| Icon | Description |
 | Power on or off the product. |
1.2.2 Reverse Side

The color and shape of parts may differ from what is shown. Specifications are subject to change without notice to improve quality.
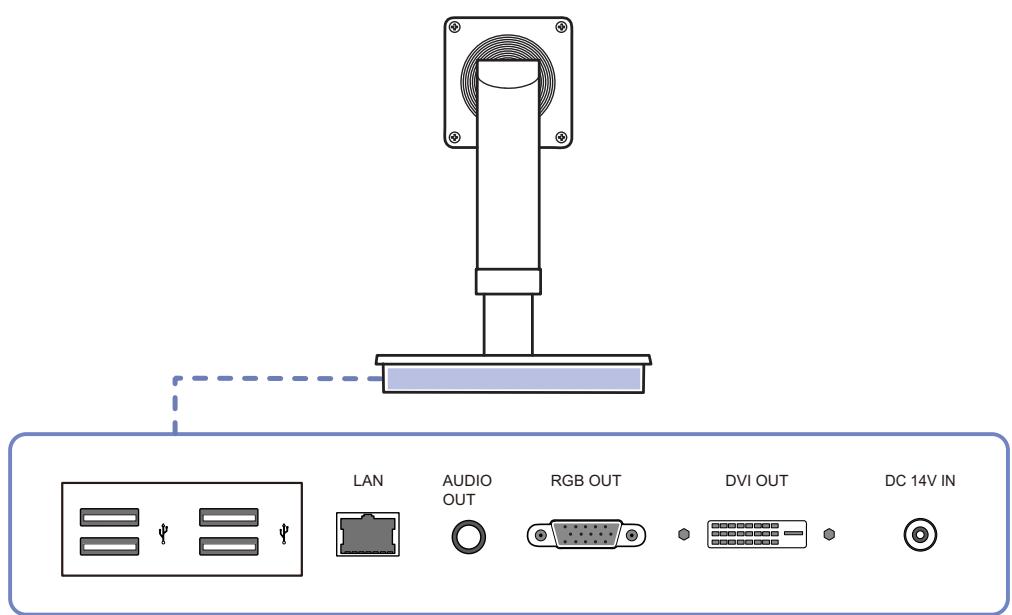
| Ports | Description |
 | Connect to a USB device. |
LAN | Connect to a network using the LAN cable. |
AUDIO OUT | Connect to an audio output device such as headphones. |
RGB OUT | Connect to the monitor using the D-SUB cable. |
DVI OUT | Connect to the monitor using the DVI cable. |
| DC 14V IN[KSTX] | Connect to the DC power adapter. |
1.2.3 Right Side View

The color and shape of parts may differ from what is shown. Specifications are subject to change without notice to improve quality.
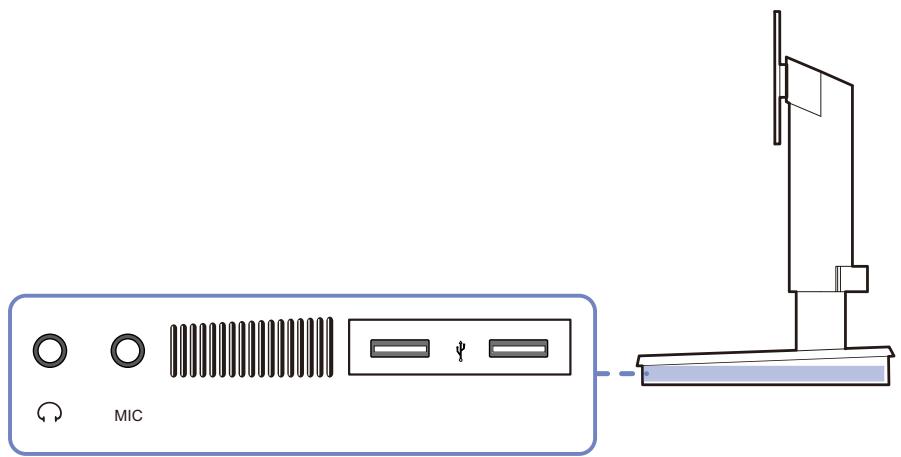
| Ports | Description |
 | Connect to an audio output device such as headphones. |
| [TT25] | |
| [BY25] | Connect to a microphone. |
| MIC | |
 | Connect to a USB device. |
 | Speaker (located on both sides). |
1.3 Installation
1.3.1 Reassembly
Ensure the monitor that will be connected to the stand complies with VESA standards.
natural_image
Isometric line drawing of a rectangular electronic component with internal structure (no text or symbols)Prepare a monitor that will be connected to the stand. Put a protective cloth or cushion on a flat surface. Next, place the monitor facing down onto the cloth or cushion.
natural_image
Mechanical assembly diagram showing a rotating component with mounting holes and a close-up of a key inserted into a housing (no text or symbols)Align the grooves on the monitor to the grooves on the stand connector. Then, fasten with screws.
natural_image
Technical line drawing of a mechanical assembly with an inset magnified view showing a component detail (no text or symbols)Insert the stand base into the stand in the direction of the arrow.
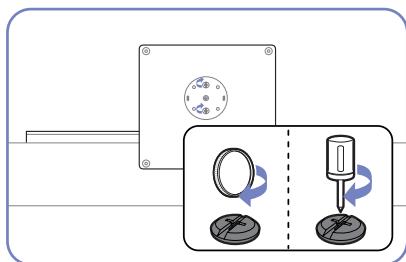
Fasten the screw tightly (using a screwdriver or coin) into the bottom of the stand base.
natural_image
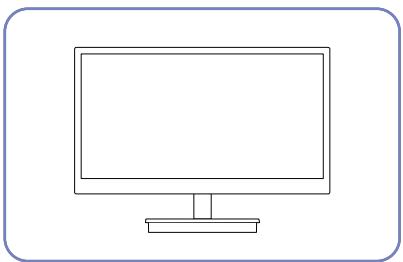
Line drawing of a computer monitor with a stand (no text or symbols)After installing the stand, place the product upright.

- The color and shape of parts may differ from what is shown. Specifications are subject to change without notice to improve quality.
• The monitor images in this manual are for reference only. Monitor is sold separately.
• Using screws longer than the supplied screws may cause internal product damage. - Do not use a monitor or screw that does not comply with VESA standards. Also, do not use excessive force when attaching the stand to the monitor. The product may get damaged or fall and cause personal injury. Samsung shall not be held liable for any damage or injury caused by using improper screws or attaching the wall-mount kit or desktop stand using excessive force.
Caution
Do not unfasten the lock or remove the fixing pin on the stand before attaching the stand base to the stand.
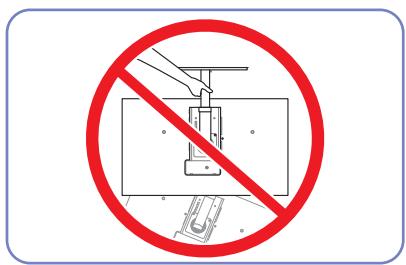
Do not hold the product upside down only by the stand.
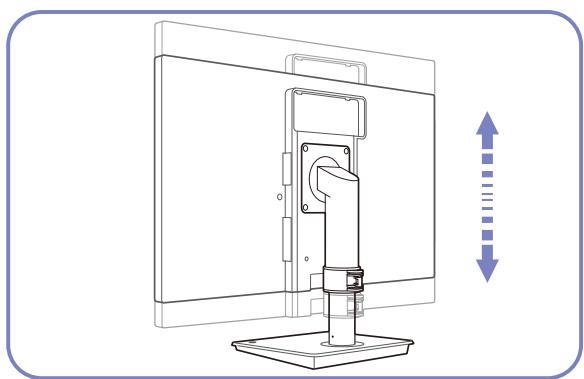
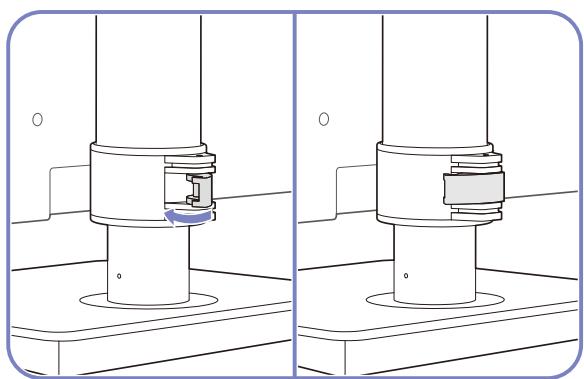
1.3.2 Adjusting the Product Height
Adjust the stand height after attaching the stand to the monitor.

The color and shape of parts may differ from what is shown. Specifications are subject to change without notice to improve quality.

natural_image
Technical line drawing of a mechanical assembly with a knob and shaft (no text or symbols)Remove the fixing pin.
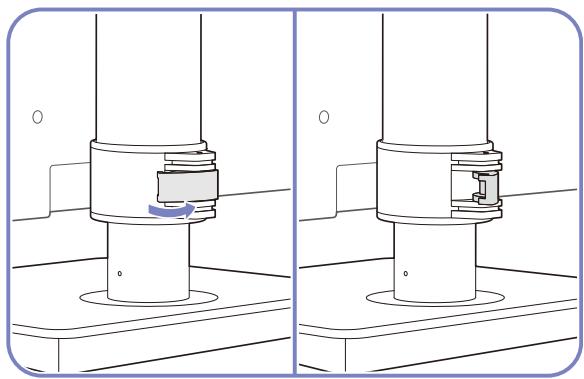
natural_image
Technical illustration of a mechanical assembly with two views showing a cylindrical component and a base platform (no text or symbols)Unfasten the lock (outward direction) fixing the stand height.
natural_image
Line drawing of a computer monitor with a vertical double-headed arrow indicating left-side motion (no text or symbols)Adjust the stand height as desired.
natural_image
Technical illustration of a mechanical assembly with two views (top and side), showing a cylindrical component with a blue arrow indicating rotation or movement (no text or symbols present)Fasten the lock (inward direction) on the stand.
- Hold the top center of the product and adjust the height carefully.
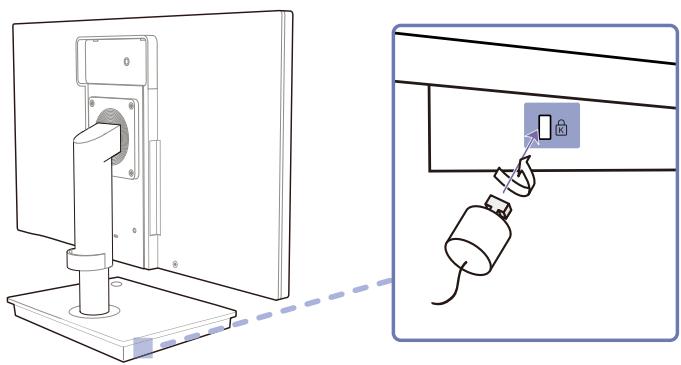
1.3.3 Anti-theft Lock
An anti-theft lock allows you to use the product securely even in public places. The locking device shape and locking method depend on the manufacturer. Refer to the user guide provided with your anti-theft locking device for details. The lock device is sold separately.
natural_image
Diagram showing a computer monitor mounted on a base connected to a wall-mounted device with a lock, alongside a close-up of the device's cable (no text or symbols present)To lock an anti-theft locking device:
1 Fix the cable of your anti-theft locking device to a heavy object such as a desk.
2 Put one end of the cable through the loop on the other end.
3 Insert the locking device into the anti-theft lock slot at the back of the product.
4 Lock the locking device.

• An anti-theft locking device can be purchased separately.
• Refer to the user guide provided with your anti-theft locking device for details.
• Anti-theft locking devices can be purchased at electronics retailers or online.
• The monitor images in this manual are for reference only. Monitor is sold separately.
2.1 What is "Windows Embedded Standard 7" Client?
The Microsoft Windows Embedded Standard 7 (WES7) client uses the Microsoft Windows Embedded Standard 2011 OS. When the WES client is connected to a server where Citrix XenDesktop, VMWare View Client, or Microsoft Remote Desktop Connection service is available, the keyboard, mouse, audio/video, and display data will be forwarded to the client through the network between the client and server.
Connectable Servers
• A Citrix XenDesktop Server
☐ Microsoft Windows 2000/2003/2008 Server where the Terminal Service and Citrix XenServer are installed
• A VMWare View Client Server
☐ Microsoft Windows 2000/2003/2008 Server where the Terminal Service and VMWare Server are installed
• A Microsoft RDP (Remote Desktop Protocol) Server
☐ Microsoft Windows 2000/2003/2008 Server where the Terminal Services are installed
□ Microsoft Windows 7 Professional

This manual describes the functions provided by the WES Client. However, it does not explain general functionalities of WES. For more general information on Windows 7, refer to Windows 7 Help provided by Microsoft.
2.2 Connection to Use "Windows Embedded Standard 7"
2.2.1 Before Connecting

natural_image
Technical line drawing of a mechanical component with a cylindrical housing and base (no text or symbols)Pre-connection Checkpoints
• Before connecting a source device, read the user manual provided with it.
The number and locations of ports on source devices may differ from device to device.
- Do not connect the power cable until all connections are completed.
Connecting the power cable during connection may damage the product.
- Check the types of ports at the back of the product you want to connect.
• The port names may vary depending on the monitor.
- For details on how to change the input source for your monitor, refer to the monitor user manual.
• The monitor images in this manual are for reference only. Monitor is sold separately.
2.2.2 Connection Using the D-SUB Cable (Analogue Type)

flowchart
graph TD
    A["Computer monitor"] -->|RGB IN| B["Video device"]
    B -->|RGB OUT| C["Video device with cable"]
    style A fill:#f9f,stroke:#333
    style B fill:#bbf,stroke:#333
    style C fill:#bfb,stroke:#333
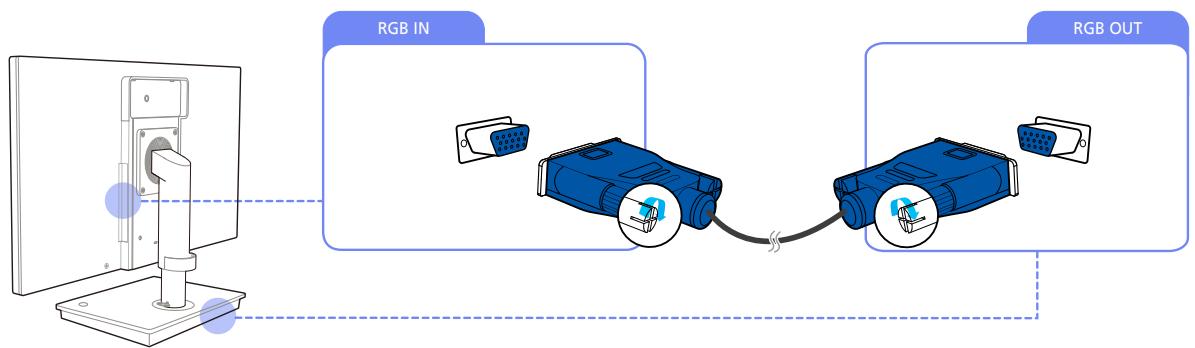
1 Connect the D-SUB cable to [RGB IN] on the back of the monitor and [RGB OUT] on the stand base.
2.2.3 Connection Using the DVI Cable

flowchart
graph LR
    A["Computer monitor"] --> B["DVI IN"]
    B --> C["Device 1: USB port"]
    C --> D["Device 2: USB port"]
    D --> E["DVI OUT"]
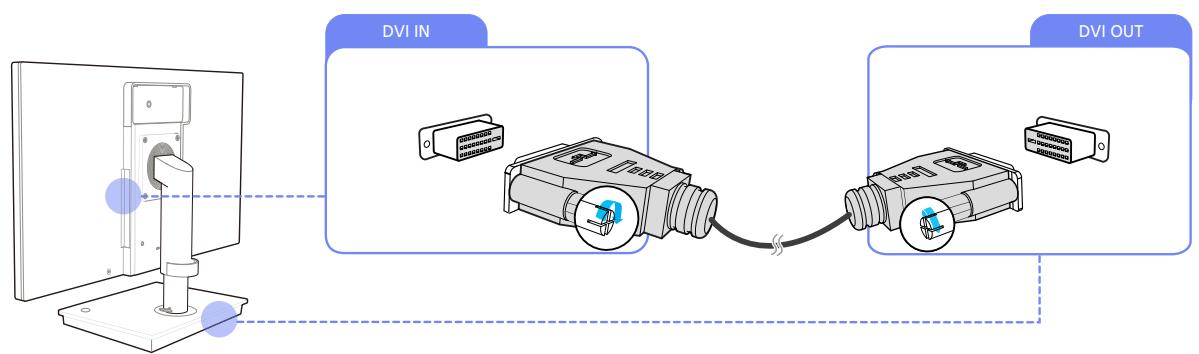
1 Connect the DVI cable to [DVI IN] on the back of the monitor and [DVI OUT] on the stand base.
2.2.4 Connecting a Microphone
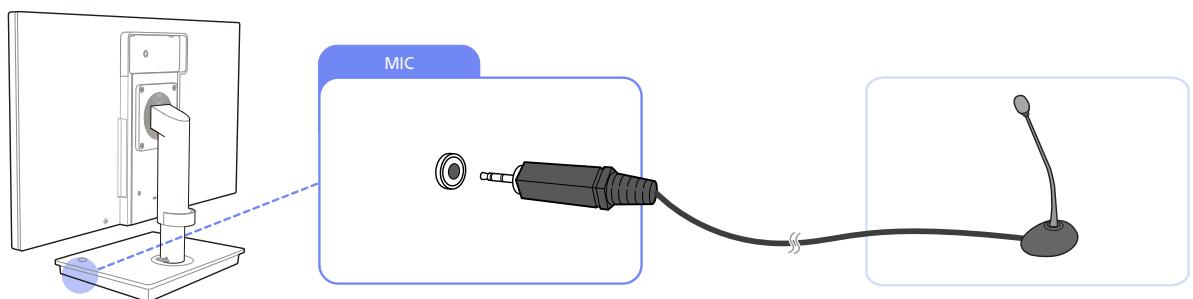
1 Connect the microphone to [MIC] on the right side of the stand base.
2.2.5 Connecting to Headphones or Speakers
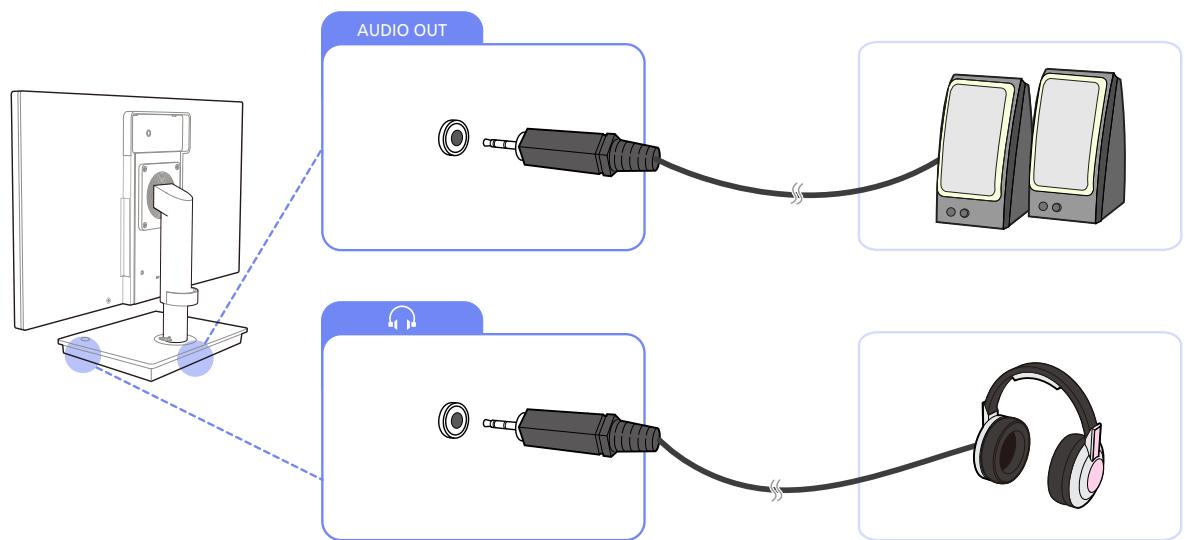
1 Connect an audio output device (headphones or speakers) to [AUDIO OUT] on the back or [💡] on the right side of the stand base.
2.2.6 LAN Connection

flowchart
graph TD
    A["Computer"] -->|LAN| B["Device 1"]
    B --> C["Device 2"]
    C --> D["Device 3"]
    D --> E["Device 4"]
1 Connect the LAN cable to [LAN] on the back of the stand base.

It is not supported when the network speed is below or equal to 10Mbps.
- Ensure you use the CAT 5 (*STP type) cable.
*Shielded Twist Pair
2.2.7 Connecting USB Devices
flowchart
graph TD
    A["Computer monitor"] --> B["USB drive"]
    B --> C["USB cable"]
    C --> D["Computer keyboard"]
    style A fill:#f9f,stroke:#333
    style D fill:#ccf,stroke:#333
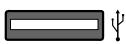
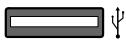
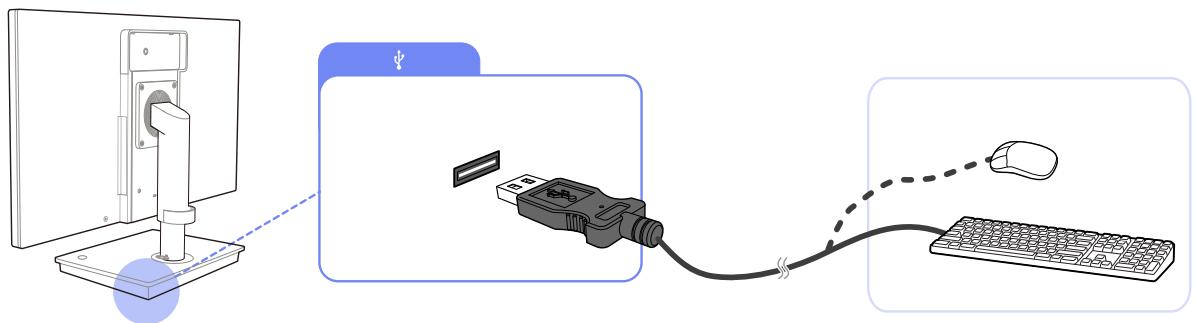
1 Connect USB devices (keyboard, mouse, etc.) to [ψ] on the back or right side of the stand base.
Using "Windows Embedded Standard 7" (TB-WH)
2.2.8 Connecting the Power

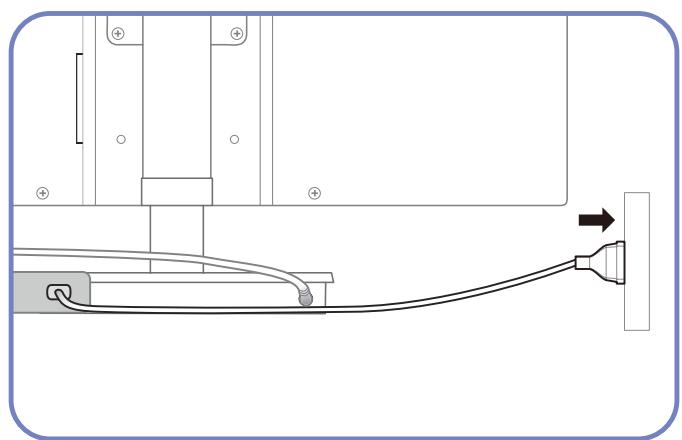
Connect the power cable to the DC power adapter. Next, connect the DC power adapter to [DC 14V IN] on the stand base.
natural_image
Diagram of a cable or connector assembly with a terminal block and cable, showing no text or symbols.Plug in the power cable to the power socket.

- The color and shape of parts may differ from what is shown. Specifications are subject to change without notice to improve quality.
• The monitor images in this manual are for reference only. Monitor is sold separately. - For details on how to connect the power cable to the monitor, refer to the monitor user manual.
2.3 Using "Windows Embedded Standard 7"
2.3.1 Logon
When the client starts, you can logon to the server by entering your username and password. The default account IDs are Administrator and User. The corresponding passwords are not set.
2.3.2 "Windows Embedded Standard 7" Desktop
User
When you log in, the User Desktop appears. The default icons that appear on the User Desktop are Recycle Bin, Computer, Citrix Online Plug in, VMWare View Client, Remote Desktop Connection and Internet Explorer. You can also run this connection from the Start menu. The audio volume icon and system time are displayed on the User Taskbar.
When logged on as a user, there are many restrictions that protect the system from incorrect user actions. You cannot access the system drives and there are restrictions on configuring properties for them. To configure the client's advanced and detailed settings, log on as an administrator.
Administrator
If you logon as Administrator, the Administrator Desktop appears. The default icons that appear on the Administrator Desktop are Recycle Bin, Computer, Citrix Online Plug in, VMWare View Client, Remote Desktop Connection and Internet Explorer. You can also run the Citrix Online Plug in, VMWare View Client, Remote Desktop Connection, and Internet Explorer from the Start menu. The audio volume icon, Enhanced Write Filter status icon, and system time are displayed on the Administrator Taskbar. The Administrator privilege is required for adding and removing programs.
Log off, Restart, Shut down
- To log off the current session, shut down or restart your client, use the Start menu. [Start → Shut down]. The Shut Down Windows dialog box is displayed. To shut down the client immediately, select [Start → Shut down]. To select Log off, Restart, etc., move the mouse over the ▶ icon next to [Shut down]. Alternatively, you can perform Log off or Shut down using the Windows Security Dialog box by pressing [Ctrl + Alt + Del]. If ‘Force Auto Log on’ is activated, you will be immediately logged on after each log off.
- The Client Log off, Restart and Shut down take effect on the operations of the EWF (Enhanced Write Filter). To keep the changed system configuration, you must save a cache for the current system session into flash memory. Failing to do so will cause the changed configuration to be lost when the client is shutdown or restarted. (In the case of logging off, the configuration is remembered when loggin in again.) For more information on the Enhanced Write Filter, refer to the Program Help.
2.3.3 Programs
Remote Desktop Connection
You can control a running terminal server or another computer (Windows 95 or later) remotely through a remote desktop connection.
- Remote Desktop
Windows 7 Professional or Windows 2000/2003/2008 Server must be installed on the computer to be controlled remotely. This computer is called a host.
☐ A remote computer running on an operating system later than Windows 95 is required. This remote computer is called a client. The client software for the remote desktop connection must be installed on the client.
☐ You must also be connected to the Internet. A broadband Internet connection is good for high performance. However, because the remote desktop transmits a minimum set of data including the display data and keyboard data to control the host remotely, a broadband Internet connection is not required. You can run a remote desktop on a low bandwidth Internet connection.

When running a remote desktop on Windows 7 Professional, you cannot use the operating system of your computer.
• Enabling Your Computer as the Host
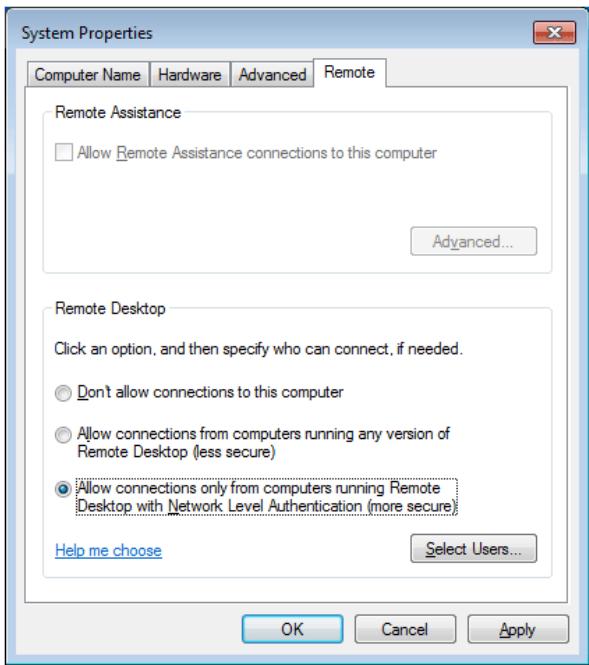
You must enable the Remote Desktop feature to control it from another computer. You must be logged on as an administrator or a member of the Administrators group to enable Remote Desktop on your computer. Follow these steps:
1 Open the System folder in the Control Panel.
2 Go to [Start → Control Panel → System and Security → System], and click Remote settings.
3 If you want to block other PCs from accessing your PC using Remote Desktop or RemoteApp, select "Don't allow connections to this computer."

- To allow a remote PC to access your PC using any version of Remote Desktop or RemoteApp, select "Allow connections from computers running any version of Remote Desktop (less secure)." This option is suitable if you do not know the Remote Desktop Connection version being used on other PCs. Note that this option is less secure than the next option (option 3).
Using "Windows Embedded Standard 7" (TB-WH)
- To allow a remote PC to access your PC using a Remote Desktop or RemoteApp version requiring a networklevel authentication, select "All Remote Assistance connections to this computer" to run Remote Desktop using network-level authentication.
• Start a Remote Desktop Session on the Client
Once you have enabled your host computer to allow remote connections and installed the client software on a Windowsbased client computer, you are ready to start a Remote Desktop session. You must first establish a virtual private network connection or remote access service connection from your client computer to your host computer. To connect to another remote desktop, follow the instructions below.
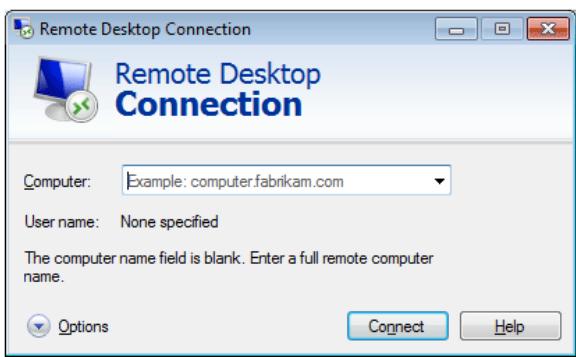
1 Go to [Start → All Programs → Accessories → Remote Desktop Connection] or double-click the Remote Desktop Connection icon to open Remote Desktop Connection.
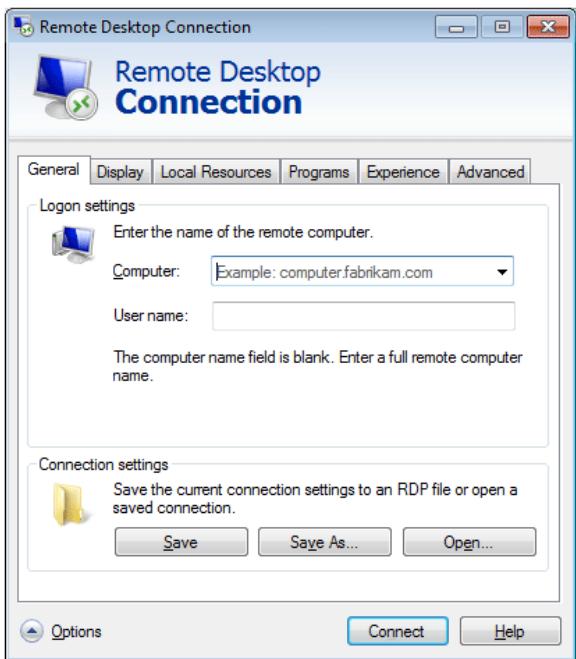
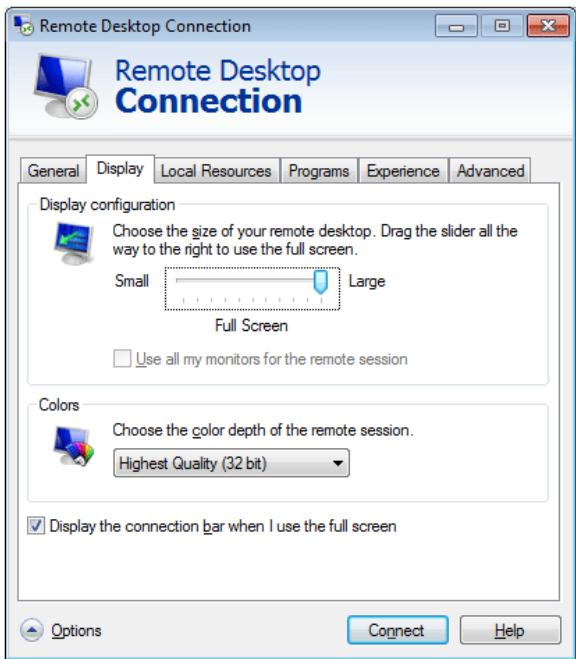
2 Enter the host computer name. You can configure detailed settings by clicking the Options button.
Using "Windows Embedded Standard 7" (TB-WH)
3 Options
- General : Enter in the login information for the host computer. To log in automatically, enter in the user name and password.
- Display : The Remote Desktop Connection sends and receives compressed screen data. If you set the resolution and color quality to the high option, the speed may become slow.
Using "Windows Embedded Standard 7" (TB-WH)
- Local Resource : Specify whether to use the hard disks and ports.
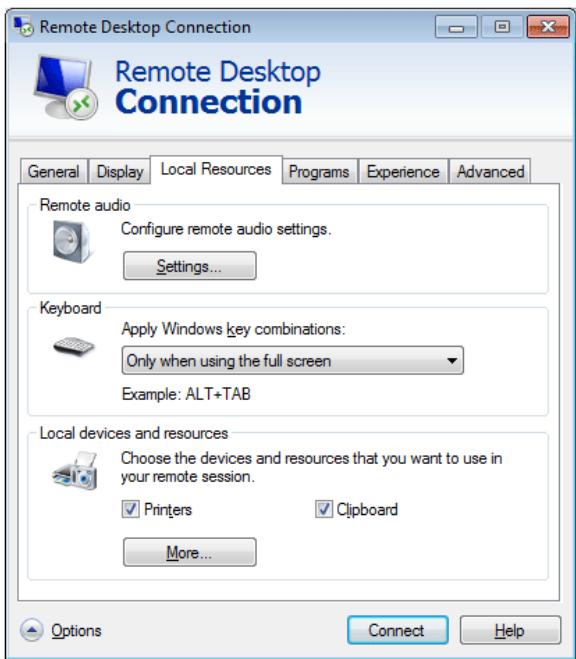
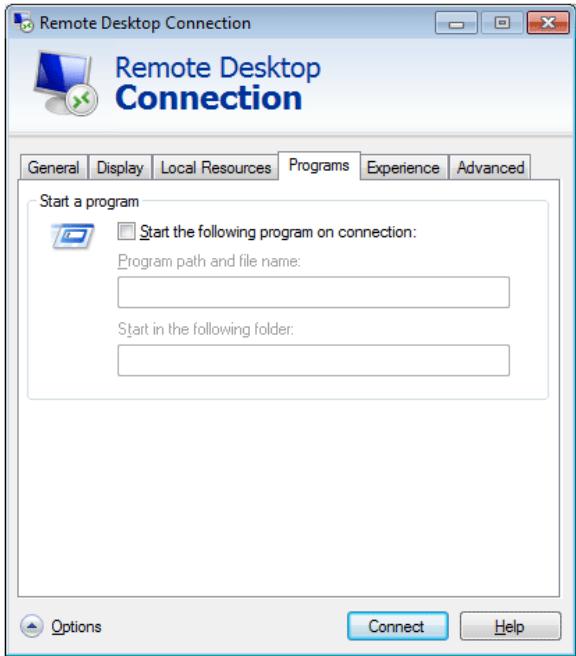
- Programs : Select an application and specify the folder where you want to run the application when a connection is established to the host PC.
Using "Windows Embedded Standard 7" (TB-WH)
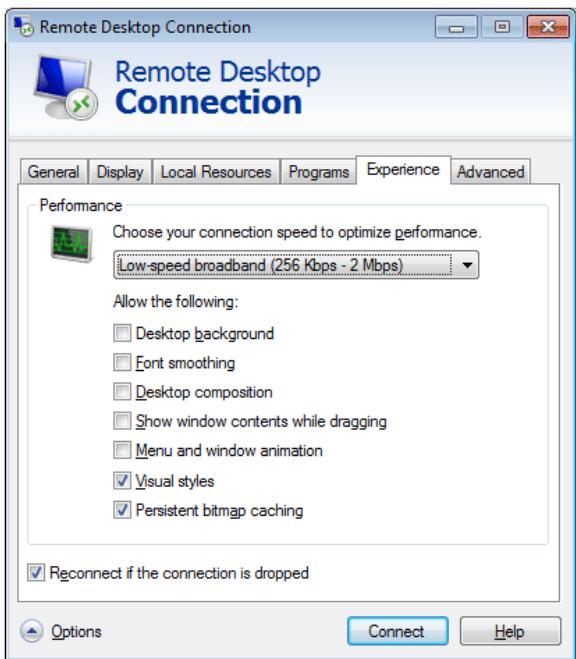
- Experience : Specify the connection speed and the menu items you want to use on the remote PC connected. The settings specified will be shared with the host PC.
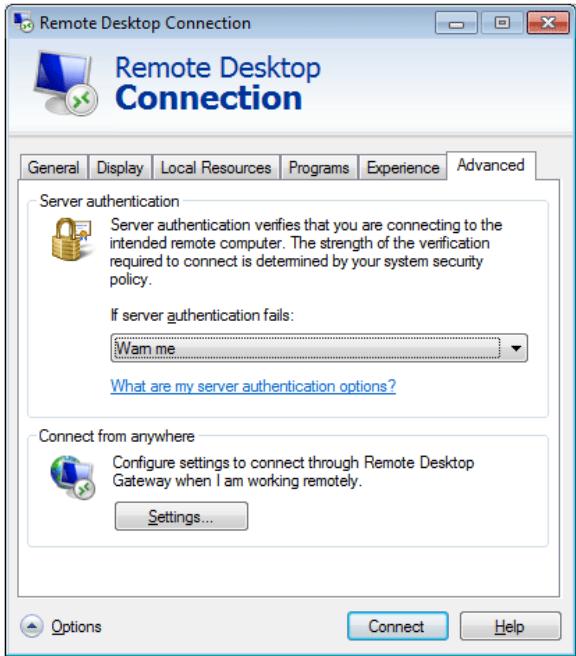
- Advanced : Protect your personal information when a connection is established.
4 Click Connect. The Log On to Windows dialog box appears.
5 In the “Log On to Windows” dialog box, type your username, password, and domain (if required), and then click OK. The Remote Desktop window will open and you will see the desktop settings, files, and programs that are on the host computer.

For more information on Remote Desktop Connections, visit the Microsoft web site.
Using "Windows Embedded Standard 7" (TB-WH)
Internet Explorer
A WES Client includes Internet Explorer. This program is permitted for all users. Microsoft website.

For more information on Internet Explorer, visit the Microsoft website.
Enhanced Write Filter (EWF)
Enhanced Write Filter (EWF) protects a flash volume from write access and consequently, preserves the durability of the flash device. EWF provides read and write access through a cache to the client instead of allowing direct access to a flash volume.
If EWF is activated, data is not stored to the flash. The data stored in the cache is only effective while the client is operating. The cached data will be lost when restarting or shutting down your client. Therefore, to store the data written to the registry, favorites and cookie folders, etc., the content stored in the cache should be transferred to the flash. An error message is displayed when it is not possible to write to the cache due to a lack of memory. If this message is displayed, you have to deactivate EWF to flush the EWF cache. The user can double-click the EWF icon on the tray at the bottom right of the screen to call the EWF Manager. A user can also change the EWF configuration by entering EWF management commands at the command prompt. This task requires the Administrator privilege.
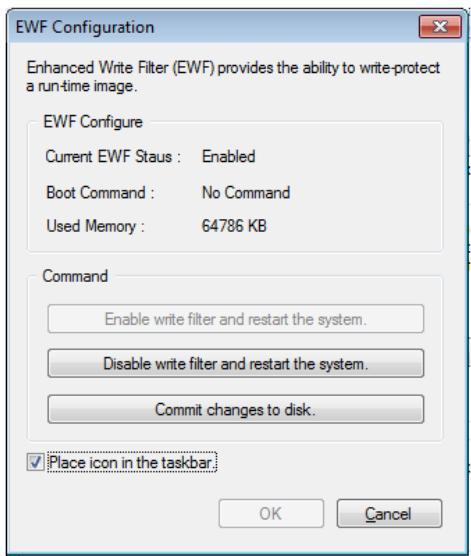
- Enable write filter and restart the system.
If the EWF is disabled, enable it. If this item is selected, the cache is flushed and the EWF is enabled. After restarting your computer, the configurations and file system information for the client are written to a cache. You can also perform this operation by entering “ewfmgr.exe c: -enable” at the command prompt and restarting your computer.
- Disable write filter and restart the systems.
This item is activated when the EWF is running. If this item is selected, the current states of the client (saved in a cache) are saved to a flash volume and the EWF is disabled. After restarting your computer, the configurations and file system information for the client are written to a flash volume.
Using "Windows Embedded Standard 7" (TB-WH)
You can also perform this operation by entering “ewfmgr.exe c: -commitanddisable” at the command prompt and restarting your computer.
• Commit changes to disk.
This item is activated when the EWF is running. If this item is selected, the current states of the client (saved in a cache) are saved to a flash volume. However, the state of EWF will not be changed. You can also perform this operation by entering “ewfmgr.exe c: -commit” at the command prompt.

You can view the configurations for the protected volumes by entering "ewfmgr.exe c:" at the command prompt.
File-Based Write Filter (FBWF)
The File-Based Write Filter (FBWF) protects the memory of the client from being overwritten by any unauthorized user. By restricting excessive writing into the memory, the FBWF allows you to use the client for a long time. If you request I/O, the FBWF has the client perform its operations using the cache instead of the memory so that the memory can be protected.
The data saved in the cache is preserved while the client operates normally. It is removed when it is restarted or exited. To save the changes, you should write the relevant file onto the disk using the commit command. If you don't know which file is changed, disable the FBWF, change it, and enable it again.
You can control the FBWF using the various options of the command at a command prompt.
FBWF Configuration
☐ Current FBWF status : Displays the current status of the FBWF (Enabled or Disabled).
☐ Boot command : Displays the FBWF command that will be performed at the next boot-up.
☐ RAM Used by FBEF : Displays the size of the RAM the FBWF is using. If the current status is set to "Disabled", the used memory is displayed as 0 KB.
☐ Threshold : Displays the maximum size of the RAM that the FBWF can use.
FBWF Command
Enable the FBWF and reboot the system : Enables the disabled FBWF and restarts the client. If the client is not restarted, only the boot command is changed to BWF_ENABLE and the current status is not changed.
☐ Disable the FBWF and reboot the system : Disables the enabled FBWF and restarts the client. If the client is not restarted, only the boot command is changed to FBWF_DISABLE and the current status is not changed.
- Commit files : Even if the disks are protected by the FBWF, you can add or delete the files you want to save on them. To write the changes onto the disk, click the [Write the changes to the disk] button.
- Session Status
☐ Current session : Displays the volumes being protected by the FBWF and a list of the folders and files on those volumes that are excepted from protection by the FBWF.
Using "Windows Embedded Standard 7" (TB-WH)
☐ Next session : Select the volumes that will be protected by the FBWF when the client is booted up next time. Also, select the folders and files that you want to except from protection by the FBWF.
Windows Media Player
The WES Client includes Windows Media Player 12. With Windows Media Player, you can play audio and video files on a website.
2.3.4 Configuring Utilities
Local Drive
C Drive
The C drive is used for the system. The client OS will not operate if space available on the system drive is not sufficient. Ensure sufficient space is available on the C drive. EWF can help maintain available space by preventing the C drive being written to directly.
Saving Files
Your client uses a fixed size of flash memory. Therefore, it is better to save files to the server rather than to your client.
Mapping a Network Drive
The Administrator can map a folder to a network drive. To keep the mapping information after restarting the client, take note of these directions carefully.
- Select the Reconnect at logon checkbox in the Map Network Drive dialog box.
• If the EWF or FBWF is enabled, you must disable it before proceeding with installation.
2.3.5 Recover the System
Overview
The WES Client provides a recovery function which allows you to revert to a backed up system when encountering a serious problem. You can back up an OS image which is working normally to USB memory or the PXE server. You can revert to a backed up image when your client has one of these problems:
- When a system file is deleted accidentally or is corrupted
- When the client computer is unstable or there is a problem with a device driver
- When problems occur, after installing a new program or device
- When the client computer is infected with a virus
- When Windows Embedded Standard fails to start When a system file is deleted accidentally or is corrupted
How to Recover the System
• Recovery Using USB Memory
By following these steps, you can save all necessary files to USB memory, and boot up with the backed up system on the USB memory and recover the system.
1 Perform system formatting for your USB memory in order to make it bootable.
2 Save the Windows Embedded Standard image and the Backup/Recovery Utility which will be recovered later to your USB memory.
3 Boot up with the USB memory.
4 Recover the system using the Windows Embedded Standard image and the Backup/Recovery Utility in the USB memory.
• Recovery Using Network Booting
This method is provided through the PXE (Preboot eXecution Environment) server. The PXE sever provides a client/server interface based on TCP/IP, DHCP, and TFTP. It allows an administrator at a remote location to configure and boot the operating system onto a client over a network.
Implement a PXE server.
☐ Save the Windows Embedded Standard image and the Backup/Recovery Utility which will be recovered later onto the PXE server.
- Boot the client via the network.
☐ Recover the system using the Windows Embedded Standard image and the Backup/Recovery Utility saved on the PXE server via the network.

For more information, refer to the PXE Server User Manual.
2.4 MagicRMS Pro
2.4.1 About MagicRMS Pro
The MagicRMS Pro program can be used to remotely control a Samsung network monitor. The design of the user-oriented interface makes it easy and convenient to use.
Using MagicRMS Pro, you can schedule a task to be performed at a specified time on a network monitor.
Also, you can manage multiple network monitors efficiently by grouping or filtering them according to specific conditions.
To use the MagicRMS Pro Solution or MagicRMS Pro Agent and to view the user guide, visit www.samsunglfd.com. Go to Support>Download Center, and search for MagicRMS to download.
Open source license notice
In the case of using open source software, Open Source licenses are available on the MagicRMS Pro Agent.
Open Source License Notice is written only English.
3.1 About "Zero Client"
The "Zero Client" uses a Linux operating system. When the Client connects to a server where the Citrix XendDesktop/XenApp service is available, information relating to the keyboard, mouse, audio/video and display data is transmitted from the Client to the server over the network.
Compatible servers
• Citrix XenDesktop/XenApp server
☐ Microsoft Windows 2000/2003/2008 server where the Terminal Service and Citrix XenServer are installed
3.2 Connection to Use the "Zero Client"
3.2.1 Before Connecting

natural_image
Technical line drawing of a mechanical component with a cylindrical housing and base (no text or symbols)Pre-connection Checkpoints
• Before connecting a source device, read the user manual provided with it.
The number and locations of ports on source devices may differ from device to device.
- Do not connect the power cable until all connections are completed.
Connecting the power cable during connection may damage the product.
- Check the types of ports at the back of the product you want to connect.
• The port names may vary depending on the monitor.
- For details on how to change the input source for your monitor, refer to the monitor user manual.
• The monitor images in this manual are for reference only. Monitor is sold separately.
3.2.2 Connection Using the D-SUB Cable (Analogue Type)
flowchart
graph TD
    A["Computer monitor"] -->|RGB IN| B["Video device"]
    B -->|RGB OUT| C["Video device with cable"]
    style A fill:#f9f,stroke:#333
    style B fill:#bbf,stroke:#333
    style C fill:#bfb,stroke:#333
1 Connect the D-SUB cable to [RGB IN] on the back of the monitor and [RGB OUT] on the stand base.
3.2.3 Connection Using the DVI Cable
flowchart
graph LR
    A["Computer monitor"] --> B["DVI IN"]
    B --> C["Device 1: USB port"]
    C --> D["DVI OUT"]
    D --> E["Device 2: USB port"]
1 Connect the DVI cable to [DVI IN] on the back of the monitor and [DVI OUT] on the stand base.
3.2.4 Connecting a Microphone
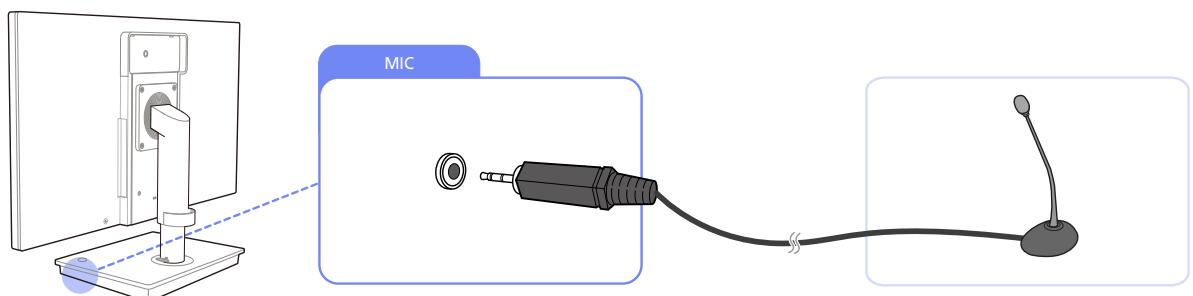
1 Connect the microphone to [MIC] on the right side of the stand base.
3.2.5 Connecting to Headphones or Speakers

1 Connect an audio output device (headphones or speakers) to [AUDIO OUT] on the back or [💡] on the right side of the stand base.
3.2.6 Connecting to a Server (LAN/USB Connection)
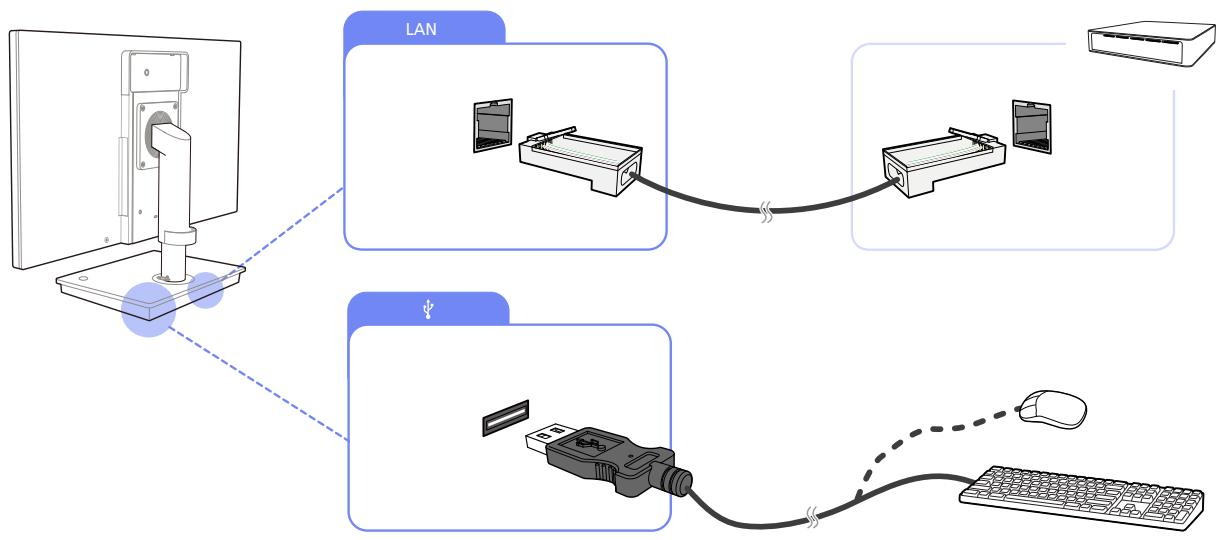
flowchart
graph TD
    A["Monitor"] --> B["LAN"]
    B --> C["Device 1"]
    B --> D["Device 2"]
    B --> E["Device 3"]
    C --> F["Computer"]
    D --> G["Computer"]
    E --> H["Computer"]
1 Connect the [LAN] port on the back of the stand base to the server using the LAN cable.

It is not supported when the network speed is below or equal to 10Mbps.
- Ensure you use the CAT 5 (*STP type) cable.
*Shielded Twist Pair
2 Connect USB devices (keyboard, mouse, etc.) to [ψ] on the back or right side of the stand base. (To use the [ψ] port, ensure the Client is connected to the server.)
3.2.7 Connecting the Power
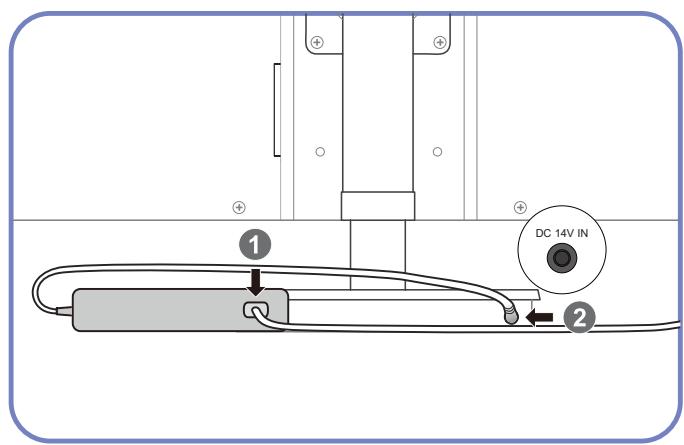
Connect the power cable to the DC power adapter. Next, connect the DC power adapter to [DC 14V IN] on the stand base.

natural_image
Diagram of a cable or connector assembly with a terminal block and cable, showing no text or symbols.Plug in the power cable to the power socket.

- The color and shape of parts may differ from what is shown. Specifications are subject to change without notice to improve quality.
• The monitor images in this manual are for reference only. Monitor is sold separately. - For details on how to connect the power cable to the monitor, refer to the monitor user manual.
3.3 Using the "Zero Client"
3.3.1 Login
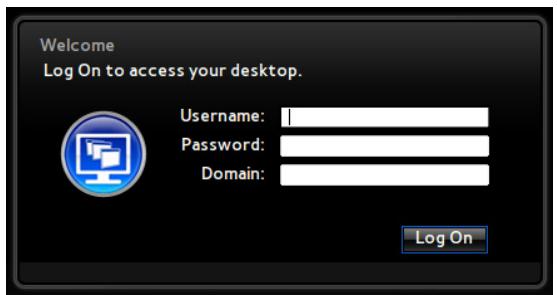
- Username : Enter the user name that will be used to connect to the "Citrix" server.
- Password : Enter the password that will be used to connect to the "Citrix" server.
- Domain : Enter the domain that will be used to connect to the "Citrix" server.

Ensure Broker Server is enabled under Network.
3.3.2 Message Box
MagicRMS
When the MagicRMS server is on, messages received from the server are displayed on the screen.
Message
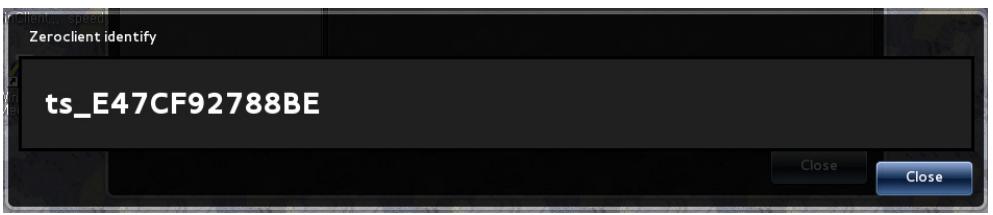
The Identity function of MagicRMS allows you to check the host name of the Client.
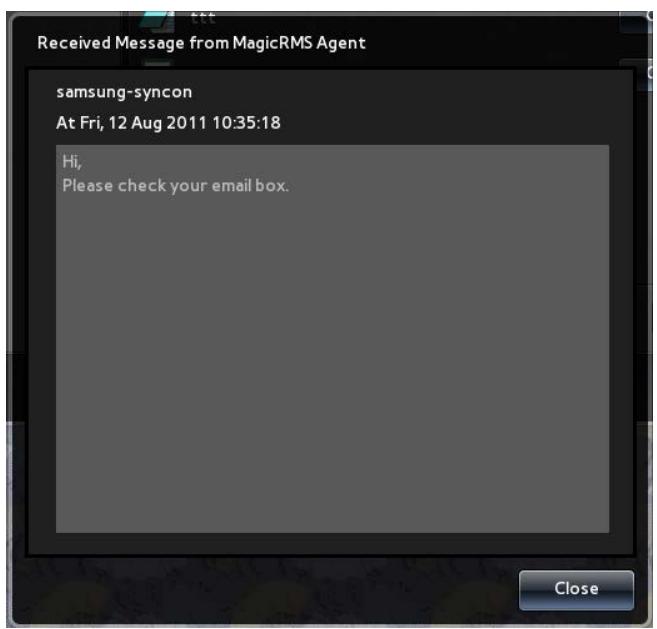
Identity
The Identity function of MagicRMS allows you to check the host name of the Client.
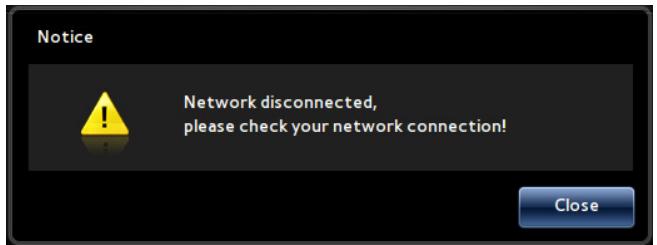
Disconnect Message
If the Client is disconnected from the network, a message will appear indicating the disconnection. In this case, if you are logged on, the desktops/applications connected will disconnect and log off.
3.3.3 Toolbar
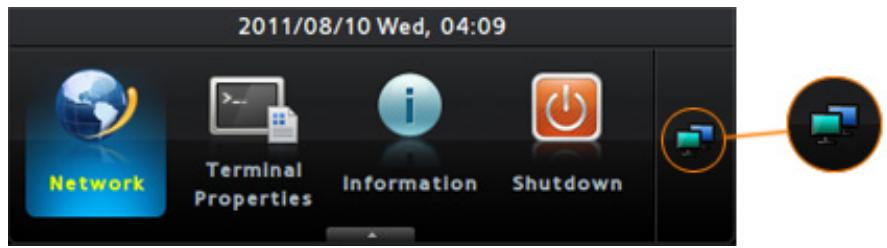
Network
You can view or configure the network and server settings for the Client.
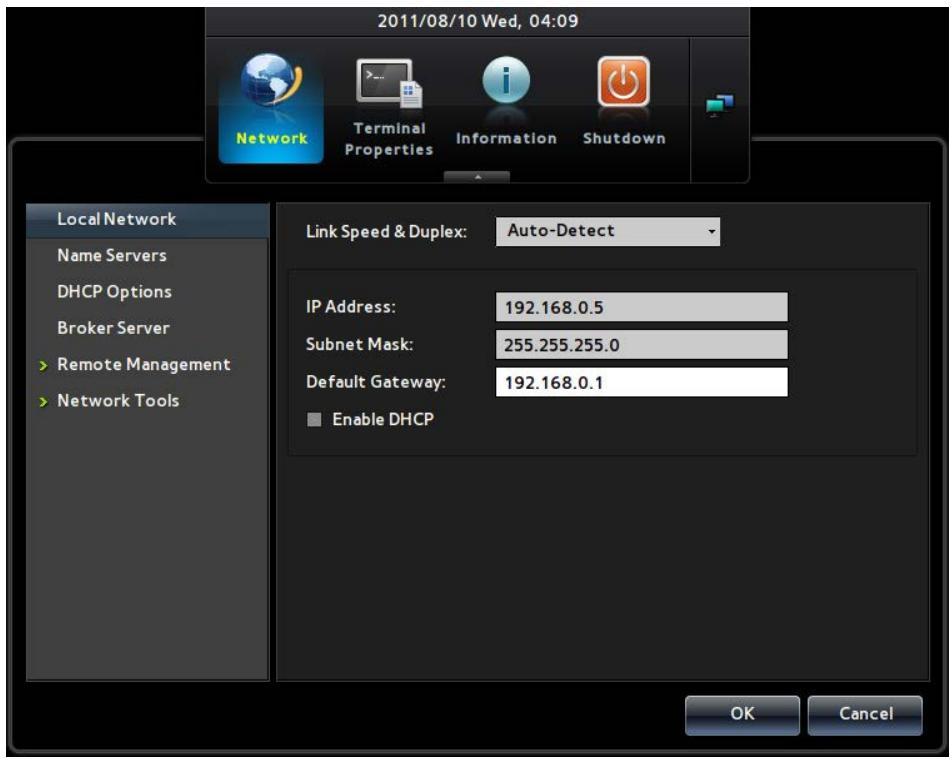
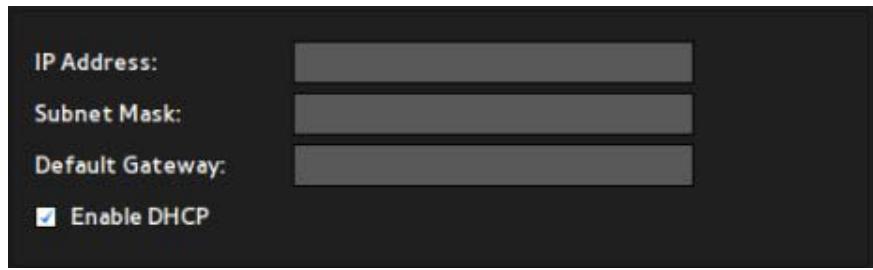
Local Network
You can configure the IP to connect the Client to a network.
- Link Speed & Duplex : Select a network connection type and speed.
Link Speed & Duplex:
Auto-Detect
• To use a static IP, deselect Enable DHCP and specify the IP.
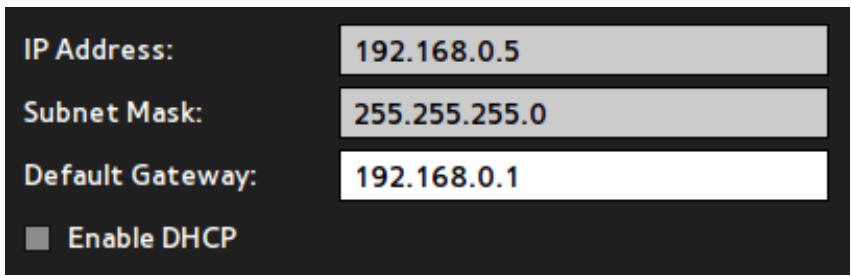
• To use DHCP, select Enable DHCP.
Name Servers
Configure the DNS Domain and DNS Server information on the Client.
• Specify the DNS Domain.
DNS Domain:
- Specify the DNS Servers. More than one DNS Server can be entered using “,”. e.g.) 192.168.0.1, 192.168.1.1
DNS Servers:

For example:1.1.1.1,2.2.2.2
DHCP Options
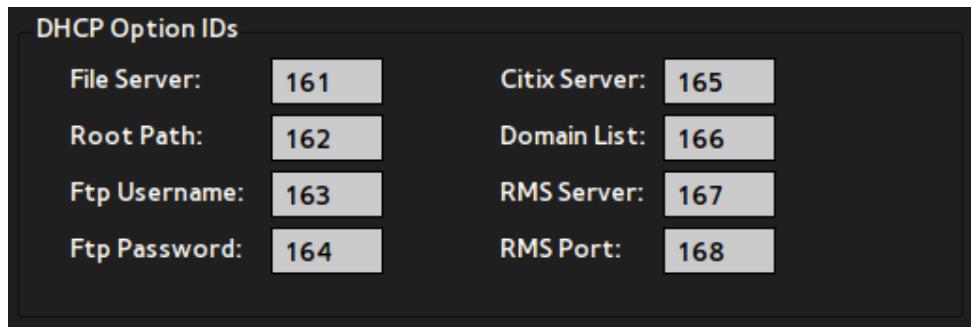
other
DHCP Option IDs | Entity | ID | | :--- | :--- | | File Server: | 161 | | Citix Server: | 165 | | Root Path: | 162 | | Domain List: | 166 | | Ftp Username: | 163 | | RMS Server: | 167 | | Ftp Password: | 164 | | RMS Port: | 168 |To automatically configure several settings for the Client all at once using DHCP upon boot up, configure the DHCP Options IDs.
• Ensure the setting is specified between 128 and 254.
• If this option is configured, the setting specified will replace the customized setting.

Requirements
• Local Network must be set to Enable DHCP.
• Information about the Options IDs must be configured on the DHCP server.
Security
Client provides a security function using IEEE802.1x authentication.
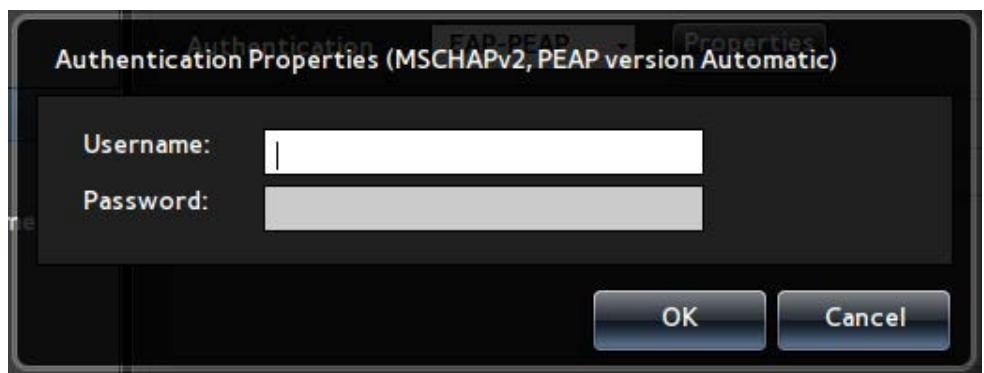
Available modes
• EAP-PEAP (MSCHAPv2, PEAP version Automatic)
EAP-TLS
To use this function, select Enable IEEE802.1x Authentication and specify the Authentication mode.

1 EAP-PEAP
To use EAP-PEAP mode, set the Authentication mode to EAP-PEAP.

Click Properties, and enter the Username and Password for authentication.
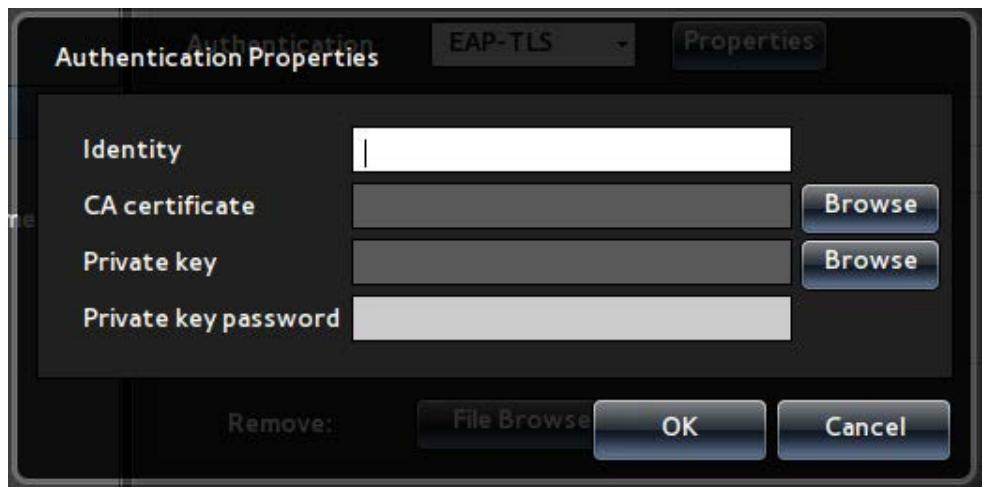
2 EAP-TLS
To use EAP-TLS mode, set the Authentication mode to EAP-TLS.

Click Properties, and configure the following settings for authentication. To select a certificate, ensure you copy the authentication file to the Client using Certification Management.
a. Enter the Identity information.
b. Select a CA certificate file (*.der, *.pem, *.crt, *.cer).
c. Select a Private key file.
d. Enter the Private key password.
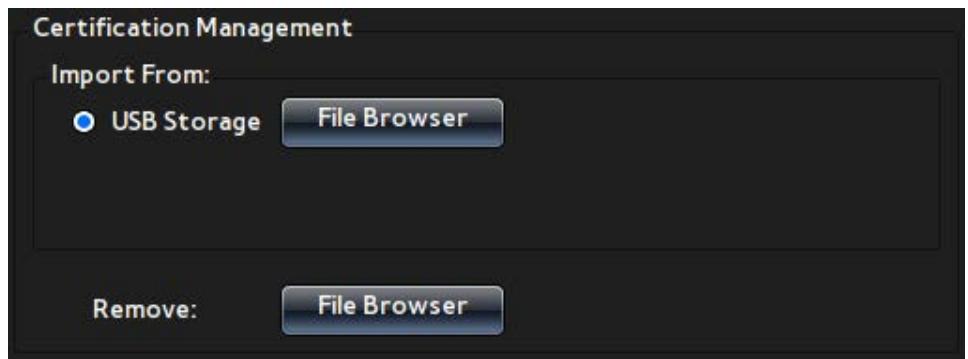
3 Certification Management
For you to manage authentication files that are used in EPA-TLS mode, the following menu options are provided.
a. An option for copying a file using several methods including USB Storage (The file will be copied to a specific directory on the Client.)
b. An option for deleting a saved file
Broker Server
Enter information to connect to the Citrix server.
• Enter the IP address of the Citrix server.
XenDesktop Broker Server:
10.88.44.50
- Specify the Default Username and Default Domain that will be used to connect to the server.
Default Username:
xendt05
Default Domain:
xendt
Remote Management
You can configure the settings for servers that manage the Client, enter information about the servers, or view the status of the servers.
For details on the MagicRMS function, refer to the MagicRMS user manual.
1 File Server
Address:
ftp://
Path:
Username:
Password:
Configure the FTP server to connect to in order to upgrade the firmware on the Client. The information configured will be used to upgrade the firmware when the Client boots up.
• Address : Enter the IP address of the FTP server.
• Path : Enter the Path of the FTP server where the new firmware is saved.
- Username : Enter the Username that will be used to connect to the FTP server.
- Password : Enter the Password that will be used to connect to the FTP server.

Requirements
• Ensure the FTP server is working properly.
• The new firmware must be in a compatible file format.
2 MagicRMS Connection
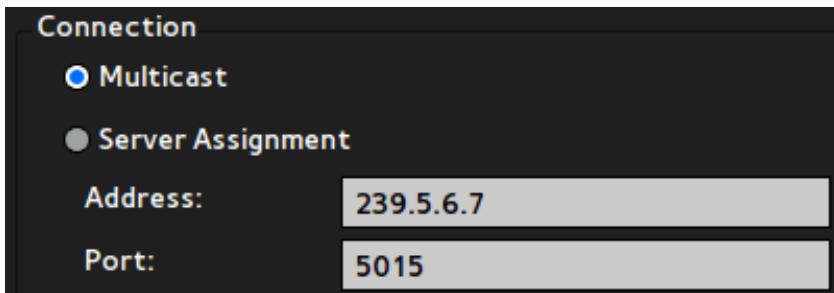
Enter the Connection information to connect to the MagicRMS server.
Using the "Zero Client" (TB-CH)
Multicast
Enable this option if you want to automatically connect to the MagicRMS server. Specify the IP Address and Port number for Multicast. If the MagicRMS server is assigned with the same IP address and port number as the Client, it will automatically connect to the Client.
Server Assignment
If you know the static IP address and port number of the MagicRMS server, you can manually enter them to connect to the server.
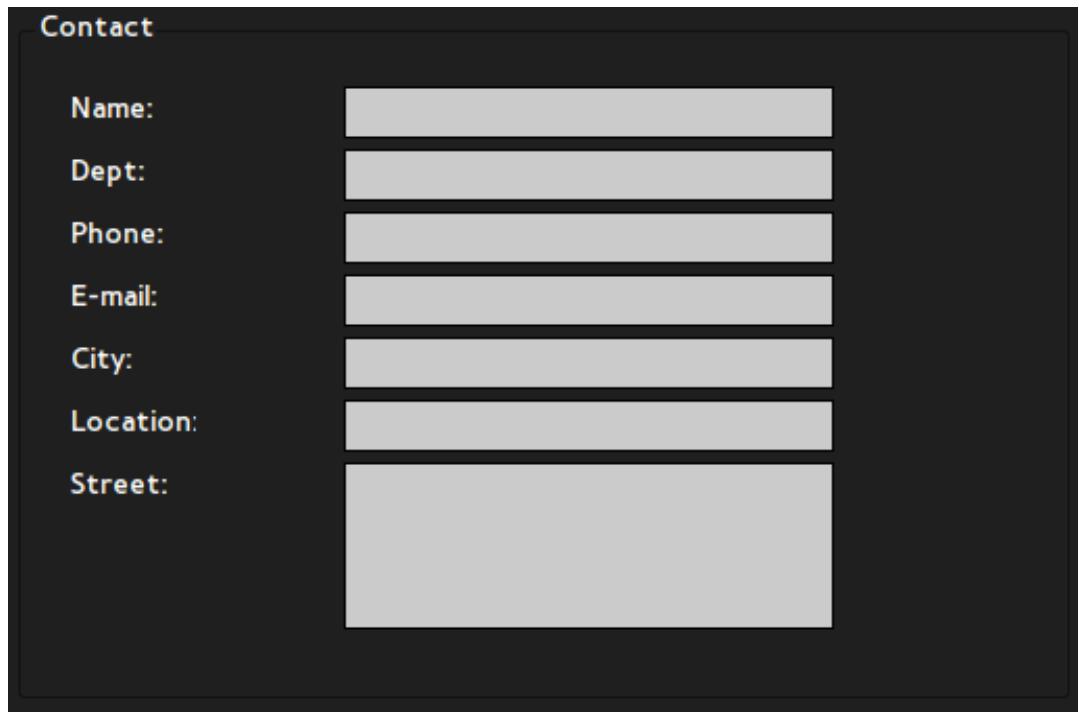
3 MagicRMS Contact
Enter information to identify the Client on the MagicRMS console.
4 MagicRMS Status

You can check the connection status of the MagicRMS server. If there are connection issues, check the server connection and select Start, Stop, or Restart to start the server.
To view details of the MagicRMS server logs, click View Log.
![MagicRMS Log file MRAgentService [08/26-15:08:42-8750] [Sysinfo]Not able to open file /etc/network/interfaces. MRAgentService [08/26-16:14:43-1296] No such device MRAgentService [08/26-16:22:26-1286] No such device MRAgentService [08/26-16:22:45-1596] [Sysinfo]Not able to open file /etc/network/interfaces. MRAgentService [08/31-19:17:40-1022] No such device](/content/2025/01/98994/images/0f1482fad240a056d0ffead375f890e1250ca30700a906272b57ac95ecc6c06c.jpg)
5 Network Tools
Network Tools can be used to check the connection status between the Client and network.
• Ping
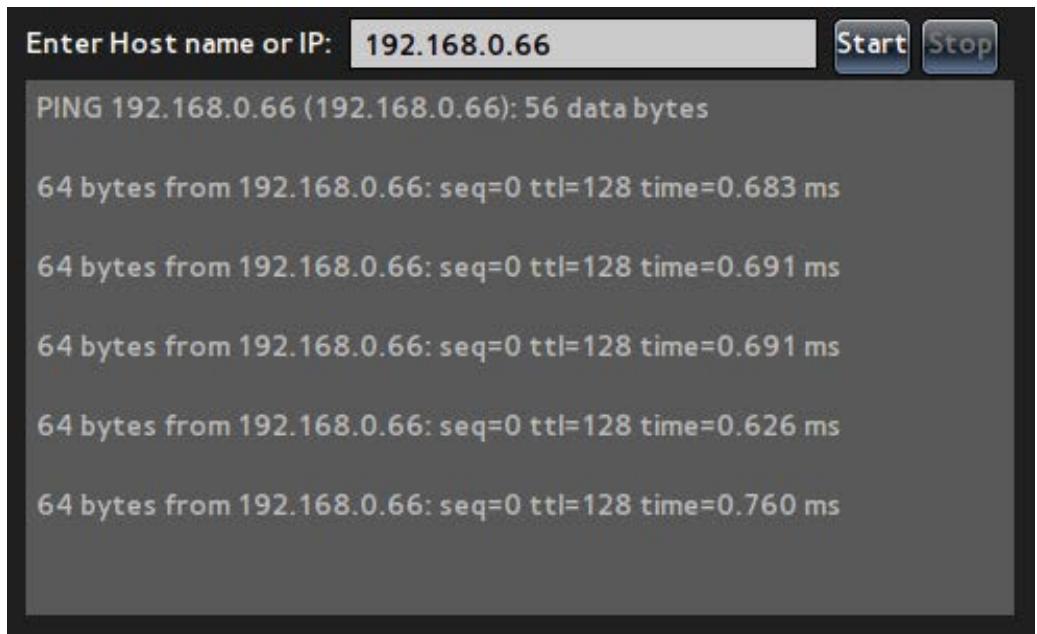
Using the Ping command, you can check the status of the network connection for the IPs entered.
Trace Route

Using the Route command, you can check the network connection status for the IPs entered.
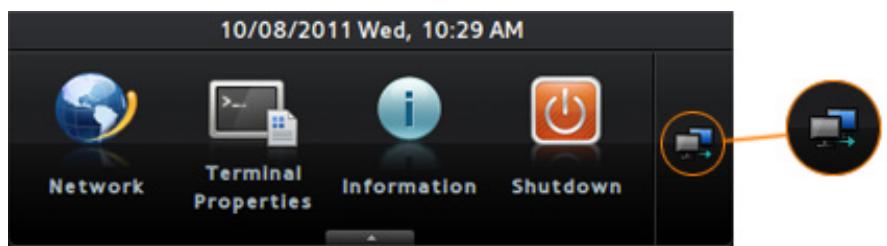
Terminal Properties
Configure the properties of the Client.
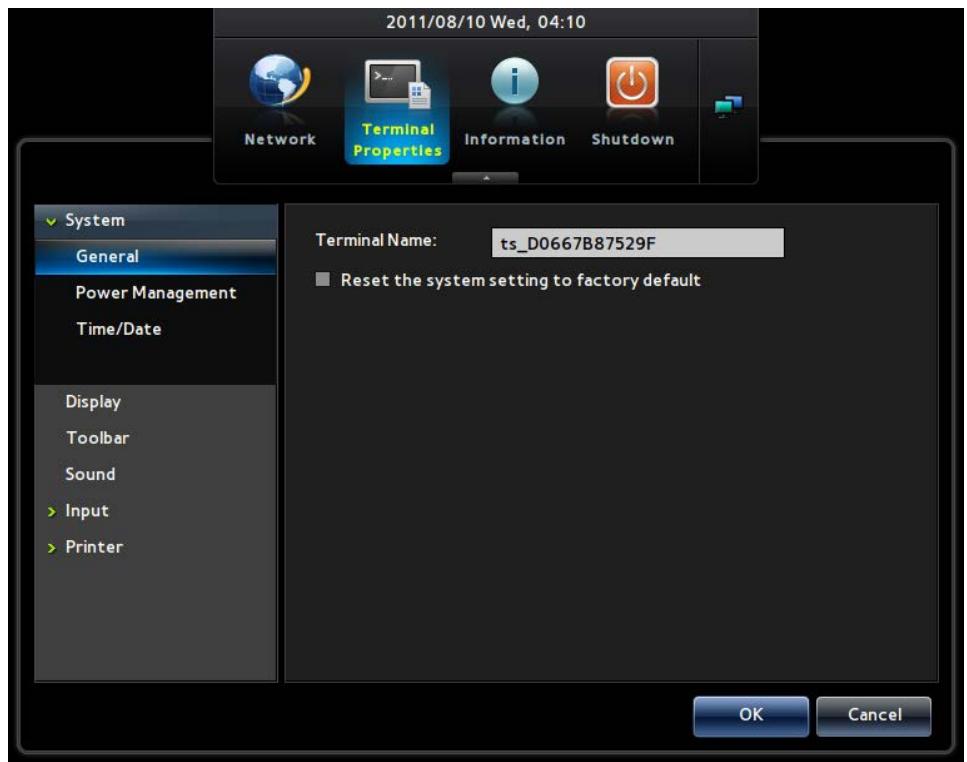
System
1 General
- Terminal Name : Change the Client name. The default name is "TS_ + MAC information."
Terminal Name:
ts_D0667B87529F
- Reset the system setting to factory default : Reset the Client settings by selecting the checkbox.
√ Reset the system setting to factory default
Select Yes in the Notice window that appears after selecting the checkbox. The settings will be reset.

2 Power Management
- Control the power supply to the Client by changing the Screen Off setting. The Client will activate Power Management if it is left idle for a specified amount of time.

The following time settings are available to choose from.
□ Never
5 minutes
10 minutes
30 minutes
□ 1 hour
2 hours
3 Time/Date
Set the clock on the Client.
Time Zone

Enter the Time Zone information to apply to the Client. Click Change, and select the time zone desired.
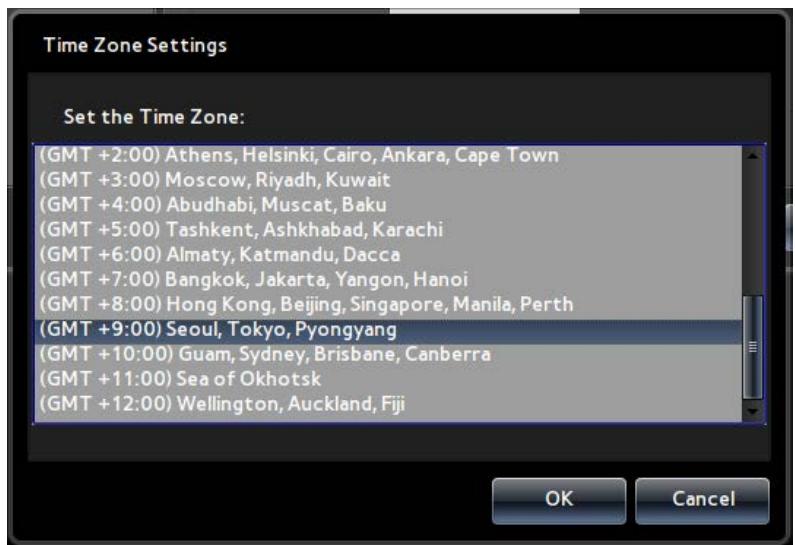
To enable DayLight Saving, select the Enable DayLight Saving checkbox and select the number of hours to apply.
Enable DayLight Saving
1 hour
2 hours
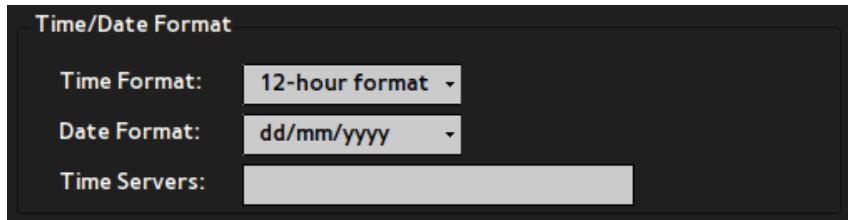
• Time/Date Format
☐ Time Format / Date Format : Specify the format to display the time and date on the toolbar.
☐ Time Servers : Enter the Time Server information provided online. The time and date on the Client will automatically be set.
Display
Configure the settings for display devices connected to the Client.
1 Orientation
Orientation:
Horizontal

Configure the screen orientation of the selected display device.
You can select Horizontal or Vertical.
2 Resolution
Resolution:
1600x1200

Set the resolution of the selected display device.
The resolutions available vary depending on the display device.
3 Multiple Display
When two display devices are connected to the Client, specify how you will use the screens.
- To display the same desktop on the displays, select Clone. When Clone is selected, the same Orientation and Resolution will be applied to the displays.

• To display an extended desktop on the two displays, select Extend.
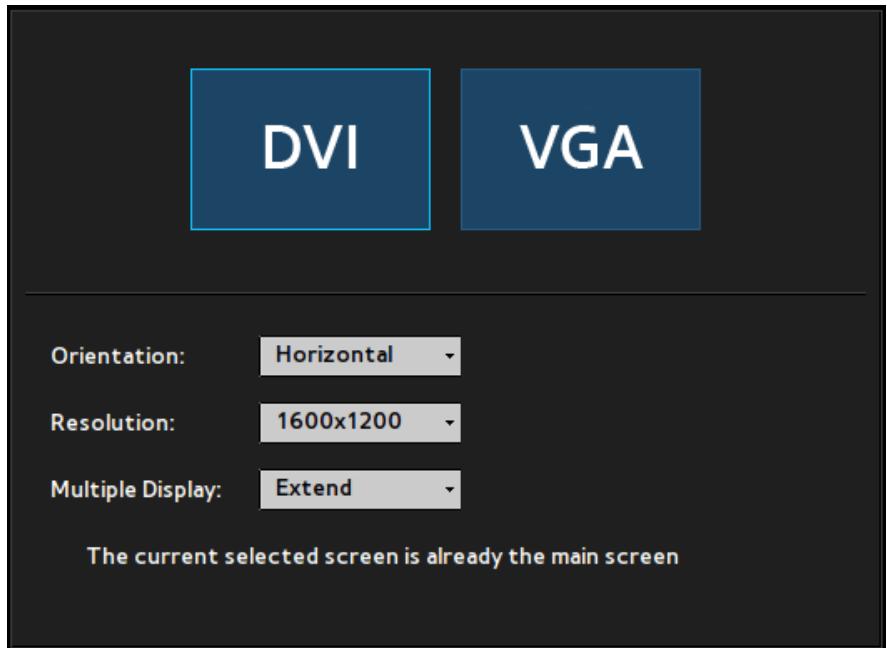
The display selected as the primary screen will be placed on the left.
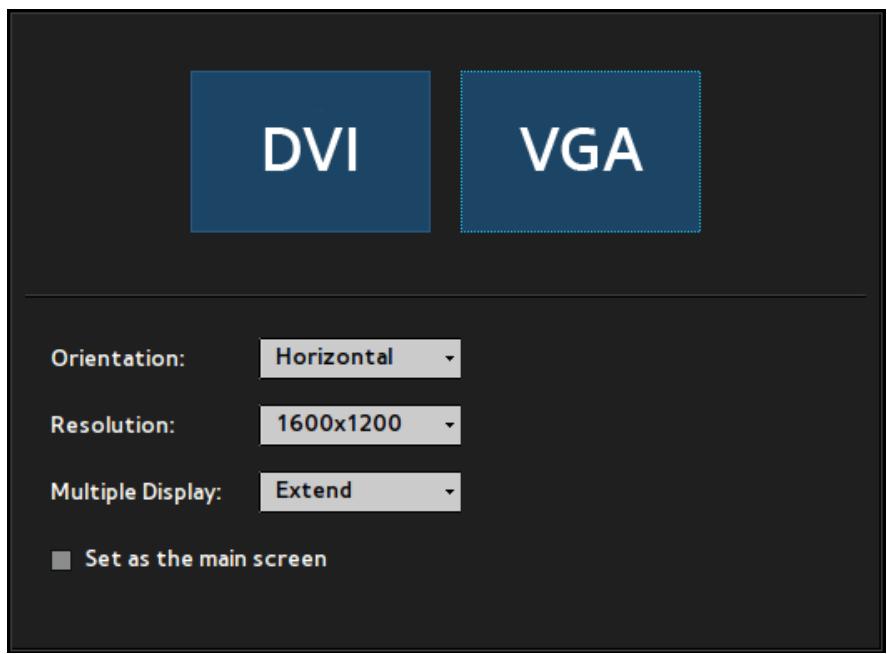
To set the selected display as the primary screen, select the Set as the main screen checkbox.

When only one display device is connected, the Multiple Display option is disabled.
Toolbar
Select whether to display the toolbar or enable the shortcut keys on the Client.
• Always hide toolbar
Hide the toolbar on the screen: select the checkbox and minimize the toolbar. To unhide the toolbar, press the corresponding shortcut key.
√ Always hide toolbar
■ Disable hotkey (CTRL-ALT-UP) to invoke toolbar
• Disable hotkey(CTRL-ALT-UP) to invoke toolbar
Shrink the toolbar by pressing the corresponding shortcut key (CTRL-ALT-UP). To expand the toolbar, click the arrow button on the minimized toolbar.
Always hide toolbar
☑ Disable hotkey (CTRL-ALT-UP) to invoke toolbar

The two options above cannot be enabled at the same time.
Sound
Adjust the sound on the Client.
• Volume : Adjust the volume using the scrollbar.
• Mute : Mute the sound.

Input
1 Keyboard
You can configure the keyboard settings for the Client.
• Character Set : Specify the character encoding method to use on the Client.
• Keyboard Language : Specify the keyboard language.
• Repeat Rate : Specify the keyboard sensitivity.

2 Mouse
You can configure the mouse settings for the Client.
• Mouse Speed : Configure the mouse movement sensitivity.
- Buttons : Activate the left-handed mouse mode.

Printer
1 LPDs
Configure the LPD-type printer settings.
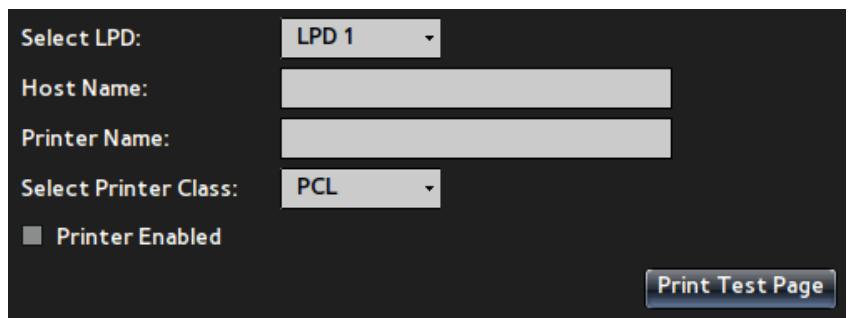
2 SMBs
Configure the SMB-type printer settings.

Information
You can view the Client information.
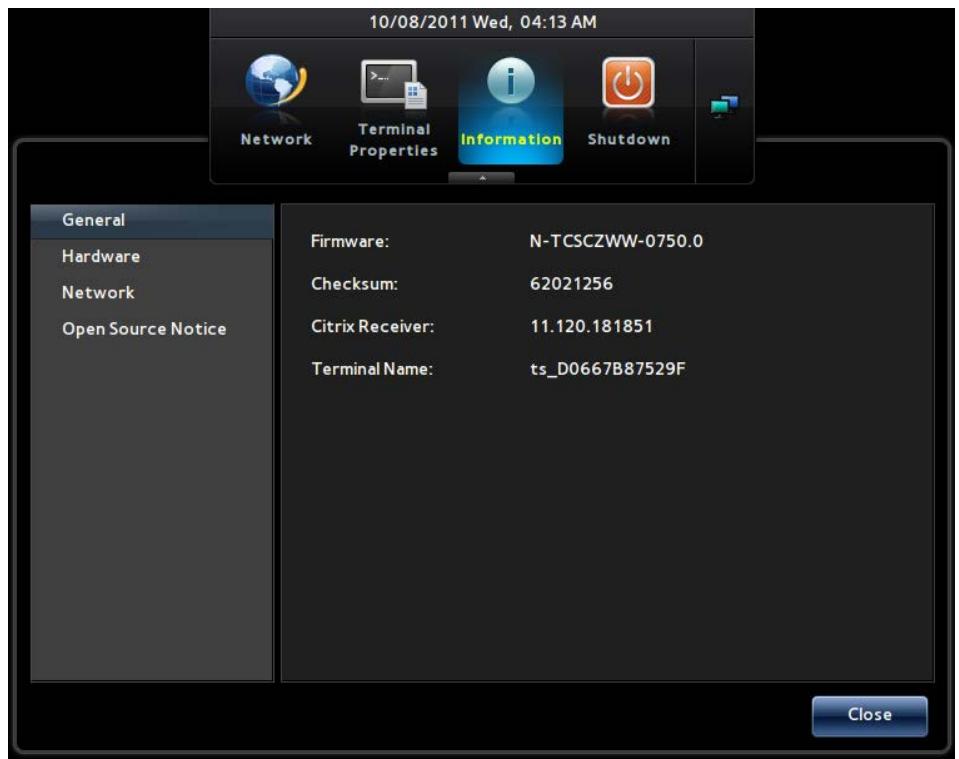
General
- Firmware : View the version of the firmware on the Client.
- Checksum : View the checksum of the firmware on the Client.
Citrix Receiver : View the version of the Citrix Receiver used on the Client.
• Terminal Name : View the Terminal Name of the Client.
| Firmware: | N-TCSCZWW-0750.0 |
| Checksum: | 62021256 |
| Citrix Receiver: | 11.120.181851 |
| Terminal Name: | ts_D0667B87529F |
Hardware
• CPU : View information about the CPU on the Client.
• CPU Busy : View the current CPU usage on the Client.
• Memory size : View the total amount of memory on the Client.
• Free Memory : View the amount of memory currently available on the Client.
• Resolution : View the display resolution configured on the Client.
• System up Time : View the amount of time the Client has been running.
| CPU: | AMD G-T44R Processor |
| CPU Busy: | 17% |
| Memory size: | 1650936 KB |
| Free Memory: | 1416980 KB |
| Resolution: | 1600x1200 |
| System up Time | 24 Min |
Network
• IP Address : View the IP information configured on the Client.
- Subnet Mask : View the subnet mask configured on the Client.
- Default Gateway : View the Default Gateway configured on the Client.
- DHCP Lease : View the amount of time (in seconds) it takes for an IP address to be assigned when the Client uses DHCP.
- Speed & Duplex : View the speed and duplex information of the link that is used when the Client connects to a network.
• Mac Address : View the Mac Address of the network adapter on the Client.
| IP Address : | 192.168.0.67 |
| Subnet Mask : | 255.255.255.0 |
| Default Gateway : | 192.168.0.1 |
| DHCP Lease : | N.A |
| Speed & Duplex : | 100Mb/s & Full |
| Mac Address : | D0:66:7B:87:52:9F |
Open Source Notice
You can view details of the Open Source components used on the Client.
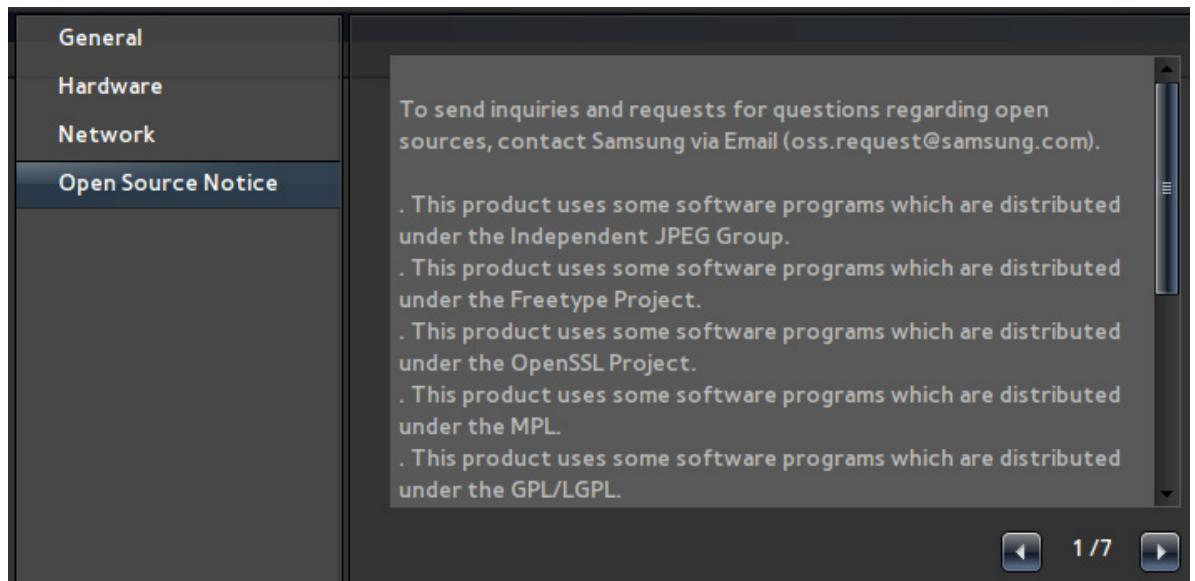
Open source license notice
In the case of using open source software, Open Source licenses are available on the product menu.
Open Source License Notice is written only English.
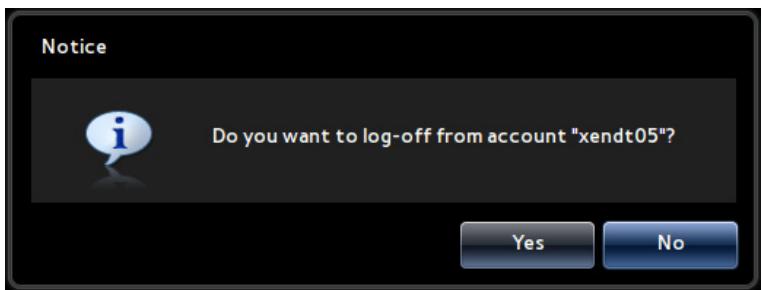
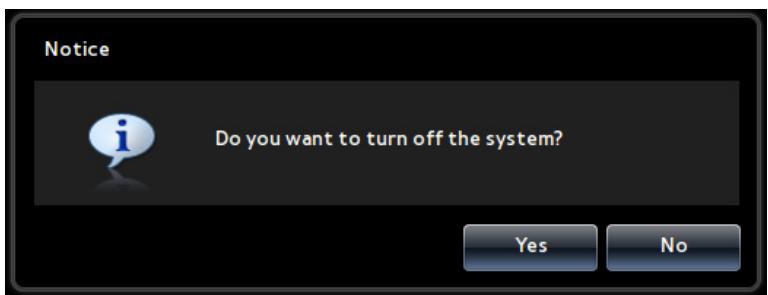
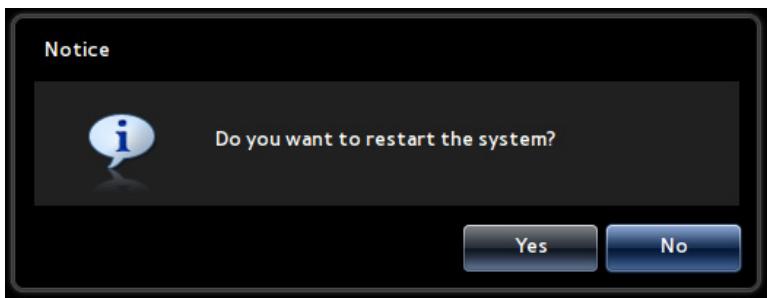
Shutdown
You can log off, close, or restart the Client.

Using the "Zero Client" (TB-CH)
1 Log-off from account “\*\*\*”
Log off from the Client if you are logged on. This option is enabled only when you are logged on to the Client. To log off, select Yes in the Notice window.
2 Shutdown the system
You can close the Client. To close the Client, select Yes in the Notice window.
3 Restart the system
You can restart the Client. To restart the Client, select Yes in the Notice window.
Remote Desktop
You can view a list of desktops and applications (on the Citrix Server) the Client can connect to when logged on.
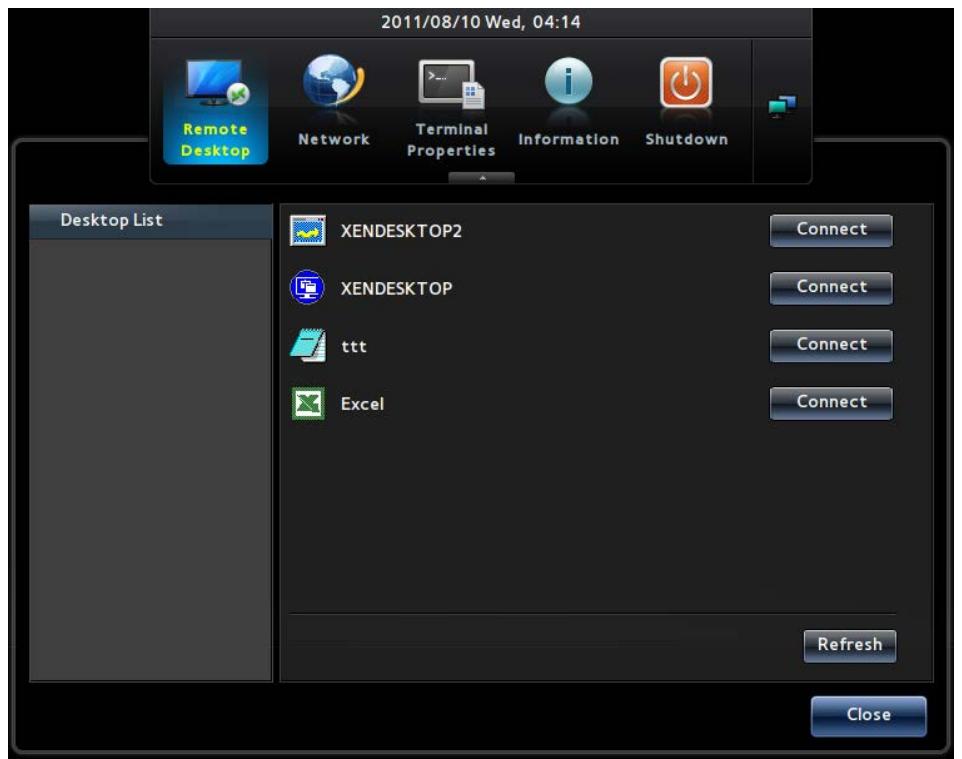
Desktop List
1 Connect
You can connect to a desktop or application on the list by clicking the corresponding Connect button or double-clicking the desktop or application desired.

XENDESKTOP
Connect
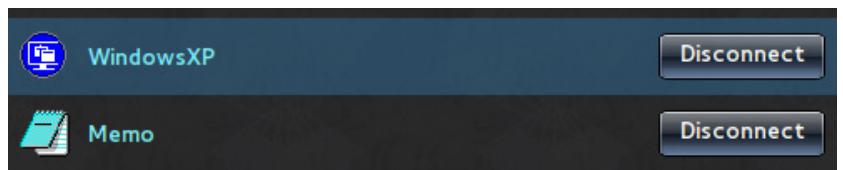
When a connection to a desktop or application is established, the Connect button for the desktop or application will be replaced by the Disconnect button in the Desktop List. The corresponding desktop or application row in the list will be highlighted as shown below.
You can connect to more than one desktop or application. The names of the desktops and applications connected will be highlighted.
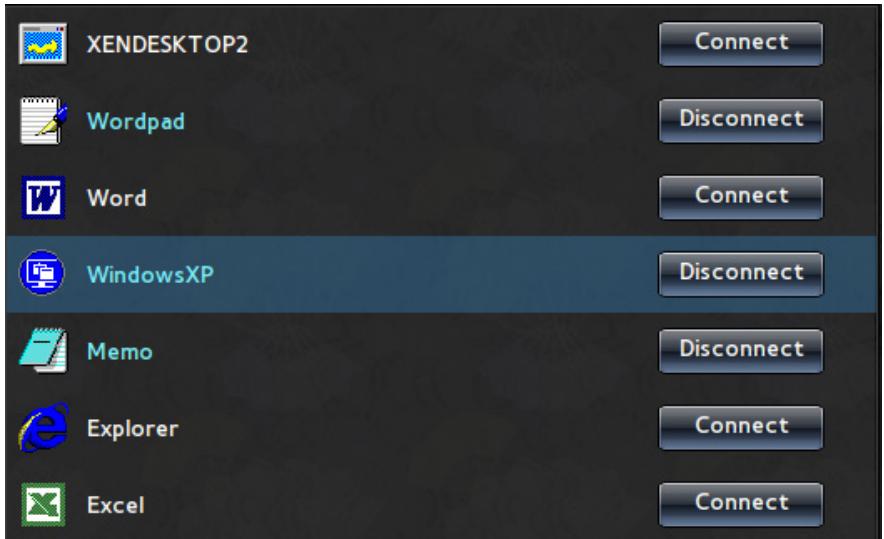
2 Disconnect
The Disconnect button disconnects the corresponding desktop or application connected. When the desktop or application is disconnected, a list of connected desktops or applications will appear if there are any.

XENDESKTOP
Disconnect
3 Refresh
To update the Desktop List that contains a list of desktops or applications on the Citrix Server, click Refresh.
Using the "Zero Client" (TB-CH)
4 Reconnect
You can display desktops and applications that are not displayed even though they are connected to the Client. Double-click the desktop or application desired. The corresponding desktop or application row in the list will be highlighted.
Double-click Memo. A notepad window will be displayed.

Status Icon
Network icon: Display the current network status using an icon.
1 Not connected to the network.
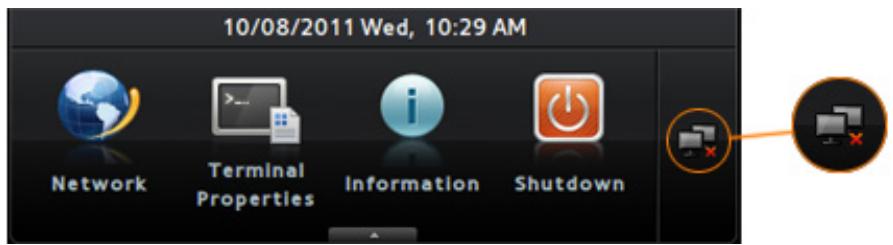
2 Attempting to connect to the network.
3 Connected to the network.
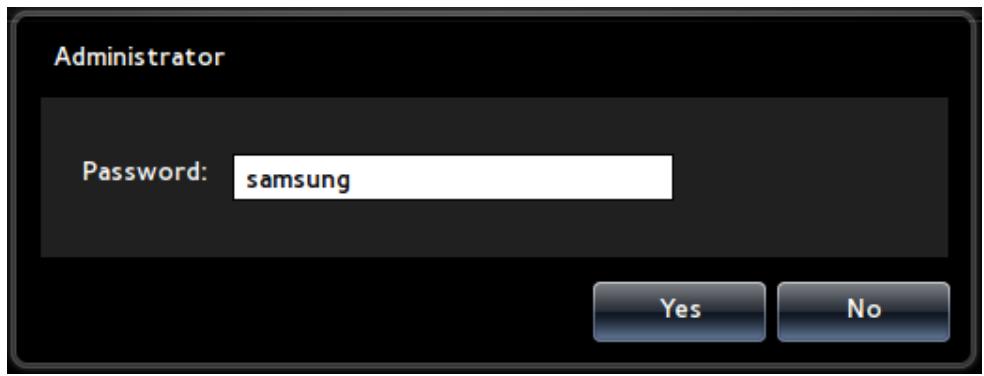
Terminal Lock
This menu locks the Network and Terminal Properties options so that their settings cannot be changed.
The corresponding shortcut key is [CTRL + ALT + F6].
• How to lock the two options
Press and hold the shortcut key for a specified time (about 8 seconds).
When the lock is on, the options locked will be indicated on the toolbar as shown below.
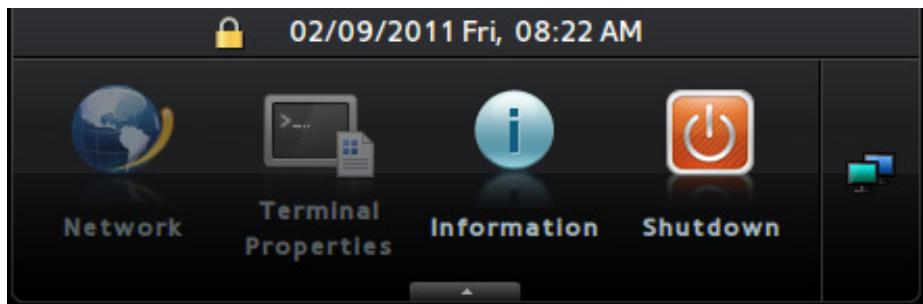
• How to unlock the two options
Press and hold the shortcut key for a specified time (about 8 seconds).
Note that you are prompted to enter the password in order to unlock the two options.
4.1 Requirements Before Contacting Samsung Customer Service Center
4.1.1 Check the following.
| Sound issue | |
| There is no sound. | Check the connection of the audio cable or adjust the volume. |
| Check the volume. | |
| The volume is too low. | Adjust the volume. |
| If the volume is still low after turning it up to the maximum level, adjust the volume in the audio settings program. | |
5.1 General
| Model Name | TB-WH | TB-CH | |
| Power Supply | This product uses 100 to 240V. Refer to the label at the back of the product as the standard voltage can vary in different countries. | ||
| Monitor connectors | RGB OUT (D-Sub) port, DVI OUT port | ||
| Server connector | LAN | ||
| Speaker | 1 W x 2 | ||
| USB | USB 2.0 x 6 (Down stream) | ||
| Dimensions (W x H x D) / Weight | 244.0 X 340.0 X 227.0 mm / 9.6 X 13.4 X 8.9 inches / 2.3 kg / 5.1 lb | ||
| Environmental considerations | Operating | Temperature: 50°F ~ 122°F (10°C ~ 50°C) Humidity: 10% - 90%, non-condensing | |
| Storage | Temperature: -4°F ~ 113°F (-20°C ~ 45°C) Humidity: 5% - 90%, non-condensing | ||
| VESA (V x H) | 75 x 75 mm / 100 x 100 mm | ||

The above specifications are subject to change without notice to improve quality.

This device is a Class B digital apparatus.
(USA only)
Dispose unwanted electronics through an approved recycler.
To find the nearest recycling location, go to our website:
www.samsung.com/recyclingdirect or call, (877) 278 - 0799
CALIFORNIA USA ONLY (Applicable for networking models only.)
This Perchlorate warning applies only to primary CR(Manganese Dioxide) Lithium coin cells in the product sold or distributed ONLY in California USA
"Perchloate Material - special handling may apply, See www.dtsc.ca.gov/hazardouswaste/perchlorate."
5.2 Power consumption
| PowerSaver | Normal operation mode | Stand by (S3) | Power off (S5) (Power button off) | Power off (Power switch off) | |
| Typical | Rating | ||||
| Power lamp | On | Off | Off | Off | |
| Power Consumption | 11 W | 35 W | Less than 2 W | Less than 2 W | 0 W |

- The power consumption level can vary in different operating conditions or when settings are changed.
- To reduce the power consumption to 0 watts, turn off the switch on the adapter or disconnect the power cable. Be sure to disconnect the power cable when you will not be using the product for an extended period of time. To reduce the power consumption to 0 watts when the power switch is not available, disconnect the power cable.
Contact SAMSUNG WORLDWIDE

If you have any questions or comments relating to Samsung products, please contact the SAMSUNG customer care center.
| NORTH AMERICA | ||
| U.S.A | 1-800-SAMSUNG (726-7864) | http://www.samsung.com |
| CANADA | 1-800-SAMSUNG (726-7864) | http://www.samsung.com/cahttp://www.samsung.com/ch_fr(French) |
| MEXICO | 01-800-SAMSUNG (726-7864) | http://www.samsung.com |
| LATIN AMERICA | ||
| ARGENTINA | 0800-333-3733 | http://www.samsung.com |
| BRAZIL | 0800-124-4214004-0000 | http://www.samsung.com |
| BOLIVIA | 800-10-7260 | http://www.samsung.com |
| CHILE | 800-SAMSUNG (726-7864)From mobile 02-482 82 00 | http://www.samsung.com |
| COLOMBIA | 01-8000112112 | http://www.samsung.com |
| COSTA RICA | 0-800-507-7267 | http://www.samsung.com |
| DOMINICA | 1-800-751-2676 | http://www.samsung.com |
| ECUADOR | 1-800-10-7267 | http://www.samsung.com |
| EL SALVADOR | 800-6225 | http://www.samsung.com |
| GUATEMALA | 1-800-299-0013 | http://www.samsung.com |
| HONDURAS | 800-27919267 | http://www.samsung.com |
| JAMAICA | 1-800-234-7267 | http://www.samsung.com |
| NICARAGUA | 00-1800-5077267 | http://www.samsung.com |
| PANAMA | 800-7267 | http://www.samsung.com |
| PERU | 0-800-777-08 | http://www.samsung.com |
| PUERTO RICO | 1-800-682-3180 | http://www.samsung.com |
| TRINIDAD & TOBAGO | 1-800-SAMSUNG (726-7864) | http://www.samsung.com |
| VENEZUELA | 0-800-100-5303 | http://www.samsung.com |
| EUROPE | ||
| ALBANIA | 42 27 5755 | http://www.samsung.com |
| AUSTRIA | 0810 - SAMSUNG(7267864, € 0.07/min) | http://www.samsung.com |
| BELGIUM | 02-201-24-18 | http://www.samsung.com/be(Dutch)http://www.samsung.com/be_fr(French) |
| BOSNIA | 05 133 1999 | http://www.samsung.com |
| BULGARIA | 07001 33 11 | http://www.samsung.com |
| CROATIA | 062 SAMSUNG (062 726 7864) | http://www.samsung.com |
| CZECH | 800 - SAMSUNG (800-726786) | http://www.samsung.com |
| Samsung Electronics Czech and Slovak, s.r.o.,Oasis Florenc, Sokolovská 394/17, 180 00, Praha 8 | ||
| DENMARK | 70 70 19 70 | http://www.samsung.com |
| FINLAND | 030 - 6227 515 | http://www.samsung.com |
| FRANCE | 01 48 63 00 00 | http://www.samsung.com |
| GERMANY | 01805 - SAMSUNG(726-7864,€ 0,14/Min) | http://www.samsung.com |
| CYPRUS | From landline : 8009 4000 | http://www.samsung.com |
| GREECE | From landline : 80111-SAMSUNG(7267864)From landline & mobile : (+30)210 6897691 | http://www.samsung.com |
| HUNGARY | 06-80-SAMSUNG (726-7864) | http://www.samsung.com |
| ITALIA | 800-SAMSUNG (726-7864) | http://www.samsung.com |
| KOSOVO | +381 0113216899 | http://www.samsung.com |
| LUXEMBURG | 261 03 710 | http://www.samsung.com |
| MACEDONIA | 023 207 777 | http://www.samsung.com |
| MONTENEGRO | 020 405 888 | http://www.samsung.com |
| NETHERLANDS | 0900 - SAMSUNG(0900-7267864) (€ 0,10/Min) | http://www.samsung.com |
| NORWAY | 815-56 480 | http://www.samsung.com |
| POLAND | 0 801-1SAMSUNG (172-678)+48 22 607-93-33 | http://www.samsung.com |
| PORTUGAL | 808 20 - SAMSUNG (808 20 7267) | http://www.samsung.com |
| RUMANIA | From landline : 08010-SAMSUNG (7267864)From landline & mobile : (+40)21 206 01 10 | http://www.samsung.com |
| SERBIA | 0700 Samsung (0700 726 7864) | http://www.samsung.com |
| SLOVAKIA | 0800 - SAMSUNG(0800-726 786) | http://www.samsung.com |
| SPAIN | 902 - 1 - SAMSUNG(902 172 678) | http://www.samsung.com |
| SWEDEN | 0771 726 7864 (SAMSUNG) | http://www.samsung.com |
| SWITZERLAND | 0848-SAMSUNG(7267864, CHF 0.08/min) | http://www.samsung.com/chhttp://www.samsung.com/ch_fr(French) |
| U.K | 0330 SAMSUNG (7267864) | http://www.samsung.com |
| EIRE | 0818 717100 | http://www.samsung.com |
| LITHUANIA | 8-800-77777 | http://www.samsung.com |
| LATVIA | 8000-7267 | http://www.samsung.com |
| ESTONIA | 800-7267 | http://www.samsung.com |
| TURKEY | 444 77 11 | http://www.samsung.com |
| CIS | ||
| RUSSIA | 8-800-555-55-55 | http://www.samsung.com |
| GEORGIA | 8-800-555-555 | http://www.samsung.com |
| ARMENIA | 0-800-05-555 | http://www.samsung.com |
| AZERBAIJAN | 088-55-55-555 | http://www.samsung.com |
| KAZAKHSTAN | 8-10-800-500-55-500(GSM: 7799) | http://www.samsung.com |
| UZBEKISTAN | 8-10-800-500-55-500 | http://www.samsung.com |
| KYRGYZSTAN | 00-800-500-55-500 | http://www.samsung.com |
| TADJIKISTAN | 8-10-800-500-55-500 | http://www.samsung.com |
| MONGOLIA | - | http://www.samsung.com |
| UKRAINE | 0-800-502-000 | http://www.samsung.com/uahttp://www.samsung.com/ua_ru |
| BELARUS | 810-800-500-55-500 | http://www.samsung.com |
| MOLDOVA | 00-800-500-55-500 | http://www.samsung.com |
| ASIA PACIFIC | ||
| AUSTRALIA | 1300 362 603 | http://www.samsung.com |
| NEW ZEALAND | 0800 SAMSUNG (0800 726 786) | http://www.samsung.com |
| CHINA | 400-810-5858 | http://www.samsung.com |
| HONG KONG | (852) 3698 - 4698 | http://www.samsung.com/hkhttp://www.samsung.com/hk_en/ |
| INDIA | 1800 1100 113030 82821800 3000 82821800 266 8282 | http://www.samsung.com |
| INDONESIA | 0800-112-8888021-5699-7777 | http://www.samsung.com |
| JAPAN | 0120-327-527 | http://www.samsung.com |
| MALAYSIA | 1800-88-9999 | http://www.samsung.com |
| PHILIPPINES | 1-800-10-SAMSUNG (726-7864) for PLDT1-800-3-SAMSUNG (726-7864) for Digitel1-800-8-SAMSUNG (726-7864) for Globe02-5805777 | http://www.samsung.com |
| SINGAPORE | 1800-SAMSUNG (726-7864) | http://www.samsung.com |
| THAILAND | 1800-29-323202-689-3232 | http://www.samsung.com |
| TAIWAN | 0800-329-9990266-026-066 | http://www.samsung.com |
| VIETNAM | 1 800 588 889 | http://www.samsung.com |
| MIDDIE EAST | ||
| IRAN | 021-8255 | http://www.samsung.com |
| OMAN | 800-SAMSUNG (726-7864) | http://www.samsung.com |
| KUWAIT | 183-2255 | http://www.samsung.com |
| BAHRAIN | 8000-4726 | http://www.samsung.com |
| EGYPT | 08000-726786 | http://www.samsung.com |
| JORDAN | 800-22273 | http://www.samsung.com |
| MOROCCO | 080 100 2255 | http://www.samsung.com |
| SAUDI ARABIA | 9200-21230 | http://www.samsung.com |
| U.A.E | 800-SAMSUNG (726-7864) | http://www.samsung.com |
| AFRICA | ||
| CAMEROON | 7095- 0077 | http://www.samsung.com |
| COTE D'LVOIRE | 8000 0077 | http://www.samsung.com |
| GHANA | 0800-100770302-200077 | http://www.samsung.com |
| KENYA | 0800 724 000 | http://www.samsung.com |
| NIGERIA | 0800-726-7864 | http://www.samsung.com |
| SENEGAL | 800-00-0077 | http://www.samsung.com |
| SOUTH AFRICA | 0860-SAMSUNG (726-7864) | http://www.samsung.com |
| TANZANIA | 0685 88 99 00 | http://www.samsung.com |
| UGANDA | 0800 300 300 | http://www.samsung.com |
Correct Disposal
Correct Disposal of This Product (Waste Electrical & Electronic Equipment)
(Applicable in the European Union and other European countries with separate collection systems)
This marking on the product, accessories or literature indicates that the product and its electronic accessories (e.g. charger, headset, USB cable) should not be disposed of with other household waste at the end of their working life. To prevent possible harm to the environment or human health from uncontrolled waste disposal, please separate these items from other types of waste and recycle them responsibly to promote the sustainable reuse of material resources.
Household users should contact either the retailer where they purchased this product, or their local government office, for details of where and how they can take these items for environmentally safe recycling.
Business users should contact their supplier and check the terms and conditions of the purchase contract. This product and its electronic accessories should not be mixed with other commercial wastes for disposal.
Correct disposal of batteries in this product
(Applicable in the European Union and other European countries with separate battery return systems.)
The marking on the battery, manual or packaging indicates that the battery in this product should not be disposed of with other household waste. Where marked, the chemical symbols Hg, Cd or Pb indicate that the battery contains mercury, cadmium or lead above the reference levels in EC Directive 2006/66.
The battery incorporated in this product is not user replaceable. For information on its replacement, please contact your service provider. Do not attempt to remove the battery or dispose it in a fire. Do not disassemble, crush, or puncture the battery. If you intend to discard the product, the waste collection site will take the appropriate measures for the recycling and treatment of the product, including the battery.
A
About Zero Client 39
C
Checking the Contents 13
Connection to Use the Zero Client 40
Connection to Use Windows Embedded Standard 7 23
Contact SAMSUNG WORLDWIDE 72
Copyright 5
Correct Disposal 77
G
General 70
|
Installation 18
M
MagicRMS Pro 38
P
Parts 15
Power consumption 71
R
Requirements Before Contacting Samsung Customer Service Center 69
S
Safety Precautions 6
U
Using the Zero Client 45
W
What is Windows Embedded Standard 7 Client? 22


- User Manual
- TB-WH
- TB-CH
- Table Of Contents
- BEFORE USING THE 5 PRODUCT 5
- Copyright
- 6
- Safety Precautions
- 7
- 9
- PREPARATIONS 13
- Checking the Contents
- 13
- 14
- 15
- Parts
- 16
- 17
- 18
- Installation
- 20
- 21
- USING "WINDOWS 22 EMBEDDED STANDARD 7" (TB-WH) 23
- What is "Windows Embedded Standard 7" Client?
- Connection to Use "Windows Embedded Standard 7"
- 23
- 24
- 25
- 26
- 27
- Using "Windows Embedded Standard 7"
- MagicRMS Pro
- About "Zero Client"
- Connection to Use the "Zero Client"
- Using the "Zero Client"
- Requirements Before Contacting
- Samsung Customer Service Center
- General
- Contact SAMSUNG WORLDWIDE
- 77
- Correct Disposal
- INDEX
- Before Using the Product
- Icons used in this manual
- Symbols for safety precautions
- Electricity and Safety
- Warning
- Caution
- Installation and Safety
- Operation and Safety
- Checking the Contents
- Removing the Packaging
- Checking the Components
- Components
- Items sold separately
- Parts
- Button
- Reverse Side
- Right Side View
- Installation
- Reassembly
- Adjusting the Product Height
- Anti-theft Lock
- To lock an anti-theft locking device:
- What is "Windows Embedded Standard 7" Client?
- Connectable Servers
- Connection to Use "Windows Embedded Standard 7"
- Before Connecting
- Pre-connection Checkpoints
- Connection Using the D-SUB Cable (Analogue Type)
- Connection Using the DVI Cable
- Connecting a Microphone
- Connecting to Headphones or Speakers
- LAN Connection
- Connecting USB Devices
- Using "Windows Embedded Standard 7" (TB-WH)
- Connecting the Power
- Using "Windows Embedded Standard 7"
- Logon
- "Windows Embedded Standard 7" Desktop
- User
- Administrator
- Log off, Restart, Shut down
- Programs
- Remote Desktop Connection
- - Remote Desktop
- • Enabling Your Computer as the Host
- Options
- Internet Explorer
- Enhanced Write Filter (EWF)
- • Commit changes to disk.
- File-Based Write Filter (FBWF)
- FBWF Configuration
- FBWF Command
- - Session Status
- Windows Media Player
- Configuring Utilities
- Local Drive
- C Drive
- Saving Files
- Mapping a Network Drive
- Recover the System
- Overview
- How to Recover the System
- MagicRMS Pro
- About MagicRMS Pro
- About "Zero Client"
- Compatible servers
- Connection to Use the "Zero Client"
- Before Connecting
- Connection Using the D-SUB Cable (Analogue Type)
- Connection Using the DVI Cable
- Connecting a Microphone
- Connecting to Headphones or Speakers
- Connecting to a Server (LAN/USB Connection)
- Connecting the Power
- Using the "Zero Client"
- Login
- Message Box
- MagicRMS
- Disconnect Message
- Toolbar
- Network
- Local Network
- Name Servers
- DHCP Options
- Requirements
- Security
- Available modes
- EAP-PEAP
- EAP-TLS
- Certification Management
- Remote Management
- File Server
- MagicRMS Connection
- Using the "Zero Client" (TB-CH)
- Multicast
- Server Assignment
- MagicRMS Contact
- MagicRMS Status
- Network Tools
- Terminal Properties
- System
- General
- Power Management
- Time/Date
- • Time/Date Format
- Orientation
- Resolution
- Multiple Display
- Toolbar
- • Always hide toolbar
- • Disable hotkey(CTRL-ALT-UP) to invoke toolbar
- Sound
- Input
- Keyboard
- Mouse
- Printer
- LPDs
- SMBs
- Information
- Hardware
- Shutdown
- Log-off from account “\*\*\*”
- Shutdown the system
- Restart the system
- Remote Desktop
- Desktop List
- Connect
- Disconnect
- Refresh
- Reconnect
- Status Icon
- Terminal Lock
- Requirements Before Contacting Samsung Customer Service Center
- Check the following.
- General
- Power consumption
- Correct Disposal of This Product (Waste Electrical & Electronic Equipment)
- Correct disposal of batteries in this product
- A
- C
- G
- |
- M
- P
- R
- S
- U
- W
Marque : SAMSUNG
Modèle : LF-TBWHD
Catégorie : Casque audio