
CLT-9915 - Téléphone sans fil SANYO - Notice d'utilisation et mode d'emploi gratuit
Retrouvez gratuitement la notice de l'appareil CLT-9915 SANYO au format PDF.


| Type de produit | Téléphone sans fil |
| Marque | SANYO |
| Modèle | CLT-9915 |
| Technologie | 900 MHz |
| Fréquence | 900 MHz |
| Canaux | 40 canaux (auto/manuel) |
| Réduction de bruit | COMPANDER PLUS |
| Mémoire de numérotation | 10 numéros (jusqu'à 24 chiffres) |
| Clavier rétroéclairé | Oui (modèle CLT-9915 uniquement) |
| Sonnerie | Interrupteur marche/arrêt |
| Indicateur de messagerie vocale | Oui (FSK) |
| Montage mural | Oui |
| Clip ceinture | Oui (modèle CLT-9915 uniquement) |
| Système de sécurité | Code numérique anti-intrusion |
| Alimentation | Adaptateur secteur 9V DC (A10920) |
| Type de batterie | Ni-Cd 3,6 V, 600 mAh |
| Charge initiale | 12 heures continues |
| Prise casque | Oui (2,5 mm) |
| Entretien et nettoyage | Chiffon doux; éviter produits abrasifs |
| Pièces détachées | Batterie GES-PCF03 |
| Garantie | 1 an (pièces et main-d'œuvre) |
FOIRE AUX QUESTIONS - CLT-9915 SANYO
Questions des utilisateurs sur CLT-9915 SANYO
0 question sur cet appareil. Repondez a celles que vous connaissez ou posez la votre.
Poser une nouvelle question sur cet appareil
Téléchargez la notice de votre Téléphone sans fil au format PDF gratuitement ! Retrouvez votre notice CLT-9915 - SANYO et reprennez votre appareil électronique en main. Sur cette page sont publiés tous les documents nécessaires à l'utilisation de votre appareil CLT-9915 de la marque SANYO.
MODE D'EMPLOI CLT-9915 SANYO
900-MHz
Cordless Telephone

CLT-9910
CLT-9915
Instruction Manual
IMPORTANT
Charge the handset battery for 12 continuous hours prior to first use.
SANYO Canada Inc.
www.sanyocanada.com
SOS HELP LINE
At Sanyo, fulfilling the needs of our customers is a priority. That's why we created our SOS customer service program that guarantees satisfaction.
NATIONWIDE CUSTOMER SUPPORT
SOS is there to help you. Our friendly and knowledgeable product specialists will quickly answer your questions about setup and use of Sanyo telephone products. Simply call toll free from anywhere in Canada to connect to our no-charge, SOS support and service network:
1-800-263-2244
between 8:30 am - 7:00 pm EST
Or visit our website at www.sanyoservice.com, and click the Customer Relations button to get access to our FAQ's (Frequently Asked Questions) and other helpful features.
STAY-AT-HOME CONVENIENCE
It's a nuisance making another trip to the store when you're stuck. Now with SOS, all that's necessary is a quick call from your home for product assistance.
HASSLE-FREE EXCHANGE
Should your Sanyo telephone require servicing due to a manufacturing defect during the warranty period, SANYO Canada will ship prepaid a replacement unit* within two business days after receiving your defective unit.
Consumers are responsible for the shipping costs of the unit back to Sanyo.
- For older, non-current models, replacement units may not be available, in which case our regular warranty conditions will apply.
GUARANTEED QUALITY
All SOS replacement sets are checked and serviced by factory-authorized technicians before being sent out.
SOS means you never have to worry.
C.O.D. and/or Collect shipments will not be accepted
Unit must be returned to Sanyo in its original box with all accessories, ie: owner's manual, battery, adaptor, telephone cord, etc.
INTRODUCTION
Congratulations on your purchase of this Sanyo cordless telephone.
Your Sanyo 900-MHz cordless telephone is a fine-quality home communications product. It is carefully designed and produced by a world leader of consumer and industrial electronics equipment. With proper maintenance and care, it will provide you with years of enjoyment and convenience.
Main Features
900-MHz Technology
Extended Range -The use of 900-MHz frequency band for signal transmission between base and handset means greater communication range compared to conventional 43 - 49 MHz cordless telephones.
Ultra-Low Noise -The high frequency communication has also significantly reduced noise level.
40-Channel Auto/Manual Scan -Your new telephone uses one of 40 channels in the 900-MHz frequency band. It automatically selects a clear channel every time you receive or place a call on the handset.
COMPANDER PLUS Noise Reduction
This fourth generation of the Sanyo's original noise reduction technology now filters out more background noise.
10-number speed dial memory
Lighted keypad (CLT-9915 only)
Ringer on/off switch
Voice mail waiting indicator*
- Wall-mountable
- Belt clip (CLT-9915 only)
*Important:
Reuires a subscription to digital voice mail box provided by your local telephone company

The exclamation point within the triangle is a warning sign alerting you of important instructions accompanying the product.
GETTING STARTED
Checking the package contents
Make sure your package includes the items shown here.
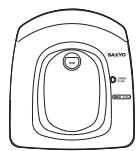
Base
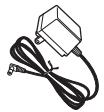
AC adaptor A10920

Belt clip (CLT-9915 only)
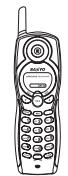
Handset
Telephone line cord
Replacement Battery Order Form
Modular jack
To properly connect your phone to your telephone lines, you will need an RJ11 type modular phone jack. If you do not have a modular jack, call your local phone company to find out how to get one installed.
Installation note: Avoid places near electrical equipment such as refrigerators, computers, TVs or fluorescent lamps. These may cause interference or reduce the operating range of the cordless telephone.
Digital Security System
Your cordless phone uses a digital security system to provide protection against false ringing, unauthorized access and charges to your phone line.
When you place the handset in the base, the unit verifies its security code. After a power outage or battery replacement, place the handset in the base for about 20 seconds to reset the code.
INSTALLATION
Connections
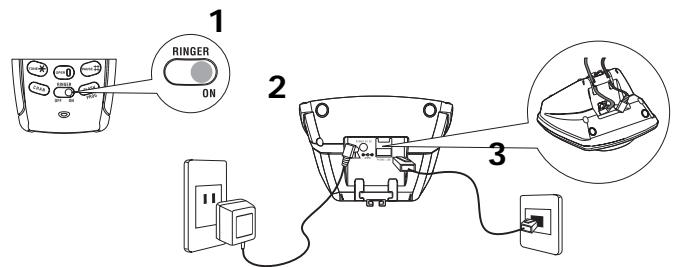
- Set the RINGER switch on the front of the handset to ON and place the handset in the base.
- Plug the AC adaptor into the POWER 9V DC jack on the bottom of the base and the other end into an electrical outlet. The VOICE MAIL/CHARGE/IN USE indicator lights, verifying the battery is charging.
Charge the handset battery for 12 continuous hours prior to first use. The initial battery charge is important for best performance.
Note: The handset can be charged facing up or down.
Low Battery Warning: When the battery is low you will hear a short beep every 7 seconds.
Important: Do not connect the telephone line to the modular jack until the phone has been charged for 12 continuous hours.
3. Plug the telephone line cord into the PHONE LINE jack on the bottom of the base and into a modular jack.
Caution: Use only Sanyo AC adaptor, A10920, that came with this phone. Using other adaptors may damage the phone.
Note: The phone automatically defaults to touch tone dialing. To change to pulse (rotary) dialing, see Tone/Pulse Dialing. If you do not know which type of service you have, check with your telephone company.
Mounting on a wall
Do not attempt to wall-mount the phone before initial 12-hour charging is completed.
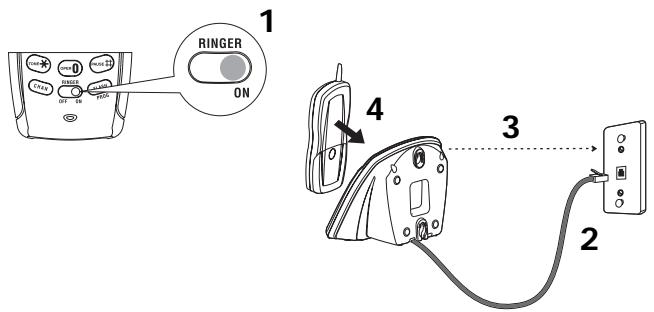
- Follow steps 1 - 2 above to charge the handset. Wait at least 12 hours.
- Plug the telephone line cord into the PHONE LINE jack on the bottom of the base and the other end into a modular jack.
- Slip the mounting holes on the bracket over the wall plate posts and firmly slide the base down into place (wall plate not included).
- Place the handset in the base.
Note: If desired, gather the extra line cord together, and fasten with a wire tie.
NAMES AND CONTROLS
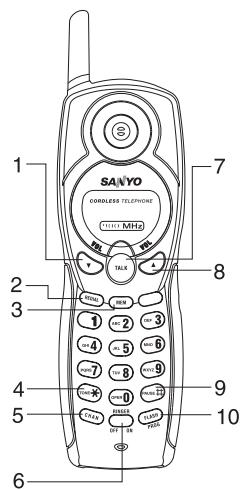
- VOL (volume) key
2 REDIAL key - MEM (memory) key
- TONE key
- CHAN (channel) key
- Ringer switch: RINGER ON/OFF
- TALK key
- VOL (volume) key
- PAUSE key
10.FLASH/PROG (program) key
VOICE MAIL/CHARGE/
IN USE indicator
Tone/pulse setting
The dialing mode of your telephone is set to TONE at factory.
To change it to PULSE mode:
- Make sure the phone is off (not in TALK mode).
- Press FLASH/PROG twice
- Press number 2 key to select PULSE dialing.
- Press FLASH/PROG twice to confirm.
BASICS
Receiving a call
Press TALK.
Ringer switch
The RINGER switch must be ON for the handset to ring during incoming calls.
Volume
While talking, press VOL keys (▲ and▼) to control the receiver volume
There are four volume levels. Press to increase the volume level, and press to decrease.
Making a call
Press TALK before you dial and press it again to hang up.
Redialing a call
Press TALK and then REDIAL to radial the last number you dialed (up to 32 digits). If you get a busy signal, and want to keep dialing the number, just press REDIAL again (you do not have to turn the phone off and back on).
FLASH key
Use the FLASH/PROG key to use special calling services such as Call Waiting or Call Transfer. You must subscribe to these services available through your local phone company.
Tip: Do not use TALK to activate custom calling services or you'll hang up the phone.
VOICE MAIL/CHARGE/IN USE indicator
- Flashes when you have a new voice mail
- Lights when the handset is being charged in the base
- Lights when the handset is in use.
Voice mail
When you subscribe to a voice mail service offered by your phone company, the VOICE MAIL/ CHARGE/IN USE indicator on the base flashes to indicate there is voice mail waiting. After the voice mail has been reviewed, the indicator stops flashing. This indicator does not work with your answering machine.
Note: The phone will only work with an FSK type of VMWI system. It will not work with the Stutter Dial Tone type of VMWI system.
CHAN (Channel) key
Press and release CHAN to advance to the next channel to get rid of static while talking.
Temporary tone
This feature enables pulse (rotary) service phone users to access touch-tone services offered by banks, credit card companies, etc.
- Call the bank's information line.
- Press TONE after your call is connected.
- Follow the voice instructions to complete your transaction.
- Hang up when finished. The phone returns to pulse (rotary) service.
Handset locator
This feature helps to locate a misplaced handset. Press PAGE on the base. The handset beeps continuously for about two minutes or until you press any key on the handset. Press PAGE to cancel.
Note: The RINGER switch does not have to be ON for this feature to work.
SPEED DIAL
Store up to 10 numbers in the speed dial memory for quick dialing. The number can be up to 24 digits.
Storing a number in the memory
- Make sure the phone is off (not in TALK mode).
- Press MEM.
- Press the desired memory location (0 through 9).
- Press MEM twice.
- Use the number keypad to enter the telephone number you want to store (up to 24 digits).
- Press MEM again to store the number. You will hear a confirmation tone.
Changing a stored number
- Repeat steps 1 through 5 in Storing a number in the memory.
- Press MEM twice to replace the current number with a new number. You will hear a confirmation tone.
Storing last-dialed number
- Repeat steps 1 through 4 in Storing a number in the memory.
- Press REDIAL.
- Press MEM twice to store the number. You will hear a confirmation tone.
Making calls from the memory
- Press TALK.
- Press MEM.
- Press number (0 - 9) for the desired memory location. The number is dialed automatically.
Inserting a pause in the dialing sequence
Press PAUSE twice within one second to insert a delay in the dialing sequence of a telephone number when a pause is needed to wait for a dial tone. For example after you dial 9 for an outside line, or to wait for a computer access tone. Each pause counts as 1 digit in the dialing sequence.
Chain dialing from the memory
Use this feature to make calls that require a sequence of numbers such as using a calling card for a frequently called long distance number. You can dial each part of the sequence from a different memory location. The following example shows how you can chain dial to make a call through a long distance service:
| The Number for: | Memory Location |
| Long distance access number | 7 |
| Authorization code | 8 |
| Frequently called long distance number | 9 |
- Make sure the phone is on.
- Press MEM and then press 7.
- When you hear the access tone, press MEM again and then press 8
- At the next access tone, press MEM and then 9.
Tip: Wait for the access tones between pressing MEM, or your call might not go through.
SOUND SIGNALS
| Signal: | Meaning |
| A long warbling tone: | Signals an incoming call (with ringer on) |
| Two long beeps: | Confirmation tone |
| One short and one long beep: | Page signal |
| One short beep every 7 seconds: | Low battery warning |
HEADSET JACK AND BELT CLIP
(CLT-9915 only)
Headset connection (Headset not included)

For hands free conversation, connect any standard shielded headset with a 2.5-mm plug (not included) to the HEADSET jack as shown. The handset receiver and microphone are disabled when the headset is connected.
- Press TALK to answer or place a call before using the headset.
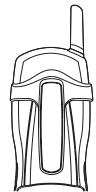
Belt clip installation
- Attach the belt-clip by inserting the clip into the slots on the side of the handset. Snap the ends of the belt clip into place.
CHANGING THE BATTERY
Battery replacement and handling
When the operating time becomes short even after a battery is recharged, please replace the battery.
With normal usage, your battery should last about one year.
For a replacement battery, please contact your place of purchase or fill out the attached order form and mail it.
Note: Repeated short chARGings may cause memory effect in the battery, which reduces use time of the battery. It is recommended not to replace the handset to the base unit after each call.
Caution
- Use only the specified battery type (3.6V, 600mAh).
- Do not remove the battery from the handset to charge it.
- Never throw the battery into a fire, disassemble it, or heat it.
- Do not remove or damage the battery casing.
- Remove battery if storing the phone over 30 days.
Make sure the telephone is off before you replace the battery.
- Slide off the battery compartment cover.
- Disconnect the battery plug from the jack in the compartment and remove the battery.
- Insert the new battery and connect the cord into the jack.
- Put the battery compartment cover back on.
- Place handset on the base to charge
Note: If the handset battery is removed for more than 5 minutes, the speed dial memory will be erased.
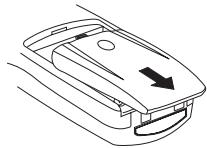
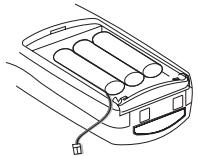
Charge the handset battery for 12 continuous hours prior to first use.
Caution: To reduce the risk of fire or personal injury, use a 3.6V, 600 mAh battery. Replacement part number: GES-PCF03.
Power Failure
During the period that the power is off, you will not be able to make or receive calls with the telephone.
After a power outage, place the handset in the base for about 20 seconds to reset the digital security code.
RECYCLING NICKEL-CADMIUM BATTERIES
NICKEL-CADMIUM BATTERIES MUST BE DISPOSED OF PROPERLY
Please take your used battery to a store that recycles Ni-Cd batteries.

MAINTENANCE
To keep your telephone working, follow these guidelines:
- Avoid putting the phone near heating appliances and devices which generate electrical noise (for example, motors or fluorescent lamps).
- Do not expose to direct sunlight or moisture.
- Avoid dropping and other rough treatment of the phone.
Clean with a soft cloth. - Never use a strong cleaning agent or abrasive powder because this will damage the finish.
- Retain the original packaging in case you need to ship the phone at a later date.
Causes of poor reception
Aluminum siding
- Foil backing on insulation
Heating ducts and other metal construction.
- The phone is too close to appliances such as microwaves, stoves, computers, etc.
- Atmospheric conditions, such as strong storms.
- Base is installed in the basement or lower floor of the house.
- Base is plugged into an AC outlet with other electronic devices.
- Baby monitor is using the same frequency.
Handset battery is low.
- Handset is out of range of the base.
TROUBLESHOOTING
VOICE MAIL/CHARGE/IN USE indicator flashes
- When you subscribe to a voice mail service from your phone company, the VOICE MAIL/CHARGE/IN USE indicator on the base flashes when the phone is not in use to indicate there is a voice mail waiting. It stops flashing after the voice mail has been reviewed.
No dial tone
- Check all connections.
- Is the AC adaptor connected to a working outlet?
- Is the telephone line cord connected to the base and the wall jack?
- Disconnect the base from the wall jack and connect another phone to the same jack.
If there is no dial tone in the second phone, the problem might be your wiring or local service.
Is the handset out of range of the base?
- Make sure the battery is properly charged (12 continuous hours).
Is the battery installed correctly?
- Does the handset beep when you press TALK? The battery may need to be charged.
Dial tone is OK, but cannot dial out
- Make sure the tone/pulse setting is programmed correctly.
Handset does not ring
- Make sure the RINGER switch on the handset is turned to ON.
- You may have too many extension phones on your line. Try unplugging some phones.
See solutions for No dial tone.
You experience static, noise or fading in and out
- Change channels,
- Is handset out of range? Move closer to the base.
- Does the base need to be relocated?
Charge battery. - Make sure base is not plugged into an outlet with another household appliance.
Handset beeps
- Place handset in base for 20 seconds to reset the security code. If that doesn't work, charge battery for 12 continuous hours.
-
Clean charging contacts on handset and base with a soft cloth, or an eraser.
See solutions for No dial tone. -
Replace battery.
Dialing from memory
- Did you program the memory locations?
- Did you follow proper dialing sequence?
- Make sure the tone/pulse setting is programmed correctly.
- Did you reprogram memory after power outage or battery replacement?
TECHNICAL INFORMATION
REN Number:
The Ringer Equivalence Number (REN) assigned to each terminal device provides an indication of the maximum number of terminals allowed to be connected to a telephone interface.
The REN number of this phone is located on the bottom of the base unit. The termination on an interface may consist of any combination of devices subject only to the requirement that the sum of the Ringer Equivalence Numbers of all the devices does not exceed 5.
CAUTION
This product is intended for use in CANADA only. Sale or use in other countries may violate local laws.
Cordless telephones use radio frequencies to allow mobility. This affects the performance of your phone.
1. NOISE
Electrical pulse noise is present in most homes at one time or another. This is most intense during electrical storms. Certain kinds of electrical equipment, such as light dimmers, fluorescent bulbs, motors, fans, etc., also generate pulse noise.
Because radio frequencies are susceptible to this, you may on occasion hear pulse noise through the handset. This is usually only a minor annoyance and should not be interpreted as a defect of the phone.
2. RANGE
Because radio frequencies are used, the location of the base station can affect the operating range of the phone. Try several locations and choose the one that gives the clearest signal to the handset. (Turning in a circle while holding the handset may also increase the operating range.)
3. INTERFERENCE
Electronic circuits activate a relay to connect the unit to your telephone line. These electronic circuits operate in the radio frequency spectrum. While several protection circuits are used to prevent unwanted signals, there may be periods when these unwanted signals enter the base station. You may hear click or hear the relay activate when you are not using the cordless handset. If this occurs frequently, you can minimize or eliminate the problem by lowering the height of the base station or relocating the base station. It may also be helpful to change the operating channel and/or the security code setting.
Operation is subject to the following two conditions: (1) this device may not cause interference, and (2) this device must accept any interference, including interference that may cause undesired operation of the device.
NOTICE
Privacy of communications may not be ensured when using this telephone. Other devices, including other cordless telephones, may interfere with the operation of this cordless telephone or cause noise during operation. Units without coded access may be accessed by other radio communication systems. Cordless telephones must not cause interference to any licensed radio service.
The Industry Canada Label identifies certified equipment. This certification means that the equipment meets certain telecommunications network protective, operational and safety requirements. The ministry does not guarantee that the equipment will operate to the user's satisfaction.
Before installing this equipment, users should ensure that it is permissible to be connected to the facilities of the local telecommunications company. The equipment must also be installed using an acceptable method of construction. In some cases, the company's inside wiring associated with single-line individual service may be extended by means of a certified connector assembly (telephone extension cord). The customer should be aware that compliance with the above conditions may not prevent degradation of service in some situations.
Repairs to certified equipment should be made by an authorized Canadian maintenance facility designated by the supplier. Any repairs or alterations made by the user to this equipment, or equipment malfunctions, may give the telecommunications company cause to request that the use disconnect the equipment.
The user should ensure for his own protection that the electrical ground connections of the power utility, telephone lines and internal metallic water pipe system, if present, are connected together. This precaution may be particularly important in rural areas.
CAUTION
Users should not attempt to make such connections themselves, but should contact the appropriate electrical inspection authority, or electrician, as appropriate.
The exclamation point within an equilateral triangle is intended to alert the user to the presence of important operating and maintenance (servicing) instructions in the literature accompanying the product.
This symbol on the product is used to identify the following important information. Use only with specified SANYO power adaptor.
NOTICE: This equipment meets the applicable Industry Canada Terminal Equipment Technical Specifications. This is confirmed by the registration number. The abbreviation, IC, before the registration number signifies that registration was performed based on a Declaration of Conformity indicating that Industry Canada technical specifications were met. It does not imply that Industry Canada approved the equipment.
THE SANYO COMFORT WARRANTY
WARRANTY APPLICATION
Sanyo Communications products purchased new, unused in Canada through a Sanyo Authorized Dealer are warranted against manufacturing defects in materials and workmanship for ONE YEAR covering parts and labour, from the date of purchase by the original retail purchaser. This warranty only applies in favour of the original retail purchaser of the warranted product.
SANYO CANADA INC.'S RESPONSIBILITY
During the warranty period, SANYO Canada Inc. will repair, or at our option, replace a Communications product which shows evidence of a manufacturing defect in materials or workmanship. Replacement PARTS are warranted for the remaining portion of the warranty period.
WHAT IS NOT COVERED
a. Communications products purchased outside Canada.
b. Communications products purchased in a used condition
c. Communications products purchased from non Sanyo-authorized dealer.
d. Communications products not intended for Canadian usage or products without appropriate Can dian regulatory approvals.
e. Problems due to product set-up and installation.
f. Adjustments that are outlined in the Operating Manual.
g. Accessory items including antenna, and batteries,
h. Damage in or due to transportation.
i. Damage due to improper maintenance, accident, abuse, misuse or negligence.
j. Damage caused by lightning and power surges.
ORIGINAL RETAIL PURCHASER'S RESPONSIBILITY
You, the original retail purchaser, must present your original, dated bill-of-sale together with this warranty to SANYO Canada Inc. or to an authorized Sanyo Service Depot when you make a claim under this warranty.
You, the original retail purchaser, are responsible for any costs of TRANSPORTING the product to and from SANYO Canada Inc. or an authorized Sanyo Service Depot. You also are responsible for the cost of any MAINTENANCE necessary in respect of the product.
WARRANTY BECOMES VOID
This warranty becomes void if the product's serial numbers are altered or removed or if any repair to the product is made other than by SANYO Canada Inc. or by an authorized Sanyo Service Depot.
LIMITATIONS
a. SANYO Canada Inc. reserves the right to change or improve the design of the model of the product warranted hereunder without incurring any obligation to make any modifications to or to install any improvement in or on the product.
b. In no event shall SANYO Canada Inc. or any of its Authorized Dealers be liable for special or consequential damage arising from the use of this product.
STATUTORY WARRANTYIS
The above provisions do not preclude the operation of any applicable provincial statute which in certain circumstances may not allow some of the limitations and exclusions described in this Warranty. Where any terms of this Warranty are prohibited by such a statute, they shall be deemed null and void but the remainder of this warranty shall remain in effect.
HOW TO OBTAIN WARRANTY SERVICE
Please contact the Sanyo Authorized Dealer from whom the product was purchased, or contact us directly at:
SANYO Canada Inc.
1-300 Applewood Cres.
Concord, Ont. L4K 5C7
(905) 760-9944
1-800-263-2244
Printed in China
- IMPORTANT
- SOS HELP LINE
- NATIONWIDE CUSTOMER SUPPORT
- 1-800-263-2244
- STAY-AT-HOME CONVENIENCE
- HASSLE-FREE EXCHANGE
- GUARANTEED QUALITY
- INTRODUCTION
- MAIN FEATURES
- 900-MHZ TECHNOLOGY
- COMPANDER PLUS NOISE REDUCTION
- GETTING STARTED
- CHECKING THE PACKAGE CONTENTS
- MODULAR JACK
- DIGITAL SECURITY SYSTEM
- INSTALLATION
- CONNECTIONS
- MOUNTING ON A WALL
- NAMES AND CONTROLS
- TONE/PULSE SETTING
- BASICS
- RECEIVING A CALL
- RINGER SWITCH
- VOLUME
- MAKING A CALL
- REDIALING A CALL
- FLASH KEY
- VOICE MAIL/CHARGE/IN USE INDICATOR
- VOICE MAIL
- CHAN (CHANNEL) KEY
- TEMPORARY TONE
- HANDSET LOCATOR
- SPEED DIAL
- STORING A NUMBER IN THE MEMORY
- CHANGING A STORED NUMBER
- STORING LAST-DIALED NUMBER
- MAKING CALLS FROM THE MEMORY
- INSERTING A PAUSE IN THE DIALING SEQUENCE
- CHAIN DIALING FROM THE MEMORY
- HEADSET JACK AND BELT CLIP
- BELT CLIP INSTALLATION
- CHANGING THE BATTERY
- CAUTION
- POWER FAILURE
- RECYCLING NICKEL-CADMIUM BATTERIES
- MAINTENANCE
- CAUSES OF POOR RECEPTION
- TROUBLESHOOTING
- NO DIAL TONE
- DIAL TONE IS OK, BUT CANNOT DIAL OUT
- HANDSET DOES NOT RING
- YOU EXPERIENCE STATIC, NOISE OR FADING IN AND OUT
- HANDSET BEEPS
- DIALING FROM MEMORY
- TECHNICAL INFORMATION
- REN NUMBER
- NOISE
- RANGE
- INTERFERENCE
- NOTICE
- THE SANYO COMFORT WARRANTY
- WARRANTY APPLICATION
- SANYO CANADA INC.'S RESPONSIBILITY
- WHAT IS NOT COVERED
- ORIGINAL RETAIL PURCHASER'S RESPONSIBILITY
- WARRANTY BECOMES VOID
- LIMITATIONS
- STATUTORY WARRANTYIS
- HOW TO OBTAIN WARRANTY SERVICE
- SANYO CANADA INC
Marque : SANYO
Modèle : CLT-9915
Catégorie : Téléphone sans fil