
AVL-193 - Téléviseur SANYO - Notice d'utilisation et mode d'emploi gratuit
Retrouvez gratuitement la notice de l'appareil AVL-193 SANYO au format PDF.


| Type de produit | Téléviseur LCD 19 pouces |
| Marque | SANYO |
| Modèle | AVL-193 |
| Taille de l'écran | 19 pouces (diagonale) |
| Résolution | 1440 x 900 pixels |
| Système TV | NTSC-M |
| Alimentation | AC 100-240V, 50/60Hz |
| Consommation électrique | 70 W |
| Dimensions (L x P x H) | 54,4 x 17,5 x 45,2 cm |
| Poids | 17,6 kg |
| Haut-parleurs | 2 x 8 W, 8 ohms |
| Entrées vidéo | Antenne RF, Composite, S-Vidéo, Component (YPbPr), D-Sub (VGA) |
| Entrées audio | Audio L/R (RCA) pour chaque entrée vidéo, Audio line-in pour PC |
| Sorties vidéo | Composite (AV out) pour enregistrement |
| Fonctions spéciales | Contrôle parental, sous-titres codés, DCDi, minuterie de sommeil |
| Modes d'image | Bright, Soft, Normal, User |
| Modes son | Movie, Music, News, User |
| Accessoires inclus | Télécommande, piles AAA, manuel d'utilisation |
| Garantie | 1 an (pièces et main-d'œuvre) |
| Entretien | Chiffon doux et sec ; nettoyant pour lunettes pour l'écran LCD ; éviter alcool et solvants |
FOIRE AUX QUESTIONS - AVL-193 SANYO
Questions des utilisateurs sur AVL-193 SANYO
0 question sur cet appareil. Repondez a celles que vous connaissez ou posez la votre.
Poser une nouvelle question sur cet appareil
Téléchargez la notice de votre Téléviseur au format PDF gratuitement ! Retrouvez votre notice AVL-193 - SANYO et reprennez votre appareil électronique en main. Sur cette page sont publiés tous les documents nécessaires à l'utilisation de votre appareil AVL-193 de la marque SANYO.
MODE D'EMPLOI AVL-193 SANYO
INSTRUCTION MANUAL
AVL-191/193
19"LCD High-definition Colour TV
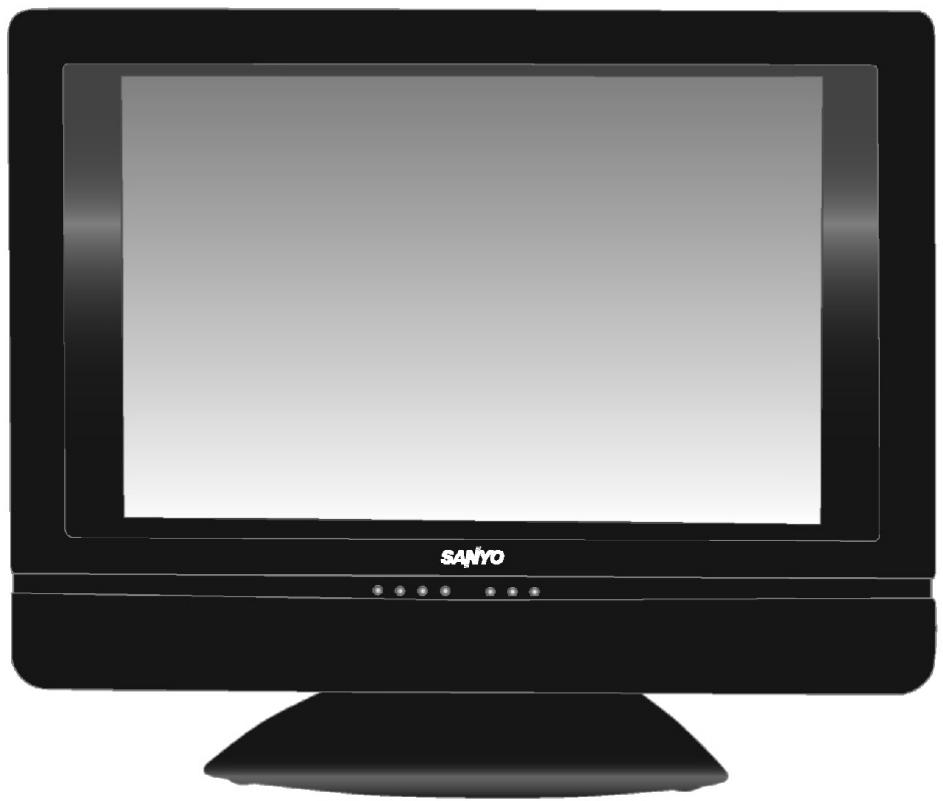
- Diagonal measure
For best TV picture quality and channel selection connect to a digital cable or satellite receiver
Help Line: 1-800-263-2244
Monday to Friday 9am-5pm (Eastern)
Thank you for choosing SANYO. Please read all instructions carefully to obtain maximum benefit of your product. Questions? Our toll-free number is 1-800-263-2244, 9am-5pm, Monday to Friday (Eastern time).
Table of Contents
Important Information 1
Important Safety Precautions 2
Preparations 5
Identification of Controls 7
Connections 10
Turning the Unit On and Off 14
Memorizing the Channels. 15
Basic Operations 17
Setting Picture 18
Adjusting Image in D-Sub mode 19
Setting Sound 20
Other Functions 21
Viewing Closed Captions 22
Parental Controls. 23
Troubleshooting 28
Care and Maintenance 29
Specifications 30
WARNING: TO REDUCE THE RISK OF FIRE OR ELECTRIC SHOCK, DO NOT EXPOSE THIS APPARATUS TO RAIN OR MOISTURE.

CAUTION
RISK OF ELECTRIC SHOCK DO NOT OPEN

CAUTION-To reduce the risk of electric shock, do not perform any servicing other than that contained in the operating instructions unless you are qualified to do so.
The lightning flash with arrowhead symbol, within an equilateral triangle is intended to alert the user to the presence of uninsulated dangerous voltage within the product's enclosure that may be of sufficient magnitude to constitute a risk of electric shock to persons.

The exclamation point within an equilateral triangle is intended to alert the user to the presence of important operating and maintenance (servicing) instructions in the literature accompanying the appliance.
"Note to CATV system installer: This reminder is provided to call the CATV system installer's attention to Article 820-40 of the National Electrical Code that provides guidelines for proper grounding and, in particular, specifies that the cable ground shall be connected to the grounding system of the building, as close to the point of cable entry as practical."
This product utilizes tin-lead solder, and fluorescent lamp containing a small amount of mercury. Disposal of these materials may be regulated due to environmental considerations. For disposal or recycling information, please contact your local authorities or the Electronic Industries Alliance: www.eia.org
FCC STATEMENT
FCC Notice
LCD TV: A CLASS B digital device
This equipment has been tested and found to comply with the limits for a Class B digital device, pursuant to part 15 of the FCC Rules. These limits are designed to provide reasonable protection against harmful interference when the equipment is operated in a commercial environment.
This equipment generates, uses, and can radiate radio frequency energy and, if not installed and used in accordance with the instruction manual, may cause harmful interference to radio communications. Operation of this equipment in a residential area is likely to cause harmful interference in which case the user will be required to correct the interference at his own expense.
FCC CAUTION:
Pursuant to 47CFR, Part 15.21 of the FCC rules, any changes or modifications to this monitor not expressly approved by the manufacturer could cause harmful interference and would void the user's authority to operate this device.
WARNING: This is a CLASS B product. In a domestic environment this product may cause radio interference in which case the user may be required to take adequate measures to counter interference.
Electrical energy can perform many useful functions, but it can also cause personal injuries and property damage if improperly handled. This product has been engineered and manufactured with the highest priority on safety. But IMPROPER USE CAN RESULT IN POTENTIAL ELECTRICAL SHOCK OR FIRE HAZARD. In order to prevent potential danger, please observe the following instructions when installing, operating and cleaning the product. To ensure your safety and prolong the service life of your LCD TV product, please read the following precautions carefully before using the product.
- Read these instructions---All operating instructions must be read and understood before the product is operated.
- Keep these instructions---These safety and operating instructions must be kept in a safe place for future reference.
- Heed all warnings---All warnings on the product and in the instructions must be observed closely.
- Follow all instructions---All operating instructions must be followed.
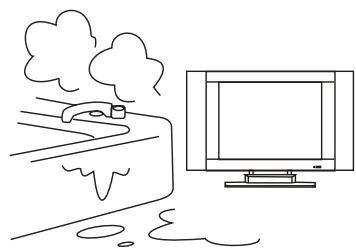
- Do not use this apparatus near water---for example, near a bathtub, washbowl, kitchen sink, or laundry tub, in a wet basement, or near a swimming pool, and the like.
Do not use immediately after moving from a low temperature to high temperature environment, as this causes condensation, which may result in fire, electric shock, or other hazards.
Apparatus shall not be exposed to dripping or splashing and no objects filled with liquids, such as vases, shall be placed on the apparatus.
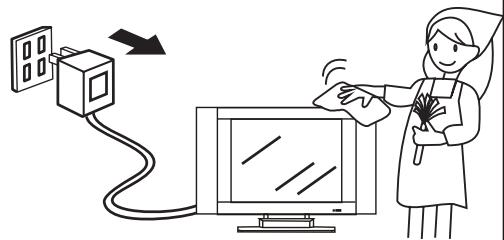
6. Clean only with dry cloth---Unplug this product from the wall outlet before cleaning. Do not use liquid cleaners or aerosol cleaners. Use a damp cloth for cleaning.
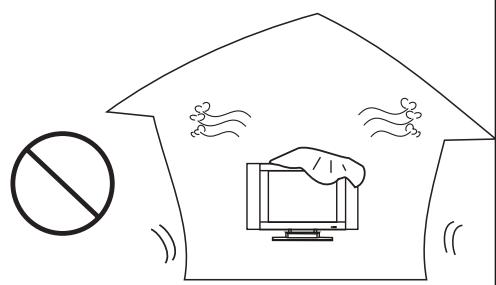
7. Ventilation---Do not block any ventilation openings. Install in accordance with the manufacturer instructions. The vents and other openings in the cabinet are designed for ventilation. Do not cover or block these vents and openings since insufficient ventilation can cause overheating and/or shorten the life of the product. Do not place the product on a bed, sofa, rug or other similar surface, since they can block ventilation openings. This product is not designed for built-in installation; do not place the product in an enclosed place such as a bookcase or rack, unless proper ventilation is provided or the manufacturer's instructions are followed.
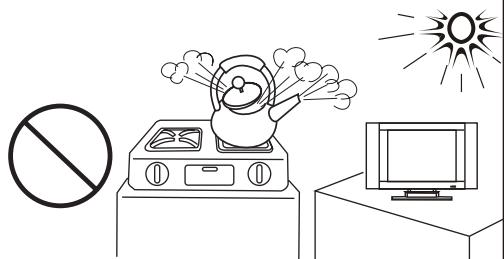
8. Heat sources---Do not install near any heat sources such as radiators, heat registers, stoves, or other apparatus (including amplifiers) that produce heat.
9. Grounding or Polarization---Do not defeat the safety purpose of the polarized or grounding-type plug. A polarized plug has two blades with one wider than the other. A grounding type plug has two blades and a third grounding prong. The wide blade or the third prong are provided for your safety. If the provided plug does not fit into your outlet, consult an electrician for replacement of the obsolete outlet.
10.Power cord protection---Protect the power cord from being walked on or pinched particularly at plugs, convenience receptacles, and the point where they exit from the apparatus.
Note: where the mains plug or an appliance coupler is used as the disconnect device, the disconnect device shall remain readily operable.
11. Attachments---Only use attachments/accessories specified by the manufacturer. Do not use attachments not recommended by the manufacturer. Use of improper attachments can result in accidents.

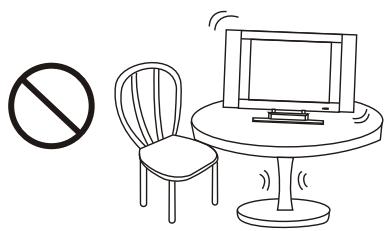
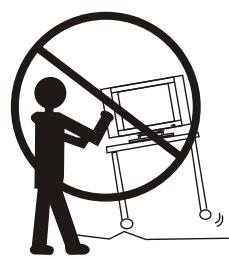
- Stand---Use only with the cart, stand, tripod, bracket, or table specified by the manufacturer, or sold with the apparatus. Do not place the product on an unstable trolley, stand, tripod or table. Placing the product on an unstable base can cause the product to fall, resulting in serious personal injuries as well as damage to the product. When mounting the product on a wall, be sure to follow the manufacturer's instructions. Use only the mounting hardware recommended by the manufacturer.
- Move Carefully---When a cart is used, use caution when moving the cart/apparatus combination to avoid injury from tip-over. Sudden stops, excessive force and uneven floor surfaces can cause the product to fall from the trolley.
Never attempt to move the TV unless the AC power cord has been disconnected.
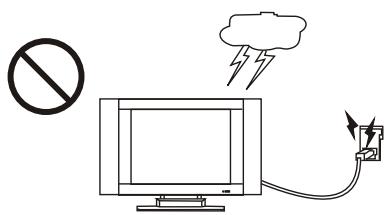
- Lightning---Unplug this apparatus during lightning storms or when unused for long periods of time.
For added protection for this television equipment during a lightning storm, or when it is left unattended and unused for long periods of time, unplug it from the wall outlet and disconnect the antenna. This will prevent damage to the equipment due to lightning and power-line surges.
-
Servicing---Refer all servicing to qualified service personnel. Servicing is required when the apparatus has been damaged in any way, such as power-supply cord or plug is damaged, liquid has been spilled or objects have fallen into the apparatus, the apparatus has been exposed to rain or moisture, does not operate normally, or has been dropped.
-
Replacement parts---In case the product needs replacement parts, make sure that the service person uses replacement parts specified by the manufacturer, or those with the same characteristics and performance as the original parts. Use of unauthorized parts can result in fire, electric shock and/or other danger.
-
Overloading---Do not overload wall outlets, extension cords, or convenience receptacles on other equipment as this can result in a risk of fire or electric shock.
-
Entering of objects and liquids---Never insert an object into the product through vents or openings. High voltage flows in the product, and inserting an object can cause electric shock and/or short internal parts. For the same reason, do not spill water or liquid on the product.
-
Damage requiring service---If any of the following conditions occurs, unplug the power cord from the AC outlet, and request a qualified service person to perform repairs.
a. When the power cord or plug is damaged.
b. When a liquid is spilled on the product or when objects have fallen into the product.
c. When the product has been exposed to rain or water.
d. When the product does not operate properly as described in the operating instructions.
Do not touch the controls other than those described in the operating instructions. Improper adjustment of controls not described in the instructions can cause damage, which often requires extensive adjustment work by a qualified technician.
e. If the product has been dropped or the cabinet has been damaged in any way.
f. When the product displays an abnormal condition or exhibits a distinct change in performance. Any noticeable abnormality in the product indicates that the product needs servicing.
20. Safety checks--- Upon completion of service or repair work, request the service technician to perform Safety checks to ensure that the product is in proper operating condition.
21.Wall or ceiling mounting---When mounting the product on a wall or ceiling, be sure to install the product according to the method recommended by the manufacturer. This is a safety feature.
-
Power source---This product is intended to be supplied by a listed power supply indicated on the marking label. If you are not sure of the type of power supply to your home, consult your product dealer or local power company. For added protection for this product during a lightning storm, or when it is left unattended and unused for long periods of time, unplug it from the wall outlet and disconnect the cable system. This will prevent damage to the product due to lightning and power line surges. When the unit has to be used with another power supply voltage, the power cable must be changed. Consult your product dealer. The socket outlet should be installed near the equipment and easily accessible. Use only the power cord designated by our dealer to ensure safety and EMC. When connecting other products such as VCRs and personal computers, you should turn off the power of the unit for protection against electric shock.
-
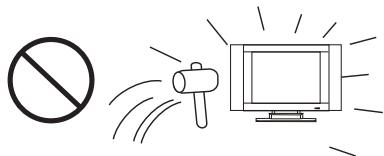
Panel protection---The LCD panel used in this product is made of glass. Therefore, it can break when the product is dropped or impacted upon by other objects. Be careful not to be injured by broken glass pieces in case the LCD panel breaks.
24.Pixel defect---The LCD panel is a very high technology product, giving you finely detailed pictures. Occasionally, a few non-active pixels may appear on the screen as a fixed point of blue, green or red. Please note that this does not affect the performance of your product.
WARNING: For continued safety, apparatus with class I construction shall be connected to a mains socket outlet with a protective earthing connection.
■ If an outside antenna is connected to the television equipment, be sure the antenna system is grounded so as to provide some protection against voltage surges and built-up static charges. Section 810 of the National Electrical Code provides information with respect to proper grounding of the mast and supporting structure, grounding of the lead-in wire to an antenna discharge unit, size of grounding conductors, location of antenna-discharge unit, connection to grounding electrodes, and requirements for the grounding electrode.
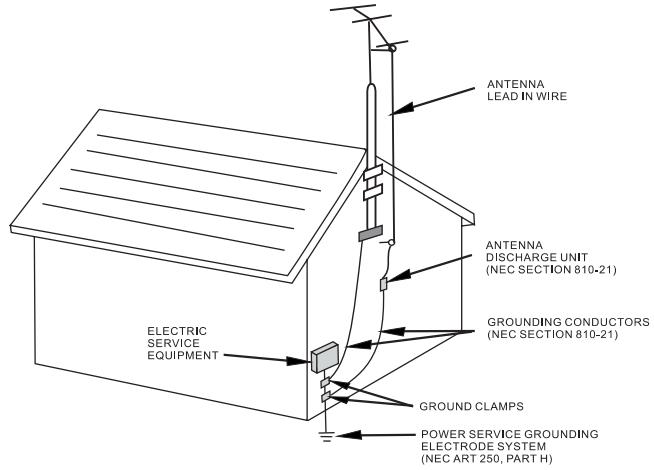
EXAMPLE OF ANTENNA GROUNDING AS PER NATIONAL ELECTRICAL CODE
NEC—NATIONAL ELECTRICAL CODE
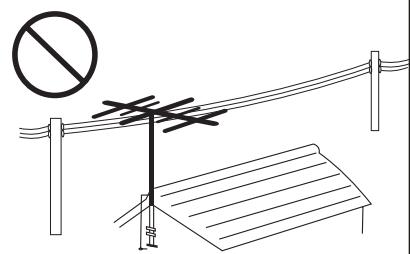
An outside antenna system should not be located in the vicinity of overhead power lines or other electric light or power circuits, or where it can collide with such power lines or circuits. When installing an outside antenna system, extreme care should be taken to keep from touching such power lines or circuits, as contact with them might be fatal.
Using the Remote Control
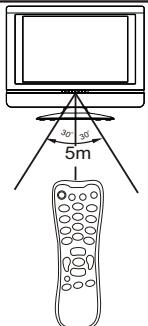
- Use the remote control by pointing it towards the remote sensor window of the set. Objects between the remote control and sensor window may prevent proper operation.
Note: This illustration is for reference only. The remote sensor may be in different locations on different models.
Cautions regarding use of remote control
- Do not expose the remote control to shock. In addition, do not expose the remote control to liquids, and do not place in an area with high humidity.
■ Do not install or place the remote control under direct sunlight. The heat may cause deformation of the unit. - The remote control may not work properly if the remote sensor window of the main unit is under direct sunlight or strong lighting. In such a case, change the angle of the lighting or LCD TV set, or operate the remote control closer to the remote sensor window.
Batteries for the Remote Control
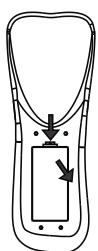
If the remote control fails to operate the LCD TV functions, replace the batteries in the remote control.
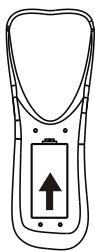
1 Open the battery cover.
2 Insert two size-AAA batteries.
3 Replace the battery cover.
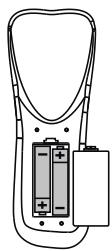
Install two "AAA" batteries matching the +/- polarities of the battery to the +/- marks inside the battery compartment.
Precaution on battery use
Improper use of batteries can result in a leakage of chemicals and/or explosion. Be sure to follow the instructions below.
Place batteries with their terminals corresponding to the (+) and (-) indications.
Different types of batteries have different characteristics. Do not mix batteries of different types.
■ Do not mix old and new batteries. Mixing old and new batteries can shorten the life of new batteries and/or cause old batteries to leak chemicals.
■ Remove batteries as soon as they are non-operable. Chemicals that leak from batteries can cause a rash. If chemical leakage is found, wipe with a cloth.
The batteries supplied with the product may have a shorter life expectancy due to storage conditions.
If the remote control is not used for an extended period of time, remove the batteries from the remote control.
Antenna Connection
CABLE TV (CATV) CONNECTION
A 75-ohm coaxial cable connector is built into the set for easy hookup. When connecting the 75- ohm coaxial cable to the set, screw the 75-ohm cable to the ANT. Terminal.
Some cable TV companies offer "premium pay channels". Since the signals of these premium pay channels are scrambled, a cable TV converter/descrambler is generally provided to the subscriber by the cable TV company.
This converter/descrambler is necessary for normal viewing of the scrambled channels. For more specific instructions on installing cable TV, consult your cable TV company. One possible method of utilizing the converter/descrambler provided by your cable TV company is explained below. Please note: An RF switch provided with two inputs (A and B) is required (not supplied).
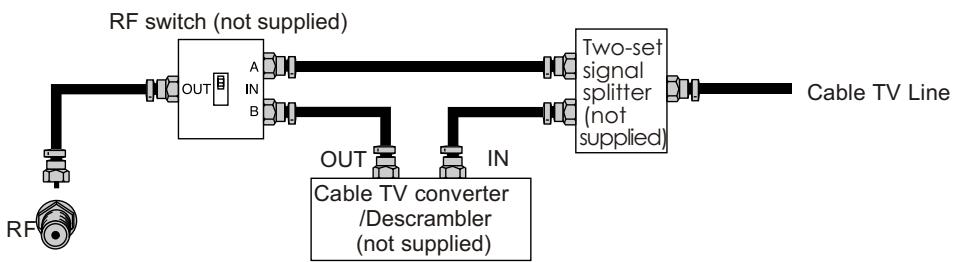
"A" position on the RF switch (not supplied): You can view all unscrambled channels by using the TV's channel keys.
"B" position on the RF switch (not supplied): You can view the scrambled channels via the converter/descrambler by using the converter's channel keys.
Note:
Consult your Dealer or Service Center for the type of splitter, RF switch or combiner that might be required.
ANTENNAS
The antenna requirements for good color television reception are more important than those for black & white television reception. For this reason, a good quality outdoor antenna is strongly recommended.
The following is a brief explanation of the type of connections that are provided with the various antenna systems.
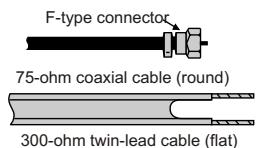
- A 75-ohm system is generally a round cable with F-type connector that can easily be attached to a terminal without tools (not supplied).
- A 300-ohm system is a flat "twin-lead" cable that can be attached to a 75-ohm terminal through a 300-75-ohm adapter (not supplied).
OUTDOOR ANTENNA CONNECTION
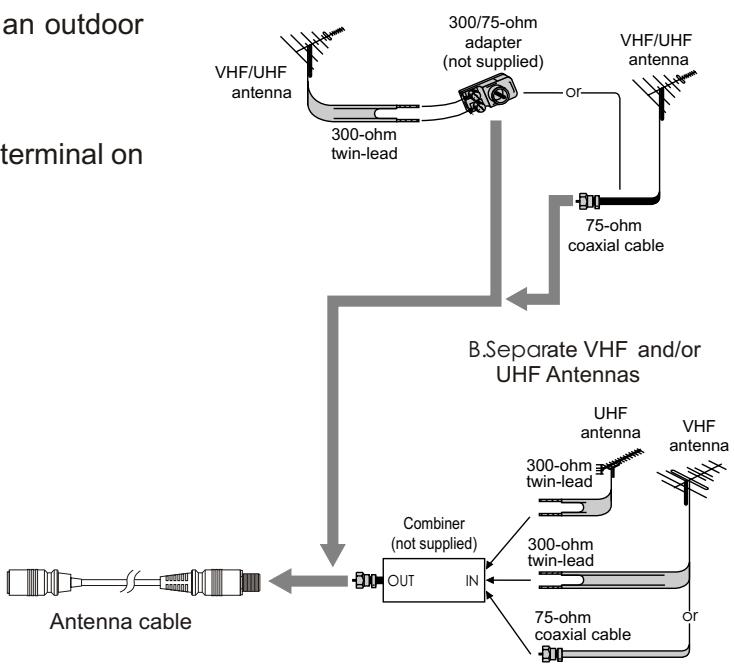
Use one of the following two diagrams if you connect an outdoor antenna.
A: Using a VHF/UHF combination outdoor antenna.
B: Using separate VHF and/or UHF outdoor antennas.
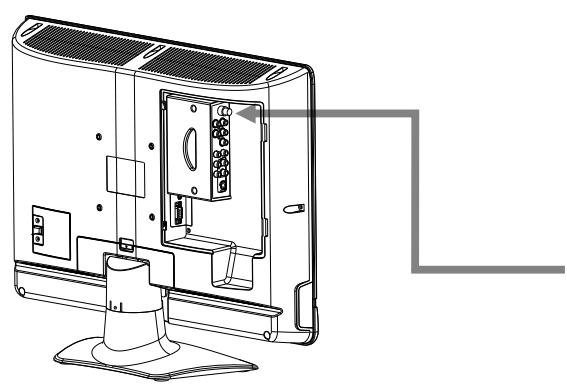
Connect the outdoor antenna cable lead-in to the ANT. terminal on the rear of the TV set.
A. Combination VHF/UHF Antenna
Main Unit
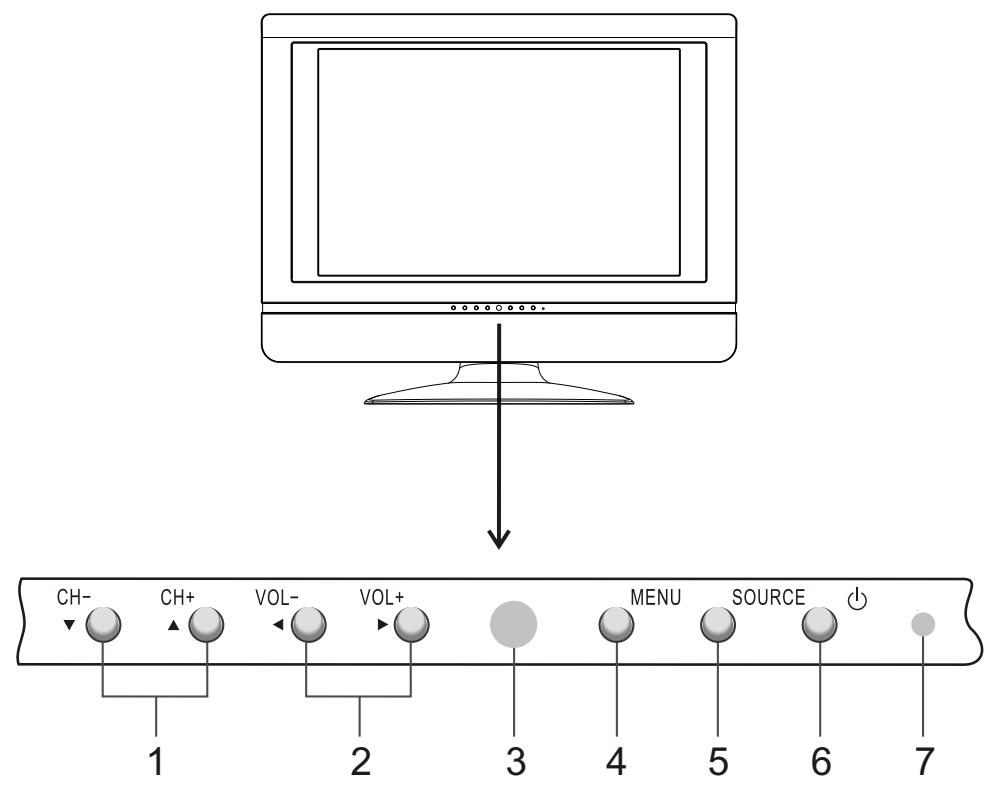
- CH + / -
Press these two buttons to directly change the TV channel;
In OSD MENU, press these buttons to choose the OSD items.
- VOL+/-
Press the VOL+ or VOL- button to directly increase or decrease the sound volume level;
In OSD MENU, press these buttons to adjust the value or setting of each item.
-
Remote Sensor
-
MENU
Press this button to access the MENU main page.
- SOURCE
To select the input signal source.
- POWER
Press this button to turn the unit ON from STANDBY mode. Press it again to turn the set back to STANDBY.
- Power Indicator
Note:
Functions of VOL+/-, CH+/-, MENU, SOURCE and POWER are also provided to the remote control. This operation manual provides a description based on operating functions with the remote control.
Main Unit
Removing the Back Cover
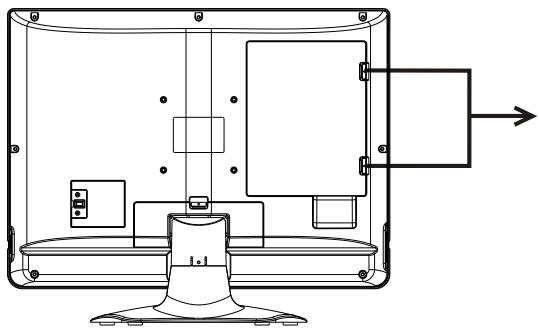
Push downward and then pull out the cover carefully in the direction of the arrow to remove the cover.
Before you connect external devices with the unit, please remove the back cover firstly.
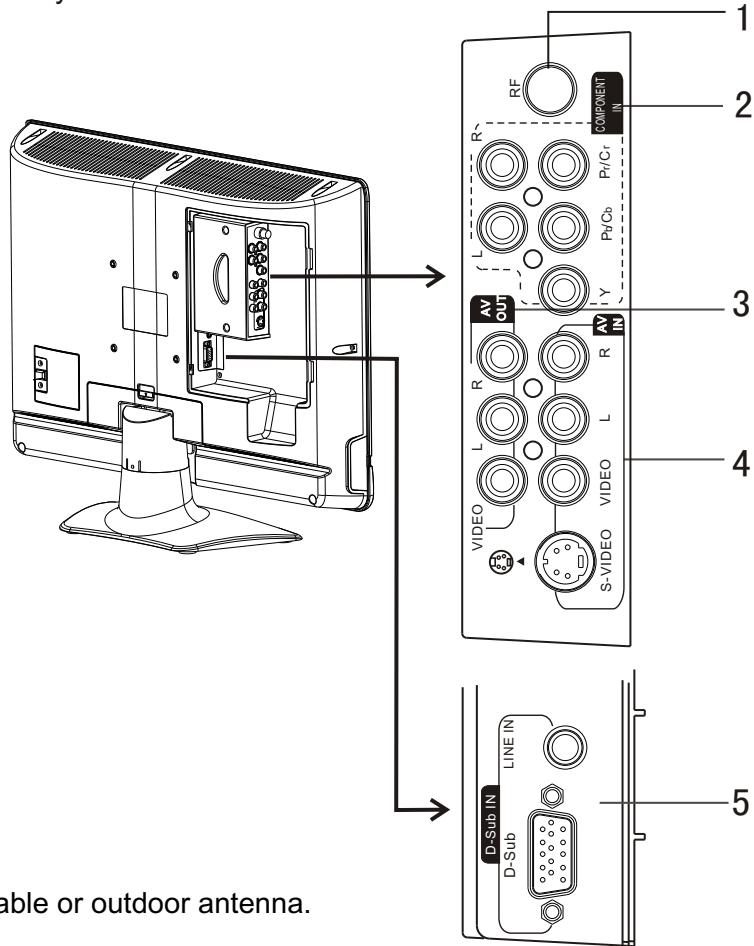
- Antenna input(RF)
Allows you to connect cable or outdoor antenna.
- Component inputs
Connect to the audio and component output jacks of a DVD player or Set-Top Box.
- AV outputs
Connect to the VCR input jacks to record programs.
- AV inputs
Receive video/audiosignals from external sources such as VCR or DVD player.
- D-Sub input /Audio Line in
Connect to the D-Sub.audio output jacks on your PC.
Note:
The AV output terminals only can output TV or AV signal.
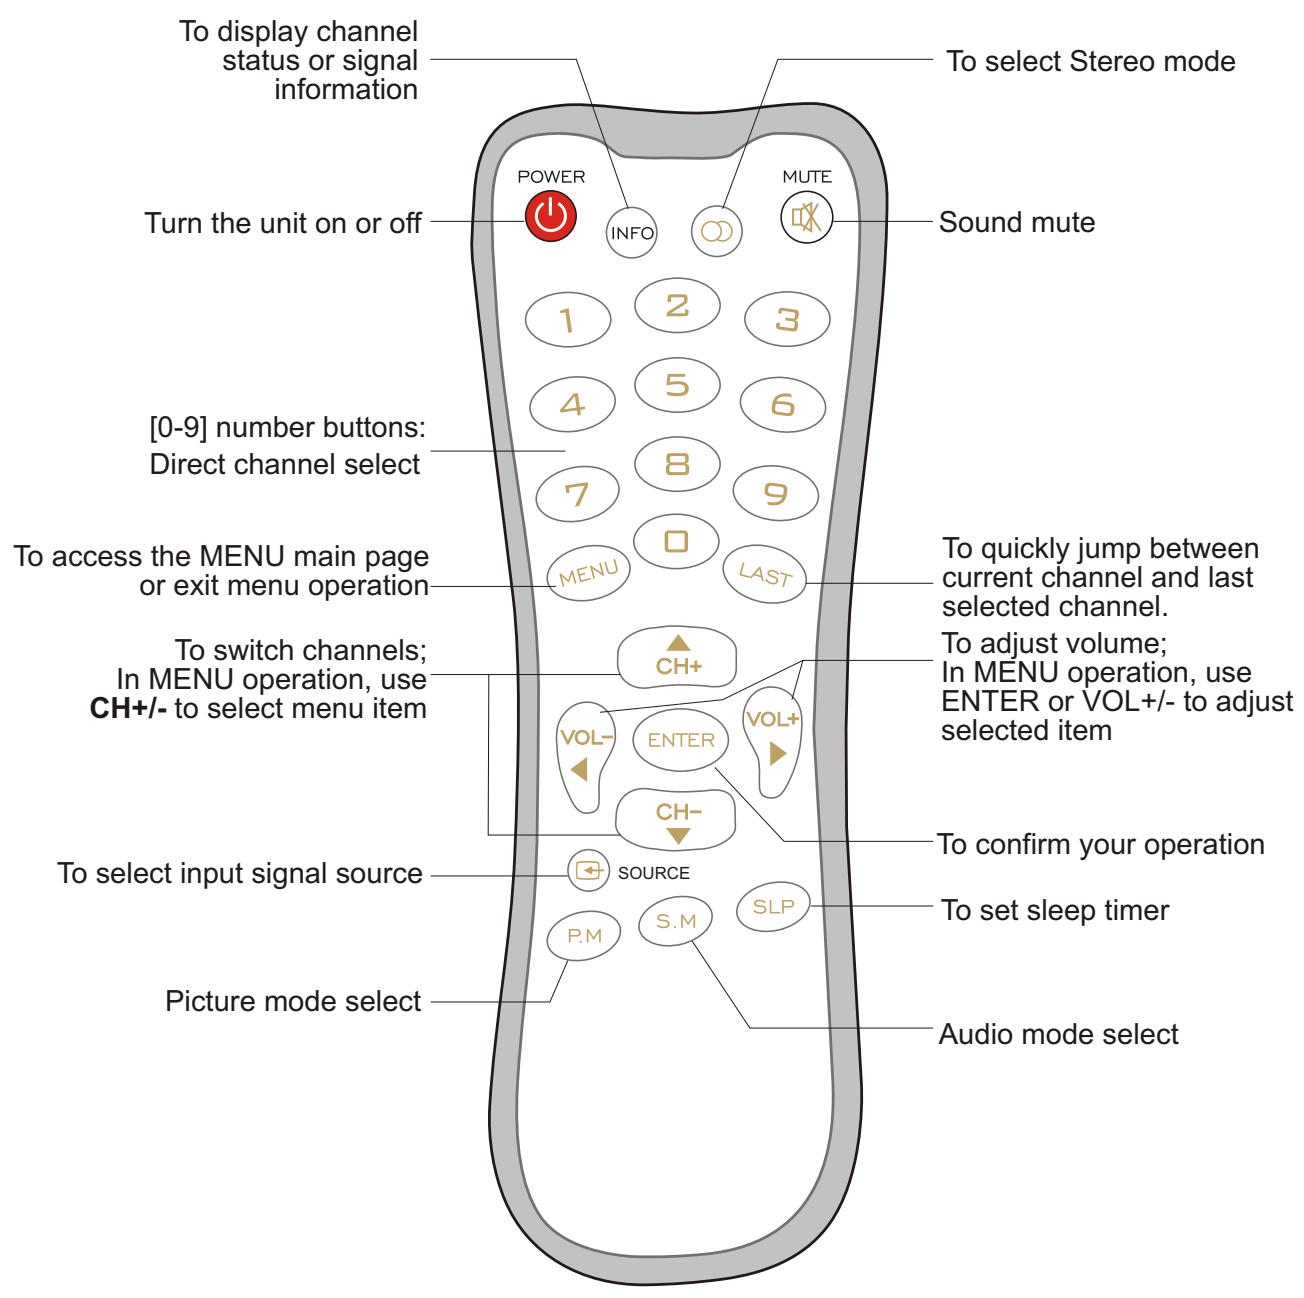
Remote Control
Cautions Before Connecting
- Carefully check the terminals for position and type before making any connections.
The illustration of the external equipment may be different depending on your model. - Loose connectors can result in image or color problems. Make sure that all connectors are securely inserted into their terminals.
Refer to the operating manual of the external device as well.
When connecting an external device, turn the power off on the panel to avoid any issues.
Connect a VCR
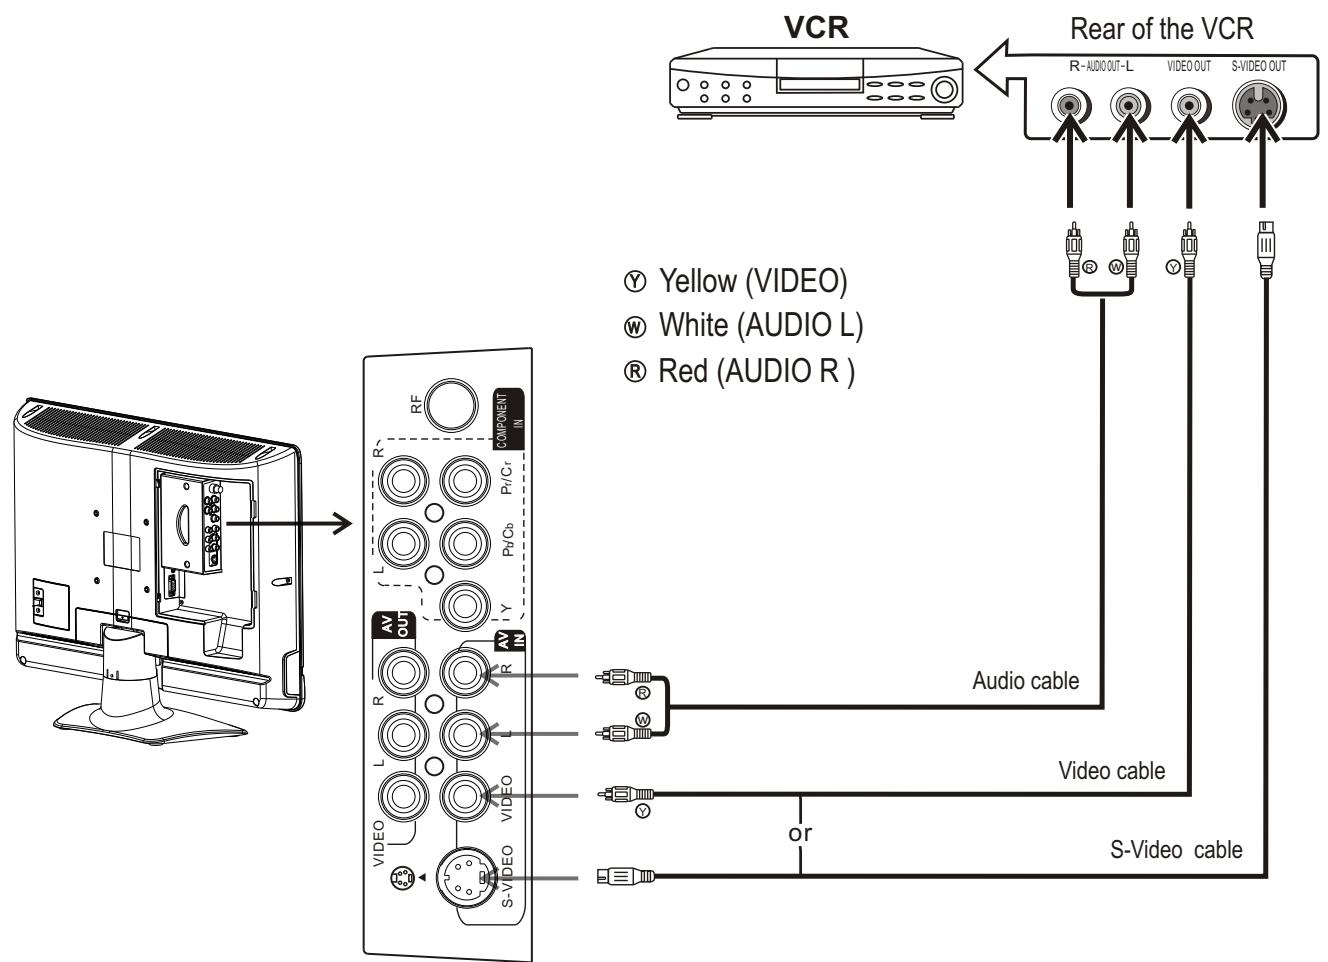
How to connect:
Connect the Audio/Video cables between the Audio (L/R)/Video jacks on the unit and VCR.
Note:
For better video, you can use the S-video jack if your source supports it.
The unit automatically identifies S-Video if you are using S-Video jack. We recommend you to disconnect S-Video cable before you use Video jack.
To play VCR
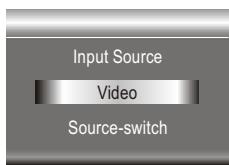
- Turn on your LCD TV, press SOURCE button repeatedly to select Video.
- Turn on your VCR, insert a videotape and press the Play button.
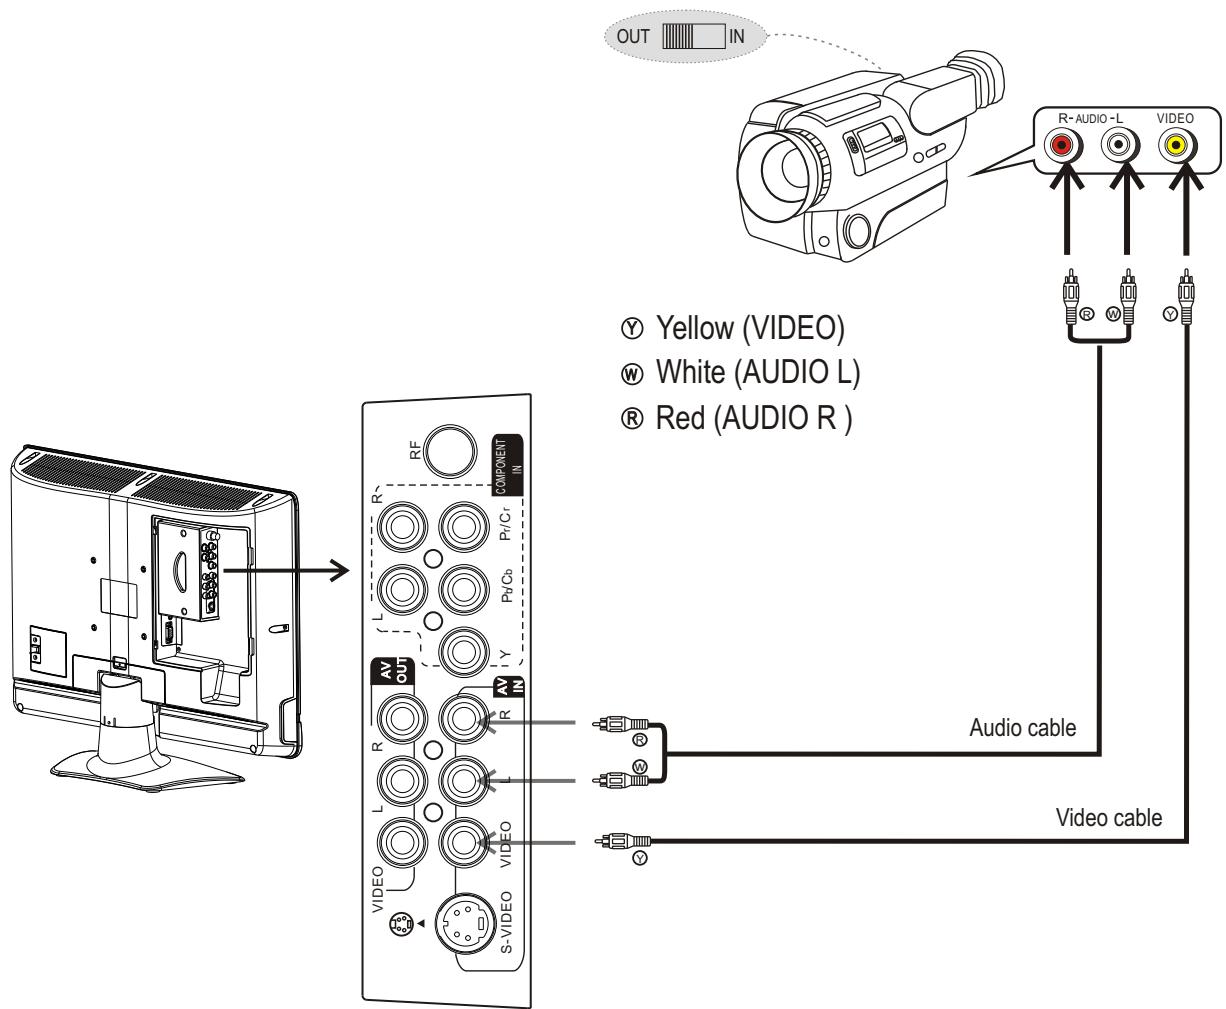
Connect a Camcorder
How to connect:
Connect the Audio/Video cables between the Audio (L/R)/Video jacks on the unit and camcorder.
To playback Camcorder
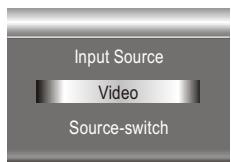
- Turn on your LCD TV , press SOURCE® button repeatedly to select Video.
- Turn on your camcorder and set it to output mode. (For details, refer to your camcorder owner's manual.)
- Insert the tape into the camcorder and press Play button.
Note:
The operations of the camcorder may be different and is dependent on your model. Please read the owner's manual of your camcorder to confirm operation.
Connect a DVD player
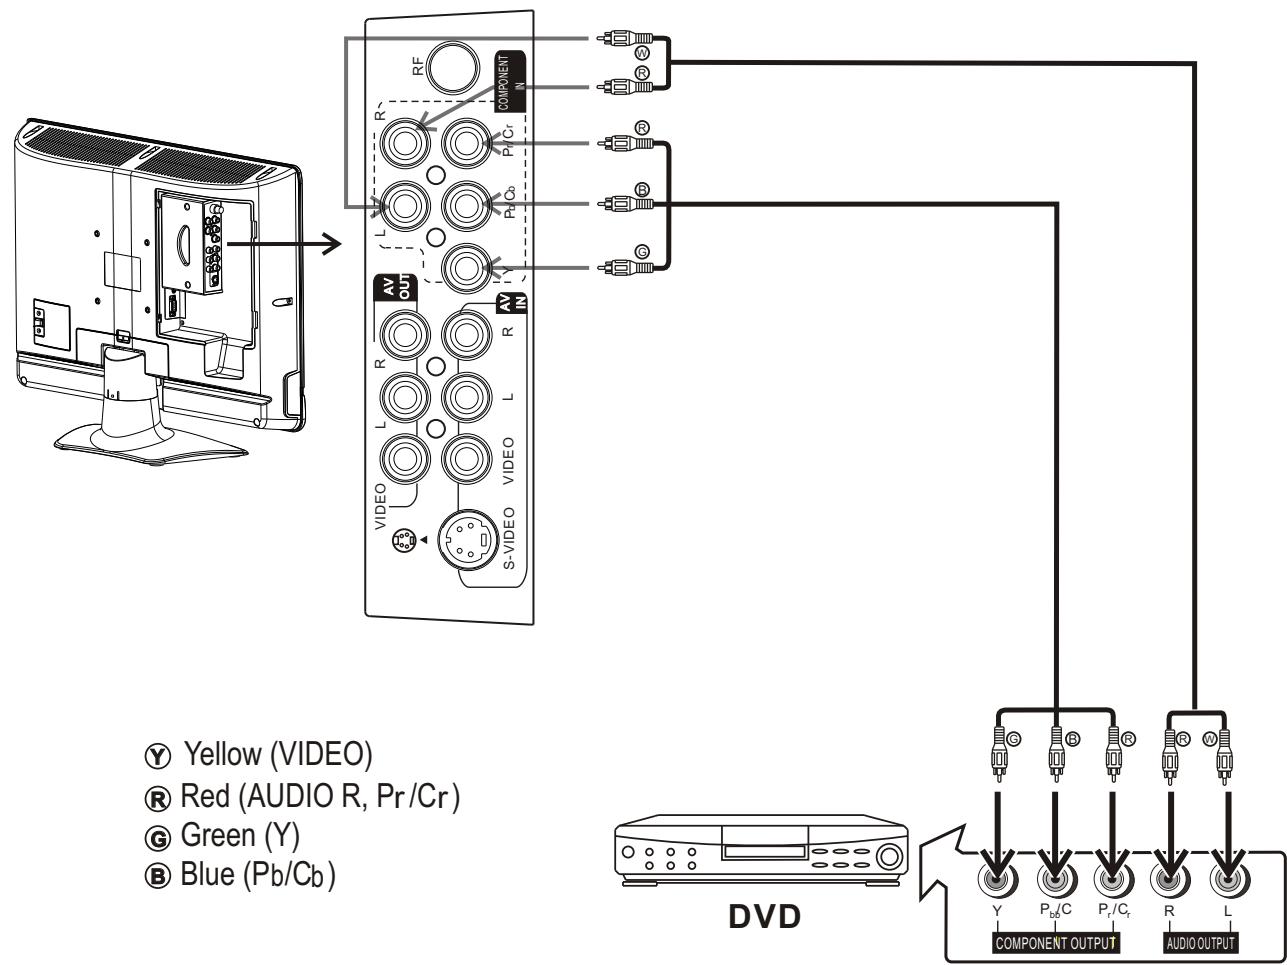
Rear of the DVD player
How to connect a DVD Player using Component Video Connections:
Connect the Video cable between the Y, Pb/Cb, Pr/Cr input jacks on the unit and Y, Pb, Pr ( or Y, Cb, Cr) output jacks on the DVD player.
Connect the Audio cable between the AUDIO input jack on the unit and AUDIO output jacks on the DVD player.
To play DVD
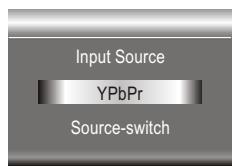
- Turn on your LCD TV, press SOURCE button repeatedly to select YPbPr.
- Turn on your DVD player.
- Insert a disc and press PLAY button.
Connect a PC
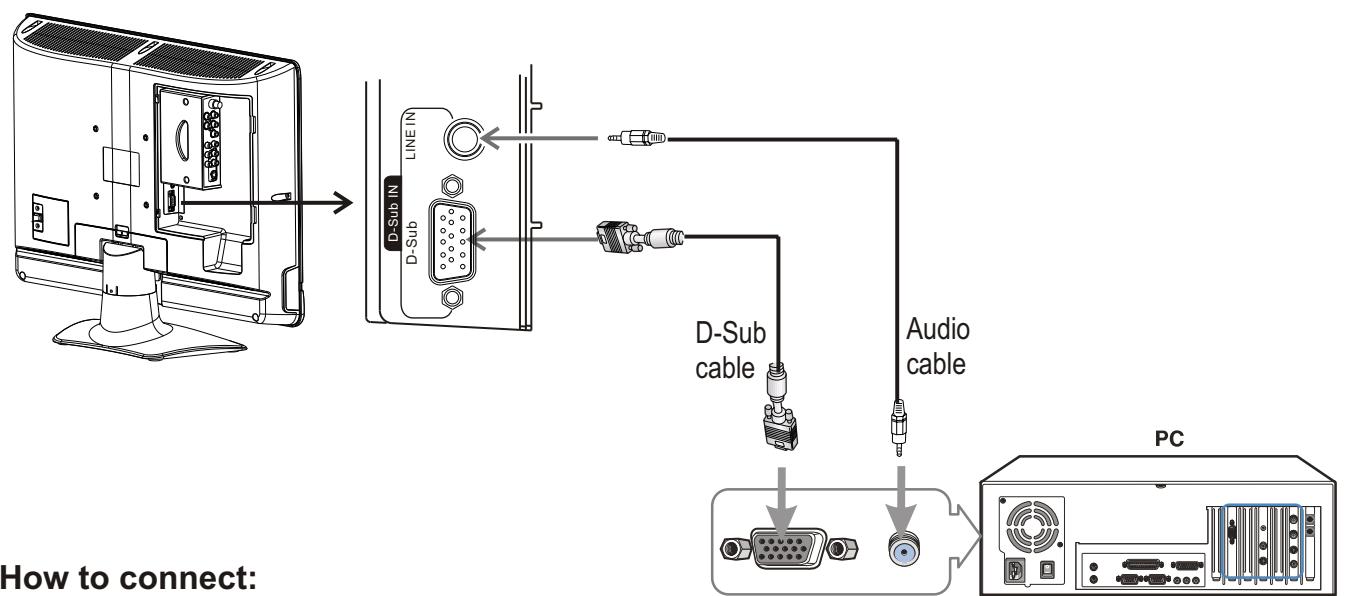
Connect a D-Sub cable between the D-Sub jack on the PC and the D-Sub input jack on the unit. Connect an Audio cable between the AUDIO output on the PC and AUDIO input jack on the unit.
To Watch the PC screen
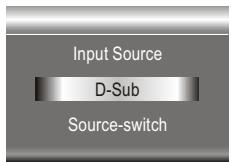
- Turn on your LCD TV, press SOURCE button repeatedly to select D-Sub.
- Turn on your PC and check for PC system requirements.
- Adjust the screen resolution and settings on your computer to the preferred settings.
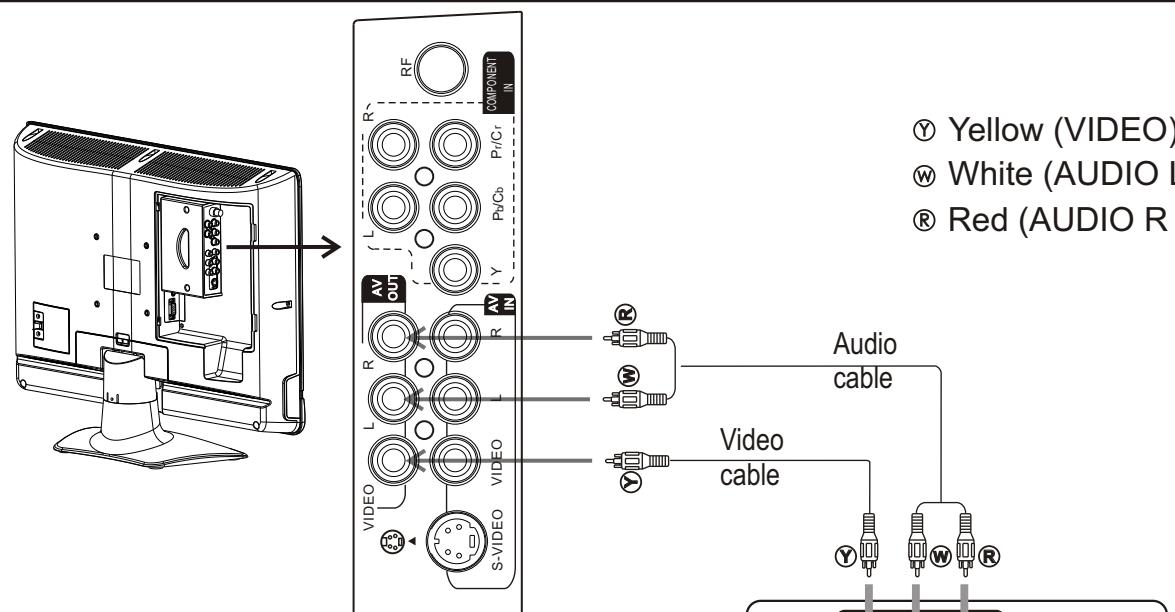
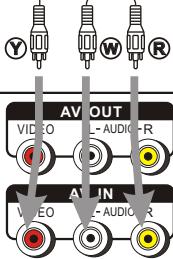
Connect a VCR for Recording
How to connect:
Connect the Audio/Video cables between the Audio (L/R)/Video jacks on the unit and VCR.
To record program
- Turn on your LCD TV, select a program you wish to record.
- Turn on your VCR, insert a videotape for recording.
- Press the Record button to begin recording.
Note:
The AV output terminals only can output TV or AV signal.
Yellow (VIDEO)
White (AUDIO L)
Red (AUDIO R)
car of the VCR
S-VIDEO
ANTIN

1
1
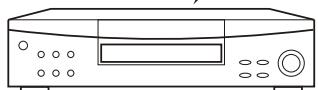
VCR for recording
Turning the Unit On and Off
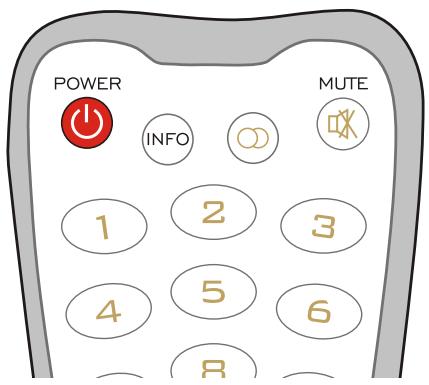
Turning On
Insert the power cord into the wall outlet.
Press the Power button on the remote control.
The unit will be turned on and you will be ready to use its features.
Turning Off
With the power on, press the Power button on the remote control to turn off.
Note:
You can also use the Power button on the control panel on the main unit.
Viewing the MENUs and Displays
Your LCD TV has a simple, easy-to-use menu system that appears on the screen. This system makes it convenient and fast to use features on the unit. The unit also lets you display the status of many of your LCD TV features.
Viewing the MENUs
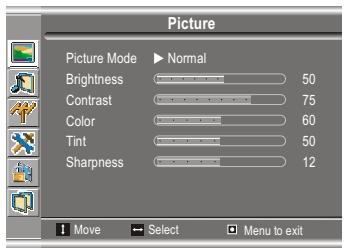
1 With the power on, press the MENU button on the remote control. The main menu appears on the screen. The picture menu is selected.
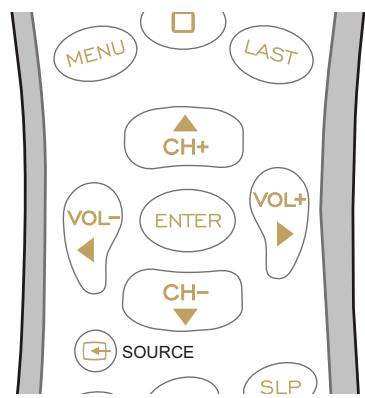
2 Use the CH + / - to select submenu page. Use ENTER or VOL+/- to access the selected submenu page.
3 Use the CH + / - to select menu item. Use VOL + / - to adjust value of item. Use ENTER or VOL + / - to confirm. you can press the MENU button repeatedly to return or exit the menu operations.
Note:
To clearly introduce the menu operations, this operation manual provides a description based on operation with the remote control.
When performing confirmation in MENU operation, you may press either ENTER or VOL+/- button.
Displaying Status Information
Press the INFO button on the remote control, the unit will display current status information such as channel number, audio mode or signal source, etc.
Your LCD TV can memorize and store all the available channels for both antenna and cable channels. After the available channels are memorized, use CH+/- to scan the channels.
Selecting the Signal Source
Before your LCD TV can memorize the available channels, you must specify the type of signal source that is connected to the unit. (i.e., an antenna or cable system)
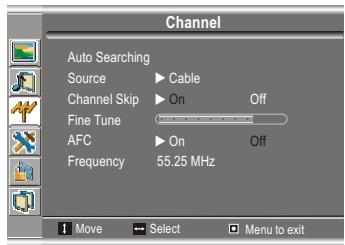
Press MENU to display the menu main page.
2 Press CH + / - repeatedly to select Channel page.
3 Press ENTER or VOL+/- to access the submenu.
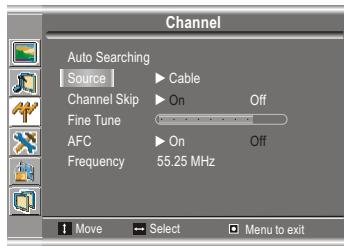
4 Press CH + / - to select Source item.
5 Press ENTER or VOL+/- to toggle between Antenna or Cable. If you are connected to an antenna, please select Antenna. If you connect cable, please select cable.
Storing Channels in Memory Automatically
1 Repeat steps 1~3 in [Selecting the Signal Source] to access Channel page.
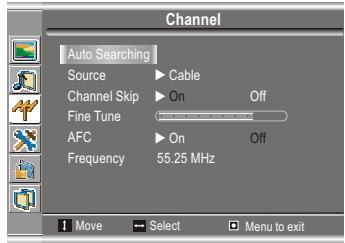
The Auto Searching item will be highlighted automatically.
2 Press ENTER or VOL+/- to store channels in memory automatically.
The unit will begin memorizing all the available channels. During the process of the Auto Search, you can press Menu to exit.

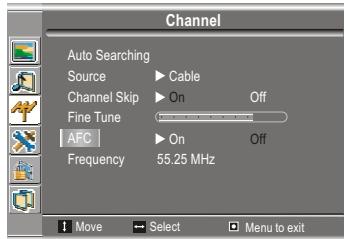
Setting Auto Frequency Control (AFC)
Repeat steps 1~3 in [Selecting the Signal Source] to access Channel page.
2 Press CH + / - repeatedly to select AFC item.
3 Press ENTER or VOL+/- to select On or Off.
When the AFC is set to On, the unit will automatically tune the program frequency to provide the best possible picture and sound.
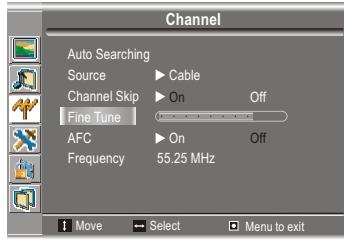
Manual Fine Tuning
Repeat steps 1~3 in [Selecting the Signal Source] to access Channel page.
2 Press CH + / - repeatedly to select Fine Tune item.
3 Press VOL+/- to fine tune till the best possible picture and sound are obtained.
If you fine tune a program manually, the AFC will be turned off automatically.
Adding and Erasing Channels
1 Use number buttons to directly select a channel that will be added or erased.
2 Repeat steps 1~3 in [Selecting the Signal Source] to access Channel page.
3 Press CH + / - repeatedly to select Channel Skip item.
4 Press ENTER or VOL+/- to select On or Off.
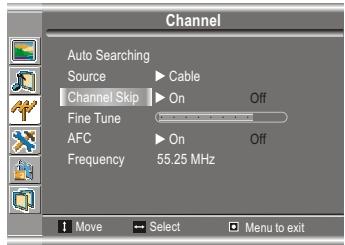
When the item is set to on, the selected channel will be erased.
When the item is set to off, the selected channel will be added.
The erased channels can not be selected by using the CH + / - buttons unless you use number buttons to input channel number directly.
Changing Channels
Using the Channel Buttons (CH+ or CH-)
Press the CH+ or CH- to change channels.
When you press the CH+ or CH- , the unit changes channels in sequence. You will see all the channels that the unit has memorized.
You will not see channels that were erased.
Direct Accessing Channels
Press the number buttons to go directly to a channel.
To select a one-digit channel: press the 0-9 number buttons to input the channel number and press ENTER or wait for some seconds to go to the selected channel.
To select a two-digit channel: press the 0-9 number buttons to input the channel number and press ENTER or wait for some seconds to go to the selected channel.
To select a three-digit channel: press the 0-9 number buttons to input the channel number one by one, then the unit goes to the selected channel.
Note:
When you use the number buttons, you can directly select channels that were erased.
Using the LAST button
Press this button to switch between the current channel and the previous channel.
Adjusting the Volume
Using the volume buttons (VOL+ and VOL-)
Press the VOL+ or VOL- to increase or decrease the volume.
Using the MUTE button
At any time, you can temporarily cut off the sound using the MUTE button.
Press the MUTE button and the sound cuts off.
2 To turn mute off, press the MUTE button again.
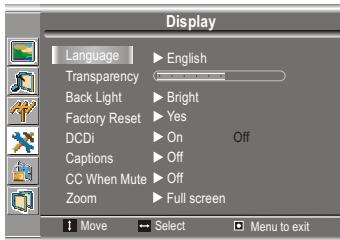
Selecting a MENU Language
Press MENU to display the menu main page.
2 Press CH + / - repeatedly to select Display page.
3 Press ENTER or VOL+/- to access the submenu. The Language item will be highlighted automatically.
4 Press ENTER or VOL+/- to toggle between English, French and Spanish.
5 Press Menu to exit.
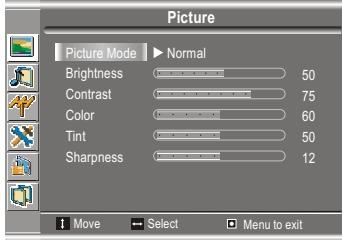
Using the Preset Picture Mode
Press MENU to display the menu main page.
The picture page will be displayed automatically.
2 Press ENTER or VOL+/- to access the Picture submenu.
The Picture Mode item is highlighted automatically.
3 Press ENTER or VOL+/- to select a desired picture mode.
You may also use the P.M button to quickly select picture mode.
There are three preset picture modes (Bright, Soft and Normal) and one user-set picture mode (User). Each preset mode has its own picture settings.
Bright: Select for a bright picture.
Soft: Select for a finely detailed picture.
Normal: Select for a normal picture.
Adjusted settings are stored in User mode.
Customizing the Picture
Press MENU to display the menu main page.
The picture page will be displayed automatically.
2 Press ENTER or VOL+/- to access the Picture submenu.
3 Press CH + / - to select the item you wish to change.
4 Press VOL+/- to adjust the value of the item.
5 Press Menu to exit.
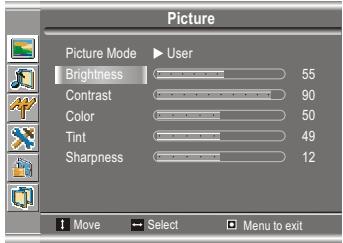
In TV/Video mode
| Option | Function | Operation | Range |
| Brightness | Adjusts screen brightness for easier viewing of dark picture such as night scenes and black hair. | VOL+ lighter VOL- darker | 0~100 |
| Contrast | Adjusts image contrast. | VOL+ stronger VOL- weaker | 0~100 |
| Color | Adjusts color saturation. | VOL+ deeper VOL- paler | 0~100 |
| Tint | Adjusts tint for image. | VOL+ greenish VOL- purplish | 0~100 |
| Sharpness | Adjusts image sharpness and displays a sharp image. | VOL+ sharper VOL- softer | 0~24 |
In D-Sub mode
| Option | Function | Operation | Range |
| Brightness | Adjusts screen brightness for easier viewing of dark picture such as night scenes and black hair. | VOL+ lighter VOL- darker | 0~100 |
| Contrast | Adjusts image contrast. | VOL+ stronger VOL- weaker | 0~100 |
| Color | Adjusts color saturation. | VOL+ deeper VOL- paler | 0~100 |
With working in D-Sub mode, this unit allows you to perform several adjustments for image
Adjusting the Picture Automatically
Press MENU to display the menu main page.
2 Press CH + / - repeatedly to select Image page.
3 Press ENTER or VOL+/- to access the Image page. The Auto Adjustment item will be highlighted automatically.
4 Press ENTER or VOL+/- again to access the Auto Adjustment page. The Auto Adjustment / Yes item will be highlighted automatically.
5 Press ENTER or VOL+/- again to start Auto Adjustment. The unit automatically adjusts phase, clock or position, etc.
Adjusting Clock and Phase
Repeat steps 1~3 in [Adjusting the Picture Automatically] to access Image page.
2 Press CH + / - repeatedly to select Clock or Phase item.
3 Press VOL+/- to adjust the value of the item until the screen is well-aligned.
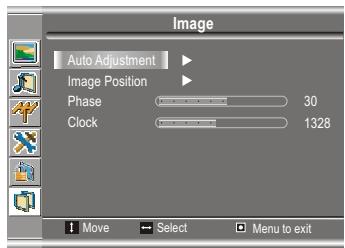

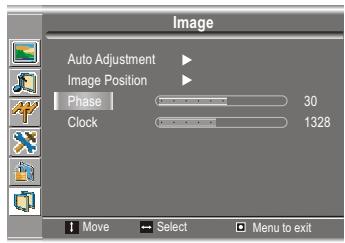
Adjust the clock frequency of the set's internal clock signal. If shimmering or rainbow-like noise is apparent in the image, try adjusting the clock frequency setting.
You may find that images blur, depending on the clock phase of your PC's Processor. If you experience blurring, you can obtain a clearer image by adjusting the phase setting. If no display at all, reduce the refresh rate to 60Hz and 1280× 768 resolution (on the computer's display menu).
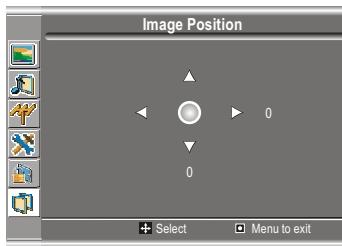
Adjusting the Image Position
The unit allows you to adjust the image position of the screen if it is not well-aligned.
Repeat steps 1~3 in [Adjusting the Picture Automatically] to access Image page.
2 Press CH + / - to select Image Position item.
3 Press ENTER or VOL+/- to access the Image Position page.
4 Press CH + / - or VOL + / - to adjust the image position until the screen is well-aligned.
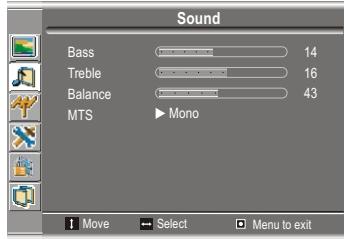
Customizing the Sound
Press MENU to display the menu main page.
2 Press CH + / - repeatedly to select Sound page.
3 Press ENTER or VOL+/- to access the submenu.
4 Press CH + / - to select Bass, Treble or Balance item.
5 Press VOL+/- to adjust the value of the item.
| Option | Function | Operation | Range |
| Bass | Adjusts Bass (low sounds) | VOL+ stronger VOL- weaker | 0~31 |
| Treble | Adjusts Treble (high sounds). | VOL+ stronger VOL- weaker | 0~31 |
| Balance | Adjusts volume balance (left and right volumes). | VOL+ Higher volume from right speaker. VOL- Higher volume from left speaker. | 0~100 |
Using the Preset Sound Mode
Use the S.M button to quickly select Sound mode.
There are three preset Sound modes (News, Movie and Music) and one user-set Sound mode (User). Each preset mode has its own audio settings.
Movie: Select for a movie program.
Music: Select for a music program.
News: Select for a speech or conversation program.
Adjusted settings are stored in User mode.
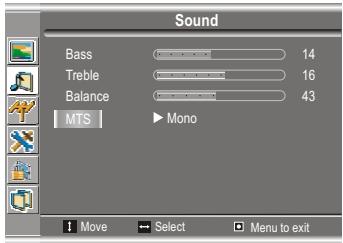
Setting Stereo Mode
This function is available in TV mode only.
Repeat steps 1~3 in [Customizing the Sound] to access Sound page.
2 Press CH + / - repeatedly to select MTS item.
3 Press ENTER or VOL+/- to select a proper stereo mode.
You may also use the STEREO button to quickly select a proper stereo mode.
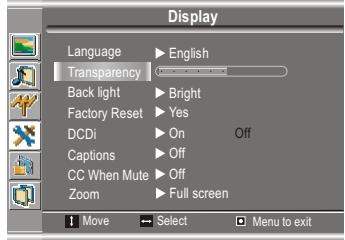
Adjusting Menu Transparency
Press MENU to display the menu main page.
2 Press CH + / - repeatedly to select Display page.
3 Press ENTER or VOL+/- to access the submenu.
4 Press CH + / - to select Transparency item.
5 Press VOL+/- to adjust transparency.
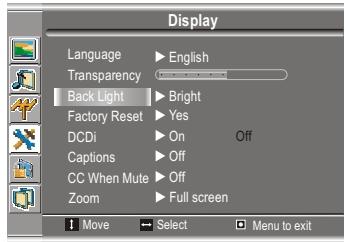
Adjusting Back Light
Repeat steps 1~3 in [Adjusting Menu Transparency] to access Display page.
2 Press CH + / - repeatedly to select Back Light item.
3 Press ENTER or VOL+/- to adjust panel back light.
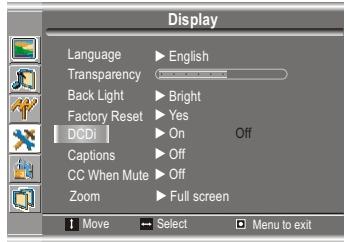
Setting DCDi Function
Repeat steps 1~3 in [Adjusting Menu Transparency] to access Display page.
2 Press CH + / - repeatedly to select DCDi item.
3 Press ENTER or VOL+/- to select On or Off.
You may set this function to On when viewing motion picture, which helps to enhance picture quality by reducing sawtooth in the motion picture.
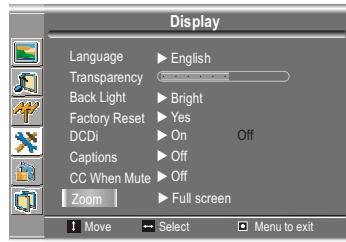
Setting Zoom Function
Repeat steps 1~3 in [Adjusting Menu Transparency] to access Display page.
2 Press CH + / - repeatedly to select Zoom item.
3 Press ENTER or VOL+/- to select Full screen or Normal.
Full screen----The image will be stretched in width to fill the screen.
Normal----The image will be displayed in 4:3 aspect ratio.
Note: If connecting a DVD player, select 16:9 in the player's set-up menu. Select Normal on TV zoom function.
Loading Default Values
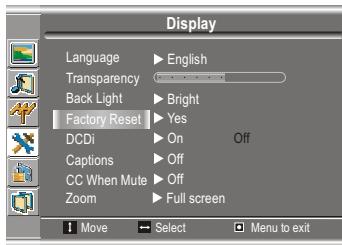
You may quickly load default values by using the Factory Reset item.
Caution: please be careful to use the Factory Reset item. Once you confirm to use this function, all your settings will be reset and the unit loads default values.
Repeat steps 1~3 in [Adjusting Menu Transparency] to access Display page.
2 Press CH + / - repeatedly to select Factory Reset item.
3 Press ENTER or VOL+/- to load default values.
Setting Sleep Timer
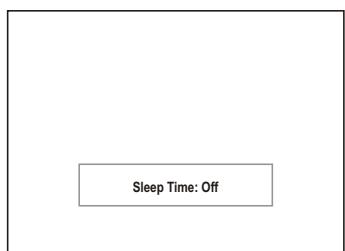
Press the SLP button repeatedly to set a sleep time to automatically turn off the unit. Each press of the button, the value changes as below.
Off 30 min. 60 min. 90 min. 120 min.
The unit decodes and displays the closed captions that are broadcast with certain TV shows. These captions are usually subtitles for the hearing impaired or foreign language translations. All VCRs record the closed caption signal from television programs, so home-recorded video tapes also provide closed captions. Most prerecorded commercial video tapes provide closed captions as well. Check for the closed caption symbol in your television schedule and on the tape's packaging:
Note:
The Caption feature does not work with YPbPr, D-Sub.
Not all the programs and videos will offer closed captioning. Please look for the symbol to ensure that captions will be shown.
Setting Closed Caption
Press MENU to display the menu main page.
2 Press CH + / - repeatedly to select Display page.
3 Press ENTER or VOL+/- to access the submenu.
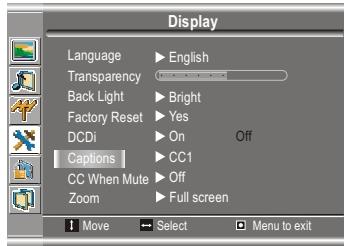
4 Press CH + / - repeatedly to select Captions item.
5 Press ENTER or VOL+/- to select a desired mode.
You may select between Off, CC1, CC2, CC3, CC4, T1, T2, T3 and T4.
The Closed Caption broadcasts can be viewed in two modes: CAPTION and TEXT. For each mode, four channels are available.
The [CAPTION] mode shows subscripts of dialogues and commentaries of TV dramas and news programs while allowing a clear view of the picture.
The [TEXT] mode displays various information over the picture (such as TV program schedule, weather forecast, etc.) that is independent of the TV programs.
Setting CC When Mute
Press MENU to display the menu main page.
2 Press CH + / - repeatedly to select Display page.
3 Press ENTER or VOL+/- to access the submenu.
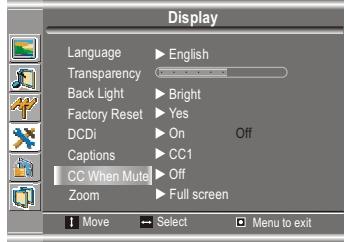
4. Press CH + / - repeatedly to select CC When Mute item.
5 Press ENTER or VOL+/- to select On or Off.
If you set this item to On, the unit displays closed caption when you mute the sound.
Parental Controls
This function allows TV programs to be restricted and TV usage to be controlled based on FCC data. It prevents children from watching violent or sexual scenes that may be harmful.
Restriction of TV programs includes two ratings that contain information about the program: the MPAA rating and the TV Parental Guidelines. The MPAA rating is restricted by age. TV Parental Guidelines are restricted by age and content.
Since a TV program may use either the MPAA rating or the TV Guidelines, both should be adjusted for complete control.
[1] Movie Rating (MPAA)
| Rating | ||
| age based | G | GENERAL AUDIENCES. All ages admitted. |
| PG | PARENTAL GUIDANCE SUGGESTED. Some material may not be suitable for children. | |
| PG-13 | PARENTAL STRONGLY CAUTIONED. Some material may be inappropriate for children under 13 | |
| R | RESTRICTED. Under 17 requires accompanying parent or adult guardian. | |
| NC-17 | NO ONE 17 AND UNDER ADMITTED. | |
| X | X Rating is an older rating that is unified with NC-17 but may be encoded in the data of older Movies | |
Note:
The Movie rating is only age-based.
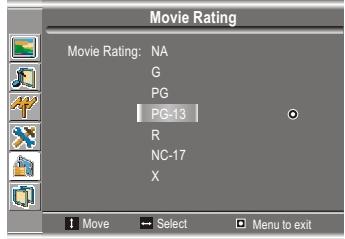
Example 1:
"PG-13" in the age based rating is blocked, this will automatically block the higher ratings "R", "NC-17", "X" also.
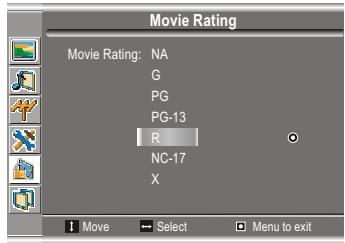
Example 2:
"R" in the age based rating is blocked, this will automatically block the higher rating "NC-17", "X" also.
[2] TV Rating
| Rating | Content based | |||||
| D | L | S | V | FV | ||
| age based | TV-Y (All children) | × | × | × | × | × |
| TV-Y7 (Direct to Older Children) | × | × | × | × | ● | |
| TV-G (General Audience) | × | × | × | × | ||
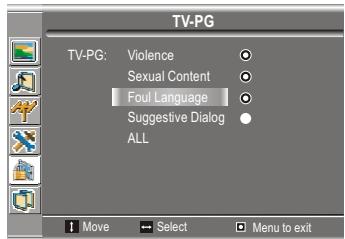
| TV-PG (Parental Guidance Suggested) | ● | ● | ● | ● | ||
| TV-14 (Parents Strongly Cautioned) | ● | ● | ● | ● | ||
| TV-MA (Mature Audience Only) | ● | ● | ● | |||
Content Rating can be set but this Rating is not normally broadcast by TV Station.
D: Suggestive Dialog
L: Foul Language
S: Sexual Content
V: Violence
FV: F Violence
Content Rating can be set.
Note:
Age-based ratings can be modified by the content-based ratings but only in the combinations indicated by an in the table above.
Choosing lower age-based rating blocks the higher age-based ratings regardless of content ratings settings.
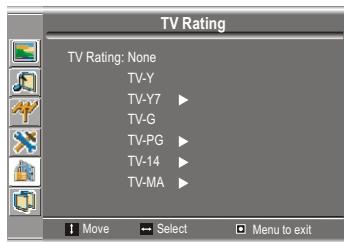
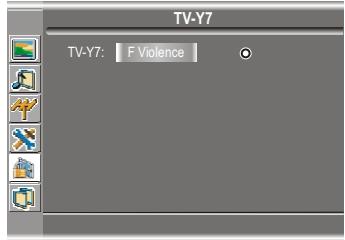
Example 1:
When TV-Y7 in the age-based rating is set to BLOCK, this will automatically block the higher ratings: TV-G, TV-PG, TV-14 and TV-MA.
Example 2:
When TV-14 in the age-based rating is set to BLOCK, this will automatically block the higher ratings: TV-MA.
In addition, if you block "L" sub-rating in TV-PG, then the TV-14 and TV-MA will automatically be blocked.
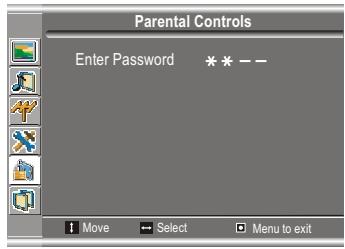
Accessing the Parental Controls Menu
Press MENU to display the menu main page.
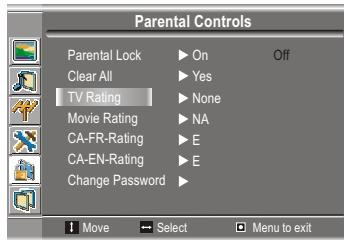
2 Press CH + / - to display Parental Controls page.
3 Press ENTER or VOL+/- to access the password checking page.
4 Input the correct password with 0-9 number buttons. The default password is 1111, you may change the password yourself.
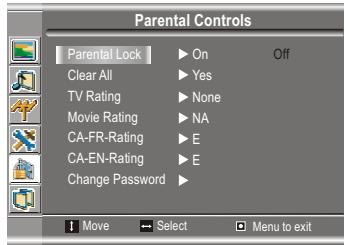
5 Press ENTER or VOL+/- to access the Parental Controls menu.
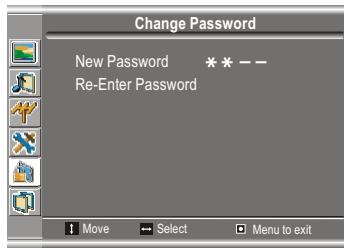
Changing the Password
From the Parental Controls menu, press CH+/- repeatedly to select Change Password item.
2 Press ENTER or VOL+/- to confirm.
3 Input a new password and press ENTER or VOL+/- to confirm.
4 Re-input the new password and press ENTER or VOL+/- to confirm. Now the password is changed successfully. Be sure to write down your password and retain it for future use.
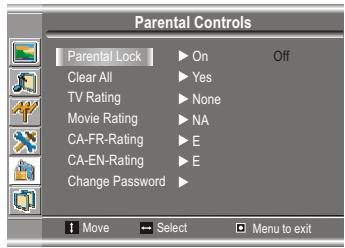
Turn On or Off Parental Lock Control Function
From the Parental Controls menu, press CH+/- repeatedly to select Parental Lock item.
2 Press VOL+/- to select On or Off. If you want to validate Parental Lock Control settings, you need to set this item to On.
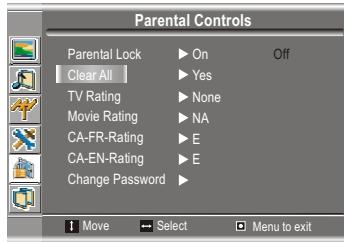
Clear Parental Control Settings
From the Parental Controls menu, press CH + / - repeatedly to select Clear All item.
2 Press ENTER or VOL+/- to clear all your parental control settings.
Caution: please be careful to use this function. Once you confirm to use this function, all your settings will be cleared.
Adjusting the Movie Rating
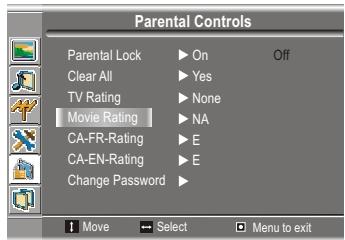
Repeat steps 1~5 in [Accessing the Parental Controls Menu].
2 Press CH+/- to select Movie Rating item.
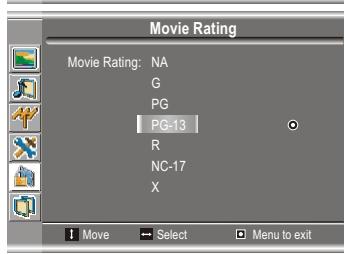
3 Press ENTER or VOL+/- to display Movie Rating page.
4 Press CH + / - to select a movie rating to be set.
5 Press ENTER or VOL+/- to confirm blocking and MENU to return. When "PG-13" in the age-based rating is blocked, this will automatically block the higher ratings "R", "NC-17", "X" also.
Adjusting the TV Rating
Repeat steps 1~5 in [Accessing the Parental Controls Menu].
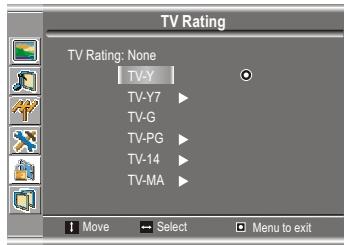
2 Press CH+/-to select TV Rating item.
3 Press ENTER or VOL+/- to display TV Rating page.
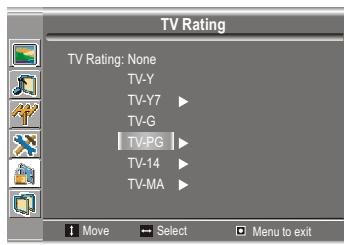
4 Press CH + / - to select an age rating to be set.
5 Press ENTER or VOL+/- to confirm blocking.
When TV-Y in the age-based rating is set to BLOCK, this will automatically block the higher ratings: TV-Y7, TV-G, TV-PG, TV-14 and TV-MA.
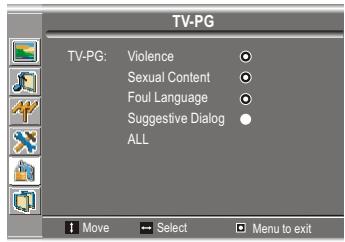
For those ratings with content sub-rating, the sub-rating page appears on for your further setting, for example, TV-PG.
6 Press CH + / - to select a content rating to be set.
7 Press ENTER or VOL+/- to confirm blocking.
When TV-PG in the age-based rating is set to BLOCK, this will automatically block the higher ratings: TV-14 and TV-MA.
Note:
Since a TV program may use either the MPAA rating or the TV Guidelines, both should be adjusted for complete control.
Adjusting Canadian English Rating
From the Parental Controls menu, press CH+/- repeatedly to select CA-EN-Rating item.
2 Press ENTER or VOL+/- to access the CanEng Rating page.
3 Press CH + / - to select a desired rating to be set.
4 Press ENTER or VOL+/- to confirm blocking and MENU to return.
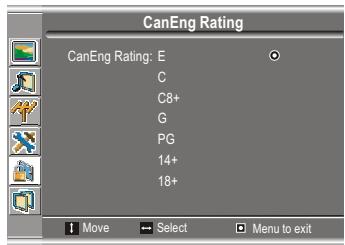
CANADIAN ENGLISH RATING CHART
| E | Exempt - Exempt programming includes: news, sports, documentaries and other information programming, talk shows, music videos, and variety programming. |
| C | Programming intended for children under age 8. No offensive language, nudity or sexual content. |
| C8+ | Programming generally considered acceptable for children 8 years and over. No profanity, nudity or sexual content. |
| G | General programming, suitable for all audiences. |
| PG | Parental Guidance suggested. Some material may not be suitable for children. |
| 14+ | Programming contains themes or content which may not be suitable for viewers under the age of 14. Parents are strongly cautioned to exercise discretion in permitting viewing by pre-teens and early teens. |
| 18+ | Intended for viewers 18 years and older and might contain depictions of violence. |
Adjusting Canadian French Rating
From the Parental Controls menu, press CH+/- repeatedly to select CA-FR-Rating item.
2 Press ENTER to access the CanFR Rating page.
3 Press CH + / - to select a desired rating to be set.
4 Press ENTER or VOL+/- to confirm blocking and MENU to return.
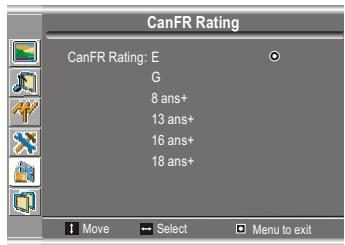
CANADIAN FRENCH RATING CHART
| E | Exempt - Exempt programming. |
| G | General - Programming intended for audience of all ages. Contains no violence, or the violence content is minimal or is depicted appropriately. |
| 8 ANS+ | 8+ General - Not recommended for young children. Programming intended for a broad audience but contains light or occasional violence. Adult supervision recommended. |
| 13 ANS+ | Programming may not be suitable for children under the age of 13 - Contains either a few violent scenes or one or more sufficiently violent scenes to affect them. Adult supervisionstrongly suggested. |
| 16 ANS+ | Programming may not be suitable for children under the age of 16 - Contains frequent scenes of violence or intense violence. |
| 18 ANS+ | Only for adult viewing. Could contain frequent violent scenes and extreme violence. |
Before calling for repair service, check the following items for possible remedies to the encountered symptoms.
| Symptoms | Check item |
| "Ghost" or double images | ·This may be caused by obstruction to the antenna due to high rise buildings or hills. Using a highly directional antenna may improve the picture. |
| No power | ·Check that the AC power cord is plugged into the mains socket. ·Unplug the power cord, wait for 60 seconds. Then re-insert plug into the mains socket and turn on the unit again. |
| No picture | ·Check antenna connections at the rear of the unit to see if it is properly connected to the unit. ·Possible broadcast station trouble. Try another channel. ·Adjust the contrast and brightness settings. ·Check the Closed Captions control. Some TEXT modes could block the screen. ·Select a correct input. ·Is a non-compatible signal being input? |
| Good picture but no sound | ·Increase the VOLUME. ·Check that the unit is not muted. |
| Good sound but poor color | ·Adjust the contrast, color and brightness settings. |
| Poor picture | ·Sometimes, poor picture quality occurs when having activated an S-VHS camera or camcorder connected and having connected another peripheral at the same time. In this case, switch off one of the other peripherals. ·Check whether the room is too bright. |
| Horizontal dotted line | ·This may be caused by electrical interference (e.g. Hairdryer, nearby neon lights, etc.). ·Turn off the equipment. |
| Television not responding to remote control | ·Check whether the batteries are working. Replace if necessary. ·Clean the remote control sensor lens on the unit. ·Do not use the remote control under strong or fluorescent lighting. ·The batteries should be inserted with polarity (+,-) aligned. |
| Snowy picture and noise | ·Check the antenna connection. |
| No stable or not synchronized D-Sub picture | ·Check if you have selected the correct D-Sub mode in your PC. |
| No output from one of the speakers | ·Adjust Balance in the SOUND menu. |
| Control buttons do not work | ·Unplug the power cord, wait for some seconds. Then re Plug the power cord and turn on the unit again. |
■ Do not use in hot or cold rooms (locations)
- When the unit is used in rooms (locations) with low temperature, the picture may leave trails or appear slightly delayed. This is not a malfunction, and the unit will recover when the temperature returns to normal.
- Do not leave the unit in a hot or cold location. Also, do not leave the unit in a location exposed to direct sunlight or near a heater, as this may cause the cabinet to deform and the LCD panel to malfunction.
(Storage temperature: 0^ to +50^
Working temperature: 5^ to +40^
Note:
If your problem is not solved, turn your unit off and then on again once.
Never attempt to repair a defective unit yourself.
LCD Display panel information
Important Information Regarding Use of Video Games, Computers, Captions or Other Fixed Image Displays.
The extended use of fixed image program material can cause a permanent "shadow image" on the LCD panel.
This background image is viewable on normal programs in the form of a stationary fixed image. This type of irreversible LCD panel deterioration can be limited by observing the following steps:
A. Reduce the brightness/contrast setting to a minimum viewing level.
B. Do not display the fixed image for extended periods of time.
C. Turn the power off when not in actual use.
Note:
The marking or retained image on the LCD panel resulting from fixed image use is not an operating defect and as such is not covered by Warranty. This product is not designed to display fixed image patterns for extended periods of time.
Cleaning and Maintenance
To clean this unit, wipe with a soft, dry cloth.
If the surfaces are extremely dirty, use a soft cloth dipped in a soap and water solution or a weak detergent solution.
- Use eyeglass cleaner to remove stubborn dirt from the LCD.
- Never use alcohol, paint thinner or benzine to clean this unit.
- Before using a chemically treated cloth, read the instructions that came with the cloth carefully.
Power supply: AC 100-240V 50/60Hz
Power Consumption: 70W
Dimensions(mm): 21.4 (W) x 6.9 (D) x 17.8(H)
Weight(kg): 17.6
Screen: 19"
Resolution: 1440 × 900
Scanning: Progressive and Interlace
TV system & channel coverage:
SYSTEM VHF UHF CATV
NTSC-M 2-13 14-69 1-125
TV system: NTSC-M
Speaker: 8W, 8ohm x 2
Accessories Operating manual X 1
Remote control unit X 1

Note: Design and specification are subject to change without notice.
SANYO COMFORT WARRANTY
WARRANTY APPLICATION
New, unused Sanyo Color Television products purchased in Canada through a Sanyo authorized dealer are warranted against manufacturing defects in materials and workmanship for ONE YEAR for parts and labor, from the date of purchase by the original retail purchaser for non-commercial use. This warranty only applies in favor of the original retail purchaser of the warranted product.
SANYO CANADA INC.'S RESPONSIBILITY
During the warranty period, SANYO Canada Inc. will repair, or at our option, replace a Color Television product which shows evidence of a manufacturing defect in materials or workmanship.
Replacement PARTS are warranted for the remaining portion of the warranty period.
WHAT IS NOT COVERED
(a) Color Television products purchased outside Canada.
(b) Color Television products purchased in a used condition.
(c) Problems due to product set-up and installation.
(d) Adjustments that are outlined in the Operating Manual.
(e) Accessory items including antenna, batteries and connecting cables.
(f) Damage in or due to transportation.
(g) Damage due to improper maintenance, accident, abuse, misuse or negligence.
(h) Damage caused by lightning and power surges.
ORIGINAL RETAIL PURCHASER'S RESPONSIBILITY
You, the original retail purchaser, must present your original, dated bill-of-sale together with this warranty to SANYO Canada Inc. or to an authorized Sanyo Service Depot* when you make a claim under this warranty.
You, the original retail purchaser, are responsible for any costs of TRANSPORTING the product to and from SANYO Canada Inc. or an authorized Sanyo Service Depot. You also are responsible for the cost of any MAINTENANCE necessary in respect of the product.
*In-home service is only available to the units whose screen size is 25 inches or over, and limited to the locations within a 30-km radius of any authorized Sanyo Service Depot, throughout Canada.
WARRANTY BECOMES Void This warranty becomes void if the product's serial numbers are altered or removed or if any repair to the product is made other than by SANYO Canada Inc. or by an authorized Sanyo Service Depot.
LIMITATIONS
(a) SANYO Canada Inc. reserves the right to change or improve the design of the model of the product warranted hereunder without incurring any obligation to make any modifications to or to install any improvement in or on the product.
(b) In no event shall SANYO Canada Inc. or any of its Authorized Dealers be liable for special or consequential damage arising from the use of this product.
STATUTORY WARRANTY
The above provisions do not preclude the operation of any applicable provincial statute which in certain circumstances may not allow some of the limitations and exclusions described in this Warranty. Where any terms of this Warranty are prohibited by such a statute, they shall be deemed null and void but the remainder of this warranty shall remain in effect.
HOW TO OBTAIN WARRANTY SERVICE
Please contact the Sanyo Authorized Dealer from whom the product was purchased or contact us directly at:
SANYO Canada Inc.
300 Applewood Cres.
Concord Ont. L4K 5C7
(905) 760-9944
1-800-263-2244
- INSTRUCTION MANUAL
- CAUTION
- FCC STATEMENT
- FCC Notice
- LCD TV: A CLASS B digital device
- FCC CAUTION:
- NEC—NATIONAL ELECTRICAL CODE
- Using the Remote Control
- Cautions regarding use of remote control
- Batteries for the Remote Control
- Precaution on battery use
- Antenna Connection
- CABLE TV (CATV) CONNECTION
- ANTENNAS
- OUTDOOR ANTENNA CONNECTION
- Main Unit
- Note:
- Removing the Back Cover
- Cautions Before Connecting
- Connect a VCR
- How to connect:
- To play VCR
- To playback Camcorder
- Connect a DVD player
- How to connect a DVD Player using Component Video Connections:
- To play DVD
- To Watch the PC screen
- To record program
- Turning the Unit On and Off
- Turning On
- Turning Off
- Viewing the MENUs and Displays
- Viewing the MENUs
- Displaying Status Information
- Selecting the Signal Source
- Storing Channels in Memory Automatically
- Setting Auto Frequency Control (AFC)
- Manual Fine Tuning
- Adding and Erasing Channels
- Changing Channels
- Using the Channel Buttons (CH+ or CH-)
- Direct Accessing Channels
- Using the LAST button
- Using the MUTE button
- Selecting a MENU Language
- Using the Preset Picture Mode
- Customizing the Picture
- Adjusting the Picture Automatically
- Adjusting Clock and Phase
- Adjusting the Image Position
- Customizing the Sound
- Using the Preset Sound Mode
- Setting Stereo Mode
- Adjusting Menu Transparency
- Adjusting Back Light
- Setting DCDi Function
- Setting Zoom Function
- Loading Default Values
- Setting Sleep Timer
- Setting Closed Caption
- Setting CC When Mute
- Parental Controls
- [1] Movie Rating (MPAA)
- Example 1:
- Example 2:
- Accessing the Parental Controls Menu
- Changing the Password
- Turn On or Off Parental Lock Control Function
- Clear Parental Control Settings
- Adjusting the Movie Rating
- Adjusting the TV Rating
- Adjusting Canadian English Rating
- CANADIAN ENGLISH RATING CHART
- Adjusting Canadian French Rating
- CANADIAN FRENCH RATING CHART
- ■ Do not use in hot or cold rooms (locations)
- LCD Display panel information
- Cleaning and Maintenance
- To clean this unit, wipe with a soft, dry cloth.
- SANYO COMFORT WARRANTY
- WARRANTY APPLICATION
- SANYO CANADA INC.'S RESPONSIBILITY
- WHAT IS NOT COVERED
- ORIGINAL RETAIL PURCHASER'S RESPONSIBILITY
- LIMITATIONS
- STATUTORY WARRANTY
- HOW TO OBTAIN WARRANTY SERVICE
Marque : SANYO
Modèle : AVL-193
Catégorie : Téléviseur