
DAS-202 - Répondeur téléphonique SANYO - Notice d'utilisation et mode d'emploi gratuit
Retrouvez gratuitement la notice de l'appareil DAS-202 SANYO au format PDF.


| Type de produit | Répondeur téléphonique numérique |
| Marque | SANYO |
| Modèle | DAS-202 |
| Capacité d'enregistrement total | 40 minutes |
| Durée maximale par message | 60 secondes |
| Messages d'accueil (OGM) | 2 messages (OGM1 et OGM2) |
| Alimentation principale | Adaptateur secteur 9V CC, 300mA |
| Alimentation de secours | 4 piles AAA (non incluses) |
| Affichage | LED à 2 chiffres |
| Fonctions téléphoniques | Écran d'appel, économiseur de sonnerie, suivi des appels (Call Screening) |
| Contrôle à distance | Oui, avec code de sécurité (défaut 159) |
| Fonctionnalités supplémentaires | Mémos, enregistrement bidirectionnel, code d'urgence CBT |
| Entretien et nettoyage | Garder au sec, éviter les chocs, ne pas modifier les composants internes |
| Sécurité | Ne pas utiliser près de l'eau, utiliser uniquement les piles recommandées, respecter les instructions de sécurité |
| Garantie | 1 an pièces et main-d'œuvre (Canada) |
| Réparabilité | Réparations par un centre agréé SANYO |
FOIRE AUX QUESTIONS - DAS-202 SANYO
Questions des utilisateurs sur DAS-202 SANYO
0 question sur cet appareil. Repondez a celles que vous connaissez ou posez la votre.
Poser une nouvelle question sur cet appareil
Téléchargez la notice de votre Répondeur téléphonique au format PDF gratuitement ! Retrouvez votre notice DAS-202 - SANYO et reprennez votre appareil électronique en main. Sur cette page sont publiés tous les documents nécessaires à l'utilisation de votre appareil DAS-202 de la marque SANYO.
MODE D'EMPLOI DAS-202 SANYO
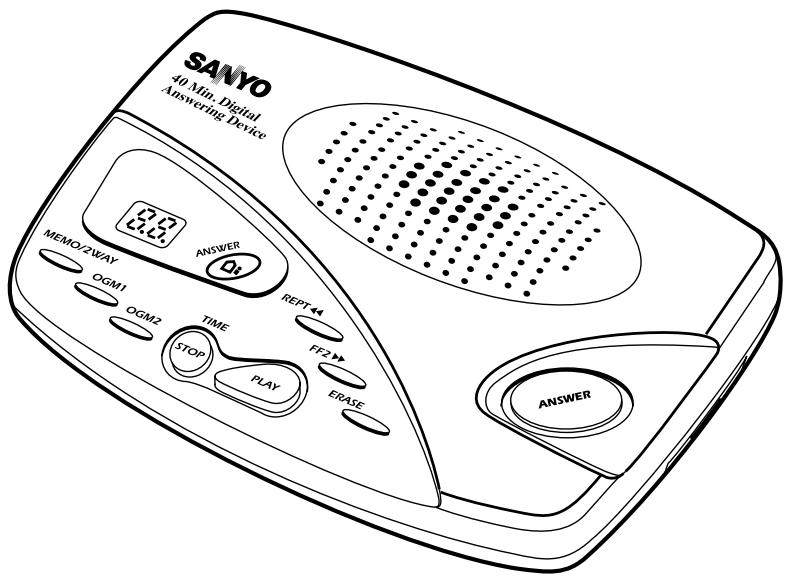
Fully Digital
Answering
System
SANYO
DAS 202
INSTRUCTION MANUAL
Please read this operation manual before using your new answering machine and keep it for further reference
QUICK INSTRUCTIONS
- Setting the Time
- Press and hold 'STOP/TIME' to enter the SET CLOCK mode
- Press the FF c Key or the REPT d Key to adjust the day
- Press 'STOP/TIME' again to set the day
- Repeat to set Hours and Minutes
- Playing the Current Time
- Press 'STOP/TIME'
• Recording the Outgoing Message (OGM)
- Press and hold 'OGM1
- Speak clearly into the microphone with your message
- Press 'STOP/TIME' to stop recording
- Repeat the process for 'OGM2'
- Recording a Memo
- Press and hold 'MEMO/2WAY' for 2 seconds
- Speak clearly into the microphone with your message
- Press 'STOP/TIME' to stop recording
• 2 Way Recording
- Press and hold 'MEMO/2WAY' for 4 seconds
- Have a normal conversation on your telephone
- Press 'STOP/TIME' to stop recording
- Playing a Memo
- Press 'MEMO/2WAY' or 'PLAY'
- Setting to Answer/Record Mode or Answer Only Mode
- If the system is in Answer Only Mode, press and hold 'ANSWER' for about 2 seconds.
- The DAS 202 will beep and OGM1 will play.
- Repeat the process to return the system to ANSWER ONLY MODE.
- The DAS 202 will beep and OGM2 will play
- To turn on/off the answering system, press 'ANSWER'
- Playing Messages
- Playback Press 'PLAY'
- Pause Message Press 'PLAY'
-
Resume Playback from Pause Press 'PLAY'
-
Repeat Message
Press 'REPT d' once to replay current message, twice to replay the previous message
- Skip Message
Press 'FF c' once to skip the current message, multiple times to skip through more than one message
- Erase Single Message
Press 'ERASE' while message is playing
- Stop Playback
Press 'STOP/TIME'
- Erase and Save ALL Messages ALL
Press and Hold 'ERASE' to erase
Messages. To restore or save all messages, press and hold 'ERASE' again
• 40-Minute Total Recording Time
- The DAS 202 has 40-minute memory capacity in total to record your outgoing messages, incoming message, memos and 2-way conversation.
• Security Code Remote Control
- Refer to "Remote Control Functions Table" on Page 12/13.
LOCATION AND FUNCTION OF CONTROLS
-
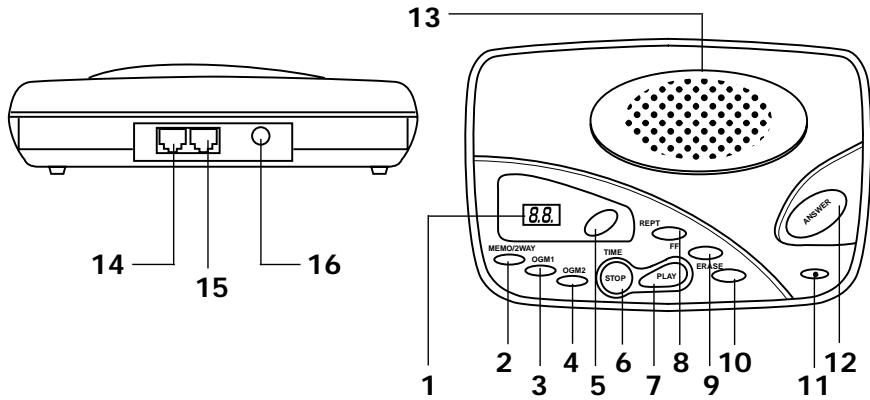
Message LED Indicator – Indicates the DAS 202 Answering Machine's current status.
-
'A1' or 'A2' flashes four times on the display to indicate that there is no outgoing message (greeting) recorded.
- 'CL' flashes once on the display to indicate that the time is not set
- A ‘Number’ displayed before playing your messages back indicates the total number of messages currently in the DAS-202's Memory.
-
A 'Number' displayed while playing your messages back indicates the sequential number of the message currently being played.
-
MEMO/2WAY Key – Allows you to leave messages for other family members when you leave the house. Also allows you to record both sides of a conversation you are having on the telephone.
3/4.OGM1/OGM2 Keys –The DAS 202 allows you to record two outgoing messages. OGM1 is a conventional message, and OGM2 is an “answer only” message. The DAS 202 will automatically switch to the OGM2 message if your memory is full and the unit is unable to take a message. - ANSWER LED Indicator – Lights up when the DAS 202 is ready to answer calls, and flashes when you have messages.
- STOP/TIME Key – Stops current operation, plus allows you to either set the time or hear the current time.
- PLAY Key – Press to play recorded messages.
-
REPT d Key – Repeats the current or previously played message.
-
FF c Key - Skips to the next sequential message.
- ERASE Key – Can be used to erase a single message or all messages in memory.
- Microphone – Used to record outgoing messages and memos.
- ANSWER Key - Used to set the Answer Mode.
- Speaker
- MODULAR LINE JACK – Used to connect the DAS 202 to your household phone jack.
- MODULAR PHONE JACK – Used to connect the DAS 202 to your telephone.
- Adapter Jack - Used to connect the DAS 202 to the supplied AC power adapter.
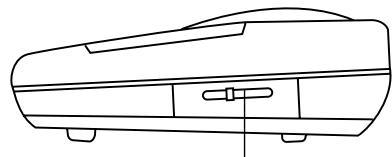
- Volume Control (VOL) - Used to adjust the speaker volume.
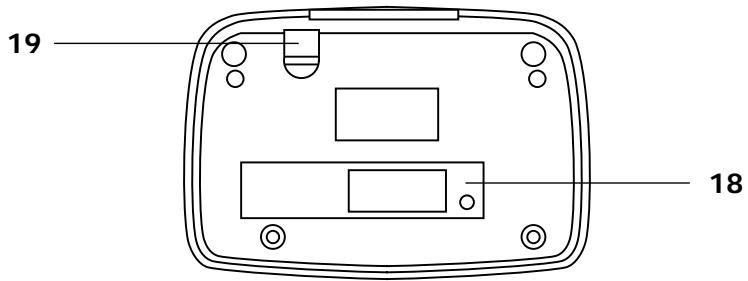
- BATTERY COVER – Houses the Memory Backup Batteries. (Batteries not included)
- Adapter Cord Holder – Prevents the AC adapter cord from falling out. (Adapter included)
natural_image
Line drawing of a car front view showing roof, side panels, and dashboard (no text or symbols)17
INSTALLATION
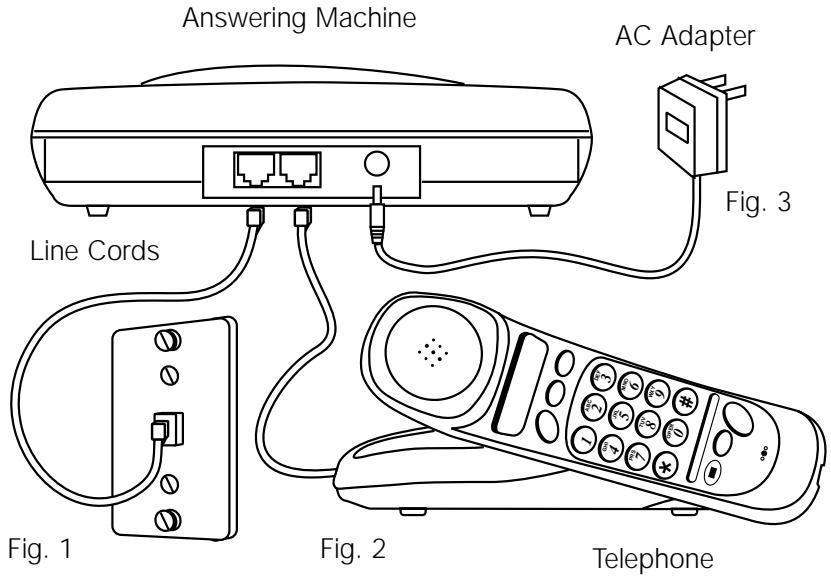
- The DAS 202 includes a modular telephone line cord with a modular plug at each end. Insert one plug into the LINE input jack on the DAS 202, and the other end into your household telephone jack (Fig.1). You may have to unplug your telephone to do this.
- To use a phone in the same area as the DAS 202, simply plug the telephone into the TEL input jack on the DAS 202 (Fig. 2).
- Connect the AC Power Adapter (DC 9V 300mA) to any standard electrical outlet (AC 120V) and plug the other end into the DC power input jack on the DAS 202 (Fig. 3). (AC power adapter included)
Battery Installation — Install the batteries for saving the memory after the DAS 202 AC adapter has been connected and the time/day has been programmed. You will not be able to program the time/day if the batteries are installed first.
If the battery power is low or batteries are not installed, the low battery message "Lo" will flash on the LED display. You need to replace or install batteries as per the following instructions.
BATTERY INSTALLATION
Your DAS 202 Answering Machine is equipped with Battery Backup. In the event of a power failure, the Battery Backup will prevent the loss of saved messages.
Please follow these simple instructions to install your batteries.
natural_image
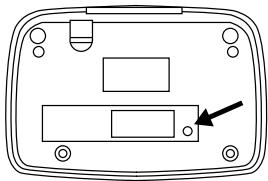
Diagram of a device rear panel with buttons and a black arrow pointing to a component (no text or symbols)Unscrew the
Battery Cover
natural_image
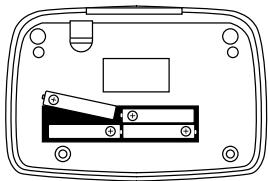
Pure technical diagram of a device casing with internal components and mounting holes (no text or symbols)Remove the
Battery Cover
Insert 4 Fresh
'AAA' Batteries
as per the
Diagram.
natural_image
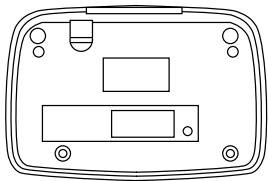
Front view of a device casing with internal compartments and mounting holes (no text or symbols)Replace the
Battery Cover
and Tighten the Screw.
PLEASE READ BEFORE OPERATION
After plugging in the AC Adapter, the DAS 202 will automatically turn on and the LED will display the numbers 0 to 60. After about 60 seconds, you will hear a long beep. The LED will then indicate the following.
-
A1 or A2 flashes four times indicating that there is no outgoing message (greeting) recorded.
-
CL flashes once indicating that the DAS 202 time and date have not been set up.
-
0 flashes indicating there are no incoming messages in the memory.
-
If ER flashes once, this indicates that the DAS 202 needs to be reset. Please disconnect the unit from power, and then re-connect it.
OPERATING INSTRUCTIONS
BASIC USE
Setting the Time
When the DAS 202's LED displays 'CL', the timer needs to be set using the following procedure
- Press and hold the 'STOP/TIME' key for approximately 2 seconds, and release when the DAS 202 announces the day.
- Press the 'FF c' key or the 'REPT d' key to select the correct day of the week.
- Press the 'STOP/TIME' key again to set the day. The hour will then be announced.
- Repeat steps 2. and 3. for hours and minutes.
- After the minutes are set, the exact time will be announced.
Note: If no key is pressed within 8 seconds, the DAS 202 will return to normal mode.
Playing the Current Time
- Press the 'STOP/TIME' key. The current time will be announced.
Recording Outgoing Messages (OGM)
- OGM1 should be a conventional message, requesting the caller to leave a message. Complete the following steps to record your OGM1 message:
- Press and hold the 'OGM1' key for approximately 2 seconds and release after you hear a long beep. The LED will indicate 'A1', and then '0'.
- At the end of the beep, speak in a clear voice directly into the microphone, which is located on the bottom right hand corner of the DAS 202.
- When you have completed your OGM1 message, press 'STOP/TIME'.
- The LED will indicate 'A1', and the OGM1 message will playback.
- If you are satisfied with the message, proceed to record the OGM2 message.
- If you are not satisfied with the message, repeat this process and re-record your message.
The outgoing messages (OGM A1/A2) can be a maximum of 60 seconds (1 minute) in length.
The maximum time available for recording incoming messages (ICM) is 40 minutes total. Each incoming message has a maximum record time of 60 seconds (1 minute) per message. During an incoming call the caller will receive a "beep" tone after 45 seconds to indicate that they have 15 seconds left to complete their message. After 60 seconds the answering machine will
disconnect the line and hang-up even if the caller is still talking. Therefore, it is recommended that in your outgoing (OGM A1/A2) greeting message that you tell the caller that they only have 60 seconds (1 minute) in which to complete their message.
- OGM2 should be an Answer-Only message. This is used when you prefer not to take messages and is automatically activated if the DAS 202's memory is full. To record an OGM2 message, follow the above instructions using the OGM2 button in place of the OGM1 button.
Setting to Answer/Record Mode or Answer Only Mode
- Note: When power is on, the system is always in either one of these 2 modes.
- If the system is in Answer Only Mode, press 'ANSWER' for about 2 seconds The DAS 202 will beep and the LED will show 'A1' while OGM1 playing. The DAS 202 is now in Answer/Record Mode.
- Repeat the process to return the system to ANSWER ONLY MODE The DAS 202 will beep and the LED will indicate 'A2' while OGM2
playing.
- The DAS 202 can be turned off or on by simply tapping the answer key.
Recording Incoming Calls
- When the DAS 202 is in Answer/Record mode, it will answer the telephone after the second (or fourth) ring*, then will play your OGM1 message. At the end of the OGM1 message a beep will sound, indicating to your caller that they may begin speaking. The DAS 202 allows callers to leave a message. At the end of the message, the DAS 202 will sound a long beep, indicating that the recording time is over.
\*Ring and Toll Saver
- The DAS 202 will normally answer an incoming call after the second ring. However, if there are no unplayed messages on the system, the DAS 202 will not answer until after the fourth ring. This feature allows you to call into your answering machine and determine, without a toll, if there are any unplayed messages on the system (i.e. If the phone rings three times, there are no unplayed messages).
Playing All Messages
- The LED will display the total number of messages in the DAS 202's memory. The following details the playback procedures:
- Playback
- Pause Message
- Resume Playback from Pause
- Repeat Message
- Skip Message
- Erase Single Message
- Stop Playback
- Erase and Save ALL Messages
Press 'PLAY'
Press 'PLAY'
Press 'PLAY'
Press 'REPT d' once to replay current message, twice to replay the previous message
Press 'FF c' once to skip the current message, multiple times to skip through more than one message
Press 'ERASE' while message is playing Press 'STOP/TIME'
Press and hold ‘ERASE’ for about 2 seconds. A long beep will sound, and ALL messages will be erased. To RESTORE all messages, Press and hold
'ERASE' again for about 2 seconds. A long beep will sound and messages will be restored.
CAUTION: If you erase a single message during playback, it cannot be restored.
ADVANCED USE
Playing your Outgoing Message (OGM)
- To play your OGM, simply press the 'OGM1' or 'OGM2' button. The OGM will play, and the DAS 202 will return to normal mode.
Recording a Memo
- The DAS 202's Memo function allows you to leave a message for another member of your business or household when you are going to be away. Complete the following steps to record your Memo message:
- Press and hold the 'MEMO/2WAY' key for approximately 2 seconds. After a short beep, the LED will display '00'.
- At this time, release the 'MEMO/2WAY' key. A long beep will sound, and the unit will begin recording.
- At the end of the beep, speak in a clear voice, directly into the microphone.
- Stop the recording by pressing the 'STOP/TIME' key.
Recording a Two-Way Conversation
- The DAS 202's 2-Way Record function allows you to record important conversations you have on the telephone. Complete the following steps to use the 2-Way Record function:
- Press and hold the 'MEMO/2WAY' key for approximately 4 seconds.
- The LED will display '2R' and 2-Way Recording will begin.
- At the end of your conversation, or when you wish to stop recording, simply press the 'STOP/TIME' key.
Playing Memos and 2 Way Conversations
- To play these messages, press the 'MEMO/2WAY' or 'PLAY' key. Recordings will be played in sequence.
Call Screen
- The DAS 202 can be used to screen incoming calls. Simply set the unit to Answer/Record mode by pressing the 'ANSWER' key. When an incoming call occurs, adjust the volume control so that you can hear the incoming caller leaving their message. If you wish to speak to the caller, simply pick up the receiver. The DAS 202 will automatically stop recording.
Remote Control Security Code
- The Security Code is set to a factory default of '159'. This code can be changed to any number between 000 and 999. To change your security code perform the following steps:
- Press and hold the FF c key for approximately 2 seconds and release when you hear a short beep to display the current security code. The DAS 202 will then display the first digit of the security code. Use the FF c and the REPT d keys to increase or decrease the number of the first digit. Once you have arrived at the desired number, press the 'ANSWER' key to confirm your selection.
- Repeat the process for the second and third digits.
- If no key is pressed within 8 seconds, the setup procedure will be aborted.
- When complete, you will hear a long beep and the system will return to normal operation.
Call Breakthrough (CBT)
- The DAS 202 is equipped to alert you to an Urgent call. With CBT, incoming callers who know your CBT code will have the ability to bypass the Outgoing message and cause the DAS 202 to sound a short alarm. This is designed to alert you to an Urgent call if you are home screening your calls. The CBT code has a factory default of '267'. This code can be changed to any number between 000 and 999. To change your CBT code perform the following steps:
- Press the REPT d key for approximately 2 seconds and release to display the current CBT code. The DAS 202 will then display the first digit of the CBT code. Use the FF c and the REPT d keys to increase or decrease the number of the first digit. Once you have arrived at the desired number, press the 'ANSWER' key to confirm your selection.
- Repeat the process for the second and third digits.
- If no key is pressed within 8 seconds, the setup procedure will be aborted.
- When complete, you will hear a long beep and the system will return to normal operation.
Remote Control Function Operation
- The DAS 202 allows you to perform many of its functions from a remote telephone. To perform these remote functions, just follow these simple steps:
- Call the Answering Machine.
- When the machine answers press ‘ ★ ’ to skip the OGM. A long beep will sound.
- Enter the security code (factory default '159') to enter the Remote Control Mode.
- Enter the key combination for the desired function as per the following table:
| KEY(S) | REMOTE FUNCTION |
| 1 | Play OGM1 |
| 2 | Play OGM2 |
| 3 | Room Monitoring (listens to room DAS 202 is in) |
| 4 | Repeat or Play Memos |
| 5 | Play All Messages or Pause/Play |
| 6 | Forward or Play New Messages |
| 7 | Erase Individual Messages |
| 8 | Stop or Save All Messages |
| 9 | Set to Answering Machine OFF Mode |
| KEY(S) | REMOTE FUNCTION |
| *1 | Record OGM1 |
| *2 | Record OGM2 |
| *3 | Record a Memo |
| *4 | Change CBT Code |
| *6 | Change Security Code |
| *7 | Erase All Messages |
| *8 | Set to ANSWER ONLY Mode |
| *9 | Set to ANSWER/RECORD Mode |
| # | End Remote Operation |
Call Breakthrough Operation (CBT)
- To alert someone to an Urgent Call in the area that the DAS 202 is being used, follow these steps.
- Call the Answering Machine
- When the DAS 202 answers, press ‘ ★ ’ to skip the OGM
- When the OGM stops, enter the CBT Code (factory default '258')
- A two-beep alarm tone sounds on the DAS 202, indicating an Urgent Call. The user can then simply pick up the phone to end the tone and take the call.
- The CBT tone ends after 45 seconds. At that time the DAS 202 switches into ANSWER/RECORD mode and you can leave a message.
- In ANSWER ONLY mode, the call is terminated after the 45 seconds.
- If, during your call, you wish to terminate the CBT function, press the '#' key. If you wish to reactivate CBT, press the '6' key.
TROUBLESHOOTING GUIDE
| 1 | Will not operate | Are the power supply and telephone line cords plugged into the DAS 202 and the appropriate power/telephone jacks of your residence/business? |
| 2 | LED indicator lights are off | Is the phone line cord or power supply properly plugged in? |
| 3 | Cannot turn on Answer key | Have you recorded an outgoing message (OGM1/OGM2)? |
| 4 | Will not record the Incoming message | Is your memory full? The DAS 202 will record up to 40 minutes of messages |
| 5 | Cannot operate remote control | Is your security code correct? |
| 6 | Cannot play the current time | Does the clock need to be set or reset? |
| 7 | Cannot hear message/Playbacks very loud | Have you checked to ensure a proper volume setting is made? |
| 8 | LED indicates “88” or number of keys will not operate | Please unplug unit and plug it back in. This resets the DAS 202. |
THE CANADIAN INDUSTRY STATEMENT
“Notice: To ensure Industry Canada label identifies certified equipment. This certification means that the equipment meets certain telecommunications network protective, operational and safety requirements. Industry Canada does not guarantee the equipment will operate to the user's satisfaction.”
Before installing this equipment, users should ensure that it is permissible to be connected to the facilities of the local telecommunications company. The equipment must also be installed using an acceptable method of connections. The customer should be aware that compliance with the above conditions may not prevent degradation of service in some situations.
Repairs to certified equipment should be made by an authorized Canadian maintenance facility designated by the supplier. Any repairs or alterations made by the user to this equipment, or equipment malfunctions, may give the telecommunications company cause to request the user to disconnect the equipment."
CAUTION: "Users should not attempt to make such connections themselves, but should contact the appropriate electric inspection authority, or electrician, as appropriate."
"Notice: The Ringer Equivalence Number (REN) assigned to each terminal device provides an indication of the maximum number of terminals allowed to be connected to a telephone interface. The termination on an interface may consist of any combination of devices subject only to the requirement that the sum of the Ringer Equivalence Numbers of all the devices does not exceed 5."
The REN assigned to this device is 0.3.
CARE
- Keep the unit dry.
- Handle the unit carefully. Do not drop it.
- Do not use or store the unit in temperature extremes.
- Keep the unit away from dust and dirt.
- Do not modify or tamper with the unit's internal components. Doing so might invalidate the warranty and void your Industry Canada authorization to operate it. If the trouble is harming the telephone lines, the phone company might ask you to disconnect the unit until you fix the problem.
IMPORTANT SAFETY INSTRUCTIONS
When using your answering machine, basic safety precautions should always be followed to reduce the risk of fire, electric shock and injury to persons, including the following:
- Do not use this product near water, for example, near a bath tub, wash bowl, kitchen sink or laundry tub, in a wet basement or near a swimming pool.
- Use only the batteries indicated in the manual. Do not dispose of batteries in a fire. They may explode. Check with local codes for possible special disposal instructions.
Save these instructions
SANYO COMFORT WARRANTY
WARRANTY APPLICATION
New, unused Sanyo Communications products purchased in Canada through a Sanyo Authorized Dealer are warranted against manufacturing defects in materials and workmanship for ONE
YEAR covering parts and labour, from the date of purchase by the original retail purchaser. This warranty only applies in favour of the original retail purchaser of the warranted product.
SANYO CANADA INC.'S RESPONSIBILITY
During the warranty period, SANYO Canada Inc. will repair, or at our option, replace a Communications product which shows evidence of a manufacturing defect in materials or workmanship. Replacement PARTS are warranted for the remaining portion of the warranty period.
WHAT IS NOT COVERED
(a) Communications products purchased outside Canada.
(b) Communications products purchased in a used condition.
(c) Problems due to product set-up and installation.
(d) Adjustments that are outlined in the Operating Manual.
(e) Accessory items including antenna, and batteries,
(f) Damage in or due to transportation.
(g) Damage due to improper maintenance, accident, abuse, misuse or negligence.
(h) Damage caused by lightning and power surges.
ORIGINAL RETAIL PURCHASER'S RESPONSIBILITY
You, the original retail purchaser, must present your original, dated bill-of-sale together with this warranty to SANYO Canada Inc. or to an authorized Sanyo Service Depot when you make a claim under this warranty.
You, the original retail purchaser, are responsible for any costs of TRANSPORTING the product to and from SANYO Canada Inc. or an authorized Sanyo Service Depot. You also are responsible for the cost of any MAINTENANCE necessary in respect of the product.
WARRANTY BECOMES VOID
This warranty becomes void if the product's serial numbers are altered or removed or if any repair to the product is made other than by SANYO Canada Inc. or by an authorized Sanyo Service Depot.
LIMITATIONS
(a). SANYO Canada Inc. reserves the right to change or improve the design of the model of the product warranted hereunder without incurring any obligation to make any modifications to or to install any improvement in or on the product.
(b). In no event shall SANYO Canada Inc. or any of its Authorized Dealers be liable for special or consequential damage arising from the use of this product.
STATUTORY WARRANTIES
The above provisions do not preclude the operation of any applicable provincial statute which in certain circumstances may not allow some of the limitations and exclusions described in this Warranty. Where any terms of this Warranty are prohibited by such a statute, they shall be deemed null and void but the remainder of this warranty shall remain in effect.
HOW TO OBTAIN WARRANTY SERVICE
Please contact the Sanyo Authorized Dealer from whom the product was purchased, or contact us directly at:
SANYO Canada Inc.
300 Applewood Cres.
Concord, Ont. L4K 5C7
(905) 760-9944
1-800-263-2244
00/07
DAS 202 addition
LED Display Status List (DAS 202)
| LED Display | LED Status | Description |
| 0 | On | No messages in memory |
| 1-60 | On | Number of messages recorded |
| A1/A2 | On | OGM 1/OGM 2 recorded or played |
| Flashing | OGM1/OGM 2 not recorded | |
| Ao | On | Answer Only mode |
| CL | On | Time and Date played |
| Flashing | Time and Date setup required | |
| Cc | On | CBT code setup display |
| Sc | On | Security code setup dispplay |
| Lo | On | Batteries low or absent |
| Fu | On | Memory full |
| 00 | On | Memo message record/play |
| PS | On | Pause |
| ER | On | Memory failure |
| 2R | On | Two-way recording |
| SA | On | Save All—Restores messages erased since last All Erase. Press and hold ERASE for 2 seconds. |
| ≡ | On | Displays 1st digit of code |
| Flashing | Set 1st digit of code | |
| = | On | Displays 2nd digit of code |
| Flashing | Set 2nd digit of code | |
| - | On | Displays 3rd digit of code |
| Flashing | Set 3rd digit of code | |
| ES | Flashes once | Indicates ERASE is pressed |
| ON | Flashing once | Indicates the unit is in Answer mode |
| OF | Flashes once | Indicates the unit is not in Answer mode |
- INSTRUCTION MANUAL
- QUICK INSTRUCTIONS
- - Setting the Time
- - Playing the Current Time
- • Recording the Outgoing Message (OGM)
- - Recording a Memo
- • 2 Way Recording
- - Playing a Memo
- - Setting to Answer/Record Mode or Answer Only Mode
- - To turn on/off the answering system, press 'ANSWER'
- - Playing Messages
- • 40-Minute Total Recording Time
- • Security Code Remote Control
- LOCATION AND FUNCTION OF CONTROLS
- INSTALLATION
- BATTERY INSTALLATION
- PLEASE READ BEFORE OPERATION
- OPERATING INSTRUCTIONS
- BASIC USE
- Setting the Time
- Playing the Current Time
- Recording Outgoing Messages (OGM)
- Setting to Answer/Record Mode or Answer Only Mode
- Recording Incoming Calls
- \*Ring and Toll Saver
- Playing All Messages
- ADVANCED USE
- Playing your Outgoing Message (OGM)
- Recording a Memo
- Recording a Two-Way Conversation
- Playing Memos and 2 Way Conversations
- Call Screen
- Remote Control Security Code
- Call Breakthrough (CBT)
- Remote Control Function Operation
- Call Breakthrough Operation (CBT)
- TROUBLESHOOTING GUIDE
- THE CANADIAN INDUSTRY STATEMENT
- CARE
- IMPORTANT SAFETY INSTRUCTIONS
- Save these instructions
- SANYO COMFORT WARRANTY
- WARRANTY APPLICATION
- SANYO CANADA INC.'S RESPONSIBILITY
- WHAT IS NOT COVERED
- ORIGINAL RETAIL PURCHASER'S RESPONSIBILITY
- WARRANTY BECOMES VOID
- LIMITATIONS
- STATUTORY WARRANTIES
- HOW TO OBTAIN WARRANTY SERVICE
- SANYO Canada Inc.
- DAS 202 addition
- LED Display Status List (DAS 202)
Marque : SANYO
Modèle : DAS-202
Catégorie : Répondeur téléphonique