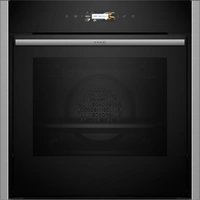
U15E42S0GB - Four électrique NEFF - Notice d'utilisation et mode d'emploi gratuit
Retrouvez gratuitement la notice de l'appareil U15E42S0GB NEFF au format PDF.

| Type de produit | Four électrique encastrable |
| Dimensions (H x L x P) | 60 cm x 60 cm x 55 cm (estimation) |
| Poids | Environ 40 kg (estimation) |
| Alimentation | 220-240 V ~ 50/60 Hz |
| Puissance totale | Environ 3,5 kW (estimation) |
| Nombre de cavités | 2 (four principal + four supérieur) |
| Modes de cuisson principaux | CircoTherm, chaleur tournante, chaleur sole-voûte, gril grande/surface, cuisson basse température, décongélation, nettoyage du four |
| Niveaux de grille | 4 (cavité principale), 2 (cavité supérieure) |
| Accessoires fournis | Lèchefrite, grille à gradins, 3 grilles plates avec butée |
| Type de nettoyage | Surfaces autocatalytiques (parois arrière, latérales et plafond) + cycle de régénération |
| Éclairage intérieur | Ampoule E14 40 W 300°C (remplaçable) |
| Minuterie | Horloge électronique avec programmation cuisson, fin de cuisson, préselection, minuteur |
| Sécurité enfant | Verrouillage temporaire et permanent, arrêt automatique de sécurité |
| Affichage | Affichage numérique de la température, indicateur de chaleur résiduelle |
| Porte amovible | Oui, avec vitres démontables pour nettoyage |
| Joints de porte | Remplaçables (référence après-vente) |
| Indice de réparabilité | Disponibilité des pièces détachées via service après-vente NEFF |
| Classe énergétique | Non précisée dans le manuel |
| Marque | NEFF |
| Modèle | U15E42S0GB |
FOIRE AUX QUESTIONS - U15E42S0GB NEFF
Questions des utilisateurs sur U15E42S0GB NEFF
0 question sur cet appareil. Repondez a celles que vous connaissez ou posez la votre.
Poser une nouvelle question sur cet appareil
Téléchargez la notice de votre Four électrique au format PDF gratuitement ! Retrouvez votre notice U15E42S0GB - NEFF et reprennez votre appareil électronique en main. Sur cette page sont publiés tous les documents nécessaires à l'utilisation de votre appareil U15E42S0GB de la marque NEFF.
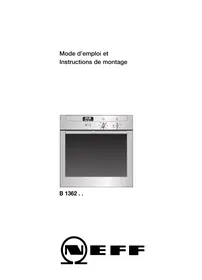
MODE D'EMPLOI U15E42S0GB NEFF
Dear customer,
congratulations on the purchase of your new Neff oven. We would like to thank you for your confidence in us and we hope that you will have many years of enjoyment and cooking pleasure with your new appliance.
To be able to take full advantage of all the technical features of your cooker, please read these instructions for use.
The detailed table of contents will guide you quickly to all the important information:
You will be informed of important safety information.
You will then be familiarised with the individual parts of your new oven.
Step by step guide on how to select particular settings.
The tables list the settings and shelf positions for a selection of typical recipes, all of which are tested in our cookery centre.
In the unlikely event of a malfunction, this is where you will find information on how to rectify minor faults yourself.
Have fun cooking.
Instructions for use
U15E42.0GB
en
9000 272 824
Table of contents
Safety information 5
Before installation 5
Information for your safety 5
Causes of damage 7
Energy and environment tips 8
Saving energy 8
Environmentally friendly disposal 8
Your new appliance 9
Control panel 9
Operating modes 10
Shelf positions 11
Accessories 12
Before using the appliance for the first time 14
Setting the time 14
Cleaning the appliance 15
Using the appliance 16
Switching on the appliance 16
Switching off the appliance 18
Changing the basic settings 18
Automatic safety switch off 19
Electronic clock 20
Clock display 20
Timer 21
Cooking time 22
End of operation 23
Preselection mode 23
Table of contents
Setting the time 24
Rapid heating 25
Checking, correcting or deleting settings 26
Childproof lock 26
Lock 26
Permanent lock 27
Baking 28
Baking on one level 29
Baking on two or more levels 30
Baking table 31
Baking table for pre-prepared products 33
Tips and tricks 35
Roasting and braising 36
Roasting 37
Braising 38
Tables for roasting and braising 38
Tips and tricks 40
Grilling 41
Circo-roasting 42
Radiant grilling 43
Grilling table 44
Low-temperature cooking 46
Using Low-temperature cooking 46
Table for Low-temperature cooking 48
Tips and tricks 49
Table of contents
Defrosting 50
Defrosting with Circotherm hot air 50
Defrost setting 51
Yoghurt 51
Cleaning and care 52
Cleaning the appliance exterior 52
Cleaning the cooking compartment 53
Self-cleaning surfaces 55
Oven cleaning 56
Removing and fitting the appliance door 57
Cleaning the door panels 59
Cleaning hook-in racks 61
Faults and repairs 62
Changing the cooking compartment bulb 64
Replacing the door seal 65
After-sales service 65
Test dishes 66
Safety information
Read this instruction manual carefully. Please keep the instruction and installation manuals in a safe place. Please pass on these manuals to the new owner if you sell the appliance.
Before installation
Transport damage
Electrical connection
Check the appliance for damage after unpacking it.
Do not connect the appliance if it has been damaged in transport.
Only allow a licensed professional to connect the appliance. Damage caused by incorrect connection is not covered under warranty.
Information for your safety
This appliance is intended for domestic use only. This appliance must only be used for food preparation.
Adults and children must not operate the appliance without supervision,
if they are physically or mentally incapable of doing so or
if they lack the knowledge and experience.
Never let children play with the appliance.
Hot cooking compartment
There is a risk of burns.
Never touch the interior surfaces of the cooking compartment or the heating elements. Open the appliance door carefully. Hot steam may escape. Small children must be kept at a safe distance from the appliance.
There is a risk of fire.
Never store combustible items in the cooking compartment.
Never open the appliance door if there is smoke inside. Switch off the appliance. Pull out the mains plug or switch off the appliance by the fuse in the fuse box.
There is a risk of short-circuiting.
Never trap connecting cables of electrical appliances in the hot appliance door. The cable insulation could melt.
There is a risk of scalding
Never pour water into the hot cooking compartment. This will cause hot steam.
There is a risk of burns.
Never prepare food containing large quantities of drinks with a high alcohol content. Alcoholic vapours can catch fire in the cooking compartment. Only use small quantities of drinks with a high alcohol content and open the appliance door carefully.
Hot accessories and ovenware
There is a risk of burns.
Never remove ovenware and accessories from the cooking compartment without an oven cloth or oven gloves.
Incorrect repairs
There is a risk of electric shock.
Incorrect repairs are dangerous. Repairs may only be carried out by one of our experienced after-sales engineers.
If the appliance is defective, pull out the mains plug or switch off the appliance by the fuse in the fuse box. Call the after-sales service.
Causes of damage
Accessories, foil, greaseproof paper or ovenware on the cooking compartment floor
Do not place accessories on the cooking compartment floor. Do not cover the cooking compartment floor with any sort of foil or greaseproof paper. Do not place ovenware on the cooking compartment floor if a temperature of over 50^ is set. This will cause heat accumulation. The baking and roasting times will no longer be correct and the enamel will be damaged.
Water in the hot cooking compartment
Never pour water into the hot cooking compartment. This will cause steam. The temperature change can cause damage to the enamel.
Moist food
Do not store moist food in the closed cooking compartment for long periods. This will damage the enamel.
Fruit juice
When baking very moist fruit flan, do not put too much on the baking tray. Fruit juice dripping from the baking tray leaves stains that cannot be removed. If possible, use the deeper universal pan.
Cooling with the oven door open
Only leave the cooking compartment to cool with the door closed. Even if you only leave the oven door open slightly, the fronts of adjacent units may become damaged over time.
Very dirty oven seal
If the oven seal is very dirty, the oven door will no longer close properly when the oven is in use. The fronts of adjacent units could be damaged. Always keep the oven seal clean.
Oven door as a seat or storage space
Do not stand or sit on the open oven door. Do not place ovenware or accessories on the oven door.
Transporting the appliance
Do not carry or hold the appliance by the door handle. The door handle cannot support the weight of the appliance and could break.
Energy and environment tips
Here you can find tips on how to save energy when baking and roasting and how to dispose of your appliance properly.
Saving energy
Only preheat the oven if this is specified in the recipe or in the operating instruction tables.
Use dark, black lacquered or enamelled baking tins. They absorb the heat particularly well.
Open the appliance door as little as possible during cooking, baking or roasting.
It is best to bake several cakes one after the other. The cooking compartment is still warm. This may reduce the baking time for the second cake.
For longer cooking times, you can switch the oven off 10 minutes before the end of the cooking time and use the residual heat to finish cooking.
Environmentally-friendly disposal

Dispose of packaging in an environmentally-friendly manner.
This appliance is labelled in accordance with European Directive 2002/96/EC on Waste Electrical and Electronic Equipment - WEEE. The directive gives a framework for the collection and recycling of old appliances, which is valid across the EU.
Your new appliance
This section provides information on
the control panel
the operating modes
the shelf positions
the accessories
Control panel
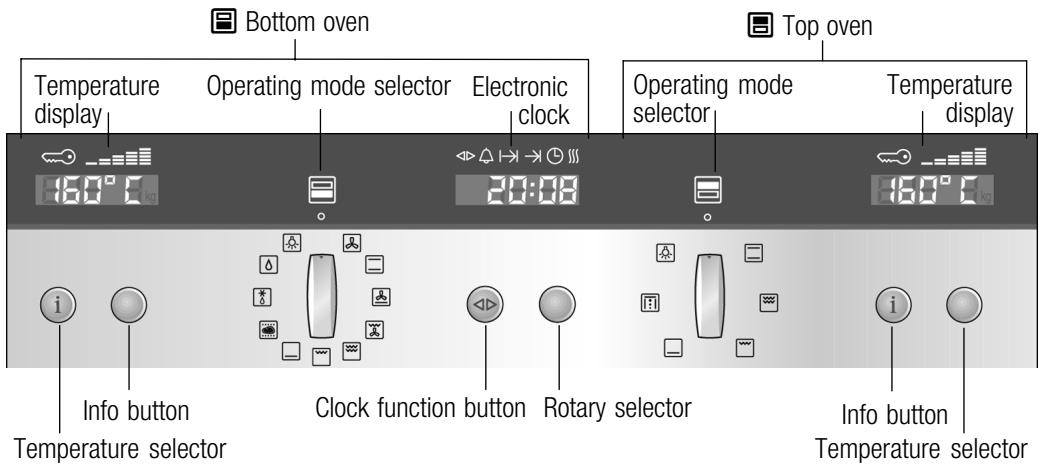
| Control element | Use |
| Clock function button | Selects the desired clock function or rapid heating (see section: Electronic clock) |
| Rotary selector | Makes settings within a clock function or activates rapid heating (see section: Electronic clock) |
| Operating mode selector | Selects the desired operating mode (see section: Switching on the appliance) |
| Info button | Displays the current temperature during the heating up phase (see section: Switching on the appliance)Bottom oven: Calls up the basic settings menu(see section: Changing the basic settings) |
| Temperature selector | Sets the temperature (see section: Switching on the appliance)Bottom oven: Changes the settings in the basic settings menu (see section: Changing the basic settings) |
Pop-out control knobs
The rotary, temperature and operating mode selectors can all be popped out. To pop the knob in and out, push the appropriate operating knob.
Operating modes
Here is an overview of the operating modes of your appliance.
Bottom oven
| Operating mode | Application |
| CurcoTherm® | For baking and roasting on one or more levels |
| Top/bottom heat | For baking and roasting on one level. It is ideally suited for cakes with moist toppings (e.g. cheesecake) |
| Circotherm intensive | For pre-prepared products and dishes which require a lot of heat from underneath (see section: Baking) |
| Circo-roasting | For poultry and larger pieces of meat |
| Large grill | For large amounts of flat, small items for grilling (e.g. steaks, sausages) |
| Small grill | For small amounts of flat, small items for grilling (e.g. steaks, bread) |
| Bottom heat | For roasting and for food and baked goods which should form a crust or which need more browning on the underside |
| Low-temperature cooking | For tender pieces of meat, that are to be cooked medium/rare or medium |
| Defrost | For gentle defrosting of pieces of meat, bread and delicate pastries (e.g. cream gateau) |
| Oven cleaning | For regeneration of the self-cleaning surfaces in the cooking compartment |
| Cooking compartment lighting | Provides assistance when maintaining and cleaning the cooking compartment |
Top oven
| Operating mode | Application |
| Top/bottom heat | Especially suitable for cakes with moist toppings (e.g. cheesecake) |
| Large grill | For large amounts of flat, small items for grilling (e.g. steaks, sausages) |
| Small grill | For small amounts of flat, small items for grilling (e.g. steaks, bread) |
| Bottom heat | For roasting and for food and baked goods which should form a crust or which need more browning on the underside |
| Oven cleaning | For regeneration of the self-cleaning surfaces in the cooking compartment |
| Cooking compartment lighting | Provides assistance when maintaining and cleaning the cooking compartment |
Shelf positions
The shelf positions in the cooking compartment are counted from the bottom up.
Note:
When baking and roasting with Circotherm®, do not use shelf position 2. Air circulation is adversely affected and the results of baking and roasting are impaired.
The cooking compartment of the lower oven has four shelf positions.
Upper oven
The cooking compartment of the upper oven has two shelf positions.
Accessories
The following accessories are supplied with your appliance:

Universal pan, enamelled for baking, roasting and grilling or for collecting drops of liquid
Stepped wire rack, close meshed for baking, roasting and grilling, for placing in the universal pan
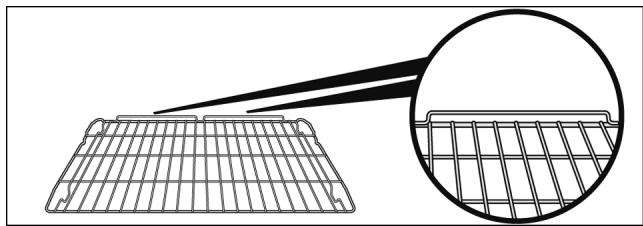
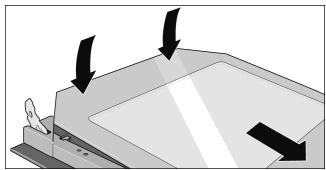
3 x wire rack, flat, with tilt protection for baking
Insert the flat wire racks in such a way that the rear upstand (to prevent items sliding off the back of the shelf) is at the back and is pointing upwards (see illustration below). Otherwise, the tilt protection feature will not work properly.
You can obtain further accessories from specialist retailers:
| Accessories | Order no. |
| System steamer | N8642X0EU |
| Grill set | Z1240X2 |
| Glass pan | Z1262X0 |
| Enamelled roasting pan | Z1272X0 |
| Aluminium baking tray | Z1332X0 |
| Enamelled baking tray | Z1342X0 |
| Non-stick baking tray | Z1343X0 |
| Baking and roasting shelf, close meshed | Z1453X0 |
| Two-piece enamelled roasting tray | Z1512X0 |
| CLOU 1x telescopic railing retrofit kit | Z1701X1 |
| CLOU 3x telescopic railings retrofit kit | Z1742X1 |
| CLOU 4x telescopic railings retrofit kit | Z1752X1 |
| Tilt protection retrofit kit, pull-out stop | Z9110X0 |
| Enamelled universal roasting dish | Z9930X0 |
Note:
The baking tray or universal pan may become distorted when the oven is operating. This is caused by the considerable temperature differences on the accessories. This may happen when only a part of the accessory is covered with food or when frozen items such as pizza have been placed on the accessory.
Before using the appliance for the first time
This section contains information on
- how to set the time on your appliance after the power is connected
- how to clean your appliance before using it for the first time
Setting the time
0:00 flashes in the clock display.
Changing the time
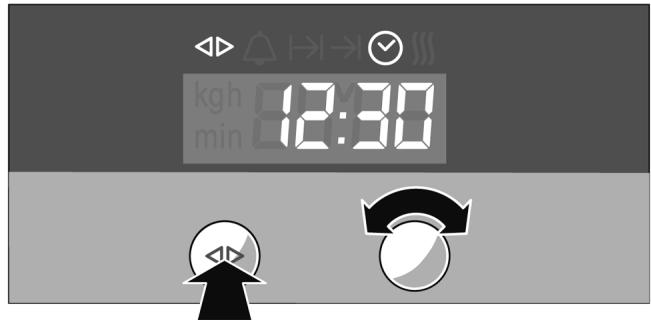
- Press the clock function button. The and symbols are lit. The clock display shows 12:00.
- Set the current time using the rotary selector. Your setting is automatically adopted after 3 seconds.
To subsequently change the time, press the clock function button repeatedly until the and symbols are lit. Change the current time using the rotary selector.
Cleaning the appliance
Clean your appliance before using it for the first time.
- Remove the accessories from the cooking compartment.
- Completely remove any residual packaging (e.g. chips of polystyrene) from the cooking compartment.
- Clean the accessories and cooking compartment with hot soapy water (see section: Cleaning and care).
- Heat with top/bottom heating at 240^ C for 30 minutes.
- Afterwards, wipe the cooled cooking compartment with hot, soapy water.
- Clean the outside of the appliance with a soft, damp cloth and soapy water.
Using the appliance
This section contains information on
how to switch your appliance on and off
how to select an operating mode and temperature
how you can change the basic settings
when your appliance switches off automatically
Switching on the appliance
- Turn the operating mode selector until the desired operating mode is selected.
A default temperature is shown on the temperature display.
- Turn the temperature selector to change the default temperature.
If no default temperature is displayed, the temperature for your selected operating mode is a fixed setting. You cannot change this temperature.
| Operating mode | Default temperature in °C | Temperature range in °C |
| CurTherm® | 160* | 40 - 200 |
| Top/bottom heat | 170* | 50 - 275 |
| Circotherm intensive | 220* | 50 - 275 |
| Circo-roasting | 170* | 50 - 250 |
| Large grill | 220* | 50 - 275 |
| Large grill (intensive)** | Fixed setting | |
| Small grill | 180* | 50 - 275 |
| Small grill (intensive)** | Fixed setting | |
| Bottom heat | 200* | 50 - 225 |
| * Turn the temperature selector to change the default temperature; see the tables for recommended settings. * Turn the temperature selector beyond 275 °C. int appears in the temperature display. | ||
| Low-temperature cooking | Fixed setting | |
| Defrost | Fixed setting | |
| Oven cleaning | Fixed setting | |
| Cooking compartment lighting | Fixed setting | |
| * Turn the temperature selector to change the default temperature; see the tables for recommended settings. | ||
| * Turn the temperature selector beyond 275 °C. int appears in the temperature display. | ||
Current temperature
With operating modes that have a default temperature, you can display the current temperature during the heating up phase.
Press the info button. The current temperature appears for 3 seconds.
Heating control
The heating control displays the rising temperature in the cooking compartment.
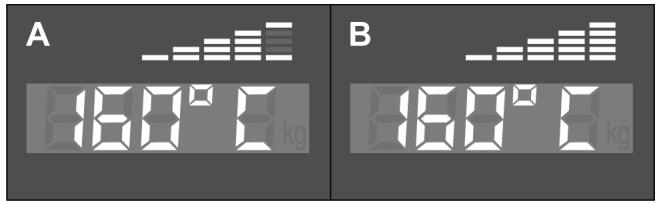
Temperature reached (figure A)
Appliance reheating to temperature (figure B)
Switching off the appliance
Residual heat indicator
Turn the operating mode selector to the o position. The appliance is switched off.
The appliance has a cooling fan. After the appliance is switched off, the cooling fan may continue to run.
You can see in the temperature display whether there is a high or low residual heat in the cooking compartment.
| Temperature display | Meaning |
| H | Residual heat high (above 120 °C) |
| h | Residual heat low (between 60 °C and 120 °C) |
Changing the basic settings
Your appliance has various basic settings that have been pre-set by the manufacturer. You can, however, change these basic settings as required.
The basic settings for both ovens are set using the control elements for the bottom oven.
In order to be able to change the basic settings,
the appliance must be completely switched off
neither the childproof lock nor any clock function must be in operation
- Press and hold the info button for 3 seconds to reach the basic settings menu.
appears in the temperature display.
- Press the info button briefly and repeatedly until the setting symbol for the current basic setting of a submenu is displayed in the temperature display (e.g. c ≥ 2 ).
- Using the temperature selector, set the required basic setting within a submenu (e.g. c 33).
- Press and hold the info button for 3 seconds. Your basic setting is saved.
Basic settings menu
| Submenu | Basic setting | Setting symbol (temperature display) |
| Childproof lock | Lock is not activated | c 10 |
| Lock is activated | c 11 | |
| Permanent lock is activated | c 21 | |
| Audible signal on/off | Audible signal off | c 30 |
| Audible signal duration 30 seconds | c 31 | |
| Audible signal duration 2 minutes | c 32 | |
| Audible signal duration 10 minutes | c 33 |
Automatic safety switch off
The automatic safety switch off is activated if your appliance is switched on and you have not made any settings for a long time.
You can adjust the period of time after which your appliance shuts off.
000 flashes in the temperature display. Appliance operation is interrupted.
Deactivating
Turn the operating mode selector back to the o position.
Electronic clock
This section contains information on
how to set the minute minder
- how to switch your appliance off automatically (operating time and end of operation)
how to switch your appliance on and off automatically (preselection operation)
how to set the time
how to activate rapid heating
Clock display

| Clock function | Use |
| Timer | You can use the timer as an egg timer or a kitchen timer. The appliance does not switch on or off automatically. |
| I→I Cooking time | Bottom oven: The oven switches off automatically after the cooking time has elapsed (e.g. 1:30 hours). |
| →I End of operation | Bottom oven: The oven switches off automatically at a set time (e.g. 12:30). |
| Preselection mode | Bottom oven: The oven switches on and off automatically. Cooking time and end of operation are combined. |
| © Clock | Sets the clock. |
| Rapid heating | Bottom oven: Shortens the preheat time. |
Notes:
- Between 22:00 and 5:59, the clock display is darkened if you do not alter any settings during this time or if no clock function is activated.
- With the clock functions for timer, 1 1 cooking time, 1 end of operation and preselection mode, a signal sounds when the duration has elapsed and the or 1 symbol flashes. To cancel the audible signal early, press the clock function button.
Switching the clock display on and off
- Press and hold the clock function button for 6 seconds.
The clock display switches off. If a clock function is active, the associated symbol remains lit.
- Press the clock function button briefly.
The clock display switches on.
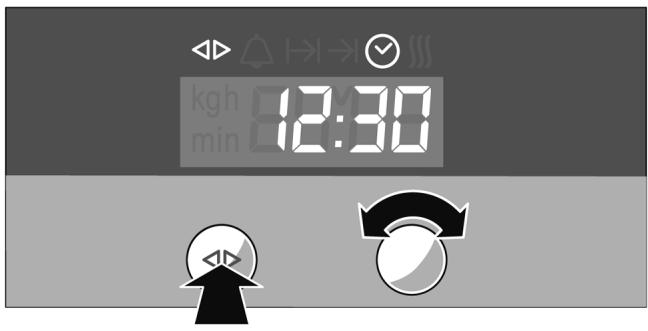
Timer

- Press the clock function button until the and symbols light up.
- Set the cooking time using the rotary selector (e.g. 5:00 minutes).
The setting is accepted automatically. Then the clock is displayed again and the timer starts counting down.
Cooking time
Automatic switch-off after a set duration of time.
A D
h 88:38


- Select the operating mode and temperature for the bottom oven.
The bottom oven heats up.
- Press the clock function button until the and symbols light up.
- Set the cooking time with the rotary selector (e.g. 1:30 hours).
The setting is accepted automatically. Then the clock is displayed again and the set cooking time starts counting down.
Once the cooking time has expired, the bottom oven switches off automatically.
- Turn the operating mode selector back to the o position.
- Press the clock function button to end the clock function.
End of operation
Automatic switch-off at a set time.

- Select the operating mode and temperature for the bottom oven.
The bottom oven heats up.
- Press the clock function button until the and symbols light up.
- Set the end of operation using the rotary selector (e.g. 12:30).
The setting is accepted automatically. The clock is then displayed again.
At the set end of operation, the bottom oven switches off automatically.
- Turn the operating mode selector back to the o position.
- Press the clock function button to end the clock function.
Preselection mode
The bottom oven switches on automatically and then off again at the preselected end of operation. To set this function, combine the clock functions cooking time and the end of operation.
Bear in mind that food which spoils easily must not stay in the cooking compartment for too long.
- Select the operating mode and temperature for the bottom oven.
The bottom oven heats up.
- Press the clock function button until the and symbols light up.
- Set the cooking time with the rotary selector (e.g. 1:30 hours).
The setting is accepted automatically.
- Press the clock function button until the and symbols light up.
- Set the end of operation using the rotary selector (e.g. 12:30).
The bottom oven switches off and waits until the correct time to switch on (in the example at 11:00).
At the set end of operation, the bottom oven switches off automatically (12:30). A signal sounds and the symbol flashes.
- Turn the operating mode selector back to the o position.
- Press the clock function button to end the preselection mode.
Setting the time
You can only change the clock, when no other clock functions are active.
- Press the clock function button until the and symbols light up.
- Set the clock using the rotary selector. The setting is accepted automatically.
Rapid heating
With CircoTherm®, you can shorten the preheat time if your temperature setting is higher than 100^ .
Note:
During rapid heating, do not place any food in the cooking compartment for as along as the symbol is lit.
- Select the operating mode and temperature for the bottom oven. The bottom oven heats up.
- Press the clock function button until the and symbols light up and FF appears on the clock display.
- Turn the rotary selector clockwise. I_n is displayed on the clock display and the III symbol lights up. Rapid heating is activated for the bottom oven.
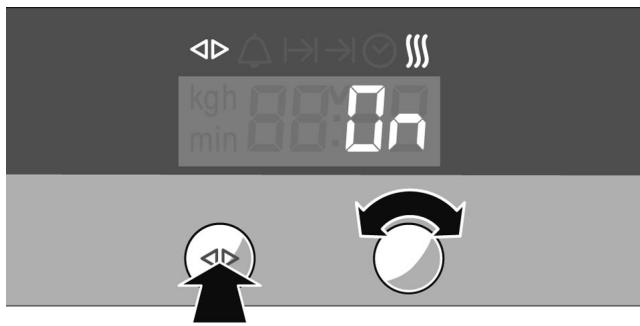
After reaching the set temperature, rapid heat-up switches off. The III symbol goes out.
Checking, correcting or deleting settings
- To check your settings, press the clock function button until the corresponding symbol lights up.
- If necessary, you can correct your setting using the rotary selector.
- If you wish to cancel your setting, turn the rotary selector anti-clockwise to the original value.
Childproof lock
In this section, you can read about
how to lock your appliance
how to lock your appliance permanently
Childproof locks for both ovens can be activated using the control on the bottom oven.
Lock
After locking, the appliance cannot be switched on accidentally or by unauthorised users (e.g. by children playing).
To switch the appliance on again, you must unlock it. After appliance operation, the appliance is not automatically locked. Lock it again if necessary or activate the permanent lock.
Locking the appliance
- Switch off the appliance.
- Press and hold the info button until c appears on the temperature display.
- Turn the temperature selector until c appears on the temperature display.
- Press and hold the info button until the symbol appears on the temperature display.
Note:
If you try to switch the locked appliance on, -5 - appears in the temperature display.
UnlockING the appliance
- Press and hold the info button until c appears on the temperature display.
- Turn the temperature selector until c appears on the temperature display.
- Press and hold the info button until the symbol goes out.
Permanent lock
After permanent locking, the appliance cannot be switched on accidentally or by unauthorized users (e.g. by children playing).
To switch the appliance on, you must suspend the permanent lock briefly. After you have switched your appliance off, it locks again automatically.
Locking the appliance permanently
- Switch off the appliance.
- Press and hold the info button until c appears on the temperature display.
- Turn the temperature selector until c appears on the temperature display.
- Press the info button for 3 seconds. Your appliance will be locked after 30 seconds. The symbol appears on the temperature display.
Note:
If you try to switch the locked appliance on, -5P appears in the temperature display.
Interrupting the permanent lock
- Press and hold the info button until c ≥ 1 appears on the temperature display.
-
Turn the temperature selector until c ≥ 0 appears on the temperature display.
-
Press and hold the info button until the symbol goes out. The permanent lock is interrupted.
- Switch the appliance on within 30 seconds.
After switching off, the permanent lock is activated again after 30 seconds.
UnlockING the appliance permanently
- Press and hold the info button until c ^ appears on the temperature display.
- Turn the temperature selector until c ≥ 0 appears on the temperature display.
- Press and hold the info button until the symbol goes out.
- Within 30 seconds, press and hold the info button again for 3 seconds.
- Turn the temperature selector until c appears on the temperature display.
- Press the info button for 3 seconds. The appliance is permanently unlocked.
Baking
In this section, you will find information on
Baking on one level
Baking on two or more levels
The baking table
The baking table for pre-prepared products
Tips and tricks for baking
Note:
When baking with ④ CircoTherm ⑧ , do not use shelf height 2. The air circulation would be impaired and this will have a negative effect on your baking.
We recommend that you use dark baking tins made from metal.
Tinplate and glass dishes increase the baking time required and the cake will not brown evenly.
If you wish to bake using tinplate dishes and Top/bottom heat, you should use shelf height 1.
Always slide the universal pan in carefully as far as it will go and make sure that the sloping edge is facing the appliance door.
Slide a wire rack in so that the rear upstand to prevent items sliding off the back of the shelf is at the rear. This prevents baking tins slipping off the back.
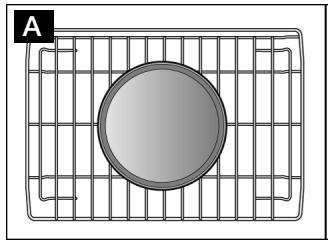
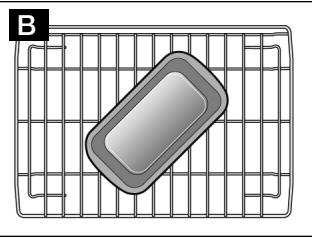
Baking on one level
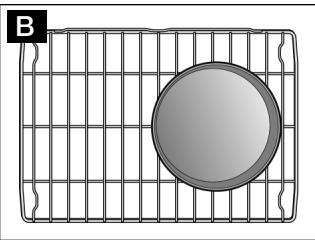
If you are baking on one level with ④ CircoTherm® always place a round baking tin in the centre (figure A) and a cake tin diagonally (figure B) on the stepped wire rack.
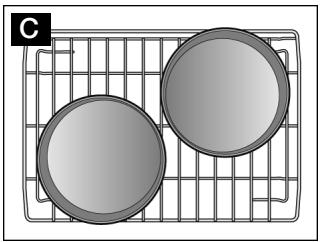
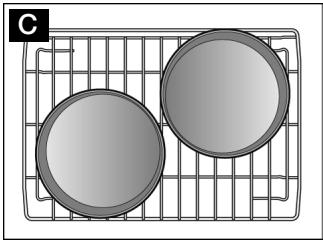
If you are baking on one level with 圆 CircoTherm®, always place two round baking tins diagonally on the on the stepped wire rack (figure C).
Baking on two or more levels
Two baking tins on two levels
When baking on several levels, only use the CircoTherm® operating mode.
Bear in mind that your items may brown at different rates on each level. The items on the top level will brown most quickly and can be taken out earlier.
When baking with two round baking tins or two trays, slide the stepped wire rack in at shelf position 1 and the straight wire rack in at shelf position 3.
Position the lower baking tin on the left (figure A) and the upper baking tin on the right (figure B) on the different wire racks.

Four baking tins on two levels
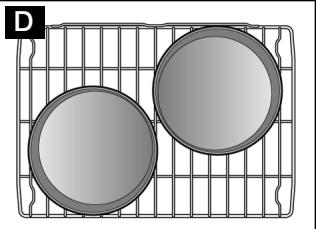
When baking with four round baking tins, slide the stepped wire rack in at shelf position 1 and the straight wire rack in at shelf position 3.
Position the lower baking tins diagonally as shown in figure C and the upper baking tins diagonally as shown in figure D on the different wire racks.
Baking table
The values in the table are average values and apply to dark baking tins. The values may vary depending on the type and amount of dough/mixture and on the baking tin.
We recommend that you set the lower of the specified temperatures the first time. This will generally allow more even browning.
If you are baking with your own recipe, use similar recipes in the table as a guide.
Observe the notes in the table about preheating.
| Meal | Oven | Setting | Level | Temperature in °C | Time in minutes |
| Victoria sponge cake | |||||
| ■ 1 level | 国 | 国 | 1 | 160 - 170* | 25 - 30 |
| ■ 1 level | 国 | □ | 2 | 160 - 170* | 20 - 30 |
| ■ 1 level | 国 | □ | 1 | 160 - 170* | 25 - 30 |
| ■ 2 levels | 国 | 国 | 1 + 3 | 150 - 160* | 25 - 35 |
| Scones | |||||
| ■ 1 level | 国 | 国 | 1 | 180 - 200* | 10 - 15 |
| ■ 1 level | 国 | □ | 3 | 210 - 220* | 8 - 10 |
| ■ 1 level | 国 | □ | 1 | 200 - 210* | 10 - 12 |
| ■ 2 levels | 国 | 国 | 1 + 3 | 180 - 200* | 10 - 15 |
| Small cakes | |||||
| ■ 1 level | 国 | 国 | 1 | 160 - 170* | 20 - 30 |
| ■ 1 level | 国 | □ | 3 | 150 - 160* | 25 - 35 |
| ■ 1 level | 国 | □ | 1 | 160 - 170* | 25 - 30 |
| ■ 2 levels | 国 | 国 | 1 + 3 | 150 - 160* | 25 - 35 |
| * Preheat oven | |||||
| ** Preheat the oven to 130 °C | |||||
| Light fruit cake | 国 | 国 | 1 | 140 - 150* | 80 - 100 |
| Light fruit cake | 国 | 国 | 2 | 160 - 170* | 70 - 90 |
| Rich fruit cake | 国 | 国 | 1 | 140 - 150* | 210 - 240 |
| Rich fruit cake | 国 | 国 | 2 | 140 - 150* | 210 - 240 |
| Jamtares | |||||
| ■ 1 level | 国 | 国 | 1 | 190 - 200* | 15 - 20 |
| ■ 1 level | 国 | 国 | 3 | 200 - 210* | 15 - 20 |
| ■ 1 level | 国 | 国 | 1 | 190 - 210* | 15 - 25 |
| ■ 2 levels | 国 | 国 | 1 + 3 | 190 - 200* | 20 - 25 |
| Swiss roll | 国 | 国 | 1 | 180 - 190* | 10 - 15 |
| Swiss roll | 国 | 国 | 2 | 190 - 200* | 10 - 15 |
| Swiss roll | 国 | 国 | 1 | 190 - 200* | 10 - 15 |
| Tart | |||||
| ■ 1 level | 国 | 国 | 1 | 160 - 170* | 50 - 60 |
| ■ 1 level | 国 | 国 | 1 | 180 - 190* | 45 - 55 |
| ■ 2 levels | 国 | 国 | 1 + 3 | 160 - 170* | 50 - 60 |
| Pies | |||||
| ■ 1 level | 国 | 国 | 1 | 170 - 180* | 65 - 75 |
| ■ 1 level | 国 | 国 | 1 | 170 - 180* | 65 - 75 |
| Biscuits | |||||
| ■ 1 level | 国 | 国 | 1 | 160 - 170* | 15 - 20 |
| ■ 1 level | 国 | 国 | 2 | 170 - 180* | 15 - 20 |
| ■ 1 level | 国 | 国 | 2 | 170 - 180* | 15 - 20 |
| ■ 2 levels | 国 | 国 | 1 + 3 | 160 - 170* | 20 - 25 |
| ■ 3 levels | 国 | 国 | 1 + 3 + 4 | 160 - 170* | 20 - 25 |
| Baiser | 国 | 国 | 1 | 80* | 100 - 130 |
| Baiser | 国 | 国 | 3 | 80* | 100 - 130 |
| Baiser | 国 | 国 | 1 | 80* | 110 - 140 |
| Pavlova | 国 | 国 | 1 | 90 - 100** | 90 - 120 |
| Pavlova | 国 | 国 | 3 | 80 - 90** | 90 - 120 |
| Fruit crumble | 国 | 国 | 1 | 170 - 180* | 45 - 55 |
| Fruit crumble | 国 | 国 | 2 | 190 - 200* | 45 - 55 |
| Yorkshire pudding | |||||
| ■ 1 level | 国 | 国 | 2 | 220 - 230* | 15 - 20 |
| ■ 1 level | 国 | 国 | 1 | 210 - 220* | 10 - 15 |
| Vol au vents | 国 | 国 | 1 | 190 - 200* | 20 - 30 |
| Vol au vents | 国 | 国 | 1 | 180 - 190* | 20 - 25 |
| Quiche | 国 | 国 | 1 | 180 - 200* | 45 - 55 |
| Quiche | 国 | 国 | 1 | 180 - 190* | 30 - 40 |
| * Preheat oven | |||||
| ** Preheat the oven to 130 °C | |||||
| (White) bread | |||||
| 1 level | 国 | 国 | 1 | 220 - 230* | 20 - 25 |
| 1 level | 国 | 国 | 1 | 200 - 220 | 20 - 25 |
| Homemade pizza | |||||
| 1 level | 国 | 国 | 1 | 190 - 200* | 20 - 30 |
| 1 level | 国 | 国 | 1 | 180 - 190* | 15 - 20 |
| 2 levels | 国 | 国 | 1 + 3 | 180 - 190* | 35 - 45 |
| Jacket potatoes | |||||
| 1 level | 国 | 国 | 1 | 160 - 170 | 60 - 70 |
| 1 level | 国 | 国 | 1 | 160 - 170 | 50 - 55 |
| 2 levels | 国 | 国 | 1 + 3 | 160 - 170 | 65 - 75 |
| * Preheat oven | |||||
| ** Preheat the oven to 130 °C | |||||
Baking table for pre-prepared products
Please note the following points for pre-prepared products:
Use the universal pan
Only use greaseproof paper that is suitable for the selected temperature
Spread chips out in a single layer
- Turn frozen potato products half way through the baking time
Only season frozen potato products after they have finished baking
Leave a little space between bread rolls when crisping them up. Do not place too many in the universal pan
Cover lasagne with plenty of cheese, so that the top browns evenly
- Do not use frozen products with freezer burn
- Do not use frozen products that are heavily frosted
Follow the manufacturer's instructions
The values in the table are average values and apply to the universal pan.
We recommend that you set the lower of the specified temperatures the first time. This will generally allow more even browning.
When baking on several levels, only use the CircoTherm® operating mode.
Observe the notes in the table about preheating.
| Meal | Oven | Setting | Level | Temperature in °C | Time in minutes |
| Frozen pizza | |||||
| 1 level | 国 | 国 | 1 | 180 - 200* | 15 - 25 |
| 1 level | 国 | 国 | 1 | 180 - 200* | 10 - 20 |
| 1 level | 国 | 国 | 1 | 180 - 200* | 10 - 20 |
| 2 levels | 国 | 国 | 1 + 3 | 170 - 190* | 20 - 30 |
| Chilled pizza | |||||
| 1 level | 国 | 国 | 2 | 190 - 210* | 10 - 15 |
| 1 level | 国 | 国 | 1 | 190 - 200* | 10 - 15 |
| Part-baked white bread | |||||
| 1 level | 国 | 国 | 1 | 180 - 190* | 10 - 20 |
| 1 level | 国 | 国 | 1 | 180 - 190* | 5 - 15 |
| 1 level | 国 | 国 | 1 | 190 - 200* | 5 - 15 |
| 2 levels | 国 | 国 | 1 + 3 | 170 - 180* | 15 - 20 |
| French fries | 国 | 国 | 1 | 180 - 200* | 25 - 30 |
| French fries | 国 | 国 | 1 | 180 - 190* | 20 - 25 |
| French fries | 国 | 国 | 1 | 190 - 200* | 25 - 30 |
| Potato wedges | 国 | 国 | 1 | 180 - 190* | 20 - 25 |
| Potato wedges | 国 | 国 | 1 | 180 - 190* | 15 - 20 |
| Potato wedges | 国 | 国 | 1 | 190 - 200* | 15 - 20 |
| Croquettes | 国 | 国 | 1 | 180 - 190* | 25 - 30 |
| Croquettes | 国 | 国 | 1 | 180 - 190* | 20 - 25 |
| Croquettes | 国 | 国 | 1 | 190 - 200* | 20 - 25 |
| Fish fingers | 国 | 国 | 1 | 180 - 200* | 15 - 20 |
| Fish fingers | 国 | 国 | 1 | 180 - 200* | 10 - 15 |
| Fish fingers | 国 | 国 | 1 | 190 - 200* | 10 - 15 |
| Lasagne, frozen (400 g) | 国 | 国 | 1 | 180 - 190* | 40 - 45 |
| Lasagne, frozen (400 g) | 国 | 国 | 1 | 180 - 190* | 35 - 40 |
| Lasagne, frozen (1200 g) | 国 | 国 | 1 | 180 - 190* | 45 - 50 |
| Lasagne, frozen (1200 g) | 国 | 国 | 1 | 180 - 190* | 40 - 45 |
| * Preheat oven | |||||
| Lasagne, chilled (400 g) | ○ | ○ | 1 | 170 - 180* | 35 - 40 |
| Lasagne, chilled (400 g) | ○ | ○ | 2 | 190 - 200* | 35 - 40 |
| Lasagne, chilled (1200 g) | ○ | ○ | 1 | 170 - 180* | 40 - 45 |
| Lasagne, chilled (1200 g) | ○ | ○ | 2 | 190 - 200* | 40 - 45 |
| * Preheat oven | |||||
Tips and tricks
| The cake is too light in colour | Check the shelf height. Check whether you have used the bakeware that we have recommended. Place your tin on the wire rack and not on the baking tray. If the shelf height and the bakeware are correct, then you should either extend the baking time or increase the temperature. |
| The cake is too dark | Check the shelf height. If the shelf height is correct, you should either shorten the baking time or reduce the temperature. |
| The cake is unevenly browned in the baking tin | Check the shelf height. Check the temperature. Make sure that your baking tin is not placed directly in front of the air outlets in the rear wall of the cooking compartment. Check that the baking tin is correctly positioned on the wire rack. |
| The cake is too dry | Set a slightly higher temperature and a slightly shorter baking time. |
| The cake is too moist in the centre | Set a slightly lower temperature. Note: you cannot decrease the baking time by setting a higher temperature (the outside will be cooked, but the inside will remain uncooked). Select a longer baking time and allow the cake mixture to prove for longer. Add less liquid to the mixture. |
| The cake collapses when you take it out of the oven | Use less liquid for the mixture. Set a longer baking time or a slightly lower temperature. |
| The specified baking time is not correct | For small items, check the amount on the baking tray. The items must not be touching each other. |
| Frozen products are not browned evenly after baking | Check whether the frozen product is unevenly browned before baking. This unevenbrowning will remain after the baking time. |
| Several cakes on one level are unevenly browned | Check the position of the baking dishes on the wire rack. |
| Frozen products are not browned, not crispy or the specified time is not correct | Remove ice from frozen products before baking. Do not use frozen products that are heavily frosted. |
| Saving energy | Only preheat the appliance when it is specified in the baking table that you should do so. Use dark baking tins as these absorb the heat better. Make use of the residual heat with longer baking times and switch the oven off 5 - 10 minutes before the end of the baking time. |
Roasting and braising
In this section, you will find information on
Roasting
Braising
Tables for roasting and braising
Tips and tricks

There is a risk of injury if you use roasting dishes that are not heat-resistant. Only use roasting dishes that are marked as being suitable for use in the oven.
Note:
When roasting with CircoTherm®, do not use shelf height 2. The air circulation would be impaired and this will have a negative effect on your roast.
Roasting
For roasting, a roasting dish without a lid is used.
When you are roasting with Top/bottom heat, you should turn the roast approximately half to two thirds of the way through the roasting time.
Roasting in the universal pan
Juices escape from the roasting meat and are collected in the universal pan. You can use these juices as the basis for a tasty gravy.
Deglaze the pan of the juices with hot water, stock, wine or similar, bring it to the boil, thicken with cornflour, season and pass through a sieve if necessary.
You can also cook side dishes (e.g. vegetables) at the same time as roasting meat in the universal pan.
Note:
For smaller joints, you can use a smaller roasting dish instead of the universal pan. Place this directly on the wire rack.
Roasting in the universal pan with stepped wire rack
Place the stepped wire rack on the universal pan and slide them in together at the same shelf height.
For fatty meat and poultry, add 18 to 14 litre of water to the universal pan, depending on the size and type of the joint.
Roasting in the universal pan with roasting sheet
While the meat is roasting, the liquid in the roasting dish will evaporate. Pour in more hot water if required.
The roasting sheet reduces dirt in the cooking compartment. Place the roasting sheet in the universal pan and slide them in together at the same shelf height.
Dripping fat and meat juices are caught in the universal pan.
Braising
For braising, a roasting dish with a lid is used. Ensure that the roasting dish and lid are designed for one another and fit closely.
First, sear the meat if required.
Add the meat, vegetables and liquid to the roasting dish in the proportion 1:1:1 and place it with the lid closed on the wire rack on shelf position 1.
While the meat is braising, the liquid in the roasting dish will evaporate. Pour in more liquid if required.
Tables for roasting and braising
Poultry
The values in the tables are only average values.
The information in the tables applies to unstuffed poultry. Turn the poultry after half of the cooking time.
Lean meat
Coat lean meat with fat or oil as required and cover it with strips of bacon.
Cooking time and temperature
The cooking time and temperature depend on the size, height, type and quality of the food and the roasting dish.
In general, the larger the joint, the lower the temperature and the longer the roasting time.
You should set the lower of the specified temperatures the first time. This will generally allow more even browning.
The values for cooking time apply to 0.5 - 2kg of food. For greater weights, reduce the temperature and increase the cooking time. For multiple pieces, apply the cooking time for the weight of the heaviest piece.
Standing time
At the end of the cooking time, switch the oven off and leave the roast to stand for approximately 10 minutes in the cooking compartment with the door closed. The recommended standing time is not included in the cooking times specified.
The information in the tables apply to food placed in a cold oven and for meat taken directly from the refrigerator.
| Meal | Oven | Setting | Level | Temperature in °C | Time in minutes (per 500 g) |
| Beef | |||||
| Slow roast joint | 国 | 国 | 1 | 140 | 40 + 40 |
| Slow roast joint | 国 | □ | 2 | 150 | 40 + 40 |
| Top side / top rump | 国 | 国 | 1 | 160 | 30 + 25 |
| Top side / top rump | 国 | □ | 2 | 190 | 30 + 25 |
| Lamb | |||||
| Leg | 国 | 国 | 1 | 170 | 30 + 25 |
| Leg | 国 | □ | 2 | 200 | 30 + 25 |
| Shoulder (bone-in) | 国 | 国 | 1 | 170 | 25 + 20 |
| Shoulder (bone-in) | 国 | □ | 2 | 200 | 25 + 20 |
| Shoulder (boned and rolled) | 国 | 国 | 1 | 170 | 30 + 25 |
| Shoulder (boned and rolled) | 国 | □ | 2 | 200 | 30 + 25 |
| Rack of lamb | 国 | 国 | 1 | 180 | 25 + 25 |
| Rack of lamb | 国 | □ | 2 | 200 | 25 + 25 |
| Pork | |||||
| Roast joint | 国 | 国 | 1 | 180 | 35 + 35 |
| Roast joint | 国 | □ | 2 | 180 | 35 + 35 |
| Loin joint | 国 | 国 | 1 | 180 | 30 + 30 |
| Loin joint | 国 | □ | 2 | 180 | 30 + 30 |
| Belly | 国 | 国 | 1 | 160 | 30 + 25 |
| Belly | 国 | □ | 2 | 190 | 30 + 25 |
| G lammon | |||||
| Joint | 国 | 国 | 1 | 160 | 30 + 30 |
| Joint | 国 | □ | 2 | 190 | 30 + 30 |
| Chicken | |||||
| Whole chicken | 国 | 国 | 1 | 170 - 180 | 20 + 25 |
| Whole chicken | 国 | □ | 2 | 190 - 200 | 20 + 25 |
| Portion (boned) | 国 | 国 | 1 | 190 | 20 + 25 |
| Portion (boned) | 国 | □ | 2 | 200 - 210 | 20 + 25 |
| Quarter | 国 | 国 | 1 | 190 | 20 + 25 |
| Quarter | 国 | □ | 2 | 200 - 210 | 20 + 25 |
| Duck | 国 | 国 | 1 | 180 | 20 + 20 |
| * Preheat oven** + time for yorkshire pudding | |||||
| Duck | □ | □ | 2 | 190 - 200 | 20 + 20 |
| Turkey | |||||
| Drumstick | □ | □ | 1 | 180 | 20 + 20 |
| Crown | □ | □ | 1 | 160 | 25 + 20 |
| Whole | □ | □ | 1 | 150 - 160 | 25 + 25 |
| Complete Meal with beef | □ | □ | 1 + 3 | 160 | 30 + 25** |
| * Preheat oven | |||||
| ** + time for yorkshire pudding | |||||
| Casseroles | Oven | Setting | Level | Temperature in °C | Time in minutes (per 500 g) |
| Diced meat (beef, pork, lamb, chicken) | 国 | 国 | 1 | 140 | 40 + 80 |
| Diced meat (beef, pork, lamb, chicken) | 国 | □ | 1 | 140* | 40 + 80 |
| Braising steak | 国 | 国 | 1 | 140 | 45 + 80 |
| Braising steak | 国 | □ | 1 | 140* | 45 + 80 |
| Chicken pieces (boned) | 国 | 国 | 1 | 140 | 50 + 70 |
| Chicken pieces (boned) | 国 | □ | 1 | 140* | 50 + 70 |
| * Preheat oven | |||||
Tips and tricks
| Crust too thick and/or roast too dry | Reduce the temperature or shorten the roasting time. Check the shelf height. |
| Crust too thin | Increase the temperature or switch on the grill briefly at the end of the roasting time. |
| The meat is not cooked right through | Remove any accessories that are not required from the cooking compartment. Increase the roasting time. Check the core temperature of the joint using a meat thermometer. |
| Steam in the cooking compartment is condensing on the appliance door | The steam dries during the course of the cooking. If there is an excessive volume of steam, you can carefully open the door briefly to dissipate the steam more quickly. |
| The meat is burned slightly during braising | Add the meat, vegetables and liquid to the roasting dish in the proportion 1:1:1. The roasting dish and lid must be designed for one another and fit closely. Reduce the temperature. |
Grilling
In this section, you will find information on
Grilling in general
Circo-roasting
- Radiant grilling (large grill and small grill)
The grilling table
Caution
There is a risk of damage to kitchen units if you grill with the appliance door open. The adjacent units may be damaged by the extreme heat. Keep the appliance door closed when using the grill.
Notes:
Always use the stepped wire rack and the universal pan when grilling
- Place the stepped wire rack in the universal pan and slide them both in at the height specified in the grilling table
Always place the food to be grilled in the centre of the stepped wire rack
If you are grilling more than one piece of meat, make sure that they are the same sort of meat and that they are of similar thickness and weight
Circo-roasting
The Circo-roasting operating mode is particularly suitable for grilling poultry and meat so that it is crispy (e.g. roast pork with crackling).
Turn large items of food after approximately half to two-thirds of the grilling time. Place food with a crust on the wire rack with the crust side down for the first half of the grilling time.
Pierce duck and goose skin under the wings and legs to allow the fat to escape.
Depending on the food you are cooking, the cooking compartment may become very dirty when you cook food on the wire rack using Circo-roasting. You should therefore clean the cooking compartment after every use so that the dirt does not burn on.
At the end of the cooking time, switch the oven off and leave the food to rest for approximately 10 minutes in the cooking compartment with the door closed. The recommended rest time is not included in the grilling times specified.
Radiant grilling
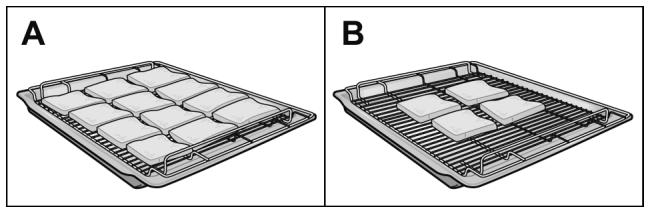
For large amounts of flat grill items, use the large grill (figure A).
For small amounts of flat grill items, use the small grill. Place the food to be grilled in the centre of the wire rack (figure B). You will save energy by using the small grill operating mode.
Brush the items to be grilled with a little oil to taste.
Turn the items after half to two-thirds of the grilling time.
Wire rack position
You can influence the grilling result by changing the position of the wire rack.
| Wire rack type/ position | Use |
| ~ | Place the stepped wire rack in the universal pan with the step pointing downwards: suitable for grilling items that should be well-done |
| ~ | Place the stepped wire rack in the universal pan with the step pointing upwards: suitable for grilling items that should be rare to medium |
Grilling table
The information in the table are guidelines and apply to the enamelled universal pan with stepped wire rack. The values may vary depending on the type and amount of food to be grilled.
You should set the lower of the specified temperatures the first time. This will generally allow more even browning.
The values are for food placed in a cold oven and for meat taken directly from the refrigerator.
| Meal | Oven | Setting | Level | Temperature in °C | Time in minutes |
| Beef | |||||
| Steaks, high 2-3 cm | 国 | 国 | 4 | intensive* | 1st side: 9 - 12 |
| 2nd side: 5 - 7 | |||||
| Steaks, high 2-3 cm | 国 | 国 | 2 | intensive* | 1st side: 10 - 13 |
| 2nd side: 6 - 8 | |||||
| Burgers, high 1 - 2 cm | 国 | 国 | 4 | intensive | 1st side: 8 - 10 |
| 2nd side: 6 - 8 | |||||
| Burgers, high 1 - 2 cm | 国 | 国 | 2 | intensive | 1st side: 10 - 12 |
| 2nd side: 6 - 8 | |||||
| Lamb | |||||
| Leg | 国 | 国 | 2 | 170 - 190 | 120 - 150*** |
| Shoulder (bone-in) | 国 | 国 | 2 | 170 - 190 | 100 - 130*** |
| Shoulder (boned and rolled) | 国 | 国 | 2 | 170 - 190 | 120 - 150*** |
| Steaks, high 2 - 3 cm | 国 | 国 | 4 | intensive | 1st side: 5 - 7 |
| 2nd side: 3 - 5 | |||||
| Steaks, high 2 - 3 cm | 国 | 国 | 2 | intensive | 1st side: 6 - 8 |
| 2nd side: 4 - 6 | |||||
| Chops, high 2 - 3 cm | 国 | 国 | 4 | intensive | 1st side: 6 - 8 |
| 2nd side: 4 - 7 | |||||
| Chops, high 2 - 3 cm | 国 | 国 | 2 | intensive | 1st side: 7 - 9 |
| 2nd side: 5 - 8 | |||||
| * Preheat for 3 minutes** Turn frequently*** Turn after half of the time | |||||
| Pork | |||||
| Roast joint | 国 | 国 | 2 | 180 - 200 | 120 - 150*** |
| Steaks, high 1 - 2 cm | 国 | 国 | 4 | intensive* | 1st side: 8 - 10 2nd side: 5 - 8 |
| Steaks, high 1 - 2 cm | 国 | 国 | 2 | intensive* | 1st side: 9 - 12 2nd side: 6 - 8 |
| Chops, high 2 - 3 cm | 国 | 国 | 4 | intensive | 1st side: 10 - 12 2nd side: 8 - 10 |
| Chops, high 2 - 3 cm | 国 | 国 | 2 | intensive | 1st side: 10 - 13 2nd side: 8 - 12 |
| Burgers, high 1 - 2 cm | 国 | 国 | 4 | intensive | 1st side: 8 - 10 2nd side: 6 - 8 |
| Burgers, high 1 - 2 cm | 国 | 国 | 2 | intensive | 1st side: 10 - 12 2nd side: 6 - 8 |
| Sausages, ø 2 - 4 cm | 国 | 国 | 4 | intensive | 12 - 16** |
| Sausages, ø 2 - 4 cm | 国 | 国 | 2 | intensive | 14 - 18** |
| Gammon | |||||
| Steaks, high 1 - 2 cm | 国 | 国 | 4 | intensive | 1st side: 9 - 12 2nd side: 5 - 7 |
| Steaks, high 1 - 2 cm | 国 | 国 | 2 | intensive | 1st side: 10 - 12 2nd side: 5 - 7 |
| Chicken | |||||
| Drumsticks | 国 | 国 | 3 | 250 | 1st side: 15 - 17 2nd side: 10 - 13 |
| Drumsticks | 国 | 国 | 2 | 250 | 1st side: 16 - 20 2nd side: 12 - 15 |
| Breast (boneless) | 国 | 国 | 4 | 250 | 1st side: 12 - 15 2nd side: 7 - 10 |
| Breast (boneless) | 国 | 国 | 2 | 250 | 1st side: 13 - 15 2nd side: 8 - 10 |
| Whole chicken | 国 | 国 | 2 | 200 - 220 | 70 - 90*** |
| Quarter | 国 | 国 | 2 | 210 - 230 | 40 - 50*** |
| * Preheat for 3 minutes | |||||
| ** Turn frequently | |||||
| *** Turn after half of the time | |||||
| Fish | |||||
| Whole fish, e.g. trout | 国 | 国 | 3 | 220 | 1st side: 10 - 15 |
| 2nd side: 10 - 15 | |||||
| Whole fish, e.g. trout | 国 | 国 | 2 | 220 | 15 - 25 |
| Filets | 国 | 国 | 4 | 220 | 1st side: 8 - 12 |
| 2nd side: 7 - 10 | |||||
| Filets | 国 | 国 | 1 | 220 | 1st side: 9 - 13 |
| 2nd side: 8 - 12 | |||||
- Preheat for 3 minutes
Turn frequently
*Turn after half of the time
Low-temperature cooking
In this section, you will find information on
Low-temperature cooking
tips and tricks
Low-temperature cooking is a method of cooking slowly at low temperatures, and is also known as slow cooking.
Low-temperature cooking is ideal for all prime cuts of meat (e.g. tender portions of beef, veal, pork, lamb and poultry) that are to be cooked medium or medium rare. The meat will remain succulent and tender.
Using Low-temperature cooking
Please observe the following points:
Only use fresh, cleaned meat
The meat will always look pink on the inside after low-temperature cooking. This does not mean that the cooking time was too short
Only use boned meat
Do not use defrosted meat
You can also use seasoned or marinated meat
Always use shelf height 1 for low-temperature cooking
- Do not cover the meat while it is cooking in the cooking compartment
- Do not turn pieces of meat during the low-temperature cooking process
The size, thickness and type of meat will have a significant influence on the searing and low-temperature cooking times
The properties of the pan and the heat output of the hotplate can influence the searing time
- Do not use the low-temperature cooking setting together with the preselection mode clock function
Only switch the low-temperature cooking setting on when the cooking compartment has completely cooled down (room temperature).
If H or H' and H'' appear alternately in the temperature display after switching on the slow cooking operating mode, the cooking compartment has not cooled down completely.
Wait until the cooking compartment has cooled down and switch Low-temperature cooking on again.
- Insert a glass or ceramic plate on a wire rack into the cooking compartment at shelf position 1 to preheat the plate.
- Switch on the Slow cooking operating mode.
III appears in the temperature display during the heating up phase (15 to 20 minutes). - Remove the fat and sinews from the meat.
-
Sear the meat on all sides over a high heat to seal the meat and create a roasted flavour.
-
When a signal sounds and D n appears in the temperature display, place the meat on the glass or porcelain plate in the cooking compartment.
- Remove the food once the cooking time has elapsed and switch off the appliance.
Note:
Slow-cooked meat does not need to be rested and can be kept warm at a low temperature without any problems.
Table for Low-temperature cooking
The information in the table is only a guideline. The searing time is for searing in a hot pan with fat.
You can find information on how to proceed, further instructions and recipes in the accompanying cookbook.
| Searing in minutes | Low-temperature cooking in minutes | |
| Pork | ||
| Fillet, whole (approx. 500 g) | 5 - 6 | 100 - 120 |
| Loin (approx. 1 kg, 4 - 5 cm thick) | 5 - 6 | 120 - 150 |
| Medallions (5 cm thick) | 3 - 4 | 45 - 60 |
| Loin steaks (2 - 3 cm thick) | 2 - 3 | 30 - 45 |
| Beef | ||
| Fillet, whole (1.5 kg) | 6 - 7 | 160 - 200 |
| Sirloin (approx. 1.5 kg, 5 - 6 cm thick) | 6 - 7 | 180 - 210 |
| Centre-cut rump (6 - 7 cm thick) | 6 - 7 | 240 - 300 |
| Medallions (5 cm thick) | 3 - 4 | 60 - 80 |
| Rump steak (3 cm thick) | 3 - 4 | 50 - 70 |
| Steak-cut rump (3 cm dick) | 3 - 4 | 50 - 70 |
| Veal | ||
| Fillet, whole (approx. 800 g) | 4 - 5 | 150 - 180 |
| Flank (approx. 2 kg, 8 - 9 cm thick) | 6 - 7 | 360 - 420 |
| Centre-cut rump (approx. 1.5 kg, 4 - 5 cm thick) | 6 - 7 | 240 - 300 |
| Medallions (4 cm thick) | 3 - 4 | 70 - 90 |
| * well-done | ||
| ** see the note below | ||
| Lamb | ||
| Loin, boned (approx. 200 g) | 2 - 3 | 30 - 40 |
| Leg, boned (approx. 1 kg) | 6 - 7 | 240 - 300 |
| Poultry | ||
| Chicken breast (150 - 200 g)* | 4 - 5 | 90 - 120 |
| Duck breast (300 - 400 g)** | 10 - 12 | 70 - 90 |
| Turkey breast (1 kg)* | 4 - 5 | 150 - 180 |
| Turkey steaks (2 - 3 cm)* | 3 - 4 | 40 - 60 |
| * well-done | ||
| ** see the note below |
Note:
Place the duck breast in a cold pan and fry the skin side first. Following low-temperature cooking, insert at shelf height 3 and grill at 250^ for 3 - 5 minutes until crispy.
Tips and tricks
| Slow-cooked meat cools down too quickly | Serve on preheated plates with a piping hot sauce. |
| Keeping slow-cooked meat warm | Switch on Top/bottom heat and set the temperature at 60 °C. Small pieces of meat can be kept warm for up to 45 minutes and large pieces for up to 2 hours. |
Defrosting
In this section, you can read about
how to defrost with Circotherm® hot air
how to use the defrost setting
Defrosting with Circotherm® hot air
Use Circotherm® hot air ® to defrost and cook frozen products. Please note the following points here:
- Frozen products that have been defrosted (meat in particular) require shorter cooking times than fresh products
The cooking time for frozen meat increases by the defrosting time
Always defrost frozen poultry before cooking, so that the giblets can be removed
Cook frozen fish at the same temperatures as fresh fish - You can place large quantities of ready made frozen vegetables in aluminium dishes in the cooking compartment at the same time
Use shelf position 1 when defrosting on one level, and shelf positions 1 + 3 when using two levels - Observe the manufacturer's instructions when using frozen foods
Defrost table
| Frozen meals | Temperature in °C | Defrosting time in minutes |
| Raw frozen products/foods | 50 | 30 -90 |
| Bread/bread rolls (750 - 1500 g) | 50 | 30 - 60 |
| Dry, frozen tray bakes | 60 | 45 - 60 |
| Moist, frozen tray bakes | 50 | 50 - 70 |
Defrost setting
With this operating mode you can defrost delicate baked goods (e.g. cream cakes) particularly well.
- Switch on the defrost setting .
- Defrost frozen products for 25 - 45 minutes, depending on the type and size.
- Remove the frozen product from the cooking compartment and allow it to defrost for a further 30 - 45 minutes.
Note:
With small quantities (pieces) the defrosting time is shortened to 15 - 20 minutes and the extended defrosting time is shortened to 10 - 15 minutes.
Yoghurt
You can also make home-made yoghurt with your appliance. The heat from the interior lighting is used for this.
Use the lower oven for yoghurt.
- Remove accessories and hook-in rack, telescopic shelf or individual connector system.
- Heat up 1 litre UHT milk (3.5 % fat) or pasteurised fresh milk to 40^
or
Bring 1 litre of fresh milk to the boil and allow to cool down to 40^ C .
- Add 300 ~g set yoghurt to the heated milk, stir it in and pour equal amounts into glasses or bowls. Do not add more than 200 ml to a container.
- After filling, cover the containers with a suitable lid or cling film.
-
Place and arrange the containers evenly spaced over the whole cooking compartment floor.
-
Close the appliance door and switch on the interior light.
- After 7 hours, switch off the interior light and place the containers in the refrigerator for at least 18 hours.
Cleaning and care
In this section, you will find information on
cleaning and care of your appliance
cleaning agents and aids
- self-cleaning surfaces in the cooking compartment
oven cleaning

Risk of short-circuit. Do not use high-pressure cleaners or steam jet cleaners to clean your appliance.
Caution!
Damage to surfaces. Do not use sharp or abrasive cleaning agents. Do not use abrasive cleaning aids such as steel wool or scourers.
Note:
Highly recommended cleaning and care products can be purchased through our after-sales service. Observe the manufacturer's instructions.
Cleaning the appliance exterior
| Appliance part/surface | Cleaning agent/aid |
| Stainless steel surfaces | Apply commercially available detergent with a soft, damp cloth or chamos leather; dry with a soft cloth. |
| Use cleaners for matted stainless steel if very dirty. | |
| Painted surfaces | Apply commercially available detergent with a soft, damp cloth or chamos leather; dry with a soft cloth. |
| Glass surfaces | Apply commercially available detergent with a soft, damp cloth or chamos leather; dry with a soft cloth. |
| Door panels | Use commercially available glass cleaner or apply commercially available detergent with a soft, damp cloth or chamos leather; dry with a soft cloth. The inner door panel on the appliance door has a coating which reduces the temperature and reflects the heat. The view through the appliance door is not impaired by this. When the appliance door is open this coating can have the effect of a light-coloured film. This is part of the design and is not due to any quality defect. |
Cleaning the cooking compartment
Caution!
Damage to surfaces. Do not clean the appliance while still warm, even if using oven cleaners specially intended for this purpose.
Notes:
- Enamel is baked on at very high temperatures during manufacture. This can cause some slight colour variation. This is normal and does not affect proper functioning.
- The edges of thin trays cannot be completely enamelled. As a result, these edges can be rough. Anti-corrosion protection is still guaranteed, however.
| Appliance part | Cleaning agent/aid |
| Enamel surfaces (smooth surfaces) | To facilitate cleaning you can switch on the interior lighting and detach the appliance door if necessary. Apply commercially available detergent or vinegar solution with a soft, damp cloth or chamosis leather; dry with a soft cloth. Loosen baked on food residues with a damp cloth and detergent. We recommend using oven cleaning gel if the oven is very dirty. This can be applied neat to the stain. Leave the cooking compartment open to dry after cleaning. |
| Self-cleaning surfaces (rough surfaces) | Please observe the instructions in the section: Self-cleaning surfaces |
| Door seal | Hot soapy water |
| Hook-in rack/telescopic shelf | Hot soapy water |
| Accessories | Soak in hot soapy water, clean with a brush and sponge or wash in the dishwasher |
Keeping the appliance clean
To avoid getting the cooking compartment dirty,
- clean the cooking compartment after each use, as dirt will bake on the next time it is heated up, and this can only be removed with difficulty
- always remove lime, grease, starch and egg-white stains immediately
- qhere possible use Circotherm® hot air ®. This operating mode creates less dirt
use the universal pan to bake very moist cakes - use suitable ovenware when roasting (e.g. roasting dish) or a roasting sheet (see the section: Accessories
Self-cleaning surfaces
The back panel, side panels and ceiling of the cooking compartment are coated with a highly porous ceramic layer. This coating absorbs and disintegrates splashes from baking and roasting while the oven is in operation.
The higher the set temperature and the longer the oven is in operation, the better the cleaning result. Large splashes only disappear after the oven has been used several times. Residues can be removed with water and a soft sponge.
Colour variations on the self-cleaning surfaces have no effect on the self-cleaning function.
Caution.
Damage to the self-cleaning surface due to the application of oven cleaner.
- Never clean the self-cleaning surface with oven cleaner.
If oven cleaner is accidentally applied to the self-cleaning surface, remove it immediately with a sponge and plenty of water.
Caution.
Damage to surfaces on self-cleaning areas due to the use of abrasive and acidic cleaning agents and aids.
- Do not use cleaning agents containing abrasive substances or acids.
- Do not use abrasive cleaning aids such as steel wool or scourers.
Oven cleaning
The back wall, ceiling and side walls of the cooking compartment are coated with a highly porous ceramic layer. This coating absorbs and disintegrates splashes from baking and roasting while the oven is in operation.
If these self-cleaning surfaces (rough surfaces) in the oven no longer clean themselves adequately, they can be regenerated using the Oven cleaning operating mode.
Preparing for oven cleaning
- Remove the accessories from the cooking compartment.
- Clean the enamel surfaces (smooth surfaces) to avoid any lasting stains (see section: Cleaning and care).
Starting oven cleaning
- Set the operating mode selector to l Oven cleaning.
- Turn the temperature selector to set the desired cleaning setting.
Bottom oven
| Cleaning setting | Temperature display | Clock display (cooking time in hours) |
| low | 1 | 0:45 |
| medium | 2 | 1:00 |
| intensive | 3 | 1:15 |
Your setting is automatically accepted after 10 seconds and oven cleaning starts. I I and the set cooking time light up in the clock display. The cooking time cannot be changed.
You can activate the preselection mode within the 10 seconds until oven cleaning starts.
Once oven cleaning is complete, a signal will sound and 0:00 appears on the clock display and the symbol flashes.
Top oven
| Cleaning setting | Temperature display | Oven cleaning time |
| low | 1 | 45 minutes |
| medium | 2 | 60 minutes |
| intensive | 3 | 75 minutes |
Your setting is automatically accepted after 10 seconds and oven cleaning starts.
Once oven cleaning is complete, a signal will sound and the cleaning setting goes out on the temperature display.
Ending/cancelling oven cleaning
Bottom oven
- Turn the operating mode selector back to the o position.
- Press the clock function button. The appliance is switched off.
Top oven
Turn the operating mode selector back to the o position. The appliance is switched off.
Removing and fitting the appliance door

You can remove the appliance door to clean it more thoroughly.
Risk of injury!
The hinges on the appliance door can snap back with great force. Always open the locking lever on the hinge fully when removing the appliance door and close it again fully after fitting it. Do not reach into the hinge.

Risk of injury!
If the appliance door is detached on one side, do not reach into the hinge. The hinge can snap back with great force. Call the after-sales service.
Removing the appliance door
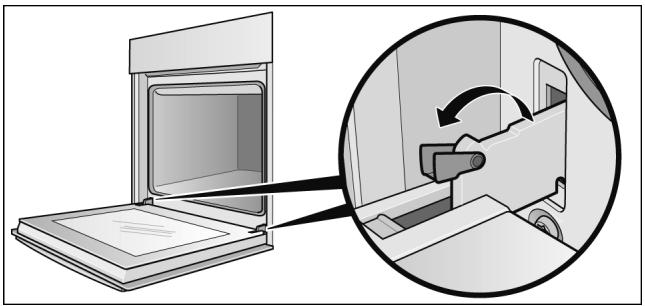
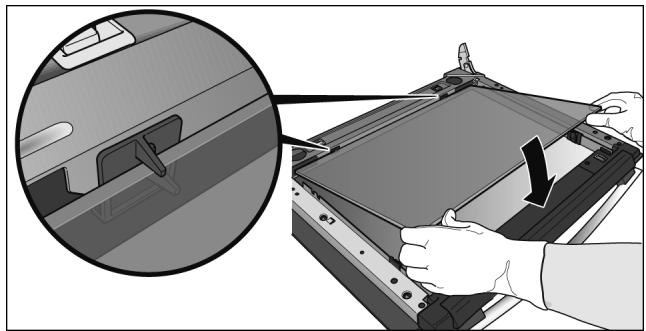
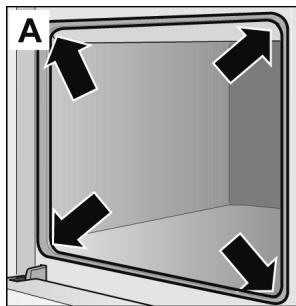
- Open the appliance door fully.
- Open the locking levers on the left and right-hand side fully.
The hinges are secured and cannot snap closed.
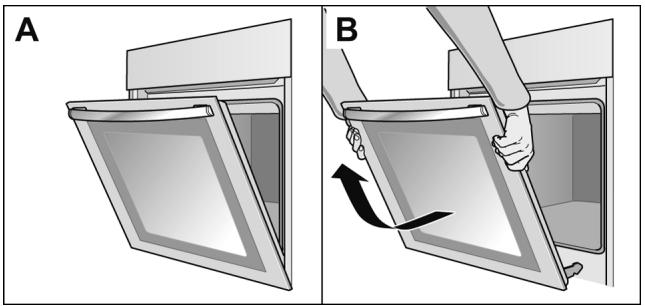
- Close the appliance door only until resistance becomes noticeable (Fig. A).
- With both hands, grip the door on the left and right-hand side, close the door a little more and pull it out (Fig. B).
Fitting the appliance door

Cleaning the door panels
- Insert the hinges in the left and right-hand holders (Fig. A).
The notch on both hinges must engage.
- Open the appliance door fully.
- Close the locking levers on the left and right-hand side fully (Fig. B).
The appliance door is secured and can no longer be removed.
- Close the appliance door.

To facilitate cleaning, you can remove the inner door panels from the appliance door.
Risk of injury.
The components inside the appliance door may have sharp edges. Take care not to cut yourself. Wear protective gloves.
Caution.
The appliance must not be used again until the door panels and the appliance door have been correctly fitted.
Removing the door panel
- Remove the appliance door and place on a soft, clean surface with the front side facing down (see section: Removing and fitting the appliance door).
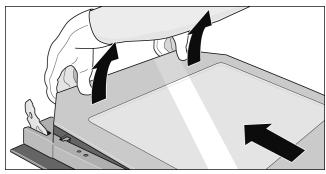
- Grip the door panel next to the hinges and pull it out of the plug-in holders (not visible).
- Lift the door panel slightly and remove it in the direction of the hinges.
Removing the intermediate panel
Before removing, make a note of the position in which the intermediate panel is fitted, so that you do not refit it the wrong way round later.
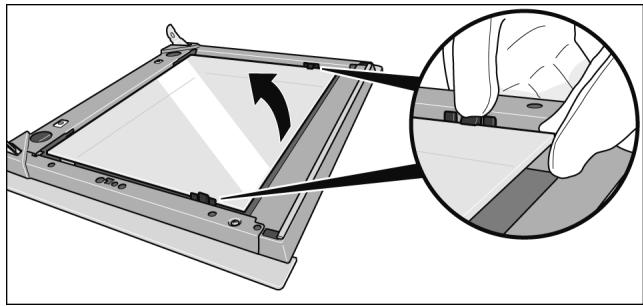
- Press the left and right-hand holders outwards. The intermediate panel disengages upwards.
- Lift the intermediate panel slightly and take it out.
Cleaning
Clean the door panels with glass cleaner and a soft cloth.
Caution.
Do not use any sharp or abrasive medium or a glass scraper. The glass could become damaged.
Fitting the intermediate panel
Fitting the door panel
- Insert the intermediate panel on the left and right into the supports.
- Press the intermediate panel downwards into the holders.
- Insert the door panel on the left and right into the supports.
- Press the door panel downwards into the plug-in holders.
- Refit the appliance door.
Cleaning hook-in racks

For easier cleaning, you can remove the hook-in racks.
Risk of burning due to hot elements in the cooking compartment. Wait until the cooking compartment has cooled down.
Remove hook-in rack
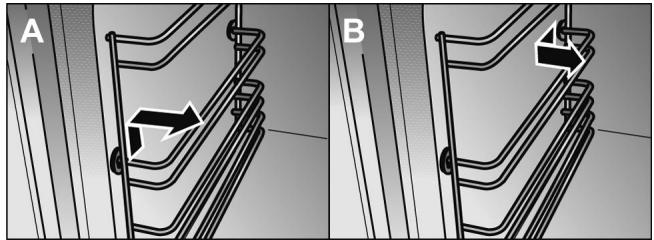
- Push the hook-in rack upwards at the front and unhook to the side (figure A).
- Push the hook-in rack forwards at the rear and unhook to the side (figure B).
Cleaning hook-in racks
Clean hook-in racks with detergent and a sponge or brush.
Hanging hook-in racks
Always install the hook-in rack with the indentation (a) facing downwards, so that the shelf positions match.
- Insert the hook-in rack at the rear until the limit stop and push to the rear (figure A).
- Insert the hook-in rack at the front until the limit stop and push downwards (figure B).
Faults and repairs
It is not always necessary to call the after-sales service. In some cases, you can take remedial action yourself. You will find some tips for troubleshooting in the following table.
Risk of electric shock.
Work on the appliance electronics must only be carried out by an expert
During work on the appliance electronics, the power supply to the appliance must be disconnected. Switch off the circuit breaker or take out the fuse in your household fuse box
| Problem | Possible cause | Remedial action |
| Electrical operation is malfunctioning (e.g. indicator lamps do not light up) | Blown fuse | Check the fuses in the fuse box and replace if necessary |
| Liquid or thin dough runs to one side | Appliance not installed level | Check the appliance installation (see Installation instructions) |
| The appliance no longer functions, 0:00 flashes in the clock display | There was a power cut | Reset the clock (see section: Electronic clock) |
| 0:00 flashes in the clock display, "rrr" appears in the temperature display | Power supply was interrupted while the appliance was in operation | Press the clock function button, Reset the clock (see section: Electronic clock) |
| It is not possible to operate the appliance, ≅ and -5- appear in the temperature display | The appliance has been locked | Deactivate the lock (see section: Childproof lock) |
| It is not possible to operate the appliance, ≅ and -SP appear in the temperature display | The appliance has been locked permanently | Deactivate the permanent lock (see section: Childproof lock) |
| The appliance does not heat up, the colon flashes in the clock display, 1500 appears in the temperature display, for example | A key combination was activated | Switch off the appliance, press and hold the info button for 3 seconds, then press and hold the clock function button for 4 seconds before pressing the info button again and holding it for a further 3 seconds |
| Electronically controlled functions are malfunctioning | Energy surges (e.g. lightening strike) | Reset the function concerned |
| When an operating mode is activated, H or h appears in the temperature display | The appliance has not cooled down fully | Wait until the appliance has cooled down, then switch on the operating mode again |
| The appliance has switched itself off automatically, 000 flashes in the temperature display | The appliance has switched off to protect itself from overheating | Turn the operating mode selector back to the o position |
| Smoke is generated during roasting or grilling | Fat is burning on the grill element | Continue grilling or roasting until the fat on the grill element is burnt away |
| Wire rack or universal pan inserted incorrectly | Place the wire rack in the universal pan and insert them together at a low shelf height | |
| High levels of condensation are generated in the cooking compartment | Normal occurrence (e.g. with cakes with very moist toppings or a large roasting joint) | Open the appliance door occasionally during operation |
| Enamelled accessories have light, matt stains | Normal occurrence caused by dripping meat or fruit juices | Not possible |
| Door panels are misted up | Normal occurrence caused by temperature differences | Heat the appliance up to 100 °C and then switch off again after 5 minutes |
Changing the cooking compartment bulb
Replace faulty cooking compartment bulbs. Spare bulbs can be obtained from the after-sales service or specialist shops:
E14, 220 - 240 V, 40 W, heat resistant to 300^ C Use these bulbs only.

Risk of electric shock.
Disconnect the appliance from the power supply.
Switch off the circuit breaker or take out the fuse in the household fuse box.
- Place a tea towel in the cold oven to prevent damage.
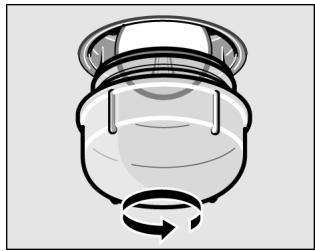
- Turn the glass cover anticlockwise and remove it.
- Replace the bulb with one of the same type.
- Screw on the glass cover again.
- Remove the tea towel and switch on the fuse.
Replacing the door seal
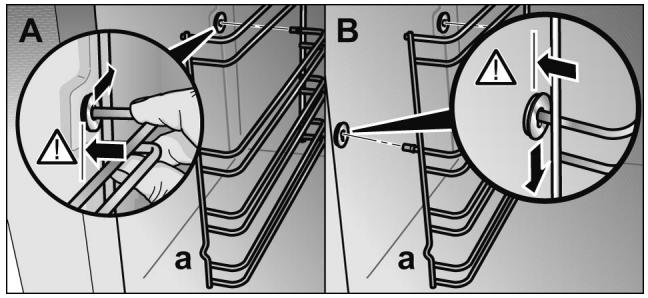
If the door seal is defective, it must be replaced. Replacement seals for your appliance can be obtained from the after-sales service.
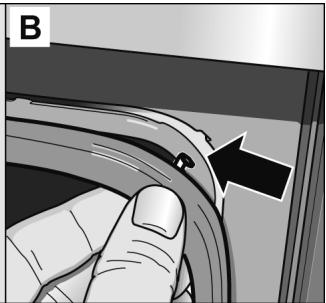
The door seal is attached in four places (figure A). To replace it, disconnect or attach the hooks at all four points (figure B).
Check to ensure in particular that the seal is seated correctly in the corners.
After-sales service
In the event of faults and repairs that you cannot solve yourself, please use our after-sales service.
You can find the addresses in the after-sales service directory.
Note:
You will be charged for calling the after-sales service regarding an operating fault.
E number and FD number
For after-sales service cases, please specify the E-number and FD number.
You can find these on the rating plate behind the appliance door on the left-hand bottom edge.
E-Nr.
FD
Test dishes
Dishes tested in accordance with standard EN 60350. Please note the information in the tables about preheating. The table values do not include rapid heating.
| Baking | Cookware | Oven | Setting | Level | Temperature in °C | Time in minutes |
| Shortbread | ||||||
| ■ 1 level | Baking tray*** | 国 | 国 | 3 | 140 - 150** | 20 - 25 |
| ■ 1 level | Baking tray*** | 国 | 国 | 1 | 140 - 150** | 20 - 30 |
| ■ 2 levels | 2 baking trays*** | 国 | 国 | 1 + 3 | 140 - 150** | 20 - 30 |
| ■ 3 levels | 3 baking trays*** | 国 | 国 | 1 + 3 + 4 | 130 - 150** | 35 - 45 |
| Small cakes (20 pieces) | ||||||
| ■ 1 level | Baking tray*** | 国 | 国 | 3 | 160 - 170* | 25 - 35 |
| ■ 1 level | Baking tray*** | 国 | 国 | 1 | 150 - 160* | 25 - 35 |
| ■ 2 levels | 2 baking trays*** | 国 | 国 | 1 + 3 | 150 - 160* | 25 - 35 |
| ■ 3 levels | 3 baking trays*** | 国 | 国 | 1 + 3 + 4 | 150 - 160* | 25 - 35 |
| Fatless sponge cake | Springform cake tinø 26 cm | 国 | 国 | 2 | 160 - 170** | 25 - 35 |
| Fatless sponge cake | Springform cake tinø 26 cm | 国 | 国 | 1 | 160 - 170** | 25 - 35 |
| Apple pie | ||||||
| ■ 1 level(see figure A) | 2 x Springform cake tinø 20 cm | 国 | 国 | 1 | 170 - 180** | 70 - 80 |
| ■ 2 levels(see figure B and C) | 2 x Springform cake tinø 20 cm | 国 | 国 | 1 + 3 | 170 - 180** | 70 - 80 |
| Apple pie | 2 x Springform cake tinø 20 cm | 国 | 国 | 1 | 170 - 180** | 70 - 80 |
- Preheat for 10 minutes
** Preheat oven
*** Only use original baking trays, order no. Z1342X0
When baking apple pies using CircoTherm® ®, always place the two springform cake tins diagonally on the stepped wire rack (figure A).
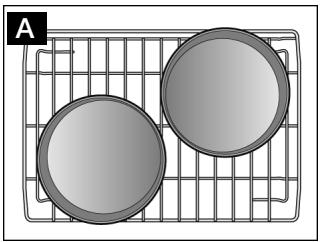
When baking apple pies on two levels, place the lower baking tin to the left on the stepped wire rack (figure B) and the upper baking tin to the right on the straight wire rack (figure C).
| Grilling | Oven | Wire rack position | Setting | Level | Temperature in °C | Time in minutes |
| White bread (universal pan + stepped wire rack) | 国 | ─ | 国 | 4 | intensive* | 0,5 - 2 |
| White bread (universal pan + stepped wire rack) | 国 | ─ | 国 | 2 | intensive* | 0,5 - 2 |
| Beefsteaks (universal pan + stepped wire rack) | 国 | ─ | 国 | 4 | intensive | 20 - 25** |
| Beefsteaks (universal pan + stepped wire rack) | 国 | ─ | 国 | 2 | intensive | 20 - 30** |
| * Preheat for 10 minutes ** Turn after 2/3 of the time | ||||||