XRM 35 - Chaîne Hi-Fi MPMAN - Notice d'utilisation et mode d'emploi gratuit
Retrouvez gratuitement la notice de l'appareil XRM 35 MPMAN au format PDF.


| Type d'appareil | Chaîne hi-fi |
| Fonctions principales | Radio stéréo, lecteur MP3, CD, USB, SD |
| Lecteur CD | Oui |
| Support USB | Oui |
| Support carte SD | Oui |
| Radio | FM stéréo |
| Puissance de sortie | Non précisé |
| Nombre de haut-parleurs | 2 satellites + unité centrale |
| Télécommande | Incluse |
| Affichage | Écran LCD |
| Alimentation | Secteur |
| Dimensions | Non précisé |
| Poids | Non précisé |
| Formats audio supportés | MP3, CD |
| Fonction réveil | Non précisé |
| Entrée auxiliaire | Non précisé |
FOIRE AUX QUESTIONS - XRM 35 MPMAN
Questions des utilisateurs sur XRM 35 MPMAN
0 question sur cet appareil. Repondez a celles que vous connaissez ou posez la votre.
Poser une nouvelle question sur cet appareil
Téléchargez la notice de votre Chaîne Hi-Fi au format PDF gratuitement ! Retrouvez votre notice XRM 35 - MPMAN et reprennez votre appareil électronique en main. Sur cette page sont publiés tous les documents nécessaires à l'utilisation de votre appareil XRM 35 de la marque MPMAN.
MODE D'EMPLOI XRM 35 MPMAN
INSTRUCTION MANUAL
natural_image
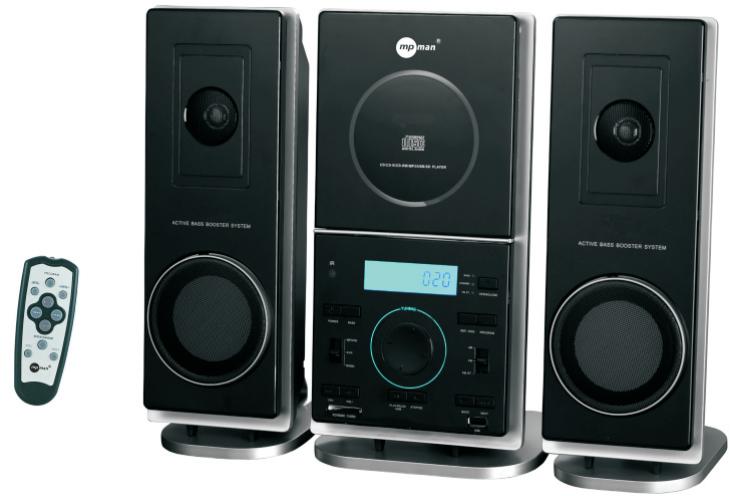
Three black MPV audio synthesizer units with control knobs and a digital display, accompanied by a remote control unit (no visible text or symbols on devices)Know these
safety symbols

CAUTION
RISK OF ELECTRIC SHOCK DO NOT OPEN

CAUTION: TO REDUCE THE RISK OF ELECTRIC SHOCK, DO NOT REMOVE COVER (OR BACK). NO USER-SERVICEABLE PARTS INSIDE. REFER SERVICING TO QUALIFIED SERVICE PERSONNEL.

This "bolt of lightning"
indicates uninsulated
material within your unit
which may cause an electrical shock. For the safety of everyone in your household, please do not remove product covering.

The “exclamation point” calls attention to features for which you should read the enclosed literature closely to prevent operating and maintenance problems.
Dripping warning:
The product shall not be exposed to dripping or splashing and that no objects filled with liquids, such as vases, shall be placed on the product.
For Customer Use
Enter below the Serial No. which is located On the bottom of the cabinet. Retain this Information for future reference.
Mode No.
Serial No.
WARNING: TO PREVENT
FIRE OR SHOCK HAZARD, DO NOT EXPOSE THIS EQUIPMENT TO RAIN OR MOISTURE.
CAUTION: TO PREVENT
ELECTRIC SHOCK, MATCH WIDE BLADEOF PLUG TO WIDE SLOT, AND FULLY INSERT.
Ventilation warning:
The normal ventilation of the product shall not be impeded for intended use.

CLASS 1
LASER PRODUCT
PREPARATION FOR USE
Unpacking and Setup
* Carefully remove the unit from the display carton and remove all packing material from the unit itself.
* Remove any descriptive labels that may be found on either the front or top cabinet of the unit. Do not remove any labels located on either the back or button cabinet of the unit.
Power Sources
Using AC Power
Connect the AC power into Standard household wall outlet. For dual voltage version.
Make sure that the AC VOLTAGE SELECTOR is switched to your local voltage.
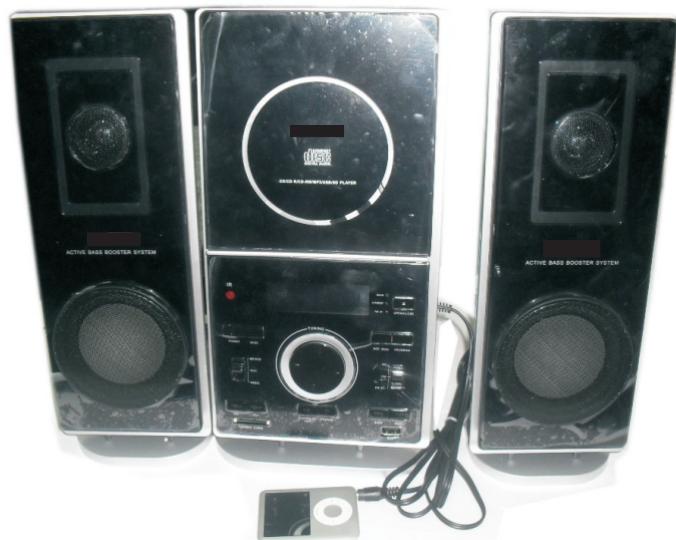
AUX IN CONNECTIONS WAYS
1
natural_image
Four black audio/video audio synthesizer units with visible speaker bases and control panel, connected to a small electronic device (no readable text or symbols)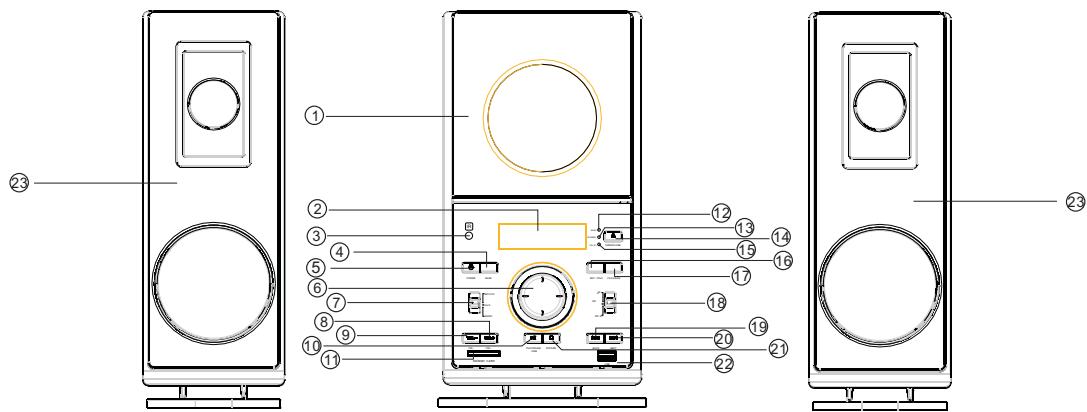
text_image
Diagram of three different speaker units with numbered labels pointing to each component.- CD DOOR
- LCD DISPLAY
- REMOTE SENSOR
- BASS BUTTON
- POWER BUTTON
- TUNING CONTROL
- FUNCTION SELECT
- VOLUME+ BUTTON
- VOLUME- BUTTON
- PLAY/PAUSE/USB BUTTON
-
MMC/SD CARD
-
BASS INDICATOR
- STANDBY INDICATOR
- CD DOOR OPEN/CLOSE BUTTON
- FM STEREO INDICATOR
- REPEAT/RANDOM BUTTON
- PROGRAM BUTTON
- BAND SELECTOR (AM • FM • FM ST.)
- BACK BUTTON
- NEXT BUTTON
- STOP/SD BUTTON
- USB JACK

text_image
Technical diagram of a computer monitor with labeled parts and numbered annotations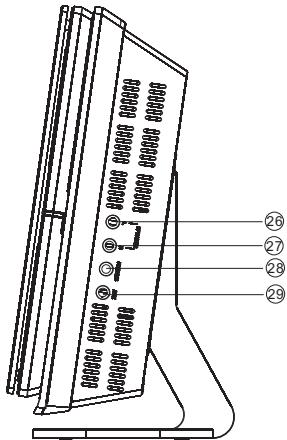
text_image
Technical diagram of a device rear panel with numbered component labels23.LEFT/RIGHT SPEAKER BOX
24.FM ANTENNA
25.AC MAINS
26.LEFT SPEAKER JACK
27. RIGHT SPEAKER JACK
28.PHONES JACK
29.AUX IN JACK
text_image
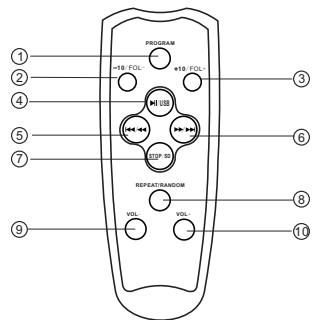
PROGRAM +18: FOL +16: F2L REFRANT RANDOM VOL VOL ① ② ③ ④ ⑤ ⑥ ⑦ ⑧ ⑨ ⑩- Program button
- -10/FOL-button
- +10/FOL+ button
- Play/pause (▶II) /usb
- Back (◀◀) / search (◀◀)
- Next (▶▶) / search (▶▶)
- Stop/sd button
- Repeat/Random button
- Volume - button
- Volume + button
English
CONTROLS
POWER SUPPLY
Top and front panels (See 1)
- CD DOOR
-
LCD DISPLAY
-
show the AM/FM dial frequency
-
show the number of tracks
-
REMOTE SENSOR
-
BASS BUTTON
-to enhances bass response
- POWER BUTTON
-Press POWER button on
- TUNING CONTROL
- select AM/FM/FM ST. Stations
- FUNCTION SELECT
- select source of sound MP3/CD, AUX, or RADIO.
- VOLUME CONTROL+
- adjust volume up level.
- VOLUME CONTROL
- adjust volume down level.
-
PLAY/PAUSE/USB BUTTON
-
start or pause MP3/CD/USB/SD/MMC play
-
Press and hold more than 1.5 sec change to CD/USB mode.
-
SD/MMC CARD JACK
- To listen to your SD/MMC card with Mp3 music files
-
BASS INDICATOR
-
STANDBY INDICATOR
-
CD DOOR OPEN/CLOSE BUTTON
- press here to open/close the CD door.
- FM STEREO INDICATOR
- show the FM stereo indicator
-
REPEAT BUTTON
-
repeat a track/CD/MP3/USB/SD
/MMC/program
RANDOM BUTTON -
play CD/MP3 tracks in random orde
-
PROGRAM
-program and review programmed track numbers.
- BAND SELECTOR (AM · FM · FM ST.)
- select AM/FM/FM ST. wave band
-
SEARCH BACK
-
to select back track
-
press and hold more than 1.5 sec BACK search intra track
-
SEARCH NEXT
-to select nest track
- press and hold more than 1.5 sec forward search intra track
-
STOP/SD BUTTON
-
stop CD/MP3/USB/SD/MMC playback; erase a CD program.
-Press and hold more than 1.5 sec change to MMC (SD) mode -
USB JACK
To listen to your USB flash memory stick with Mp3 music files
- LEFT&RIGHT SPEAKER BOXES
- FM ANTENNA
- to improve FM reception
- AC MAINS
- inlet for power cord
- SPEAKER WIRE CONNECTOR (L)
-
SPEAKER WIRE CONNECTOR (R)
-
STEREO HEADPHONE JACK
- 3.5 mm stereo headphone jack.
- AUX JACK
-Push FUNC button, select AUX station. play Mp3、DISCMAN、WALKMAN AUX insert when no disc.
REMOTE CONTROL HANDSET (See 1)

The remote control buttons function is the same as the button of CD/MP3/USB/SD section.
Select the CD/MP3 tracks by (+10)/(-10) button.
- The remote control volume button no function in the AUX or and radio mode.
Power Supply
Using AC Power
- Check if the power voltage, as shown on the type plate located on the bottom of the set, corresponds to your local AC power supply. If it does not, consult your dealer or service centre.
-
Connect the power cord to the AC MAINS inlet and the wall outlet. The power supply is now connected and ready for use.
-
To switch off completely, unplug the power cord from the wall outlet.
- Unplug the power cord from the wall outlet to protect your set during heavy thunderstorms.
remote control Install battery
- Open the battery cover to remove it.
- Insert two (AAA) battery (not included) correctly so that the + and - polarities match the polarity diagrams inside the battery compartment.
Note:
* About half a year of normal operation can be expected when using the general batteries.
* When the batteries are exhausted, the commander should no longer operate the system. Replace both batteries with new ones.
* When the commander is not to be use for a long time, remove the batteries to avoid damage caused by battery leakage and corrosion.
* Avoid keeping the commander in extremely hot or humid locations.
* Between remote controller and remote sensor there should be no obstacle and have to within 30 range.
* The remote controller's operating distance is about 0.2M to 6M away from the remote sensor.
BASIC FUNCTION
RADIO
Switching power on/off: avoid unnecessary energy consumption always adjust the source selector to off.
General operation
- To select your sound source adjust the source selector to MP3/AUX/RADIO
- Adjust the sound with the VOLUME.
RADIO
Radio reception
- Slide the FUNCTION selector to RADIO.
- Slide the BAND selector to a desired setting -FM STEREO, FM, AM.
- Rotate the TUNING control to find the desired stations.
NOTE: If the BAND selector is set to the FM stereo station, the FM stereo LED indicator will light.
- For FM, pull out the telescopic antenna. Incline and turn the antenna. Reduce its length if the signal is too strong (very close to a transmitter).
- For AM, the set is provided with a built-in antenna so the telescopic antenna is not antenna by turning the needed. Direct the whole set.
CD/MP3 PLAYER
CD/MP3 Player
Playing a CD/MP3
This CD-player can play Audio Discs, MP3 CD-R, CD-Rewritables, Do not try to play CD-ROM, CDi, VCD, DVD or computer CD.
- Adjust the source selector to MP3/CD
- To open the CD door, press CD OPEN/CLOSE button.
- Insert a MP3/CD or CD-R with the printed side facing up and press CD OPEN/CLOSE button to close the CD door.
- Press ▶ on the set to start playback.
- To pause playback press ▶II. To resume, press ▶II again.
- To stop CD playback, press STOP ■.
Note: CD/MP3 play will also stop when:
– you open the CD compartment;
-you select the other mode of AUX or RADIO.
– the CD/MP3 has reached to the end.
Selecting a different track
During playback you can use ◀◀ or ▶▶ to select a particular track in Play or pause mode.
- Press ▶ once briefly for the next track, or press repeatedly until the desired track number appears in the display.
- Press ◀ once briefly for the back track.
- Press more than once briefly for a previous track.
Finding a passage within a track
- press & hold down◀◀ or ▶▶ continuously, the disc is forwarding or rewarding at high speed! the speaker has no sound to output in high speed until release ◀◀◀ or ▶▶
- When you recognize the passage you want release ◀◀ or ▶▶. →Normal playback resumes.
- Press the +10/FOL+ or -10/FOL- button on the remote to the select tracks or folder. -You can use ◀◀ or ▶▶ to select a particular track. -The LCD display the current song folder after 5 seconds, the LCD don't show the folder if there is no folder.
Notice: Connect AUX when the CD is playing. The sound of AUX output. But the CD isn't stop working.
Different play modes: Repeat/Random repeat – plays the current track continuously. repeat all – plays the entire CD continuously.
playing tracks in Repeat mode after press Repeat/Random button one time, the displaying will be show:
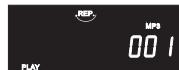
2>playing tracks in Repeat mode after press Repeat/Random button 2nd time, the displaying will be show:
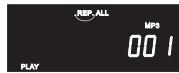
3>playing tracks in Repeat mode after press Repeat/Random button 3rd time, the displaying will be show:
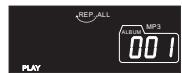
4>release tracks in playing mode after press Repeat/Random button 4th time, Repeat indicator goes off and go to Random mode, the displaying will be show:
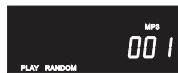
5>release tracks in playing mode after press Repeat/Random button 5th time, Random indicator goes off, the displaying will be show:

Notice: -If there is no folder, press repeat/random third time, it will go to the 4 step directly.
- If the format of music isn't Mp3, the LCD will not display Mp3.
-If it is playing a USB, the LCD will display USB.
Different play modes: Program
program- using main unit, program function can be operated when the unit is stop potion
1>> when the unit is playing CD DISC:
A>press "program" knob of remote control one time in stop potion, the displaying will be show:

B>Using ◀◀ or ▶▶ to select you're favorite track No. and then the LCD display of unit will show as following, then press "program" again to confirm.

C>Repeat the above operation to program the next favorite track unit complete, you can press ◀◀ or ▶▶ to select your favorite track
D>Press PLAY button to play the programmed tracks, the displaying of unit will show:
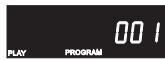
E>press STOP button one time to stop the program play, press STOP button one more time to Erasing a program!
2>> when the unit is playing Mp3 DISC:
A>press "program" knob of remote control one time in stop potion, the
displaying will be show:

B>Using ◀◀ or ▶▶ to select you're favorite track No. and then the LCD display of unit will show as following, then press "program" again to confirm.

C>Repeat the above operation to program the next favorite track unit complete, you can press or to select your favorite track
D>Press PLAY button to play the programmed tracks, the displaying of unit will show:

E>press STOP button to stop the program play, press STOP button one more time to Erasing a program!
Notice: -the former programmed tracks can not be deposited by unit automatically; -the max program function is 99 tracks. after the 99 tracks of program is full program don't be continue. -If it is playing a USB, the LCD will display USB.
Different play modes: BASS
BASS-Advancing the bass function directly
1>press BASS button one time to work; and the BASS function will be erased pressing BASS buttons in double time.
notice: BASS function has NO Indicator on unit' LCD displaying when it is working.
Playing a USB/SD
USB audio functions
1) PLAY/PAUSE/STOP
2) NEXT/FW, BACK/FB skip search
3) +10 track/ -10 track skip search
4) Folder Increment/ Folder decrement skip search.
5) Program tracks(99 tracks)
6) Repeat/random : normal->repeat 1->repeat all-> repeat album->random ->normal
(There is no repeat album mode in program PLAY mode)
-Press and hold the [PLAY] key more than 1.5sec at CD mode, system will change to USB mode. Then "USb" will be displayed. At this moment, system will read the USB .then press play button to start playback.
- Press and hold the [STOP] key more than 1.5sec at CD or USB mode, system will change to SD mode. Then "Sd" will be displayed. At this moment, system will read the SD .then press play button to start playback.
-Press and hold the [PLAY] key more than 1.5sec at USB/SD mode, system will change to CD mode. Then “--” will be displayed. Press PLAY button to start playback - If a device is successfully read, then the correspond device is ready to play a file.
- If a device fails to be read, then "NO" will be appear on the Display to indicate that there is no device.
*Notice : If no device is attached or the player fails to read the device when user switch over USB to MMC(SD) with pressing [STOP] key, then “NO” is display and the system moves into the STOP mode.
Notice :
-When the unit has not a disc, inserting the USB/SD card will read the usb/sd card automatically, it read the USB first while having a USB.
-The unit don't support the HDD all and the portion USB with Mp3 player.
MAINTENANCE & SAFETY
Precautions & General Maintenance
- Place the set on a hard and flat surface so that the system does not tilt.
- Do not expose the set, batteries or CDs to humidity, rain, sand or excessive heat caused by heating equipment or direct sunlight.
- Do not cover the set. Adequate ventilation with a minimum gap of 6 inches between the ventilation holes and surrounding surfaces is necessary to prevent heat build-up.
- The mechanical parts of the set contain self-lubricating bearings and must not be oiled or lubricated.
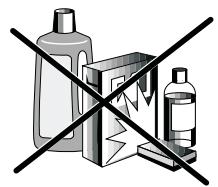
- To clean the set, use a soft dry cloth. Do not use any cleaning agents containing alcohol, ammonia, benzene or abrasives as these may harm the housing.
natural_image
Crossed warning symbol with three items: bottles, a box, and a bottle (no text or labels)CD player and CD handling
- The lens of the CD player should never be touched!
- Sudden changes in the surrounding temperature can cause condensation to form and the lens of your CD player to cloud over. Playing a CD is then not possible. Do not attempt to clean the lens but leave the set in a warm environment until the moisture evaporates.
- Always close the CD door to keep the CD compartment dust-free. To clean, dust the compartment with a soft dry cloth.
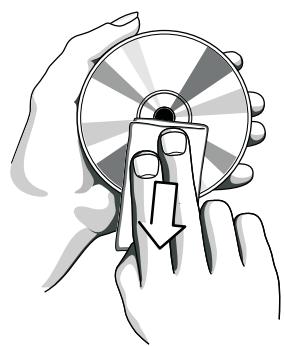
- To clean the CD, wipe in a straight line from the centre towards the edge using a soft, lint-free cloth. Do not use cleaning agents as they may damage the disc.
- Never write on a CD or attach any stickers to it.
natural_image
Illustration of hands holding a CD or DVD disc with a downward arrow indicating compression (no text or symbols)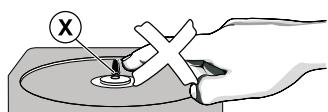
TROUBLESHOOTING
Troubleshooting
If a fault occurs, first check the points listed below before taking the set for repair.
Do not open the set as there is a risk of electric shock.
If you are unable to remedy a problem by following these hints, consult your dealer or service center.
WARNING: Under no circumstances should you try to repair the set yourself, as this will invalidate the warranty.
- Problem
- Solution
No sound /power
– Volume not adjusted
- Adjust the VOLUME
– power cord not securely connected
- Connect the AC power cord properly
CD/MP3/USB/SD playback does not work
- CD/MP3/USB/SD badly scratched/dirty
- Replace/clean CD/MP3/USB/SD (see maintenance)
– Laser lens steamed up - Wait until lens has adjusted to room temperature
Display does not function properly / No reaction to operation of any of the controls
– Electrostatic discharge
- Switch off and unplug the set. Reconnect after a few seconds
The CD/MP3 skips tracks
- CD/MP3 damaged or dirty
- Replace or clean CD/MP3
– Program is active - Quit Program mode(s)
no disc indication
- No CD/MP3 inserted
- Insert a CD,MP3, CD-R.
– CD badly scratched or dirty -
Replace/ clean CD, see Maintenance
-
CD-R, is blank or the disc is not finalized
- Use a finalized CD-R.
Environmental information
We have done our best to reduce the packaging and make it easy to separate into 3 materials: cardboard, paper pulp and expandable polyethylene.
Your set consists of materials which can be recycled if disassembled by a specialized company. Please observe the local regulations regarding the disposal of packaging, dead batteries and old equipment..
TECHNICAL SPECIFICATIONS
GENERAL
Power Requirement 230V\~50Hz
Power consumption ......AC 45 Watts
Dimensions....Approx.418 mm(L)x172 mm(W) x 327 mm(H)
Operation temperature....+5 ℃ - +35℃
RECEIVER SECTION
Receiving Bands......AM/FM
Tuning Range......AM:520-1620KHz
FM:88-108MHz
COMPACT DISC SECTION
Optical Pickup....3-Beam Laser
Frequency Response....100Hz - 16KHz
AUDIO SECTION
Power output ......Maximum 8 Watt x 2
Headphone Impedance ....4 \~ 32 Ohms
ACCESSORIES
Instruction Booklet....1
Remote control....1
This is to certify that XRM35 is in conformity with:
Council directive 89/336/EEC(EMC direction):
Applicable standards:
EN55013:2001+A1:2003+A2:2006
EN61000-3-2:2006+A1:2009+A2:2009
EN61000-3-3:2008
EN55020:2007
For more information please visit our website www.mpmaneurope.com