
MP107 - Tablette MPMAN - Notice d'utilisation et mode d'emploi gratuit
Retrouvez gratuitement la notice de l'appareil MP107 MPMAN au format PDF.


| Type de produit | Lecteur MP3 |
| Capacité de stockage | 8 Go |
| Formats audio supportés | MP3, WMA, WAV, FLAC |
| Écran | Écran LCD 1,8 pouces |
| Autonomie de la batterie | Jusqu'à 10 heures |
| Type de batterie | Batterie lithium-ion rechargeable |
| Connectivité | USB 2.0 |
| Dimensions approximatives | 9,5 x 4,2 x 1,2 cm |
| Poids | 60 g |
| Fonctions principales | Lecture de musique, enregistrement vocal, radio FM |
| Entretien et nettoyage | Essuyer avec un chiffon doux, éviter l'humidité |
| Pièces détachées et réparabilité | Pas de pièces détachées disponibles, réparation limitée |
| Compatibilités | Compatible avec Windows et Mac |
| Garantie | 1 an |
FOIRE AUX QUESTIONS - MP107 MPMAN
Questions des utilisateurs sur MP107 MPMAN
0 question sur cet appareil. Repondez a celles que vous connaissez ou posez la votre.
Poser une nouvelle question sur cet appareil
Téléchargez la notice de votre Tablette au format PDF gratuitement ! Retrouvez votre notice MP107 - MPMAN et reprennez votre appareil électronique en main. Sur cette page sont publiés tous les documents nécessaires à l'utilisation de votre appareil MP107 de la marque MPMAN.
MODE D'EMPLOI MP107 MPMAN
MP3 Player
MP107
User's Manual
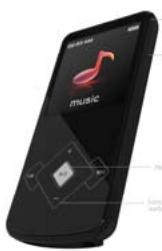
KC 1X Artwork
TABLE OF CONTENTS
Introduction. 1
Important Safety Precautions 2
Main Features 4
Overview. 5
Connecting to the Computer 6
System requirements 6
Installing the driver for windows 98 SE 6
Connecting player to computer 7
Copy Files from computer 7
Disconnecting from the computer 7
Charging the battery 8
Basic operation. 9
Turn on/off the Player 9
Adjusting the volume 9
Resetting the Player 9
Unlock All Buttons 10
Entering the main menu 10
Listening to Music 11
Playing music 11
Display 12
Using Music Function Menu 12
Lyric Displaying 14
Watching a Video. 15
Playing a video 15
Viewing Photos. 16
Viewing a Photo 16
E-book Reading 17
Save and Load a bookmark 18
Voice Recording and Playing 19
Recording a Voice 19
Setup the recording quality 20
Using voice function menu 20
Managing Files 22
Browsing all files and deleting a file 22
Changing Player Setups 23
Setup items 24
Power setup 24
Adjust the brightness 25
System tools 25
Converting Video to MTV Format. 26
Troubleshooting 28
Introduction
Thank you for purchasing this MP3 Player.
This manual contains important safety information and operation instructions, so please read all these instructions carefully before using the player and keeps it for future reference.
This manual will help you use all of the exiting features to make your player view more enjoyable.
We have done our best to produce a complete and accurate manual; however, we cannot ensure there are no errors or omissions. We also have no responsibility for damages or loss of data caused by improper operation.
The instruction manual is subject to change for improvement without notice.
Trademarks and trade names used in this user's manual are owned by their respective companies or organizations.
Important Safety Precautions
Always follow these basic safety precautions when using your player. This will reduce the risk of product damage and personal injury.
- Do not disassemble, repair or modify the player by yourself. Refer servicing to qualified personnel.
- Do not dispose of the player in fire to avoid explosion because the player has built-in battery.
- Do not touch the player with bare hands if the built-in battery is leaking. In this case, contact service center for help since the liquid may remain in the player. If your body or clothes has contacted with the battery liquid, wash it off thoroughly with water. Also, if some of liquid gets into your eyes, do not rub your eyes but immediately wash them with clean water, and consult a doctor.
- Keep the player away from direct sunlight and heat source.
- Do not expose the unit to rain or moisture to avoid any malfunction.
- Do not use the player in rather dry environment to avoid static.
- Never apply heavy impact on the player like dropping it or placing it on the magnet.
- Route USB cable so that people and pets are not likely to trip over or accidentally pull on them as they move around or walk through the area.
- Disconnect the USB cable from the computer when you do not use the player for a long time.
Clean only with dry cloth. Make sure the player is turned off before cleaning. Do not use liquid cleanser. - Be sure to back up your files. We will not be liable for the loss of data due to improper operation, repair or other causes.
At full power, the prolonged listening of the walkman can damage the ear of the use.
Maximum output voltage ≤ 150mV
Precautions in using the headphone
- Do not use the headphone while driving an automobile or riding a bicycle. It is not only dangerous, but also against the law. To avoid an accident, do not turn up the volume of the headphones too high while walking.
It's not recommended that you use the headphones at a high volume for an extended time as this may cause hearing damage.

Main Features
1.44"CSTN color display 128128
Built-in rechargeable lithium battery
Using the player even if the player is connected to the computer
- Playback of MP3, WMA, WAV music files
Multiple equalizers (EQ) and 3D sound effects
- Display titles, artists and albums of music files (ID3 tag)
- Lyrics synchronization while music is playing*
Supports JPEG and BMP photo formats
Supports MTV video format converter included)
- Reading e-book in TXT format
- Folder navigation
USB 2.0 high speed transmission
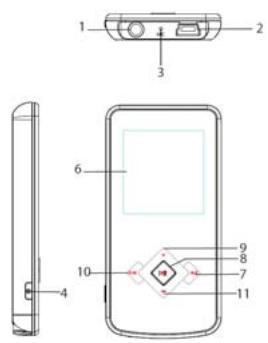
- Earphone jack
- Mini USB connection
- MIC Built-in microphone for voice recording
- [O] Power on/off; Record save; Open music/movie/Voice menu; Return to previous menu
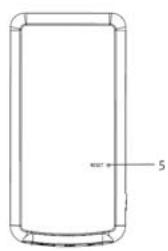
- RESET hole
- Display screen
- [>>] Next track/option. Fast forward search.
- [▶II] Open the main menu; Confirm the selection; Starts/Pause playback; Unlock buttons.
- [+] Increases the volume/ UP
- [Previous track/option;Fast backward search. Return to previous menu the list interface
- [Decrease the volume/ Down]
Connecting to the Computer
System requirements
Your computer system must meet the following requirements:
- Pentium 200MHz or above
Microsoft Windows 98SE/2000/ME/XP/Vista/7
120MB of available hard disk space
USB port supported
CD-ROM drive
Installing the driver for windows 98 SE
If your computer is running Windows ME/2000/XP/Vista, no driver is required to install.
If your computer is running Windows 98 SE, you must install the driver provided on the CD before connecting the player to your computer.
- Insert the CD into the CD-ROM drive.
- Execute the "USB Disk Win98 Driver Version xxx.exe" file in the CD.
- Follow the instructions from the pop-up windows to complete the installation.
- Restart the computer.
Note: Make sure the player is not connected to the computer while installing the driver.
Connecting player to computer
Files can be transferred directly into the player by using the USB data cable.
- Make sure that your computer has been started before you start.
- Connect the mini plug of the USB cable to the mini USB port on the player, and push the other end into a free USB port on your computer.
- When the MP3 player is connected to your computer, a "Removable Disk" will be created in "My computer".
Copy Files from computer
- Open the Windows Explorer or My computer. "Removable Disk" is displayed.
- Drag and drop the files on your computer to the "Removable Disk".
Note:
- Please do not disconnect the USB cable during file transferring. It may cause malfunction of the player and the files.
Disconnecting from the computer
After finishing transferring, please disconnect the player from the computer as the following:
1 Left click the"icon at the taskbar.
2 Click the pop-up mini-window with message of "Stop the USB Mass Storage Device -Driver (X)".
3 When you are prompted to remove the device, you can unplug the player safely.
Charging the battery
- The battery of the player is charging automatically when the player is connected to the computer. Make sure the computer has been started.
- The battery of the player is 80-percent charged in about two hours and fully charged in about four hours. If you charge the player while downloading files to the player, it might take longer.
- Read the battery level indication of your player:
:
:
:
Full
Three-quarters full
Half full
Low
Empty
Important:
Recommended temperature for battery charging is 0^ to 35^ .
Fully charge it before you use the player for the first time or when you haven't used it for a long time.
- Charge the player right now when the "Low battery" message is displayed.
- Do not over charge or discharge the player. Over charging or discharging will shorten the battery life.
- The battery could be over discharged if the player is not used for a long time (over three months). To avoid over discharge, fully charge the player every three months and always keep the voltage of the battery above 50% .
If the player is not used for a long time, keep it under the temperature of 23 ± 5^ C and the moisture of 65 ± 20% RH to maintain the performance of the battery.
Basic operation
Turn on/off the Player
Make sure the battery is sufficient and the headphone is connected correctly.
To turn on the player, press and hold the button.
To turn off the player, press and hold the U button.
Note:
- If it is the first time for you to turn on the player or turn on the player after default settings or resetting, you have to select a display language by pressing[+] or[ ] buttons and then press [▶] button to confirm.
While the player is connected to the computer, you can also press and hold the [O] button to turn on the player.
Adjusting the volume
To increase the volume, press the[+]button while music playing.
To decrease the volume, press the[] button while music playing.
Resetting the Player
If a malfunction of the player occurs, take a metal pin, e.g. the end of a paper clip, and press it into the RESET hole to re-initialize the system of your player.
Unlock All Buttons
All buttons of the player will be locked after you do not use it in a certain time (you can set the time in setup menu). This prevents you from accidental pressing the buttons while using the MP3 player on the move. Press and hold the [▶I/M]buttons to unlock all buttons.
Entering the main menu
- In standby or playing mode, press and hold the [▶] button to enter the main menu.
- Press the[+]or[ ] button to select: Music, Video, Photo, E-Book, Voice, File Browse, Setup.
- Then press the[ ] button to enter the desired setting.
| Main menu items | Description | Main menu items | Description |
| MUSIC | Play music tracks. | E-BOOK | Reading E-books. |
| VIDEO | Play video files. | VOICE | Voice recording and playing. |
| FILE BROWSE | Browse all files in the player and delete a file or not. | SETUP | Customize the settings of your player. |
| PHOTO | View photos. |
Listening to Music
Playing music
Make sure that the battery is enough and the headphone is connected correctly.
- Press[▶] bottom to
enter the main menu.
- Select "MUSIC" with

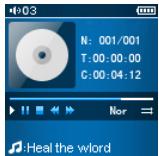
While music playing, you can:
- Pause/Resume Playing: Press[▶] button to pause playing. To resume playing, press[▶] button again.
- Skipping Tracks: Press [▶] or [▶] button to skip to previous/next track.
- Searching: Press and hold [▶] button to fast rewind within a track. Press and hold [▶] button to fast forward within a track.
- Adjust Volume: Press[+]or[ ]button to increase/decrease the volume.
Music function menu: Press [ ] button to enter music function menu, and press it again to exit.
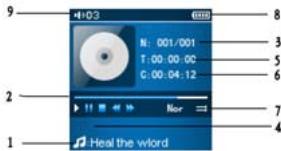
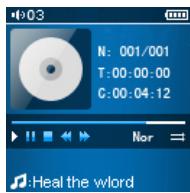
- Mode/File name/ID3 tag 7. Music repeat mode
- Progress bar 8. Battery status
- Track No./Total Tracks 9. Volume level
- Lyrics
- Time Elapsed
- Total time
Using Music Function Menu
While music playing, press the [O] button, the music function menu appears for you to set the music repeat mode, equalizer, 3D, play rate, file browse and classification.
- Press [+ ]or[--]button to select among Repeat Mode, Equalizer, 3D, Play rate, File Browse and Classification
- Press▶ button to enter.
-
Press[ ] button to exit and return to music playing mode.
-
Repeat Mode: set the music repeat mode. Use[+]or[]button to select among: No repeat, Repeat One, Repeat All, Shuffle All, Folder Normal, Folder All Repeat and Folder Shuffle All. And then press [▶] button to confirm, or press [▶] button to back to previous screen.
a) No Repeat: Play all songs in order once.
b) Repeat One: Repeat the current or selected song.
c) Repeat All: Repeat all songs.
d) Shuffle All : Play all songs in the Player at random.
e) Folder Normal: Play all songs in the current folder in order once.
f) Folder All Repeat: Repeat all songs in the current folder.
g) Folder Shuffle All: Play all songs in the current folder at random.
- Equalizer: set the music playing equalizer. Use[+]or[ ]button to select among: Normal, Pop, Rock, Classic, Jazz, Bass, and Custom EQ. And then press [▶] button to confirm, or press [▶] button to back to previous screen.
To customize EQ:
a) Select "Custom EQ", and then press [▶] button.
b) Press [or [] button to navigate among value bars.
c) Press[+]or[] button to adjust the value.
d) Press [▶] button to confirm and exit.
- 3D: to open 3D effect or not. Use[+]or[ ]button to select "Off" or "On", and then press [▶] button to confirm, or press [ ] button to back to previous screen.
- Play rate: set the music-playing rate. Use[+]or[=]button to select among: 1.00X, 1.14X, 1.33X, 0.67X, 0.80X. And then press [▶III] button to confirm, or press [K] button to back to previous screen.
File Browse: Press[+or]按钮 to select File Browse, press [▶] to play it. - Classification: classify songs by their genre, artist, album and title. If it is the first time for you to classify your songs, choose "Classification" and select "Yes", and then press [▶III] to refresh your classification. When the classification is finished, use[+]or[-]to select among genre, artist, album or title, then press [▶II], press[+]or[-]to choose a song,
Note: The play rate function is not available for WMA music format.
Lyric Displaying
This player supports lyrics display while music playing. Only the lyrics in LRC format can be displayed.
To add lyrics to the music, take "love music. Mp3" for example:
- Download the corresponding lyrics with extension“.lrc” from the Internet.
- Rename the lyrics file as "love music.lrc". Make sure the lyrics filename is the same as the music file name.
- Copy both files into the same folder on the player.
- The lyrics will be displayed on the screen while the music is playing.
- Press and hold[▶] to access the main menu.
- Use[+]or[] to select VIDEO and press[]. The video list appears on the screen.
- Use[+]or[]to select a folder or a video and press[▶] to open the folder or play the selected video.
- Press [ ] to return to previous screen.
While video playing, you can:
- Pause/Resume Playing: Press[▶] button to pause playing. To resume playing, press[▶] button again.
- Skipping videos: Press [▶] or [▶] button to skip to previous/next video.
- Searching: Press and hold [▶] button to fast rewind within a video; Press and hold [▶] button to fast forward within a video.
- Adjust Volume: Press[+]or[ ]button to increase/decrease the volume.
- Exit: Press and hold[▶] button to return to video list menu.
Power Off: Press and hold the [ ] button to turn off the player.
Viewing Photos
Viewing a Photo
- Press and hold▶▶ to access the main menu.
- Use[+orto select PHOTO and press [▶]. The photo list appears on the screen.
- Use[+]or[] to select a folder or photo and press [▶][] to open the folder or view the selected photo.
- Press [ ] to return to previous screen.
While viewing photos, you can:
- Use [+ or [-] to select a folder or photo and press [ to open the folder or view photos.
To select previous or next photo, press[+]or[].
To return to photo list, press [H] or [U]
Power Off: Press and hold the [O] button to turn off the player.
E-book Reading
This player only supports E-Book in TXT format. Other formats must be saved as TXT format before transfer.
- Press and hold[▶]to access the main menu.
- Use[+]or[] to select E-BOOK and press[ ]. The E-Book list appears on the screen.
- Use[+]or[ ]to select a folder or file and press[ ] to open the folder or view the selected file.
- Press [ ] to return to previous screen.
While reading an E-Book, you can:
- Auto paging: Press[▶] button to start auto paging for every 4 seconds.
- Fast browse: Press and hold[+]or[ ] button to fast browse.
To move to the previous or next page:press [M] or [M].
To return to E-book list:Press and hold the[11]
Power Off: Press and hold the [O] button to turn off the player.
Save and Load a bookmark
This function helps you to save the page you have read and recall it to continue reading next time. While reading an E-Book, press and hold button to enter "Bookmark List".
- Save a bookmark:
- Press[+]or[ ]button to select "NewBookmark", and the press[ ]. "SaveBookmark" appears on the screen.
- Press[ ] button to confirm. There pops up a window for you to select "Yes" or "No".
- Use [± ] or button to select "Yes" (Save bookmark) or "No" (back to previous screen).
- Press [u] button to exit.
- Load a bookmark:
- Press [▶] button in "Bookmark List" interface.
- Use [· +] or [· -] button to select "LoadBookmark".
- Press▶ button to confirm. Then you can skip to the page you have been saved.
- Press [O] button to exit.
- Delete aBookmark:
- Press▶▶ button in "Bookmark List" interface.
- Use [± ] or button to select "DeleteBookmark".
- Press [▶] button to confirm. There pops up a window for you to select "Yes" or "No".
- Use[+]or[] button to select "Yes" (Delete bookmark) or "No" (back to previous screen).
- Press[] button to exit.
Note: While in E-Book list mode, you also can press[ ] button to enter "Bookmark List". However, you can only load or
Voice Recording and Playing
Recording a Voice
- Access Main menu by
holding[1]

- Select "VOICE" with[+]/[■]
then [11]
While recording a voice, you can:
To pause the playback, press[▶] button again. To resume the playback, press the [▶] button.
To skip to previous or next track, press the [ ] or [ ] button.
To search backward or forward within a track, press and hold the [ ] or [ ] button.
Press the [O] button to enter the voice Sub-menu and select "Record", To stop the recording, press the [▶I] button.
Press [U] button to save the recording and return to voice recording interface.
- Save the Recording: Press [U] button to save the recording and return to voice recording interface.
Note:
The recorded voice files are saved in the VOICE folder of the MiS player as WAV files (format: MiC0007.WAV, MIC00002.WAV).
Voice recording is automatically stopped when the memory of the player is full or the battery power is no longer sufficient. Date for recording is automatically saved.
Setup the recording quality
Before starting the recording, you can set the recording quality.
- Press and hold▶▶ to access the main menu.
- Use [± ] or to select SETUP mode and press[]. The SETUP menu appears.
- Use[+] or[] to select Record Setting and press[]. The record options appear.
| Item | Occupy memory | Quality |
| Long Time | Occupy least memory | Normal recorded quality |
| Normal Quality | Occupy less memory | Better recorded quality |
| High Quality | Occupy much memory | Best recorded quality |
- Use [± ] or to select Long Time, Normal Quality or High Quality.
- Press[▶]to confirm.
Using voice function menu
While in standby mode of voice mode, press [U] button to enter voice function menu.
- Press[+]or[ ]button to select among Repeat Mode, Equalizer, 3D, Play rate, File Browse, Record
- Press[ ]button to enter.
-
Press [ ] button to exit.
-
Record: start recording. Use[+or-]button to select "Record", and then press[▶] button to start recording.
File Browse: select a voice and play it. Use[+]or[] button to select a voice, and then press[ ] button to play it.
Note: Repeat Mode,Equalizer,3D and Play rate function in the Voice mode are same to the functions in the Music mode.
- Press and hold [▶] to access the main menu.
- Use[+]or[] to select FILE BROWSE and press [▶]. The file list appears on the screen.
- Press[+]or[]to navigate between files or folders. To open a folder, select the folder and press[▶III].
- Use[+]or[ ]to highlight a file, and then press [ ] button, there will pop up a DELETE option menu.
- Press[+]or[-]to select "Yes" or "No", and then press[▶][]to confirm.
- Press [ ] to return to previous screen or press and hold [ ] to exit.
The system setups let you customize and configure your MP3 player.
- In standby or playing mode, press and hold[▶]to access the main menu.
- Use[+]or[-]to select SETUP and press[▶].The setup menu appears on the screen.
- Use [± ] or[] button to select a setup item.
- Then press the[ ] button to enter the submenu.
- Use the [+ or [] button to select a value.
- Press the[ ] button to confirm. Or press the [ ] button to exit and not confirm.
Setup items
| Setup Items | Description |
| Power | Set how long it will power off automatically after it is not used for a certain time. The available options include: 15 Minutes,30 Minutes,60 Minutes,90 Minutes,120 Minutes, Close |
| Language | Set up the display language. |
| Display Setting | Set the brightness and backlight time. The available options of backlight time include:15 Seconds, 30 Seconds,1 Minute and Close |
| Record Setting | Set the recording quality |
| Sys Tools | Delete a file on the player; format the player; reset the player; get to know the system information; refresh playlist and sort files. |
| Hold Time | Set how long the keys will be locked if no button is pressed. The available options include: 10 Seconds,30 Seconds,1 Minute,3 Minutes,5 Minutes, Off |
Power setup
- Auto off: To set how long it will power off automatically after it does not used for a certain time.
Press[+]or[]to select a time, and then press[1]to confirm
Always on
Press[+or]to select "Yes" or "No", and then press[▶]to confirm
Yes: The player will be always on while playing. However, it will power off automatically in
Adjust the brightness
- Press[+]or[]to select "Display setting" in SETUP menu, and then press[ ]to confirm.
- Use [± ] or to select "Brightness", and then press[]to enter.
- Press[+]or[]to adjust the backlight, and then press[▶] to confirm or press [▶] to exit.
System tools
- Delete: To delete a file in the player.
- Format: To format the player quickly or completely. After formatting, all the data on the player will be erased.
- Reset: To restore all settings of the player to factory default settings.
- System info: To check the free memory and firmware version of the player.
Refresh: To refresh all the playlist of the player.
File Sort: To sort all files on the player.
Note: Back up important files in the player before formatting. The erased files cannot be restored.
Converting Video to MTV Format
This player supports the playback of videos in MTV format. Other formats (AVI, WMV, MPEG1, Quick Time, MPEG2, RealMedia, MPEG4, 3GP) must be converted to MTV format. The "MTV Video Converter" is supplied on the CD to enable you to convert the other formats to MTV format.
- Insert the provided CD to the CD-ROM driver of your computer.
- Double-click the file "VideoConvert.exe" in the folder "MTV Video Converter" of the CD. The Video Converter window appears.
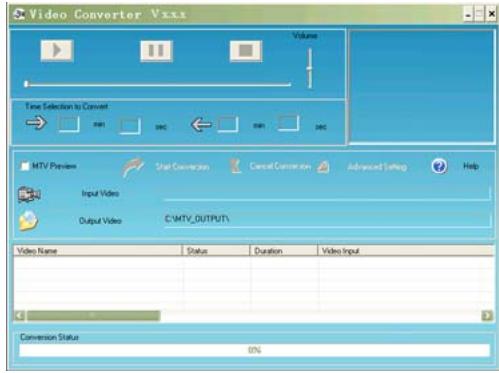
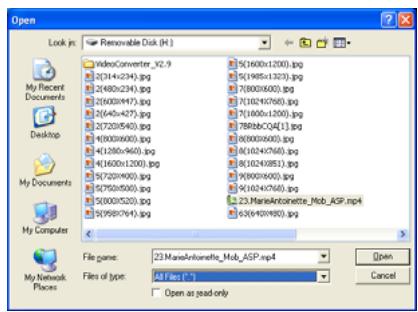
- Click Input Video, and then select the input source from the Open dialog box.
Note: To input MP4 files, select All Files (.) in the File of type box so that the MP4 files can be found in the Open dialog box.
- Click Output Video to select an output directory.
- Click Advanced Settings. Select 128x128 in the Output Frame Size box and select MTV in the Output Format box.
- Click Start Conversion.
For detailed operations, click Help.
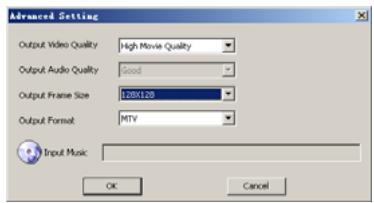
Note:
To make your video playable on the player, you must select 128x128 or less in the Output Frame Size box (Advanced Setting). Otherwise, the message "Device Not Support" will appear on the screen when you play the video file.
- You have to install relevant codec package before running "Video Converter.exe". If not, the system will prompt "Load Video Failed!" when you attempt to convert the video files. Click "OK" and follow the prompt to download and install codec from the web sites.
Troubleshooting
If you have problems in operating your player, please check the points below before sending it to service center.
Cannot power on
The battery may be exhausted. Please recharge the battery.
Files cannot be downloaded
- Check if the driver is installed correctly in the computer.
- Check the connection between the player and PC.
No sound from the headphone
Please ensure the volume is not 0, and the connection of headphone is no problem.
- Check if the format of music file is supported by the player.
Recording cannot be done
- Check if there is enough memory and battery capacity.
The words of LCD display abnormality
Please ensure you select the correct language.
The buttons do not work
The key may be locked. Press and hold▶▶ to deactivate the lock function.
- Press the reset hole with metal pin to re-initialize the system of the player.
| Audio Format | MP3/WMA/WAV | Size | |
| Photo Format | JPEG/BMP | weight | |
| Video Format | MTV | Frequency response | 20Hz~20KHz |
| MP3 bit Rate | 8Kbps ~320Kbps | Dynamic current | 15mA |
| WMA bit rate | 5Kbps ~320Kbps | Storage condition | Humidity <90%, Normal temperature |
| S/N rate | 80db (30K filter) | Working condition | Humidity <85%,-10~40°C |
| Dynamic range | >80db(1KHz) | Recorded format | WAV |
| Distortion | <0.2% | EQ | Normal/Pop/Rock/Classic/Jazz/Bass/Custo m EQ |
| Battery | 170mAh, up to 9 hours playback for music and 3 hours for video | ||
| Support video format to converter | AVI(*.avi), WMV(*.wmv, *.asf), MPEG1(*.mpg), QuickTime(*.mov, *.qt), MPEG2(*.vob), Real Media(*.rm, *.rmvb,...), MPEG4, 3GP(*.3gp) | ||