
MPH100 - Lecteur mp3 MPMAN - Notice d'utilisation et mode d'emploi gratuit
Retrouvez gratuitement la notice de l'appareil MPH100 MPMAN au format PDF.


| Intitulé | Description |
|---|---|
| Type de produit | Lecteur MP3 |
| Caractéristiques techniques principales | Écran LCD, capacité de stockage de 8 Go, prise en charge des formats audio MP3, WMA, WAV, et FLAC. |
| Alimentation électrique | Batterie lithium-ion rechargeable via USB. |
| Dimensions approximatives | 9.5 x 4.5 x 1.2 cm |
| Poids | 80 grammes |
| Compatibilités | Compatible avec Windows et Mac OS. |
| Type de batterie | Batterie lithium-ion |
| Tension | 5V |
| Puissance | Non spécifiée |
| Fonctions principales | Lecture de musique, enregistrement vocal, radio FM, et support de livres audio. |
| Entretien et nettoyage | Essuyer avec un chiffon doux, éviter l'exposition à l'eau. |
| Pièces détachées et réparabilité | Réparabilité limitée, pièces détachées non spécifiées. |
| Informations générales utiles | Vérifier la compatibilité des formats audio avant l'achat. |
FOIRE AUX QUESTIONS - MPH100 MPMAN
Questions des utilisateurs sur MPH100 MPMAN
0 question sur cet appareil. Repondez a celles que vous connaissez ou posez la votre.
Poser une nouvelle question sur cet appareil
Téléchargez la notice de votre Lecteur mp3 au format PDF gratuitement ! Retrouvez votre notice MPH100 - MPMAN et reprennez votre appareil électronique en main. Sur cette page sont publiés tous les documents nécessaires à l'utilisation de votre appareil MPH100 de la marque MPMAN.
MODE D'EMPLOI MPH100 MPMAN


User Manual
Hard Disk Multimedia Player
QH100



man
Table of Contents
品 Product features
※Safety and Other Instructions
※Product Specification
※Product Contents and Descriptions
※HDD Installation
※Network-based Data Sharing with a PC
※HDD Partition Setup and Format (Win2000/XP)
※ Video Cable Connection
Audio Cable Connection
※ Remote Controller
※ Setup Menu Setting
※Main Menu Screen
※Movie Play
※MusicPlay
※Photo Play
※Virtual DVD
※Firmware Upgrade
Firmware Recovery
※ Trouble shooting
PRODUCT FEATURES
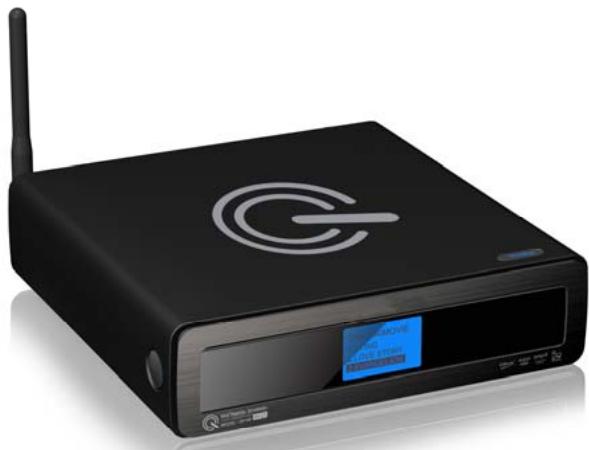
PLAYER is network-based Home Media Center which, with a built-in 3.5' high-capacity HDD, can play various media files(e.g.films,MP3,photos,etc.) through a TV and, if connected to a PC, can also play shared movie files via the network.
Multi-codec MPEG Player
-Digital Music Jukebox
Digital Photo Album
10/100M Home Network
Analog and Digital Output
- USB Host Play
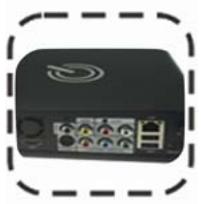
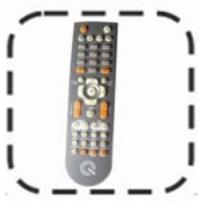
SAFETY AND OTHER INSTRUCTIONS
Pls use the products after carefully reading the following instructions. Particularly, pls give more attention to warning parts.
>>> Copyrights
Software, audio, video, or any intellectual properties are protected by copyright and international laws.
It is user s responsibility when s/he reproduces or distributes the content(s) created by this product.
>>> Codec Check
This product may not support some media codec formats. Please check the available codec types. Moreover, even with a supported codec, some files may not be played because of file property or system environment.
>> Data Backup
Please backup the data stored in this product in a safe place. We are not responsible for any data loss or damage.
>>Drop/Shock
Do not give a shock or drop the product. This may cause a severe problem of the product.
>> Foreign Substance
Do not insert any metal (e.g., coin, hairpin etc.) or inflammable foreign substances into the interior. This may cause a damage to the circuit or a fire.
>>> Disassembly / Modification
Do not attempt to disassemble or modify any part of the product. It may cause a severer problem of the product and any product modification may void the warranty.
>>> Load
Do not place any heavy object on the top of the product. This may cause a product damage or a injury.
>>> Chemicals
Do not clean the product using chemicals or cleansers. This may cause a damage to the surface of the product.
>>Water / Moisture
Do not contact the product with water or liquid. This may cause a fire or electric shock. If any conductive liquid enters the product, turn off the product and disconnect the power cable immediately.
>>> Magnet or Magnetic Properties
Do not place the product near an object with a strong magnetic field. This may cause a malfunction of the product or damage to the stored data.
>>Heat
Do not place the product under the direct sunlight or near a heat source. Do not also keep the product for long time in high temperature.
>>> Vision / Hearing
Do not watch a TV or hear loud sound for long time. This may cause a vision or
Fire
During the use of the product, if you detect smoke or an unusual smell, turn off the product and disconnect the adapter immediately, and request A/S.
hearing problem.
Power
Do not use many electronic products with a single outlet. Firmly insert the power plug. In the middle of the use, do not unplug the product unnecessarily. After using the product, turn off the product and disconnect the adapter.
Children / Infants
Do not let children or infants touch the product.
This may cause an injury.
PRODUCTS SPECIFICATION
| Supported Codec | Video | Codec | MPEG1/2/4,DivX,XviD,WMV9(max 1920*1080) |
| Format | WMV, AVI, MPG,DAT,,VOB,IFO,ISO,TP,TRP,TS | ||
| Audio | MP3,WMA,AAC,WAV,AC3,DTS down mixing/Pass through | ||
| Photo | JPEG | ||
| Connections | Video output | Composite/S-Video HDMI(480p(576p),720p,1080i ,1080p,) Component (480i(576i),480p(576p),720p,1080i) | |
| Audio output | Analog(Stereo),Coaxial,Opticals(5.1ch) | ||
| Network | 10/100 Mbps | ||
| USB Interface | USB2.0 Host port x2 (support USB hub) | ||
| General | HDD File System | FAT32/NTFS | |
| HDD Type | 3.5' SATA and IDE hard disk | ||
| Dimensions | 187(W)*193(H)*60(L)mm | ||
| Temperature | 0-60 | ||
| Power Adapter | 12V 3.5A AC/DC Adapter free voltage (AC100-240V,50-60Hz) | ||
PRODUCT CONTENTS & DESCRIPTIONS
PLAYER/ Remote Controller /Batteries/ A/V Cable/Adapter/Power Cable/ CD/Manual
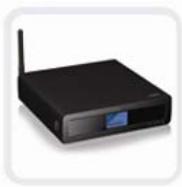
XBAY-1600S
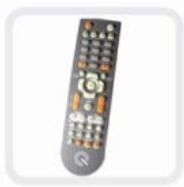
Remote Controller

Batteries
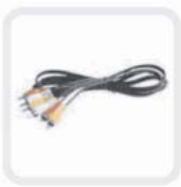
A/V Cable
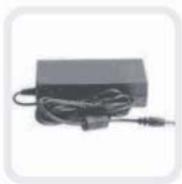
Adapter
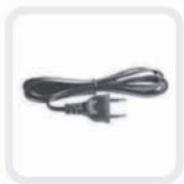
Power Cable

Install CD

Users Manual
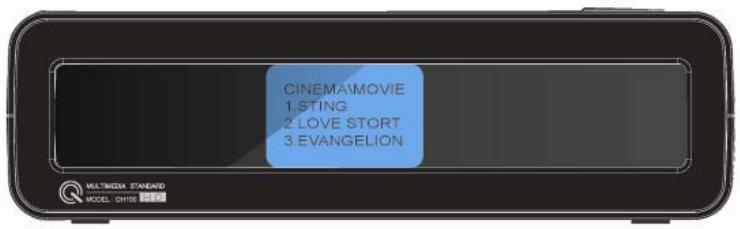
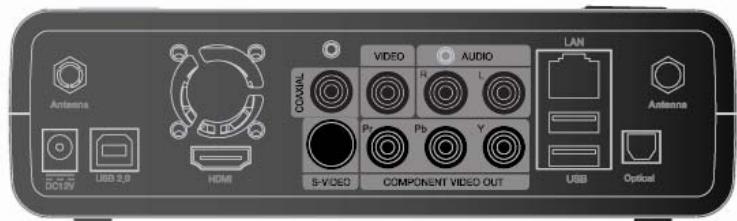
PART DESCRIPTIONS
- LCD Condition Display Window
PLAYER s current condition is displayed on this window - Wireless Connection LED
When the wireless connection is established, it turns on
3. LAN Connection LED
When the LAN connection is established, it turns on
4. HDD Operation LED
When the HDD is in use, it turns on.
5. USB Connection LED
It displays the connection condition of cable to the USB device.
6. Remote Control Signal Receiver
This sensor receives signals from the remote controller. Use the controller aiming it. Do not block this sensor
7. Power LED
When power On, it turns on
8. Power Button
Power On/Off.
9. Setup Button
Enter/Exit the setup menu
10. Stop Button
For stopping the current playback
11. Play Button
It plays a selected file.
12. OK Button
It selects a menu or plays a selected file
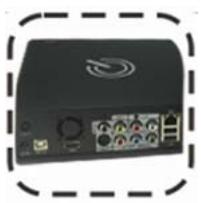
13. Power Input Terminal
Connect the provided adapter to this Terminal (DC 12V/3.5A)
14. USB HOST Port
An external HDD, ODD, memory stick etc. can be connected to this port.
15. LAN Cable Connection Port
A LAN cable is connected to this port .
16. HDMI Video Output Terminal
A HDMI cable is connected to this terminal. The product can be connected to a digital TV with a HDMI cable.
17. COAXIAL Digital Audio Output Terminal
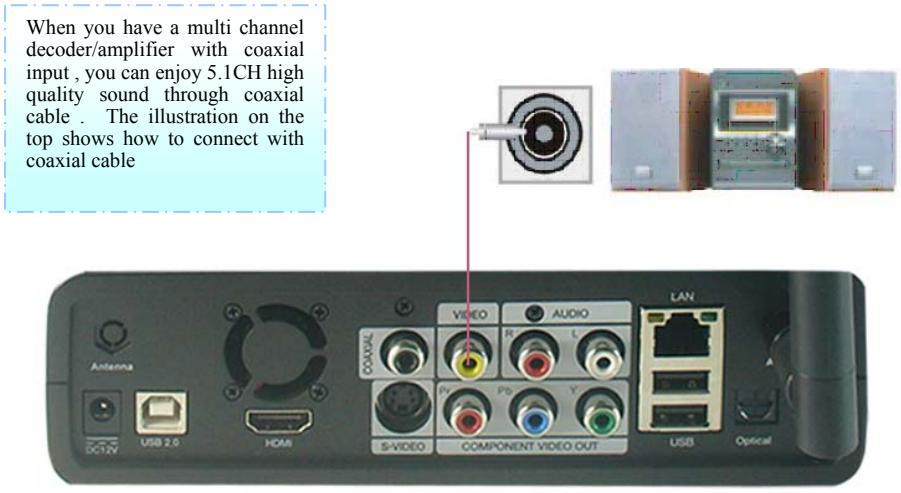
You can enjoy 5.1 Channel sound by connecting the product to a home theater amp or receiver using a coaxial cable.
18. OPTICAL Digital Audio Output Terminal
You can enjoy 5.1 Channel sound by connecting the product to a home theater amp or receiver using an optical cable.
19. S-Video Video Output Terminal
S-Video cable is connected to this terminal for the connection to a TV.
20. Component Video Output Terminal
A component video cable with a red, blue, and green terminal is connected to this terminal. When using this connection, the TV output of the player should be set to be supported by your TV.
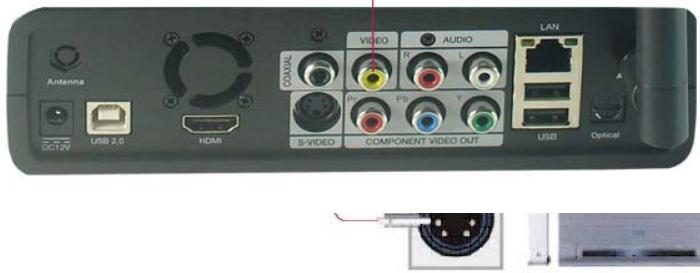
21. Composite Video Output Terminal
A composite cable is connected to this terminal for the connection to a TV.
22. Stereo Audio Output Terminal
These terminals are for analog stereo output.
HDD INSTALLATION
Please install the player according to the following instructions.
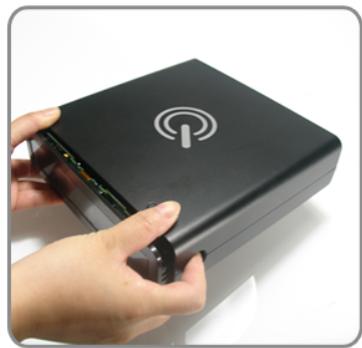
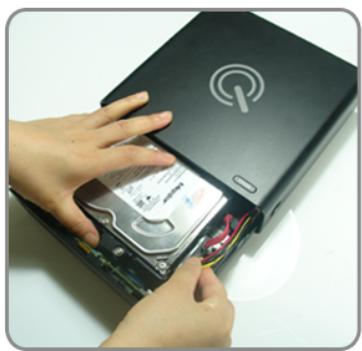
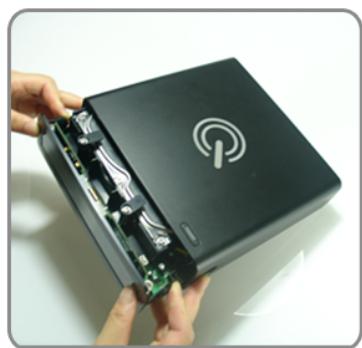
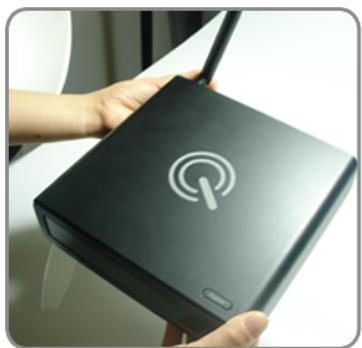
- Press the lateral buttons at the same time and slide the hard disk bracket out
- Fit the bracket with the hard disk well
- Connect SATA cable and power cable.
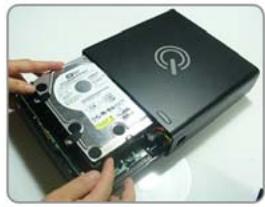
- Set right the two plastic strips to protect hard disk drive from moving.
- Slide the hard disk bracket in and make sure the buttons fit the holes well.
- ok
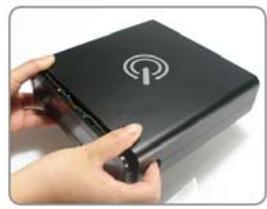
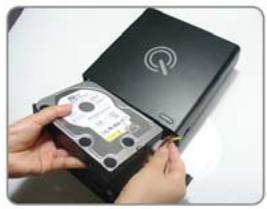
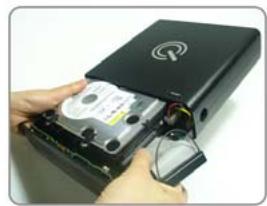
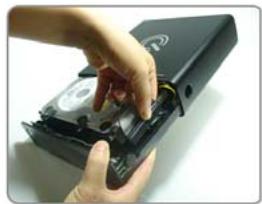
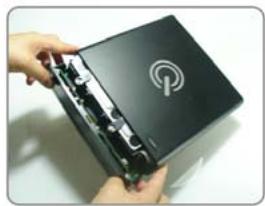
- Press the lateral buttons at the same time and slide the hard disk bracket out
- Fit the bracket with the hard disk well
- Connect SATA cable and power cable.
- Set right the two plastic strips to protect hard disk drive from moving.
11.Slide the hard disk bracket in and make sure the buttons fit the holes well.
12.ok
Network-based Data Sharing with a PC
1. LAN Cable connection between PLAYER and a PC
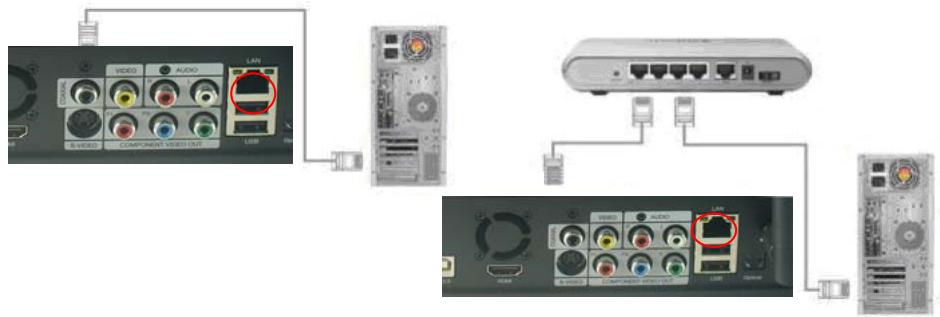
1.1 Connection to a PC
You can use any cable for the connection (either a direct or cross cable can be used)
Tip: If you have a previous LAN card connected to Internet, you may add
additional LAN card to connect PLAYER to the PC.
1.2 Connection using a HUB (or Internet Router)
For the connection to a hub or internet router, use a direct cable, Connect the LAN
port of PLAYER to a LAN port of the hub or Internet router using a LAN cable.
Note:
To be connected to PLAYER,a PC (Notebook) should have a 10/100Mbps LAN card. Either a cross or direct LAN cable can be used for the connection. You can buy one of these cables in online shopping malls or PC stores near your place.
2. Network-based Data Sharing with a PC
After the LAN cable connection, according to your system environment, set up windows networking as follows.
To establish the network communication between PLAYER and your PC, in general, two requirements should be satisfied.
1) Folder sharing and security setup
2) Using same IP address band and Subnet Mask
2.1 Data Sharing Setup for Windows 98/SE/ME
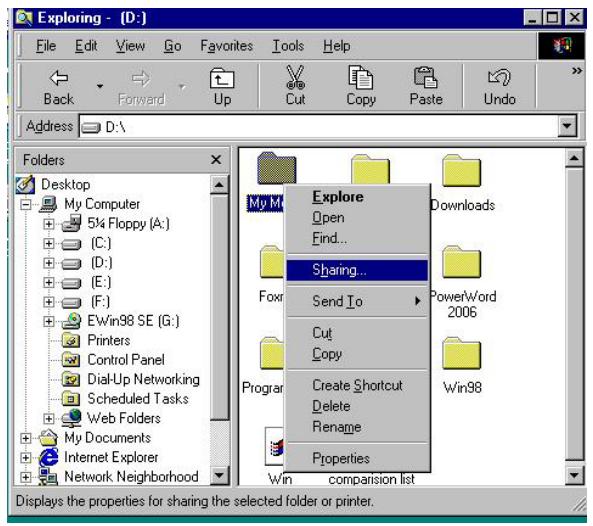
- Select a folder your want to share and select "Sharing" menu using the mouse right button.
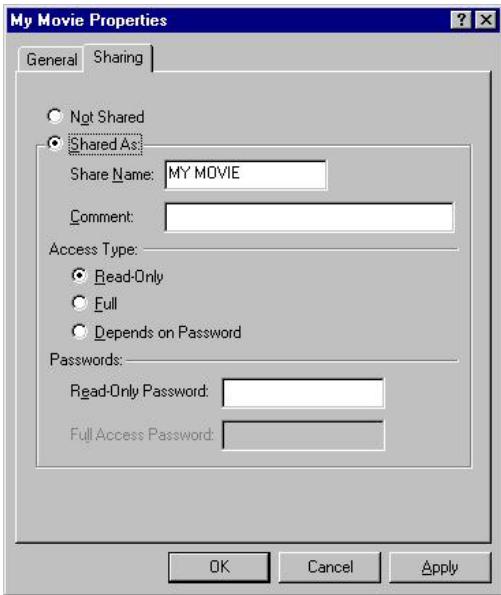
- Check "Sharing" and type "[Share Name]. EX my movie
WARNING!
1) "Share name" should be less than 12 English Alphabets.
2) Set Access Type to Ready-Only.
3) Do not give passwords
- If the folder is share, you will see a hand mark on the folder icon.

My Movie
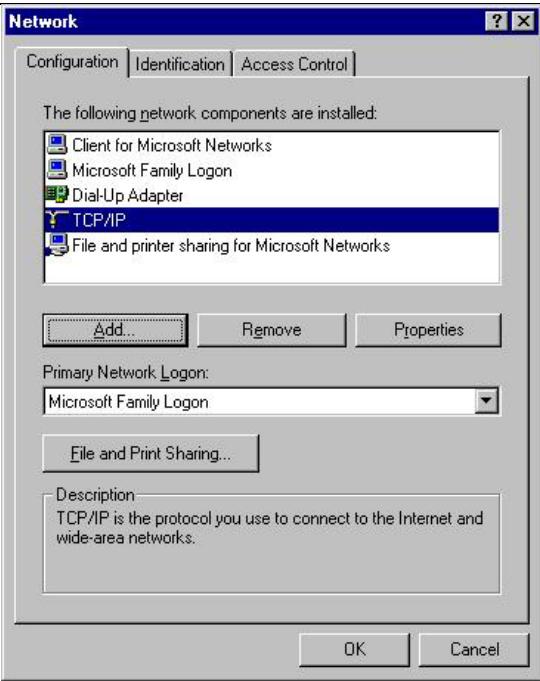
- Go to "Control Pannel-Network" and, among the displayed items, select "TCP/IP-LAN card name"
Warning
You can find the LAN card name under "Device Manager—Network Adapter".
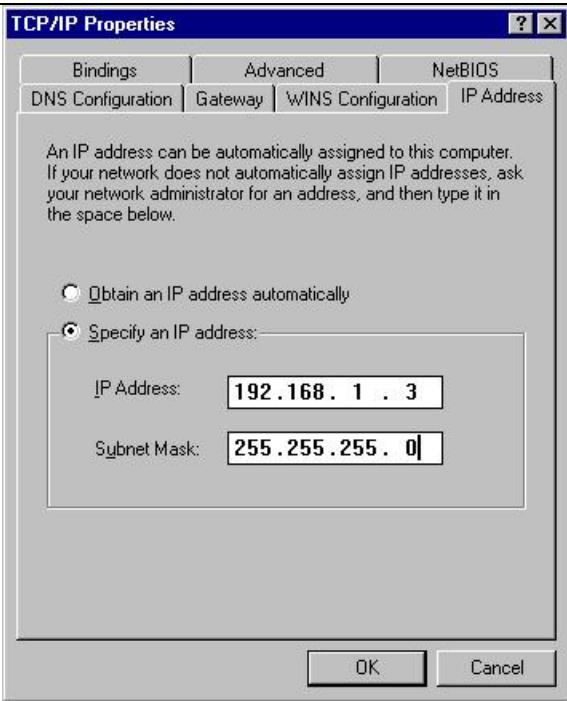
- After checking "Specify an IP address" enter your IP address and subnet mask. Then click "OK".
Ex) IP Address : 192.168.1.3
Subnet Mask : 255.255.255.0
WARNING!
If your PC already has "Obtain IP address automatically" checked and the IP is auto matically assigned from an internet router or DHCP server, You may not need this setup.
If you want this IP setup, please obtain an available IP address and subnet mask from the router manufacturer or DHCP service provider.
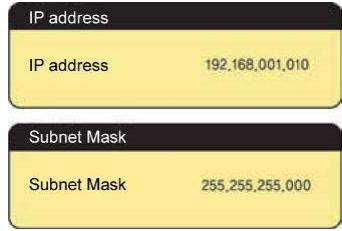
- Configure PLAYER's network environment. After pressing "SETUP" buttom, select "IP SETUP" among the "NETWORK" setup items and IP address and subnet mask.
Ex) IP Address : 192.168.1.10
Subnet Mask : 255.255.255.0
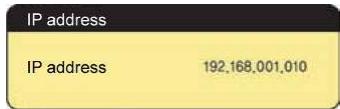
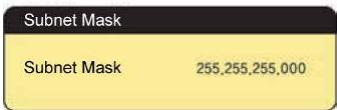
After finishing the setup, save the setup value by pressing the “Setup” button once again
WARNING!
If IP address of your PC is automatically assigned by an internet router or DHCP server, You may not need this setup. In this case, set "IP SETUP" to Auto. Then the IP will be automatically assigned.
If you want a manual setup, please obtain an available IP address and subnet
mask from the router manufacturer or network administrator.
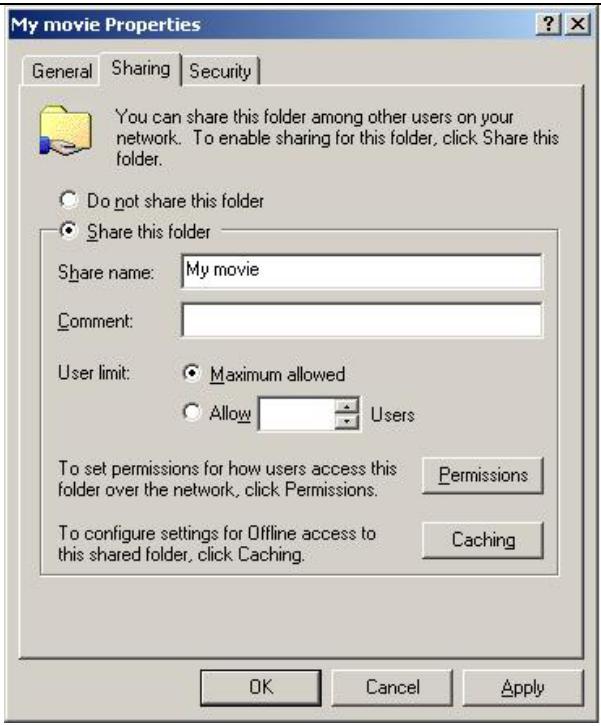
2.2 Data sharing setup for Windows2000
- Select a folder your want to share and select "Sharing" menu using the mouse right button.
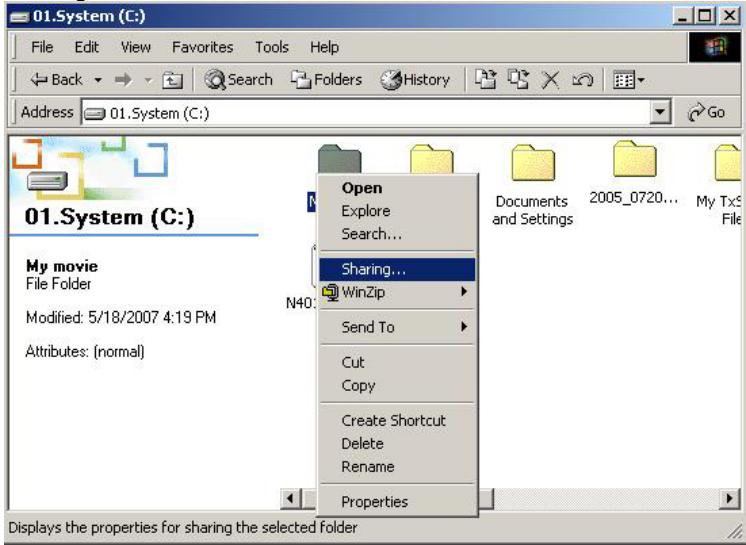
- Check "Sharing" and type "Share Name" Ex) My Movie
WARNING!
"Share Name" should be less than 12 English Alphabets
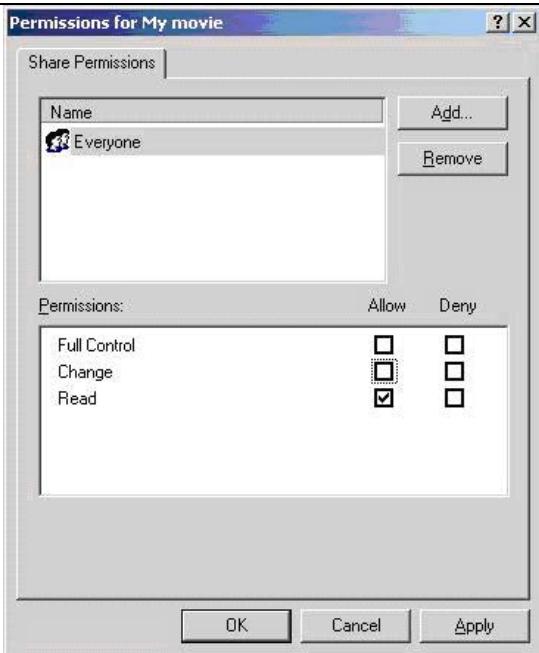
- In the above screen, click on "Permissions" and check of an everyone account exists. If not, add one by clicking on "Add" button.
Note: Set permissions to Read- Allow
4.If the folder is share, you will see a hand mark on the foloder icon.

MY Movie
- Go to "Control Pannel—Administrative Tools—Computer Management—Local Users and Group" and, among the displayed items, double --click the Guest item.
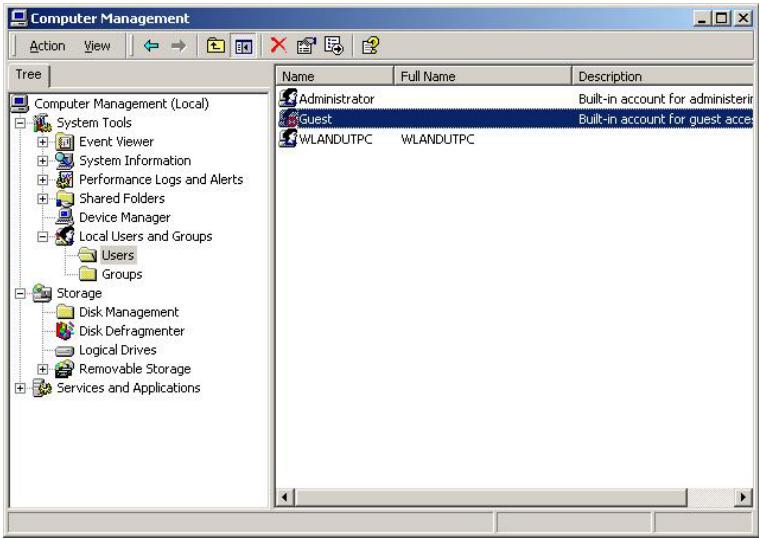
- After Checking "User cannot change password" and "Password never expires", keep the other checkboxes unchecked. Then click on "OK".
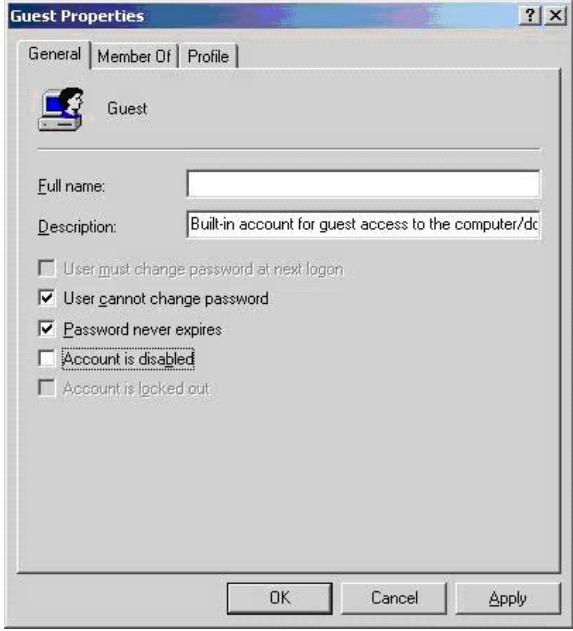
- Go to "Control Panel—Network and Dial up Connections". Select "Local Area Connection" and open its property window by using the mouse right button and selecting "Properties".
WARNING! If there are more than two "Local Area Connections", select one of the LAN card that is connected to PLAYER.
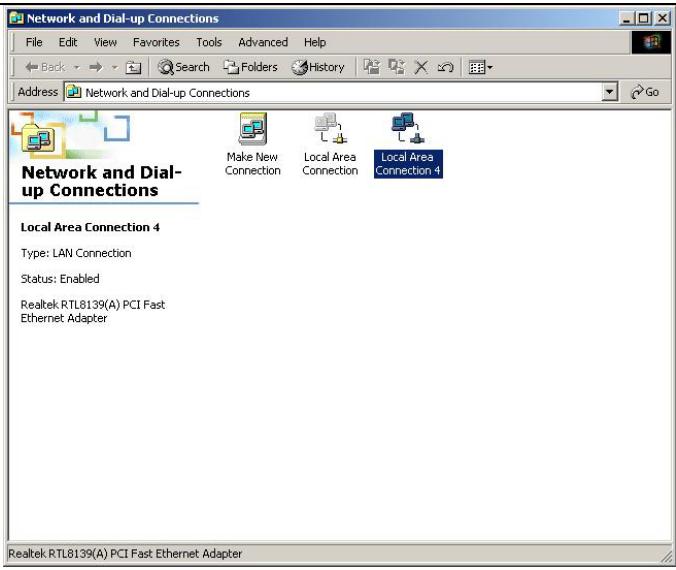
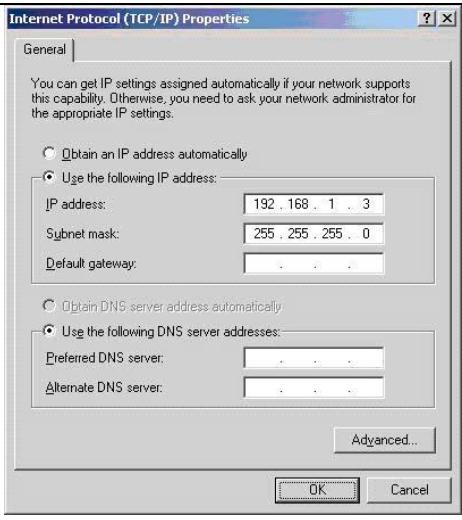
- Among the displayed items, double-click "Internet Protocol(TCP/IP)".
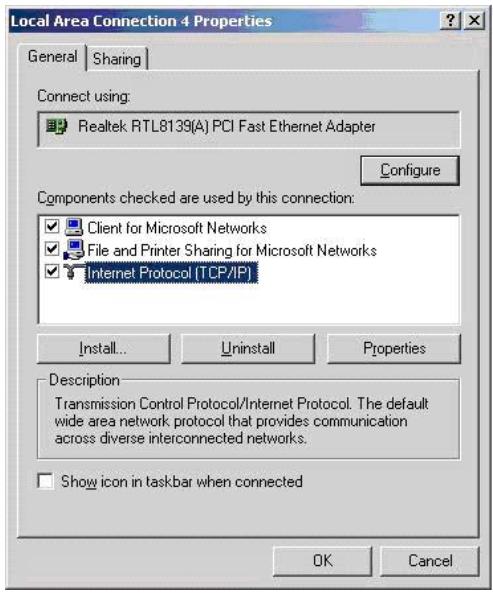
- After checking "Specify an IP address", enter your IP address and subnet mask. Then click on "OK".
Ex) IP address :192.168.1.3
Subnet Mask: 255.255.255.0
WARNING!
If your PC already has "Obtain IP address automatically" checked and the IP is automatically assigned from an Internet router or DHCP server, you may not need this setup.
If you want a manual IP setup, please obtain an available IP address and subnet mask from the router manufacturer or network administrator.
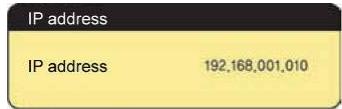
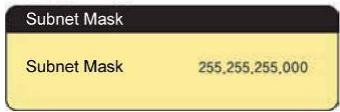
- Configure PLAYER's network environment. After pressing "Setup" Button, select items and set this to manual setup. Then enter your IP address and subnet mask.
Ex) IP Address : 192.168.1.10
Subnet Mask: 255.255.255.0
After finishing the setup, save the setup value by pressing the setup button once again.
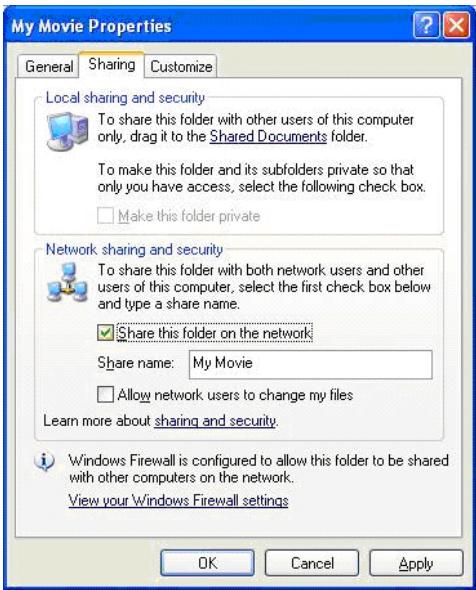
2.3 Data sharing Setup for Windows XP
- Select a folder your want to share and select "Sharing and security" menu using the mouse right button.
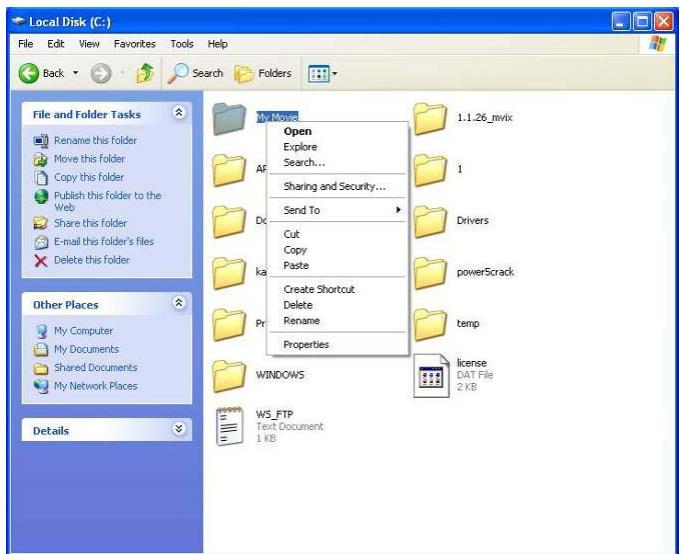
- Checking "Sharing this folder on the network" and type "Share Name".

MY Movie
WARNING! "Share Name" should be less than 12 English Alphabets.
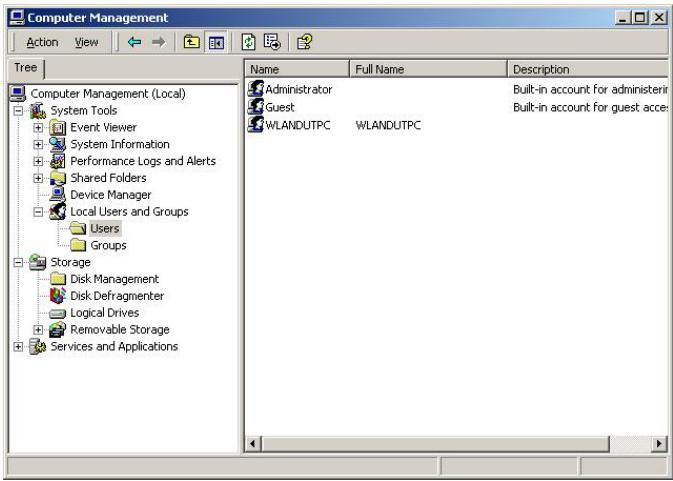
- Go to "Control Panel -Administrative Tools -Computer Management -Local Users and Group" and, among the displayed items, double -click the Guest item.
WARNING!
- The permission setting is only required for Windows XP Pro users. If you are an XP home user, go to "6" directly.
- If you cannot see the "Administrative Tools", click on "Switch to Classic view" on the left corner.
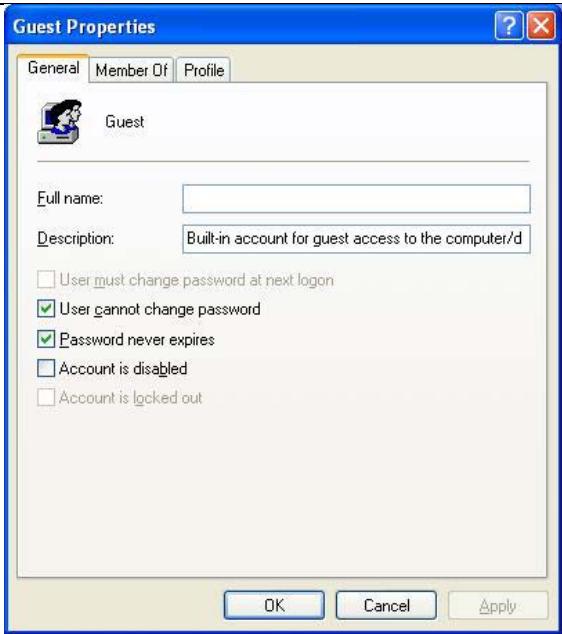
- After checking "User cannot change password" and "Password never expires", keep the other checkboxes unchecked. Then click on "OK".
- Go to "Control Panel—Network Connections". Select "Local Area Connections". Select "Local Area Connection" and open its property window by using the mouse right button and selecting "Properties".
WARNING!
- If you cannot see the "Network connections", click on "Switch to Classic View" on the upper left corner
- If there are more than two "Local Area Connections", Select one for the LAN card that is connected to PLAYER.
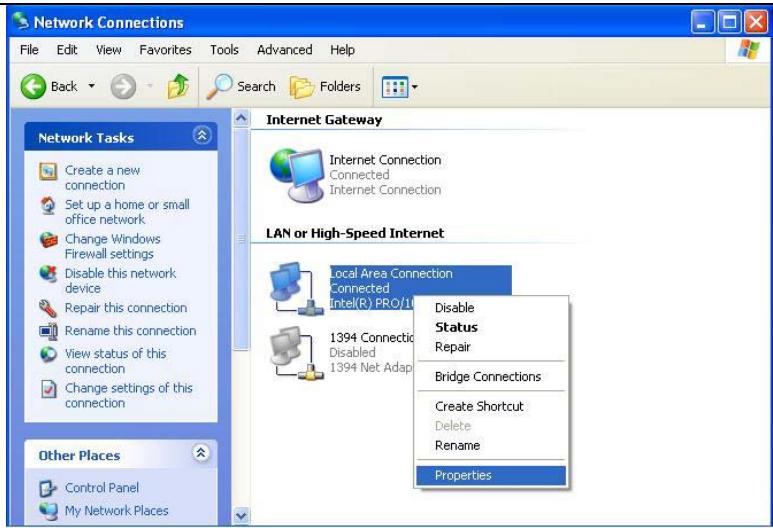
- Among the displayer items, double-click "Internet Protocol (TCP/IP)".
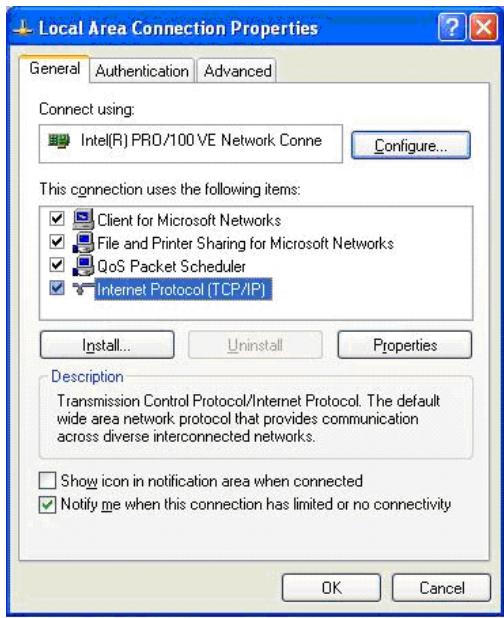
After checking "Specify an IP address" enter your IP address and subnet mask. Then click on "OK". Ex) IP address: 192.168.1.3 Subnet Mask: 255.255.255.0.
WARNING!
If your PC already has "Obtain IP address automatically" checked and the IP is automatically assigned from an Internet router or DHCP server, you may not need this setup.
If you want a manual IP setup, please obtain an available IP address and subnet mask from the router manufacturer or network administrator.
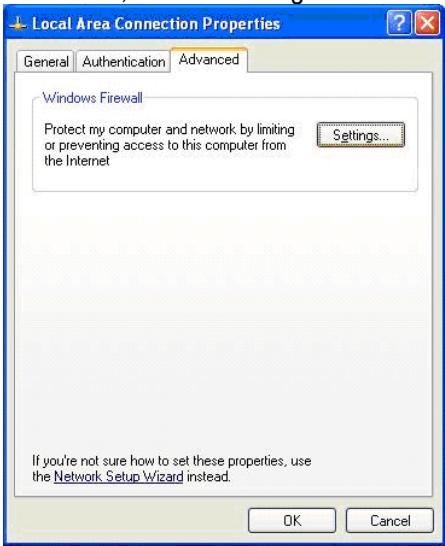
On the following screen, click on the "Advanced" tap. If the "Internet Connection
Firewall" option is checked, cancel this option.
Note
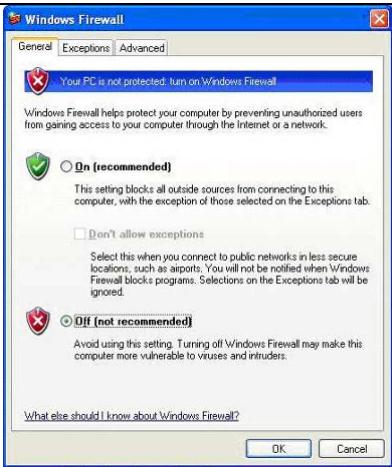
If you are using service pack2, consult the figure below.
In the "Window Firewall" Section, click on "Settings".
After selecting off, click on "ok".
- Configure PLAYER's network environment. After pressing "Setup" button, select "IP SETUP" among the "NETWORK" setup items and set this to manual Setup. Then enter your IP address and subnet mask.
Ex) IP address:192.168.1.10
Subnet Mask: 255.255.255.0.
A PC cannot recognize an unformatted HDD. If your HDD is not formatted yet, please format is by following the instructions below. Generally, if you purchase a new HDD, it is not formatted.
1) Connect PLAYER to your PC via a LAN cable.
2) Go to "Start- Control Panel- Administrative Tools—Computer Management" and select "Disk Management"
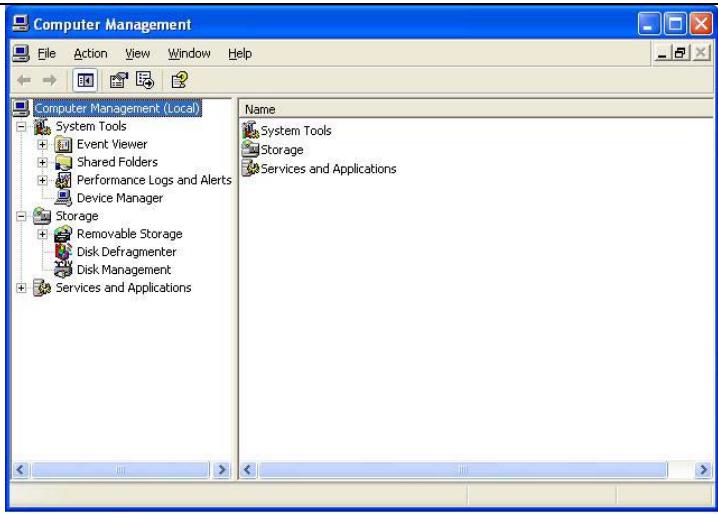
3) If Disk Signature and Upgrade Wizard appear, click on "NEXT".
4) Select the new HDD and click on "Next".
5) If the wizard is completed, click on "Finish".
6) Under "Disk Management", select the new HDD marked unallocated and click on "New Partition" using the mouse right button.
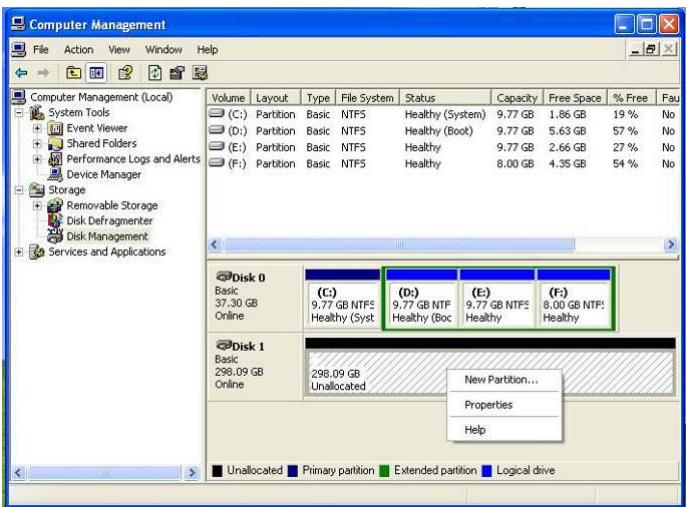
HDD Partition Setup&Format (win2K/XP)
- If "New Partition Wizard" is executed, click on "Next".
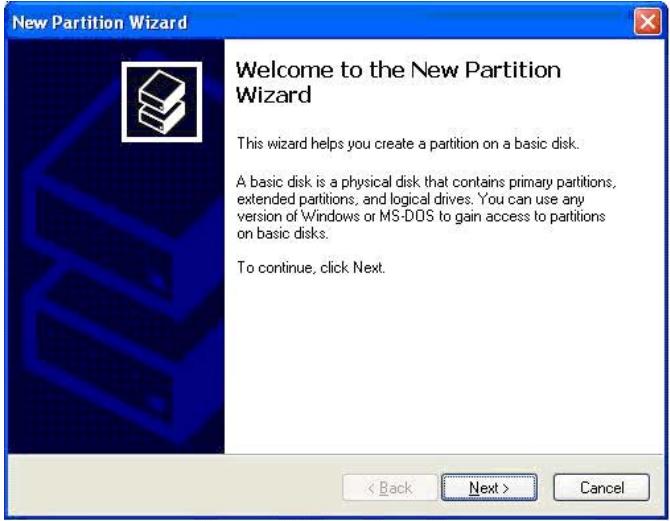
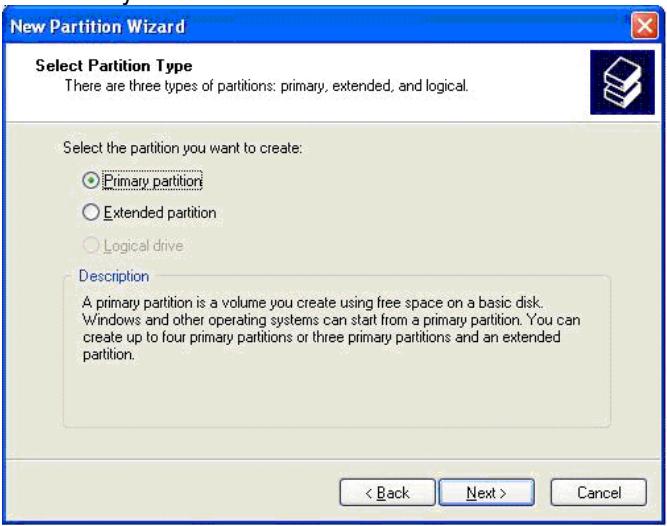
- Check "Primary Partition" and click on "Next".
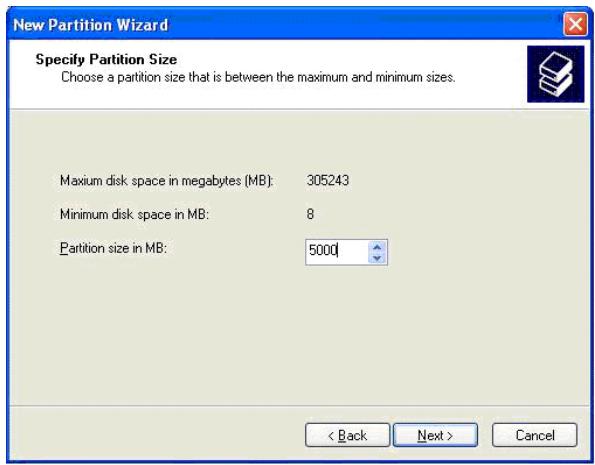
- After entering a partition size in the partition size in MB box, click on "Next".
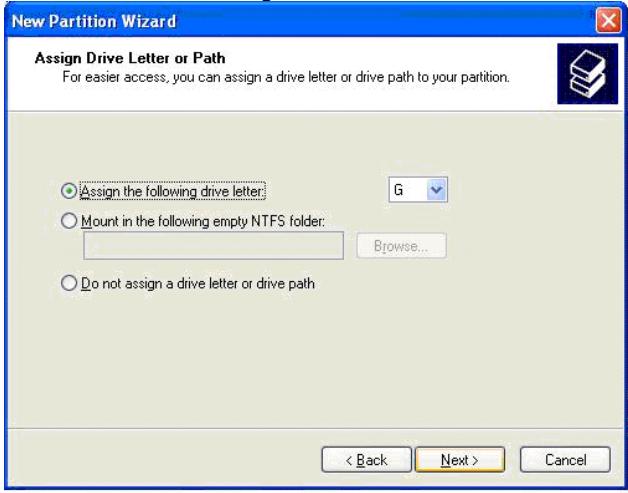
- If a new drive letter is assigned to the HDD ,click on "Next".
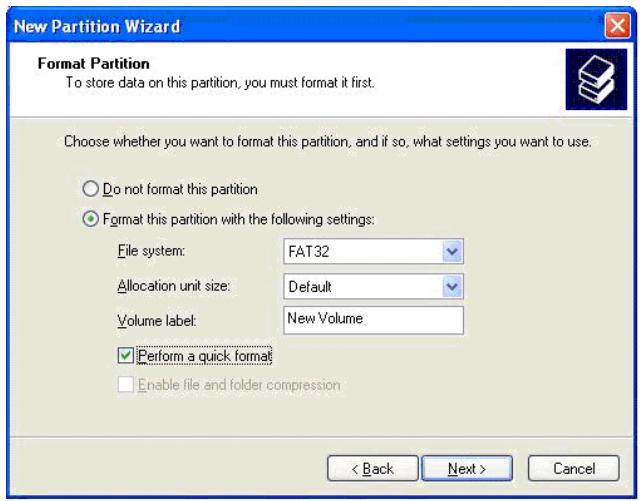
- Under "Format this partition with the following setting", Set "File System" to the FAT32 and check "Perform a quick format". Then click on "Next".
- If [Competing the New Partition Wizard] appears, click on [Finish].
- Now, a PLAYER partition (Formatted in FAT32) is created. In the next step, a NTFS partition will be created.
- Under [Disk Management], select the rest, Unallocated part of the disk and click on [New Partition] using the mouse right Button.
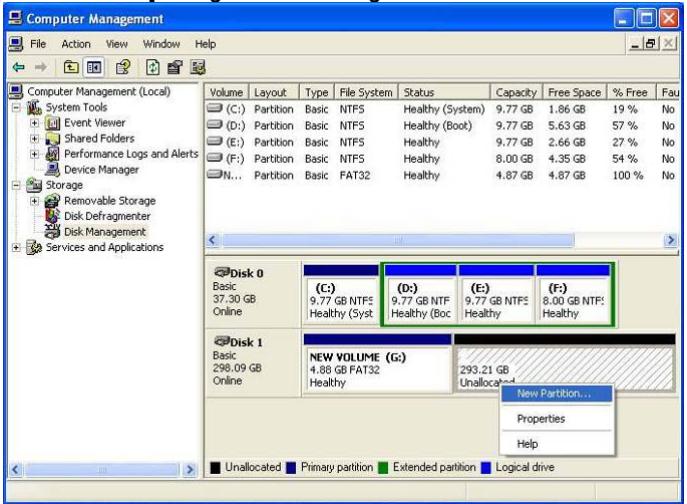
- If [New Partition Wizard] is executed, click on [Next].
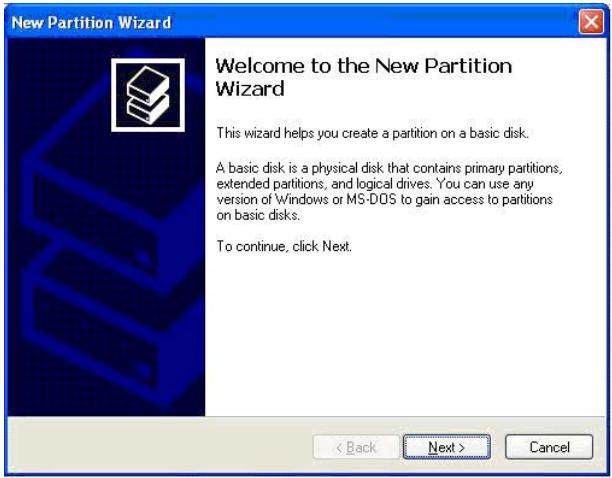
10. Check [Primary Partition] and click on [Next].
![MPMAN MPH100 - Check [Primary Partition] and click on [Next]. - 1](/content/2025/01/95709/images/477d6e4cfbd35662a9377090d328d565e124b309cddac9ca2e7a44159ac2b5a7.jpg)
- In the Partition Size in MB box, keep the current size unchanged and click on [Next].(The default size indicates the remaining unallocated part of the disk.)
![MPMAN MPH100 - Check [Primary Partition] and click on [Next]. - 2](/content/2025/01/95709/images/574ef080afef818e48c10a140558509c2bed6203a73b461fd7dc81e2d71cfa0c.jpg)
- If a new drive letter is assigned to the HDD, click on [Next].
![MPMAN MPH100 - Check [Primary Partition] and click on [Next]. - 3](/content/2025/01/95709/images/eb4b9b2d52060a31d0a71f26e6fa0179404e156114e38c1be9db6a857f4542e8.jpg)
- Under [Format this partition with the following settings], set [File system] to NTFS and check [Perform a quick format]. Then click on [Next].
![MPMAN MPH100 - Check [Primary Partition] and click on [Next]. - 4](/content/2025/01/95709/images/fce7fb60421dbc114d6f8975e880e575965b5a64b9936736610b031cf1d0b958.jpg)
- If [Competing the New Partition Wizard] appears, click on [Finish].
![MPMAN MPH100 - Check [Primary Partition] and click on [Next]. - 5](/content/2025/01/95709/images/bfd2d87907bc13ac27c37eef25851a8a459c22ce653022afd60839e0b7885cff.jpg)
Warning:
A NTFS-formatted drive can only be recognized in a Window 2000 or XP system. That is, it cannot be recognized in a Windows 98 or ME system, if you create a FAT32 file system. Do not check "Enable file and folder compression". In a window 2000 or XP system, if you create a FAT32 file system, you cannot assign a single driver letter to a HDD over 32G. (A single NTFS system is recommended.) If you want to create a single FAT32 partition, use a Windows 98 or ME system. Moreover, if you divide a HDD over 40G into several partitions, set them to "Primary Partition". A extended partition may not be recognized.
Installtion Cable Connection
1、Connection with ordinary (Composite) TV output
Connect Player and your TV using the yellow video cable. Turn on the Player and TV. Select appropriate video input mode on your TV until you can get the initial Player screen.
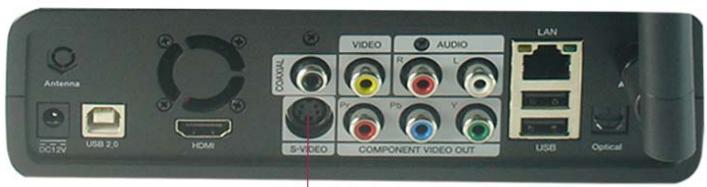
Connect Player and your TV using the S-Video cable. Turn on the Player and TV, select appropriate video input mode on your TV until you can get the initial Player screen.
3. Connection with HDMI output
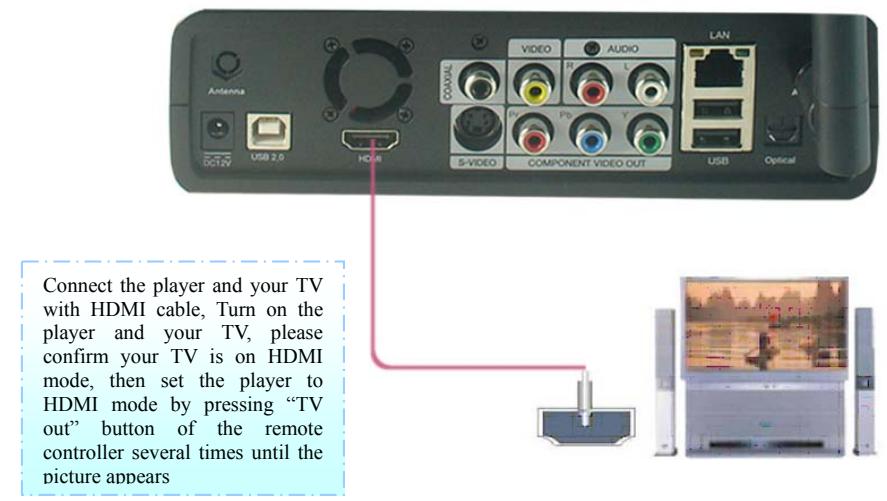
4、Connection with Component output
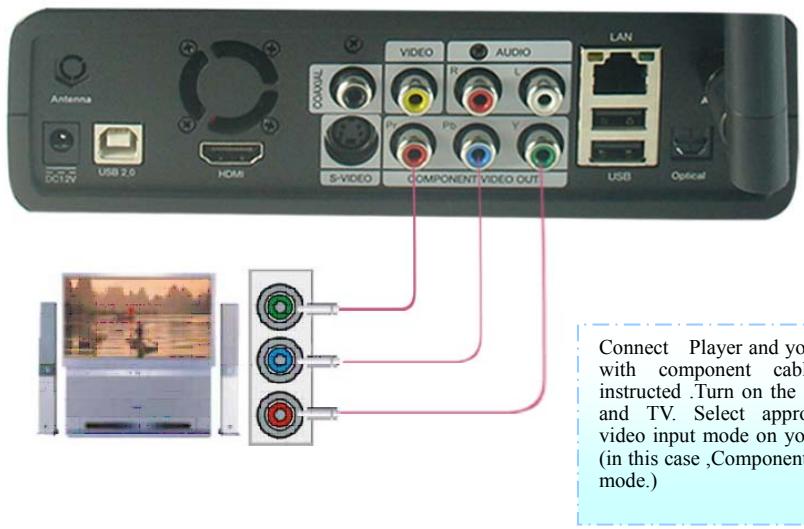
5、Connection with 2 CH of Normal TV
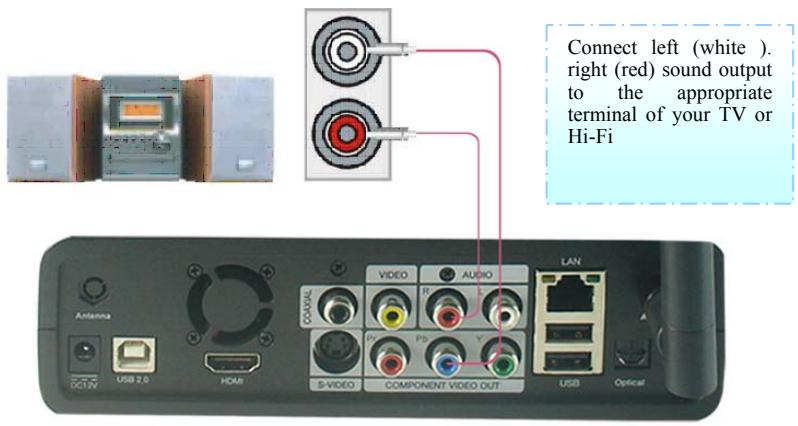
5、Connection with Coaxial output
6. Connection with Optical output
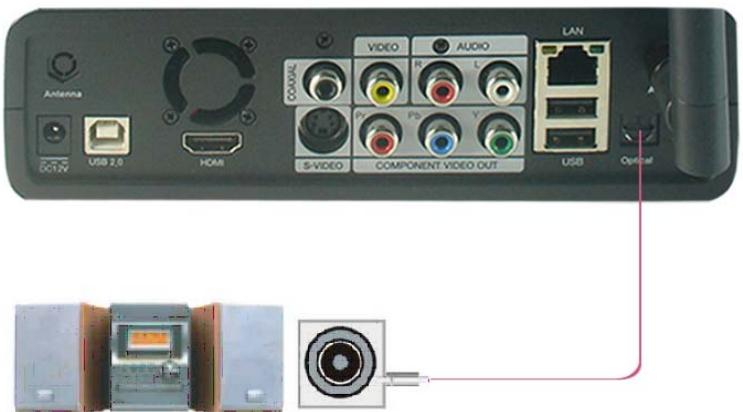
When you have a multi channel decoder/amplifier with optical input, you can enjoy 5.1 high quality sound through optical cable. The illustration on the top shows how to connect with optical cable.
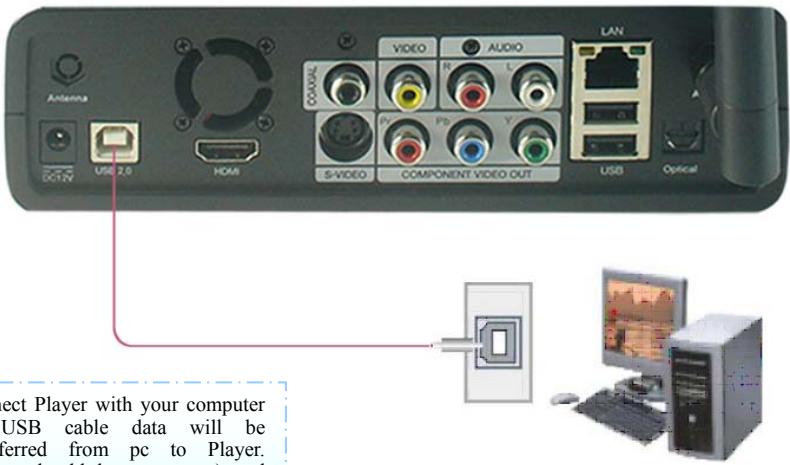
7. Connection with computer
Remote Controller
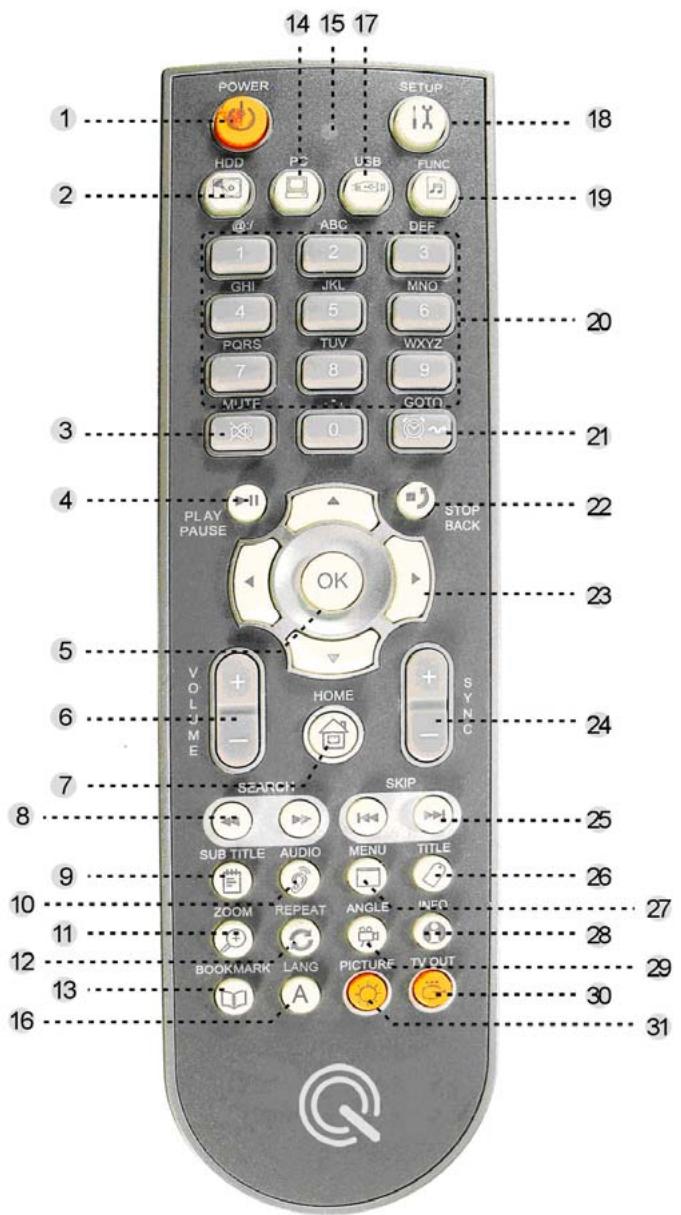
Power Button
Used to turn the power on or off
2 Local Disk Mode
Switches to the Local Disk mode
3 Mute
Cuts off the sound
4 Play / Pause
Starts or pauses the playback of movie, music, or picture files
OK
Selects a menu item or select a file to be played
6 Volume
Adjusts volume
7 Home Screen Shortcut
Go to PLAYER s Home Screen Menu 1-Click: Partition selection page for each mode 2-Clicks: Go to PLAYER s Home Screen Menu
Search
Forward or backward search of the current movie (Each click doubles up the search speed : 2, 4, 8, 16, and 32 speeds).
9 Subtitle
Adjusts the subtitle setting
1-Click:
Change the size of a subtitle (after changing the size using the UP and DOWN arrow, click on the OK button.)
2-Click:
Change the color of a subtitle (after changing the color using the UP and DOWN arrow,
click on the OK button.)
3-Click:
Select multiple subtitles (When a subtitle file contains more than two languages, click
the button 3 times and select a subtitle language using the UP and DOWN arrow. Then click on the OK button.)
10
Audio
Selects a specific audio source when multiple audio sources exist in the movie file.
11 Zoom-in / Zoom-Out
Zoom-in or Zoom-out the screen
1-click (Screen Zoom-in)
Customizes a zoom level using the arrow buttons( it will be implemented in the future)
2-clicks (Pan& Scan)
Fills up the screen preferentially based on the horizontal ratio of a movie file (but, some portion of the left and right side of the image are lost)
3-Clicks (Full screen)
Regardless of the aspect ratio of a file, fills up the screen.
4-Clicks (Defaulted Screen)
Sets the screen to the original aspect ratio of a files
12Playback Mode Selection
Selects a playback mode for playing music or movie files (see the icon descriptions below)

1-song repeat

unlimited repeat

1-time playback

random playback

Unlimited repeat playback for all the files

Unlimited repeat random playback for all the files

1-time playback for all the files

1-time random playback for all the files

Unlimited repeat playback for a single file
13 Bookmark
Saves a bookmark in the middle of media playback (Using the bookmark button to go to a desired bookmarked frame)
14 PC Network Mode
Switches to the PC Network search mode
Remote Controller Condition Display
When a button is pressed, a red LED blinks to show the operation of the controller.
16 LANG
You can choose proper languages among different languages by using this button
17 USB HOST Mode
Switches to the USB HOST mode
18 SETUP
Switches to the SETUP menu screen
19 FUNC
When you set wifi with encryption password, you can choose the proper input status by pressing this button, press one time, you can change input status from Arabic number to Capital letters, press two times, you can change the input status from Capital letters to lowercase.
20 Number/Character Input Button
Used to enter numbers and characters for various menu items and options In the mode of file browsing, this makes it possible to go to a specific file location quickly.
21 GOTO
Jumps to a desired time position during the playback
22 STOP
For stopping the current playback or going back to a previous folder
23
Arrow Buttons
They are used for navigating and selecting menu items. In case of a movie playback, do the following functions.
Up/Down: Changing the position of a subtitle
Left/Right
Movie: Forward or backward search of the current movie.
Music: Jumping forward/ backward by 15 seconds
24 SYNC
When a movie is not in sync with a subtitle, use this button to sync the movie and subtitle. Each click adjusts 1-second sync timing.
25 SKIP
Jumps to next file during playback. When used on a file list screen, it jumps forward/backward to different pages.
26 TITLE
During a DVD playback, it calls the title menu.
27 MENU
During a DVD playback, it calls the menu.
28 INFO
Displays the information of a played file
29 Multi Angle
During a DVD playback, it changes the camera angle. (only for multi-angle titles)
30 TV Output Mode
Changes the TV output mode according to the following order (NTSC Composite -> NTSC Component -> NTSC HDMI -> PAL Composite -> PAL Component ->PAL HDMI)
31 Picture
Adjusts the brightness, contrast, and color. It selects a picture property according to
the following order. (Brightness -> Contrast -> Color) Change the value of each property by using the left and right arrow button.
Setup Menu Setting
The figure below is PLAYER's SETUP screen
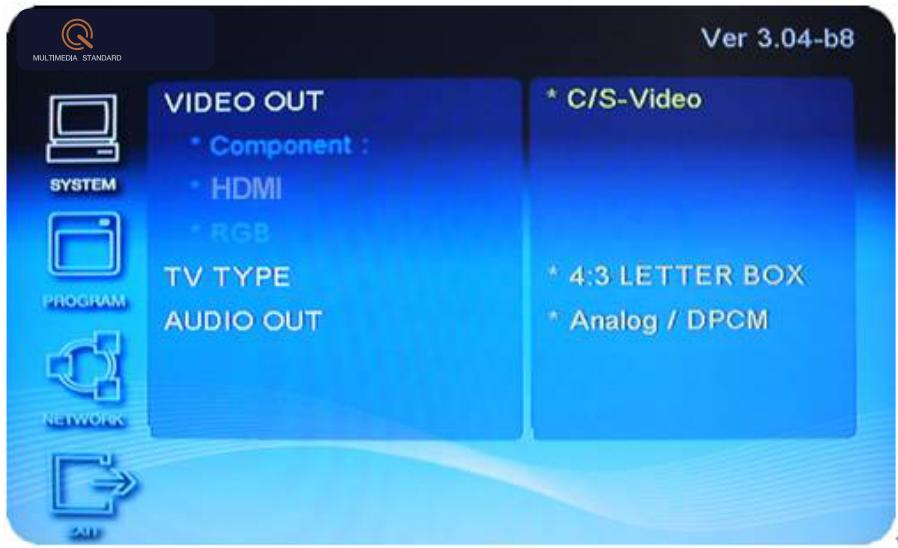
For each menu item, possible options are described below.
1. SYSTEM
TV OUT
C/S-Video: Video signals through the composite and S-Video output terminal
Component: Video signals through the component output terminal (4 Available Resolutions: 480i (576i), 480p (576p), 720p, and 1080i)
HDMI: Video signals through the HDMI output terminal 4 Available Resolutions: 480p (576p), 720p, 1080i, 1080p)
TV Type
4:3 Letterbox
This aspect ratio displays the content based on its horizontal length. Black horizontal bars are place by the player at the top and bottom of the screen to be displayed in a wide mode.
4:3 Pan & Scan
This aspect ratio displays the content based on its vertical length. It fills up the screen, but some portion of the left and right side of the image are lost.
16:9 image output in the aspect ratio of 16:9
Audio Output
Analog 2 channel audio output
Encoded digital
Digital audio signals through the optical or coaxial output terminal(no analog output)
2. PROGRAM
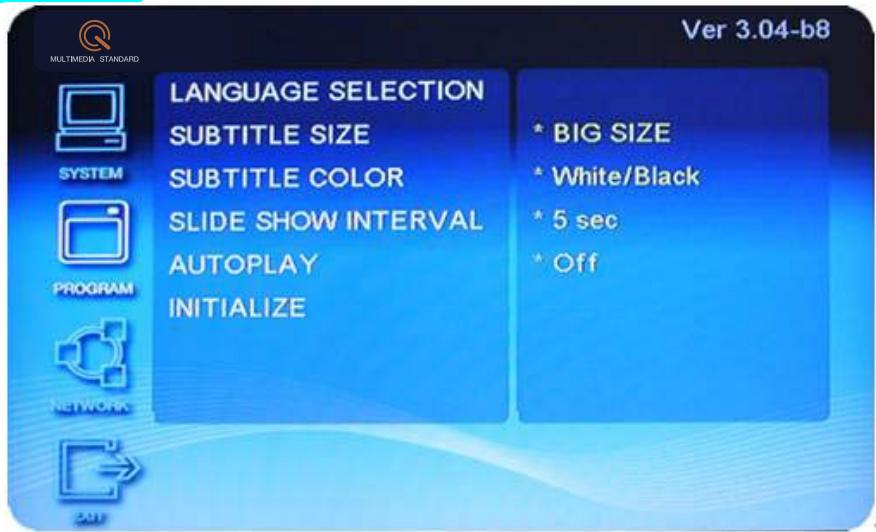
Language selection
Display by a select language, It Selects a language among Korean, English, Espanol, etc.
Size Selection
Select a subtitle size among small-subtitle, Big-subtitle, and No-subtitle.
Color Selection
Selects a subtitle color among White/Black, Yellow/Black, Green/Black, White/Blue, Yellow/Blue, and Green/Blue
Slideshow Duration
Sets a slideshow duration
Initialize(Default Setting)
Resetsthe settings to the default values,
3. Network

Wired / Wireless:
Wired:
IP Setting
Automatic Setting:
Assigns an IP address automatically from an Internet router or DHCP
serer
Manual Setting:
Assign an IP Setting
Wireless:
Select the access point
Encryption Key: use, not use, cancel
Use: please input 10 Hex characters (WEP mode 64 Bits)
(Authentication type: WEP mode:open,share, auto and WPA
mode:TKIP,AES)
Automatic Setting:
Assigns an IP address automatically from an Internet router or DHCP server
Manual Setting:
Assign an IP Setting
- enter setup interface,remote control operation as following:
power on ur player, press">" key to "setup" option then enter "ok" - wireless network setup. remote control operation as following
press "down" key to network option, press "+" two times, press "down" and "ok" keys to enter wireless setup interface. choose the available wlan.
- encryption
if u would like no web encryption pls enter"ok" to choose "not use" encryption, otherwise pls move"up" key to "use" option then press "<" key, please input ur encryption keys with 10 Hex characters, you can delete characters with "stopback" key and revise the figures buy use "up, down" key. press "ok" to save the encryption.
when ip setup mode shows in the screen, choose "auto" if u would like searching available ip address automatically, otherwise choose manual to setup the ip address you would like.
- press "ok"
5 exit, then you can choose the available resources fm the network.
Exit
Exits the SETUP menu
Warning: USING OF NTSC.PAL
EX) NTSC: KOREA,USA,JAPAN,CANADA ETC.
PAL:EUROPE MIDDLE EAST,HONGKONG ETC.
1Turn on the PLAYER and select the TV OUT mode by pressing "TV out" button of the remote controller (NTSC Composite -> NTSC Component -> NTSC HDMI -> PAL Composite -> PAL Component ->PAL HDMI)
Main Menu Screen
The figure below is PLAYER's MAIN screen.
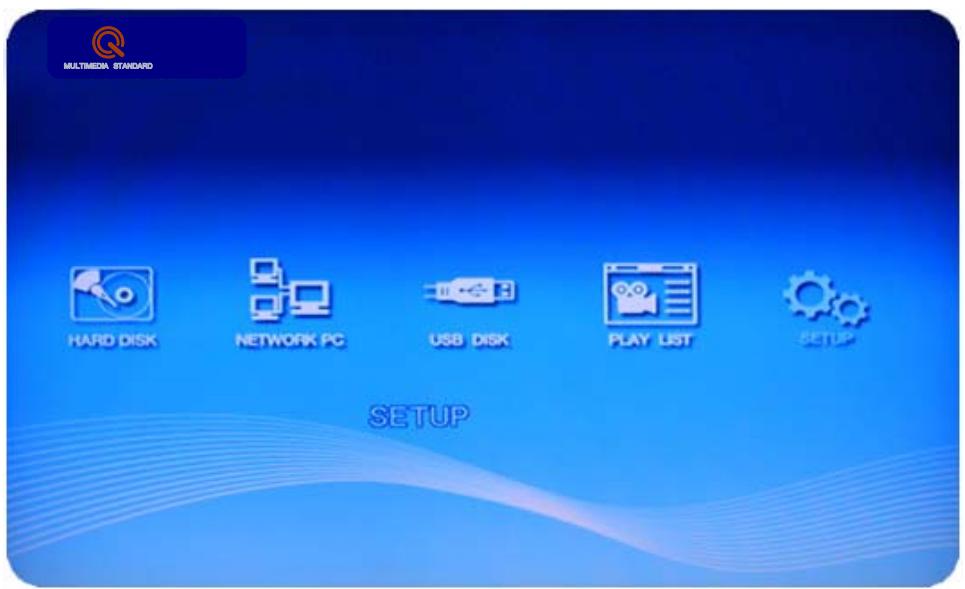
Icons and Screen Components
1. Hard Disk Selection
If you select the icon of Hard Disk Selection, PLAYER will search and display all the disks of your local system. Use this icon for searching the PLAYER's HDD as well. After selecting a disk, you can play a media file.
2. Network PC selection
If you select the icon of Shared PC Selection, PLAYER will search and display all the PCs that have shared folder(s) in yours local network. See [Network-based Data Sharing] for more detail about data sharing setting.
3. USB Disk Selection
If you select the icon of USB Disk Selection, PLAYER will search and display USB
devices that are connected via a USB HOST port. You can play a media file from an eternal HDD, memory, etc.
Movie Play
PLAYER can play the following files: AVI, MPG, MPEG, DAT, VOB, TP, TRP, WMV, ISO etc, Playback order and method are determined by a selected repeat mode.
Buttons and functions for movie playback
| Remote Control Button | Function | Description |
| SUBTITLE | 1-Click | Change the size of a subtitle (after changing the size using the UP and DOWN arrow, dick on the OK button.) |
| 2-Click | Change the color of a subtitle (after changing the color using the UP and DOWN arrow, dick on the OK button.) | |
| 3-Click | Select multiple subtitles (When a subtitle file contains more than two languages, click the button 3times and select a subtitle language using the UP and DOWN arrow, Then click on he OK button. | |
| AUDIO | Multiple Audio Selection | Selects a specific audio source when multiple audio sources exist in a movie file |
| INFO | File Info Display | Displays the information of a played file |
| BOOKMARK | Continuous Play | Support two types: stopped points and bookmarked points (up to 9 in order) |
| Remote Control Button | Function | Discription |
| VOL | Volume Adjust | Adjusts volume |
| MUTE | Sound Mute | Cuts off the sound |
| ZOOM | 1-Click | Customizes a zoom level using the arrow buttons |
| 2-Click | Pan & Scan | |
| 3-Click | Regardless of the aspect ratio of a file, fills up the screen | |
| 4-Click | Sets the screen to the original aspect ratio of a file | |
| SYNC | Subtitle Display and Timing | When a movie is not in sync with a subtitle, use this button to sync the movie and subtitle, Each click adjusts 1-second sync timing. |
| GOTO | Instant Jump | Jumps to a desired time position during the playback. After entering a time a value using the arrow buttons or number buttons, press the (OK) button. |
| OK | Playing a selected file | Play a selected file |
| ARROW BUTTONS | Up/Down | Changing the position of a subtitle |
| Left/Right | Forward or backward search of the current movie | |
| PLAY | Start/Pause | Start or paused the playback |
| STOP | Stop | Stop the current playback |
| Prev.Folder | To move to upper-level folder on a file list | |
| SKIP | Next/Prev. File | Jumps to a next or previous file during a playback |
| Next/Prev. Page | When used on a file list screen, it jumps forward/backward to different pages | |
| SEARCH | Quick Search | Forward or backward search of the current movie (Each click doubles up the search speed -2,4,8,16,and 32 speeds). |
Music Play
During playing music files, the system is in the music playback mode, In the middle of playing music files, you can search folder and files, After selecting a new file and pressing the (OK) button, the selected file will be played.
Buttons and functions for music playback
| Remote | Function | Description |
| Control Button | ||
| BOOKMARK | Continuous Play | Support two types: stopped points and bookmarked points(up to 9 in order) |
| VOL | Volume Adjust | Adjusts volume |
| MUTE | Sound mute | Cuts off the sound |
| OK | Playing selected file | Play a selected file |
| PLAY | Start/Pause | Starts or pauses the playback |
| STOP | Stop | Stop the current playback |
| Prev.Folder | To move to a upper-level folder on a file list | |
| SKIP | Next/Prev.File | Stop the current playback |
| Next/Prev.Page | When used on a file list screen, it jumps forward/backward to different pages. | |
| ARROW BUTTON | Up/Down | File navigation during a playback |
| Left/Right | Jumping forward/backward by 15 seconds |
Photo Play
JPG files can be played. PLAYER also provides a slideshow function. The display duration or each picture can be set in the SETUP menu by seconds. When 0second is given, the system keeps displaying a specific picture until the (SKIP) or (STOP) button is pressed.
Buttons and functions for photo playback
| Remote Control Button | Function | Description |
| ANGLE | Picture Rotation | Rotate a picture by 90 degrees in clockwise direction |
| OK | Playing a selected file | Play a selected file |
| PLAY | Start/Pause | Starts or paused the playback |
| STOP | Stop | Stop the current playback |
| Prev. Folder | To move to a upper-lever folder on a file lst | |
| SKIP | Next/Prev. File | Jumps to a next file during a playback |
| Next/Prev. Page | When used on a file list screen, it jumps forward/backward to different pages | |
| ZOOM | 1-Click | Customizes a zoom level using the arrow buttons |
| 2-Click | Pan& Scan | |
| 3-Click | Full screen | |
| 4-Click | Original aspect ratio | |
| SYNC | Time Setting | Sets slideshow duration |
Virtual DVD
Virtual DVD is a function that rips a DVD disk, saves the contents in the HDD, and plays the saved contents as if playing the same DVD. With this function. You can prevent and damages of original disks and can easily play movies without swapping disks.
Buttons and functions with Virtual DVD
| Remote Control Button | Function | Description |
| INFO | File Info Display | Displays the information of a played file |
| VOL | Volume Adjust | Adjusts volume |
| MUTE | Sound mute | Cuts off the sound |
| GOTO | Instant Jump | Jumps to a desired time position during the playback. After entering a time a value using the arrow buttons or number buttons, press the (OK) button. |
| PLAY/OK | Start/Pause | Starts or pauses the playback |
| STOP | Stop | Stop the current playback |
| Prev.Folder | To move to a upper-level folder on a file | |
| list | ||
| SKIP | Next/Prev. File | Jumps to a next file during a playback |
| Next/Prev. Page | When used on a file list screen, it jumps forward/backward to different pages | |
| SEARCH | Quick Search | Forward or backward search of the current movie (Each click doubles up the search speed -2,4,8,16,and 32 speeds). |
Firmware Upgrade
The firmware of PLAYER will be upgraded anytime for various performance update and bug fix to satisfy customers need, the version of a firmware can be confirmed on the right upper corner of the SETUP screen.
- The latest firmware can be downloaded from www.zioncom.net
- After connection PLAYER to your PC, copy the firmware to a desired location of the HDD. (You can save the firmware in a shared PC.)
- Connect PLAYER to your TV and turn on the power.
- Select the firmware file using the remote controller and press [OK].
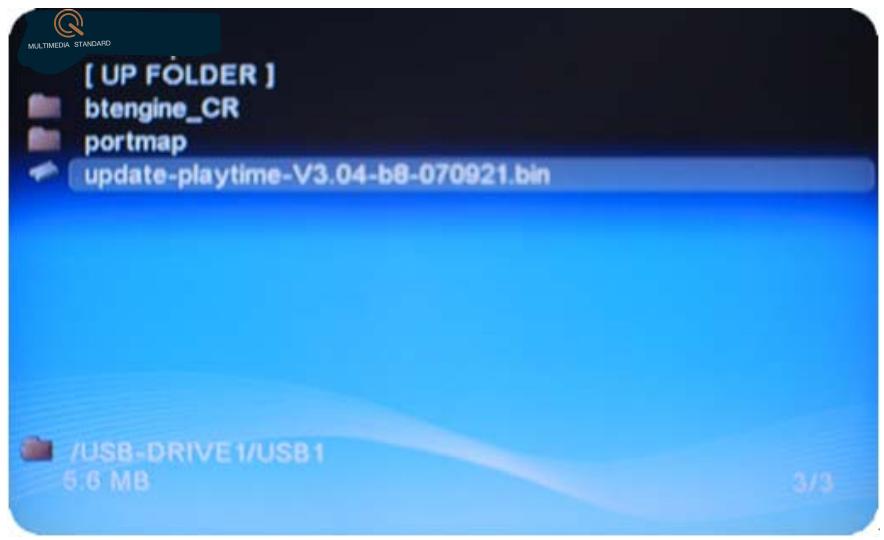
- If a firmware warning screen appears, initiate the firmware upgrade by selecting (YES)
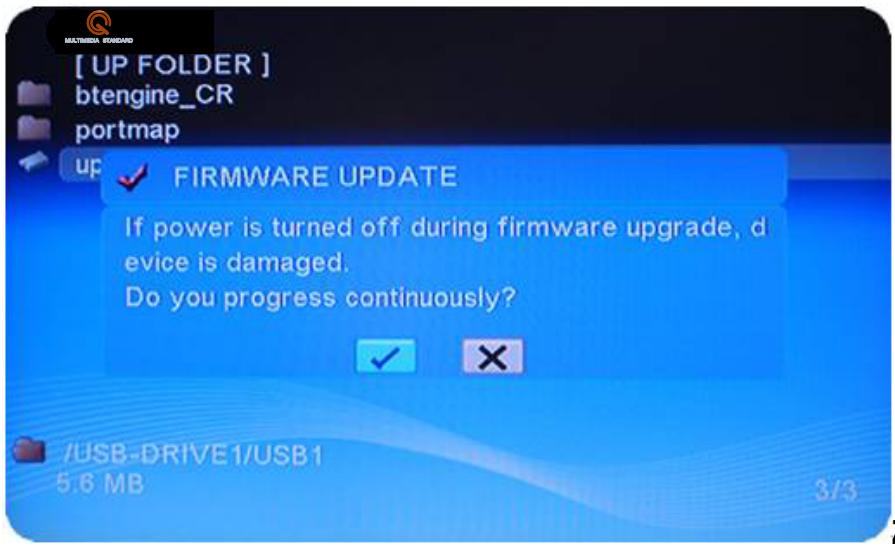
- The firmware upgrade is in progress.
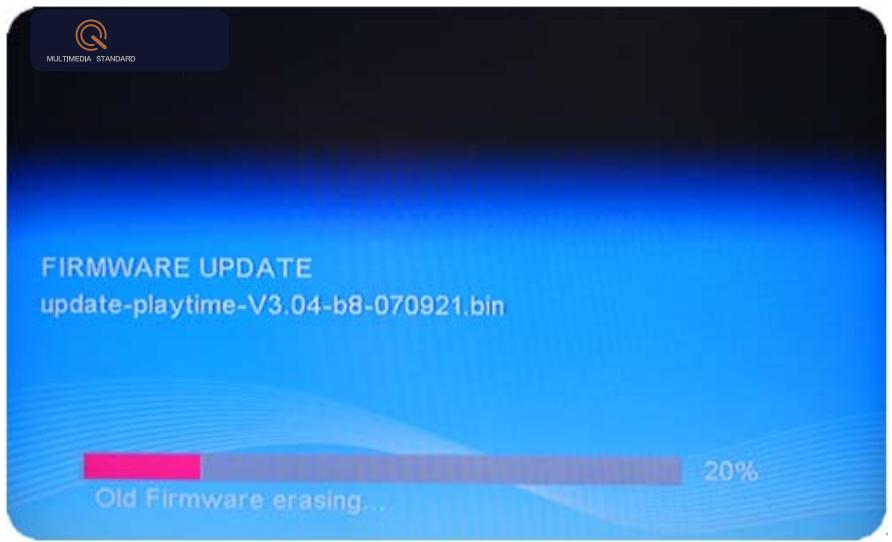
When the firmware upgrade is successfully completed, the system will be automatically rebooted.
Warning
During the firmware upgrade process, Do not turn off the power or disconnect the adapter
The latest firmware can be downloaded from www.zioncom.net
Trouble Shooting
-
When the power is on, nothing appears on the screen or the screen is shaking.
-
When the video output mode is not properly set, nothing may appear on the screen, the screen may be in monochrome, or the screen may be shaking. Press [TV OUT] button of the remote controller slowly and change the output mode until the video output mode is properly set.
The player is PAL or NTSC mode, Please check the TV Output (NTSC/PAL) -
While playing a movie file, its subtitle is not shown.
-
If the name of a movie file does not match to the name of a subtitle file, no subtitle can be shown.
-
In the case of multiple subtitles, if there is no first subtitle, subtitle cannot be shown. In this case, using the [SUBTITLE] button, select the second subtitle file.
-
While playing a movie, there is no audio output.
-
In the SETUP menu, check if the audio output mode is properly set.
- Check the volume level.
- Check if the [MUTE] function is activated.
For more information, please visit our website www.mpmaneurope.com