
BICYCLE CHARGER DC-14 - Chargeur de vélo NOKIA - Notice d'utilisation et mode d'emploi gratuit
Retrouvez gratuitement la notice de l'appareil BICYCLE CHARGER DC-14 NOKIA au format PDF.


| Type de produit | Chargeur de vélo pour appareils Nokia |
| Marque | Nokia |
| Modèle | Bicycle Charger DC-14 |
| Alimentation | Dynamo à bouteille (incluse) ; sortie 2,0 mm |
| Fonctions principales | Charge la batterie des appareils Nokia compatibles lors du pédalage |
| Vitesse minimale de charge | 6 km/h (4 mph) |
| Compatibilité | Appareils Nokia avec connecteur chargeur 2,0 mm |
| Contenu de l'emballage | Chargeur avec câble de charge, câble de masse, câble électrique ; dynamo avec support, levier, rouleau, loquet, boulon de réglage ; support Nokia CR-124 ; fils de masse et électrique ; accessoires de montage |
| Sécurité | Les connecteurs contiennent du nickel ; ne pas toucher la dynamo après usage ; ne pas gêner le freinage ou la direction ; s'assurer que le dynamo ne tombe pas dans les rayons |
| Entretien et nettoyage | Nettoyer avec un chiffon doux sec ; garder au sec ; ne pas peindre ; ne pas tenter d'ouvrir |
| Utilisation prévue | Sur routes pavées uniquement |
| Recyclage | Ne pas jeter avec les ordures ménagères ; rapporter aux points de collecte |
| Type de dynamo | Dynamo à bouteille avec rouleau de friction |
| Fixation | Sur la fourche avant (côté droit) et sur le guidon avec le support CR-124 |
| Température de fonctionnement | Non spécifiée ; la dynamo peut chauffer après une utilisation prolongée |
| Humidité | Éviter tout contact avec l'humidité et les liquides |
FOIRE AUX QUESTIONS - BICYCLE CHARGER DC-14 NOKIA
Questions des utilisateurs sur BICYCLE CHARGER DC-14 NOKIA
0 question sur cet appareil. Repondez a celles que vous connaissez ou posez la votre.
Poser une nouvelle question sur cet appareil
Téléchargez la notice de votre Chargeur de vélo au format PDF gratuitement ! Retrouvez votre notice BICYCLE CHARGER DC-14 - NOKIA et reprennez votre appareil électronique en main. Sur cette page sont publiés tous les documents nécessaires à l'utilisation de votre appareil BICYCLE CHARGER DC-14 de la marque NOKIA.
MODE D'EMPLOI BICYCLE CHARGER DC-14 NOKIA
Nokia Bicycle Charger DC-14
natural_image
Line drawing of a paintbrush with a blue circular badge containing the number 9 (no text or symbols on the brush itself)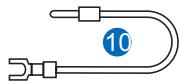
natural_image
Pure diagram of a U-shaped pipe with a blue circular marker labeled '10' (no text or symbols beyond the number)
natural_image
Simple line drawing of a U-shaped tube with a blue circular badge labeled '11' (no text or symbols beyond the number)9222639/1.0
natural_image
Diagram of a bicycle wheel with attached chain and bracket components (no text or symbols)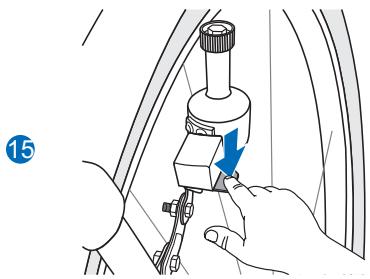
natural_image
Illustration of a hand using a tool to adjust or install a mechanical component (no text or symbols visible)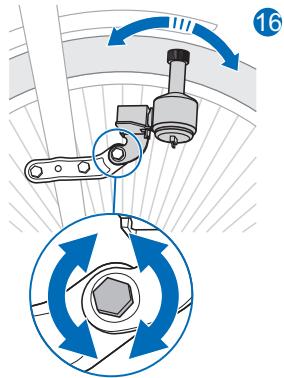
natural_image
Mechanical assembly diagram showing a lever mechanism with a blue arrow indicating direction (no text or symbols present)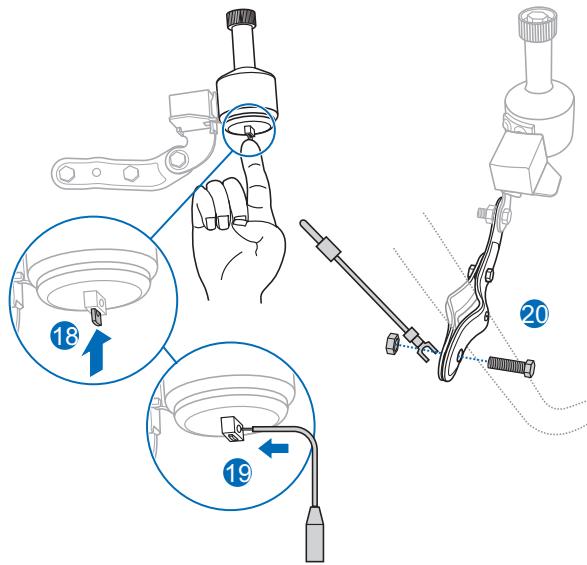
natural_image
Line drawing of a bicycle's cable and suspension system (no text or symbols)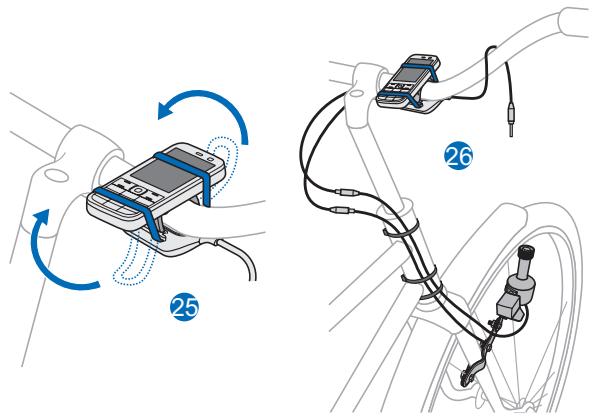

© 2010 Nokia. All rights reserved.
Nokia, Nokia Connecting People and the Nokia Original Accessories logo are trademarks or registered trademarks of Nokia Corporation.
Introduction
With the Nokia Bicycle Charger DC-14, you can charge the battery in your compatible Nokia device using the bottle dynamo mounted on the bicycle.
The product is designed to be used on paved roads.
Read this guide carefully before installing and using the product. Also, read the user guide for your
bicycle and the Nokia device that you connect to the charger.
This product may contain small parts. Keep them out of the reach of small children.

Warning: The connectors of this device may contain a small amount of nickel.
Persons who are sensitised to nickel may have symptoms from prolonged skin contact with the connectors.
Parts
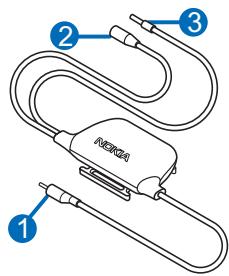
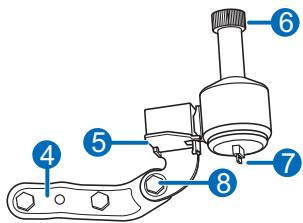
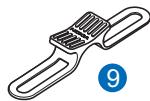
The product contains the following parts shown on the title page:
- Nokia Bicycle Charger DC-14: charging cable (1), grounding cable (2), electric cable (3)
- Dynamo: mounting bracket (4), lever (5), friction roller (6), latch for electric wire (7), adjustment bolt for dynamo position (8)
- Other parts: Nokia Bicycle Holder CR-124 (9), grounding wire (10), electric wire (11)
General safety instructions
Obey all local laws. Always keep your hands free to operate the bicycle while cycling. Your first consideration while cycling should be road safety. Only operate the product if it is safe to do so under all cycling conditions.
When you install the product, make sure it does not interfere with or hinder the steering or braking systems of the bicycle.
Make sure the product is not installed where you might come in contact with it in the event of an accident or collision.
During extended operation or in high temperatures, the charger or dynamo may be very warm. Do not touch the dynamo for a few minutes after a long ride.
Incorrect installation may cause the dynamo to fall between the bicycle spokes and jam the wheel. After riding a few kilometres, make sure that the dynamo is still securely fitted. After that, check every time before using the bicycle.
Incorrect installation of the dynamo causes an increase in running resistance and an excessive wearing of tyres during operation.
Mount the dynamo
Only use the supplied dynamo with the charger.
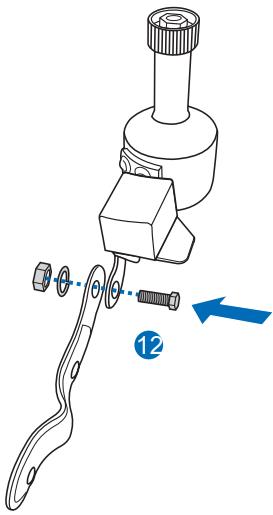
Attach the dynamo to the mounting bracket
To attach the dynamo to the mounting bracket, use the supplied bolt, nut, and washer (12). Make sure the bracket is firmly attached to the dynamo.
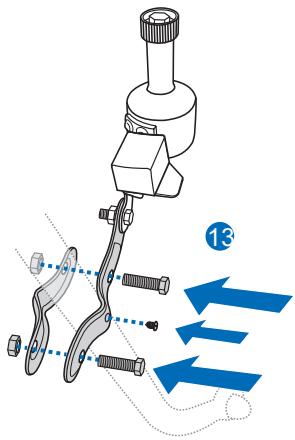
Attach the bracket to the front fork
To attach the mounting bracket to the right side of the front fork on your bicycle, use the supplied bolts, nuts, and screw (13). Make sure the bracket is firmly attached to the fork.
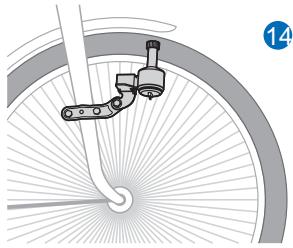
Mount the dynamo against the tyre
To mount the dynamo against the tyre, place the friction roller at the correct angle, height, and distance to the tyre (14) so that it properly touches the side of the tyre when you press the lever (15). Position the dynamo correctly using the adjustment bolt (16).
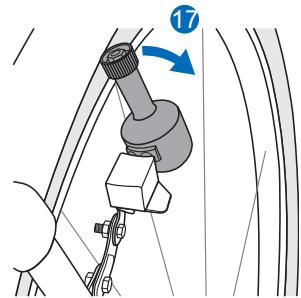
To detach the roller from the tyre, pull the dynamo away from the tyre (17).
Attach the electric wire
To attach the electric wire to the dynamo, firmly press and hold the latch at the bottom of the dynamo upwards (18), guide the bare end of the wire through the hole (19), and release the latch to lock the wire in place.
Attach the grounding wire
To attach the grounding wire to the mounting bracket, place the
connector of the wire under the nut (20), and tighten the bolt to lock the wire firmly in place.
Mount the charger and mobile device
Attach the charger to the handlebar
To attach the charger and your Nokia mobile device to the handlebar, use the supplied Nokia Phone Holder for Bicycles CR-124.
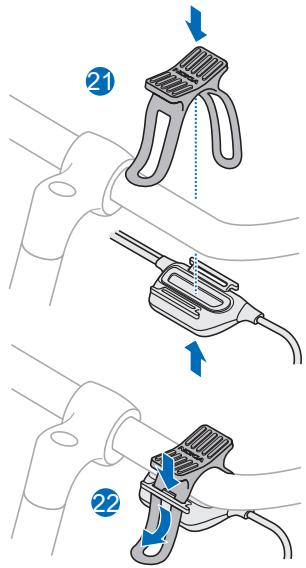
Place the holder on the top and the charger on the bottom of the handlebar (21). Thread the straps of the holder through the slots at the charger (22).
Connect the cables
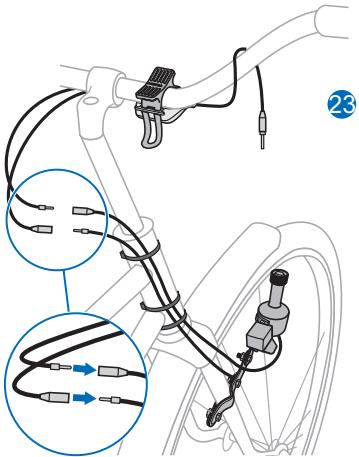
To connect the charger cables to the electric wire attached to the dynamo and the grounding wire attached to the mounting bracket, press the ends of the corresponding cables and wires into each other (23).
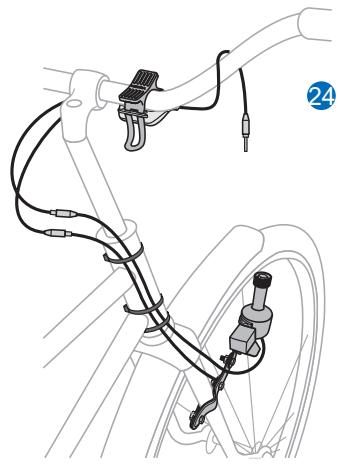
Attach the electric and grounding wires to the head tube with the supplied removable cable ties. Make sure the charger is properly mounted (24).
Attach the mobile device to the handlebar
Place the mobile device over the holder. Carefully stretch the holder straps, and thread them around the top and rear sides of the mobile device (25). Make sure the mobile device stays firmly in place and is properly mounted (26).
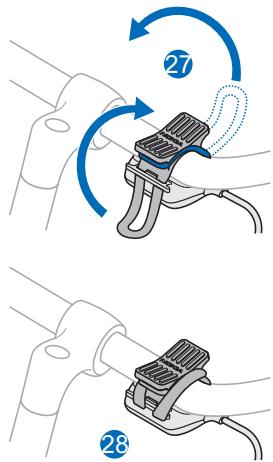
To keep the holder attached to the handlebar when you are not using it, carefully stretch the holder straps over the handlebar, and thread the straps behind the tabs on the charger (27). Make sure the holder stays firmly in place (28).
Connect the charger to the mobile device
Plug the charging cable of the charger into the 2.0 mm charger connector on your Nokia device.
If you connect the dynamo to a headlamp at the same time, your device will not charge properly.
Charge the battery using the dynamo
Make sure the charger is connected to your mobile device.
Press the lever of the dynamo so that the friction roller touches the tyre.
Begin pedalling your bicycle faster than 6 km/h (4 mph), which is
a typical walking speed. If you pedal too slowly, charging may not start even when you increase your speed. In that case, stop the bicycle, and detach the charging cable from the mobile device for a few seconds.
Take care of your device
Handle your device and accessories with care. The following suggestions help you protect your warranty coverage.
- Keep the device dry. Precipitation, humidity, and all types of liquids or moisture can contain minerals that
corrode electronic circuits. If your device gets wet, allow it to dry completely.
- Do not use or store the device in dusty or dirty areas. Moving parts and electronic components can be damaged.
- Do not attempt to open the device.
- Do not drop, knock, or shake the device. Rough handling can break mechanics.
- Only use a soft, clean, dry cloth to clean the surface of the device.
- Do not paint the device. Paint can clog the moving parts and prevent proper operation.
Recycle
Always return your used electronic products, batteries, and packaging materials to dedicated collection points. This way you help prevent uncontrolled waste disposal and promote the recycling of materials. Check product environmental information and how to
recycle your Nokia products at www.nokia.com/werecycle, or with a mobile device, www.nokia.mobi/werecycle.

The crossed-out wheeled-bin symbol on your product, battery, literature, or packaging reminds you that all electrical and electronic products, batteries, and accumulators must be taken to separate collection at the end of their working life. This requirement applies in the European Union. Do not dispose of these products as unsorted municipal waste. For more information on the environmental attributes of your device, see www.nokia.com/ecodeclaration.
- Nokia Bicycle Charger DC-14
- Introduction
- Parts
- General safety instructions
- Mount the dynamo
- Attach the dynamo to the mounting bracket
- Attach the bracket to the front fork
- Mount the dynamo against the tyre
- Attach the electric wire
- Attach the grounding wire
- Mount the charger and mobile device
- Attach the charger to the handlebar
- Connect the cables
- Attach the mobile device to the handlebar
- Connect the charger to the mobile device
- Charge the battery using the dynamo
- Take care of your device
- Recycle
Marque : NOKIA
Modèle : BICYCLE CHARGER DC-14
Catégorie : Chargeur de vélo