
DV-320-K - Lecteur dvd PIONEER - Notice d'utilisation et mode d'emploi gratuit
Retrouvez gratuitement la notice de l'appareil DV-320-K PIONEER au format PDF.
| Type de produit | Lecteur DVD |
| Marque | Pioneer |
| Modèle | DV-320-K |
| Dimensions (L x H x P) | 420 mm x 49,5 mm x 215 mm |
| Poids | 1,7 kg |
| Alimentation | 220 – 240 V AC, 50/60 Hz |
| Consommation électrique | 11 W (veille : 0,5 W) |
| Formats de disques compatibles | DVD-Video, DVD-R/RW, DVD+R/RW, Video CD, CD-R/RW, CD audio |
| Formats de fichiers compatibles | DivX, WMV, WMA, MP3, MPEG-4 AAC, JPEG |
| Port USB | Oui (type A, pour lecture de fichiers et enregistrement CD audio) |
| Sorties vidéo | Composite (RCA), SCART (RGB/Video), composante (Y/Pb/Pr) |
| Sorties audio | Stéréo analogique (RCA), sortie audio numérique coaxiale |
| Résolution maximale | 720 x 480 / 720 x 576 pixels (entrelacé ou progressif) |
| Télécommande | Oui, avec piles AA (fournies) |
| Fonctions spéciales | Répétition A-B, lecture aléatoire, programmée, zoom, multi-angle, sous-titres |
| Réglages audio | Sound Retriever, égaliseur, virtual surround, DRC, dialogue |
| Réglages vidéo | Netteté, luminosité, contraste, gamma, teinte, niveau de chrominance |
| Contrôle parental | Oui, avec mot de passe et verrouillage par niveau |
| Température de fonctionnement | +5°C à +35°C |
| Humidité de fonctionnement | 5% à 85% (sans condensation) |
| Entretien | Nettoyer avec un chiffon doux et sec, ne pas utiliser de solvants |
| Sécurité | Produit laser de classe 1, ne pas ouvrir, confier la réparation à un technicien qualifié |
| Informations générales | Notice disponible en téléchargement au format PDF |
FOIRE AUX QUESTIONS - DV-320-K PIONEER
Questions des utilisateurs sur DV-320-K PIONEER
0 question sur cet appareil. Repondez a celles que vous connaissez ou posez la votre.
Poser une nouvelle question sur cet appareil
Téléchargez la notice de votre Lecteur dvd au format PDF gratuitement ! Retrouvez votre notice DV-320-K - PIONEER et reprennez votre appareil électronique en main. Sur cette page sont publiés tous les documents nécessaires à l'utilisation de votre appareil DV-320-K de la marque PIONEER.
MODE D'EMPLOI DV-320-K PIONEER
DV-420V-S DV-420V-K DV-320-S DV-320-K
DVD Player Lettore per DVD
Discover the benefits of registering your product online at http://www.pioneer.co.uk (or http://www.pioneer.eu).
Registra il suo prodotto su http://www.pioneer.it (o http://www.pioneer.eu) e scopri subito quali vantagei puoi ottenere!
Operating Instructions Istruzioni per l'uso


Thank you for buying this Pioneer product.
Please read through these operating instructions so you will know how to operate your model properly.
After you have finished reading the instructions, put them away in a safe place for future reference.
IMPORTANT

The lightning flash with arrowhead symbol, within an equilateral triangle, is intended to alert the user to the presence of uninsulated "dangerous voltage" within the product's enclosure that may be of sufficient magnitude to constitute a risk of electric shock to persons.
CAUTION
RISK OF ELECTRIC SHOCK DO NOT OPEN
CAUTION:
TO PREVENT THE RISK OF ELECTRIC SHOCK,DO NOT REMOVE COVER (OR BACK).NO USER-SERVICEABLE PARTS INSIDE.REFER SERVICING TO QUALIFIED SERVICE PERSONNEL.

The exclamation point within an equilateral triangle is intended to alert the user to the presence of important operating and maintenance (servicing) instructions in the literature accompanying the appliance.
D3-4-2-1-1_A1_En
CAUTION
This product is a class 1 laser product, but this product contains a laser diode higher than Class 1. To ensure continued safety, do not remove any covers or attempt to gain access to the inside of the product. Refer all servicing to qualified personnel. The following caution label appears on your unit. Location: inside of the unit
CLASS 1 LASER PRODUCT
CAUTION : CLASS 1M LASER RADIATION WHEN OPEN. DO NOT VIEW DIRECTLY WITH OPTICAL INSTRUMENTS.
ATTENTION : RADIATION CLASSE LASER 1M: LORSQUE L'APPAREIL EST OUVERT NE REGARDEZ PAS VERS L'OUVERTURE, SURTOUT SI VOUS PORTEZ DES LUNETTES OU D'AUTRES TYPES DE CORRECTIONS OPTIQUES.
Vorsicht : KLASSE 1M LASER Strahlung: Bei geöffnetem Gerät nicht mit optischen Geräten in den Laserstrahl blichen.
PRECAUCION : RADIACION LASER CLASE 1M, AL ABRIR NO MIRAR DIRECTAMENTE CON INSTRUMENTOIS OPTICOS.
VIKTIG : KCLASS 1M LASER STRALNING: NAR APPARATEN AR ÖPPEN. TITTA INTE RAKT IN I DEN. SPECIELLT INTE OM DU HAR GLASÖGON PÄ DIG.
Varoitus! : Luokka 1M:n Lasersäteily: Åla koskaan katso laitteen sisään sen ollessa auki-ey myoskän silmalaseilla tai muilla optisilla laitteilla!
ADVARSEL : LASERSTRÄLER KLASSE 1M KIG IKKE DIREKTE IND I APPARATET NAR DETTE ER ABENT IS/ER IKKE MED BRILLER ELLER ANDRE OPTISK OEJEKTER
D3-4-2-1-8*CEn
WARNING
This equipment is not waterproof. To prevent a fire or shock hazard, do not place any container filled with liquid near this equipment (such as a vase or flower pot) or expose it to dripping, splashing, rain or moisture. D3-4-2-1-3_B_En
VENTILATION CAUTION
When installing this unit, make sure to leave space around the unit for ventilation to improve heat radiation (at least 10cm at top, 10cm at rear, and 10cm at each side).
WARNING
Slots and openings in the cabinet are provided for ventilation to ensure reliable operation of the product, and to protect it from overheating. To prevent fire hazard, the openings should never be blocked or covered with items (such as newspapers, table-cloths, curtains) or by operating the equipment on thick carpet or a bed. D3-4-2-1-7b_A_En
WARNING
Before plugging in for the first time, read the following section carefully.
The voltage of the available power supply differs according to country or region. Be sure that the power supply voltage of the area where this unit will be used meets the required voltage (e.g., 230 V or 120 V) written on the rear panel. D3-4-2-14_A_En
WARNING
To prevent a fire hazard, do not place any naked flame sources (such as a lighted candle) on the equipment. D3-4-2-1-7a_A_En
Operating Environment
Operating environment temperature and humidity: +5^ to +35^ (+41^ to +95^) ; less than 85% RH (cooling vents not blocked)
Do not install this unit in a poorly ventilated area, or in locations exposed to high humidity or direct sunlight (or strong artificial light)
D3-4-2-1-7c*A1_EN
If the AC plug of this unit does not match the AC outlet you want to use, the plug must be removed and appropriate one fitted. Replacement and mounting of an AC plug on the power supply cord of this unit should be performed only by qualified service personnel. If connected to an AC outlet, the cut-off plug can cause severe electrical shock. Make sure it is properly disposed of after removal. The equipment should be disconnected by removing the mains plug from the wall socket when left unused for a long period of time (for example, when on vacation). D3-4-2-1a_A_En
CAUTION
The 念 STANDBY/ON switch on this unit will not completely shut off all power from the AC outlet. Since the power cord serves as the main disconnect device for the unit, you will need to unplug it from the AC outlet to shut down all power. Therefore, make sure the unit has been installed so that the power cord can be easily unplugged from the AC outlet in case of an accident. To avoid fire hazard, the power cord should also be unplugged from the AC outlet when left unused for a long period of time (for example, when on vacation). D3-4-2-2a_A_En
This product is for general household purposes. Any failure due to use for other than household purposes (such as long-term use for business purposes in a restaurant or use in a car or ship) and which requires repair will be charged for even during the warranty period.
POWER-CORD CAUTION
Handle the power cord by the plug. Do not pull out the plug by tugging the cord and never touch the power cord when your hands are wet as this could cause a short circuit or electric shock. Do not place the unit, a piece of furniture, etc., on the power cord, or pinch the cord. Never make a knot in the cord or tie it with other cords. The power cords should be routed such that they are not likely to be stepped on. A damaged power cord can cause a fire or give you an electrical shock. Check the power cord once in a while. When you find it damaged, ask your nearest PIONEER authorized service center or your dealer for a replacement. S002*En
Information for users on collection and disposal of old equipment and used batteries
Symbol for equipment

(Symbol examples) for batteries


These symbols on the products, packaging, and/or accompanying documents mean that used electrical and electronic products and batteries should not be mixed with general household waste.
For proper treatment, recovery and recycling of old products and used batteries, please take them to applicable collection points in accordance with your national legislation.
By disposing of these products and batteries correctly, you will help to save valuable resources and prevent any potential negative effects on human health and the environment which could otherwise arise from inappropriate waste handling.
For more information about collection and recycling of old products and batteries, please contact your local municipality, your waste disposal service or the point of sale where you purchased the items.
These symbols are only valid in the European Union.
For countries outside the European Union:
If you wish to discard these items, please contact your local authorities or dealer and ask for the correct method of disposal.
K058a_A1_En
01 Before you start
What's in the box. 5
Loading the batteries in the remote control. 5
Playable discs 6
Playable files. 7
Part Names and Functions
Front Panel. 9
Remote control. 10
Front Panel Display. 11
03 Connections
Connecting using an audio/video cable.....12
Connecting using a SCART AV cable. 12
Connecting using an HDMI cable
(DV-420V only) 13
Connecting using a component video
cable. 15
Connecting using a digital audio cable. 16
04Playback
Playing discs or files 17
Playing files stored on USB devices 22
Recording audio CD tracks on USB devices .... 22
Playing using the Disc Navigator 23
Playing using the Play Mode function 24
Adjusting the audio. 26
Adjusting the picture quality. 27
05 Changing the Settings (Initial Settings)
Operating the Initial Settings menu 28
06 Additional information
Troubleshooting 35
Language Code Table and Country/Area
Code Table 42
Setting the TV system 43
Cautions on use 43
Handling discs 44
Specifications. 46
What's in the box
Remote Control
Audio/video cable
Power cable
AA batteries (R6) x 2
Warranty card
- Operating instructions (this document)
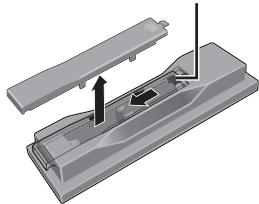
Loading the batteries in the remote control
1 Open the back cover.
Press lightly on this part and slide into the direction of the arrow.
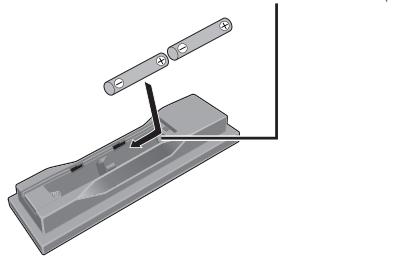
2 Insert the included batteries (two size AA batteries).
Insert the batteries in the proper direction, as indicated by the and marks inside the case.
Insert one at a time from the top.
3 Close the back cover.
Close the cover securely (a click should be heard).


Notes
WARNING
- Do not use any batteries other than the ones specified. Also, do not use a new battery together with an old one.
- When loading the batteries into the remote control, set them in the proper direction, as indicated by the polarity marks ( and ).
- Do not heat batteries, disassemble them, or throw them into flames or water.
- Batteries may have different voltages, even if they are the same size and shape. Do not use different types of batteries together.
- To prevent leakage of battery fluid, remove the batteries if you do not plan to use the remote control for a long period of time (1 month or more). If the fluid should leak, wipe it carefully off the inside of the case, then insert new batteries. If a battery should leak and the fluid should get on your skin, flush it off with large quantities of water.
- When disposing of used batteries, please comply with governmental regulations or environmental public instruction's rules that apply in your country/area.
Do not use or store batteries in direct sunlight or other excessively hot place, such as inside a car or near a heater. This can cause batteries to leak, overheat, explode or catch fire. It can also reduce the life or performance of batteries.
Playable discs
| DVD-Video | • Commercially available DVD-Video discs • DVD-R/-RW/-R DL and DVD+R/+RW/+R DL discs recorded in the Video mode and finalized |
| DVD VR | DVD-R/-RW/-R DL discs recorded in the VR mode |
| Video CD | Video CDs (including Super VCDs) |
| CD(R/RW) | • Commercially available audio CDs • CD-R/-RW-ROM discs containing music recorded in the CD-DA format |
| JPEG | JPEG files recorded on DVD-R/-RW/-R DL discs, CD-R/-RW-ROM discs or USB devices |
| DivX® | DivX video files recorded on DVD-R/-RW/-R DL discs, CD-R/-RW-ROM discs or USB devices |
| WMV | WMV files recorded on DVD-R/-RW/-R DL discs, CD-R/-RW-ROM discs or USB devices |
| WMA | WMA files recorded on DVD-R/-RW/-R DL discs, CD-R/-RW-ROM discs or USB devices |
| MP3 | MP3 files recorded on DVD-R/-RW/-R DL discs, CD-R/-RW-ROM discs or USB devices |
| MPEG-4 AAC | MPEG-4 AAC files recorded on DVD-R/-RW/-R DL discs, CD-R/-RW-ROM discs or USB devices |
| Fujicolor CD | |
| KODAK Picture CD | |
DVD is a trademark of DVD Format/Logo Licensing Corporation.
is a trademark of FUJIFILM Corporation.
RW
COMPATIBLE
This label indicates playback compatibility with DVD-RW discs recorded in VR format (Video Recording format). However, for discs recorded with a record-only-once encrypted program, playback can only be achieved using a CPRM compatible device.

Notes
This player does not support multisession discs or multiborder recording.
- Multisession/multiborder recording is a method in which data is recorded on a single disc in two or more sessions/borders. A "session" or "border" is one recording unit, consisting of a complete set of data from lead-in to lead-out.
Discs that cannot be played
DVD Audio discs
DVD-RAM discs
SACDs
CD-G
- Blu-ray discs
HD DVDs
Discs that have not been finalized
- Discs recorded with packet writing
About region numbers
DVD player and DVD- Video discs are assigned region numbers according to the region in which they are sold. This player's region number(s) is (are) as shown below.
DVD-Video: 2
Discs not including these numbers cannot be played.
Discs playable on this player are as shown below.
DVDs: 2 (including 2) and ALL
Regarding copy protected CDs
This player is designed to conform to the specifications of the audio CD format. This player does not support the playback or function of discs that do not conform to these specifications.
About playing DualDiscs
- A DualDisc is a new two-sided disc, one side of which contains DVD content — video, audio, etc. — while the other side contains non-DVD content such as digital audio material.
- The DVD side of a DualDisc can be played on this player (excluding any DVD-Audio content).
- The non-DVD, audio side of the disc is not compatible with this player.
It is possible that when loading or ejecting a DualDisc, the opposite side to that being played will be scratched. Scratched discs may not be playable. - For more detailed information on the DualDisc specification, please refer to the disc manufacturer or disc retailer.
Playing discs created on computers or BD/DVD recorders
- It may not be possible to play discs recorded using a computer due to the application settings or computer's environment settings. Record discs in a format playable on this player. For details, contact the dealer.
It may not be possible to play discs recorded using a computer or a BD/DVD recorder, if burn quality is not good due to characteristics of the disc, scratches, dirt on the disc, dirt on the recorder's lens, etc.
Playable files
- Only discs recorded in ISO9660 Level 1, Level 2 and Joliet can be played.
- Files protected by DRM (Digital Rights Management) cannot be played.
Supported video file formats Windows Media™ Video (WMV)
Resolution: Up to 720 x 480/720 x 576 pixels
This player supports files encoded using Windows Media Player 9 Series.
This player does not support Advanced Profile.
- Windows Media is either a registered trademark or trademark of Microsoft Corporation in the United States and/or other countries.
This product includes technology owned by Microsoft Corporation and cannot be used or distributed without a license from Microsoft Licensing, Inc.
DivX
DivX is a media technology created by DivX, Inc. DivX media files contain image data.
- DivX files may also include such advanced playback functions as menu screens and selection of multiple subtitle languages/audio tracks.

Plays DivX® video, including premium content
DivX® is a registered trademark of DivX, Inc., and is used under license.
Displaying external subtitle files
- The font sets listed below are available for external subtitle files. You can see the proper font set on-screen by setting the Subtitle Language on page 32 to match the subtitle file.
- This player supports the following language groups:
| Group 1 | Afrikaans (af), Basque (eu), Catalan (ca), Danish (da), Dutch (nl), English (en), Faroese (fo), Finnish (fi), French (fr), German (de), Icelandic (is), Irish (ga), Italian (it), Norwegian (no), Portugu- guese (pt), Rhaeto-Romantic (rm), Scot- tish (gd), Spanish (es), Swedish (sv) |
| Group 2 | Albanian (sq), Croatian (hr), Czech (cs), Hungarian (hu), Polish (pl), Romanian (ro), Slovak (sk), Slovenian (sl) |
| Group 3 | Bulgarian (bg), Byelorussian (be), Macedonian (mk), Russian (ru), Ser- bian (sr), Ukrainian (uk) |
| Group 4 | Hebrew (iw), Yiddish (ji) |
| Group 5 | Turkish (tr) |
- Some external subtitle files may be displayed incorrectly or not at all.
- For external subtitle files the following subtitle format filename extensions are supported (please note that these files are not shown within the disc navigation menu): .srt, .sub, .ssa, .smi
- The filename of the movie file has to be repeated at the beginning of the filename for the external subtitle file.
- The number of external subtitle files which can be switched for the same movie file is limited to a maximum of 10.
Supported image file formats
JPEG
Resolution: Up to 3 072 x 2 048 pixels
This player supports baseline JPEG.
This player supports Exif Ver.2.2.
- This player supports JPEG HD. Images are output with a high resolution of 720p or 1080i (DV-420V only).
This player does not support progressive JPEG.
Supported audio file formats
-
This player does not support VBR (Variable Bit Rate).
-
This player does not support lossless encoding.
Windows Media Audio (WMA)
- Sampling frequencies: 32 kHz, 44.1 kHz and 48 kHz
Bit rate: Up to 192 kbps - This player supports files encoded using Windows Media Player Ver. 7/7.1, Windows Media Player for Windows XP and Windows Media Player 9 Series.
MPEG-1 Audio Layer 3 (MP3)
- Sampling frequencies: 32 kHz, 44.1 kHz and 48 kHz
MPEG-4 Advanced Audio Coding (MPEG-4 AAC)
- Sampling frequencies: 44.1 kHz and 48 kHz
- This player supports files encoded using iTunes.
Depending on the version of iTunes used for encoding, it may not be possible to play some files. - Apple and iTunes are trademarks of Apple Inc., registered in the U.S. and other countries.
Playable file extensions
Video files
<divx .avi .wmv
- Files not containing DivX video signals cannot be played, even if they have the extension“.avi”.
Image files
.jpg .jpeg
Audio files
.wma .mp3 .m4a
Front Panel
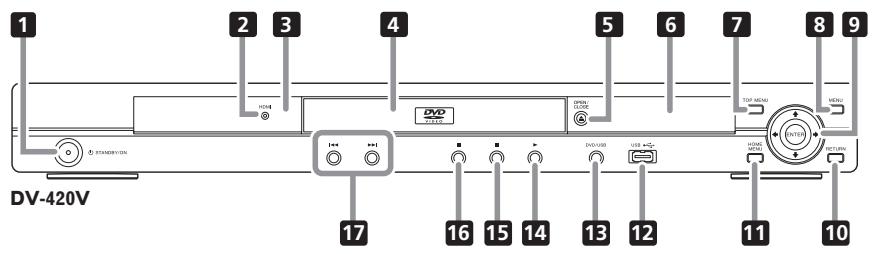
1 STANDBY/ON (page 17)
2 HDMI (page 13) (DV-420V only)
This lights when the device connected to the HDMI terminal is recognized.
Remote control sensor
Point the remote control to this, then operate it within a distance of approximately 7m
- Reception of remote control signals may be poor when exposed to direct sunlight or strong artificial light from a fluorescent bulb, etc.
4 Disc tray
5 △ OPEN/CLOSE (page 17)
6 Front panel display (page 11)
7 TOP MENU
Press to display the top menu of the DVD-Video.
8 MENU
Press to display the menu screen or Disc Navigator.
9 / / /
Use these to select items, change settings and move the cursor.
ENTER
Use this to implement the selected item or enter a setting that you have changed.
10 RETURN
Press to return to the previous screen.
11 HOME MENU
Press to display/hide the Home Menu.
USB port (type A) (page 22)
DVD/USB (page 22)
14 (page 17)
15 (page 17)
16 II (page 17)
17 1<//>I (page 19)
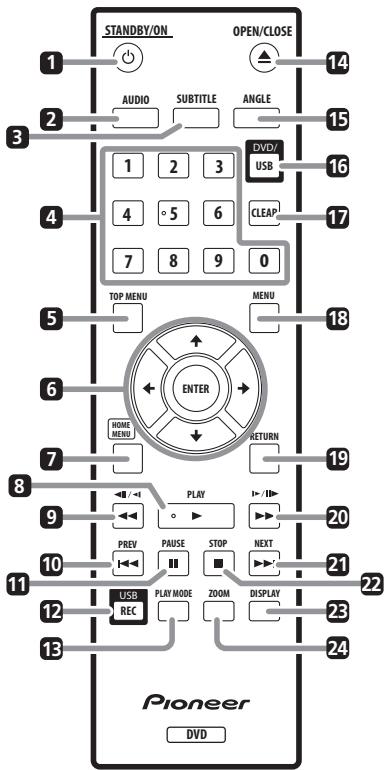
Remote control
4 Number buttons (0 to 9)
1 STANDBY/ON (page 17)
2 AUDIO (page 19)
SUBTITLE (page 20)
Use these to specify and play the title, chapter, track or file you want to view/ listen to. Also use them to select items on menu screens, etc.
5 TOP MENU
Press to display the top menu of the DVD-Video.
6 / / /
Use these to select items, change settings and move the cursor.
ENTER
Use this to implement the selected item or enter a setting that you have changed.
7 HOME MENU
Press to display/hide the Home Menu.
8 PLAY (page 17)
9 1/111 page 18)
10 PREV (page 19)
II PAUSE (page 17)
12 USB REC (page 22)
13 PLAY MODE (page 24)
14 ▲ OPEN/CLOSE (page 17)
15 ANGLE (page 20)
DVD/USB (page 22)
17 CLEAR
Press to clear the selected item. Use this for example if you input the wrong number.
18 MENU
Press to display the menu screen or Disc Navigator.
RETURN
Press to return to the previous screen.
20 /1 /1 (page 18)
21 NEXT (page 19)
22 STOP (page 17)
23 DISPLAY (page 21)
24 ZOOM (page 20)
Front Panel Display
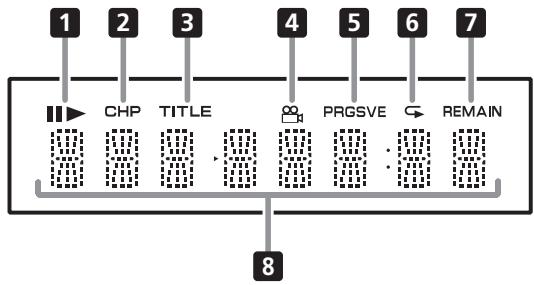

1 Lights when playback is paused.
Lights during playback.
CCH Lights when the chapter number is displayed.
3 TITLE Lights when the title number is displayed.
4 (page 20) Lights when switched to a different angle (DVD-Video only).
5 PRGSVE (page 31) Lights when Component Out is set to Progressive.
6 (page 24) Lights when in the Repeat Play mode.
7 REMAIN Lights when the remaining time of the currently playing title, chapter or track is displayed.
Counter display Displays the title, chapter, track or file number, the elapsed time, etc.
- Be sure to turn off the power and unplug the power cord from the power outlet whenever making or changing connections.
- Connect the power cord after all the connections between devices have been completed.
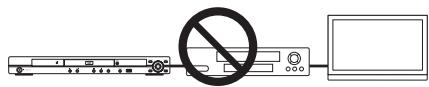
- Connect the player's video output directly to the TV.
This player supports analog copy protection technology. Therefore the picture may not be displayed properly if connected to a TV via a DVD recorder/video deck or when playing the player's output material that is recorded by a DVD recorder/video deck. Furthermore, the picture may not be displayed properly due to the copy protection when the player is connected to a TV with a built-in video deck. For details, contact the manufacturer of your TV.
Connecting using an audio/video cable
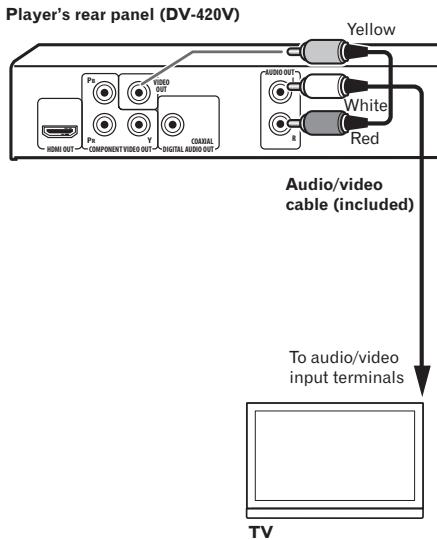
Player's rear panel (DV-320)

Connecting using a SCART AV cable
The video signal to be output can be selected (AV Connector Out on page 31).
- Analog audio signals are also output from the SCART AV connector.
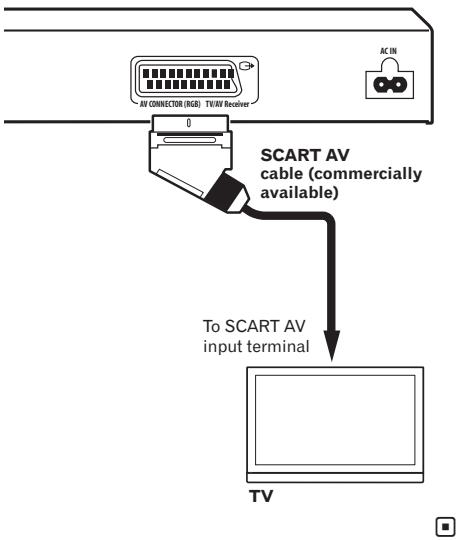
Player's rear panel (DV-420V)
Connecting using an HDMI cable (DV-420V only)
By using an HDMI cable, digital signals can be transferred to an HDMI-compatible TV on a single cable with no loss of picture or sound quality. After connecting, make the player's resolution and HDMI color settings according to the HDMI-compatible TV. Also refer to the HDMI-compatible TV's operating instructions.

HIGH-DEFINITION MULTIMEDIA INTERFACE
- HDMI, the HDMI Logo and High-Definition Multimedia Interface are trademarks or registered trademarks of HDMI Licensing, LLC.

Notes
- This player's interface is designed based on the High-Definition Multimedia Interface specification.
- When an HDMI-compatible device is connected, the resolution is displayed on the front panel display.
- The resolution of the video signals output from the player's HDMI OUT terminal is changed manually. Change the HDMI Resolution setting (page 31). Settings for two units can be stored in the memory.
- This player is designed for connection to HDMI-compatible devices. It may not operate properly if connected to DVI devices.
Connecting to a TV
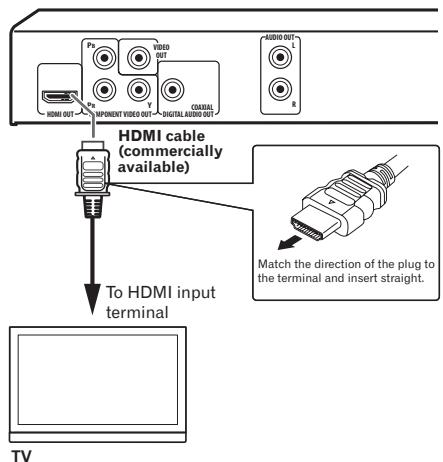
Player's rear panel (DV-420V)
Connecting to an AV receiver or amplifier
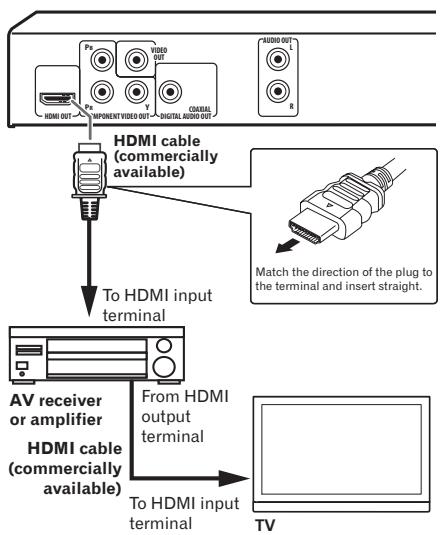
Player's rear panel (DV-420V)
About video/audiosignals output from the HDMI OUT terminal
Video signals (resolution of) that can be output from the player's HDMI OUT terminal
- 720 × 480 / 720 × 576 pixel progressive or interlaced video
1280x720 pixel progressive video
1920x1080pixel progressive or interlaced video
Audio signals that can be output from the player's HDMI OUT terminal
44.1 kHz to 96 kHz, 16-bit/20-bit/24-bit 2-channel linear PCM audio (including 2-channel downmixing)
- Dolby Digital 5.1-channel audio
- DTS 5.1-channel audio
MPEG audio

Manufactured under license from Dolby Laboratories. Dolby and the double-D symbol are trademarks of Dolby Laboratories.

Manufactured under license under U.S. Patent #: 5,451,942 & other U.S. and worldwide patents issued & pending. DTS and DTS Digital Out are registered trademarks and the DTS logos and Symbol are trademarks of DTS, Inc. © 1996-2008 DTS, Inc. All Rights Reserved.
About KURO LINK function
- The functions listed below can be used when a Pioneer KURO LINK compatible Flat Screen TV, AV system (AV receiver or amplifier, etc.) and HD AV Converter is connected to the player using an HDMI cable.
Refer to the operating instructions of the Flat Screen TV, etc.
To use the KURO LINK function
- The KURO LINK function operates when KURO LINK is set to On for all devices connected to the HDMI OUT terminal.
- Once connections and the settings of all the devices are finished, be sure to check that the player's picture is output to the Flat Screen TV. (Also check after changing the connected devices and reconnecting HDMI cables.) The KURO LINK function may not operate properly if the player's picture is not properly output to the Flat Screen TV.
Connections
- Use High Speed HDMI™ cables when using the KURO LINK function. The KURO LINK function may not operate properly if other HDMI cables are used.
- For some models, the KURO LINK function may be referred to as "HDMI Control".
- The KURO LINK function does not work with devices of other brands, even if connected using an HDMI cable.
What the KURO LINK function can do
Operating the player with the Flat Screen TV's remote control.
- Such player operations as starting and stopping playback and displaying the menus can be performed from the Flat Screen TV. For details on the functions that can be operated, see the Flat Screen TV's operating instructions.
The player's playback picture is displayed on the Flat Screen TV's screen. (Auto-select function)
- The input switches automatically on the Flat Screen TV, AV system (AV receiver or amplifier, etc.) and HD AV Converter when playback is started on the player or the Home Menu or the Disc Navigator is displayed. When the input is switched, the playback picture, the Home Menu or the Disc Navigator appears on the Flat Screen TV.
The power of the Flat Screen TV turns on automatically. (Simultaneous power function)
- When playback on the player is started or the Home Menu or Disc Navigator is displayed, if the Flat Screen TV's power was off, its power turns on automatically.
Connecting using a component video cable
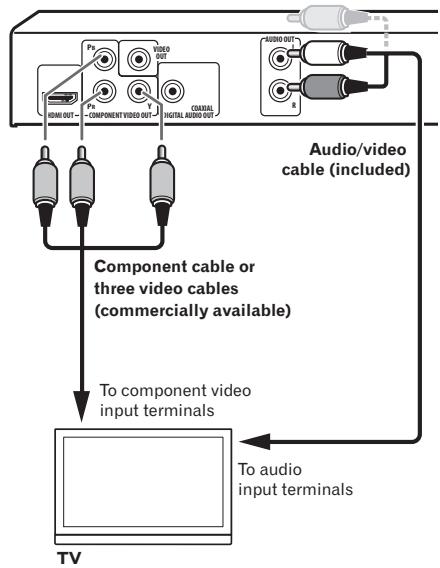
Player's rear panel (DV-420V)
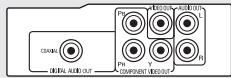
Player's rear panel (DV-320)

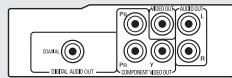
Connecting using a digital audio cable
- Connect an AV receiver or amplifier, etc., compatible with Dolby Digital or DTS audio to one of the DIGITAL AUDIO OUT COAXIAL terminals.
- For instructions on connecting the AV receiver or amplifier to the TV and speakers, refer to the AV receiver or amplifier's operating instructions.
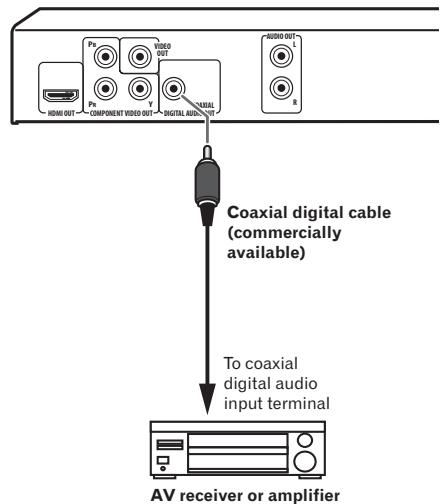
Player's rear panel (DV-420V)
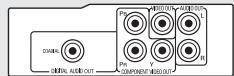
Player's rear panel (DV-320)

Playing discs or files
Before starting, turn the TV's power on and switch the TV's input.
- The player's screen display language can be changed (OSD Language on page 32).
1 Turn the power on. Press STANDBY/ON.
2 Open the disc tray and load the disc. Press OPEN/CLOSE. Set the disc with the printed side facing up

3 Starts playback. Press PLAY.
To pause, press PAUSE during playback.
- To stop, press STOP during playback.
To turn the power off, press STANDBY/ON.

Notes
Some discs start playing automatically when they are loaded.
- For some discs, black bars may be displayed along the top and bottom of the TV screen.
If the menu screen appears
For some discs, the menu screen appears automatically when playback starts. The contents of the menu screen and how the screen is operated differ from disc to disc.
Various playback functions
It may not be possible to use some of these functions, depending on the type of disc or file.
| Starting playback from where it was stopped (Resume Play) | DVD-Video DVD VR Video CD CD(R/RW) DivX° WMV | When STOP is pressed during playback, the point at which playback was stopped is stored in the memory. When PLAY is pressed, playback resumes from the point at which it was stopped. To cancel the resume play, press STOP while play-back is stopped. Resume Play may not possible for certain discs. |
| Storing the stop point for ejected discs (Last Memory) | DVD-Video Video CD | The player stores the point at which ejected DVD-Video discs (for up to five discs) and Video CDs (for one disc) were stopped. When the disc is reloaded and PLAY is pressed, playback starts from the point at which the disc was stopped before it was ejected. To cancel the last memory setting, press STOP while playback is stopped. If you do not want the player to store the point at which playback was stopped, press ▲ OPEN/CLOSE during playback to eject the disc. For some discs, the point at which playback was stopped cannot be stored. When the limit for the number of discs for which the stop point can be stored is exceeded, the older settings are overwritten. |
| Forward and reverse scanning | DVD-Video DVD VR Video CD CD(R/RW) DivX° WMV WMA MP3 MPEG-4 AAC | During playback, press ←/←/II/ or >/I> /II>. The speed changes each time the button is pressed. The speed steps differ according to the disc or file. With DVD-Video and DVD VR discs, when >/I> /II> is pressed once during playback, the picture and sound are played at about 1.4 times the regular speed. Note that the sound may not be output or may be broken. To resume normal playback, press PLAY. |
| Frame-by-frame forward/ frame-by-frame reverse play | DVD-Video DVD VR Video CD DivX° WMV | While playback is paused, press ←/←/II/ or >/I> /II>. The picture moves a frame forward or backward each time the button is pressed. To resume normal playback, press PLAY. No sound is produced during frame-by-frame forward/reverse play. The picture may shake during frame-by-frame reverse play. Frame-by-frame reverse play is not possible for Video CDs and video files. |
| Playing in slow motion | DVD-Video DVD VR Video CD DivX® WMV | While playback is paused, press and hold in /Press and hold the button until Slow is displayed on the TV screen. The speed changes each time the button is pressed. The speed steps differ according to the disc or file. To resume normal playback, press PLAY. No sound is output during slow motion playback. Reverse playback in slow motion is not possible for Video CDs and video files. |
| Skipping content | DVD-Video DVD VR Video CD CD(R/RW) DivX® WMV WMA MP3 MPEG-4 AAC | During playback, press PREV or NEXT. When NEXT is pressed, playback skips ahead to the beginning of the next title, chapter, track or file. When PREV is pressed, playback skips back to the beginning of the currently playing title, chapter, track or file. When pressed twice, playback skips back to the previous title, chapter, track or file. It is not possible to return to previous titles, chapters, groups, tracks or files during random play. Operation is different during PBC playback of Video CDs. Check the disc's jacket, etc. |
| Playing specific titles, chapers or tracks | DVD-Video DVD VR Video CD CD(R/RW) | Use the number buttons (0 to 9) to input the number of the title, chapter or track you want to play, then press ENTER. Playback starts automatically 2 seconds after the number is input. For DVD-Video chapter searching, only chapters within the currently playing title can be specified. |
| Switching the audio stream/channel | DVD-Video DVD VR Video CD CD(R/RW) DivX® | For discs or files including multiple audio streams/channels, the audio stream/channel can be switched during playback. During playback, press AUDIO. The audio stream/channel switches each time the button is pressed. The types of audio streams/channels depend on the disc or file. For some DVD-Videos, the audio stream/channel is switched using a menu screen. The picture may stop momentarily when the audio stream/channel is switched. If the Resume Play or Last Memory setting has been canceled, the Audio Language setting is restored (page 32). |
| Switching the subtitle | DVD-Video DivX® | ·On DVD-Video or DivX discs containing subtitles in multiple languages, the subtitle can be switched during playback. ·During playback, press SUBTITLE. ·The subtitle switches each time the button is pressed. ·The recorded subtitles depend on the disc or file. ·-/- is displayed if the disc or file does not contain any subtitles. ·For some DVD-Videos, the subtitle is switched using a menu screen. ·If the Resume Play or Last Memory setting has been canceled, the Subtitle Language setting is restored (page 32). |
| Changing the angle (Multi-Angle) | DVD-Video | ·On DVD-Video discs containing multiple angles, the angle can be switched during playback. ·During playback, press ANGLE. ·For some DVD-Videos, the angle is switched using a menu screen. ·The mark appears on the TV screen at scenes for which there are multiple angles. If you do not want the mark to be displayed, set Angle Indicator to Off (page 32). |
| Zooming on the image | DVD-Video DVD VR Video CD DivX® WMV JPEG | ·Press ZOOM. ·The zoomed area is displayed. ·Use ↑/↓/←/→ to move the zoom area. ·The magnification (2x → 4x → normal) changes each time the button is pressed. ·When playing slideshows of JPEG files, the zoomed area is not displayed. ·When a JPEG file is zoomed, normal slideshow play-back can be resumed by pressing▶PLAY. |
| Rotating (inverting) the image | JPEG | ·When playing a slideshow, press one of ↑/↓/←/→. ·When ↑ is pressed, the image is inverted vertically. ·When ↓ is pressed, the image is inverted horizontally. ·When ← is pressed, the image is rotated 90° count-clockwise. ·When ⇒ is pressed, the image is rotated 90° clockwise. ·To return to the normal slideshow, press▶PLAY. |
| Viewing the disc's or file's information | DVD-Video DVD VR Video CD CD(R/RW) DivX° WMV WMA MP3 MPEG-4 AAC | During playback, press DISPLAY. The elapsed time, amount remaining, etc., is dis-played. For some discs and files, the contents displayed switch each time the button is pressed. To turn the information off, press DISPLAY again until it turns off. Some information is not displayed during PBC play-back of Video CDs. To display such information, cancel PBC playback (see below). If On Screen Display is set to Off, no information is displayed when DISPLAY is pressed (page 32). |
| Playing Video CDs from their menu screen (PBC playback) | Video CD | Playing Video CDs using their menu screens is called PBC (playback control) playback. The contents displayed and operations differ from disc to disc. Also refer to the operating guide included with the disc. To display the menu screen, load a PBC playback-compatible disc then press PLAY. To start PBC playback, use the number buttons (0 to 9) while the menu screen is displayed to select the track, then press ENTER. To return to the menu screen, press RETURN during playback. To switch pages, press PREV or NEXT. To play the disc without displaying the menu screen (with PBC off), use the number buttons (0 to 9) while playback is stopped to select the track, then press ENTER (or select the track using PREV and NEXT while playback is stopped). |

Playing files stored on USB devices
- The player may not recognize the USB device, may not play files or may not supply power to the USB device. For details, see When a USB device is connected on page 40.
- Pioneer does not support that all files recorded on all USB devices will play or that power will be supplied to the USB device. Also note that Pioneer will accept no responsibility whatsoever for loss of files on USB devices caused by connection to this player.
1 Turn the power on.
Press STANDBY/ON.
2 Switching the input to the USB mode.
Press DVD/USB.
USB MODE is displayed on the front panel display.
3 Connecting USB devices.
The Disc Navigator appears automatically.
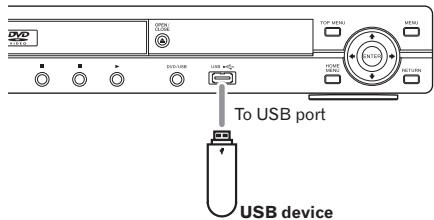
Player's front panel
4 Starts playback.
Use / / / to select the file, then press ENTER.
- Turn the power off before removing the USB device.
- The input will remain in the USB mode the next time the power is turned on. To return to the DVD mode, press DVD/USB (or press OPEN/CLOSE to open the disc tray).
Recording audio CD tracks on USB devices
- The tracks of audio CDs loaded in the player can be recorded on a USB device connected to the USB port.
- It may not be possible to record tracks of audio CDs on a USB device. For details, see When a USB device is connected on page 40.
Recording all the tracks
1 Load the audio CD.
If playback starts automatically, press STOP to stop playback.
2 Display the CD -> USB Rec screen.
Press USB REC.

3 Start recording.
Use / / / to select Start, then press ENTER.
Selecting the track(s) to be recorded
1 Load the audio CD.
If playback starts automatically, press STOP to stop playback.
2 Display the Home Menu.
Press HOME MENU.
3 Select CD->USB Rec.
Use / / / to select, then press ENTER.
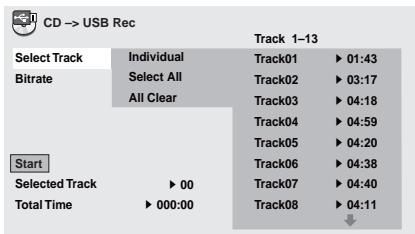
4 Select Select Track Individual the track(s) you want to record.
Use / / / to select.
- Individual: Select 1 track at a time.
- Select All: Select all the tracks.
- All Clear: Deselect all the tracks.
5 Select Bitrate (transfer rate).
Use / / / to select, then press ENTER.
- Select 128kbps, 192kbps or 320kbps.
6 Start recording.
Use / / / to select Start, then press ENTER.

Notes
- CD -> USB Rec can only be selected when the audio CD is stopped.
- When recording is completed, a folder named "PIONEER" is automatically created on the USB device. The recorded tracks are stored in this folder.
Playing using the Disc Navigator
Playing discs
DVD-Video DVD VR Video CD
1 Display the Home Menu.
Press HOME MENU.
2 Select Disc Navigator.
Use / / / to select, then press ENTER.
3 Select the type of Disc Navigator.
Use / to select, then press ENTER.
The Disc Navigator is displayed.
- The contents displayed on the Disc Navigator differ from disc to disc.
4 Playing specific titles, chapters or tracks.
Use / / / to select, then press ENTER.
To switch pages, press PREV or NEXT.
- Press RETURN to return to the previous screen.
Press HOME MENU to exit the Disc Navigator.

Notes
The Disc Navigator cannot be displayed for some DVD-Video discs.
- The Disc Navigator cannot be displayed during PBC playback of Video CDs. To display such information, cancel PBC playback (page 21).
Playing files
DivX WMV WMA MP3 MPEG-4 AAC JPEG
1 Display the Home Menu.
Press HOME MENU.
2 Select Disc Navigator.
Use / / / to select, then press ENTER.
3 Select the folder.
Use / to select, then press ENTER.
4 Select and play the file.
Use / to select, then press ENTER.
-
When JPEG files are played, the files switch automatically (slideshow playback).
-
Press to return to the previous screen. (It is also possible to return to the previous screen by selecting then pressing ENTER.)
Press HOME MENU to exit the Disc Navigator.

Note
When a disc contains both audio files and JPEG files, they can be played simultaneously. To do so, first select the audio file, then select the JPEG file.
Playing using the Play Mode function
The Play Mode function may not work for some discs or files.
- Display the Play Mode screen.
During playback, press PLAY MODE.
It is also possible to display the Home Menu by selecting Play Mode from the home menu then pressing ENTER.
- The Play Mode screen cannot be displayed during PBC playback of Video CDs. In this case, cancel PBC playback (page 21).
Playing a specific section repeatedly (A-B Repeat Play)
DVD-Video DVD VR Video CD CD(R/RW)
The specified section within a single title or track is played repeatedly.
1 Display the Play Mode screen.
During playback, press PLAY MODE.
2 Select A-B Repeat.
Use / to select, then press ENTER or .
3 Select the point at which you want to start A-B play.
Use / to select A (Start Point), then press ENTER.
4 Select the point at which you want to stop A-B Repeat play.
Use / to select B (End Point), then press ENTER.
A-B repeat play starts.
- To cancel A-B repeat play, select Off, then press ENTER.
Playing repeatedly (Repeat Play)
DVD-Video DVD VR Video CD CD(R/RW)
DivX WMM
1 Display the Play Mode screen.
During playback, press PLAY MODE.
2 Select Repeat.
Use / to select, then press ENTER or .
3 Select the type of Repeat play.
Use / to select, then press ENTER or . Repeat play starts.
- To cancel repeat play, select Repeat Off, then press ENTER. (Repeat play is canceled automatically when playback is stopped.)
- The types of repeat play available depend on the disc and file.
Playing in random order (Random Play)
DVD-Video Video CD CD(R/RW)
1 Display the Play Mode screen.
Press PLAY MODE.
2 Select Random.
Use / to select, then press ENTER or .
3 Select the type of Random play.
Use / to select, then press ENTER or .
Random play starts.
To cancel random play, select Random Off, then press ENTER. (Random play is canceled automatically when playback is stopped.)
- The types of random play available depend on the disc and file.

Note
The same title, chapter or track may be played twice during random play.
Playing in the desired order (Programmed Play)
DVD-Video
Video CD
CD(R/RW)
DivX
WMV
WMA
MP3
MPEG-4 AAC
1 Display the Play Mode screen.
Press PLAY MODE.
2 Select Program.
Use / to select, then press ENTER or .
3 Select Create/Edit.
Use / to select, then press ENTER.
- The Create/Edit screen differs according to the disc or file.
4 Select the title, chapter, track or file to be played.
Use / / / to select, then press ENTER.
- To add to a program, first select the place in the program (the program step), next select the title, chapter or track, then press ENTER (files are added at the end of program).
- Press RETURN to return to the previous screen. If you return to the previous screen when inputting it, the settings you have programmed are cleared.
To delete a step, highlight it and press CLEAR.
5 Starts playback.
Press PLAY.
To play a program that has already been set, select Playback Start from the program screen, then press ENTER.
To resume normal playback, select Playback Stop from the program screen, then press ENTER. The program remains in the memory.
- To cancel the entire program, select Program Delete from the program screen, then press ENTER.

Notes
- Programs can be played repeatedly. During programmed play, select Program Repeat from Repeat on the Play Mode screen (page 24).
- Programs cannot be played in random order (random play is not possible during programmed play).
Playing by specifying a number or time (Search Mode)
DVD-Video
DVD VR
Video CD
CD(R/RW)
DivX
WMV
This function allows you to specify the title, chapter or track number or time to be played.
1 Display the Play Mode screen.
Press PLAY MODE.
2 Select Search Mode.
Use / to select, then press ENTER or .
3 Select the type of Search Mode.
Use / to select, then press ENTER.
- The types of search mode available depend on the disc and file.
4 Input the number of the title, chapter or track or the time you want to play.
Use the number buttons (0 to 9) to input, then press ENTER. (For example, to specify 1 hour and 4 minutes (64 minutes), input 6, 4, 0 and 0.)
Playback starts.

Notes
- For some DVD-Videoos, the number or time can be specified using a menu screen.
- For video files, only the time can be specified (only Time Search (time searching) is possible).
Time searching (Time Search) is not possible on DVD+R/+RW discs.
Adjusting the audio
1 Display the Home Menu.
Press HOME MENU.
2 Select Audio Settings.
Use / / / to select, then press ENTER.
3 Change the settings.
Use / / / to select, then press ENTER.
- Press RETURN to return to the previous screen.
4 Enter the changes.
Press HOME MENU.
The changed settings are stored in the memory.

Notes
The effect may be weak for some discs or files.
These settings also affect the sound output from the DIGITAL AUDIO OUT COAXIAL terminals and the HDMI OUT terminal (DV-420V only).
Note that there is no effect when Dolby Digital, DTS or MPEG audio signals are being output.
Audio Settings parameters
| Parameters (settings) | |
| Sound Retriever (High/Low/Off) | WMA, MP3 and MPEG-4 AAC audio is played with high sound quality. This is only valid for files with the extension '.wma', '.mp3' or '.m4a'. The effect depends on the file. Try different settings, and choose the one providing the good effect. |
| Equalizer (Off/ Rock/Pop/Live/ Dance/Techno/ Classic/Soft) | Select according to the genre of music to be listened to. |
| Virtual Surround (On/Off) | A surround sound field with a sense of presence can be created with two speakers. When set to On, linear PCM audio signals of 96 kHz or greater are converted to 48 kHz. |
| Audio DRC (High/Medium/ Low/Off) | This makes loud sounds weaker and weak sounds louder. Change the setting for example when watching movies late at night. This setting only affects Dolby Digital sound. The effect depends on the volume of the connected TV, AV receiver or amplifier, speakers, etc. Try different settings, and choose the one providing the strongest effect. |
| Dialog (High/ Medium/Low/ Off) | Change this setting if the sound of dialogs is low and the dialogs are hard to hear. |
The factory default settings are indicated in italic.
About Sound Retriever function
- When audio data is removed during the compression process, sound quality often degrades. The Sound Retriever function automatically enhances compressed audio and restores CD quality sound.
Adjusting the picture quality
1 Display the Home Menu.
Press HOME MENU.
2 Select Video Adjust.
Use / / / to select, then press ENTER.
3 Change the settings.
Use / / / to select, then press ENTER.
- Press RETURN to return to the previous screen.
4 Enter the changes.
Press HOME MENU.
The changed settings are stored in the memory.

Notes
The effect depends on the connected TV, the disc or the file.
- The settings affect the video signals output from the HDMI OUT terminal (DV-420V only).
Video Adjust parameters
| Parameters (settings) | |
| Sharpness (Fine/Standard/ Soft) | Adjusts the picture's sharpness. |
| Brightness (-20 to 20) | Adjusts the picture's brightness. |
| Contrast (-16 to 16) | Adjusts the ratio of the brightness of the brightest and darkest portions of the picture. |
| Gamma (-3 to 3) | Adjusts the look of the dark portions of the picture. |
| Hue (green 9 to red 9) | Adjusts the balance between green and red. |
| Chroma Level (-9 to 9) | Adjusts the density of the colors. This setting is effective for sources with many colors, such as cartoons. |
The factory default settings are indicated in italic.
- Brightness, Contrast, Gamma, Hue and Chroma Level are set to 0 upon purchase.

Changing the Settings (Initial Settings)
Operating the Initial Settings menu
Initial Settings cannot be selected during playback. Stop the disc first.
1 Display the Home Menu.
Press HOME MENU.
2 Select Initial Settings.
Use / / / to select, then press ENTER.
3 Select the item and change the setting.
Use / / / to select, then press ENTER.

Notes
- HDMI Out, HDMI Resolution and HDMI Color can only be set when the player is connected to an HDMI-compatible device using an HDMI cable (DV-420V only).
- Digital Audio Out, AV Connector Out and Component Out cannot be set when the player is connected to an HDMI-compatible device using an HDMI cable (DV-420V only).
Setting the Component Out and HDMI Resolution settings back to their defaults
1 Turn the player's power off.
Press 品 STANDBY/ON
2 Press STANDBY/ON while pressing
Use the buttons on the player's front panel. The power turns on.
Restoring all the settings to the defaults
1 Turn the player's power off.
Press 品 STANDBY/ON.
2 Press STANDBY/ON while pressing.
Use the buttons on the player's front panel.
Changing the Settings (Initial Settings)
Digital Audio Out settings
| Options settings | Settings | |
| HDMI Out(DV-420V only) | LPCM (2CH) | Multichannel audio signals are converted to 2-channel linear PCM audio signals for output. This can be selected when the connected HDMI-compatible device does not support multichannel audio. |
| Auto | Audio signals supported by the connected HDMI-compatible device (Dolby Digital, DTS, MPEG and linear PCM) are output. Audio signals not supported by the connected HDMI-compatible device are converted to linear PCM for output. | |
| Off | No audio signals are output from the HDMI OUT terminal. | |
| The settings can only be changed when the player and HDMI-compatible device are connected using an HDMI cable.If the connected HDMI-compatible device is not compatible with DTS audio, the DTS audio signals are not output (the DTS audio signals are not converted to linear PCM signals for output). | ||
| Digital Out | On | Audio signals are output from the DIGITAL AUDIO OUT termi-nals. |
| Off | No audio signals are output from the DIGITAL AUDIO OUT ter-minal. | |
| When Digital Out is set to Off, the audio signals output from the HDMI OUT terminal are converted to linear PCM(DV-420V only). | ||
| Dolby Digital Out | Dolby Digital | Dolby Digital audio signals are output. Select this when the con- nected AV receiver or amplifier supports Dolby Digital audio. |
| Dolby Digital > PCM | Dolby Digital audio signals are converted to linear PCM audio signals for output. Select this when the connected AV receiver or amplifier does not support Dolby Digital audio. | |
| DTS Out | DTS | DTS audio signals are output. Select this when the connected AV receiver or amplifier supports DTS audio. |
| Off | DTS audio signals are not output. Select this when the connected AV receiver or amplifier does not support DTS audio. | |
| When the connected AV receiver or amplifier does not support DTS audio, set Off. Noise may be generated if DTS is set. | ||
| 96 kHz PCM Out | 96kHz > 48kHz | 96 kHz audio signals are converted to 48 kHz/44.1 kHz audio signals for output. Select this when the connected AV receiver or amplifier does not support 96 kHz audio. |
| 96kHz | 96 kHz audio signals are output. Select this when the connected AV receiver or amplifier supports 96 kHz audio. | |
| MPEG Out | MPEG | MPEG audio signals are output. Select this when the connected AV receiver or amplifier supports MPEG audio. |
| MPEG > PCM | MPEG audio signals are converted to linear PCM audio signals for output. Select this when the connected AV receiver or amplifier does not support MPEG audio. | |
The factory default settings are indicated in italic.
Changing the Settings (Initial Settings)
About the HDMI Out setting and the type of audio signal that is output (DV-420V only)
| Audio format | HDMI Out settings | ||||
| LPCM (2CH) | Auto | ||||
| DVD-Video | DVD VR | Dolby Digital | 2ch downmix | Dolby Digital1 | |
| Dolby Digital Karaoke | Left/right | Dolby Digital1 | |||
| Linear PCM | Left/right | Left/right | |||
| DTS | Not output | DTS2 | |||
| MPEG | Left/right | MPEG1 | |||
| CD(R/RW) | WMA | MP3 | MPEG-4AAC | Left/right | Left/right |
| DTS-CD | Not output | DTS2 | |||
| Video CD | Left/right | Left/right | |||
1 When the connected HDMI-compatible device is not compatible with Dolby Digital or MPEG audio, the signals are automatically converted to linear PCM audio signals for output.
2 If the connected HDMI-compatible device is not compatible with DTS audio, the DTS audio signals are not output (the DTS audio signals are not converted to linear PCM signals for output).
Video Output settings
| Options settings | Settings | |
| TV Screen | 4:3 (Letter Box) | Select this to view 16:9 images on a 4:3 TV screen, with black bars at the top and bottom of the screen. |
| 4:3 (Pan & Scan) | Select this to view 16:9 images over the entire 4:3 TV screen, with the left and right sides of the 16:9 images cut off. | |
| 16:9 (Wide) | Select this when connected to a widescreen (16:9) TV. | |
| 16:9 (Compressed) (DV-420V only) | Select this to view 4:3 images on a high definition TV (16:9). The image will be displayed on the TV screen properly, with black bars along the sides. This can only be selected when the player and TV are connected using an HDMI cable and HDMI Resolution is set to 1920x1080p, 1920x1080i or 1280x720p. | |
| When you have a conventional size TV (4:3) | When you have a widescreen TV (16:9) | ||
| Player setting | Picture on screen | Player setting | Picture on screen |
| 4:3 (Letter Box) | 16:9 picture 4:3 picture | 16:9 (Wide) | 16:9 picture 4:3 picture |
| 4:3 (Pan & Scan) | 16:9 picture 4:3 picture | 16:9 (Compressed) | 16:9 picture 4:3 picture |
The setting is only reflected if the disc allows the screen's aspect ratio to be switched. Check the disc's jacket, etc.
Changing the Settings (Initial Settings)
| Options settings | Settings | |
| Component Out | Progressive | Select this when a TV or projector supporting progressive video signals is connected to the COMPONENTVIDEO OUT terminals. PRGSVE appears on the front panel display. |
| Interlace | Select this when a TV or projector that does not support progressive video signals is connected to the COMPONENTVIDEO OUT terminals. | |
| · When Progressive is selected and ENTER is pressed, a confirmation message appears. To change the setting, select Yes then press ENTER. If you do not want to change the setting, select No then press ENTER. · The picture may be disturbed when switching between Progressive and Interlace. · When HDMI Resolution is set to 720x480i/720x576i, Interlace is set (DV-420V only). · If the picture no longer appears after changing the setting to Progressive, set it back to Interlace. For instructions on how to do so, see Setting the Component Out and HDMI Resolution settings back to their defaults on page 28. | ||
| AV Connector Out | Video | Regular video signals (composite) are output. |
| RGB | Select this when connected to a TV compatible with RGB video signals. Note, however, that no video signals are output from the composite video output terminals when set to RGB. | |
| HDMI Resolution (DV-420V only) | 720x480i/720x576i | 720 x 480 pixel (NTSC)/720 x 576 pixel (PAL) interlaced images are output. |
| 720x480p/720x576p | 720 x 480 pixel (NTSC)/720 x 576 pixel (PAL) progressive images are output. | |
| 1280x720p | 1 280 x 720 pixel progressive images are output. | |
| 1920x1080i | 1 920 x 1 080 pixel interlaced images are output. | |
| 1920x1080p | 1 920 x 1 080 pixel progressive images are output. | |
| · When the setting is changed, the picture may be disturbed or some time may be required for it to appear. · When the setting is changed, a confirmation message appears. If the picture is properly displayed, select Yes then press ENTER. If it is not properly displayed, select No then press ENTER. · If the picture no longer appears after changing the setting, set it back to 720x480p/720x576p. See Setting the Component Out and HDMI Resolution settings back to their defaults on page 28. | ||
| HDMI Color (DV-420V only) | Full range RGB | The colors become denser. Select this if dark colors seem displayed in a uniform black. |
| RGB | The colors become lighter. Select this if the dark colors seem too light. | |
| Component | Select this when connected to an HDMI-compatible TV. The signals are sent in color difference (8-bit) format. | |
| The settings can only be changed when the player and HDMI-compatible device are connected using an HDMI cable. | ||
The factory default settings are indicated in italic.
Language settings
Some discs will not change to the selected language.
- On some discs, the language is changed on a menu screen. For such discs, change the language on the menu screen.
Changing the Settings (Initial Settings)
| Options settings | Settings | |
| Audio Language | English | Select this to listen to the sound of a DVD-Video disc in English. |
| available languages | Choose a language from the listed languages to set the default audio language for DVD-Video playback. | |
| Other Language | Select one of 136 languages. See Language Code Table on page 42 when performing this operation. If a language not included on the DVD-Video disc is selected, the language is set to one of the languages on the disc. | |
| Subtitle Language | English | Select this to display the subtitles of a DVD-Video disc in English. |
| available languages | Choose a language from the listed languages to set the default subtitle language for DVD-Video playback. | |
| Other Language | Select one of 136 languages. See Language Code Table on page 42 when performing this operation. If a language not included on the DVD-Video disc is selected, the language is set to one of the languages on the disc. | |
| DVD Menu Lang. | w/Subtitle Lang. | Select this to display the DVD-Video disc's menu screens in the same language as selected for Subtitle Language. |
| available languages | Choose a language from the listed languages to set the default language for DVD-Video menus. | |
| Other Language | Select one of 136 languages. See Language Code Table on page 42 when performing this operation. If a language not included on the DVD-Video disc is selected, the language is set to one of the languages on the disc. | |
| Subtitle Display | On | Select this to display the subtitles. |
| Off | Subtitles are always off by default when you play a DVD disc. Note that some discs override this setting. | |
The factory default settings are indicated in italic.
Display settings
| Options settings | Settings | |
| OSD Language | English | Select this to display the operation indicators (Play, Stop, etc.) in English. |
| available languages | Choose a language for the on-screen displays from the listed languages. | |
| Angle Indicator | On | Select this to display the mark on the TV screen. |
| Off | Select this if you do not want to display the mark on the TV screen. | |
| On Screen Display | On | Select this to display operation indications (Play, Stop, etc.) on the TV screen. |
| Off | Select this if you do not want to display operation indications (Play, Stop, etc.) on the TV screen. | |
The factory default settings are indicated in italic.
Changing the Settings (Initial Settings)
Options settings
| Options settings | Settings | |
| KURO LINK(DV-420V only) | On | Select this to operate the player using the remote control of the AV device connected using an HDMI cable. For details, see About KURO LINK function on page 14. |
| Off | Select this when you do not want to control the player with the remote control of the AV device connected using an HDMI cable. | |
| Parental Lock | Password | Register (change) the password required for playing discs for which the Parental Lock function is set. For details, see Register (changing) the password on page 34. |
| Level Change | Change the player's Parental Lock level. For details, see Changing the Parental Lock level on page 34. | |
| Country Code | Change the country/area. Refer to Country/Area Code Table on page 42 when performing this operation. | |
| DivX VOD | Activate | Display the player's registration code required to play DivX VOD files. |
| Deactivate | Display the VOD deactivation code. | |
| • DivX VOD files are protected by DRM. They can only be played on registered devices. • If the registration code has not been authorized, DivX VOD files cannot be played. Authorization Error appears on the TV screen if you attempt to play such files. • For some DivX VOD files, the number of viewings is restricted. The remaining number of authorized views is displayed on the TV screen when such files are played. Rental Expired is displayed when the remaining number of viewings reaches 0. | ||
| Auto Power Off | On | Select this to turn the power off automatically (the power turns off automatically if no operation is performed for over 30 minutes). |
| Off | Select this if you do not want the power to turn off automatically. | |
The factory default settings are indicated in italic.
When Other Language is selected
Select one of 136 languages. See Language Code Table on page 42 when performing this operation. If a language not included on the DVD-Video disc is selected, the language is set to one of the languages on the disc.
1 Select Other Language.
Use / to select, then press ENTER.
2 Select List of Languages or Code.
Use / to select, then press ENTER.
There are some languages for which only the code number is displayed. For details, see Language Code Table on page 42.
3 Select the language code.
Use / or number buttons (0 to 9) to select, then press ENTER.
Changing the Settings (Initial Settings)
Registering (changing) the password
Some DVD-Video discs have Parental Lock levels (check the disc's jacket, etc.). Viewing of such discs can be restricted by setting the player's level to a level lower than the disc.
1 Select Password.
Use / to select, then press ENTER.
2 Input the password.
Use the number buttons (0 to 9) to input the password, then press ENTER.
- To change the password, first input the registered password, then input the new password.

Notes
We recommend making a written note of the password.
- If you forget the password, restore the player's settings to the defaults, then register a new password.
- On some DVD-Video discs, a screen for inputting the password appears during playback. Input the password to continue playing the disc.
Changing the Parental Lock level
1 Select Level Change.
Use / to select, then press ENTER.
2 Input the password.
Use the number buttons (0 to 9) to input the password, then press ENTER.
3 Change the level.
Use / to select, then press ENTER.
Changing the country/area code for the Parental Lock function
Refer to Country/Area Code Table on page 42 when performing this operation.
1 Select Country Code.
Use / to select, then press ENTER.
2 Input the password.
Use the number buttons (0 to 9) to input the password, then press ENTER.
3 Select the country code.
Use / to select, then press ENTER.
Troubleshooting
- Incorrect operation is often mistaken for trouble or malfunction. If you think that there is something wrong with this component, check the points below. Sometimes the trouble may lie in another component. Inspect the other components and electrical appliances being used. If the trouble cannot be rectified after checking the items below, ask your nearest Pioneer authorized service center or your dealer to carry out repair work.
- The player may not operate properly due to static electricity or other external influences. In such cases, normal operation may be restored by unplugging the power cord then plugging it back in.
General problems
| Problem | Check | Remedy |
| Settings you have made have been cleared. | Was the power cord unplugged forcibly while the player's power was on? | The settings may be cleared if the power cord is unplugged or if there is a power failure while the player's power is on. Be sure to press STANDBY/ON on the player's front panel or press STANDBY/ON on the remote control and wait for the - OFF - indicator on the front panel display to turn off before unplugging the power cord. Be particularly careful when the player's power cord is plugged into the AC outlet of another component, since the supply of power to the player turns off together with the power supply of the other component. We recommend plugging the power cord directly into a wall outlet, etc., whenever possible. |
| Difference in volume between DVDs and CDs. | This is not a problem with the player. | The volume may sound different due to differences in how the signals are recorded on the disc. |
| Player cannot be operated with the remote control. | Are you operating from far away? | Operate from within a distance of 7 meters from the remote control sensor. |
| Is the remote control sensor exposed to direct sunlight or strong artificial light from a fluorescent bulb, etc.? | The remote control signals may not be received properly if the remote control sensor is exposed to direct sunlight or strong artificial light from a fluorescent bulb, etc. | |
| Are the batteries dead? | Replace the batteries (page 5). | |
| Disc cannot be played or disc tray opens automatically. | Is the disc scratched? | Scratched discs may not play. |
| Is the disc dirty? | Wipe the dirt off the disc (page 44). | |
| Is the disc properly set in the disc tray? | Set the disc with the printed side facing up. | |
| Set the disc within the groove in the disc tray. | ||
| Does the disc have the right region number? | Discs with the region number "2 (including 2)" and "ALL" can be played on this player. | |
| Is the player placed in a humid location? | There could be condensation inside. Wait a while for the condensation to evaporate. Do not place the player near an air-conditioner, etc. (page 44). | |
| The player's power turns off automatically. | Is Auto Power Off set to On? | If Auto Power Off is set to On, the player's power turns off automatically if no operation is performed for over 30 minutes (page 33). |
| Power turns on or off automat- cally. | Is KURO LINK set to On? (DV-420V only) | The player's power may turn on together with the power of the TV connected to the HDMI OUT terminal. If you do not want the player's power to turn on when the TV's power is turned on, set KURO LINK to Off (page 33). |
| Input of connected TV and AV system switches automatically. | Is KURO LINK set to On? (DV-420V only) | The input of the TV, AV system (AV receiver or amplifier, etc.) and HD AV Converter connected to the HDMI OUT terminal may automatically switch to the player when playback starts on the player or the menu screen (Home Menu, etc.) is displayed. If you do not want the inputs of the connected TV, AV system (AV receiver or amplifier, etc.) and HD AV Converter to switch automat- cally, set KURO LINK to Off (page 33). |
| Picture is not displayed. | Is the video cord properly con- nected? | Connect the cord properly, inserting the plug all the way in. |
| Is the video cord damaged? | If the video cord is damaged, replace it with a new cord. | |
| Is the input on the connected TV or AV receiver or amplifier properly set? | Switch to the proper input, referring to the connected device's operating instructions. | |
| Picture is stretched, or aspect ratio cannot be switched. | Is the aspect ratio properly set on the connected TV? | Refer to the TV's operating instructions and set the TV's aspect ratio properly. |
| Is TV Screen properly set? | Set TV Screen properly (page 30). | |
| During playback, picture is disturbed or dark. | This is not a problem with the player. | This player supports Macrovision copy protection. With some TVs, the picture may not display properly when playing discs including copy prevention signals. This is not a malfunction. |
| Are the player and TV connected via a video deck? | When the player and TV are connected via a video deck, the player's analog copy protect function may cause the picture being played on the video deck not to display properly. Connect the player and TV directly. | |
| Is the TV system properly set? | The factory default setting is AUTO. If the picture is distorted, switch the TV system to the one used in your country or region (NTSC or PAL) (page 43). | |
| Playback stops momentarily or the disc is not properly played. | Are you playing a disc that was edited on a DVD recorder, etc.? | When edited images are played, the picture may stop momentarily at points where images were combined, and the disc may not play as edited. |
Additional information
| Problem | Check | Remedy |
| Sound is not produced or is distorted. | Is the pause, frame-by-frame forward or reverse, or slow play mode set? | No sound is output during pause, frame-by-frame forward/reverse or slow motion playback. |
| Are the connected devices (AV receiver or amplifier, etc.) properly set? | Refer to the TV's operating instructions and check the settings (volume, input, speaker settings, etc.). | |
| Is the disc scratched? | Scratched discs may not play. | |
| Is the disc dirty? | Wipe the dirt off the disc (page 44). | |
| Are the audio cords properly connected? | Connect the cord properly, inserting the plug all the way in. | |
| Are the audio cords damaged? | If the audio cord is damaged, replace it with a new cord. | |
| Is the player properly connected to the other devices (AV receiver or amplifier, etc.)? | Check whether you are mistakenly connected to the other device's audio output terminals, etc. | |
| Check whether you are mistakenly connected to the AV receiver or amplifier's PHONO input terminals, etc. | ||
| Is the other device (AV receiver or amplifier, etc.) connected to the DIGITAL AUDIO OUT COAXIAL terminals? | When connected to the DIGITAL AUDIO OUT COAXIAL terminals, set Digital Out to On (page 29). | |
| Refer to the connected AV receiver or amplifier's operating instructions and check the audio signals it supports. | ||
| Set Digital Audio Out according to the audio signals supported by the AV receiver or amplifier, etc. (page 29). | ||
| Digital audio signals are not output from the DIGITAL AUDIO OUT COAXIAL terminals. | Is Digital Out set to On? | When connected to the DIGITAL AUDIO OUT COAXIAL terminals, set Digital Out to On (page 29). |
| Multichannel audio signals are not output. | Is the audio output properly set on the connected AV receiver or amplifier, etc.? | Refer to the connected AV receiver or amplifier's operating instructions and check the audio output settings. |
| Switch the disc's audio to multichannel audio using the menu screen or AUDIO. | ||
| Is Digital Audio Out set to audio signals the AV receiver or amplifier, etc., supports? | Refer to the connected AV receiver or amplifier's operating instructions and check the audio signals it supports. | |
| Set Digital Audio Out according to the audio signals supported by the AV receiver or amplifier, etc. (page 29). | ||
| DTS audio signals are not output. | Are connections proper? | Properly connect the AV receiver or amplifier, etc., to the DIGITAL AUDIO OUT COAXIAL terminals. |
| Does the connected AV receiver or amplifier, etc., support DTS audio signals? | If the connected AV receiver or amplifier, etc., does not support DTS audio signals, set DTS Out to Off (page 29). | |
| Is the audio output properly set on the connected AV receiver or amplifier, etc.? | If the connected AV receiver or amplifier, etc., supports DTS audio signals, change the audio output of the AV receiver or amplifier, etc., to a setting allowing output of DTS audio signals. | |
| 96 kHz/88.2 kHz digital audio signals are not output from the DIGITAL AUDIO OUT COAX-IAL terminals. | Is 96 kHz PCM Out set to 96kHz? | Set 96 kHz PCM Out to 96kHz > 48kHz. |
| Are you playing a copyright-pro-tectiond disc? | The 96 kHz/88.2 kHz digital audio signals of copyright-protected discs cannot be output. | |
| Folder or file names are not recognized. | Have you exceeded the maximum number of folder or file names the player can recognize? | Up to 299 folders can be recognized on one disc. Up to 648 files can be recognized within one folder. Depending on the folder structure, however, the player may not be able to recognized certain folders or files. |
| Time is required to play JPEG files. | Are you playing large files? | Some time may be required to display large files. |
| Black bars are displayed when playing JPEG files. | Are you playing files with different aspect ratios? | Black bars may be displayed along the top and bottom or sides when JPEG files with different aspect ratios are played. |
When connected to an HDMI-compatible device (DV-420V only)
| Problem | Check | Remedy |
| HDMI indicator does not light. | Is a DVI device connected? | The picture may not be output properly when a DVI device is connected. |
| Is the input properly set on the connected HDMI-compatible device? | Refer to the operating instructions of the connected HDMI-compatible device and switch to the proper input. | |
| Picture is not displayed. | Is the resolution properly set? | Set HDMI Resolution properly for the con- nected device (page 31). |
| Restore HDMI Resolution to the default setting (720x480p/720x576p) (page 31). | ||
| Is the HDMI cable properly con- nected? | Connect the cable securely (all the way in). | |
| With some cables, 1 080p video signals will not be output. | ||
| Is the HDMI cable damaged? | If the cable is damaged, replace it with a new cable. | |
| Is a DVI device connected? | The picture may not be output properly when a DVI device is connected. | |
| Sound is not produced or is distorted. | Is HDMI Out properly set? | Set HDMI Out to LPCM (2CH) or Auto (page 29). |
Additional information
| Problem | Check | Remedy |
| Multichannel audio signals are not output. | Is HDMI Out properly set? | Set HDMI Out to Auto (page 29). |
| Colors are not properly displayed on TV screen. | Is HDMI Color properly set? | Change the HDMI Color setting (page 31). |
| Is the input properly set on the connected TV? | Refer to the TV's operating instructions and switch to the proper input. | |
| KURO LINK function does not work. | Is the HDMI cable you are using a High Speed HDMI™ cable? | Use a High Speed HDMI™ cable. The KURO LINK function may not work properly if HDMI cable other than a High Speed HDMI™ cable is used. |
| Is KURO LINK set to On on the player? | Set KURO LINK to On on the player (page 33). | |
| Does the connected device support the KURO LINK function? | The KURO LINK function does not work with devices of other brands, even if connected using an HDMI cable. | |
| The KURO LINK function will not work if devices that do not support the KURO LINK function or devices of other brands are connected between the KURO LINK-compatible device and the player. | ||
| Even when connected to a Pioneer product compatible with the KURO LINK function, some of the functions may not work. | ||
| Also refer to the operating instructions of the connected device. | ||
| Is KURO LINK set to On on the connected device? | Set KURO LINK to On on the connected device. The KURO LINK function operates when KURO LINK is set to On for all devices connected to the HDMI OUT terminal. Once connections and settings of all the devices are finished, be sure to check that the player's picture is output to the Flat Screen TV. (Also check after changing the connected devices and connecting and/or disconnecting HDMI cables.) If the player's picture is not being output to the Flat Screen TV, the KURO LINK function may not work properly. For details, refer to the operating instructions of the connected device. | |
| Are multiple players connected? | The KURO LINK function may not work if three or more players, including this player, are connected by HDMI cable. | |
| The message CEC200 appears. | Is the player's power turned off? | When the Disc Navigator is selected using the Flat Screen TV's remote controller, the message CEC200 is displayed if the player's power is turned off. This is not a malfunction. You may continue using the player and Flat Screen TV as such. |
When a USB device is connected
| Problem | Check | Remedy |
| USB device is not recognized. | Is the USB device properly connected? | Connect the device securely (all the way in). |
| Is the USB device connected via a USB hub? | This player does not support USB hubs. Connect the USB device directly. | |
| This player only supports USB mass storage class devices. | ||
| This player supports portable flash memory and digital audio playback devices. | ||
| Only the FAT16 and FAT32 file systems are supported. Other file systems (exFAT, NTFS, etc.) are not supported. | ||
| This is not a problem with the player. | Turn the power off then back on. | |
| This is not a problem with the player. | Some USB devices may not be recognized properly. | |
| File cannot be played. | Is the file copyright-protected (by DRM)? | Copyright-protected files cannot be played. |
| This is not a problem with the player. | Files stored on a computer cannot be played. | |
| This is not a problem with the player. | It may not be possible to play some files. | |
| Folder or file names are not displayed or are not properly displayed. | Do the folder of file names contain more than 14 characters? | The maximum number of characters displayable for the folder and file names on the Disc Navigator is 14. |
| Folder or file names are not displayed in alphabetical order. | This is not a problem with the player. | The order of the folder and file names displayed on the Disc Navigator depends on the order in which the folders or files were recorded on the USB device. |
| Much time is required to recognized the USB device. | What is the USB device's capacity? | Some time may be required to load the data when large capacity USB devices are connected (this could take several minutes). |
| Power is not supplied to the USB device. | Is USB ERR displayed on the front panel display? No power is supplied if the power consumption is too high. | Turn the power off then back on. |
| Turn the power off, then disconnect and reconnect the USB device. | ||
| Press DVD/USB to switch back to the DVD mode, then switch again to the USB mode. (When the input is switched back to the DVD mode, LOADING is displayed on the front panel display and the disc is recog-nized. When the input is switched back to USB, USB MODE is displayed on the front panel display.) | ||
| If the USB device is equipped with an AC adapter, use the USB device with the AC adapter connected. |
Additional information
| Problem | Check | Remedy |
| Audio CD tracks cannot be recorded on a USB device. | Is there enough free space on the USB device? | Recording is not possible if there is not enough free space left on the USB device. In this case, Available USB space is low is displayed. |
| Are there 300 or more folders on the USB device? | Recording is not possible if the USB device contains 300 or more folders. | |
| Are there already 99 PIONEER folders on the USB device? | Recording is not possible if there are already 99 PIONEER folders on the USB device. |

Language Code Table and Country/Area Code Table Language Code Table
Language names (codes) and input codes
Japanese (ja), 1001
English (en), 0514
French (fr), 0618
German (de), 0405
Italian (it), 0920
Spanish (es), 0519
Chinese (zh), 2608
Dutch (nl), 1412
Portuguese (pt), 1620
Swedish (sv), 1922
Russian (ru), 1821
Korean (ko), 1115
Greek (el), 0512
Afar (aa), 0101
Abkhazian (ab), 0102
Afrikaans (af), 0106
Amharic (am), 0113
Arabic (ar), 0118
Assamese (as), 0119
Aymara (ay), 0125
Azerbaijani (az), 0126
Bashkir (ba), 0201
Byelorussian (be), 0205
Bulgarian (bg), 0207
Bihari (bh), 0208
Bislama (bi), 0209
Bengali (bn), 0214
Tibetan (bo), 0215
Breton (br), 0218
Catalan (ca), 0301
Corsican (co), 0315
Czech (cs), 0319
Welsh (cy), 0325
Danish (da), 0401
Bhutani (dz), 0426
Esperanto (eo), 0515
Estonian (et), 0520
Basque (eu), 0521
Persian (fa), 0601
Finnish (fi), 0609
Fiji (fj), 0610
Faroese (fo), 0615
Frisian (fy), 0625
Irish (ga), 0701
Scots-Gaelic (gd), 0704
Galician (gl), 0712
Guarani (gn), 0714
Gujarati (gu), 0721
Hausa (ha), 0801
Hindi (hi), 0809
Croatian (hr), 0818
Hungarian (hu), 0821
Armenian (hy), 0825
Interlingua (ia), 0901
Interlingue (ie), 0905
Inupiak (ik), 0911
Indonesian (in), 0914
Icelandic (is), 0919
Hebrew (iw), 0923
Yiddish (ji), 1009
Javanese (jw), 1023
Georgian (ka), 1101
Kazakh (kk), 1111
Greenlandic (kl), 1112
Cambodian (km), 1113
Kannada (kn), 1114
Kashmiri (ks), 1119
Kurdish (ku), 1121
Kirghiz (ky), 1125
Latin (la), 1201
Lingala (In), 1214
Laothian (Io), 1215
Lithuanian (lt), 1220
Latvian (lv), 1222
Malagasy (mg), 1307
Maori (mi), 1309
Macedonian (mk), 1311
Malayalam (ml), 1312
Mongolian (mn), 1314
Moldavian (mo), 1315
Marathi (mr), 1318
Malay (ms), 1319
Maltese (mt), 1320
Burmese (my), 1325
Nauru (na), 1401
Nepali (ne), 1405
Norwegian (no), 1415
Occitan (oc), 1503
Oromo (om), 1513
Oriya (or), 1518
Panjabi (pa), 1601
Polish (pl), 1612
Pashto,Pushto (ps),1619
Quechua (qu), 1721
Rhaeto-Romance (rm), 1813
Kirundi (rn), 1814
Romanian (ro), 1815
Kinyarwanda (rw), 1823
Sanskrit (sa), 1901
Sindhi (sd), 1904
Sangho (sg), 1907
Serbo-Croatian (sh), 1908
Sinhalese (si), 1909
Slovak (sk), 1911
Slovenian (sl), 1912
Samoan (sm), 1913
Shona (sn), 1914
Somali (so), 1915
Albanian (sq), 1917
Serbian (sr), 1918
Siswati (ss), 1919
Sesotho (st), 1920
Sundanese (su), 1921
Swahili (sw), 1923
Tamil (ta), 2001
Telugu (te), 2005
Tajik (tg), 2007
Thai (th), 2008
Tigrinya (ti), 2009
Turkmen (tk), 2011
Tagalog (tl), 2012
Setswana (tn), 2014
Tonga (to), 2015
Turkish (tr), 2018
Tsonga (ts), 2019
Tatar (tt), 2020
Twi (tw), 2023
Ukrainian (uk), 2111
Urdu (ur), 2118
Uzbek (uz), 2126
Vietnamese (vi), 2209
Volapuk (vo), 2215
Wolof (wo), 2315
Xhosa (xh), 2408
Yoruba (yo), 2515
Zulu (zu), 2621
Country/Area Code Table
Country/Area name, Input codes and Country/Area code
United States, 2119, us
Argentina, 0118, ar
United Kingdom, 0702, gb
Italy, 0920, it
India, 0914, in
Indonesia, 0904. id
Australia, 0121, au
Austria, 0120, at
Netherlands, 1412, nl
Canada, 0301, ca
Korea, Republic of, 1118, kr
Singapore, 1907, sg
Switzerland, 0308, ch
Sweden, 1905, se
Spain, 0519, es
Thailand, 2008, th
Taiwan, 2023, tw
China, 0314, cn
Chile, 0312, cl
Denmark, 0411, dk
Germany, 0405, de
Japan, 1016.jp
New Zealand, 1426, nz
Norway, 1415, no
Pakistan, 1611, pk
Philippines, 1608, ph
Finland, 0609, fi
Mexico, 1324, mx
Russian Federation, 1821, ru
Brazil, 0218, br
France, 0618, fr
Belgium, 0205, be
Portugal, 1620, pt
Hong Kong, 0811, hk
Malaysia, 1325, my

Setting the TV system
If the picture of the disc being played is distorted, switch the TV system to the one used in your country or region.
- When the TV system is switched, the types of discs that can be played are limited.
The factory default setting is AUTO.
1 Turn the player's power off.
Press 品 STANDBY/ON.
2 Press STANDBY/ON while pressing
▶▶.
Use the buttons on the player's front panel. The power turns on and the TV system switches as shown below.
AUTO NTSC
NTSC PAL
- PAL→AUTO
| Types of discs/files | Format | Player setting | ||
| NTSC | PAL | AUTO | ||
| DVD-Video | NTSC | NTSC | PAL | NTSC |
| DVD VR | PAL | NTSC | PAL | PAL |
| Video CD | ||||
| DivX® | ||||
| WMV | ||||
| CD(R/RW) | — | NTSC | PAL | NTSC or PAL |
| WMA | ||||
| MP3 | ||||
| MPEG-4 AAC | ||||
| JPEG no disc | ||||

Cautions on use
When moving the player
When moving the player, check first that there is no disc loaded and that the disc tray is closed. Then press STANDBY/ON on the player (or STANDBY/ON on the remote control), wait for the - OFF - indicator on the front panel display to turn off, then unplug the power cord. Moving the player with a disc inside it could result in damage.
Place of installation
- Choose a stable place near the TV or stereo system being used with the player.
- Do not place the player on top of a TV or color monitor. Also install it away from cassette decks and other devices easily affected by magnetic forces.
Avoid the following types of places:
Places exposed to direct sunlight
- Humid or poorly ventilated places
- Extremely hot places
Places exposed to vibrations
Dusty places
- Places exposed to soot, steam or heat (kitchen, etc.)
Do not place objects on the player.
Do not place any objects on top of the player.
Do not obstruct the ventilation holes.
Do not use the player on shaggy rugs, beds, sofas, etc., or wrapped in cloth, etc. Doing so will prevent the heat from dispersing, leading to damage.
Do not expose to heat.
Do not place the player on top of an amplifier or other component that generates heat. When placing it in a rack, to avoid the heat given off by the amplifier or other audio component, place it on a shelf below the amplifier.
Turn off the player's power when not using it.
Depending on signal conditions, striped patterns may appear on a TV screen and noise may enter the sound of radio broadcasts when the player's power is on. If this happens, turn the player's power off.
About condensation
If the player is moved suddenly from a cold place into a warm room (in winter, for example) or if the temperature in the room in which the player is installed rises suddenly due to a heater, etc., water droplets (condensation) may form inside (on operating parts and the lens). When condensation is present, the player will not operate properly and playback is not possible. Let the player stand at room temperature for 1 or 2 hours with the power turned on (the time depends on the extent of condensation). The water droplets will dissipate and playback will become possible. Condensation can also occur in the summer if the player is exposed to the direct wind from an air-conditioner. If this happens, move the player to a different place.
Cleaning the product
- Unplug the power cord from the power outlet when cleaning the player.
- Clean the player using a soft cloth. For tough dirt, apply some neutral detergent diluted in 5 to 6 parts water to a soft cloth, wring out thoroughly, wipe off the dirt, then wipe again with a soft, dry cloth.
- Alcohol, thinner, benzene, insecticides, etc., could cause the print or paint to peel off. Also, leaving rubber or vinyl products in contact with the player for long periods of time could mar the cabinet.
- When using chemical-impregnated wipes, etc., read the cautions included with the wipes carefully.
Caution for when the unit is installed in a rack with a glass door
Do not press OPEN/CLOSE on the remote control to open the disc tray while the glass door is closed. The door will hamper the movement of the disc tray, and the unit could be damaged.
Cleaning the lens
The player's lens should not become dirty in normal use, but if for some reason it should malfunction due to dust or dirt, consult your nearest Pioneer authorized service center. Although lens cleaners for players are commercially available, we advise against using them since some may damage the lens.
About copyrights
This product incorporates copyright protection technology that is protected by method claims of certain U.S. patents and other intellectual property rights owned by Macrovision Corporation and other rights owners. Use of this copyright protection technology must be authorized by Macrovision Corporation, and is intended for home and other limited viewing uses only unless otherwise authorized by Macrovision Corporation. Reverse engineering or disassembly is prohibited.
Handling discs
Storing
Always place discs in their cases and store them vertically, avoiding hot, humid places, places exposed to direct sunlight and extremely cold places.
- Be sure to read the cautions included with the disc.
Cleaning discs
- Discs may not play if there are fingerprints or dust on them. In this case, use a cleaning cloth, etc., to gently wipe the disc from the inside towards the outside. Do not use dirty cleaning cloths.
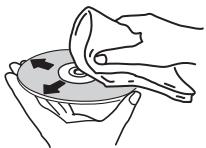
- Do not use benzene, thinner or other volatile chemicals. Also do not use record spray or antistatic agents.
- For tough dirt, apply some water to a soft cloth, wring out thoroughly, wipe off the dirt, then wipe off the moisture with a dry cloth.
- Do not use damaged (cracked or warped) discs.
- Do not let the signal surface of discs get scratched or dirty.
- Do not place two discs in the disc tray, one on top of the other.
- Do not attach pieces of paper or stickers to discs. Doing so could warp discs, making it impossible to play them. Also note that rental discs often have labels attached to them, and the label's glue may have oozed out. Check that there is no glue around the edges of such labels before using rented discs.
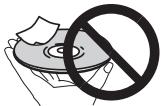

About specially shaped discs
Specially shaped discs (heart-shaped, hexagonal, etc.) cannot be played on this player. Do not attempt to play such discs, as they could damage the player.

About condensation on discs
Water droplets (condensation) may form on the surface of discs if they are moved from a cold place (particularly in winter) into a warm room. Discs may not play normally if there is condensation on them. Carefully wipe the water droplets off the surface of the disc before loading it.
Specifications
Power requirements.....AC 220 V to 240 V, 50 Hz/60 Hz
Power consumption. 11 W
Power consumption (standby)
DV-420V. .0.7 W
DV-320 .0.5 W
Weight 1.7 kg
External dimensions
420 mm (W) x 49.5 mm (H) x 215 mm (D)
Tolerable operating temperature +5^ to +35^
Tolerable operating humidity . 5 % to 85%
(no condensation)
AV Connector (21-pin connector assignment)
AV connector output. 21-pin connector This connector provides the video and audio signals for connection to a compatible colour TV or monitor.
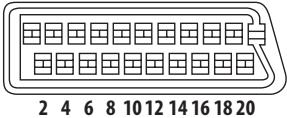
13579111315171921
PIN no.
1 Audio 2/R out
3. Audio 1/L out
4. GND
7. Bout
8.......Status
11. Gout
15.... Rout
17..GND
19....... Video out
21. GND
Video output
Output level 1 Vp-p (75 Ω)
Output terminal.RCA terminal
Component video output (Y, C_B / P_B, C_R / P_R)
Y output level 1 Vp-p (75 Ω)
C_B / P_B, C_R / P_R Output level 0.7 Vp-p (75 Ω)
Output terminal.RCA terminal
HDMI output (DV-420V only)
Output terminal. 19-pin
Audio output (stereo L/R)
Audio output level. 200 mVrms (1 kHz, -20 dB)
Output terminal.RCA terminal
Frequency response. 4 Hz to 44 kHz
S/N ratio. 115 dB
Dynamic range. 88 dB
Total harmonic distortion .0.0065 %
Digital audio output
Coaxial digital output. RCA terminal
Additional information
USB port. A type

Notes
- The specifications and design of this product are subject to change without notice.
- This product includes FontAvenue® fonts licensed by NEC Corporation. FontAvenue is a registered trademark of NEC Corporation.
Published by Pioneer Corporation.
Copyright © 2009 by Pioneer Corporation.
All rights reserved.

Additional information
Grazie per aver acquistato quello prodotto Pioneer.
Leggere attendamente quello manuale di istruzioni per familiarizzarsi con l'uso dell'apparecchio. Conservare poi il manuale per agli eventuale futuro riferimento.
IMPORTANTE

Il significo del lampo con terminale a forma di frezza situato all'interno di un triangolo equilatore serve ad avvisare l'utilizzatore della presenza di una "tensione pericolosa" non isolata nella struttura del prodotto che potrebbe essere di un'intensità tale da provocare scosse elettriche all'utilizzatore.
CAUTION
RISK OF ELECTRIC SHOCK DO NOT OPEN
ATTENZIONE:
PER EVITARE IL RISCHIO DI SCOSSSE ELETTRICHE, NON RIMUOVERIE DEL COPERCHIO (O IL RETRO).NON CSONO PARTI INTERNE LA CUI MANUTENZIONE POSSA ESSERE EFFETTUATA DAL'UTENTE. IN CASO DI NECCESSITA, RIVOLGERSI ESCLUSIVAMENTA A PERSONALEDI SERVIZIO QUALIFICATO.

Il punto esclamativo in un triangolo equilatoro serve ad avviso l'utilizzatore della presenza di importanti struzioni di funzionamento e manutenzione riportate nel librettore allevato al prodotto.
D3-4-2-1-A1It
AVVERTENZA
Questo apparecchio è un prodotto al laser di Classe 1, ma contiene un diodo al laser di classe superiore alla Classe 1. Per owi motivi di sicurezza, non togliere alcuni dei coperchi dell'apparechio e non tentare di accederà di positivi interni allo stesso. Ogni e qualsiasi intervento o riparazione devono essere effettuate solamente da personale qualificato. Sull'apparechio si trova applicata la seguente etichetta di avertimento: Posizione dell'etichetta: interno dell'unità
PRODOTTO LASER DI CLASSE 1
CAUTION : CLASS 1M LASER RADIATION WHEN OPEN. DO NOT VIEW DIRECTLY WITH OPTICAL INSTRUMENTS.
ATTENTION : RADIATION CLASSE LASER 1M: LORSQUE L'APPAREIL EST OUVERT NE REGARDEZ PAS VERS L'OUVERTURE, SURTOUT SI VOUS PORTEZ DES LUNETTES OU D'AUTRES TYPES DE CORRECTIONS OPTIQUES.
Vorsicht : KLASSE 1M LASER Strahlung: Bei geöffnetem Gerät nicht mit optischen Geräten in den Laserstrahl blichen.
PRECAUCION : RADIACION LASER CLASE 1M, AL ABRIR NO MIRAR DIRECTAMENTE CON INSTRUMENTOIS OPTICOS.
VIKTIG : KCLASS 1M LASER STRÄLNING: NÄR APPARATEN ÅR ÖPPEN. TITTA INTE RAKT IN I DEN. SPECIELLT INTE OM DU HAR GLASÖGON PÄ DIG.
Varoitus! ; Luokka 1M:n Lasersateily; Alä koskaan katso laitteen sisään sen ollesa auki-eri myoskäan silmalaseilla tai muilla optisilla laitteilla!
ADVARSEL : LASERSTRÄLER KLASSE 1M KIG IKKE DIREKTE IND I APPARATET NÄR DETTE ER ÅBENT IS/ER IKKE MED BRILLER ELLER ANDRE OPTISK OEJEKTER
D3-4-2-1-8*CIt
ATTENZIONE
Questo apparecchio non è impermeabile. Per prevenir pericoli di incendi o folgorazioni, non posizionare nelle vicinane di quello apparecchio contentitori pieni di liquidi (quali vasi da fiori, o similii), e non esporre l'appareccio a sgocciolii, schizzi, pioggia o umidità. D3-4-2-1-3
AVVERTENZA PER LA VENTILAZIONE
Installare l'apparecchio avendo cura di lasciare un certo spazio all'intorno dello stesso per consentire una adeguata circolazione dell'aria e migliorare la dispersione del calore (almeno 10 cm sulla parte superiore, 10 cm sul retro, e 10 cm su ciascuno dei lati).
ATTENZIONE
L'apparecchio è dotato di un ricerca numero di fissure e di apertura per la ventilazione, allo scopo di garantirne un funzionamento affidavitile, e per proteggerlo dal surriscaldamento. Per prevenir possibili pericoli di incendi le aperture non devono mai venire bloccate o coperte con oggetti vari (quali giornali, tovaglie, tende o tendaggi, ecc.), e l'apparecchio non deve essere utilizzato appoggiandolo su tappeti spessi o suletto.
ATTENZIONE
Prima di collegare per la primaolta l'apparecchio alla sorgente di alimentazione leggere attendamente la sezione che segue.
La tensione della sorgente di elettricità differisce da Paese a Paese e da regione a regione. Verificare che la tensione di rete della zona in cui si intende utilizzare l'apparechio suaQL corretta, come indicate sul pannello posteriore dell'apparechio stesso (ad es.: 230 V o 120 V). D3-4-2-1-4.A.1
ATTENZIONE
Per evitate il pericolio di incendi, non posizionare sull'apparecchio dispositivi con fiamme vivo (ad esempio una candela accesa, o similii). D3-4-2-1-Ta.A.Jt
Condizioni ambientali di funzionamento
Gamma ideale della temperatura ed umidità dell'ambiente di funzionamento: da +5 °C a +35 °C, umidità relativa inferiore all'85 % (fessure di ventilazione non bloccate) Non installment l'apparecchio in luoghi peu ventilati, o in luoghi esposti ad alte umidità o alla diretta luce del sole (o a sorgenti di luce artificiale molto forti).
D3-4-2-1-7c*A1_It
Se la spina del cavo di alimentazione di quello apparecchio non si adatta alla presa di corrente alternata di rete nella quale si intende insertire la spina stessa,QLa dette essere sostituita con una adatta allo scopo. La sostuzione della spina del cavo di alimentazione deve essere effettuata solamente da personale di servizio qualificato.Dopo la sostuzione, la vecchia spina, tagliata dal cavo di alimentazione, develle essere adegatamente eliminata per evitare possibili scosse o folgorazioni dovute all'accidentale insertimento della spina stessa in una presa di corrente molto tensione.
Se si pensa di non utilizzato l'apparecchio per un relativamente lungo periodo di tempo (ad esempio, durante una vacanza), staccare la spina del cavo di alimentazione dalla presa di corrente alternata di rete.
D3-4-2-2-1a_A1_It
AVVERTENZA
L'interruttore principale (O STANDBY/ON) dell'appareccchio non stacca completeness il flusso di corrente elettrica alla presa di corrente alternata rete. Dal momento che il cavo di alimentazione costituisce l'unico dispositivo di distacco dell'appareccchio alla sorgente di alimentazione, il cavo stesso deve essere staccato alla presa di corrente alternata di rete per sospendere completeness qualsiasi flusso di corrente. Verificare quando che l'appareccchio sia stato installato in modo da poter procedere con facilità al distacco del cavo di alimentazione alla presa di corrente, in caso di necessità. Per prevenir pericoli di incendi, inoltre, il cavo di alimentazione deve essere staccato alla presa di corrente alternata di rete se si pensa di non utilizzato l'appareccchio per periodi di tempo relativamente lunghi (ad esempio, durante una vacanza). D3-4-2-2-2a A.1t
Questo prodotto è destinato esclusivamente all'uso domestico. Eventuali disfunzioni dovute ad usi diversi (quali uso prolongato a scopi commerciali, in ristoranti, o uso in auto o su navi) e che richiedano particulari riparazioni, saranno a carico dell'utente,anche se nel corso del periodo di garanzia. K041.it
AVVERTIMENO RIGUARDANTE IL FILO DI ALIMENTAZIONE
Prendete sempre il filo di alimentazione per la spina. Non tiratelo mai agenda per il filo stesso e non toccate mai il filo con le mani bagnati, perché questo potrebbe causare cortocircuito o scosse elettriche. Non collocate l'unità, oppure dei mobili sopra il filo di alimentazione e controllate che lo stesso non sia premuto. Non annodate mai il filo di alimentazione né collegatelo con altri fili. I fili di alimentazione devono essere collocati in tal modo che non saranno calpestati. Un filo di alimentazione danneggiato potrebbe causare incendi o scosse elettriche. Controllate il filo di alimentazione regolarmente. Quando localizzate un eventuale danno, rivolgetevi ai più vicino centro assistenza autorizzato della PIONEER oppure al vostro rivenditore per la sostituzione del filo di alimentazione. S002*.t
Informazioni per gli utilizzatori finali sulla raccolta e lo smaltimento di vecchi dispositivi e batterie ESAuste
(Simbolo per il prodotto)

(Esempi di symboli per le batterie)


Pb
Questi simboli sui prodotti, confezioni, e/o documenti allegati significano che vecchi prodotti elettrici ed elettronici e batterie这样一 non devono essere mischiati ai rifiuti urbani indifferenziate.
Per l' appropriato trattamento, recupero e riciclaggio di vecchi prodotti e batterie这样一uste, fate riferimento ai puniti di raccolta autorizzati in conformità alla sua legislazione nazionale.
Con il corretto smaltimento di quosti prodotti e delle batterie, aiuterai a salvaguardare preziose risorse e prevenire i potenziali effetti negativi sull'ambiente e sulla salute umana che altrimenti potrebbero sorgere da una inappropriata gestione dei rifiuti.
Per maggiori informazioni sulla racolta e il riciclaggio di vecchi prodotti e batterie ESAuste, contattate il vosto Comune, il Servizio di racolta o il punto vendita dove avete acquistato l'articolo.
Questi symboli sono validi solo nell'Unione Europea.
Per i paesi al di fuori dell'unione Europea:
Se volete liberarvi哪些 oggetti, contattate le vosre autorità locali o il punto vendita per il corretto metodo di smaltimento.
K058a_A1_It
01 Prima di iniziare
Conteno della confezione 5
Inserimento delle batterie nel telecomando. 5
Dischi riproducibili. 6
File riproducibili. 7
12 Nome delle varie parti e funzioni
Pannello anteriore. 10
Telecomando 11
Display del pannello anteriore 12
03 Collegamenti
Collegamento usingo un cavo audio/video.....13
Collegamento using an avalanche AV SCART. 13
Collegamento via cavo HDMI
(solo DV-420V) 14
Collegamento usingo un cavo video
component 16
Collegamento usingo n cavo audio
digitale. 17
04 Riproduzione
Riproduzione di dischi e file 18
Riproduzione di file da dispositivi USB. 23
Registrazione di brani da CD audio su
dispositivi USB 23
Riproduzione con Disc Navigator 24
Uso della funzione Play Mode. 25
Regolazione dell'audio 27
Regolazione della qualità dell'imagine. 28
Modifica delle impostazioni (Impostazione iniziale)
Uso del menu Initial Settings. 29
06 Informazioni aggiuntive
Diagnostica. 36
Tabella dei codici delle lingue e tabella
deicidipaesi ed area. 45
Impostazione del systemà di colore. 46
Precauzioni per l'uso 46
Trattamento dei dischi 48
Dati tecnici 49
Contenuto della confezione
Telecomando
Cavo audio/video
Cavo di alimentazione
- Batterie AA (R6) x 2
- Documento di garanzia
- Istruzioni per l'uso (questo documento)
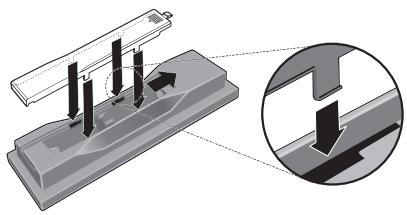

Note
AVVERTENZA
Non usare batterie che non siano quale indicate. Inoltre, non usare insieme batterie vecchie e nuove.
- Nel caricare le batterie nel telecomando,fare attenzione ad orientarle correttamente seguongo leindicazioni di polarità ( e)
Non riscaldare le batterie, non smontarle enon gettarle in acqua o nel fuoco.
- Le batterie possono avere voltaggio diversoanche se hanno la stessa dimensione e forma. Non usare insieme batterie di tipo differente.
- Per evitare che perdano fluido, togliere le batterie se si pensa di non dover usare il telecommando per quale tempo (un mese o più). Se il fluido dovesse fuoriuscire, pulire bene il vano delle batterie prima di insere Batterie nuove. Se una batteria dovesse perdere il fluido che contiene dovesse entrare in contatto con la palle, lavarlo via bene con acqua abbondante.
- Nel gettare batterie usate, rispettore le norme di legge in vigorenel vs. paese o area in tema di protezione dell'ambiente.
Non usare né conservare le batterie alla luce diretta del sole o in luoghi eccessivamente caldi, ad esempio all'interno di un'automobile o in prossimità di un calorifero. Le batterie potrebbero perdere liquido, surriscaldarsi, esplodere o prendere fuoco. Anche la durata e le prestazioni delle batterie potrebbero risultare ridotte.
Inserimento delle batterie nel telecomando
1 Aprire il coperchio sul retro.
Premere leggermente in quello punto e far scivolare nella direzione della freccia.

2 Inserire le batterie accluse (due, di fornato AA).
Inserire le batterie orientandole correttamente comme indicato dai simboli and all'interno del vano.

3 Chidere il coperchio sul retro.
Chiudere bene il coperchio (si deve sentire un cig).
Dischi riproducibili
| DVD-Video | DVD-Video disponibili in com-mercioDVD-R/-RW/-R DL e DVD+R/+RW/+R DL registrati in moda-lità Video e finalizzati |
| DVD VR | DVD-R/-RW/-R DL registrati in moda-lità VR |
| Video CD | Video CD (inclusi i Super VCD) |
| CD(R/RW) | CD audio disponibili in commer-cioCD-R/-RW/-ROM contenti musica e registrati in formato CD-DA |
| JPEG | File JPEG registrati su DVD-R/-RW/-R DL, CD-R/-RW/-ROM o dispositivi USB |
| DivX® | File video DivX registrati su DVD-R/-RW/-R DL, CD-R/-RW/-ROM o dispos-itivi USB |
| WMV | File WMV registrati su DVD-R/-RW/-R DL, CD-R/-RW/-ROM o dispositivi USB |
| WMA | File WMA registrati su DVD-R/-RW/-R DL, CD-R/-RW/-ROM o dispositivi USB |
| MP3 | File MP3 registrati su DVD-R/-RW/-R DL, CD-R/-RW/-ROM o dispositivi USB |
| MPEG-4AAC | File MPEG-4 AAC registrati su DVD-R/-RW/-R DL, CD-R/-RW/-ROM o dispos-itivi USB |
| CD Fujicolor | |
| Picture CD Kodak | |
DVD è un marchio di fabbrica della DVD Format/Logo Licensing Corporation.
- é un marchio registrato di FUJIFILM Corporation.
RW
- COMPATIBLE
Questa etichetta indica la compatibilità di riproduzione con dischi DVD-RW registrati nel formato VR (formato Video Recording). Tuttavia, nel caso di dischi registrati con un programma criptato registrabile una sola volta, la riproduzione può essere stata solo uso. CPRM compatibile.

Note
- Questolettore non supporti dischimultisessione o la registrazione multiborder.
- La registrazione multissessione/multiborder consiste nel registrarare i dati su di un singolo disco in due o più sessioni/border. Una "sessione" o un "border" è un'unità di registrazione constente di un set completo di dati dall'inizio alla fine.
Dischi non riproducibili
Dischi DVD Audio
Dischi DVD-RAM
SACD
CD-G
Dischi Blu-ray
DVD HD
Dischi che non sono stati finalizzati
Dischi registrati con il packet writing
I numeri di regione
Sia ilettori DVD sia o DVD-Video possiedono numero di regione corrispondenti alla regione geografica di vendita. I numero o numero di regione di quellolettore sono i seguenti.
DVD-Video: 2
I dischi non possedenti uno di questi numero non possono venire riprodotti.
I dischi riproducibili con quellolettore sono i seguenti.
DVD:2 (inclusi 2) e ALL
I CD protetti alla copia
Questolettoreecostruitoinconformitàalle caratteristicede formato CDaudio.Qestotolettorenonsupporta rproduzione o lefunzioni di dischi che non siano conformi a talicaratteristiche.
Riproducione di dischi DualDisc
- Un DualDisc è un disco avente due facciate, una contente dati DVD — video, audio, ecc. — e l'altra contente materiale non DVD, ad esempio materiale audio digitale.
Il lato DVD di un DualDisc può essere riprodotto con quellolettore (escludo il materialeDVD-Audio).
Il lato audio non DVD del disco non è invece compatibile con quellolettore. - Può accadere che, nel caricare o togliere un DualDisc, il lato opposto a quello riprodotto venga graffiato. Tale lato potrebbe in quello modo non esser più riproducibile.
- Per ulteriori informazioni sulle specifiche tecniche DualDisc, rivolgersi al produttore o al rivenditore del disco.
Riproduzione di dischi creati su computer o registratori BD/DVD
- Può non essere possibile riproduire dischi registrati con un computer a causa delle circostanze o dell'ambiente operativo del computer. Registrare dischi in formati compatibili con questolettore. Per dettagli, consultare il proprio negotiante di fiducia.
- Può non essere possibile riproduire dischi registrati con un computer o registraratore BD/DVD se il disco è di qualità scadente, ha graffiti o è sporco, se la lente del registraratore è sporca, ecc.
File riproducibili
- Posso n o v e n i r e r i p r o d o tti s o l o i dischi regist rati con i metodi ISO9660 Level 1, Level 2 e Joliet.
- I file protetti col sistema DRM (Digital Rights Management) non possono venire riprodotti.
Formati dei file video supportati
Windows Media™ Video (WMV)
- Risoluzione: Fino a 720 x 480/720 x 576 pixel
- Questolettore supporta i file codificati con Windows Media Player della Serie 9.
- Questolettore non supporta la caratteristica Advanced Profile.
- Windows Media è un marchio di fabbrica o marchio di fabbrica depositato della Microsoft Corporation negli Stati Uniti ed in altri paesi.
- Questo prodotto include technologie di proprietà della Microsoft Corporation e non è utilizzabile perché licenza della Microsoft Licensing, Inc.
DivX
DivX è una Tecnologia multimediale cre-ata alla DivX, Inc. I file multimediali DivX contengono dati video.
- I file DivX possono includere anche funzioni di riproduzione, ad esempio dei menu e e la selezione di una fra varie lingue o piste audio.

- Inizia la riproduzione di video DivX®, compreso materiale in omaggio
DivX® é un marchio registrar di DivX, Inc., e viene'utilizzato su licenza.
Visualizzazione di file esterni di sottotitoli
-
I set di font elencati di seguito sono disponibili per la visualizzazione di file esterni contententi sottotitoli. è possibile ottenere il corretto font sullo schermo impostando Subtitle Language a pagina 33 in modo adatto al file dei sottotitoli.
-
Questolettore supporta i seguenti gruppi di lingue:
| Gruppo 1 | Afrikaans (af), basco (eu), catalano (ca), danese (da), olandese (nl), inglese (en), faroese (fo), finlandese (fi), francese (fr), tedesco (de), islandese (is), gaelico irlandese (ga), italiano (it), norvegese (no), portoghese (pt), reto-romancio (rm), gaelico scozzese (gd), spagnolo (es), svedese (sv) |
| Gruppo 2 | Albanese (sq), croato (hr), ceco (cs), ungherese (hu), polacco (pl), rumeno (ro), slovacco (sk), sloveno (sl) |
| Gruppo 3 | Bulgaro (bg), bielorusso (be), machedone (mk), russo (ru), serbo (sr), ucraino (uk) |
| Gruppo 4 | Ebraico (iw), yiddish (ji) |
| Gruppo 5 | Turco (tr) |
- Alcuni file esterni contenti sottotitoli possono venire visualizzati in modo scorretto o per nulla.
- Sono supportate le seguenti estensioni dei nomi dei file esterni contenti sottitoli (tenere presente che i file stessi non vengono visualizzati nel menu di navigazione dei dischi): .srt, .sub, .ssa, .smi
- Il nome dei file di un film deve venire ripetuto all'inizio del nome del file esterno contentente sottotitoli.
Il numero di file esterni contenti sostitoli che possono venire usati con il file di uno stesso film è di al massimo 10.
Formati dei file di immagini supportati
JPEG
Risoluzione: Fino a 3072 x 2048 pixel
- Questolettore supporta i file JPEG baseline.
- Questolettore supporta il formato Exif di Ver.2.2.
- Questolettore supporta il formato JPEG HD. Leimmagini vengono emesse con
un'alta risoluzione 720p o 1 080i (solo DV-420V).
- Questolettore non supporta il formato JPEG progressivo.
Formati dei file audio supportati
- Questolettore non supporta il fornato VBR (Variable Bit Rate).
- Questolettore non supporta il fornato la compressione sensa perdite.
Windows Media Audio (WMA)
- Frequenze di campionamento: 32 kHz, 44.1 kHz e 48 kHz
Bit rate: Fino a 192 kbps - Questolettore supporta file codificati con Windows Media Player Ver. 7/7.1, Windows Media Player per Windows XP e Windows Media Player 9 Series.
MPEG-1 Audio Layer 3 (MP3)
- Frequenze di campionamento: 32 kHz, 44,1 kHz e 48 kHz
MPEG-4 Advanced Audio Coding(MPEG-4 AAC)
- Frequenze di campionamento: 44,1 kHz e 48 kHz
- Questolettore supporta i file codificati.
usandoiTunes. - Può accadere che i file codificati concerte versioni di iTunes non vengano riprodotti.
Apple ed iTunes sono marchi di fabbrica di Apple Inc., registrati negli Stati Uniti ed in altri Paesi.
Estensioni dei file riproducibili
File video
<divx .avi .wmv
Prima di iniziare
- I file non contenti segnali video DivX non possono venire riprodottianche se possiedono l'estensione“.avi”.
File di immagini
.jpg .jpeg
File audio
.wma .mp3 .m4a
Pannello anteriore
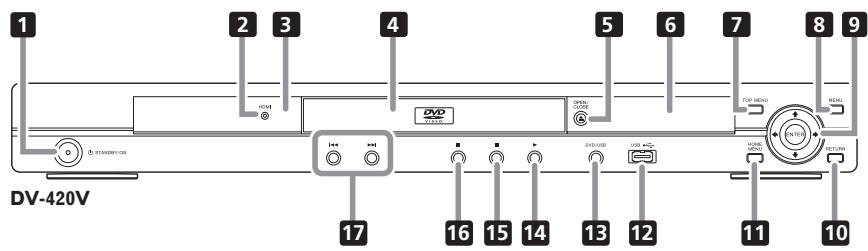
1 STANDBY/ON (a pagina 18)
2 HDMI (a pagina 14) (solo DV-420V)
Si illumina quando il dispositorio collegato al terminale HDMI viene riconosciuto.
3 Sensore di telecomando
Puntare qui il telecomando, poi uso la distance entro circa 7 m.
- La ricezione dei segnali di telecomando più essere scadente in presenza di luce solare diretta o artificiale intensa da lampadine a incandescenza, e così via.
4 Cassetto del disco
5 OPEN/CLOSE (a pagina 18)
6 Display del pannello anteriore (a pagina 12)
TOP MENU
Da premere per far comparire il menu principale di un DVD-Video.
8 MENU
Da premere per visualizzare la schermata del menu o Disc Navigator.
9 / / /
Da usare per scegliere voci, modificare impostazioni e spostare il cursore.
ENTER
Da usare per finalizzare una scelta o una impostazione fatt.
10 RETURN
Da premere per tornare alla schermata precedente.
HOMEMENU
Da premere per far comparire o scomparire il menu Home Menu.
12 Porta USB (como A) (a pagina 23)
DVD/USB (a pagina 23)
14 (a pagina 18)
15 (a pagina 18)
16 II (a pagina 18)
17 144/▶(a pagina 20)
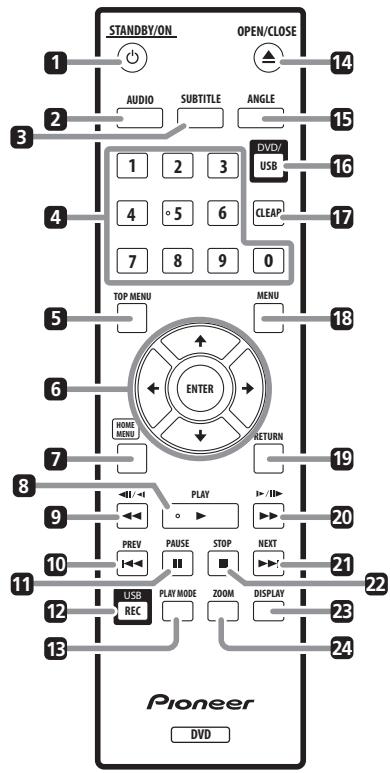
Telecomando
1 STANDBY/ON (a pagina 18)
2 AUDIO (a pagina 20)
SUBTITLE (a pagina 21)
4 Pulsanti numerici (da 0 a 9)
Usare quosti per specificare e riproduire il titolo, il capitolo, il brano o file da vedere/ascoltare. Vanno usatianche per scegliere voci da schermate di menu, ecc.
5 TOP MENU
Da premere per far comparire il menu principale di un DVD-Video.
6 / / /
Da usare per scegliere voci, modificare impostazioni e spostare il cursore.
ENTER
Da usare per finalizzare una scelta o una impostazione fatt.
7 HOME MENU
Da premere per far comparire o scomparire il menu Home Menu.
8 PLAY(a pagina 18)
9 //a (a pagina 19)
10 PREV (a pagina 20)
II PAUSE (a pagina 18)
12 USBREC(apageina23)
13 PLAY MODE (a pagina 25)
14 △ OPEN/CLOSE (a pagina 18)
15 ANGLE (a vagina 21)
16 DVD/USB (a pagina 23)
17 CLEAR
Da premere per cancellare la你可以 scelta.
Da usare ad esempio se si digita un numero scorretto.
18 MENU
Da premere per visualizzare la schermata del menu o Disc Navigator.
RETURN
Da premere per tornare alla schermata precedente.
20 /1 /1 (a pagina 19)
21 NEXT (a pagina 20)
22 STOP (a pagina 18)
23 DISPLAY (a pagina 22)
24 ZOOM (a pagina 21)
Display del pannello anteriore
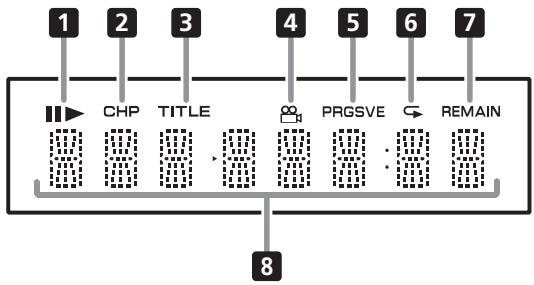
11
Si illumina durante la pausa della riproduzione.

Si illumina durante la riproduzione.
2 CHP
Si illumina quando appeare il numero di capitolo.
3 TITLE
Si illumina quando appeare il numero di titolo.
4 (a pagina 21)
Si illumina quando si passa ad un'angolazione differente (solo DVD-Video).
5 PRGSVE (a pagina 32)
Si illumina quando Component Out è regolato su Progressive.
6 (a pagina 25)
Si illumina nella modalità di riproduzione a ripetizione.
7 REMAIN
Si illumina quando il tempo rimanente del titolo, capitolo, o brano attuale viene visualizzato.
Contatore
Visualizza il numero del titolo, capitolo, brano o file, il tempo trascorso, ecc.
-
Prima di fare o modificare collegamenti, non mancare di spegnere l'apparecchio e di scollegare il cavo di alimentazione.
-
Collegare il cavo di alimentazione dopo che tutti i collegamenti fra dispositiivi sono stati fatti.
- Collegare il terminale video dellettore direttamente al tevisore.
Questolettore supporta la technologia di protezione dalla copia analogica. L'imagine potrebbe quando non venire visualizzata correttamente se ci si collega ad un tevisore passando per un registraratore DVD/registrarore video o se si riproduce il segnale di uscita dellettore registrato direttamente dal registraratore DVD/registrarore video. Inoltre, l'imagine potrebbe non venire visualizzata correttamente a causa della protezione dalla duplicazione se illettore viene collegato ad un tevisore con videoregristrarore incorporato.Per maggiori dettagli, entrare in contatto col fabbricante del tevisore.
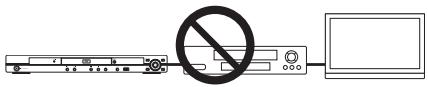
Collegamento usingo un cavo audio/video
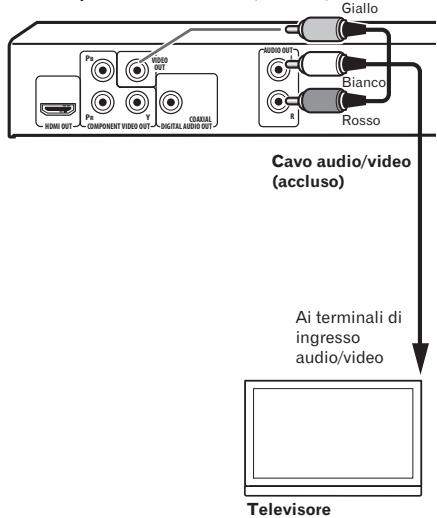
Pannello posteriore dellettore (DV-420V)
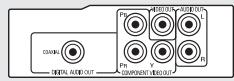
Pannello posteriore dellettore (DV-320)

Collegamento usingo un cavo AV SCART
- É possible scegliere il segnale video (AV Connector Out a pagina 32).
- Il connettore SCART AV emetteanchesignali audio analogici.
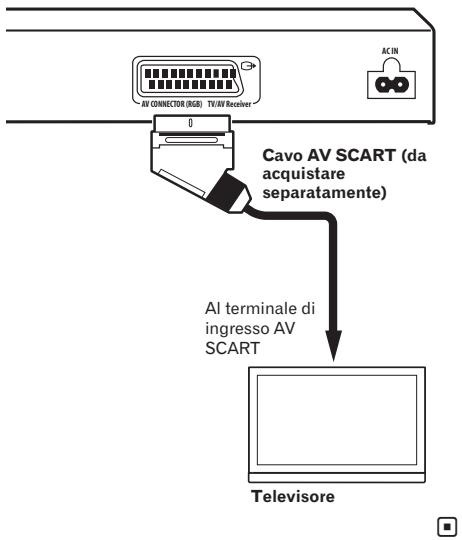
Pannello posteriore dellettore (DV-420V)
Collegamento via cavo HDMI (solo DV-420V)
Usando un cavo HDMI, i segnali digitali possonoVeniretrasferitiaduntelevisoreHDMI compatibile con un solo cavo sansa perdite di qualita del video o dell'audio.Dopo i collegamenti,regolare la risoluzione dellettore ed il colore HDMI in modo adatto al tevisore HDMI compatibile.Consultare anche leistruzioni per I'uso del televisore HDMI compatibile.

HIGH-DEFINITION MULTIMEDIA INTERFACE
- Il terme HDMI, il logo HDMI ed il terme High-Definition Multimedia Interface sono marchi di fabbrica o marchi di fabbrica depositati della HDMI Licensing, LLC.

Note
- L'interfaccia di quellolettore è stata costruita sulla base delle specifiche High-Definition Multimedia Interface.
- Se ci si collega a un dispositorio HDMI compatibile, la risoluzione appeare nel display del pannello anteriore.
- La risoluzione del segnale video emesso dal terminale HDMI OUT dellettore vaambiata manualmente. Cambiare l'impostazione HDMI Resolution (a pagina 32). Possono venire memorizzare impostazioni per due unità.
- Questolettore è progettato per il collegamento con dispositivi compatibili con HDMI. Può non funzionare bene se collegato a dispositivi DVI.
Collegamento a un tevisore
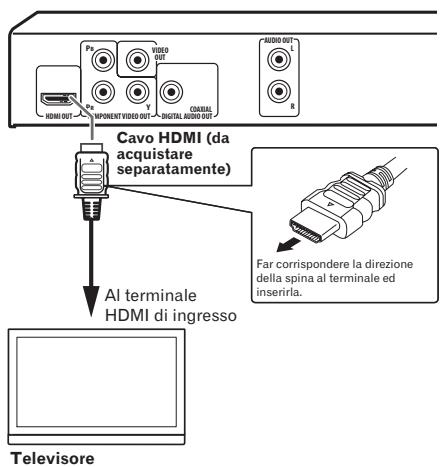
Pannello posteriore dellettore (DV-420V)
Collegamento con un ricevitatore amplificatore AV
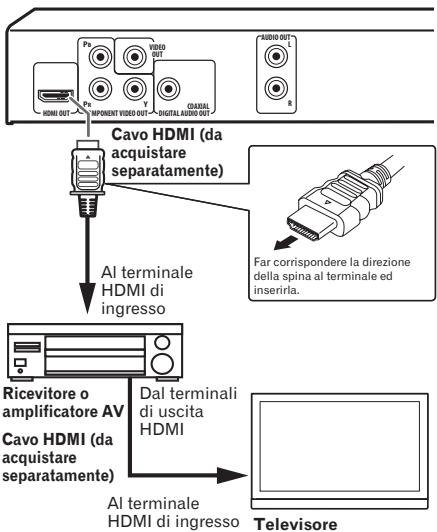
Pannello posteriore dellettore (DV-420V)
I segnali video.audio emessi dal terminale HDMI OUT
I segnali video (risoluzione dei) che possono venire emessi dal terminale HDMI OUT dellettore
Video da 720× 480 / 720× 576 pixel a scan-. sione progressiva or interlacciata
Video da 1 280 x 720 pixel a scansione progressiva
Video da 1920 x 1080 pixel a scansione.
progressiva or interlacciata
Segnali audio che possocono venire emessi dal terminale HDMI OUT dellettore
Audio PCM Linear a 2 canali da 44,1 kHz a 96 kHz, 16-bit/20-bit/24-bit (compreso quello rimissato in 2 soli canali)
Audio Dolby Digital a 5.1 canali
Audio DTS a 5.1 canali
Audio MPEG

- Prodotto su licenza dei Dolby Laboratories. Dolby e il symbolo della doppia D sono marchi dei Dolby Laboratories.

- Fabbricato su licenza nei termini dei brevetti USA N° 5,451,942 e di altri brevetti negli USA ed in tutto il mondo rilasciate ed in attesa di rilascio. DTS e DTS Digital Out sono marchi di fabbrica depositati ed i loghi ed il simbolo DTS sono marchi di fabbrica della DTS, Inc. © 1996-2008 DTS, Inc. Tutti i diritti riservati.
La funzione KURO LINK
- Le funzioni che seguono possono venire usati se si possiede un TV Flat-Screen, un sistema AV (ricevitore o amplificatore AV, ecc.) Pioneer che sia KURO LINK compatibile ed un convertitore HD AV sono collegati allettore con un cavo HDMI.
- Consultare le istruzioni per l'uso del TV Flat-Screen, ecc.
Per fare uso della funzione KURO LINK
- La funzione KURO LINK è operativa quando KURO LINK è attivo in tutti i dispositivi collegati al terminale HDMI OUT.
-
Una volta che tutti i collegamenti e impostazioni dei dispositivi sono terminati, controllare se le immagini dellettore vengono riprodotte dal TV Flat-Screen. (Controllareanchekipodercambiato i dispositivi collegati ed aver ricollegato i cavi HDMI.) La funzione KURO LINK potrebbe non funzionare bene se il segnale video dellettore non viene mandato correttamente al TV Flat-Screen.
-
Durante l'uso della funzione KURO LINK, usare solo cavi High Speed HDMI™. La funzione KURO LINK potrebbe non funzionare bene se si usano cavi HDMI di altri tipo.
- In alcuni modelli, la funzione KURO LINK potrebbe chiamarsi "HDMI Control".
- La funzione KURO LINK non funziona con dispositivi di altre marcheanche se collegati via cavo HDMI.
Cosa permette la funzione KURO LINK
Uso dellettore col telecomando del TV Flat-Screen.
- Le operazioni dellettore come l'inizio e la fine della riproduzione e la visualizzazione dei menu possono venire eseguite dal TV Flat-Screen. Per dettagli sulle funzioni che possono venire fatte, consultare le istruzioni per l'uso del TV Flat-Screen.
L'immagine riprodotta dallettore viene visualizzata dal TV Flat-Screen. (Funzione di selezione automatica)
- L'ingresso del TV Flat-Screen,istema AV (ricevitore o amplificatore AV, ecc.) o del convertitore HD AV viene scelto automaticamente quando la riproduzioneiene avviata collettore o il menu Home Menu o Disc Navigator viene visualizzato. Quando l'ingressoiene cambiato, le immagini riprodotte, il menu Home Menu o Disc Navigator appaiono sullo schermo del TV Flat-Screen.
II TV Flat-Screen si accende automaticamente. (Funzione di accensione simultanea)
- Quando la riproduzione dellettore viveni iniziata o Home Menu o Disc Navigator sono visualizzati, se il TV Flat-Screen è spento, si accende automaticamente.
Collegamento using un cavo video component
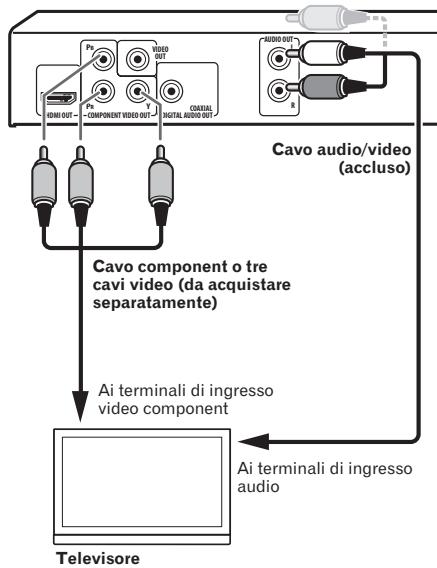
Pannello posteriore dellettore (DV-420V)
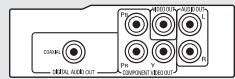
Pannello posteriore dellettore (DV-320)

Collegamento usingo un cavo audio digitale
- Collegare un ricevitore o amplificatore AV, ecc. compatibile con l'audio Dolby Digital o DTS ad uno dei terminali DIGITAL AUDIO OUT COAXIAL.
- Per istruzioni sul collegamento del teilevisore o dei diffusori al ricevitatore o amplificatore AV, consultare le istruzioni per l'uso del ricevitatore o amplificatore AV.
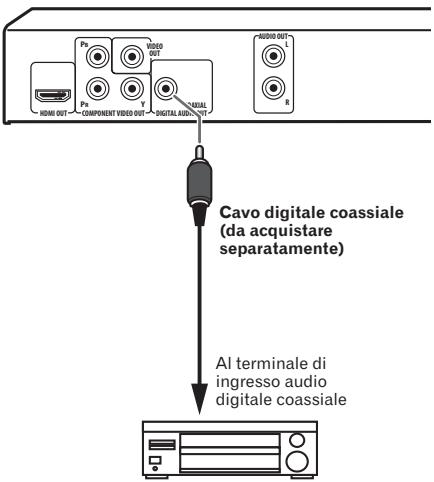
Pannello posteriore dellettore (DV-420V)
Ricevitore o amplificatore AV
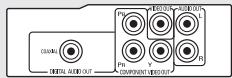
Pannello posteriore dellettore (DV-320)

Riproduzione di dischi e file
- Prima di iniziare, accendere il teilevisore e scegliere l'ingresso adatto del teilevisore.
- La lingua dei messaggi sullo schermodel dellettorepuovenirecambiata(OSD Languagea pagina33).
1 Accendere il sistema.
Premere 品 STANDBY/ON.
2 Fare après il piatto portadisco e caricare un disco.
Premere OPEN/CLOSE.
Caricare il disco col lato stampato rivolto in alto.
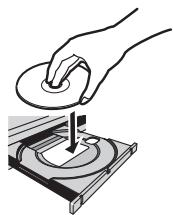
3 La riproduzione inizia.
Premere PLAY.
Per portarsi in pausa, premere II PAUSE durante la riproduzione.
- Per fermare illettore, premere STOP durante la riproduzione.
Per spagnere l'apparecchio, premere 念 STANDBY/ON.

Note
- Alcuni dischi vengono riprodotti subito automaticamente.
- Alcuni dischi possono far comparire barre nere sopra e sotto lo schermo del tevisore.
Se appeare la schermata del menu
Per alcuni dischi, il menu viene visualizzato automaticamente quando la riproduzione inizia. Il contento del menu ed il suo uso differiscono a seconda del disco.
Varie funzioni di riproduzione
Può non essere possibile usare alcune di queste funzioni, a seconda del tipo di disco o file.
| Inizio della riproduzione dal punto di interrupzione (ripresa della riproduzione) | DVD-Video DVD VR Video CD CD(R/RW) DivX° WMV | Se STOP viene premuto durante la riproduzione, il punto di interrupzione viene memorizzato. Premendo PLAY la riproduzione riprende da dove era stata interrotta. Per cancellare la funzione di ripresa della riproduzione, premere STOP nelle ripproduzione èferma. La ripresa della riproduzione può non essere possibile con certi dischi. |
| Memorizzazione del punto di arresto dei dischi espulsi (Last Memory) | DVD-Video Video CD | Illettore memorizza il punto dove un DVD-Video (fino a cinque dischi) o Video CD (un solo disco) viene espulso. Se un disco viene ricaricato e PLAY viene premuto, la riproduzione inizia dal punto in cui era stata interrotta.Per cancellare l'ultima memoria impostata, premere STOP nelle ripproduzione èferma.Se non si desidera memorizzare il punto di interrup- zione della riproduzione, premere ▲ OPEN/CLOSE durante la riproduzione per fare uscire il disco.Con alcuni dischi, il punto di interrupzione della ripro- duzione non è memorizzabile. Se il limite del numero di dischi per cui è possibile memorizzare un punto di interrupzione viene superato, una nuova memorizz- zione ne cancella una vecchia. |
| Scansione in avanti ed inversa | DVD-Video DVD VR Video CD CD(R/RW) DivX° WMV WMA MP3 MPEG-4 AAC | Durante la riproduzione, premere «/«/«/0»/ «/II».La velocità cambia ad ogni pressione del pulsante. La variazione della velocità dipende dal disco o dal file. Con i dischi DVD-Video e DVD VR, quando «/«/«/ II»viene premuto una volta durante la riproduzione, l'imagine e l'audio vengono prodotti ad 1,4 volte la velocità normale. Tenere presente che l'audio più non venire riprodotto oVenire riprodotto male.Per riprendere la riproduzione normale, premere PLAY. |
| Riproduzione per fotogrammi/per fotogrammi inversa | DVD-Video DVD VR Video CD DivX° WMV | A riproduzione in pausa, premere «/«/«/0»/ «/II».L'imagine avanza o indietreggia di un fotogramma ad ogni pressione del pulsante.Per riprendere la riproduzione normale, premere PLAY.Durante la riproduzione per fotogrammi normale o inversa noniene prodotto alcun suono.L'imagine durante la riproduzione per fotogrammi inversa più muoversi.La riproduzione per fotogrammi inversa non è possi-bile con Video CD e file video. |
| Riproduzione al rallentatore | DVD-Video DVD VR Video CD DivX® WMV | A riproduzione in pausa, tener premuto //II/ o >>/II>>. Tenere premuto il pulsante fino a che Slow appeare sullo schermo del tevisore in questione. La velocità cambia ad agli pressione del pulsante. La variazione della velocità dipende dal disco o dal file. Per riprendere la riproduzione normale, premere PLAY. Durante la riproduzione al rallentatore non è possible emesso alcun suono. La riproduzione al rallentatore inversa non è possible con Video CD e file video. |
| Salto di contentuti | DVD-Video DVD VR Video CD CD(R/RW) DivX® WMV WMA MP3 MPEG-4 AAC | Durante la riproduzione, premere I<PREV o >I NEXT. Se si preme I<NEXT, la riproduzione salute all'inizio del titolo, capitolo, brano o file successivo. Se si preme I<PREV, la riproduzione torna all'inizio del titolo, capitolo, brano o file precedente. Se pre-muto due volte, la riproduzione torna al titolo, capitolo, brano o file precedente. Non è possibile tornare ai titoli, capitoli, gruppi, brani o file precedenti durante la riproduzione casuale. L'operazione da farsi è differente durante la riproduzione PBC di Video CD. Controllare la custodia del disco. |
| Riproduzione di titoli, capitoli e brani particulari | DVD-Video DVD VR Video CD CD(R/RW) | Usare i pulsanti numerici (da 0 a 9) per digitare il numero di un titolo, capitolo o brano da riproduurre, quando premere ENTER. La riproduzione"inizia automaticamente 2 secondi dopo che si digita il numero. Durante la ricerca di capitoli DVD-Video, solo i capitoli entro il titolo attuale possono venire specificati. |
| Cambio dello stream/canale audio | DVD-Video DVD VR Video CD CD(R/RW) DivX® | Con dischi o file che contengono più stream o canali audio, questi possono venire cambiati durante la riproduzione. Durante la riproduzione, premere AUDIO. Lo stream/canale audio cambia ad agli pressione del pulsante. I tipi di stream o canali audio presenti dipendono dal disco e dal file. Nel caso di alcuni DVD-Video, lo stream/canale audio viene cambiato usando un menu. L'immagne più fermarsi momentaneamente quando lo stream/canale audio viene cambiato. Se l'impostazione Restume Play o Last Memory è stata cancellata, l'impostazione Audio Language viene ristabilita (a pagina 33). |
| Cambiamento dei sottotitoli | DVD-Video DivX® | In dischi DVD-Video o DivX che contengono sottotitoli in più lingue, i sottotitoli sono venire cambiati durante la riproduzione. Durante la riproduzione, premere SUBTITLE. I sottotitoli cambiano ad agli pressione del pulsante. I sottotitoli presenti dipendono dal disco o dal file. -/- appara se il disco o file non contiene sottotitoli. In certi DVD-Video, i sottotitoli vengono cambiati usingo un menu. Se l'impostazione Resume Play o Last Memory è stata cancellata, l'impostazione Subtitle Language viene ristabilita (a pagina 33). |
| Cambiamento dell'angola-zione (Multi-Angle) | DVD-Video | Se un DVD-Video contiene più angolazioni, se ne può scegliere una durante la riproduzione. Durante la riproduzione, premere ANGLE. In certi DVD-Video, le angolazioni vengono cambiate usingo un menu. Il simbolo appara sullo schermo del teilevisore se sono disponibili altre angolazioni. Se non volete che il simbolo appaia, portare Angle Indicator su Off (a pagina 33). |
| Ingrandimento di un'imma-gine | DVD-Video DVD VR Video CD DivX® WMV JPEG | Premere ZOOM. L'area ingranditaiene visualizzata. Usare ↑/↓/←/→ per spostare l'area ingrandita. L'ingrandimento (2x → 4x → normale) cambia ad agli pressione del pulsante. Durante la riproduzione di slideshow di file JPEG, l'area ingrandita noniene visualizzata. Se si ingrandisce un file JPEG, la riproduzione non-male dello slideshow cui vuene ripresa premendo PLAY. |
| Rotazione (ribaltamento) dell'immagine | JPEG | Premere ↑/↓/←/→ durante uno slideshow. Premendo ↑ l'immagine viene ribaltata verticalmente. Premendo ↓ l'immagine viene ribaltata specular-mente. Premendo ← l'immagine viene ruotata di 90° in senso orario. Premendo → l'immagine viene ruotata di 90° in senso antiorario. Per tornare allo slideshow normale, premere PLAY. |
| Visione delle informazioni di un disco o file | DVD-Video DVD VR Video CD CD(R/RW) DivX® WMV WMA MP3 MPEG-4 AAC | • Durante la riproduzione, premere DISPLAY. • è possibile visualizzare il tempo trascorso, il tempo rimanente ed altro. • Con alcuni dischi e file l'indicazione cambia ad ogni pressione del pulsante. • Per far spare l'informazione, premere DISPLAY di nuovo fino a che si spegne. • Alcune informazioni non appaiono durante la riproduzione PBC di Video CD. Per visualizzare tali informazioni, cancellare la riproduzione PBC (vedi di seguito). • Se On Screen Display è regolato su Off, nessuna informazione viene visualizzataanche se DISPLAY viene premuto (a pagina 34). |
| Riproduzione di Video CD con il loro menu (riproduzione PBC) | Video CD | • La riproduzione di Video CD con il loro menu si chiama riproduzione PBC (riroduzione di base). Quanto visualizzato e le operazioni possibili variano da disco a disco. Consultare ancche le istruzioni accluse al disco. • Per visualizzato un menu, caricare un disco compatibile con PBC e premere PLAY. • Per iniziare la riproduzione PBC, usare i pulsanti numerici (da 0 a 9) nelle una menu viene visualizzato per scegliere un brano, poi premere ENTER. • Per tornare alla schermata del menu, premere RETURN durante la riproduzione. • Per camiare pagina, premere i PREV o NEXT. • Per riproduire un disco senza visualizzato il menu (con PBC disattivato), usare i pulsanti numerici (da 0 a 9) a riproduzione ferma per scegliere il brano, poi premere ENTER (o scegliere un brano usingo i PREV e NEXT a riproduzione ferma). |

Riproduzione di file da dispositivi USB
- Illettore potrebberon riconoscere il dispositivo USB, potrebber non riproducné i file o alimentare il dispositorivo USB.Per dettagli, vedere Se si collega un disposito di memoria di massa USB a pagina 43.
- Pioneer non garantisce che tutti i file di dispositivi di memoria di massa USB verranno riprodotti o che i dispositivi di memoria di massa USB verranno tutti alimentati. Tenereanche presente che Pioneer non accettera la responsabilità per perdite di file da dispositivi di memoria di massa USB causate da questolettore.
1 Accendere il sistema.
Premere 品 STANDBY/ON.
2 Passaggio alla modalità USB.
Premere DVD/USB.
USB MODE viene visualizzato nel display del pannello anteriore.
3 Collegamento di dispositivi di memoria di massa USB.
Disc Navigator appare automaticamente.

Pannello anteriore dellettore
4 La riproduzione inizia.
Usare / / / per scegliere il file, poi premere ENTER.
- Prima di rimuovere il disposativo USB, spe-gnere esta unità.
- La modalità USB di ingresso permane fino alla prossima volta但这a unità viene accesa. Per tornare al modo DVD, premere DVD/USB (o premere OPEN/CLOSE per fare après il piatto portadisco).
Registrazione di brani da CD audio su dispositivi USB
I brani del CD audio nellettore possono venire registrati nei dispositivi di memoria di massa USB collegati alla porta USB.
- Potrebbe non essere possibile registrare brani di CD audio su di un dispositivo USB. Per dettagli, vedere Se si collegea un dispositivo di memoria di massa USB a pagina 43.
Registrazione di tutti i brani
1 Caricare il CD audio.
- Se la riproduzione inizia automaticamente, premere STOP per fermare la riproduzione.
2 Far comparire la schermata CD->USB Rec.
Premere USB REC.
3 Iniziare la registrazione.
Usare / / / per scegliere Start, poi premere ENTER.
Scelta dei brani da registrar
1 Caricare il CD audio.
- Se la riproduzione inizia automaticamente, premere STOP per fermare la riproduzione.
2 Far comparire Home Menu.
Premere HOME MENU.
3 Scegliere CD -> USB Rec.
Usare / / / per scegliere, poi premere ENTER.
4 Scegliere Select Track Individual i brani da registrar.
Fare la selezione using / / / .
- Individual: Scegliere 1 brano alla volta.
- Select All: Scegliere tutti i brani.
- All Clear: Annullare la selezione di tutti i brani.
5 Scegliere Bitrate (velocità di trasmissione).
Usare / / / per scegliere, poi premere ENTER.
- Scegliere 128kbps, 192kbps o 320kbps.
6 Iniziare la registrazione.
Usare / / / per scegliere Start, poi premere ENTER.

Note
- CD -> USB Rec può venire scelto solo a CD audio fermo.
- A registrazione completeness, una cartella "PIONEER" viene automaticamente creata sul dispositivo USB. I brani registrati sono memorizzati in tale cartella.
Riproduzione con Disc Navigator
Riproducione di dischi
DVD-Video DVD VR Video CD
1 Far comparire Home Menu.
Premere HOME MENU.
2 Scegliere Disc Navigator.
Usare / / / per scegliere, poi premere ENTER.
3 Scegliere il tipo di Disc Navigator.
Usare / per scegliere, poi premere ENTER.
Viene visualizzatoo Disc Navigator.
- Quanto visualizzato da Disc Navigator può differire da disco a disco.
4 Riproduzione di titolo, capitoli e brani particolari.
Usare / / / per scegliere, poi premere ENTER.
Per cambiare pagina, premere PREV o NEXT.
- Premere RETURN per tornare alla scher-mata precedente.
- Premere HOME MENU per uscire da Disc Navigator.

Note
- Disc Navigator non viene visualizzato con certi dischi DVD-Video.
- Disc Navigator non è visualizzabile durante la riproduzione PBC di Video CD. Per visualizzare tali informazioni, cancellare la riproduzione PBC (a pagina 22).
Riproducione di file

1 Far comparire Home Menu.
Premere HOME MENU.
Riproducione
2 Scegliere Disc Navigator.
Usare / / / per scegliere, poi premere ENTER.
3 Scegliere la cartella.
Usare / per scegliere, poi premere ENTER.
4 Scegliere er riproduire il file.
Usare / per scegliere, poi premere ENTER.
- Se si riproducono file JPEG, i file cambiano automaticamente (riproduzione slideshow).
- Premere per tornare alla schermata precedente. Éanche possible tornare alla schermata precedente scegliendo --e poi premendo ENTER.
- Premere HOME MENU per uscire da Disc Navigator.

Nota
Se un disco contiene sua file audio sua file JPEG,questi possono venire riprodotti simultaneamente.Per farlo, scegliere prima il file audio,poi quello JPEG.
Uso della funzione Play Mode
La funzione Play Mode più non funzionare con alcuni dischi o file.
- Far comparire la schermata Play Mode.
Durante la riproduzione, premere PLAY MODE.
- Éanches possible far comparire Home Menu scegliendo Play Mode dal menu di base e premendo poi ENTER.
- La schermata Play Mode non è visualizzabile durante la riproduzione PBC di Video CD. In tal caso, cancellare la riproduzione PBC (a).[22]
Riproduzione a ripetizione di una sezione (A-B Repeat Play)
DVD-Video DVD VR Video CD CD(R/RW)
Una sezione da voi scelta di un file o brano viene riprodotta ripetutamente.
1 Far comparire la schermata Play Mode.
Durante la riproduzione, premere PLAY MODE.
2 Scegliere A-B Repeat.
Usare / per scegliere, poi premere ENTER o .
3 Scegliere il punto di inizio della riproduzione A-B Repeat.
Usare / per scegliere A (Start Point), poi premere ENTER.
4 Scegliere il punto di fine della riproduzione A-B Repeat.
Usare / per scegliere B (End Point), poi premere ENTER.
La riproduzione a ripetizione A-B inizia.
Per cancellare la riproduzione AB, scegliere Off, poi premere ENTER.
Ripetizione della riproduzione (Riproduzione ripetuta)
DVD-Video DVD VR Video CD CD(R/RW)
DivX WMV
1 Far comparire la schermata Play Mode.
Durante la riproduzione, premere PLAY MODE.
2 Scegliere Repeat.
Usare / per scegliere, poi premere ENTER o .
3 Scegliere il tipo di riproduzione ripetuta.
Usare / per scegliere, poi premere ENTER o→.
La riproduzione a ripetizione inizia.
- Per cancellare la riproduzione a ripetizione, scegliere Repeat Off, poi premere ENTER. (La riproduzione a ripetizione viene cancellata automaticamente quando la riproduzione viene fermata.)
- I tipi di riproduzione a ripetizione disponibili dipendono dal disco e dal file.
Riproduzione in ordine casuale (Riproduzione casuale)
DVD-Video Video CD CD(R/RW)
1 Far comparire la schermata Play Mode. Premere PLAY MODE.
2 Scegliere Random.
Usare / per scegliere, poi premere ENTER o .
3 Scegliere il tipo di riproduzione casuale.
Usare / per scegliere, poi premere ENTER o .
La riproduzione a ripetizione inizia.
Per cancellare la riproduzione casuale, scegliere Random Off, poi premere ENTER. (La riproduzione casuale viene cancellata automaticamente quando la riproduzioneiene fermata.)
- I tipi di riproduzione casuale disponibili dipendono dal disco e dal file.

Nota
Lo stesso titolo, capitolo o brano può essere risire riproduotto due volte durante la produzione casaule.
Riproroduzione in un ordine desiderato (Riproroduzione programmata)
| DVD-Video | Video CD | CD(R/RW) | DivX® |
| WMV | WMA | MP3 | MPEG-4 AAC |
1 Far comparire la schermata Play Mode. Premere PLAY MODE.
2 Scegliere Program.
Usare / per scegliere, poi premere ENTER o .
3 Scegliere Create/Edit.
Usare / per scegliere, poi premere ENTER.
- La schermata Create/Edit dipende dal disco o dal file.
4 Scegliere il titolo, capitolo, brano o file da riproduire.
Usare / / / per scegliere, poi premere ENTER.
- Per aggiungere dati ad un programma, prima scegliere una posizione nel programma (la fase del programma), quando scegliere il titolo, capitolo o brano, poi pre-mere ENTER (i file vengono aggiunti alla file del programma).
- Premere RETURN per tornare alla schermata precedente. Se si ritorno alla schermata precedente durante la digitazione, le impostazioni programmate vengono cancellate.
Per cancellare una fase, evidenziarla e pre-mere CLEAR.
5 La riproduzione inizia.
Premere PLAY.
Per riproduire un programma già in memoria, scegliere Playback Start alla schermata di programmazione e poi premere ENTER.
Per riprendere la riproduzione normale, scegliere Playback Stop alla schermata di programmazione e premere ENTER. Il programma rimane in memoria.
- Per cancellare tutto il programma, scegliere Program Delete alla schermata di programmazione e premere ENTER.

Note
- I programmi possono venire riprodotti più volte. Durante la coproduzione programmata, scegliere Program Repeat da Repeat della schermata Play Mode (a pagina 25).
Riproducione
- I programmi non sono riproducibili in ordine casuale (la riproduzione casuale non è possibile durante la riproduzione programmata).
Riproduzione specificando un numero o tempo particolare (Search Mode)
DVD-Video DVD VR Video CD CD(R/RW)
DivX WMV
Questa funzione permette di specificare il titolo, capitolo, numero di brano o momento nel tempo da riproduire.
1 Far comparire la schermata Play Mode.
Premere PLAY MODE.
2 Scegliere Search Mode.
Usare / per scegliere, poi premere ENTER o .
3 Scegliere il tipo di Search Mode.
Usare / per scegliere, poi premere ENTER.
- I tipi di modalità di ricerca disponibili dipendono dal disco e dal file.
4 Digitare il numero del titolo, capitolo, brano o momento nel tempo da riproduire.
Usare i pulsanti numerici(da 0 a 9) per digitare, poi premere ENTER. (Per digitare ad esempio 1 ora e 4 minuti (64 minuti), digitare 6, 4, 0 e 0.)
La riproduzione inizia.

Note
- Con alcuni DVD-Video, il numero o tempo puòVenire specificato usando un menu.
- Con file video, solo il tempo può essere specificato (è possibile solo Time Search (ricerca a tempo)).
La ricerca a tempo (Time Search) non è possibile con dischi DVD+R/+RW.
Regolazione dell'audio
1 Far comparire Home Menu.
Premere HOME MENU.
2 Scegliere Audio Settings.
Usare / / / per scegliere, poi premere ENTER.
3 Cambiare le impostazioni.
Usare / / / per scegliere, poi premere ENTER.
- Premere RETURN per tornare alla schermata precedente.
4 Memorizzare le modifiche fatte.
Premere HOME MENU.
Le modifiche fatte vengono memorizzate.

Note
L'effetto potrebbe essere debole con certi dischi o file.
- Queste impostazioni influenzanoanche il suono emesso dai terminali DIGITAL AUDIO OUT COAXIAL e dal terminale HDMI OUT (solo DV-420V).
Tenere presente che non si ha alcun effetto se vengono emessi segnali audio Dolby Digital, DTS o MPEG.
Parametri Audio Settings
| Parametri (impostazioni) | |
| Sound Retriever (High/Low/Off) | I file audio WMA, MP3 e MPEG-4 AAC vengono ribrodotti con una qualità elevata. Questo perché accade solo con file che possiedono l'estensione '.wma', '.mp3' o '.m4a'. L'effetto ottenegro dipende dal file. Provarre impostazioni differenti e scegliere quella che produce l'effetto migliorare. |
| Equalizer (Off/ Rock/Pop/Live/ Dance/Techno/ Classic/Soft) | Impostare a seconda del genere di musica da ascoltare. |
Parametri (impostazioni)
| Virtual Surround (On/Off) | • è possibile create un Campo surround sound con un senso di presenza usingo solo due diffusori. • Se On è impostato, i segnali audio Linear PCM da 96 kHz o più possocono venire convertiti sui 48 kHz. |
| Audio DRC (High/Medium/Low/Off) | • Questo indebolisce i suoni forti e rafforza quali deboli. Cambiare questa impostazione ad esempio per vedere film a tarda notte. • Questa impostazione influenza solo l'audio Dolby Digital. • L'effetto dipende dal volume del televisione TV, ricevitore o amplificatore AV, diffusori o atro apparecchio collegati. Provarare varie impostazioni, scegliendo quella migliorare. |
| Dialog (High/Medium/Low/Off) | Cambiare questa impostazione se i dialoghi sono difficili da sentire. |
Le impostazioni predefinite sono indicate incorsivo.
La funzione Sound Retriever
- Durante la compressione, i dati audio inevitabilemente perdono di qualità. La funzione Sond Retriever automaticamente ripara i dati ai dati compressi e li riporta alla qualità di un CD.
Regolazione della qualità dell'imagine
1 Far comparire Home Menu.
Premere HOME MENU.
2 Scegliere Video Adjust.
Usare / / / per scegliere, poi premere ENTER.
3 Cambiare le impostazioni.
Usare / / / per scegliere, poi premere ENTER.
- Premere RETURN per tornare alla scher-mata precedente.
4 Memorizzare le modifiche fatte.
Premere HOME MENU.
Le modifiche fatte vengono memorizzate.

Note
L'effetto dipende dal teilevisore, disco o file usato.
Le impostazioni influenzano i segnali video emessi dal terminale HDMI OUT (solo DV-420V).
Parametri Video Adjust
| Parametri (impostazioni) | |
| Sharpness(Fine/Standard/Soft) | Regola la nitidezza dell'immagine. |
| Brightness(da -20 a 20) | Regola la luminosità dell'imma-gine. |
| Contrast(da -16 a 16) | Regola il rapporto fra la luminosità massima e minima dell'immagne. |
| Gamma(da -3 a 3) | Regola l'aspetto delle zone scure dell'immagne. |
| Hue (da green9 a red 9) | Regola il bilanciamento fra verde erosso. |
| Chroma Level(da -9 a 9) | Regola la densità dei colori. Que-sta impostazione è utile per sor-genti con multi colori, ad esempio cartoni animati. |
Le impostazioni predefinite sono indicate in corsivo.
- Brightness, Contrast, Gamma, Hue e Chroma Level sono regolati su 0 al momento dell'acqui-sto.

Modifica delle impostazioni (Impostazione iniziale)
Uso del menu Initial Settings
Initial Settings non è selezionabile durante la riproduzione. Fermare prima il disco.
1 Far comparire Home Menu.
Premere HOME MENU.
2 Scegliere Initial Settings.
Usare / / / per scegliere, poi premere ENTER.
3 Scegliere unaoicee modificarla.
Usare / / / per scegliere, poi premere ENTER.

Note
- HDMI Out, HDMI Resolution e HDMI Color sono impostabili solo quando illettore è collegato a dispositivi HDMI compatibili con un cavo HDMI (solo DV-420V).
- Digital Audio Out, AV Connector Out e Component Out non sono impostabili quando illettore è collegato a dispositivi HDMI compatibili con un cavo HDMI (solo DV-420V).
Perriportare
Component Out e HDMI Resolution alle impostazioni predefinite
1 Spagnere illettore.
Premere 品 STANDBY/ON.
2 Premere STANDBY/ON partie si preme I.
Usare i pulsanti del pannello anteriore dellettore. Ilsystema si accende.
Ritorno alle impostazioni predefinite
1 Spagnere illettore.
Premere 品 STANDBY/ON.
2 Premere STANDBY/ON membres si preme ■.
Usare i pulsanti del pannello anteriore dellettore.
Modifica delle impostazioni (Impostazione iniziale)
Impostazione Digital Audio Out
| Impostazione delle opzioni | Impostazioni | |
| HDMI Out (solo DV-420V) | LPCM (2CH) | I segnali audio multicanale vengono convertiti in segnale audio Linear PCM a 2 canali e quindi emessi. Questo può venire scelto quando il dispositivo HDMI compatible collegato non supporta l'audio multicanale. |
| Auto | Vengono emessi segnali audio dei tipi supportati dal dispositivo HDMI compatible (Dolby Digital, DTS, MPEG e Linear PCM). I segnali audio non supportati dal dispositivo HDMI compatible collegato vengono convertiti in Linear PCM prima di venire emessi. | |
| Off | Il terminale HDMI OUT non emette alcun segnale audio. | |
| Le impostazioni possono venire cambiate solo se illettore ed il dispositivo HDMI compatible sono collegati using an cavo HDMI. Se il dispositivo HDMI compatible non è compatible con l'audio DTS, i segnali audio DTS non vengono emessi (i segnali audio DTS non vengono convertiti in segnali Linear PCM prima di venire emessi). | ||
| Digital Out | On | I terminali DIGITAL AUDIO OUT non emettono alcun segnale audio. |
| Off | Il terminale DIGITAL AUDIO OUT non emette alcun segnale audio. | |
| Se Digital Out è regolato su Off, i segnali audio emessi dal terminale HDMI OUT vengono convertiti in formato Linear PCM (solo DV-420V). | ||
| Dolby Digital Out | Dolby Digital | Vengono emessi segnali audio Dolby Digital. Scegliere quello se il ricevitore o amplificatore AV collegato supporta l'audio Dolby Digital. |
| Dolby Digital > PCM | I segnali Dolby Digital prima di venire emessi vengono convertiti in segnale audio Linear PCM. Scegliere quello se il ricevitore o amplificatore AV collegato non supporta l'audio Dolby Digital. | |
| DTS Out | DTS | Vengono emessi segnali audio DTS. Scegliere quello se il ricevi-tore o amplificatore AV collegato supporta l'audio DTS. |
| Off | Vengono emessi segnali audio DTS. Scegliere quello se il ricevi-tore o amplificatore AV collegato non supporta l'audio DTS. | |
| Se il ricevitore o amplificatore AV collegato non supporta l'audio DTS, impostare Off. Se si imposta DTS si più generare del rumore. | ||
| 96 kHz PCM Out | 96kHz > 48kHz | I segnali audio a 96 kHz vengono convertiti sui 48 kHz/44,1 kHz e poi emessi. Scegliere quello se il ricevitore o amplificatore AV collegato non supporta l'audio a 96 kHz. |
| 96kHz | Vengono emessi segnali audio a 96 kHz. Scegliere quello se il ricevitore o amplificatore AV collegato supporta l'audio a 96 kHz. | |
| MPEG Out | MPEG | Vengono emessi segnali audio MPEG. Scegliere quello se il ricevi-tore o amplificatore AV collegato supporta l'audio MPEG. |
| MPEG > PCM | I segnali MPEG prima di venire emessi vengono convertiti in segnale audio Linear PCM. Scegliere quello se il ricevitore o amplificatore AV collegato non supporta l'audio a MPEG. | |
Le impostazioni predefinite sono indicate incorsivo.
Modifica delle impostazioni (Impostazione iniziale)
L'impostazione HDMI Out ed il tipo di segnale audio emesso (solo DV-420V)
| Formato audio | Impostazione HDMI Out | |||
| LPCM (2CH) | Auto | |||
| DVD-Video | DVD VR | Dolby Digital | Downmix in 2 canali | Dolby Digital1 |
| Dolby Digital Karaoke | Sinistra/destra | Dolby Digital1 | ||
| Linear PCM | Sinistra/destra | Sinistra/destra | ||
| DTS | Non emesso | DTS2 | ||
| MPEG | Sinistra/destra | MPEG1 | ||
| CD(R/RW) | WMA | MP3 | MPEG-4AAC | Sinistra/destra |
| DTS-CD | Non emesso | DTS2 | ||
| Video CD | Sinistra/destra | Sinistra/destra | ||
1 Se il dispositorio HDMI compatibile collegato non supporti i segnali Dolby Digital o MPEG audio, il segnale viene automaticamente convertito in formato audio Linear PCM prima di venire emesso.
2 Se il dispositorio HDMI compatibile non è compatibile con l'audio DTS, i segnali audio DTS non vengono emessi (i segnali audio DTS non vengono convertiti in segnali Linear PCM prima di venire emessi).
Impostazione Video Output
| Impostazione delle opzioni | Impostazioni | |
| TV Screen | 4:3 (Letter Box) | Da scegliere per vedere immagini di rapporto di forma 16:9 su teilevisori 4:3 con barre nere sopra e sotto lo schermo. |
| 4:3 (Pan & Scan) | Da scegliere per vedere immagini 16:9 sull'intero schermo di un teilevisore 4:3 coi lati destro e sinistro dell'immagine 16:9 tagliati. | |
| 16:9 (Wide) | Da scegliere per usare un teilevisore widescreen (16:9). | |
| 16:9 (Compressed)(solo DV-420V) | Da scegliere per vedere immagini 4:3 su teilevisori ad alta defi-nizione (16:9). L'immagine viene visualizzata correttamente dal teilevisore con barre nere sui lati. Selezionabile solo se illettore ed il teilevisore sono collegati via cavo HDMI e HDMI Resolution è regolato su 1920x1080p, 1920x1080i o 1280x720p. | |
| Con tevisori di rapporto di forma normale (4:3) | Con tevisori widenscreen (16:9) | ||
| Impostazione dellettore | Immaginesulcho schemo | Impostazione dellettore | Immaginesulcho schemo |
| 4:3 (Letter Box) | Immagine 16:9 Immagine 4:3 | 16:9 (Wide) | Immagine 16:9 Immagine 4:3 |
| 4:3 (Pan & Scan) | Immagine 16:9 Immagine 4:3 | 16:9 (Compressed) | Immagine 16:9 Immagine 4:3 |
Questa impostazioneiene usata solo se il disco permette l'uso del rapporto di forma dello schermo. Controllare la custodia del disco.
Modifica delle impostazioni (Impostazione iniziale)
| Impostazione delle opzioni | Impostazioni | |
| Component Out | Progressive | Da scegliere se un teilevisore o proietto che supporta segnali video a scansione progressiva è collegato ai terminali COM-PONENT VIDEO OUT. PRGSVE appara sul display del pannello anteriore. |
| Interlace | Da scegliere se un teilevisore o proietto che non supporta i segnali video a scansione progressiva è collegato ai terminali COMPONENTVIDEO OUT. | |
| Se Progressive è scelto e ENTER viene premuto, appara un messaggio di conferma. Per cancellare l'impostazione, scegliere Yes e premente ENTER. Per non cancellare l'impostazione, scegliere No e quindi ENTER.L'immagine più essere disturbata quando si passa da Progressive a Interlace.Se HDMI Resolution è impostato su 720x480i/720x576i, Interlace è impostato (solo DV-420V).Se l'immagine non compare più dopo aver cancellato l'impostazione su Progressive, riportarla su Interlace.Per le istruzioni necessarie, videere Per riportare Component Out e HDMI Resolution alle impostazioni predefini- nite a pagina 29. | ||
| AV Connector Out | Video | Vengono emessi normali segnali video (composito). |
| RGB | Da scegliere se ci si collega ad un teilevisore compatibile con i segnali video RGB. Tenere più presente che nessun segnale video viene emesso dai terminali di uscita video composito se si scegliere l'impostazione RGB. | |
| HDMI Resolution (solo DV-420V) | 720x480i/720x576i | Vengono emesse immagini a scansione interlacciata da 720 x 480 pixel (NTSC)/720 x 576 pixel (PAL). |
| 720x480p/720x576p | Vengono emesse immagini a scansione progressiva da 720 x 480 pixel (NTSC)/720 x 576 pixel (PAL). | |
| 1280x720p | Vengono emesse immagini da 1 280 x 720 pixel con scansione progressiva. | |
| 1920x1080i | Vengono emesse immagini da 1 920 x 1 080 pixel con scansione interlacciata. | |
| 1920x1080p | Vengono emesse immagini da 1 920 x 1 080 pixel con scansione progressiva. | |
| Cambiata Questa impostazione, l'imagine può essere disturbata o potrebbe richiedere quale tempo per apparire.Cambiata un'impostazione, appara un messaggio di conferma. Se l'imagine viene visualizzata corretta- mente, scegliere Yes, poi premere ENTER. Se non viene visualizzata correttamente, scegliere No, poi premere ENTER.Se l'imagine non compare più dopo aver cancellato l'impostazione, riportarla su 720x480p/720x576p.Vedere Per riportare Component Out e HDMI Resolution alle impostazioni predefinite a pagina 29. | ||
| HDMI Color (solo DV-420V) | Full range RGB | I colori diventano più carichi. Scegliere quello se i colori scuri sembrano essere tutti neri. |
| RGB | I colori diventano più chiari. Da scegliere se i colori scuri sem-brano troppo chiari. | |
| Component | Da usare se il proprio teilevisore è compatibile con HDMI. Il segnale viene emesso sotto forma di differenza di colori (formato a 8 bit). | |
| Le impostazioni possono venireCambiate solo se illettore ed il dispositivo HDMI compatibile sono collegati usando un cavo HDMI. | ||
Le impostazioni predefinite sono indicate incorsivo.
Modifica delle impostazioni (Impostazione iniziale)
Impostazione Language
- Alcuni dischi non passano alla lingua scelta.
- Con alcuni dischi, la lingua vieneambiata con un menu. Con tali dischi,ambiare la lingua col menu apposto.
| Impostazione delle opzioni | Impostazioni | |
| Audio Language | English | Da scegliere per riproduire l'audio di un DVD-Video in inglese. |
| lingue disponibili | Scegliere una lingua fra quale elencate per determinare la lingua audio predefinita di DVD-Video. | |
| Other Language | Scegliere una delle lingue 136. Per fare esta operazione, vedere Tabella dei codici di lingua a pagna 45. Se si sceglie una lingua che il DVD-Video non possiede, viene scelta una lingua presente. | |
| Subtitle Language | English | Da scegliere per visualizzare i sottotitoli di un DVD-Video in inglese. |
| lingue disponibili | Scegliere una lingua fra quale elencate per determinare la lingua dei sottotitoli predefinita di DVD-Video. | |
| Other Language | Scegliere una delle lingue 136. Per fare esta operazione, vedere Tabella dei codici di lingua a pagna 45. Se si sceglie una lingua che il DVD-Video non possie, viene scelta una lingua presente. | |
| DVD Menu Lang. | w/Subtitle Lang. | Da scegliere per visualizzare i menu di un DVD-Video nella lingua scelta per Subtitle Language. |
| lingue disponibili | Scegliere una lingua fra quale elencate per determinare la lingua predefinita dei menu di DVD-Video. | |
| Other Language | Scegliere una delle lingue 136. Per fare esta operazione, vedere Tabella dei codici di lingua a pagna 45. Se si sceglie una lingua che il DVD-Video non possie, viene scelta una lingua presente. | |
| Subtitle Display | On | Da scegliere per visualizzare i sottotitoli. |
| Off | I sottotitoli sono normalmente disattiviati quando si riproduze un DVD. Tenere presente che alcuni dischi annullano Questa impostazione. | |
Le impostazioni predefinite sono indicate in corsivo.
Impostazioni Display
| Impostazione delle opzioni | Impostazioni | |
| OSD Language | English | Da scegliere per visualizzare gli indicatori di funzione (Play, Stop, ecc.) in inglese. |
| lingue disponibili | Scegliere per i messaggi sullo schermo una delle lingue elencate. | |
| Angle Indicator | On | Da scegliere per visualizzare il symbolo sullo schermo del teile-visore. |
| Off | Da scegliere per non visualizzare il symbolo sullo schermo del teilevisore. | |
Modifica delle impostazioni (Impostazione iniziale)
| Impostazione delle opzioni | Impostazioni | |
| On Screen Display | On | Da scegliere per visualizzare gli indicatori di funzione (Play, Stop, ecc.) sullo schermo. |
| Off | Da scegliere per non visualizzare gli indicatori di funzione (Play, Stop, ecc.) sullo schermo. | |
Le impostazioni predefinite sono indicate in corsivo.
Impostazione Options
| Impostazione delle opzioni | Impostazioni | |
| KURO LINK(solo DV-420V) | On | Da scegliere per controllare illettore via iltelecomando del dispositivo AV collegato via cavo HDMI. Per dettagli, vedi La funizione KURO LINK a pagana 15. |
| Off | Da scegliere per non controllare illettore via iltelecomando del dispositivo AV collegato via cavo HDMI. | |
| Parental Lock | Password | Memorizzare (cambiare) il password richiesto per riproduire dischi per i quali la funizione Parental Lock è attivata. Per dettagli, vedere Memorizzazione o modifica del password a pagana 35. |
| Level Change | Permette diambiare il livello di Parental Lock dellettore. Per dettagli, vedere Cambio del livello Parental Lock a pagana 35. | |
| Country Code | Permette diambiare il paese/area. Per fare esta operazione, vedere Tabella dei codici di paesi ed area a pagana 45. | |
| DivX VOD | Activate | Visualizzare il codice di registrazione dellettore richiesto per riproduire file DivX VOD. |
| Deactivate | Permette di visualizzare il codice di disattivazione VOD. | |
| I file DivX VOD sono protetti dalsystema DRM. Possocono venire riprodotti sono con dispositivi immatricolati.Se il codice di registrazione non ha alcora ricevuto l'autorizzatoza, i file DivX VOD non possocono venire riprodotti. Se si tenta la coproduzione, Authorization Error appeappe sul tevisore.Nel caso di alcuni file DivX VOD, il numero di visioni è limitato. Il numero rimanente di visioni autorizzate appara sullo schermo del tevisore quando tali file vengono visualizzati. Rental Expired appeappe quando il numero di visioni restanti è 0. | ||
| Auto Power Off | On | Da scegliere per far spegnere automaticamente l'apparecchio (eso si spegne da solo se nessuna operazione viene fatta per 30 minuti). |
| Off | Da scegliere se non si desidera che l'apparecchio si spenga da solo. | |
Le impostazioni predefinite sono indicate incorsivo.
Modifica delle impostazioni (Impostazione iniziale)
Quando Other Language è scelto
Scegliere una delle lingue 136. Per fare que sta operazione, vedere Tabella dei codici di lingua a pagna 45. Se si sceglie una lingua che il DVD-Video non possiede, viene scelta una lingua presente.
1 Scegliere Other Language.
Usare / per scegliere, poi premere ENTER.
2 Scegliere List of Languages o Code.
Usare / per scegliere, poi premere ENTER.
- Ci sono lingue per le quali viene visualizzato solo il numero di codice. Per dettagli, videere Tabella dei codici di lingua a pagina 45.
3 Scegliere il codice della lingua.
Usare / o i pulsanti numerici (da 0 a 9) per scegliere, poi premere ENTER.
Memorizzazione o modifica del password
Alcuni DVD-Video possiedono livelli di controllo parenti Parental Lock (controllare la custodia del disco). La visione di questi dischi cui quesseressere limitata impostando un livello dellettore inferiore a quello del disco.
1 Scegliere Password.
Usare / per scegliere, poi premere ENTER.
2 Digitare il password.
Usare i pulsanti numerici (da 0 a 9) per digitare il password, poi premere ENTER.
- Per cancellare il password, per prima casa digitare quello in memoria, poi quello nuovo.

Note
- Raccomandiamo di prendernota del password.
-
Se si dimentica il password, reinizializzato illettore e memorizzare un altro password.
-
Con alcuni DVD-Video durante la riproduzione appeare una schermata di digitazione del password. Digitare il password per continuare la riproduzione del disco.
Cambio del livello Parental Lock
1 Scegliere Level Change.
Usare / per scegliere, poi premere ENTER.
2 Digitare il password.
Usare i pulsanti numerici (da 0 a 9) per digitare il password, poi premere ENTER.
3 Modificare il livello.
Usare / per scegliere, poi premere ENTER.
Cambio del codice di paese/area della funzione Parental Lock
Per fare esta operazione, vedere Tabela dei codici di paesi ed area a categoria 45.
1 Scegliere Country Code.
Usare / per scegliere, poi premere ENTER.
2 Digitare il password.
Usare i pulsanti numerici (da 0 a 9) per digitare il password, poi premere ENTER.
3 Scegliere il codice del paese.
Usare / per scegliere, poi premere ENTER.
Diagnostica
- L'uso scorretto dell'apparecchio viene spesso scambiato per un guasto. Se si ritiene che questo componente non funzioni bene, controllare la sezione che segue. A volte il problema risiede in un altro componente. Controllare tutti i componenti ed apparecchi elettronici usati. Se il problema non può venire eliminato neppure dopo aver fatto i controllingi suggeriti, chiedere assistenza tecnica al più vicino centro assistenza o rivenditore autorizzato Pioneer.
- Illettore non funzione a causa di elettricità statica o altre influenze esterne. In tali casi, il funzionamento normale cui venire ripristinato scollegando il cavo di alimentazione e ricollegandolo.
Problemi di carattere generale
| Problema | Controllare | Rimedio |
| Le impostazioni che avete fatto sono state cancellate. | Il cavo di alimentazione è stato scollegato alettore in funzione? | Se il cavo di alimentazione viene scollegato o viene a mancare la corrente, si sono perdere le impostazioni. Non mancare di premere STANDBY/ON del pannello anteriore dellettore o premere STANDBY/ON del telecomando ed attendere che l'indicatore - OFF - del pannello anteriore si spenga prima di scollegare il cavo di alimentazione. Fare particolarmente attenzione quando il cavo di alimentazione dellettore è collegato alla presa di servizio di un'alto componente, dato che in tal caso questolettore si spegne insieme all'alto componente. Raccomandiamo di collegare illettore se possibile direttamente ad una presa a muro. |
| Differenza di volume fra DVD e CD. | Questo non è un guasto dellettore. | Il volume può sonare differente a causa di differenze nella registrazione. |
| Illettore non è controllabile col telecomando. | Siete Iontani dall'apparecchio? | Usare il telecomando entro 7 metri dal sensore di telecomando. |
| Il sensore di telecomando è esosto a luce solare diretta o artificiale intensa da lampadine a incande-scenza? | Il segnali di telecomando sono non essere raccertamente se il sensore di telecomando è esosto a luce solare diretta o artificiale intensa da lampadine a incan-descenza. | |
| Le batterie sono scariche? | Sostituire le batterie (a pagina 5). |
Informazioni aggintive
| Problema | Controllare | Rimedio |
| I dischi non possono venire riprodotti o il disco si après automaticamente. | Il disco è graffiti? | Un disco graffiti più non esser più ribro-ducibile. |
| Il disco è sporco? | Pulire il disco (a paglia 48). | |
| Il disco è caricato correttamente nel piatto portadisco? | Caricare il disco col lato stampato rivolto in alto. | |
| Mettere il disco nell'incassatura del piatto portadisco. | ||
| Il disco ha il numero di regione giusto? | Questolettore più riproduire dischi di regione "2 (compresa 2)" e "ALL". | |
| Illettore è installato in un luogo umido? | Potrebbe esserci condensa. Attendere che la condensa evapori. Non installare illettore vicino ad un climatizzatore o simili (a paglia 47). | |
| L'alimentazione dellettore viene disattivata automaticamente. | Auto Power Off è regolato su On? | Se Auto Power Off è regolato su On, l'apparecchio si spegne automaticamente se nessuna operazioneiene eseguita peroltre 30 minuti (a paglia 34). |
| L'apparecchio si accende o spegne da solo. | KURO LINK è regolato su On? (solo DV-420V) | Illettore può accendersi insieme al televisore collegato al terminale HDMI OUT. Se non si desidera che illettore si accenda insieme al tevisore, portare KURO LINK su Off (a paglia 34). |
| L'ingresso del tevisore e delsystema AV collegati vieneambiato automaticamente. | KURO LINK è regolato su On? (solo DV-420V) | Gli ingressi del tevisore,SYSTEMA AV (ricevitore o amplificatore AV, ecc.) e convertire AV HD collegati al terminale HDMI OUT potrebbero automaticamente lasciare ilosto a quello dellettore quando questo inizia la produzione o la schermata del menu (Home Menu, ecc.) è visualizzata. Se non si desidera che I'ingresso del tevisore,SYSTEMA AV (ricevitore o amplificatore AV, ecc.) e convertire AV HD venga sostituito automaticamente da un'altre, portare KURO LINK su Off (a paglia 34). |
| Non appare alcuna imagine. | Il cavo video è collegato corretta-mente? | Collegare correttamente il cavo inserendo fino in fondo la spina. |
| Il cavo video è danneggiato? | Se il cavo è danneggiato, sostuirlo con uno nuovo. | |
| L'ingresso del tevisore, ricevitore o amplificatore AV è giusto? | Passare all'ingresso giusto consultando in proposito le istruzioni per l'uso del dispositivo collegato. | |
| L'immagine è deformata o il rapporto di forma non puòambiato. | Il rapporto di forma del tevisore è regolato correttamente? | Leggere le istruzioni per l'uso del tevisore ed impostare correttamente il rapporto di forma del tevisore. |
| TV Screen è regolato corretta-mente? | Regolare TV Screen correttamente (a paglia 31). | |
| Durante la riproduzione, l'imagine è disturbata o scura. | Questo non è un guasto dellettore. | Questolettortosupporta la technologia Macrovision di protezione dallacopia. Con alcuni televitori l'imaginepuònonesserenormale durante la riproduzione di dischietrotti daulduplicazione.Ciònon è dovutoad un guasto. |
| Illettore ed iltelevisore sono collegati passando per un videoregistratore? | Se illettore ed iltelevisoresono collegatiattraverso un videoregistratore,la funizione di protezione dallacopia analogica dellettorepuòdisturbarela riproduzione delvideoregistratore.Collegareillettoreddile televisoredirrettamente. | |
| Iltelevisore èregolato corretta-mente? | L'impostazione predefinitadi fabbricareAUTO.Sel'immagireddistorta,impostarelsystemadi coloreinuso nel proprio paeseo regione(NTSC orPAL)(a pagin46). | |
| La riproduzione cessa tempo-raneamente o il disco non ècaricato correttamente. | Si sta riproduccendo un disco modificato con un registraratore diDVD,ecc.? | Se delle immagini modificate vengonoriprodotte,la riproduzione sipotrebelfermaretemporaneamenteneipunti incui delle immagini sono state combinatedie ildisco potrebbernonvireriprodottocon lemodifiche. |
| Riproroduzione audio asente o distorta. | La modalità di pausa, di riproduzione per fotogrammi normale o inversa, o di riproduzione al rapplen-tatore è impostata? | La riproduzione audio non aviene in pausa, durante l'avanzamento o ritorno per fotogrammi o la riproduzione al rallentatore. |
| I componenti collegati (ricevitore o amplificatore AV, ecc.) sono regolati correttamente? | Consultare le istruzioni per l'uso del teilev-sore e controllare le impostazioni (volume, ingressso, diffusori, ecc.). | |
| Il disco è graffiato? | Un disco graffiato più non esser più ripro-ducibile. | |
| Il disco è sporco? | Pulire il disco (a pagina 48). | |
| I cavi audio sono collegati corret-amente? | Collegare correttamente il cavo inserendo fino in fondo la spina. | |
| I cavi audio sono danneggiati? | Se il cavo audio è danneggiato, sostituirlo con uno nuovo. | |
| Illettore è collegato correttamente agli altri componenti (ricevitore o amplificatore AV, ecc.)? | Controllare se ad esempio ci si è collegati per erreore ai terminali di uscita audio di un altro disposizione. | |
| Controllare se ad esempio ci si è collegati per erreore ai terminali di ingressso PHONO di un ricevitore o amplificatore AV. | ||
| L'altre componente (ricevitore o amplificatore AV, ecc.) è collegato ai terminali DIGITAL AUDIO OUT COAXIAL? | Se si è collegati via i terminali DIGITAL AUDIO OUT COAXIAL, portare Digital Out su On (a pagina 30). | |
| Consultare le istruzioni per l'uso del rice-vitore o amplificatore AV e controllare che segnali audio supporta. | ||
| Impostare Digital Audio Out a seconda dei segnali audio supportati dal ricevitore o amplificatore AV, ecc. (a pagina 30). | ||
| I terminali DIGITAL AUDIO OUT COAXIAL non emettono alcun segnale audio digitale. | Digital Out è regolato su On? | Se si è collegati via i terminali DIGITAL AUDIO OUT COAXIAL, portare Digital Out su On (a pagina 30). |
| Non vengono emessi segnali audio multicanale. | L'audio emesso dal ricevitore o amplificatore AV, ecc. migliorante collagenato è regolato corretta-mente? | Consultare le istruzioni per l'uso del rice-vitore o amplificatore AV e controllare le impostazioni di uscita audio. |
| Impostare I'audio multicanale del disco usingo il menu o AUDIO. | ||
| Digital Audio Out è impostato su segnali audio che il ricevitore o amplificatore AV, ecc. supporta? | Consultare le istruzioni per l'uso del rice-vitore o amplificatore AV e controllare che segnali audio supporta. | |
| Impostare Digital Audio Out a seconda dei segnali audio supportati dal ricevitore o amplificatore AV, ecc. (a pagina 30). | ||
| Vengono emessi segnali audio DTS. | I collegamenti sono corretti? | Collegare correttamente il ricevitore o amplificatore AV, ecc. ai terminali DIGITAL AUDIO OUT COAXIAL. |
| Il ricevitore o amplificatore AV, ecc. collegato supporta i segnali audio DTS? | Se il ricevitore o amplificatore AV, ecc. collegato non supporta i segnali audio DTS, regolare DTS Out su Off (a pagagna 30). | |
| L'audio emesso dal ricevitore o amplificatore AV,ecc. componente collegato è regolato corretta-mente? | Se il ricevitore o amplificatore AV, ecc. colleague supporta i segnali audio DTS, cancellare l'uscita audio del ricevitore o amplificatore AV, ecc. in modo che permetta l'emissione di segnale audio DTS. | |
| I segnali digitali audio da 96 kHz/88,2 kHz non vengono emessi dai terminali DIGITAL AUDIO OUT COAXIAL. | 96 kHz PCM Out è regolato su 96kHz? | Portare 96 kHz PCM Out su 96kHz > 48kHz. |
| Si sta riproducedo un disco protetto alla copia? | I segnali audio digitali a 96 kHz/88,2 kHz di dischi protetti alla duplicazione non sono venire riprodotti. | |
| I nomi di cartella o file non vengono riconosciuti. | Si è superato il numero massimo di cartelle o file che illettore è in grado di riconoscere? | È possibile riconoscere fino a 299 cartelle per disco.È possibile riconoscere fino a 648 per cartella. In presenza di certe caratteristi-che della cartella, tuttavia, illettore più non essere in grado di riconoscere la cartella o dei file. |
| La riproduzione di file JPEG richiede tempo. | I file riprodotti sono grandi? | La visualizzazione di file grande più richiedere quale tempo. |
| Durante la riproduzione di file JPEG appaianoanche delle barre nere. | Si riproducono file di rapporto di forma differente? | Le barre nere possono venire visualizzate sopra e sotto o sui lati dell'imagine a seconda del rapporto di forma dell'immagine. |
Se si collega un dispositivo HDMI compatible (solo DV-420V)
| Problema | Controllare | Rimedio |
| L'indicatore HDMI non si accende. | È stato collegato un dispositorio DVI? | L'imagine potrebbe non venire visualità zata correttamente se un dispositorio DVI è collegato. |
| L'ingresso del dispositorio HDMI collegato è impostato corretta-mente? | Leggere le istruzioni di uso del componente HDMI compatibile collegato e passare all'ingresso giusto. |
Informazioni aggintive
| Problema | Controllare | Rimedio |
| Non appara alcuna imagine. | La risoluzione è impostata corret-amente? | Regolare HDMI Resolution in modo adatto al dispositivo collegato (a paglia 32). |
| Riportare HDMI Resolution alle imposta-zioni predefinite (720x480p/720x576p) (a paglia 32). | ||
| Il cavo HDMI è collegato corretta-mente? | Inserire bene (a fondo) il cavo. | |
| Con alcuni cavi, i segnali video 1 080p non vengono emessi. | ||
| Il cavo HDMI è danneggiato? | Se il cavo è danneggiato, sostituirlo con uno nuovo. | |
| È stato collegato un dispositivo DVI? | L'immagine potrebbe non venire visualiz-zata correttamente se un dispositivo DVI è collegato. | |
| Riproroduzione audio asente o distorta. | HDMI Out è regolato corretta-mente? | Portare HDMI Out su LPCM (2CH) o Auto (a paglia 30). |
| Non vengono emessi segnali audio multicanale. | HDMI Out è regolato corretta-mente? | Portare HDMI Out su Auto (a paglia 30). |
| Il teilevisore non visualizza i colori normalmente. | HDMI Color è regolato corretta-mente? | Cambiare l'impostazione HDMI Color (a paglia 32). |
| L'ingresso del teilevisore è regolato correttamente? | Consultare le istruzioni per l'uso del televi-sore e impostare l'ingresso giusto. | |
| La funzione KURO LINK non funziona. | Il cavo HDMI usato è un cavo High Speed HDMI™? | Usare sempre cavi High Speed HDMI™. La funzione KURO LINK potrebbe non funzionale bene se il cavo HDMI non è un cavo High Speed HDMI™. |
| KURO LINK dellettore è regolato su On? | Regolare KURO LINK dellettore su On (a pagina 34). | |
| Il dispositivo collegato supporta la funzione KURO LINK? | La funzione KURO LINK non funziona con dispositivi di altre marcheanche se collegati via cavo HDMI. | |
| La funzione KURO LINK non funziona se dei dispositivi che non la supportano o dispositivi di altre marche sono presenti fra il dispositivo KURO LINK compatibile ed illettore. | ||
| Alcune funzioni possono non funzionare ancchesi se è collegati con un prodotto Pioneer compatibile con la funzione KURO LINK. | ||
| Consultare ancchesi le struzioni per l'uso del dispositivo collegato. | ||
| KURO LINK è regolato su On nel dispositivo esterno? | Regolare la funzione KURO LINK del dispositivo esterno su On. La funzione KURO LINK è operativa quando KURO LINK è Attivo in tutti i dispositivi collegati al terminale HDMI OUT. Una volta che i colleague sono finiti, controllare che l'imagine dellettore venga emessa dal TV Flat-Screen. (Controllare anccheso dopo aver cambiato i dispositivi collegati ed aver scollegato o collegato i cavi HDMI.) Se l'imagine dellettore non viene emessa dal TV Flat-Screen, la funzione KURO LINK potrebbe non funzionate correttamente. Per maggiori dettagli, consultare ancchesi le struzioni per l'uso del dispositivo collegato. | |
| Avete collegati piùlettori? | La funzione KURO LINK potrebbe non funzionale se trelettori o più, compreso quello, vengono collegati via cavo HDMI. | |
| Appare il messaggio CEC200. | Illettore è spento? | Se Disc Navigator viene scelto durante l'uso del telecomando del TV Flat-Screen, il messaggio CEC200 viene visualizzato se illettore è spento. Questo non è un guasto. è possibile continuare ad usare illettore ed il TV Flat-Screen come si trovano. |
Se si collega un disposativo di memoria di massa USB
| Problema | Controllare | Rimedio |
| Il disposietivo di memoria di massa USB noniene riconosciuto. | Il disposietivo di memoria di massa USB è correttamente collegato? | Inserire bene (a fondo) il disposietivo. |
| Il disposietivo di memoria di massa USB è collegatoattraverso un hub USB? | Questolettore non supporta gli hub USB.Collegare il disposietivo di memoria di massa USB direttamente. | |
| Questolettore supporta solo i dispositori di memoria di massa USB. | ||
| Questolettore supporta le memorie flash ed i dispositori di riproduzione digitali audio. | ||
| Sono supportati solo i file system FAT16 e FAT32. Gli altri file system (exFAT, NTFS, ecc.) non sono supportati. | ||
| Questonon è un guasto dellettore. | Spagnere e riaccendere il disposietivo. | |
| Questonon è un guasto dellettore. | Alcuni dispositori USB possono non venire riconosciuti correttamente. | |
| Il file non può riprodotto. | Il file è protetto dalsystema DRM(protezione dalla copia)? | I file protetti dalla copia non possono venire riprodotti. |
| Questonon è un guasto dellettore. | I file memorizzati in un computer non pos- sono venire riprodotti. | |
| Questonon è un guasto dellettore. | Potrebbe non esser possibile riproduurre certi file. | |
| I nomidi cartella e file non vengono visualizzati o vengono visualizzati anormalmente. | I nomidi cartella o file contengono più di 14 caratteri? | Il numero massimo di caratteri visualiz-zabile per i nomidi cartella o file in Disc Navigator è 14. |
| I nomidi cartella o file non sono visualizzati in ordine alfabetico. | Questonon è un guasto dellettore. | L'ordine di nomidi cartella o file visualizzati in Disc Navigator dipende dall'ordine di registrazione delle cartelle o file nel dispos-itvo USB. |
| Il riconoscimento di un dispositivo di memoria di massa USB richiede molto tempo. | Che capacità ha il disposietivo di memoria di massa USB? | Se si usano dispositivi di memoria di massa USB di grande capacité, il caricamento dei dati più richiedere alcuni tempo (anche alcuni minuti). |
| Il disposietivo di memoria di massa USB noniene alimen-tato. | USB ERR viene visualizzato dal display del pannello anteriore? Se il consumo èccessivo, non viene erogata corrente. | Accendere e riaccendere l'appareccchio. |
| Spagnere l'appareccchio, riaccenderlo e ricollegare il disposietivo di memoria di massa USB. | ||
| Premere DVD/USB per tornare alla modalitàDVD, poi tornare a quella USB. (Se si torna alla modalità DVD, LOADING appeare nel display del pannello anteriore ed il disco viene riconosciuto. Si si torna alla modalità USB, USB MODE appeare nel display del pannello anteriore.) | ||
| Se un dispositi di memoria di massa USB possiede un adattatore di c.a. uso con l'adattatore di c.a. collegato. | ||
| I brani di CD audio non pos- sono venire registrati su un dispositivo di memoria di massa USB. | C'è spazio a sufficientia sul disposi-tivo di memoria di massa USB? | La registrazione non è possible se non c'è spazio sufficiente nel dispositivo di memoria di massa USB. In tal caso viene visualizzata l'indicazione Spazio disponibile USB basso. |
| Ci sono 300 cartelle o più nel dispositivo di memoria di massa USB? | La registrazione non è possible se un disposi-sitivo USB contiene 300 cartelle o più. | |
| Ci sono più 99 cartelle PIONEER nel dispositivo di memoria di massa USB? | La registrazione non è possible se ci sono più 99 cartelle PIONEER nel dispositivo di memoria di massa USB. |

Tabella dei codici delle lingue e tabella dei codici di paesi ed area
Tabella dei codici di lingua
Nomi (codici) delle lingue e codici da digitare delle lingue
Japanese (ja), 1001
English (en), 0514
French (fr), 0618
German (de), 0405
Italian (it), 0920
Spanish (es), 0519
Chinese (zh), 2608
Dutch (nl), 1412
Portuguese (pt), 1620
Swedish (sv), 1922
Russian (ru), 1821
Korean (ko), 1115
Greek (el), 0512
Afar (aa), 0101
Abkhazian (ab), 0102
Afrikaans (af), 0106
Amharic (am), 0113
Arabic (ar), 0118
Assamese (as), 0119
Aymara (ay), 0125
Azerbaijani (az), 0126
Bashkir (ba), 0201
Byelorussian (be), 0205
Bulgarian (bg), 0207
Bihari (bh), 0208
Bislama (bi), 0209
Bengali (bn), 0214
Tibetan (bo), 0215
Breton (br), 0218
Catalan (ca), 0301
Corsican (co), 0315
Czech (cs), 0319
Welsh (cy), 0325
Danish (da), 0401
Bhutani (dz), 0426
Esperanto (eo), 0515
Estonian (et), 0520
Basque (eu), 0521
Persian (fa), 0601
Finnish (fi), 0609
Fiji (fj), 0610
Faroese (fo), 0615
Frisian (fy), 0625
Irish (ga), 0701
Scotts-Gaelic (gd), 0704
Galician (gl), 0712
Guarani (gn), 0714
Gujarati (gu), 0721
Hausa (ha), 0801
Hindi (hi), 0809
Croatian (hr), 0818
Hungarian (hu), 0821
Armenian (hy), 0825
Interlingua (ia), 0901
Interlingue (ie), 0905
Inupiak (ik), 0911
Indonesian (in), 0914
Icelandic (is), 0919
Hebrew (iw), 0923
Yiddish (ji), 1009
Javanese (jw), 1023
Georgian (ka), 1101
Kazakh (kk), 1111
Greenlandic (kl), 1112
Cambodian (km), 1113
Kannada (kn), 1114
Kashmiri (ks), 1119
Kurdish (ku), 1121
Kirghiz (ky), 1125
Latin (la), 1201
Lingala (In), 1214
Laothian (Io), 1215
Lithuanian (lt), 1220
Latvian (lv), 1222
Malagasy (mg), 1307
Maori (mi), 1309
Macedonian (mk), 1311
Malayalam (ml), 1312
Mongolian (mn), 1314
Moldavian (mo), 1315
Marathi (mr), 1318
Malay (ms), 1319
Maltese (mt), 1320
Burmese (my), 1325
Nauru (na), 1401
Nepali (ne), 1405
Norwegian (no), 1415
Occitan (oc), 1503
Oromo (om), 1513
Oriya (or), 1518
Panjabi (pa), 1601
Polish (pl), 1612
Pashto,Pushto (ps),1619
Quechua (qu), 1721
Rhaeto-Romance (rm), 1813
Kirundi (rn), 1814
Romanian (ro), 1815
Kinyarwanda (rw), 1823
Sanskrit (sa), 1901
Sindhi (sd), 1904
Sangho (sg), 1907
Serbo-Croatian (sh), 1908
Sinhalese (si), 1909
Slovak (sk), 1911
Slovenian (sl), 1912
Samoan (sm), 1913
Shona (sn), 1914
Somali (so), 1915
Albanian (sq), 1917
Serbian (sr), 1918
Siswati (ss), 1919
Sesotho (st), 1920
Sundanese (su), 1921
Swahili (sw), 1923
Tamil (ta), 2001
Telugu (te), 2005
Tajik (tg), 2007
Thai (th), 2008
Tigrinya (ti), 2009
Turkmen (tk), 2011
Tagalog (tl), 2012
Setswana (tn), 2014
Tonga (to), 2015
Turkish (tr), 2018
Tsonga (ts), 2019
Tatar (tt), 2020
Twi (tw), 2023
Ukrainian (uk), 2111
Urdu (ur), 2118
Uzbek (uz), 2126
Vietnamese (vi), 2209
Volapuk (vo), 2215
Wolof (wo), 2315
Xhosa (xh), 2408
Yoruba (yo), 2515
Zulu (zu), 2621
Tabella dei codici di paesi ed area
Nome del paese/area, codici da digitare e codice di paese/area
Stati Uniti, 2119, us
Argentina, 0118, ar
RegnoUnito,0702,gb
Italia, 0920, it
India, 0914, in
Indonesia, 0904, id
Australia, 0121, au
Austria, 0120, at
Olanda, 1412, nl
Canada, 0301, ca
Corea, Repubblicadi 1118, kr
Singapore, 1907, sg
Svizzera,0308,ch
Svezia, 1905, se
Spagna,0519,es
Tailandia, 2008, th
Taiwan, 2023, tw
Cina,0314,cn
Cile, 0312, cl
Danimarca, 0411, dk
Germany, 0405, de
Giappone, 1016, jp
Nuova Zelanda, 1426, nz
Norvegia, 1415, no.
Pakistan, 1611, pk
Filippine, 1608, ph
Finlandia, 0609, fi
Messico, 1324, mx
Federazione russa, 1821, ru
Brasile, 0218, br
Francia, 0618, fr
Belgio, 0205, be
Portogallo, 1620, pt
Hong Kong, 0811,hk
Malesia, 1325, my

Impostazione del sistema di colore
- Se l'imagine di un disco è distorta, impostare il sistema di colore in uso nel proprio paese o regione.
- Se ilsystemadi colore vieneambiato, itipi di disco riproducibili vengono limitati.
L'impostazione predefinita di fabbrica è AUTO.
1 Spagnere illettore.
Premere 品 STANDBY/ON.
2 Premere STANDBY/ON contre si preme I.
Usare i pulsanti del pannello anteriore dellettore.
L'apparecchio si accende ed ilsystemadi colore cambia nel modo visto di seguito.
- AUTO NTSC
NTSC PAL
PAL AUTO
| Tipi di disco/file | Formato | Impostazione dellettore | ||
| NTSC | PAL | AUTO | ||
| DVD-Video | NTSC | NTSC | PAL | NTSC |
| DVD VR | ||||
| Video CD | PAL | NTSC | PAL | PAL |
| DivX® | ||||
| WMV | ||||
| CD(R/RW) | — | NTSC | PAL | NTSC |
| WMA | oppurePAL | |||
| MP3 | ||||
| MPEG-4 AAC | ||||
| JPEG | ||||
| nessun disco | ||||

Precauzioni per l'uso
Per spostare illettore
Prima di spostare illettore, controllare che non contenga dischi e che il pietto portadiscosa chiuso. Premere poi 念 STANDBY/ON dellettore (o STANDBY/ON del telecomando), attendere che I'indicatore-OFF-del pannello anteriore si spenga, poi scollegare il cavo di alimentazione. Spostando illettore quando contiene un disco lo si può danneggiare.
Posizione di installmente
- Scegliere una posizione stabile vicino ad un tevisore o impianto stereo da usare collettore.
Non installment illettore sopra un tevi-sore o monitor a colori. Installarlo inoltre lontano da registratori a cassette o altrdispositivi che generino campi magnetici.
Evitare luoghi come i seguenti:
Luoghi esposti a luce solare diretta
Luoghi umidi e loro ventilati
Luoghi extremamente caldi
Luoghi esposti a vibrazioni
Luoghi polverosi
Luoghi esposti a grasso, vapore o calore (in cucine, ecc.).
Non posare oggetti sullettore.
Non posare oggetti sullettore.
Non ostruire i fori di ventilazione.
Non usare illettore su tappeti folti, letti, sofa edalto, avolgendoli in panni, ecc.
Facendolo si impedisce al calorie di disperdersi e si causano danni.
Non esporre al calore.
Non posare illettore su di un amplificatore o altrdotispositivo che genera calore. Se si usa un rack, per evitare il calore prodotto dall'amplificatore o daaltri componenti audio, posarlo sotto l'amplificatore.
Se non è in uso, spegnere illettore.
A seconda della qualità del segnale, quando questolettore è acceso sul tevisore possono apparire righe e l'audio della radio cuiessere disturbato. Se questo accade, spegnere illettore.
La condensa
Se illettore viene improvisamente portato da un luogo freddo ad uno caldo (ad esempio d'inverno) o se la temperatura ambiente augmente rapidamente a causa di caloriferi o alto, all'interno dell'apparecchio (parti mobili e lenti) potrebbe formarsi condensa (gocce d'acqua). Se della condensa si forma, illettore non funziona bene e la riproduzione non è possibile. Lasciare riposare illettore acceso a temperatura ambiente per 1 o 2 ore (il tempo effettivamente richiesto dipende dalla quantità di condensa presente). La condensa si dissipa e la riproduzione torna ad essere possibile. La condensa può essere avvenire d'estate se illettore viene investito dall'aria di un climatizzatore. Se quello accade, spostare illettore.
Pulizia del prodotto
- Prima di pulire illettore, scollegare il cavò di alimentazione alla presa di corrente.
- Pulire illettore con un panno pulito. Per lo sporco tenace, applicare del detergente neutro diluito in 5 o 6 parti di acqua ad un panno soffice, strizzarlo bene, pulir via lo sporco ed asciugare con un panno morbido e asciutto.
-
L'alcool, il diluente, la benzina, gli insetticidi o altri possono far danneggiare le finiture o la vernice. Inoltre, evitare di lasciare oggetti in gomma o vinile aicontatto collettore per lunghi periodi, dato che questo può danneggiare le finiture del cabinet.
-
Se si usano panni trattati chimicamente o altri prodotti simili, leggerne attendamente le istruzioni.
Precauzioni nel caso l'unità venga installata in uno scaffale con una porta dietro
Non premere OPEN/CLOSE sul telecommando per aprire il piatto del disco quando la porta di vetro è chiusa. La porta ostacola i movimenti del piatto del disco ed il piatto stesso potrebbe subire dei danni.
Pulizia della lenta
La lente dellettore non dovrebbe sporcarsi seutilizzata normalmente. Se non funziona correttamente a causa di polvere o sporcizia, consultare un centro di assistenza di zona Pioneer. Nonostante siano disponibili in commercio pulenti per lenti di letterori, se ne sconsiglia l'uso perché possono danneggiare la lente.
I diritti d'autore
Questo prodotto include una Tecnologia di protezione dei diritti d'autore a sua volta protetta da rivendicazioni metodologiche di certi brevetti statunitensi ed altri diritti alla proprietà intellettuale di proprietà della Macrovision Corporation e di terme parti. L'uso di但这a Tecnologia di protezione dei diritti d'autore delve essere autorizzata alla Macrovision Corporation ed è inteso per la sola casa ed altri limitati impieghi, salva autorizzazione della Macrovision Corporation. Il reverse engineering e il disassemblaggio sono proibiti.
Trattamento dei dischi
Conservazione
- Rimettere sempre i dischi nelle loro custodie e conservarli sempre verticalmente, evitando luoghi caldi, umidi, esposti a luce solare diretta e molto freddi.
- Leggere sempre le precauzioni accluse al disco.
Pulizia dei dischi
- I dischi che portano impronte o sporchi possono non venire riprodotti. In tal caso, usare un panno pulito o altri per passare i dischi leggermente dal centro verso l'esterno. Non usare un panno sporco.
Non usare benzina, diluente o altre sostenze chimiche volatili. Evitare inoltre gli spray per dischi analogici o antistatici.
- Per lo sporco tenace, aplicare acqua ad un panno morbido, strizzarlo bene, pulir via lo sporco ad asciugare con un panno asciutto.
Non usare dischi danneggiati (incrinati o deformati).
Non permettere che la superficie dei dischi si graffi o sporchi.
Non caricare due dischi sovrapposti nel piatto portadischi.
Non applicare pezzi di carta o adesivi ai dischi. Facendolo i dischi si possono deformare, rendendone la riproduzione impossibile. Tenere anche presente che i dischi affittati sono portare adesivi e che la colla di questi cui può fuoriuscire. Prima di usare dischi affittati, controllare che non vi sia colla sui bordi di tali adesivi.


Dischi di forma insolita
I dischi non circolari (a cuore, esagonali, ecc.) non possono venire riprodotti con quostolettore. Non tentare di riproduire simili dischi, dato che possono danneggiare illettore.

Condensa sui dischi
Sulla superficie di dischi portati da un luogo freddo (ad esempio d'inverno) ad uno caldo si possono formare gocce di acqua (condensa). I dischi coperti da condensa non possono venire riprodotti correttamente. Prima di caricare un disco, lasciare che la condensa evapori completeness.
Dati tecnici
Requisiti di alimentazione
CA da 220 V a 240 V, 50 Hz/60 Hz
Consumo di corrente 11 W
Consumo di corrente (in attesa)
DV-420V. 0,7 W
DV-320. 0,5 W
Peso 1,7 kg
Dimensioni esterne
420 mm (L) × 49,5 mm (A) × 215 mm (P)
Temperature di funzionamento tollerabili
Da + 5^ a +35^
Umidità di funzionamento tollerabile...... Da 5% a 85%
(senza condensa)
Connettore AV (assegnazione dei 21 piedini del connettore)
Uscita del connettore AV.........connettore a 21 piedini.
Questo connettore trasmette segnali audio e video per il collegamento di un tevisore o monitor a colori.

Piedino N°
- Uscita audio 2/R
- Uscita audio 1/L
- TERRA
7..Uscita B - Stato
11..Uscita G
15.. Uscita R - TERRA
- Uscita video
- TERRA
Uscita video
Livello di uscita. 1 Vp-p (75Ω)
Terminale di uscita Terminale RCA
Uscita video component (Y, C_B / P_B, C_R / P_R)
Livello di uscita Y 1 Vp-p (75 Ω)
Livello di uscita C_B / P_B CR / PR 0,7 Vp-p (75Ω)
Terminale di uscita Terminale RCA
Uscita HDMI (solo DV-420V)
Terminale di uscita 19 piedini
Uscite audio (stereo L/R)
Livello di uscita audio 200 mVrms (1 kHz, -20 dB)
Terminale di uscita Terminale RCA
Risposta in frequenza....... Da 4 Hz a 44 kHz
Rapporto S/R. 115 dB
Gamma dinamica 88 dB
Distorsione armonica totale. 0,0065 %
Uscita audio digitale
Uscita digitale coassiale. Terminale RCA
Informazioni aggintive
Porta USB....... .Tipo A

Note
I dati tecnici ed il design di quello prodotto sono soggetti a modifiche alla preavviso.
- Questo prodotto include caratteri FontAvenue® concessions in licenza da NEC Corporation. FontAvenue è un marchio registrato di NEC Corporation.
Pubblicato da Pioneer Corporation. Copyright © 2009 tutelati da Pioneer Corporation. Tutti i diritti sono riservati.
http://www.pioneer.co.uk
http://www.pioneer.it
http://www.pioneer.eu

J2L90121C SH 09/07
Published by Pioneer Corporation.
Copyright © 2009 Pioneer Corporation.
All rights reserved.
PIONEER CORPORATION
4-1, Meguro 1-Chome, Meguro-ku, Tokyo 153-8654, Japan
PIONEER ELECTRONICS (USA) INC.
P.O. BOX 1540, Long Beach, California 90801-1540, U.S.A. TEL: (800) 421-1404
PIONEER ELECTRONICS OF CANADA, INC.
300 Allstate Parkway, Markham, Ontario L3R 0P2, Canada TEL: 1-877-283-5901, 905-479-4411
PIONEER EUROPE NV
Haven 1087, Keetberglaan 1, B-9120 Melsele, Belgium TEL: 03/570.05.11
PIONEER ELECTRONICS ASIACENTRE PTE. LTD.
253 Alexandra Road, #04-01, Singapore 159936 TEL: 65-6472-7555
PIONEER ELECTRONICS AUSTRALIA PTY. LTD.
178-184 Boundary Road, Braeside, Victoria 3195, Australia, TEL: (03) 9586-6300
PIONEER ELECTRONICS DE MEXICO S.A. DE C.V.
Blvd. Manuel Avila Camacho 138 10 piso Col.Lomas de Chapultepec, Mexico,D.F. 11000 TEL: 55-9178-4270